
LM-M340A - Hi-Fi System LG - Free user manual and instructions
Find the device manual for free LM-M340A LG in PDF.


| Product Type | Hi-Fi Mini System |
| Model | LM-M340A |
| Brand | LG |
| Dimensions (W x H x D) | 360 x 250 x 280 mm |
| Weight | 4.2 kg |
| Power Supply | AC 120V / 60Hz |
| Power Consumption | 60 W |
| Audio Output Power | 100 W (Total) |
| Disc Playback | CD, CD-R/RW |
| Radio Tuner | FM/AM |
| Bluetooth Version | 4.0 |
| USB Support | USB 2.0, MP3/WMA playback |
| Speaker Configuration | 2-Way, Bass Reflex |
| Display Type | LED |
| Remote Control | Included |
| Maintenance | Clean with soft dry cloth; avoid liquids |
| Safety Features | Auto power off, surge protection |
| Spare Parts Availability | Contact LG service center |
| Repairability Index | 7.0 / 10 |
| Manual Language | English (20 pages PDF) |
Frequently Asked Questions - LM-M340A LG
User questions about LM-M340A LG
0 question about this device. Answer the ones you know or ask your own.
Ask a new question about this device
Download the instructions for your Hi-Fi System in PDF format for free! Find your manual LM-M340A - LG and take your electronic device back in hand. On this page are published all the documents necessary for the use of your device. LM-M340A by LG.
USER MANUAL LM-M340A LG
Please read this manual carefully before operating your set. Retain it for future reference.
Designs and specifications are subject to change without notice for improvement.
Precautions

RISK OF ELECTRIC SHOCK DO NOT OPEN

CAUTION: TO REDUCE THE RISK OF ELECTRIC SHOCK DO NOT REMOVE COVER(OR BACK) NO USER SERVICEABLE PARTS INSIDE. REFER SERVICING TO QUALIFIED SERVICE PERSONNEL.
Explanation Graphical Symbols:

The lightning flash with arrowhead symbol, within an equilateral triangle is intended to alert the user to the presence of uninsulated dangerous voltage within the product's enclosure that may be of sufficient magnitude to constitute a risk of electric shock to persons.

The exclamation point within an equilateral triangle is intended to alert the user to the presence of important operating and maintenance(servicing) instructions in the literature accompanying the appliance.
WARNING
TO REDUCE THE RISK OF FIRE OF ELECTRIC SHOCK, DO NOT EXPOSE THIS APPLIANCE TO RAIN OR MOISTURE.
To avoid electrical shock, do not open the cabinet, Refer servicing to qualified personnel only.
The apparatus shall not be exposed to dripping or splashing and that no objects filled with liquids, such as vases, shall be placed on the apparatus.
Warning:
Do not install this equipment in a confined space such a book case or similar unit.
CAUTION
Use of controls or adjustments or performance of procedures other than those specified herein may result in hazardous radiation exposure.
Laser component in this product is capable of emitting radiation exceeding the limit for Class 1.
CAUTION: INVISIBLE LASER RADIATION WHEN OPEN AND INTERLOCKS DEFEATED. AVOID EXPOSURE TO BEAM.
VARNING:OSYNLIG LASERSTRÄLNING NÄR DENNA DEL ÄR ÖPPNAD STRÅLEN ÄR FARLIG.
This label is located on the interior.
CLASS 1
LASER PRODUCT
KLASSE 1
LASER PRODUKT
LUOKAN 1
LASER LAITE
KLASS 1
LASER APPARAT
CLASSE 1
PRODUIT LASER
This Compact Disc player is classified as a CLASS 1 LASER product.
The CLASS 1 LASER PRODUCT label is located on the exterior.
Table of Contents
INTRODUCTION
Precautions....2
Table of Contents....3
Before Use 4
Safety Precautions....4
Notes on Discs 4
Notes on Remote Control....4
Notes on Tapes 4
Front Panel/Rear Panel 5
Remote Control 6
Display Window....7
Connections....8
Speaker System Connection....8
Antenna (Aerial) Connections 8
BEFORE OPERATION
Audio Adjustment....9-11
Setting the Voltage (OPTIONAL) 9
Setting the CLOCK....9
Volume Adjustment....9
Sound Quality Adjustment 9
Sleep Function 9
MUTE....10
SURROUND....10
XDSS (Extreme Dynamic Sound System)....10
DISPLAY MODE....10
DIMMER....10
DEMO....10
OAO (Orientaion Acoustic Optimizer)....10
Timer Function 11
Auxiliary Function 11
RDS Function - OPTIONAL....12
About RDS 12
Programme Search (PTY) 12
OPERATION
Presetting the radio stations ..... 13
Listening to the radio 13
Tape Playback 14
Basic Playback....14
To Stop Play....14
Tape Counter Reset....14
To Play Rewind or Fast Forward ..... 14
Dubbing 14
Recording 14
Basic Setting 14
Recording from Radio, CD or Auxiliary source .. 14
CD to Tape Synchronized Recording....14
CD Playback 15-16
Basic Playback....15
To Pause Play 15
To Stop Play....15
To Skip a Track....15
To Search a Track 15
To Go to the next discs 15
To Select a disc directly ..... 15
To Replace discs during Playback....15
To check MP3 file information ..... 15
To Repeat Play....16
To play tracks in random order....16
To Program Play....16
REFERENCE
Troubleshooting....17
Additional Information....17
Specifications....18
About the symbols for instructions
Indicates hazards likely to cause harm to the unit itself or other material damage.
N Indicates special operating features of this unit.
Indicates tips and hints for making the task easier.
Before Use
Safety Precautions
Handling the unit
When shipping the unit
The original shipping carton and packing materials come in handy. For maximum protection, re-pack the unit as it was originally packed at the factory.
To keep the surface clean
Do not use volatile liquids, such as insecticide spray, near the unit. Do not leave rubber or plastic products in contact with the unit for a long period of time.
They will leave marks on the surface.
Cleaning the unit
To clean the cabinet
Use a soft, dry cloth. If the surfaces are extremely dirty, use a soft cloth lightly moistened with a mild detergent solution. Do not use strong solvents, such as alcohol, benzine, or thinner, as these might damage the surface of the unit.
Notes on Discs
Handling discs
Do not touch the playback side of the disc.
Hold the disc by the edges so that fingerprints will not get on the surface.
Do not stick paper or tape on the disc.
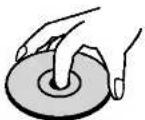

Storing discs
After playing, store the disc in its case.
Do not expose the disc to direct sunlight or sources of heat, or leave it in a parked car exposed to direct sunlight, as there may be a considerable temperature increase inside the car.
Cleaning discs
Fingerprints and dust on the disc can cause poor picture quality and sound distortion. Before playing, clean the disc with a clean cloth. Wipe the disc from the center out.

Do not use strong solvents such as alcohol, benzine, thinner, commercially available cleaners, or anti-static spray intended for analog records.

Notes on Remote Control
Remote Control Operation Range
Point the remote control at the remote sensor and press the buttons.
● Distance: About 23 ft (7 m) from the front of the remote sensor.
● Angle: About 30° in each direction of the front of the remote sensor.
Remote control battery installation

Detach the battery cover on the rear of the remote control, and insert two R03 (size AAA) batteries with +
and aligned correctly.

Caution
Do not mix old and new batteries. Never mix different types of batteries (standard, alkaline, etc.).
Notes on Tapes
Preventing record
Removing the tab(s) of the cassette (with a small screwdriver) will prevent accidental erasure.

To record again, cover the hole of the tab with adhesive tape.

Adhesive tape.

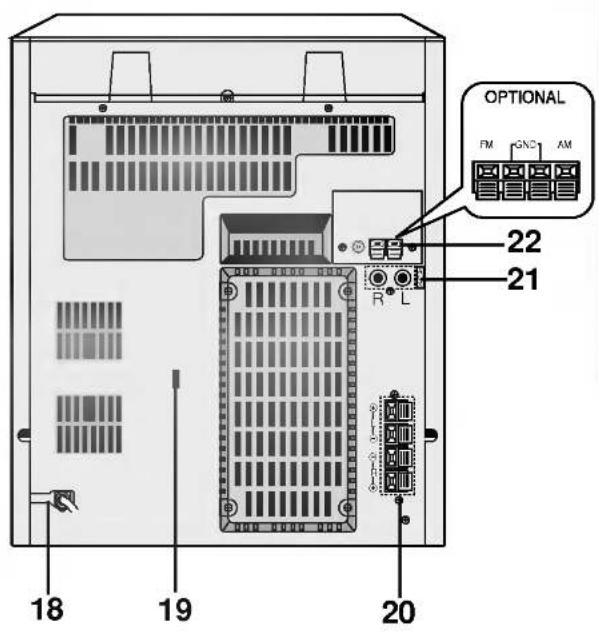
INTRODUCTION
-
POWER (○ STANDBY/ON) button
-
• DISC DIRECT PLAY buttons
(DISC 1, DISC 2, DISC 3)
- DISC SKIP button
- • CLOCK button
- TIMER button
- • PLAY MODE button : OPTIONAL
• DEMO button : LM-M1040
(Press DEMO in power off state to demonstrate the function in the display window.
To cancel it, press POWER or DEMO again.)
• SURROUND (SURR.) button
- XDSS button
- OAO button
- • MODE/RIF/NOR-DUBB. button
- CD SYNC./HI-DUBB. button
-
HEADPHONE SOCKET (PHONES) - φ 6.3mm
-
• TUNER button
- CD/MP3 button
- TAPE button
- AUX button
- • PROG./MEMO.button
- COUNT.RESET button : OPTIONAL
- CD PAUSE (CD III)/SET button
• RDS button : OPTIONAL
- • ■ STOP/CLEAR button
- RECORD/ RECORD PAUSE (● REC /II) button
- PRESET UP/DOWN buttons
- PLAY (▶) button
- REVERSE PLAY (◀) button : OPTIONAL
- TUNING buttons
- CD SKIP/SEARCH (◀◀ ◀◀ / ▶▶ ▶▶) buttons
• TAPE REWIND/FAST FORWARD
(◀◀ ◀◀ / ▶▶ ▶▶) buttons
-
▲ PUSH EJECT position-TAPE 1 (DECK 1)
-
▲ PUSH EJECT position-TAPE 2 (DECK 2)
-
EQUALIZER (EQ) button
-
• MIC JACK (MIC) - φ6.3mm : OPTIONAL
- MIC VOLUME KNOB (MIC VOL.): OPTIONAL
-
MULTI JOG.
-
CD OPEN/CLOSE (▲ OPEN/CLOSE) button
-
VOLUME CONTROL KNOB
-
DISPLAY WINDOW
-
POWER CORD
-
VOLTAGE SELECTOR SWITCH : OPTIONAL
-
SPEAKER TERMINAL
-
AUXILIARY INPUT JACKS
-
ANTENNA TERMINAL
Remote Control

- POWER button
- PRESET (▼/▲) buttons
- CLOCK button
-
CD FUNCTION buttons
-
PLAY/ PAUSE (▶/II) button
- CD STOP(■) button
- CD SKIP/SEARCH (◀◀ ◀◀ / ▶▶ ▶▶) buttons
-
REPEAT button
-
DISC SKIP (D.SKIP) button
-
EQUALIZER PATTERN
-
EQ PATT. button
- XDSS button
• SURROUND (SURR.) button -
OAO button
-
NUMBER buttons
-
MP3 file information display (MP3 Info) button
-
RANDOM button
-
TAPE FUNCTION buttons
-
RECORD/ RECORD PAUSE (●/II) button
• FORWARD PLAY (▶) button - REVERSE PLAY (◀) button : OPTIONAL
• TAPE STOP (■) button - FAST FORWARD (▶▶) button
-
REWIND (◀◀) button
• TAPE-1/2 SELECT buttons -
PROGRAM button
- SLEEP button
- VOLUME CONTROL (▼/▲) button
- • AUX button
• TUNER/BAND button - MUTE button
- • DISP.MODE button : LM-M1040
- DIMMER button
Display Window
-LM-M1040

- LEVEL METER indicator
- CD REPEAT indicators
- DUBBING SPEED indicators
- PLAY MODE indicator : OPTIONAL
- • CASSETTE DECK indicators
• TAPE PLAY DIRECTION indicators : OPTIONAL
- MP3 indicator
- DISC Number indicators
- PLAY/PAUSE indicators
- MUTE indicator
-
XDSS indicator
-
SLEEP indicator
- CD SYNCHRO RECORDING indicator
- MIC indicator : OPTIONAL
- RDS indicators : OPTIONAL
- FM STEREO RECEIVING indicators
- SURROUND indicator
- • TIMER indicator
• RECORD/RECORD PAUSE indicator - TRACK indicators
- PROGRAM indicator
- FUNCTION indicator
-LM-M540/340/342/345

- LEVEL METER indicator
- MUTE indicator
- RDS indicators : OPTIONAL
- MP3 indicator
- DISC Number indicators
- PLAY/PAUSE indicators
- CD REPEAT indicators
- •XDSS indicator
- OAO indicator
- CD SYNCHRO RECORDING indicator
- SLEEP indicator
- • TIMER indicator
-
RECORD/RECORD PAUSE indicator
-
PLAY MODE indicator : OPTIONAL
- • CASSETTE DECK indicators
• TAPE PLAY DIRECTION indicators : OPTIONAL - FM STEREO RECEIVING indicators
- RAMDOM indicator
- • PROGRAM indicator
- MEMORY indicator
- FM MONO RECEIVING indicators
- FUNCTION indicator
- MIC indicator : OPTIONAL
Connections
Speaker System Connection
Connect the speaker cords to the speaker terminals.


otes
- Be sure to match the speaker cord to the appropriate terminal on the components: + to + and - to -. If the cords are reversed, the sound will be distorted and will lack base.
- If you use front speakers with low maximum input rating, adjust the volume carefully to avoid excessive output on the speakers.
- Do not disassemble the front cover of supplied speaker.
Antenna (Aerial) Connections
Connect the supplied FM/AM antennas for listening to the radio.


otes
• To prevent noise pickup, keep the AM loop antenna away from the unit and other components.
- Be sure to fully extend the FM wire antenna.
• After connecting the FM wire antenna, keep it as horizontal as possible.
Audio Adjustment
Setting the voltage (OPTIONAL)
If your set is equipped with a voltage selector at the back side, be sure to set it to your local power supplied before connecting the AC power cord.
Setting the CLOCK
1 Press CLOCK. (If the clock requires setting, press and hold CLOCK for more than 2 seconds.) - The hours begin to blink.
2 Select a 24 hour cycle or 12 hour cycle by turning MULTI JOG.

3 Press SET to confirm the selected hour cycle.
4 Use MULTI JOG. to set the correct hours.
5 Press SET.
6 Use MULTI JOG. to set the correct minutes.
7 Press SET and the correct time is shown on the display.
8 Press CLOCK at any time briefly to see the time.
Volume Adjustment
- Turn VOLUME CONTROL KNOB clockwise to increase the sound level, or counterclockwise to decrease it.
- Press VOLUME (A) to increase the sound level, or press the VOLUME (V) to decrease it on the remote control.
Sound Quality Adjustment
• To activate stereo sound Select a desired sound mode by using EQ PATT. button on the remote control or EQ button on the front panel. Each time you press the button the indication changes as follows.
![graph LR A["-LM-M1040"] --> B["FLAT → ROCK → POP → VOCAL"] B --> C["SAMBA ← SALSA ← JAZZ ← CLASSIC"]](/content/2026/07/1522551/images/6c4f2798ad50d7a21f1359592194034b7091b2d144cc8fb2d1205b0815c70ec6.jpg)
-LM-M540/M340/342/345 FLAT → ROCK → POP → CLASSIC
- Headphone Socket Connect a stereo headphone plug ( φ 6.3mm) into the headphone jack. The speakers are automatically disconnected when you plug in the headphones (not supplied).
Sleep Function
When the sleep timer is used, the power is automatically turned off after the specified time has elapsed.
1 To specify the time delay before the power is turned off, press SLEEP. In the display window you can see SLEEP 90 for about 5 seconds. This means that the system turns off automatically after 90 minutes. Each time the button is pressed the time interval before it turns off is reduced by 10 minutes. i.e. 80...70... etc. Select the desired time to turn off.
2 To check the remaining time until the power is turned off. While the sleep function is active press SLEEP briefly. The time remaining until it turns off is displayed for about 5 seconds.
Note If you press SLEEP while the sleep time is displayed, the SLEEP time is reset.
To cancel the sleep timer mode If you wish to stop the function, press the SLEEP button repeatedly until SLEEP 10 appears, and then press SLEEP once again while SLEEP 10 is displayed.
Audio Adjustment
MUTE
Press MUTE to mute your unit.
You can mute your unit in order, for example, to answer the telephone, "MUTE" indicator blinks in the display window.
SURROUND
To activate surround mode
- Select a desired surround mode by using the SURROUND (SURR.) button on the front panel or on the remote control.
• Each you press the button the indication changes as follows.
-LM-M1040
SURROUND OFF → SIMULATED LOW → SIMULATED HIGH; uparrow HIGH ← MOVIE LOW ← MUSIC HIGH ← MUSICLOW
-LM-M540/340/342/345
- Press XDSS to reinforce treble, bass and surround effect.
- Each you press the button the indication changes as follows.
-LM-M1040
XDSS OFF → XDSS1 ON → XDSS2 ON
-LM-M540/340/342/345
XDSS OFF → XDSS ON
DISPLAY MODE : LM-M1040
Whenever you press DISPLAY MODE (DISP. MODE), you can enjoy the spectrum change with 6 types in the display window.
DIMMER
This function is darken the display window by half in power-on status. Press DIMMER once, and the display is darken, and if you press it once more, the display will darken by half too. To cancel it press the button again.
DEMO : LM-M1040
Press DEMO in power off state to demonstrate the function in the display. To cancel it, press POWER or DEMO again. During demonstration in power-on status you can cancel it by using the other buttons.
OAO (Orientation Acoustic Optimizer)
Press OAO to reinforce the bass sound. The "OAO" indicator lights and "OAO ON" passes by with the left side from the right. To cancel, press OAO again then "OAO OFF" passes by with the left side from the right.
Audio Adjustment (Cont'd)
Timer Function
The unit can set the clock function in power on/off state. With the TIMER function you can have the radio reception and recording, CD play, tape play or turned on and off at the time desired.
1 Press CLOCK to check the current time.
For your reference
If you don't set clock, timer function doesn't work.
2 Press TIMER to enter the timer setting mode. TUNER-CD-TAPE flashes in the display window in turn.
For your reference
If you want to correct the previous memorized TIMER setting, press and hold the TIMER button more than 2 seconds.
- The previous memorized timer on time and TIMER indicators appear in the display.
3 Press SET when the desired function is blinking.
4 1. a. When you select the TUNER function, 'PLAY' and 'REC' indicator blink in the display window alternately for about 3 seconds.
'PLAY' indicator : TUNER play only
'REC' indicator : TUNER play and recording
b. Select the previous memorized preset number with MULTI JOG. and press SET.
- 'ON TIME' indicator appears for about 0.5 seconds in the display window and then disappears.
- When you select the CD or TAPE function, - 'ON TIME' indicator appears for about 0.5 seconds in the display window and then disappears.
5 Set the hour to switch on by turning MULTI JOG.
6 Press SET to confirm the hour to switch on.
Auxiliary Function
1 Connect an auxiliary device i.e. TV or VCR to the rear mounted AUX phone sockets.
2 Press AUX.
7 Set the minute to switch on by pressing PRESET DOWN/UP or turning MULTI JOG.
8 Press SET to confirm the minute to switch on. 'OFF TIME' indicator appears for about 0.5 seconds in the display window and then disappears.
9 Set the hour to switch off by pressing PRESET DOWN/UP or turning MULTI JOG.
10 Press SET to confirm the hour to switch off.
11 Set the minute to switch off by pressing PRESET DOWN/UP or turning MULTI JOG.
12 Press SET.
13 Adjust the volume level by pressing PRESET DOWN/UP or turning MULTI JOG.
14 Press SET.
“💡” appears in the display window and the timer setting has been completed.
15 Switch the system off.
The selected function is automatically switched on and off at the time set.
To cancel or check the timer
Each time the TIMER button is pressed you can select the timer set or cancel. You can also check the timer setting status.
To activate or check the timer, press the TIMER button so that “⊕” appears in the display window. To cancel the TIMER, press the TIMER button so that
“💡” disappears in the display window.
Note
You can also record from the auxiliary input source, see Recording Section.
RDS Function - OPTIONAL
About RDS
This unit is equipped with RDS (Radio Data System), which brings a wide range of information from FM radio. RDS is a system for transmitting station call signs or network information, a description of station programme type text message about the station or specifics of musical selection and the correct time.
RDS Tuning
When a FM station containing RDS data is tuned in, the unit will automatically display the station's call sign and the RDS indicator will light in the Display Window as well as indicators for the programme type recognition (PTY), Radio Text (RT), Clock Time (CT) and RDS services programme (PS) if transmitted by the station.
RDS Display Options
The RDS system is capable of transmitting a wide variety of information in addition to the initial call sign that appears when a station is first tuned. In normal RDS operation the display will indicate the station name, broadcast network or call letters. Pressing RDS on the front panel enables you to cycle through the various data types in the sequence:
(PS → FREQUENCY → PTY → RT → CT)
- PTY (Programme type recognition)- The programme type is shown on the display window.
- RT (Radio text recognition)- The radio station's name is displayed on the display window.
- CT (Time controlled by the channel)- Enable the unit to receive the actual time and show it on the display window.
- PS (Programme Service name)- The programme title is displayed on the display window.
Notes
- Some RDS stations may not choose to include some of these additional features. If the data required for the selected mode is not being transmitted, the Display Window will show a PTY NONE, RT NONE, CT NONE, PS NONE message.
Programme Search (PTY)
A major benefit of RDS is its ability to encode broadcasts with Programme Type (PTY) codes that indicate the type of material being broadcast. The following list shows the abbreviations used to indicate each PTY along with an explanation of the PTY.
| NEWS | News |
| AFFAIRS | Current Affairs |
| INFO | Information |
| SPORT | Sports |
| EDUCATE | Educational |
| DRAMA | Drama |
| CULTURE | Culture |
| SCIENCE | Science |
| VARIED | Varied Speech Programme |
| POP M | Popular Music |
| ROCK M | Rock Music |
| EASY M | Easy Listening Music |
| LIGHT M | Classical Music |
| CLASSICS | Serious Classical Music |
| OTHER M | Other Music |
| WEATHER | Weather Information |
| FINANCE | Financial Programmes |
| CHILDREN | Children's Programmes |
| SOCIAL | Social Affairs Programmes |
| RELIGION | Religious Broadcasts |
| PHONE IN | Phone-In Programmes |
| TRAVEL | Travel and Touring |
| LEISURE | Leisure and Hobby |
| JAZZ | Jazz Music |
| COUNTRY | Country Music |
| NATION M | National Music |
| OLDIES | Oldies Music |
| FOLK M | Folk Music |
| DOCUMENT | Documentary Programmes |
| TEST | Station Alarm Test Message |
| ALARM 1 | Emergency Broadcast Information |
You may search for a specific Programme Type (PTY) by following these steps:
1 Press TUNER (or TUNER/BAND) to select FM mode.
2 Select a desired station by pressing TUNING buttons.
When the RDS transmission is received, the display shows the program service name (PS) after RDS indicator appears.
3 Press the RDS to select PTY mode.
4 To search for a different PTY, press the PRESET UP/DOWN buttons while the last PTY in use is still displayed to scroll through the list of available PTY types.
5 When the PTY is selected, press the ◀◀◀◀ / ▶▶▶▶ within 5 seconds.
The unit will go into an automatic search mode and attempt to find the next station with acceptable signal strength that matches the desired PTY type.
Presetting the radio stations
You can preset 50 stations for FM and AM. Before tuning, make sure that you have turned down the volume to the minimum.
1 Press TUNER (or TUNER/BAND) to select the frequency (AM or FM) you want. Every time you press this button, AM and FM changes alternately.
2 Press TUNING buttons on the front panel until the frequency indication starts to change.
Notes
• Automatic Tuning
Press the TUNING buttons.
- Scanning stops when the unit tunes in a station.
- Manual Tuning
Use the MULTI JOG.
3 Press PROG./MEMO. on the front panel. A preset number will flash in the display window.
4 Press PRESET buttons (or PRESET (√/A) on the remote control) to select the preset number you want.
5 Press PROG./MEMO. on the front panel. The station is stored.
6 Repeat steps 2 to 5 to store other stations.
To clear all the memorized stations
Press and hold PROG./MEMO. on the front panel for about two seconds, "CLEAR" appears on the display window and then press CLEAR, the stations are cleared.
For your reference
If all stations have already been entered, FULL message will appear in the display window for a moment and then a preset number will blink. To change the preset number, follow the steps 4-5.
To recall presets
Press and hold PRESET buttons (or PRESET (∀/A) on the remote control) until the desired preset number appears or press it repeatedly.
Listening to the radio
1 Press TUNER (or TUNER/BAND) to select the frequency (AM or FM) you want.
Every time you press this button, AM and FM changes alternately.
The last received station is tuned in.
2 Press PRESET buttons (or PRESET (V/A) on the remote control) repeatedly to select the preset station you want.
- Each time you press the button, the unit tunes in one preset station at a time.
3 Adjust the volume by rotating VOLUME CONTROL KNOB (or pressing VOLUME (V/A) on the remote control) repeatedly.
To listen to non-preset radio stations
- Use manual or automatic tuning in step 2.
- For automatic tuning, press and hold TUNING buttons on the front panel.
To turn off the radio
Press POWER to turn the unit off or select another function mode (CD/MP3, TAPE or AUX).
For your reference
- If an FM program is noisy
Press MODE/RIF so that "STEREO" disappears on the display window. There will be no stereo effect, but the reception will be improved. Press MODE/RIF again to restore the stereo effect.
• To improve reception
Repose the supplied antennas.
Notes
- Use MODE/RIF (Radio Interference Filter) function to switch to mono reception if stereo reception is distorted by noise.
- When recording the MW(AM) broadcast, beat noises may occur. If it does, press MODE/RIF once.
Tape Playback
Basic Playback
1 Press TAPE 1/2 to select TAPE 1 or TAPE 2. ("NO TAPE" appears in the display window.)
2 Open cassette TAPE 1 (or 2) by pushing
▲ PUSH EJECT position.
3 Insert one or two cassette with the tape side to the bottom and then close the TAPE 1 (or 2).
4 Press PLAY (▶ or ◀:OPTIONAL).
AUTO STOP DECK (TAPE 1/2)
After auto stop deck plays only front side, the unit stops automatically.
AUTO REVERSE DECK (TAPE 2):OPTIONAL
You can select direction of the cassette you want by pressing PLAY MODE.
| Pressing | Display | Function |
| Once | After the cassette plays front or reverse(backward play) side, stops automatically. | |
| Twice | After the cassette plays front and reverse side, stops automatically. | |
| Three times | After the cassette plays six times repeatedly front and reverse side, stops automatically. |
To Stop Play
Press STOP(■)/CLEAR on the front panel or TAPE STOP(■) on the remote control during playback.
Tape Counter Reset
Press COUNT.RESET during playback.
Playing time appears "TP 1(or 2) 0000" in display window.
To Play Rewind or Fast Forward
After pressing |◀◀◀◀/▶▶▶▶| on the front panel or ◀◀/▶▶ on the remote control during playback, press PLAY (▶) at the point you want.
Dubbing
This function shows how to record from tape to tape.
1 Press TAPE 1/2.
• Cassette TAPE 1- Insert a playback tape to dub.
• Cassette TAPE 2- Insert a blank tape.
2 Press NOR-/ HI-DUBB. as follow.
| Pressing | Display | Function |
| NOR-DUBB. | DUBB.(LM-M1040) | Normal speed dubbing |
| NOR DUBB(LM-M540/341/512/216) | ||
| HI-DUBB. | HI-SP. DUBB.(LM-M1040) | Double speed dubbing |
| HI DUBB(LM-M540/340/342/246) |
To stop recording, press STOP(■).
Recording
Wind the tape to the point recording starts. Use only normal tapes. You can record from cassette deck 2 only.
Basic Setting
1 Press CD/MP3 or TUNER (or TUNER/BAND).
2 Open the cassette TAPE 2 and insert a blank cassette into the cassette compartment. Set the recording direction : OPTIONAL Press PLAY MODE repeatedly to set the recording direction.
Recording from Radio, CD or Auxiliary source
1 Press ●REC/II on the front panel. "REC" blinks and holds the cassette in pause mode.
2 Press PLAY(▶) on the front panel. The recording begins.
To Pause recording
To pause the recording, press ●REC/II on front panel or ●/II on the remote control again. "REC" blinks on the display window.
To Stop recording
Press TAPE STOP(■).
CD to Tape Synchronized Recording
The CD synchro recording function dubs a complete CD and programmed titles automatically into a cassette.
1 Press CD SYNC. in stop mode. "REC" blinks and CD SYNC. is lit on the display window. (SYNC.: LM-M540/340)
2 The synchronized recording is started automatically after about 7 seconds.
Note
- If you wish to record the desired track, select the desired track with |◀◀ ◀◀ /▶▶ ▶▶ before commencing CD synchro recording.
CD Playback
Basic Playback
1 Press ⏻ STANDBY/ON to turn on the unit.
2 Press the CD/MP3 button on the front panel to enter the CD mode.
If no disc is entered in the disc tray, the "NO DISC" is displayed.
3 Press CD OPEN/CLOSE (▲ OPEN/CLOSE) and place the disc into the disc tray.
The disc on the left (DISC 1) is played first.

Note
To load an 8cm(3 inch) disc, put it onto the inner circle of the tray.
4 Press CD OPEN/CLOSE(▲ OPEN/CLOSE) to close the disc compartment.
Audio CD: "READING" appears in the display window, and then the total number of tracks and the playing time are displayed.
MP3 CD: "READING" appears in the display window, and then the total number of files is displayed.
5 Press PLAY(▶) on the front panel or CD PLAY/PAUSE (▶/II) on the remote control.
In addition, you can also play an Audio CD or MP3 CD using the NUMBER buttons.
To Pause Play
Press CD PAUSE (CDII) on the front panel or CD PLAY/PAUSE (▶/II) on the remote control during playback. Press this button again it to resume play.
To Stop Play
Press STOP(■)/CLEAR on the front panel or CD STOP(■) on the remote control during playback.
To Skip a Track
- Press ▶▶▶▶ button to go to the next track.
- When ◀◀◀◀ button is pressed once midway through a track, the player returns to the start of that track. When it is pressed again, a track is skipped each time the button is pressed.
To Search a Track
After pressing and holding |◀◀ ◀◀ /▶▶▶▶ button on the remote control during playback, then release at the point you want.
Notes
- This function is not available to play a MP3 file.
To Go to the next discs
Press DISC SKIP on the front panel or D.SKIP on the remote control during playing or stopping.
To Select a disc directly
Press DISC 1, DISC 2 or DISC 3 during playing or stopping.
When you press DISC 1-3 before playing a disc, the unit will automatically start playing the selected disc.
To Replace discs during Playback
You can open the disc tray during playing a disc to check what discs are to be played next and replace discs without interrupting playback of the current disc.
1 Press the CD OPEN/CLOSE (▲ OPEN/CLOSE). The disc tray is opened. Two disc compartments
appear. Even if the unit is playing a disc, it doesn't stop playing.
2 Replace discs in the compartments with new ones.
The unit plays the disc in the left compartment after the current disc, and then the one in the right compartment.
Press CD OPEN/CLOSE (▲ OPEN/CLOSE).
The CD door is closed.
Notes
- Do not place more than one compact disc on one disc tray at the same time.
- Do not push the disc tray to close CD door, as you may damage the unit.
To check MP3 file information
Press the MP3 Info button during MP3 file playback.
- The information (Title, Artist or Album) of the MP3 file will be shown in the display window.
- If there is no the information of the MP3 file, "NO ID3 TAG" indicator will be shown in the display window.
Notes
- This unit can play a CD-R or CD-RW that contains audio titles or MP3 files.
- The MP3 file name and ID3 TAG should be named using English.
CD Playback (Cont'd)
To Repeat Play
To play one track repeatedly
Press REPEAT once during playback.
- "1" appears on the display window.
To play one disc repeatedly
Press REPEAT again during playback.
- "1 DISC" appears on the display window.
To play all tracks on all discs repeatedly
Press REPEAT once more during playback.
- "ALL DISC" appears on the display window.
To cancel repeat play
- Press REPEAT several times until repeat indicator disappears.
Program repeat play
- Press REPEAT once during program play.
- "1" appears on the display window. (One track repeat)
- Press REPEAT again during program play.
- "ALL DISC" appears on the display window.(All program repeat)
Random repeat play
- Press REPEAT once during Ramdom play.
- "1 DISC" appears on the display window. (One track repeat)
- Press REPEAT again during Ramdom play.
- "ALL DISC" appears on the display window. (All Ramdom repeat)
To Play tracks in random order
Press the RANDOM button on the remote control during playback.
The tracks on the CD will all play in random order.

"RANDOM" appears on the display window. (LM-M540/340/342/345)
To cancel random playback
Press the RANDOM button again to return to normal CD playback.
To Program Play
You can arrange the order of the tracks on the discs and create your own program. The program can contain up to 20 tracks.
1 Press PROG./MEMO. on the front panel or PROGRAM on the remote control in the stop mode.
2 Press DISC SKIP or DISC DIRECT PLAY (DISC1/2/3) on the front panel or D.SKIP on the remote control to select the disc.
3 Press CD SKIP/ SEARCH |◀◀ ◀◀ /▶▶ ▶▶ on the front panel or on the remote control to select the track.
4 Press PROG./MEMO. on the front panel or PROGRAM on the remote control.
5 Repeat steps 1\~4.
6 Press PLAY(▶) on the front panel or CD PLAY/PAUSE (▶/Ⅲ) on the remote control.
To check program contents
Press PROG./MEMO. (or PROGRAM on the remote control) in the stop mode.
- The disc, track and program number will be displayed.
To clear program contents
Press PROG./MEMO. (or PROGRAM on the remote control) on the stop mode. And then press CLEAR on the front panel or CD STOP(■) on the remote control.
To add program contents
-
Press PROG./MEMO. (or PROGRAM on the remote control) repeatedly in the program stop mode until "Disc Number" blinks.
-
Repeat steps 2\~4.
To modify program contents
-
Press the PROG./MEMO. (or PROGRAM on the remote control) to display program number you want to modify.
-
Repeat steps 2\~4.
Troubleshooting
Check the following guide for the possible cause of a problem before contacting service.
| Symptom | Cause | Correction |
| No power. | The power cord is disconnected. | Plug the power cord into the wall outlet securely. |
| No sound. | The audio cables are not connected securely. | Connect the audio cable into the jacks securely. |
| The power of the external source equipment is switched off. | Turn on the equipment connected with the audio cable. | |
| The speaker cable is set to the wrong position. | Set the speaker cable to the correct position, then turn on the unit again by pressing POWER. | |
| The unit does not start playback. | No disc or tape is inserted. | Insert a disc disc or tape. |
| An unplayable disc or tape is inserted. | Insert a playable disc or tape. | |
| The disc is placed upside down. | Place the disc with the playback side down. | |
| The disc is not placed within the guide. | Place the disc on the disc tray correctly inside the guide. | |
| The disc is dirty. | Clean the disc. | |
| The remote control does not work properly. | The remote control is not pointed at the remote sensor of the unit. | Point the remote control at the remote sensor of the unit. |
| The remote control is too far from the unit. | Operate the remote control within about 23 ft (7 m). | |
| There is an obstacle in the path of the remote control and the unit. | Remove the obstacle. | |
| The batteries in the remote control are exhausted. | Replace the batteries with new ones. |
Additional Information
About MP3
- An MP3 file is audio data compressed by using the MPEG1 audio layer-3 file-coding scheme. We call files that have the ".mp3" file extension "MP3 files".
- The unit can not read an MP3 file that has not ".mp3" file extension.
MP3 Disc compatibility with this unit is limited as follows:
- Sampling Frequency / 8 - 48kHz
- Bit rate / 8 - 320kbps
- CD-R physical format should be "ISO 9660"
-
If you record MP3 files using the software which cannot create a FILE SYSTEM, for example "Direct-CD" etc., it is impossible to playback MP3 files. We recommend that you use "Easy-CD Creator", which creates an ISO9660 file system.
-
File names should be named using 30 letters or less and must incorporate ".mp3" extension e.g. "*******.MP3".
-
Do not use special letters such as "/ : * ? " < > " etc.
-
Even if the total number of files on the disc have more than 1000, it will only be shown up to 999.
About MULTI SESSION
- This function recognizes the multi session disc according to a disc of CD-ROM type.
ex) If there are MP3 files in the first session, the MP3 file in the first session is only played. If there are only MP3 files in the whole session, all of the MP3 files in the session are played. If there is Audio CD in the first session, only the Audio CD in the first session is played.
Specifications
| SECTION | MODEL | LM-M1040 | LM-M540 | LM-M340/342/345 | |
| [General] | Power supply | Refer to the back panel of the unit. | |||
| Power consumption | 140 W | 100 W | 70 W | ||
| Mass | 6.2 kg | 8.0 kg | 8.0 kg | ||
| External dimensions (W x H x D) | 273 x 330 x 370 mm | ||||
| [CD] | Frequency response | 40 - 18000 Hz | |||
| Signal-to-noise ratio | 70 dB | ||||
| Dynamic range | 70 dB | ||||
| [Tuner] | FM | Tuning Range | 87.5 - 108.0 MHz or 65 - 74 MHz, 87.5 - 108.0 MHz | ||
| Intermediate Frequency | 10.7 MHz | ||||
| Signal to Noise Ratio | 60/55 dB | ||||
| Frequency Response | 60 - 10000 Hz | ||||
| AM(MW) | Tuning Range | 522 - 1611 kHz or 530 - 1610 kHz | |||
| Intermediate Frequency | 450 kHz | ||||
| Signal to Noise Ratio | 35 dB | ||||
| Frequency Response | 100 - 1800 Hz | ||||
| [Amp] | Output Power | 100W+100W | 50W+50W | 30W+30W | |
| T.H.D | 0.15 % | ||||
| Frequency Response | 42 - 25000 Hz | ||||
| Signal-to-noise ratio | 80 dB | ||||
| [TAPE] | Tape Speed | 4.75 cm/sec | |||
| Wow Flutter | 0.25 %(MTT -111, JIS-WTD) | ||||
| F.F/REW Time | 120 sec (C-60) | ||||
| Frequency Response | 250 - 8000Hz | ||||
| Signal to Noise Ratio | 43 dB | ||||
| Channel Separation | 50 dB(P/B) / 45 dB(R/P) | ||||
| Erase Ratio | 55 dB(MTT-5511) | ||||
| [Speakers] | LMS-M1040 | LMS-M540 | LMS-M340/342/345 | ||
| Type | 3 Way 3 Speaker | 2 Way 2 Speaker | 2 Way 2 Speaker | ||
| Impedance | 6 Ω | 6 Ω | 6 Ω | ||
| Frequency Response | 65 - 20000 Hz | 60 - 20000 Hz | 50 - 18000 Hz | ||
| Sound Pressure Level | 86 dB/W (1m) | 85 dB/W (1m) | 84 dB/W (1m) | ||
| Rated Input Power | 100 W | 50 W | 30 W | ||
| Max. Input Power | 200 W | 100 W | 60 W | ||
| Net Dimensions (W x H x D) | 230 X 326 X 293mm | 200 X 326 X 237mm | 200 X 326 X 241 mm | ||
| Net Weight | 4.66 kg | 3.25 kg | 3.2 kg | ||
* Designs and specifications are subject to change without notice.
|
| _
[Non-Text]
[Non-Text]
[Non-Text]
[Non-Text]
[Non-Text]
[Non-Text]
[Non-Text]
[Non-Text]
[Non-Text]
[Non-Text]
[Non-Text]
[Non-Text]
[Non-Text]
[Non-Text]
[Non-Text]
[Non-Text]
[Non-Text]
[Non-Text]
[Non-Text]
[Non-Text]
[Non-Text]
[Non-Text]
[Non-Text]
[Non-Text]
[Non-Text]
[Non-Text]
[Non-Text]
[Non-Text]
[Non-Text]
[Non-Text]
[Non-Text]
[Non-Text]
[Non-Text]
[Non-Text]
[Non-Text]
[Non-Text]
[Non-Text]
[Non-Text]
[Non-Text]
[Non-Text]
[Non-Text]
[Non-Text]
[Non-Text]
[Non-Text]
[Non-Text]
[Non-Text]
[Non-Text]
[Non-Text]
[Non-Text]
[Non-Text]
[Non-Text]
[Non-Text]
[Non-Text]
[Non-Text]
[Non-Text]
[Non-Text]
[Non-Text]
[Non-Text]
(No text)
[EMPTY]
|
|
[Non-Text]
[Non-Text]
[Non-Text]
[Non-Text]

LG



- PRECAUTIONS
- EXPLANATION GRAPHICAL SYMBOLS
- WARNING
- CAUTION
- TABLE OF CONTENTS
- INTRODUCTION
- BEFORE OPERATION
- OPERATION
- REFERENCE
- ABOUT THE SYMBOLS FOR INSTRUCTIONS
- BEFORE USE
- SAFETY PRECAUTIONS
- HANDLING THE UNIT
- WHEN SHIPPING THE UNIT
- TO KEEP THE SURFACE CLEAN
- CLEANING THE UNIT
- TO CLEAN THE CABINET
- NOTES ON DISCS
- HANDLING DISCS
- STORING DISCS
- CLEANING DISCS
- NOTES ON REMOTE CONTROL
- REMOTE CONTROL OPERATION RANGE
- REMOTE CONTROL BATTERY INSTALLATION
- NOTES ON TAPES
- PREVENTING RECORD
- REMOTE CONTROL
- DISPLAY WINDOW
- CONNECTIONS
- SPEAKER SYSTEM CONNECTION
- OTES
- ANTENNA (AERIAL) CONNECTIONS
- AUDIO ADJUSTMENT
- SETTING THE VOLTAGE (OPTIONAL)
- SETTING THE CLOCK
- VOLUME ADJUSTMENT
- SOUND QUALITY ADJUSTMENT
- SLEEP FUNCTION
- MUTE
- SURROUND
- DISPLAY MODE : LM-M1040
- DIMMER
- DEMO : LM-M1040
- OAO (ORIENTATION ACOUSTIC OPTIMIZER)
- AUDIO ADJUSTMENT (CONT'D)
- TIMER FUNCTION
- FOR YOUR REFERENCE
- AUXILIARY FUNCTION
- TO CANCEL OR CHECK THE TIMER
- RDS FUNCTION - OPTIONAL
- ABOUT RDS
- RDS TUNING
- RDS DISPLAY OPTIONS
- (PS → FREQUENCY → PTY → RT → CT)
- NOTES
- PROGRAMME SEARCH (PTY)
- PRESETTING THE RADIO STATIONS
- LISTENING TO THE RADIO
- TAPE PLAYBACK
- BASIC PLAYBACK
- AUTO STOP DECK (TAPE 1/2)
- AUTO REVERSE DECK (TAPE 2):OPTIONAL
- TO STOP PLAY
- TAPE COUNTER RESET
- TO PLAY REWIND OR FAST FORWARD
- DUBBING
- 1 PRESS TAPE 1/2
- 2 PRESS NOR-/ HI-DUBB. AS FOLLOW
- RECORDING
- BASIC SETTING
- RECORDING FROM RADIO, CD OR AUXILIARY SOURCE
- TO PAUSE RECORDING
- TO STOP RECORDING
- CD TO TAPE SYNCHRONIZED RECORDING
- NOTE
- CD PLAYBACK
- TO PAUSE PLAY
- TO SKIP A TRACK
- TO SEARCH A TRACK
- TO GO TO THE NEXT DISCS
- TO SELECT A DISC DIRECTLY
- TO REPLACE DISCS DURING PLAYBACK
- TO CHECK MP3 FILE INFORMATION
- CD PLAYBACK (CONT'D)
- TO REPEAT PLAY
- TO PLAY ONE TRACK REPEATEDLY
- TO PLAY ONE DISC REPEATEDLY
- TO PLAY ALL TRACKS ON ALL DISCS REPEATEDLY
- TO CANCEL REPEAT PLAY
- PROGRAM REPEAT PLAY
- RANDOM REPEAT PLAY
- TO PLAY TRACKS IN RANDOM ORDER
- PRESS THE RANDOM BUTTON ON THE REMOTE CONTROL DURING PLAYBACK
- TO CANCEL RANDOM PLAYBACK
- TO PROGRAM PLAY
- TO CHECK PROGRAM CONTENTS
- TO CLEAR PROGRAM CONTENTS
- TO ADD PROGRAM CONTENTS
- TO MODIFY PROGRAM CONTENTS
- TROUBLESHOOTING
- ADDITIONAL INFORMATION
- ABOUT MP3
- MP3 DISC COMPATIBILITY WITH THIS UNIT IS LIMITED AS FOLLOWS
- ABOUT MULTI SESSION
Brand : LG
Model : LM-M340A
Category : Hi-Fi System