
FIRE-15 - Guitar amplifier ZOOM - Free user manual and instructions
Find the device manual for free FIRE-15 ZOOM in PDF.

| Product Type | Modeling Guitar Amplifier |
| Brand | ZOOM |
| Model | FIRE-15 |
| Dimensions (W x D x H) | 400 mm x 205 mm x 380 mm |
| Weight | 10 kg |
| Power Supply | 100-120 V or 220-240 V, 50/60 Hz (depending on version) |
| Output Power | 15 W RMS |
| Speaker | 20 cm, 8 ohms |
| Guitar Input | Standard mono jack (nominal level -20 dBm, impedance 470 kΩ) |
| Auxiliary Input (AUX IN) | Standard stereo jack (nominal level -20 dBm, impedance 10 kΩ) |
| Headphone/Recording Output | Standard stereo jack (nominal level +4 dBm, load impedance ≥ 10 kΩ) |
| Drive Types | 11 types (FDR CLN, J CLN, MS DRV, BG DRV, PVY DRV, OVER DRIVE, DISTORTION, FUZZ, METAL, ACOUSTIC, EFFECT IN) |
| Digital Effects | 17 types (10 modulation + 4 delay/reverb + BOOST + SUSTAIN + ZNR) |
| Patches | 20 patches (10 user + 10 presets) |
| Chromatic Tuner | Built-in, reference A4 = 435-445 Hz (adjustable) |
| Noise Reduction | ZNR (ZOOM Noise Reduction), 9 levels + off |
| Footswitch | FOOT SW jack for ZOOM FS-01 (optional) |
| Maintenance and Cleaning | Use a soft, dry cloth. Do not use solvents or abrasives. |
| Safety | Do not open the casing; avoid extreme temperatures, humidity, dust, and shocks. |
| Spare Parts and Repairability | Power cord included. For repair, contact an authorized ZOOM service center. |
Frequently Asked Questions - FIRE-15 ZOOM
User questions about FIRE-15 ZOOM
0 question about this device. Answer the ones you know or ask your own.
Ask a new question about this device
Download the instructions for your Guitar amplifier in PDF format for free! Find your manual FIRE-15 - ZOOM and take your electronic device back in hand. On this page are published all the documents necessary for the use of your device. FIRE-15 by ZOOM.
USER MANUAL FIRE-15 ZOOM
Thank you for selecting the ZOOM MODELING GUITAR AMPLIFIER FIRE-15 (simply called the "FIRE-15" in this manual).
Please take the time to read this manual carefully so as to get the most out of this product and to ensure optimum performance and reliability.
Please keep this manual in a convenient place for future reference.
Contents
USAGE AND SAFETY PRECAUTIONS 2
Features 4
Controls and Functions 5
Input/preamplifier section 5
Effect section 6
Patch section 6
Output/control section 7
Connections 8
Using the FIRE-15 9
Basic operation 9
Using effects 10
Loading and storing patches 11
Loading a patch 11
Storing a patch 12
Using the built-in tuner 13
Switching the mode with the foot switch 14
Returning the FIRE-15 to the factory default settings (all initialize) .. 15
Drive Types and Effect Types 16
DRIVE 16
■ ZNR 17
■ MODULATION 17
■ DELAY/REVERB 20
Specifications 21
Troubleshooting 22
Patch List 23
USAGE AND SAFETY PRECAUTIONS
SAFETY PRECAUTIONS
In this manual, symbols are used to highlight warnings and cautions for you to read so that accidents can be prevented. The meanings of these symbols are as follows:

This symbol indicates explanations about extremely dangerous matters. If users ignore this symbol and handle the device the wrong way, serious injury or death could result.

This symbol indicates explanations about dangerous matters. If users ignore this symbol and handle the device the wrong way, bodily injury and damage to the equipment could result.
Please observe the following safety tips and precautions to ensure hazard-free use of the FIRE-15.
Power requirements

Connect only to AC power outlets rated 100-120 V or 220-240 V 50/60Hz (depending on the voltage range of the unit; refer to the back panel).
When not using the unit for an extended time, disconnect the power cord from the AC outlet.
Environment

Avoid using your FIRE-15 in environments where it will be exposed to:
- Extreme temperatures
High humidity or moisture - Excessive dust or sand
- Excessive vibration or shock
Handling

The FIRE-15 is a precision instrument. Do not exert undue pressure on the keys and other controls. Also take care not to drop the unit, and do not subject it to shock or excessive pressure.
- Alterations

Never open the case of the FIRE-15 or attempt to modify the product in any way since this can result in damage to the unit.
Volume

Do not use the FIRE-15at a loud volume for a long time since this can cause hearing impairment.
- Connecting cables and input and output jacks

You should always turn off the power to the FIRE-15 and all other equipment before connecting or disconnecting any cables. Also make sure to disconnect all connection cables and the power cord before moving the FIRE-15.
Usage Precautions
- Electrical interference
For safety considerations, the FIRE-15 has been designed to provide maximum protection against the emission of electromagnetic radiation from inside the device, and protection from external interference. However, equipment that is very susceptible to interference or that emits powerful electromagnetic waves should not be placed near the FIRE-15, as the possibility of interference cannot be ruled out entirely.
With any type of digital control device, the FIRE-15 included, electromagnetic interference can cause malfunctioning and can corrupt or destroy data. Care should be taken to minimize the risk of damage.
- Cleaning
Use a soft, dry cloth to clean the FIRE-15. If necessary, slightly moisten the cloth. Do not use abrasive cleanser, wax, or solvents (such as paint thinner or cleaning alcohol), since these may dull the finish or damage the surface.
Please keep this manual in a convenient place for future reference.
© ZOOM Corporation
Reproduction of this manual, in whole or in part, by any means, is prohibited.
Features
- Versatile guitar amplifier and compact effect sound modeling
The FIRE-15 lets you select from 11 drive types which faithfully duplicate the sound of famous guitar amplifiers and compact effects. The available choices range from vintage amps to modern distortion sounds, and everything in between. There is also a function for boosting the sound and prolonging sustain simply by pushing a key.
Digital effects ideal for guitar play
The FIRE-15 also incorporates a full range of modulation effects and reverb/delay effects.
- Store amp settings as "patches"
Multiple amplifier and effect settings can be easily stored as user "patches". This allows you to instantly call up a desired combination of settings and effects, using the keys on the panel of the unit or using an optional foot switch. A number of preset patches with recommended settings are also available.
Built-in auto-chromatic tuner
An easy-to-use auto-chromatic tuner is built right into the unit.
- Versatile input/output configuration
The AUX IN jack makes it easy to connect a CD player, MD player or other source device. The RECORDING/PHONES jack lets you plug in a pair of headphones or a recorder.
Controls and Functions
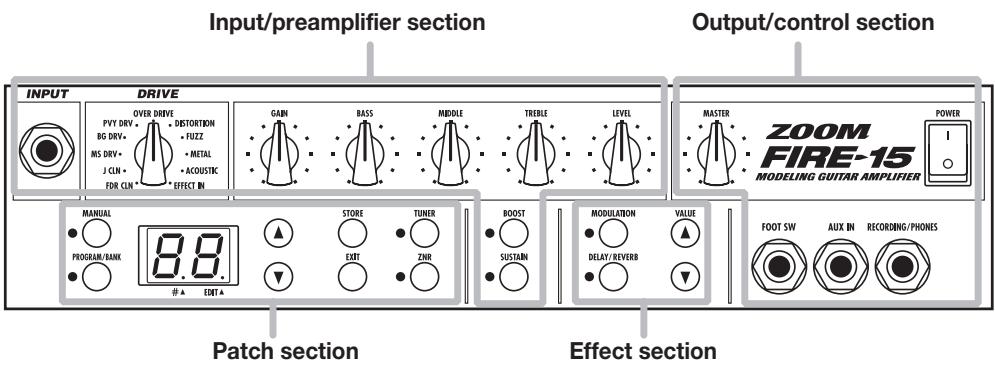
Input/preamplifier section
This section comprises the input jack and controls for adjusting distortion depth and tone.
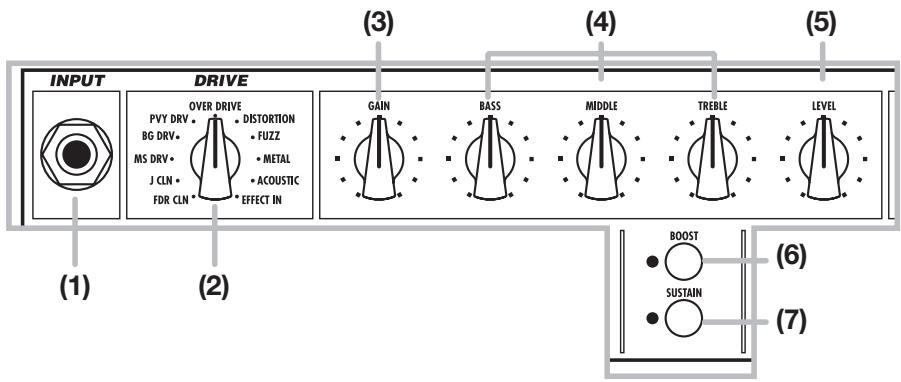
(1) [INPUT] jack
Connect the electric guitar here, using a dedicated instrument cable.
(2) [DRIVE TYPE] knob
Selects the simulated amp type and distortion (drive) type.
(3) [GAIN] knob
Adjusts the input gain. Turning this knob up increases distortion depth.
(4) [BASS]/[MIDDLE]/[TREBLE] knobs
This is a 3-band equalizer that allows boost/cut in the low, medium, and high frequency range.
(5) [LEVEL] knob
Adjusts the volume after passing the preamplifier.
(6) [BOOST] key
Setting this key to ON (LED lit) boosts the sound pressure level.
(7) [SUSTAIN] key
Setting this key to ON (LED lit) produces longer sustain.
Effect section
This section controls the built-in digital effects. The FIRE-15 provides modulation effects and delay/reverb effects.
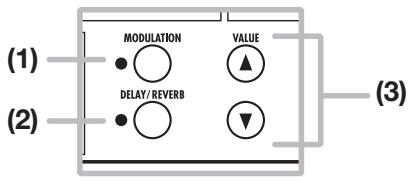
(1) [MODULATION] key
Switches the modulation effect on and off.
(2) [DELAY/REVERB] key
Switches the delay/reverb effect on and off.
(3) VALUE []/[] keys
Used to change effect settings and values.
Patch section
This section lets you store and recall effect patches. It also serves to operate the built-in tuner and noise reduction functions.
(1) [MANUAL] key
(2) [PROGRAM/BANK] key
This key switches between manual mode, where you use the controls on the front panel to shape the sound, and program mode where you use settings stored in preprogrammed patches.
When the [MANUAL] key is ON (LED lit), the manual mode is selected. When the [PROGRAM/ BANK] key is ON (LED lit), the program mode is selected. (The default setting at power-on is manual mode.)
(3) Display
Shows the number of the currently selected patch, or the value of setting parameters of the FIRE-15.
(4) [] / [] keys
Serve to switch between patches and to adjust ZNR (ZOOM Noise Reduction).
(5) [STORE] key
Stores the current settings as a user patch.
(6) [EXIT] key
Cancels an operation and calls up the number of the currently selected patch onto the display.
(7) [TUNER] key
This key activates the built-in tuner of the FIRE-15.
(8) [ZNR] key
This key turns ZOOM Noise Reduction on or off. (ZNR is ON by default at power-on.)
Output/control section
This section lets you adjust the overall amp volume and connect external devices including a foot switch.
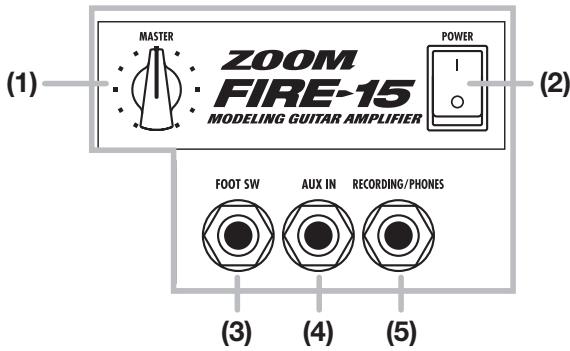
(1) [MASTER] knob
Adjusts the volume.
(2) [POWER] switch
Controls the power on/off status.
(3) FOOT SW jack
A separately available foot switch (ZOOM FS-01) can be connected here, allowing you to toggle between manual mode and program mode with your foot.
(4) [AUX IN] jack
This is a stereo input that accepts the signal from a CD player or MD player.
(5) [RECORDING/PHONES] jack
This is a stereo output that can be used to connect a recording device or a pair of headphones.
Connections

MRS-1266 or similar recording device
Using the FIRE-15
This section explains how to operate the panel controls and how to use patches and other functions of the FIRE-15.
Basic operation
1. Verify that the [MASTER] knob is turned to the 0 position. Then turn the [POWER] switch on. Set the [GAIN]/[BASS]/[MIDDLE]/[TREBLE]/[LEVEL] knobs to the center position.
Immediately after turning on the power, the manual mode is selected ([MANUAL] key is lit).
![ZOOM FIRE-15 - Verify that the [MASTER] knob is turned to the 0 position. Then turn the [POWER] switch on. Set the [GAIN]/[BASS]/[MIDDLE]/[TREBLE]/[LEVEL] knobs to the center position. - 1](/content/2025/01/152196/images/6b7f89d9d44474c3656222c3de66aa7112c278dfca213d2b6127c5e31d92657b.jpg)
Display in manual mode
2. Use the [DRIVE TYPE] knob to select the drive type.
The [DRIVE TYPE] knob selects the modeling material (amp or distortion type). The distortion depth will differ, depending on the selected drive type. (For information on available drive types, see page 16.)
3. Raise the [MASTER] knob to a suitable position, and adjust the distortion depth and volume with the [GAIN] knob and [LEVEL] knob while playing your guitar.
Normally, you will use the [GAIN] knob to adjust distortion depth and the [LEVEL] knob to adjust the level for a particular patch. The [MASTER] knob controls the overall volume, common to all patches.
4. Use the [BASS]/[MIDDLE]/[TREBLE] knobs to adjust the tone.
You can also use the [BOOST] key and the [SUSTAIN] key to increase the sound pressure and prolong sustain.
5. To change the ZNR (ZOOM Noise Reduction) setting, press the [ZNR] key.
The LED of the key flashes, and the current setting (Z1 - Z9, oF) is shown for about 2 seconds on the display. Use the [] / [] keys to select the new setting. To switch ZNR on or off, press the [ZNR] key once more. Higher setting values result in more effective noise reduction. Set the value as high as possible without causing the sound to be cut off abruptly.
6. To turn the unit off, turn the [MASTER] knob all the way down and then turn off the [POWER] switch.
Using effects
Immediately after turning on the FIRE-15, the [MANUAL] key LED is lit, and the internal effects (modulation, delay/reverb) are off. This section explains how to activate the effects and use them to achieve various kinds of sound.
1. Press the key for the desired effect in the effect section.
To use the modulation effect, press the [MODULATION] key. To use the delay/reverb effect, press the [DELAY/REVERB] key.
The respective LED flashes, and the indication "oF" (effect off) is shown on the display for 2 second.
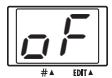
2. While "oF" is shown, press the same key once more.
If you press the key while "oF" is visible on the display, the effect is turned on, and the effect type and setting value are shown on the display.
For example, if you press the [MODULATION] key in step 1, the effect type is shown as "C" (chorus), and the setting value as "1".
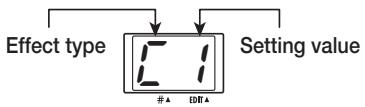
3. Use the VALUE [] / [] keys to select the desired effect type and setting value.
You can select one effect from a number of choices for the modulation effect and the delay/reverb effect, and then you can adjust the intensity of the effect by setting the value of a parameter. For information on effect types and setting values, see page 17 - page 20. To change the effect type and setting value, proceed as follows.
- To increase or decrease the setting value by one step
When you press one of the VALUE [] / [] keys, the setting value changes by one step, such as C1 → C2 → C3 or C9 → C8 → C7. When the maximum or minimum setting is reached, the unit switches to the minimum or maximum setting of the next effect type, such as C9 → F1 or H1 → F9.
- To switch the effect type
When you press both of the VALUE [] / [] keys together, the setting switches to the minimum of the next effect type, such as C5 → F1 or F3 → H1.
HINT
- You can use a modulation effect and a delay/reverb effect simultaneously. If necessary, perform the above steps again for the other effect.
- In program mode, you can call up a patch and change the effect setting.
- When the effect in the selected patch is off, you can select an effect type and setting value by performing steps 1 - 3.
- When the effect in the selected patch is on ([MODULATION] key or [DELAY/REVERB] key LED lit), you can press the key whose LED is lit to call up the effect type and setting value onto the display. You can then use the VALUE [] /[▼] keys to change the effect type and/or setting value.
Loading and storing patches
The FIRE-15 offers a bank of ten read/write user patches (U) and a bank of ten read-only preset patches (P). Patches in each bank are numbered 0 - 9.
This section explains how to call up stored user patches or preset patches and how to save amplifier and effect settings in a user patch.
Loading a patch
1. Press the [PROGRAM/BANK] key in the patch section, so that the LED lights up.
The current settings of the knobs and controls on the panel become inactive, and the settings of the patch shown on the display are enabled.
![ZOOM FIRE-15 - Press the [PROGRAM/BANK] key in the patch section, so that the LED lights up. - 1](/content/2025/01/152196/images/7522277bd061fba727b18abfe7bb36cf3ab452da107f1486d51db8d7a5fc10c0.jpg)
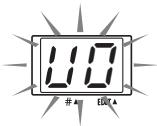
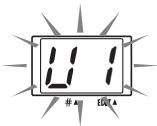
2. Use the [] / [] keys to select the bank and number of the desired patch.
With the [] / [] keys, you can cycle through the patches in the order U0 - U9 P0 P9 ... For information on factory default patch contents, see page 23.
![ZOOM FIRE-15 - Use the [] / [] keys to select the bank and number of the desired patch. - 1](/content/2025/01/152196/images/c088c688f15e43f009131b781269ec2b3978f6991b7b56b14ab65e60e192628d.jpg)
When you press the [PROGRAM/BANK] key, the patch number stays the same and only the bank is toggled: U1 P1 U1 .
3. Operate the controls in the input/preamp section and the effect section as required, to adjust the distortion, tone, volume, effect type and intensity, etc.
If a control has been operated after a patch was loaded, a dot appears at the bottom right of the display. This indicates that the contents of the patch have changed. (When you return to the original settings, the dot disappears.)
HINT
You can store the contents of a changed user patch by pressing the [STORE] key. For information on the procedure, see the section "Storing a patch".
NOTE
If you have changed some settings and then select another patch, the settings of the previous patch will return to the stored condition. If you want to preserve your changes, store the user patch.
Storing a patch
NOTE
When you store a patch, any patch currently stored under the same number will be overwritten (erased and replaced with the new settings). Take care not to accidentally erase a patch that you want to keep.
- Use the knobs and keys on the panel to establish the desired sound.
- Press the [STORE] key in the patch section.
The indication "U" (for user bank) and the patch number (0 - 9) are shown on the display. In this condition, storing the settings as a user patch is possible.
- Use the [] / [] keys to select the desired user patch (U0 - U9).
The preset patches (P0 - P9) are read-only. They cannot be selected as target for storing a user patch.
4. To store the patch, press the [STORE] key once more.
The store process is carried out, and the unit goes into program mode.
![ZOOM FIRE-15 - To store the patch, press the [STORE] key once more. - 1](/content/2025/01/152196/images/d7be541c08ba7841a4ecc05389e6f67d40bf56d35ede25833926de0990839f5a.jpg)
HINT

By calling up an existing patch and then selecting another destination for the store process, copying a patch is possible.
Using the built-in tuner
The FIRE-15 incorporates an auto-chromatic tuner which can be activated by pressing the [TUNER] key.
1. Press the [TUNER] key in the patch section.
The LED of the key lights up and the internal tuner becomes active.
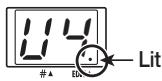
If you want to tune while keeping the sound output on, press the [TUNER] key only briefly. (The display indication shows "tU".) If you want to tune while the sound is muted, hold down the [TUNER] key somewhat longer. (Release the key when the display indication shows "Mt".)
![ZOOM FIRE-15 - Press the [TUNER] key in the patch section. - 1](/content/2025/01/152196/images/739469d0d23f2834689384613c09d9adde6fe75a4f615cd480ed521a9668cabb.jpg)
2. Play the open string you want to tune
The left side of the display shows the note which is closest to the current pitch. The right side of the display shows how far the pitch is off. Adjust the pitch while observing the display.
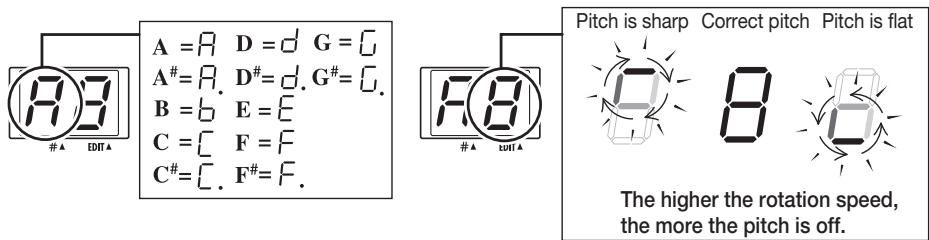
3. To change the tuner reference pitch, press one of the [] / [] keys.
The current reference pitch is shown for two seconds. The default setting is "40" (center A = 440 Hz).
![ZOOM FIRE-15 - To change the tuner reference pitch, press one of the [] / [] keys. - 1](/content/2025/01/152196/images/861fe76b8062f91c25d38961130e3f37576fdf9b0f4b5e73ac93a62fb7141d64.jpg)
4. While the reference pitch is shown, you can use the [] / [] keys to change the setting.
The setting range is 35 - 45 (center A = 435Hz - 445Hz
![ZOOM FIRE-15 - While the reference pitch is shown, you can use the [] / [] keys to change the setting. - 1](/content/2025/01/152196/images/7c128d5bc1a5ea6f225cceecfc86ac91c33407946a5e15d19af5ecc83fb6042a.jpg)
![ZOOM FIRE-15 - While the reference pitch is shown, you can use the [] / [] keys to change the setting. - 2](/content/2025/01/152196/images/dfa14289af262f35577b571a7616b7795fbf7c5a862447a97ce94c9045bcf4c1.jpg)
When power is turned off and on again, the reference pitch is reset to "40" (center A = 440 Hz).
5. When tuning is complete, press the [TUNER] key to turn the tuner off.
The tuner function is disabled.
![ZOOM FIRE-15 - When tuning is complete, press the [TUNER] key to turn the tuner off. - 1](/content/2025/01/152196/images/941d9b52525fc4b979c4cae7176fda162223552005804431bb8a77b03fbcf542.jpg)
During use of the tuner, effects are turned off.
Switching the mode with the foot switch
Using the separately available foot switch, you can toggle between manual mode and program mode during play.
1. Turn off power to the FIRE-15 and connect the foot switch FS-01 (available separately) to the [FOOT SW] jack.
![ZOOM FIRE-15 - Turn off power to the FIRE-15 and connect the foot switch FS-01 (available separately) to the [FOOT SW] jack. - 1](/content/2025/01/152196/images/0a7b57b30bf0d6fc2c5636e68037eeeb38c9ab05e83774e5a0905602dfcfeb42.jpg)
Please do not connect or disconnect the foot switch while power is turned on.
2. Turn power to the FIRE-15 on.
The FIRE-15 is in manual mode.
Display in manual mode
3. Press the foot switch while you are playing your instrument.
When you push the foot switch, the FIRE-15 switches to program mode, and the currently selected patch becomes active. If required, use the [PROGRAM/BANK] key and [] / [] keys to
switch the bank and patch number.
Program mode display
- To return to manual mode, press the foot switch again, or press the [MANUAL] key.
Returning the FIRE-15 to the factory default settings (all initialize)
If required, you can return the settings of the user patches (U0 - U9) to the condition in which the unit was shipped. (This function is called "all initialize".)

NOTE

When you carry out this function, any settings that you have stored in user patches will be lost. Proceed with care.
- Hold down the [STORE] key while turning power to the unit on.
The indication "AL" appears on the display.
- To execute the all initialize function, press the [STORE] key once more.
All user patches are returned to the factory default condition. If you wish to cancel the process, press the [EXIT] key instead of the [STORE] key.
Drive Types and Effect Types
DRIVE
Selects the modeling material (amp) and distortion type (drive type).
| Drive type | Display | Description |
| FDR CLN | Fd | Clean built-in type tube amp sound. |
| J CLN | Uc | Clean bright combo amp sound. |
| MS DRV | 75 | British-style tube stack amp drive sound. |
| BG DRV | 60 | Tube stack amp drive sound with prominent midrange. |
| PVY DRV | Pw | Tube stack amp drive sound in heavy metal style. |
| OVER DRIVE | ad | Sound of dry overdrive effect connected to combo amp. |
| DISTORTION | dt | Sound of fully revved up distortion effect connected to combo amp. |
| FUZZ | FU | Sound of nostalgic sixties fuzz connected to stack amp. |
| METAL | TE | Heavy metal sound with strong high and low boost. Great for 7-string guitar. |
| ACOUSTIC | Ac | Changes the sound of an electric guitar into that of an acoustic guitar. |
| EFFECT IN | EI | Clean guitar amp sound great for direct input from a ZOOM multi-effect processor. |
ZNR
This is ZOOM's original noise reduction which suppresses noise during play pauses. Use the [ZNR] key to turn the function on and off, and use the [ ] / [ ] keys to adjust the setting value.
| Setting value | Description | |
| ZNR | 31239 | Higher settings result in more effective noise reduction. Set the value as high as possible without causing the sound to be cut off abruptly. |
■ MODULATION
This effect adds body and to the guitar sound. Use the [MODULATION] key to turn the effect on and off, and use the [ ] / [ ] keys to select the effect type and the setting value.
| Effect type | Setting value | Description |
| CHORUS | C1C9 | Mixes pitch-shifted components (up and down) to original signal, for spacious and solid sound. Higher setting values result in deeper chorus effect. |
| FLANGER | F1F6 | Pitch-up/down modulation adds pronounced character to the sound. Higher setting values result in faster modulation. |
| FLANGER→CHORUS | F7F9 | Serial connection of flanger and chorus. Higher setting values result in faster flanger modulation. (Chorus depth is fixed.) |
| PHASE | H1H6 | Adds a swooshing modulation to the sound. Higher setting values result in faster flanger modulation. |
| PHASE→CHORUS | H7H9 | Serial connection of phaser and chorus. Higher setting values result in faster phaser modulation. (Chorus depth is fixed.) |
| DOUBLING | d1 ? d6 | This effect adds a very short-delay sound to the original sound, which gives the impression of several players playing the same phrase, resulting in more solid sound. Higher setting values result in stronger doubling action. |
| DOUBLING →CHORUS | d7 ? d9 | Serial connection of doubling and chorus. Higher setting values result in stronger doubling action. (Chorus depth is fixed.) |
| TREMODO | t1 ? t6 | This effect varies the volume periodically. Higher setting values result in faster tremolo. |
| TREMODO →CHORUS | t7 ? t9 | Serial connection of tremolo and chorus. Higher setting values result in faster tremolo. (Chorus depth is fixed.) |
| AUTO WAH | 81 ? 86 | This is an effect that automatically adds wah depending on the playing intensity. Higher setting values result in higher auto wah start sensitivity, producing wah even with low-level signals. |
| AUTO WAH →CHORUS | 87 ? 89 | Serial connection of auto wah and chorus. Higher setting values result in higher auto wah start sensitivity. (Chorus depth is fixed.) |
| STEP | 51 ? 56 | This effect causes random pitch changes and creates an auto arpeggio sound. Higher setting values result in faster sound change. |
| STEP→CHORUS | 57 ? 59 | Serial connection of step and chorus. Higher setting values result in faster sound change. (Chorus depth is fixed.) |
| SLOW-A | 81 ? 86 | This effect slows down the sound attack speed, resulting in the impression of “violin playing”. Higher setting values result in slower attack speed. |
| SLOW-A→PITCH | A7 ?A9 | Serial connection of slow attack and pitch shift. Higher setting values result in slower attack speed. (Pitch shift is fixed to one octave higher.) |
| PITCH | This effect varies the pitch of the original sound. You can select one of nine preset pitch shift patterns (P1 - P9). | |
| P1 | Mixes the original sound and a sound component shifted one octave down. | |
| P2 | Mixes the original sound and a sound component shifted a perfect fifth down. | |
| P3 | Adds a chorus effect to the P2 setting. | |
| P4 | Mixes the original sound and a sound component shifted a perfect fourth down. | |
| P5 | Adds a chorus effect to the P4 setting. | |
| P6 | Mixes the original sound and a sound component shifted one octave up. | |
| P7 | Mixes the original sound and a sound component shifted slightly, resulting in a chorus effect with only slight modulation. | |
| P8 | Mixes the original sound and sound components shifted a perfect fourth down and up. | |
| P9 | Mixes the original sound and sound components shifted an octave down and up. | |
| RING MOD | -1 ?-6 | Adds amplitude modulation to the sound, resulting in a metallic effect. Higher setting values result in higher modulation frequency. |
| RING MOD→CHORUS | -7 ?-9 | Serial connection of ring modulator and chorus. Higher setting values result in higher modulation frequency. (Chorus depth is fixed.) |
DELAY/REVERB
This effect adds a delayed component or reverb to the guitar sound. Use the [DELAY/REVERB] key to turn the effect on and off, and use the [ ] / [ ] keys to select the effect type and the setting value.
| Effect type | Setting value | Description |
| DELAY | d1 | This is a conventional digital delay effect. Higher setting values result in longer delay time. The mix/feedback amount is set to an optimum value. |
| d9 | ||
| ECHO | E1 | This delay effect recreates the warm sound of a tape echo. Higher setting values result in longer delay time. The mix/ feedback amount is set to an optimum value. |
| E9 | ||
| ROOM | r1 | This effect simulates reverberation in a room. Higher values result in a deeper effect. |
| r9 | ||
| HALL | H1 | This effect simulates reverberation in a hall. Higher values result in a deeper effect. |
| H9 |
Specifications
Power Output 15 W RMS
Speaker 20 cm, 8 ohms
Inputs
Guitar input: standard mono phone jack (nominal input level -20 dBm, input impedance 470 kilohms)
AUX IN: standard stereo phone jack (nominal input level -20 dBm, input impedance 10 kilohms)
Output Combined recording/headphone output: standard stereo phone jack (nominal output level +4 dBm with output load impedance 10 kilohms or higher)
Drive 11 types
Effect Programs 17 types (10 MODULATION + 4 DELAY/REVERB + BOOST + SUSTAIN + ZNR)
Effect Modules 5 modules (MODULATION + DELAY/REVERB + BOOST + SUSTAIN + ZNR)
Program Patches USER:10 (rewritable, with store)
PRESET:10
Total 20 patches
Sampling Frequency 31.25 kHz
A/D Conversion 20-bit, 64-times oversampling
D/A Conversion 20-bit, 8-times oversampling
Control Connector FOOT SW (FS01)
Display 2-position 7-segment LED
Dimension 400 mm (W) x 205 mm (D) x 380 mm (H)
Weight 10kg
Included Items Power Cord
^*0~dBm = 0.775~V_rms
*Design and specifications subject to change without notice.
Troubleshooting
Power does not come on.
- Is power cord correctly plugged into AC outlet?
- Is [POWER] switch set to ON?
- No sound, or low volume.
Is the guitar correctly connected to the FIRE-15?
See page 8 for information on connections.
- Is something plugged into the [RECORDING/PHONES] jack?
If something is plugged into the [RECORDING/PHONES] jack, the speaker is automatically cut off.
Is the [LEVEL] knob or [MASTER] knob turned down?
Turn the knobs clockwise while playing your guitar.
Sound is too distorted or breaks up.
[GAIN]/[LEVEL] knobs may be turned up too high?
Turn the knobs counter-clockwise. Adjust the volume with the [MASTER] knob.
- The foot switch does not toggle modes.
Is a ZOOM foot switch connected?
Use only the foot switch ZOOM FS-01.
Patch List
| BANK | PATCH | PATCH NAME | DRIVE TYPE | COMMENT |
| U [USER] | 0 | Tune Up Drive | PVY DRV | Smooth, transparent distortion sound |
| 1 | Best Crunch | MS DRV | Wide crunch sound for backing and lead | |
| 2 | Funk Beat | J CLN | Suitable from arpeggio to 16 beat cutting | |
| 3 | Cry Lead | BG DRV | Combination of the auto wah and distortion | |
| 4 | Tremolo | FDR CLN | Amp sound with tremolo | |
| 5 | Drive Lead | BG DRV | Lead sound with delay | |
| 6 | Deep Chorus | EFFECT IN | Deep, gorgeous chorus sound | |
| 7 | JET CURRENT | PVY DRV | Standard flanging jet sound | |
| 8 | Light Back | EFFECT IN | Light taste auto wah sound | |
| 9 | Pitched Metal | METAL | Heavy sound added downer 1-octave pitch shift sound | |
| P [PRESET] | 0 | PVY-Drive | PVY DRV | High-gain amp sound |
| 1 | J-Clean | J CLN | Standard amp sound with chorus | |
| 2 | MS-Drive | MS DRV | MS drive sound | |
| 3 | FDR-Clean | FDR CLN | US clean combo amp sound | |
| 4 | BG-Drive | BG DRV | Sound for sweet, mellow lead | |
| 5 | Distortion | DISTORTION | Standard distortion sound | |
| 6 | OverDrive | OVER DRIVE | Almighty overdrive sound | |
| 7 | Acoustic | ACOUSTIC | Simulation of the acoustic guitar sound | |
| 8 | Fuzz | FUZZ | High-quality fuzz sound | |
| 9 | Metal | METAL | Simulation of the metal sound |
ZECOM
CATCH US IF YOU CAN
ZOOM CORPORATION
NOAH Bldg., 2-10-2, Miyanishi-cho, Fuchu-shi, Tokyo 183-0022, Japan
PHONE: +81-42-369-7116 FAX: +81-42-369-7115
Web Site: http://wwwzoomo.co.jp
- Contents
- USAGE AND SAFETY PRECAUTIONS
- SAFETY PRECAUTIONS
- Power requirements
- Environment
- Handling
- - Alterations
- Volume
- - Connecting cables and input and output jacks
- Usage Precautions
- - Electrical interference
- - Cleaning
- © ZOOM Corporation
- Features
- - Versatile guitar amplifier and compact effect sound modeling
- Digital effects ideal for guitar play
- - Store amp settings as "patches"
- Built-in auto-chromatic tuner
- - Versatile input/output configuration
- Controls and Functions
- Input/preamplifier section
- [SUSTAIN] key
- Effect section
- [MODULATION] key
- [DELAY/REVERB] key
- VALUE []/[] keys
- Patch section
- [MANUAL] key
- [PROGRAM/BANK] key
- Output/control section
- Connections
- Using the FIRE-15
- Basic operation
- Verify that the [MASTER] knob is turned to the 0 position. Then turn the [POWER] switch on. Set the [GAIN]/[BASS]/[MIDDLE]/[TREBLE]/[LEVEL] knobs to the center position.
- Use the [DRIVE TYPE] knob to select the drive type.
- Raise the [MASTER] knob to a suitable position, and adjust the distortion depth and volume with the [GAIN] knob and [LEVEL] knob while playing your guitar.
- Use the [BASS]/[MIDDLE]/[TREBLE] knobs to adjust the tone.
- To change the ZNR (ZOOM Noise Reduction) setting, press the [ZNR] key.
- To turn the unit off, turn the [MASTER] knob all the way down and then turn off the [POWER] switch.
- Using effects
- Press the key for the desired effect in the effect section.
- While "oF" is shown, press the same key once more.
- Use the VALUE [] / [] keys to select the desired effect type and setting value.
- - To increase or decrease the setting value by one step
- - To switch the effect type
- HINT
- Loading and storing patches
- Loading a patch
- Press the [PROGRAM/BANK] key in the patch section, so that the LED lights up.
- Use the [] / [] keys to select the bank and number of the desired patch.
- Operate the controls in the input/preamp section and the effect section as required, to adjust the distortion, tone, volume, effect type and intensity, etc.
- NOTE
- Storing a patch
- To store the patch, press the [STORE] key once more.
- Using the built-in tuner
- Press the [TUNER] key in the patch section.
- Play the open string you want to tune
- To change the tuner reference pitch, press one of the [] / [] keys.
- While the reference pitch is shown, you can use the [] / [] keys to change the setting.
- When tuning is complete, press the [TUNER] key to turn the tuner off.
- Switching the mode with the foot switch
- Turn off power to the FIRE-15 and connect the foot switch FS-01 (available separately) to the [FOOT SW] jack.
- Turn power to the FIRE-15 on.
- Press the foot switch while you are playing your instrument.
- Returning the FIRE-15 to the factory default settings (all initialize)
- Drive Types and Effect Types
- DRIVE
- ZNR
- ■ MODULATION
- DELAY/REVERB
- Specifications
- Troubleshooting
- Power does not come on.
- - No sound, or low volume.
- Sound is too distorted or breaks up.
- - The foot switch does not toggle modes.
- Patch List
- ZECOM
- CATCH US IF YOU CAN
- ZOOM CORPORATION
Brand : ZOOM
Model : FIRE-15
Category : Guitar amplifier