Conga 7690 Immortal Max Home M - Robot vacuum CECOTEC - Free user manual and instructions
Find the device manual for free Conga 7690 Immortal Max Home M CECOTEC in PDF.


| Product type | Robotic vacuum and mop |
| Brand | Cecotec |
| Model | Conga 7690 Immortal Max Home M |
| Dimensions (LxWxH) | 35 x 35 x 10 cm |
| Weight | 3.5 kg |
| Power source | Li-ion battery 5200 mAh |
| Runtime | Up to 120 minutes |
| Charging time | Approximately 4 hours |
| Suction power | 3000 Pa (max) |
| Dustbin capacity | 600 ml |
| Water tank capacity | 250 ml |
| Navigation | Laser LDS (SLAM) |
| Main functions | Vacuuming, mopping, scheduling, app and voice control, multi-floor mapping |
| Obstacle detection | Infrared sensors, drop detection, anti-collision |
| Brushes | Rubber main brush and two side brushes |
| Filtration | High-performance HEPA filter |
| Noise level | Approximately 55 dB |
| Maintenance | Regularly clean the main brush, side brushes, filter, and sensors |
| Safety | Automatic shutoff when lifted, carpet detection, fall protection |
| Spare parts | Brushes, filters, tanks, batteries, bumpers available |
| Repairability | Estimated repairability score: 7/10 (parts available, can be disassembled) |
| Warranty | 2 years |
Frequently Asked Questions - Conga 7690 Immortal Max Home M CECOTEC
User questions about Conga 7690 Immortal Max Home M CECOTEC
0 question about this device. Answer the ones you know or ask your own.
Ask a new question about this device
Download the instructions for your Robot vacuum in PDF format for free! Find your manual Conga 7690 Immortal Max Home M - CECOTEC and take your electronic device back in hand. On this page are published all the documents necessary for the use of your device. Conga 7690 Immortal Max Home M by CECOTEC.
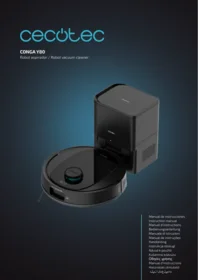
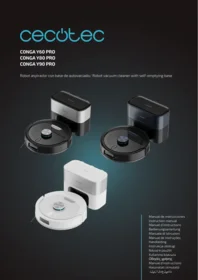
USER MANUAL Conga 7690 Immortal Max Home M CECOTEC
cecòtec
Safety instructions 8
-
Parts and components 63
-
Before use 64
-
Operation 66
-
Cleaning and maintenance 70
-
Troubleshooting 72
-
Technical specifications 75
-
Disposal of old electrical
and electronic appliances 75
-
Technical support and warranty 75
-
Copyright 76
-
Declaration of conformity 76
SOMMAIRE
EU01_107140_Conga 7690 Immortal Max Home
EN · The coding in this manual is generic and applies to all code variants of the appliance.
Read these instructions thoroughly before using the appliance. Keep this instruction manual for future reference or new users.
- This appliance must be used in accordance with these operating instructions. Cecotec will not be held liable or responsible for any damages or injuries caused by improper use.
- Make sure that the mains voltage matches the voltage stated on the rating label of the appliance and that the wall outlet is earthed.
- Check the power cable regularly for visible damage. If the
cable is damaged, it must be replaced by the official Cecotec Technical Support Service in order to avoid any type of danger.
- This appliance is designed for domestic use only and is not intended for bars, restaurants, farmhouses, hotels, motels, and offices.
- Do not attempt to repair the appliance yourself. Contact the official Cecotec Technical Support Service for advice.
- Do not use the appliance to vacuum liquids, lit matches, cigarette ends, hot ash, or on wet surfaces.
- Do not use this appliance on concrete, asphalt, or other rough surfaces.
- Stop using the appliance if you notice an abnormal sound or sense a temperature higher than usual.
- Do not block the appliance openings or airflow. Keep openings free of any objects, and do not block them with clothes or your fingers.
- Turn off and unplug the appliance from the mains supply when it is not going to be used for a long period of time, before cleaning or repairing, before attaching components, and before removing the battery. Pull from the plug, not the cable, to disconnect it from the outlet.
- WARNING: the appliance has rotating parts which may pose a risk of entrapment. Exercise extreme caution.
- Do not immerse the cable, plug, or any other part of the appliance in water or any other liquid or expose electrical connections to water. Make sure your hands are dry before handling the plug or switching on the device.
- This appliance can be used by children aged 8 years and above and people with reduced physical, sensory, or mental capabilities or lack of experience and knowledge if they have been given supervision or instruction concerning use of the
appliance in a safe way and understand the hazards involved. Children must not play with the device. Cleaning and user maintenance should not be carried out by unsupervised children.
- Never touch the cable or the power socket with wet hands.
- Do not expose the appliance to direct sunlight, fire, water, or moisture.
- Do not sit or place sharp or heavy objects on top of the appliance.
- Before operating the robot vacuum cleaner, prepare the room and supervise it. To do so, remove any objects and cables that may affect its operation.
- Keep the appliance away from clothing, curtains, and similar materials.
- Always place the appliance on a flat and stable surface. Avoid placing it on unstable surfaces it could fall from (such as tables or chairs).
- Before switching on the robot vacuum cleaner, check that all connections, both on the robot and on the self-emptying base, are in good condition.
- Avoid operating the robot vacuum cleaner under extremely high or low temperatures.
- The appliance must only be used with the battery supplied with the appliance or with compatible charging units approved by Cecotec.
- Non-rechargeable batteries must not be recharged.
- Make sure the appliance is not plugged to a mains socket before cleaning it or carrying out maintenance on it.
- Make sure the self-emptying base is not connected to a power outlet before cleaning.
Battery instructions
- This appliance includes a Li-ion battery. Do not incinerate or expose it to high temperatures, as it may explode.
- Batteries may leak under extreme conditions. Should that be the case, do not touch the liquid. If the liquid gets into contact with skin, wash immediately with soap and water. If the liquid gets into the eyes, wash them immediately with clean water for a minimum of 10 minutes and seek medical attention. Wear gloves when handling the battery or cells and dispose of it immediately in accordance with local regulations.
- Avoid contact between batteries and small metal objects such as paper clips, coins, keys, nails, or screws.
- Never modify the battery in any way.
- Batteries must be removed from the appliance for safe disposal.
- Keep batteries out of the reach of children if they can be swallowed.
- Battery ingestion can cause burns, perforation of soft tissue, and death. It can cause severe burns within two hours of the ingestion.
- In case of battery ingestion, please seek medical help immediately.
- WARNING: to recharge the battery, use only the self-emptying base supplied with the appliance.
- The batteries' supply terminals must not be short-circuited.
- Non-rechargeable batteries must not be recharged.
- The batteries' supply terminals must not be short-circuited.
- If the appliance is to be stored for a long period of time, it is advisable to remove the batteries.
- Batteries must be inserted in the correct position. Pay attention to polarity when inserting it.
INSTRUCTIONS DE SÉCURITÉ
- Back Home button
- Start/Pause button
- Laser
- Bumper
- Top cover
- Mixed-tank release button
- Free-fall sensors
- Side brush
- Drive wheels
- Mixed tank
- Charging terminals
- Omnidirectional wheel
- Main brush
- Battery
Robot vacuum cleaner accessories. Fig. 1.2:
- Self-emptying base
- Power cord
- Mop (x2)
- Instruction manual
- Self-cleaning brush
- Side brush
Self-emptying base.Fig. 2:
- Power cord
- Dirt-disposal bag
- Cover
- LED indicator light
- Charging terminals
- Dirt collection channel
Mixed tank. Fig. 3:
- High-efficiency filter cover
- Sponge
- High-efficiency filter
- Charging terminals
- Water inlet
-
Water tank
-
Mop bracket taps
- Mop bracket
- Mop
Please note:
The graphics in this manual are schematic representations and may not exactly match the device.
2. BEFORE USE
- This robot vacuum cleaner includes a package designed to protect it during transport. Take the robot vacuum cleaner out of the box. Keep the original box and other elements in a safe place, as this will help you prevent damage to the robot vacuum cleaner when transporting it in the future. In case the original packaging is disposed of, make sure all packaging materials are recycled accordingly.
- Make sure all parts and components are included and in good conditions. If there is any piece missing or not in good condition, contact the official Cecotec Technical Support Service immediately.
- Do not remove the serial number of the appliance in order to keep a correct traceability of it in case of assistance.
Warnings
- Remove all objects around the robot vacuum cleaner such as clothing, papers, cables, curtains, or other fragile objects which may block or slow down the operation of the robot vacuum cleaner. Fig. 4
- If the room to be cleaned is near a balcony or stairs, a physical barrier should be placed to prevent the robot vacuum cleaner from falling and getting damaged, thus ensuring safe operation. Fig. 5
- Do not use the robot vacuum cleaner to vacuum up liquids. Fig. 6
- Direct exposure to sunlight or heavy light contrasts may affect the correct operation of the sensors. If this happens, the robot vacuum cleaner will cease operation. Move it to a new location for it to start operating again.
- Please note that the total height of the robot vacuum cleaner is 9,3 cm and the sensors are at the bottom, so it is advisable to prevent access to all areas below 9,3 cm to avoid damaging the laser.
Installing the robot vacuum cleaner and the self-emptying base
- Place the self-emptying base against a wall and leave a minimum free space of 1.5 metres to the front and 0.5 metres to each side. Fig. 7
-
Plug the self-emptying base to a power socket. Wind and store the remaining cable to prevent accidents.
-
Install the side brush. Fig.8
- Press and hold the Start/Pause button for a few seconds.
- When the indicator light turns on, put the robot vacuum cleaner in the self-emptying base and make sure the charging terminals of the robot match those of the base. If the indicator light is flashing blue, it means the battery is not completely charged. To ensure the maximum cleaning time, wait until the light turns into steady blue, as this indicates that the battery is fully charged and that the robot vacuum cleaner is ready to clean. Fig. 9
Note
- Take the robot vacuum cleaner to the self-emptying base if battery is low. The robot vacuum cleaner may not turn on if battery is too low.
- The robot vacuum cleaner will turn on automatically when placed in the self-emptying base.
- The robot vacuum cleaner cannot be turned off during recharge.
Installing the mixed tank. Fig. 10
- Open the water-tank silicone lid and carefully fill up the tank while avoiding spillages. Make sure the lid is properly closed. Never immerse the tank in water or other liquids.
- Install the mop on the mop bracket.
- To install the tank on the robot vacuum cleaner, follow the direction shown in figure 10 and manually press the tab and push it into the correct position. You will hear a click when it is properly fixed.
- Install the mop bracket following the direction shown in figure 10.
Recommendations
- It is not recommended to use the Scrubbing function during the first-time use.
- Do not use the Mopping function if the robot vacuum cleaner is not being supervised.
- To remove the mop bracket, press the release button and pull from it outwards.
- Uninstall the mop bracket when the robot vacuum cleaner is charging or when not in use.
- Add a few drops of cleaning agent to the water if necessary, as long as it is non-corrosive.
- Using cleaning agents in excess might block water outlets.
- In order to achieve perfect scrubbing, it is suggested to moisten the mop before using it.
First use
- Once the robot vacuum cleaner and the self-emptying base are installed, follow the steps below before the first cleaning.
- First of all, fully charge the robot vacuum cleaner. It is suggested to allow the robot to charge overnight. Once fully charged, it may carry out the first cleaning cycle and save the first map. To do so, activate the Auto mode and select the Eco suction level. It is very important to follow these instructions so that the robot vacuum cleaner recognises every corner of your house and can carry out a complete mapping of it.
- If your house is very large and the robot vacuum cleaner runs out of battery, it will return to the self-emptying base, save both complete and incomplete maps, and, once recharged, it will resume cleaning where it left off until the entire cleaning surface has been mapped. The robot vacuum cleaner is constantly mapping, so it adapts in an individual and personalised way to the particularities of each home and constantly improves its map.
About the self-emptying base
- The self-emptying base includes a loading and emptying function and a new dirt-disposal bag. After cleaning, the robot will automatically return to the self-emptying base to recharge. The self-emptying base will empty the dirt tank based on the emptying scheduled selected on the app.
- If the robot vacuum cleaner is charging in the self-emptying base, you can force the robot to self-empty. Press the Back Home button for the self-emptying base to empty the dirt tank.
3. OPERATION
Robot vacuum cleaner's buttons
Auto Mode
- Press the Start/Pause button on the robot vacuum cleaner or select it in the app to make it start cleaning automatically in Edge mode and then perform a cleaning cycle in an orderly zigzag pattern while it also recognises which areas have been cleaned and which have not. The robot vacuum cleaner will automatically plan the cleaning route during cleaning.
- If you control the robot vacuum cleaner manually during this mode, the robot will recalculate the route, so it may pass through already cleaned areas. To ensure efficient cleaning, do not operate the robot vacuum cleaner manually during automatic cleaning.
- Thanks to its Total Surface 2.0 technology, if the battery is low during the cleaning cycle, the robot vacuum cleaner will smartly return to the self-emptying base automatically and, once fully charged, it will resume the cleaning process from the same point.
- During cleaning, the robot vacuum cleaner will stop briefly to evaluate the area and calculate the cleaning route (this stop will vary depending on the house conditions).
Back Home mode
- Press the Back Home button on the robot vacuum cleaner or from the app to send the robot vacuum cleaner to the self-emptying base. The robot vacuum cleaner will stop vacuuming until it reaches the base.
- This mode can be activated during any cleaning cycle.
- The robot vacuum cleaner will take the shortest route back to the self-emptying base thanks to its map-memorisation feature and the smart Back Home function.
- Upon completing a cleaning cycle or when the battery is low, thanks to its TotalSurface 2.0 technology, the robot vacuum cleaner will automatically return to the self-emptying base to avoid running out of battery. Once the robot has recharged, it will resume cleaning from the point it has stopped.
Note
The robot vacuum cleaner will not be able to return to the self-emptying base if it can't easily access it. If this happens, manually place it in the self-emptying base.
Functions
Pause
While the robot vacuum cleaner is operating, press the Start/Pause button on the robot vacuum cleaner or select it in the app to pause the cleaning process. Press the Start/Pause button on the robot vacuum cleaner or on the app to resume the cleaning process.
Standby
- The robot vacuum cleaner will automatically enter standby mode after 10 minutes of inactivity.
- Press the Start/Pause button on the robot vacuum cleaner or in the app to activate it again.
Cleaning modes
- The robot vacuum cleaner includes different modes and functions that can be enabled through the app.
- In addition, in every one of the cleaning modes on the app, you will be able to select the Turbo mode on carpets, which activates the maximum suction power when the robot vacuum cleaner detects a carpet.
Edge Mode
- When this mode is selected, the robot vacuum cleaner will clean along walls and around furniture (e.g., table or chair legs).
- Press the edge cleaning mode in the app.
Spiral mode
- When this mode is enabled, the robot vacuum cleaner will thoroughly clean a specific area. It will start cleaning at a specific spot and will move outwards in a spiral motion, and it will return to the starting spot in an inwards spiral motion again.
- Once finished, the robot vacuum cleaner will return to the self-emptying base directly.
- Before using this mode, place it in the spot you wish to clean.
- Select the spiral cleaning mode on the app.
Square Spiral mode
- When this mode is enabled, the robot vacuum cleaner will thoroughly clean a specific area. It will start cleaning at a specific spot and will move outwards in a square-spiral motion, and it will return to the starting spot in an inwards square-spiral motion.
- Once finished, the robot vacuum cleaner will return to the self-emptying base directly.
- Before using this mode, place it in the spot you wish to clean.
- Select the spiral cleaning mode on the app.
Scrubbing mode
- Attach the mop to the bracket and the latter to the mixed tank. Fill up the water tank.
- Insert the mixed tank into the robot vacuum cleaner and select the cleaning mode and scrubbing level in the application: off, low, medium, or high.
- Once you have selected the desired scrubbing level, the robot vacuum cleaner will start the All in One function to vacuum, scrub, and sweep simultaneously thanks to its mixed tank.
Note
- If you wish to mop, do not fill the water tank.
- To ensure a perfect scrubbing from the start, it is suggested to dampen the mop evenly with water before fixing it to the mixed tank. It is also recommended to wash the mop after every use.
- It is recommended to be present when the robot vacuum cleaner is scrubbing.
- When the robot vacuum cleaner returns to the self-emptying base, the mop must be removed. Do not leave the robot vacuum cleaner charging with the mop assembled.
Manual mode
The robot vacuum cleaner can be moved manually by selecting manual mode in the app and using the arrow keys.
Back Home mode
Press the Back Home button on the robot vacuum cleaner or from the app to send the robot to the self-emptying base during any cleaning mode. The robot vacuum cleaner will stop vacuuming until it reaches the self-emptying base.
Smart Area mode
- Once the home's map has been saved, select this mode for the robot to clean a specific area in zigzag motion. Once finished cleaning the selected area, the robot vacuum cleaner will return directly to the self-emptying base. You can select up to 5 different areas on the map. The robot vacuum cleaner will only clean the area selected on the map. It will therefore go to the selected area and return to the base without vacuuming.
- You can select up to two cleaning repetitions for the selected areas. The second cleaning will be carried out in a vertical zigzag motion.
- To activate this mode, select the Smart Area option on the app.
Room Mode
- Once the map of the house has been saved, select this mode for the robot to clean specific rooms in zigzag motion. Once done cleaning the selected rooms, the robot vacuum cleaner will directly return to the self-emptying base. The cleaning of the selected rooms will be carried out based on selection order. The robot vacuum cleaner will only clean the area selected on the map, therefore it will go to said area and return to the self-emptying base without vacuuming.
- To activate this mode, select the Room cleaning option on the app.
Spot mode
- Select this mode if you want to thoroughly clean a specific point in the map, making the most of the robot vacuum cleaner's maximum power. The robot vacuum cleaner will clean an area of 1.6 m x 1.6 m in a zigzag pattern and return directly to the self-emptying base once finished. The robot vacuum cleaner will only clean the area selected on the map, therefore it will go to said area and return to the self-emptying base without vacuuming.
- To activate this mode, select the spot cleaning option on the app.
Restricted Area mode
- Select this mode and mark out specific areas on the map that you do not want the robot vacuum cleaner to clean. You can select more than one restricted area on the map.
- To activate this mode, select the Restricted Area cleaning option on the app.
Complete Cleaning mode
- Select this mode to perform a deep cleaning of your house. The robot vacuum cleaner will clean in Edge mode and continue zigzagging horizontally and vertically. It will then return to the self-emptying base.
- To activate this mode, select the Complete Cleaning option on the app.
Power Level function
Select the power level on the app to control the robot vacuum cleaner's suction power during cleaning. There are four suction power levels: Off, Eco, Normal, and Turbo.
Cleaning schedule
- To make cleaning easier, the robot vacuum cleaner has a function that allows it to be programmed daily from the app. According to the setting, the robot vacuum cleaner will automatically start cleaning in the selected days at the desired time.
- Before setting the time and the options on the robot vacuum cleaner, make sure it is on.
Other Functions
Sleep function
The robot vacuum cleaner can be assigned a do-not-disturb time slot, which can be modified or canceled from the mobile APP. During the set time, the robot vacuum cleaner will disable the automatic, continuous cleaning and timer functions.
Map Editing function
This function allows you to edit generated maps: rename cleaning areas, split or combine areas, and edit cleaning mode, suction power, and scrubbing level in each selected area.
Robot vacuum cleaner's Location function
Allows to locate the robot vacuum cleaner on the map.
4. CLEANING AND MAINTENANCE
Main brush
The main brush spins at top speed and helps pushing the dirt into the suction mouth. This brush is in contact with the floor and therefore with the dirt, so it can wear out over time, affecting the cleaning efficiency. For this reason, it is suggested to replace the main brush after a maximum of 320 hours or less.
- Slightly press the main brush frame's tabs to open the main brush compartment and remove it. Fig. 11
- Remove hair, lint, and other dirt trapped in the brush and around the shafts with the help of the self-cleaning brush. Fig. 12
- Clear and clean the robot vacuum cleaner's suction channel.
- Reinstall the main brush and its frame.
Recommendation
It is recommended to clean the main brush once a week with the help of the self-cleaning brush.
Side brush. Fig. 13
The side brush is designed with many bristles that push dirt into the suction mouth and thoroughly clean edges and corners. This brush may wear out overtime, which will negatively affect cleaning efficiency.
Recommendation
- It is recommended to clean the side brush once a week with the help of the self-cleaning brush.
- Remove the side brush by pulling it outwards and clean it regularly.
Recommendation
To ensure perfect cleaning, it is recommended to change the side brush every 3 months (depending on frequency and type of use).
Mixed tank. Fig. 14:
- Remove the mixed tank.
- Open the mixed tank cover and empty it.
- Remove the filter and filter holder as shown in Figure 14.
- Use the self-cleaning brush to clean the inside of the mixed tank.
- You can clean the dirt tank with water, without immersing the tank. Male sure the tank is completely dry before re-installation to prevent water to reach the motor and damage the robot vacuum cleaner.
- Reinstall the mixed tank on the robot vacuum cleaner.
High-efficiency filter. Fig. 15:
- The high-efficiency filter is designed with fibres that help trap dust particles, dust mites, pollen, etc. It is very important to periodically clean the filter, to prevent these particles from building up in the filter, causing efficiency loss. It is convenient to carry out this maintenance once a week.
- Replace the high-efficiency filter every 3 months, depending on the frequency and type of use.
Recommendation
You can remove dirt from the high-efficiency filter with a small brush or gently shake the filter on a hard surface to remove the dust. The high-efficiency filter cannot be washed.
Primary mesh filter and sponge filter
The filtering system is featured with a primary mesh filter and a sponge filter, located next to the high-efficiency filter. It is suggested to replace them either after a maximum of 160 hours of use or when they are worn out due to operation.
Recommendation
Dirt can be removed with a small brush or by shaking carefully against a hard surface for dust to fall off. You can also use warm water without detergents to obtain better results. Always make sure they are completely dry before installing them again; otherwise, moisture can reach the robot vacuum cleaner's motor and damage it.
Cleaning the free-fall sensors
Use a clean, dry, and soft cloth to wipe off any dust from the free-fall sensors located on the robot vacuum cleaner's lower part.
Sensors. Fig. 16
- The robot vacuum cleaner has different types of sensors, for example, proximity sensors that allow the robot to move around while detecting obstacles, or free-fall sensors that help the robot detect slopes or possible gaps/unevenness such as staircases. These sensors are always in contact with dust particles, and therefore can deteriorate over time, causing possible navigation errors.
- It is recommended to clean all sensors of the robot vacuum cleaner every 35 hours of use or less, using a soft, dry cloth.
Self-emptying base. Fig. 17
Likewise, the self-emptying base includes charging terminals and a signal transmission zone. Use a clean, dry, soft cloth to wipe dust from these areas.
Charging and replacing the battery
To extend battery life, leave the robot vacuum cleaner charging on the self-emptying base whenever not in use.
Remove the battery and store it in a safe, dry place if the robot vacuum cleaner will not be used for a long period of time.
To replace the battery, follow the instructions below:
- Unscrew the screws on the lower housing, remove the latter, and take out the battery.
- Insert the new battery.
- Put the battery and the lower housing back in place and re-tighten the screws.
5. TROUBLESHOOTING
Robot vacuum cleaner
| Problem | Possible cause and solution |
| The robot vacuum cleaner does not switch on or does not clean. | The robot vacuum cleaner does not work when battery is low.Allow it to charge before operation. |
| The room temperature is below 0 °C or above 40 °C. |
| The robot vacuum cleaner isn't charging or returning to the self-emptying base. | There are too many obstacles near the self-emptying base. Relocate the base to an obstacle-free area. |
| Clean the charging terminals of the robot vacuum cleaner and the self-emptying base. | |
| Make sure the robot vacuum cleaner is switched on. | |
| The robot vacuum cleaner is too far away from the self-emptying base. Place it closer and try again. | |
| The robot vacuum cleaner makes a strange noise during operation. | The main brush, side brush, or omnidirectional wheel are blocked or tangled. Stop the robot vacuum cleaner and clean them. |
| The robot vacuum cleaner does not clean efficiently or doesn't pick up all the dirt. | The tank is full. Empty it and clear the high-efficiency filter if it is blocked. |
| The high-efficiency filter is blocked. Clean it. | |
| The main brush is blocked or tangled. Clean it. | |
| The robot vacuum cleaner could not connect to the Wi-Fi network. | Bad Wi-Fi signal. Check that the robot vacuum cleaner is located in an area with good Wi-Fi signal. |
| The Wi-Fi connection is unstable. Reset the router, check if there are any App updates, and try again. | |
| Make sure that your smartphone mobile data are disabled to improve the linking process. | |
| The robot vacuum cleaner did not carry out the scheduled cleaning task. | Check if the robot vacuum cleaner is in Sleep mode and change mode. This option can be found on the general settings of the robot vacuum cleaner and allows you to define time slots in which the robot will not perform the scheduled cleaning tasks when in Sleep mode. |
| Ensure proper connection of the robot vacuum cleaner to the Wi-Fi: you will not be able to carry out scheduled cleaning without connection and with a low battery. | |
| The robot vacuum cleaner does not return to the self-emptying base after finishing Spot cleaning or changing the starting position. | The robot vacuum cleaner will map and calculate a new route after running in Spot cleaning mode or after changing its starting position. |
| If the self-emptying base is too far away from the robot vacuum cleaner, the latter won’t be able to return to the base. Manually move the robot vacuum cleaner close to the self-emptying base. | |
| The robot vacuum cleaner does not resume cleaning. | Make sure the robot vacuum cleaner is not in Sleep mode, as it will not resume cleaning in this mode. |
| When manually placed in the self-emptying base, the robot will not resume cleaning. | |
| The robot vacuum cleaner is always offline. | Make sure the robot is successfully connected to the network and always in areas with a good Wi-Fi signal. |
| The connection between the smartphone and the robot vacuum cleaner failed. | Make sure the robot vacuum cleaner and the self-emptying base are in an area with good Wi-Fi signal, reset the router, and retry connection. |
Self-emptying base
| Problem | Possible cause and solution |
| The self-emptying base flashes in red. | The dirt-disposal bag is not installed or incorrectly fitted. Check that the bag is correctly fitted. |
| The dirt-disposal bag is full or the dirt collection channel is blocked. Check if the dirt-disposal bag is full and if so, replace it with a new one. If the issue persists, check for foreign objects blocking the dirt collection channel of the self-emptying base. If so, unscrew the transparent cover and remove the obstruction. | |
| The fan of the self-emptying base doesn't start. Frequent dust collection can lead to overheating of the fan guard or failure. It is recommended to wait 30 minutes before resuming use. | |
| No indicator light turns on | No power supply or damaged plug. Make sure the self-emptying base is connected to the mains and that the plug isn't damaged. Should the latter occur, please contact the official Cecotec Technical Support Service. |
6. TECHNICAL SPECIFICATIONS
Model: Conga 7690 Immortal Max Home
Product reference: EU01_107140
Voltage: 100-240 V \~ 50/60 Hz
Rechargeable Li-ion battery
Rated capacity: 14.4 V = 3200 mAh
Wi-Fi connection: Wi-Fi connection: Wi-Fi IEEE802.11b/g/n 2.4Ghz/5Ghz/ Bluetooth 5.0
Maximum power transmission: 20 dBm
Product: Self-emptying base
Input: 220-240 V \~ 50/60 Hz
Output: 19 V DC, 0.7 A
Power: 680W
Technical specifications may change without prior notification to improve product quality Made in China | Designed in Spain
7. DISPOSAL OF OLD ELECTRICAL AND ELECTRONIC APPLIANCES
This symbol indicates that, according to the applicable regulations, the appliance and/or batteries must be disposed of separately from household waste. When this product reaches the end of its shelf life, you should dispose of the cells/batteries/accumulators and take them to a collection point designated by the local authorities.
For detailed information on the most appropriate way to dispose of electrical and electronic equipment and/or batteries, consumers should contact their local authorities.
Compliance with the above guidelines will help protecting the environment.

8. TECHNICAL SUPPORT AND WARRANTY
Cecotec shall be liable to the end user or consumer for any lack of conformity that exists at the time of delivery of the product under the terms, conditions, and deadlines established by the applicable regulations.
Repairs should be carried out by qualified personnel.
If at any moment you detect any problem with your product or have any doubt, do not hesitate to contact the official Cecotec Technical Support Service at +34 96 321 07 28.
9. COPYRIGHT
The intellectual property rights over the texts in this manual belong to CECOTEC INNOVACIONES, S.L. All rights reserved. The contents of this publication may not, in whole or in part, be reproduced, stored in a retrieval system, transmitted, or distributed by any means (electronic, mechanical, photocopying, recording or similar) without the prior authorization of CECOTEC INNOVACIONES, S.L.
10. DECLARATION OF CONFORMITY

Cecotec Innovaciones hereby declares that this robot vacuum cleaner, model EU01_107140 Conga 7690 Immortal Max Home is in conformity with the Radio Equipment Directive 2014/53/EU.
The full text of the EU Declaration of Conformity can be found on the following website: https://cecotec.es/es/information/declaration-of-conformity
1. PIÈCES ET COMPOSANTS
Img. 1.1.
https://storececotec.it/it/information/declaration-of-conformity
1. PEÇAS E COMPONENTES
Fig. 1.1:
https://cecotec.pt/pt/information/declaration-of-conformity
1. ONDERDELEN EN COMPONENTEN
Fig. 1.1:
5. PROBLEEMOPLOSSING
Robotstofzuiger
https://cecotec.es/es/information/declaration-of-conformity
1. CZĘŚCI I KOMPONENTY
Rys. 1.1:
https://cecotec.es/es/information/declaration-of-conformity
https://cecotec.es/es/information/declaration-of-conformity

Fig./Img./Abb./Afb./Rys./Obr. 1.1

Fig./Img./Abb./Afb./ Rys./Obr. 1.2
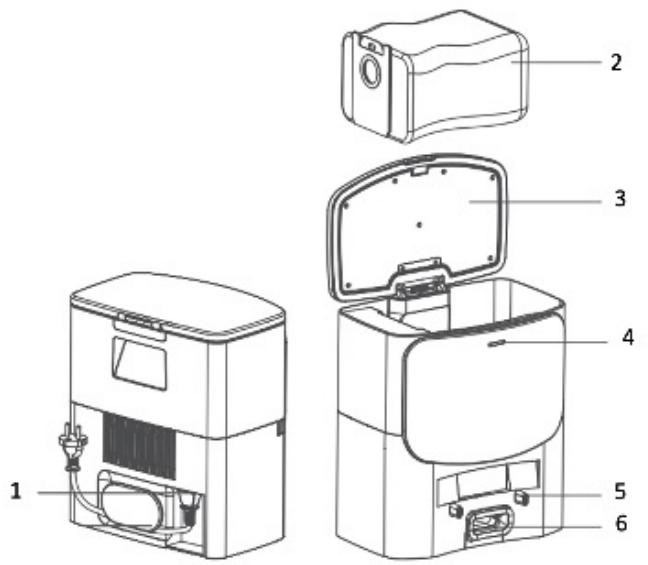
Fig./Img./Abb./Afb./Rys./Obr.2
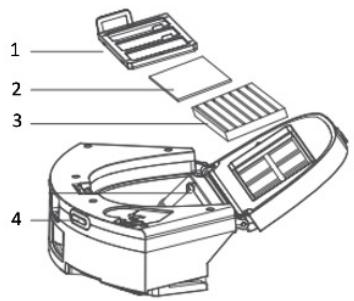


Fig./Img./Abb./Afb./Rys./Obr. 3
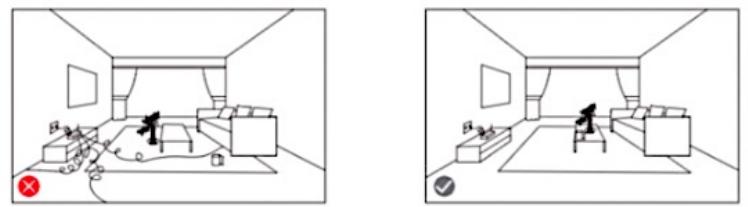
Fig./Img./Abb./Afb./Rys./Obr. 4
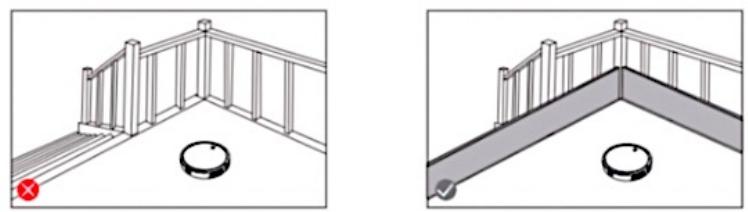
Fig./Img./Abb./Afb./Rys./Obr. 5
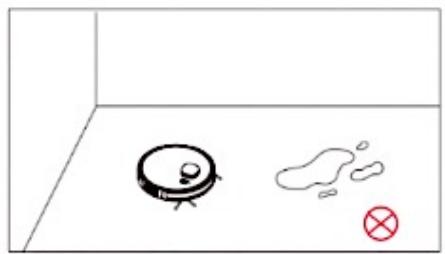
Fig./Img./Abb./Afb./ Rys./Obr. 6
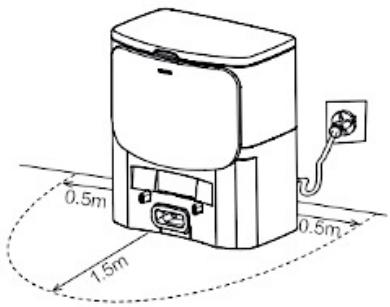
Fig./Img./Abb./Afb./ Rys./Obr. 7

Fig./Img./Abb./Afb./ Rys./Obr. 8

Fig./Img./Abb./Afb./ Rys./Obr. 9

Fig./Img./Abb./Afb./Rys./Obr. 10

Fig./Img./Abb./Afb./ Rys./Obr. 11

Fig./Img./Abb./Afb./ Rys./Obr. 12

Fig./Img./Abb./Afb./Rys./Obr. 13
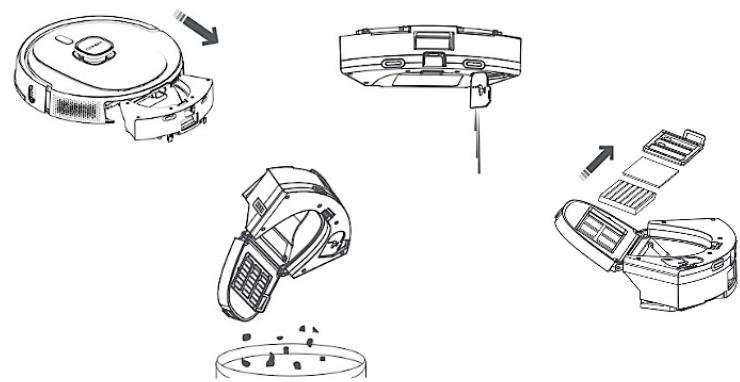
Fig./Img./Abb./Afb./ Rys./Obr. 14
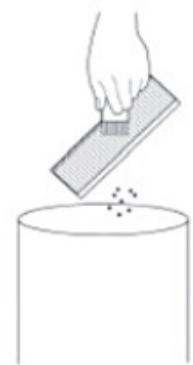
Fig./Img./Abb./Afb./ Rys./Obr. 15

Fig./Img./Abb./Afb./Rys./Obr. 16

Fig./Img./Abb./Afb./ Rys./Obr. 17
www.cecotec.es
- SOMMAIRE
- Battery instructions
- INSTRUCTIONS DE SÉCURITÉ
- Robot vacuum cleaner accessories. Fig. 1.2:
- Self-emptying base.Fig. 2:
- Mixed tank. Fig. 3:
- BEFORE USE
- Warnings
- Installing the robot vacuum cleaner and the self-emptying base
- Note
- Installing the mixed tank. Fig. 10
- Recommendations
- First use
- About the self-emptying base
- OPERATION
- Robot vacuum cleaner's buttons
- Auto Mode
- Back Home mode
- Functions
- Pause
- Standby
- Cleaning modes
- Edge Mode
- Spiral mode
- Square Spiral mode
- Scrubbing mode
- Manual mode
- Smart Area mode
- Room Mode
- Spot mode
- Restricted Area mode
- Complete Cleaning mode
- Power Level function
- Cleaning schedule
- Other Functions
- Sleep function
- Map Editing function
- Robot vacuum cleaner's Location function
- CLEANING AND MAINTENANCE
- Main brush
- Recommendation
- Side brush. Fig. 13
- Mixed tank. Fig. 14:
- High-efficiency filter. Fig. 15:
- Primary mesh filter and sponge filter
- Cleaning the free-fall sensors
- Sensors. Fig. 16
- Self-emptying base. Fig. 17
- Charging and replacing the battery
- TROUBLESHOOTING
- TECHNICAL SPECIFICATIONS
- DISPOSAL OF OLD ELECTRICAL AND ELECTRONIC APPLIANCES
- TECHNICAL SUPPORT AND WARRANTY
- COPYRIGHT
- DECLARATION OF CONFORMITY
- PIÈCES ET COMPOSANTS
- PEÇAS E COMPONENTES
- Fig. 1.1:
- ONDERDELEN EN COMPONENTEN
- PROBLEEMOPLOSSING
- CZĘŚCI I KOMPONENTY
- Rys. 1.1:
Brand : CECOTEC
Model : Conga 7690 Immortal Max Home M
Category : Robot vacuum