Lavadora Bolero Dresscode 6000n - Washing machine CECOTEC - Free user manual and instructions
Find the device manual for free Lavadora Bolero Dresscode 6000n CECOTEC in PDF.


| Product type | Front-loading washing machine |
| Washing capacity | 8 kg |
| Maximum spin speed | 1400 rpm |
| Energy class | A+++ |
| Water consumption per cycle | 50 L |
| Annual energy consumption | 190 kWh |
| Noise level (wash) | 53 dB(A) |
| Noise level (spin) | 77 dB(A) |
| Number of programs | 15 |
| Special programs | Quick wash, cotton, synthetics, delicates, wool, steam |
| Additional functions | Delayed start, pre-wash, extra rinse |
| Height | 85 cm |
| Width | 60 cm |
| Depth | 60 cm |
| Net weight | 72 kg |
| Power supply | 220-240 V, 50 Hz |
| Rated power | 2200 W |
| Child safety | Yes (key lock) |
| Leak protection system | Integrated anti-leak system |
| Drum cleaning | Automatic cleaning program |
| Filter maintenance | Accessible filter at bottom right |
| Repairability | Repairability index 8.0/10 |
| Spare parts available | Yes, via Cecotec after-sales service |
Frequently Asked Questions - Lavadora Bolero Dresscode 6000n CECOTEC
User questions about Lavadora Bolero Dresscode 6000n CECOTEC
0 question about this device. Answer the ones you know or ask your own.
Ask a new question about this device
Download the instructions for your Washing machine in PDF format for free! Find your manual Lavadora Bolero Dresscode 6000n - CECOTEC and take your electronic device back in hand. On this page are published all the documents necessary for the use of your device. Lavadora Bolero Dresscode 6000n by CECOTEC.
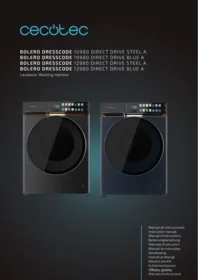
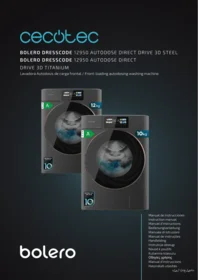
USER MANUAL Lavadora Bolero Dresscode 6000n CECOTEC
| Instrucciones de seguridad | 4 |
| Safety instructions | 8 |
| Instructions de sécurité | 11 |
| Sicherheitshinweise | 15 |
| Istruzioni di sicurezza | 19 |
| Instruções de segurança | 23 |
| Veiligheidsvoorschriften | 27 |
| Instrukcje bezpieczeństwa | 31 |
| Bezpečnostní pokyny | 34 |
ÍNDICE
- Parts and components 55
- Before use 55
- Product installation 56
- Operation 57
- Cleaning and maintenance 65
- Troubleshooting 67
- Technical specifications 69
- Disposal of old electrical appliances 69
- Technical support and warranty 69
- Copyright 70
SOMMAIRE
- Read these instructions thoroughly before using the appliance. Keep this instruction manual for future reference or new users.
- Make sure that the mains voltage matches the voltage stated on the rating label of the appliance and that the wall outlet is grounded.
- If the supply cord is damaged, it must be replaced by the Technical Support Service of Cecotec or by a similarly qualified person in order to avoid a hazard.
- This appliance is for indoor use only.
- Make sure the device is installed in places where the temperature is above 0^ C.
- The device is not designed for built-in installation.
- The new hoses set supplied with the appliance are to be used, do not reuse old hoses.
- Before carrying out any maintenance in the device, unplug the appliance from the mains.
- As a safety measure, we advise you to unplug the device and cut the water supply after every use. Maximum water inlet pressure: 1 MPa. Minimum water inlet pressure: 0.05 MPa.
- Never pull out the power plug with your hands wet.
- Unplug the power cord before cleaning or repairing the product.
- For safety reasons, the appliance must be properly earthed.
- Water channelling and electrical devices must be connected by a qualified technician in accordance with the local and national safety regulations by the manufacturer.
-
The glass door may reach high temperatures during operation. Keep children and pets away from the machine during the operation.
-
Do not operate the device in very wet rooms or in rooms with explosive or caustic gas.
- If the room where the washing machine is located has any type of device that generates fumes from the burning of fuels, make sure that there is proper ventilation, as the accumulation of these fumes may cause a fire hazard.
- Do not wash items that have been soiled with substances such as cooking oil, acetone, alcohol, petrol, kerosene, creams or lotions commonly found in specialized skin care stores or massage parlours, turpentine or wax.
- We do not recommend washing foam rubber products, shower caps, waterproof garments, items or garments lined with rubber, or pillows with foam rubber padding.
- Fabric softeners or similar products should be used as specified by manufacturer.
- Do not wash articles that have been cleaned in, washed in, soaked in, or stained with flammable or explosive substances, like wax, oil, paint, petrol, degreasers, dry-cleaning solvents, kerosene, etc., which may result in fire or explosion.
- When washing fabrics that contain vegetable or cooking oil or have been contaminated by haircare products, they should first be washed in hot water with extra detergent. This will reduce, but not eliminate, the hazard.
- The openings must not be obstructed by a carpet.
- Appliances with a single inlet valve can only be connected to a cold water supply. Appliances with a double inlet valve must be correctly connected to a hot water and cold water supply (depending on the washing machine model).
- The plug must be accessible after installation.
-
The appliance must not be installed behind a lockable door, a sliding door or a door with a hinge on the opposite side to that of the device.
-
The appliance shall not be installed in a humid place.
- The product is exclusive for household use and is only designed for the textiles suitable for machine washing.
- Do not stand or sit on the machine.
- Do not lean against the machine door.
- Flammable and explosive or toxic solvents are forbidden. Petrol, alcohol, etc. shall not be used as detergents. Use only detergents suitable for machine washing, especially those which are dosed directly in the drum.
- Do not stop the device before ending the washing cycle. In any case, if this should happen, remove the garments with caution as they may reach high temperatures.
- Once the washing cycle has finished, we recommend removing the laundry as soon as possible to prevent creases.
- This appliance can be used by children aged 8 and above, and persons with reduced physical, sensory or mental capabilities or lack of experience and knowledge, as long as they have been given supervision or instruction concerning the use of the appliance in a safe way and understand the hazards involved. Do not allow children to play with the appliance. The cleaning and maintenance of the appliance should not be carried out by children without supervision.
- Children should be supervised to make sure that they do not play with the appliance.
- Children under 3 years old must stay away from the washing machine, unless they are constantly supervised.
Cautions during the handling of the machine
- If you wish to change the location of the washing machine, make sure you install the transport bolts again on the device, as they will ensure the interior of the product is not damaged during transport.
- The accumulated water shall be drained out of the machine.
- Handle the machine carefully. Never hold protruded parts of the machine while lifting it. The machine door cannot be used as the handle during transport.
- This appliance is very heavy. Transport it with care.
- Secure the drain and water supply hoses correctly.
- Do not force the door when closing it. If you find it difficult to close the door, please check if the laundry is well distributed and introduced.
- It is forbidden to wash carpets.
- Never pour water manually during washing.
INSTRUCTIONS DE SÉCURITÉ
- Top cover
- Control panel
- Power cord
- Drum
- Service filter
- Drain hose
- Door
- Detergent tank
- Water supply hose
Accessories
Fig. 2.
- Transport hole plug
- Cold water supply hose
- Hot water supply hose (optional)
- Drain hose bracket (optional)
- Instruction manual
2. BEFORE USE
- Unpack the appliance and keep the original packaging and materials in a safe place. It will help prevent any damage if the product needs to be transported in the future. In case the original packaging is disposed of, make sure all packaging materials are recycled accordingly.
- Make sure all parts and accessories are present and in good conditions. If some are missing or not in the best condition, contact the Technical Support Service of Cecotec immediately.
- Keep all packaging materials away from children.
- Before using the wash machine, the product shall be calibrated.
- Before washing the clothes for the first time, the product shall be operated in a complete cycle without the clothes inside.
- Make sure that all pockets are empty. Sharp and rigid items such as coins, brooches, nails, screws or stones may cause serious damage to this machine.
3. PRODUCT INSTALLATION
- Place the device on a flat, stable and dry surface. Make sure the product does not stand on the power cord. Fig. 3.
- Avoid direct sunlight and ensure sufficient ventilation. Fig. 4.
- Remove the cardboard box and Styrofoam packing.
- Lift the washing machine and remove the base packing. Make sure the small triangle foam is removed with the bottom one together. If not, lay the unit down on one of the sides, then remove the small foam from the unit bottom manually. Fig. 5.
- Remove the tape securing the power supply cord and drain hose.
- Remove the water supply hose from the drum.
Removing the transport bolts
- The transport bolts must be removed from the backside of the device before installing the washing machine.
- The transport bolts will be necessary again when moving the product, so make sure they are kept in a safe place.
In order to remove the bolts: Fig. 6.
- Loosen the 4 bolts with a spanner and then remove them.
- Cover the holes with the transport hole plugs in the box.
- Keep the transport bolts properly for future use.
Levelling the washing machine
Warning
The lock nuts on all four feet must be screwed tightly against the housing.
- Check if the legs are closely attached to the cabinet. If not, please turn them to their original position and tighten the nuts.
- Loosen the lock nuts to turn the feet until they are in contact with the floor.
- Adjust the feet and tighten the washers with a spanner. Make sure the machine is steady. Fig. 7.
Water supply hose connection
Warning
Do not kink, crush, modify or repair the water supply hose.
For the models equipped with a hot valve, connect it to a hot water tap with the hot water supply hose. Energy consumption will decrease automatically for some programmes. (Only for some models).
Connect the water supply hose following one of the 2 methods:
Connection between an ordinary tap and the water supply hose.
Fig. 8.
- Loosen the clamp nut and four bolts.
- Tighten the clamp nut.
- Press and slide the hub and insert the water supply hose in the connection base.
- Connection finished.
Connection between a screw tap and the water supply hose. Fig. 9.
- Screw tap and water supply hose.
- Special tap for washing machine.
Connect the other end of the water supply hose to the inlet valve in the rear part of the product and fasten the pipe tightly clockwise. Fig. 10.
Drain hose
Note:
Do not kink or protract the drain hose.
Position the drain hose properly, at 60-90 cm from the floor.
There are two ways to place the end of the drain hose:
- In a drain pipe. It is recommended to use a vertical tube.
- In a sink's drain pipe, over the trap. Fig. 11.
If the washing machine has a drain hose bracket (depending on the model), it can also be installed on a sink or a tank, as indicated next. Fig. 12.
Warning
When installing the drain hose, fix it properly with a rope or a clamp. If the drain hose is too long, do not force it into the washing machine as it will cause abnormal noises.
4. OPERATION
Warning
- Please make sure the appliance is properly installed before operating it.
- Before washing the clothes for the first time, the product shall be operated in a complete washing cycle without the clothes inside.
QuickStart
Before washing
-
Plug the device into a power supply.
-
Open the water supply tap.
- Load the washing machine with the laundry.
- Close the door.
- Add detergent (and softener if necessary).
Fig. 13
Note:
Detergent must be added in "case I" only after selecting pre-washing for machines with this function.
Washing
- Turn the device on.
- Turn the knob to select the desired programme.
- Select a function or use the default one.
- Press Start.
Fig. 14.
Warning
If any of the default options is selected, step 3 can be skipped.
After washing
The appliance will beep, or the display will show "End".
Using the washing machine
Before each washing
- The washing machine should be operated within a temperature range of 0-40 °C. If used under 0°C, the inlet valve and draining system may be damaged. If the machine is placed or operated in rooms at 0°C or below, it should be transferred to normal room temperature to ensure the water supply hose and drain hose are not frozen before use.
- Check the care labels and the product instructions when using detergent before washing. Use non-foaming or less-foaming detergent suitable for machine washing.
- Check the label. Fig. 15.
- Empty the pockets of the clothes to be washed. Fig. 16.
- Knot the long strips or laces, close zips or tighten button. Fig. 17.
- Place small items in washing bags. Fig. 18.
- Turn easy-pilling and long-pile fabrics inside out. Fig. 19.
- Separate clothes with different textures. Fig. 20.
Detergent tank
Fig. 21.
Pull out the detergent dispenser to open it.
- Pres-wash detergent
- Main wash detergent
- Softener
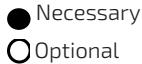
| Programme | | | | | Programme | | | | | ||
| Cotton 30°C | ● | ○ | Spin Only | ||||
| Cotton 40°C | ● | ○ | Drain Only | ||||
| Cotton 60°C | ● | ○ | Rinse & Spin | ○ | |||
| Cotton 90°C | ● | ○ | Delicate 30°C | ● | ○ | ||
| Synthetic | ● | ○ | Delicate | ● | ○ | ||
| Synthetic 40°C | ● | ○ | Quick wash 45' | ● | ○ | ||
| Drum cleaning | Quick wash 30' | ● | ○ | ||||
| Cold wash | ● | ○ | Quick wash 15' | ● | ○ | ||
| Cold wash 20°C | ● | ○ | Mix 60°C | ● | ○ | ||
| Intensive cotton 40°C | ● | ○ | Mix 40°C | ● | ○ | ||
| Intensive cotton 60°C | ● | ○ | Mix | ● | ○ | ||
| ECO 40-60 | ● | ○ |
Warning
- When using agglomerated, ropy detergent or additives, before they are poured into the detergent tank, it is suggested to use some water for dilution to prevent the inlet of detergent tank from being blocked and overflowing while filling water.
- Use a suitable type of detergent for the various washing temperatures to get the best washing performance with less water and energy consumption.
Control panel
Fig. 22.
On/off (1)
Press the On/off button to turn the device on and off.
Start/Pause (2)
Press the button to start or pause the washing cycle.
Option (3)
Select an additional function, the indicator light will turn on when selected.
Programmes (4)
Different types of programmes for different types of laundry.
Display (5)
The display shows the settings, estimated time remaining, options, and status messages of the washing machine. The display will remain on through the cycle.
Fig. 23
Selectable options
Extra Rinse (2)
The laundry will undergo extra rinse once after you select it.
Delay (1)
Press the Delay button and choose the time (the delaying time can be 0-24 h).
Spin Speed (3)
Press this button repeatedly to select the desired speed.
Child lock
- Hold down buttons (2) and (3) for 3 seconds, the device will beep indicating the Child lock function is activated. This function is designed to prevent children from misusing the appliance.
- When the child lock is activated and a programme starts, the child lock indicator will switch on, and the KL and remaining time on the display are alternately displayed.
- Every time a button is pressed, the child lock indicator will flash for 3 seconds.
- When a programme finishes, END and the child lock indicator will be displayed for 10 seconds alternately. Then, the child lock light will flash for 3 seconds.
- To cancel the child lock function, hold down both buttons for 3 seconds again.
- The child lock will disable all the buttons except for the on/off button and the Child Lock button.
- Deactivate the Child lock function before selecting a programme and starting washing.
Silent
Select this programme to mute the washing machine. Hold down button 1 for 3 seconds, this setting will remain active until it is restarted. To activate the sound again, hold down the same button for 3 seconds.
Display settings Fig. 24
These options will light up when selected for a washing cycle.
- Delay start (1)
- Extra rinse (2)
- Spin speed (3)
- Running cycle (4)
- Locked door (5)
- Child lock system (6)
- Remaining time and speed (7)
Speed
Bolero DressCode 6000 1000 rpm: 0-400-600-800-1000
| Programme | Default speed (rpm) | Programme | Default speed (rpm) | ||
| 1000 | 1400 | 1000 | 1400 | ||
| Cotton 30°C | 100 | 1400 | Spin Only | 1000 | 1400 |
| Cotton 40°C | 800 | 1400 | Drain Only | - | - |
| Cotton 60°C | 800 | 1400 | Rinse & Spin | 1000 | 1400 |
| Cotton 90°C | 800 | 1400 | Delicate 30°C | 600 | 600 |
| Synthetic | 1000 | 1200 | Delicate | 600 | 600 |
| Synthetic 40°C | 1000 | 1200 | Quick wash 45' | 800 | 800 |
| Drum cleaning | 400 | - | Quick wash 30' | 800 | 800 |
| Cold wash | 1000 | 1200 | Quick wash 15' | 800 | 800 |
| Cold wash 20°C | 1000 | 1200 | Mix 60°C | 1000 | 1400 |
| Intensive cotton 40°C | 1000 | 1400 | Mix 40°C | 1000 | 1400 |
| Intensive cotton 60°C | 1000 | 1400 | Mix | 1000 | 1400 |
| ECO 40-60 | 1000 | 1400 | |||
Washing programmes
There are different programmes suitable for different types of laundry:
Cotton/Normal
Hard-wearing and heat-resistant textiles made of cotton or linen.
Synthetics
- Wash synthetic articles, for example shirts, coats, mix.
- While washing the knitting textiles, detergent quantity shall be reduced due to its loose string construction and easily-forming bubbles. Hard-wearing and heat-resistant textiles made of cotton or linen.
Delicate
For delicate, washable textiles, e.g. silk, satin, synthetic fibres or blended fabrics.
Spin Only
Extra spin with selectable spin speed.
Rinse & spin
Extra rinse with spin.
Drain Only
Drainage of the drum water.
Mix
Select this option to wash clothes of harder texture that require longer washing time and
higher intensity. Suitable for daily washing of cotton items, like bed sheets, pillow cases, swimming suits or underwear.
Quick Wash
Extra-short programme, suitable for lightly soiled washing or for small amounts of laundry.
ECO 40-60
The washing machine operates at 40-60 °C by default. The temperature cannot be selected.
Cold wash
Select this option to wash clothes with cold water.
Washing programmes table
| Programme | Load (kg) | Temp. (°C) | Default time |
| 6.0 | Default | 6 kg | |
| 1000 | |||
| Synthetic | 3.0 | Cold | 2:20 |
| Synthetic 40°C | 3.0 | 40 | 2:20 |
| Cold wash | 6.0 | Cold | 1:00 |
| Cold wash 20°C | 6.0 | 20 | 1:01 |
| Cotton 30°C | 6.0 | 30 | 2:40 |
| Cotton 40°C | 6.0 | 40 | 2:40 |
| Cotton 60°C | 6.0 | 60 | 2:45 |
| Cotton 90°C | 6.0 | 90 | 2:50 |
| ECO 40-60 | 6.0 | 60 | 3:24 |
| Intensive cotton 40°C | 6.0 | 40 | 4:12 |
| Intensive cotton 60°C | 6.0 | 60 | 4:16 |
| Drum cleaning | - | 90 | 1:18 |
| Spin Only | 6.0 | - | 0:12 |
| Drain Only | - | - | 0:01 |
| Rinse & Spin | 6.0 | - | 0:20 |
| Delicate 30°C | 2.5 | 30 | 0:50 |
| Delicate | 2.5 | Cold | 0:48 |
| Mix 60°C | 6.0 | 60 | 1:11 |
| Mix 40°C | 6.0 | 40 | 0:59 |
| Mix | 6.0 | Cold | 0:59 |
| Quick wash 45' | 2.0 | 40 | 0:45 |
| Quick wash 30' | 2.0 | 30 | 0:30 |
| Quick wash 15' | 2.0 | Cold | 0:15 |
Warnings:
- After a programme is completed, wait for two minutes before opening the door.
- Check whether the water inside the drum has been drained before opening the door. Do not open the door if there is any water.
- Do not wash only one piece of clothes or garment, as these could unbalance the washing machine. Always introduce at least 3 or 4 clothes so that draining can be done smoothly.
-
For a better efficiency and water and energy save, we recommend filling two thirds of the drum with laundry.
-
The information given for the programmes different to the eco 40-60 programme are just indicative.
- The eco 40-60 programme can clean normally soiled cotton clothes declared as washable at 40°C or 60°C, together in the same cycle. This programme is used to assess compliance with EU eco-design legislation.
- The times indicated for each programme match the length with standard loads and temperatures. Other loads and temperatures will need different programme length.
- The most efficient programmes in terms of energy consumption are generally those that are carried out at lower temperatures and longer length.
- Load the washing machine to the quantity estimated for each programme, this will help you save energy and water.
- The length, and energy and water consumption of each programme may vary according to the weight and type of laundry, the additional functions active, water and room temperature.
- It is recommended the use of liquid detergent for washing programmes at low temperature. You can vary the quantity of detergent according to the quantity of laundry and its soiling level. Follow the detergent manufacturer recommendations for the quantity of detergent you must use.
- Noise and remaining moisture level depend on the spin speed. The higher the spin speed, the higher the noise and the lower the remaining moisture level.
- You can access the product database where the information for this model is stored by scanning the QR code of the reference of your product (you will also find the energy label).
| Model | Bolero DressCode 6000 N |
| Reference: | 02335 |
| QR code |  |
5. CLEANING AND MAINTENANCE
Warning
Before cleaning or repair tasks, unplug the appliance from the mains and close the water tap.
- Proper maintenance of the washing machine can extend its working life. The surface can be cleaned with diluted non-abrasive, neutral detergents if necessary. If there is any water overflow, use a cloth to wipe it off immediately. Fig. 25.
- Do not use abrasive cleaners or scouring pads to clean the product.
Cleaning the drum
- The rusts left inside the drum by metal items shall be removed immediately with chlorine-free detergents.
- Do not use steel wool.
Warning
Do not put laundry in the washing machine during the drum cleaning.
Cleaning the door gaskets and glass
- Wipe the glass and gaskets after each wash to remove lint and stains. If lint builds up it can cause leaks.
- Remove any coins, buttons and other objects from the gasket after each wash. Fig. 26.
Cleaning the inlet filter
Warning
The inlet filter must be cleaned when there is little water.
Washing the filter in the tap
Fig. 27.
- Close the water supply tap.
- Remove the water supply hose from the tap.
- Clean the filter edge.
- Reconnect the water supply hose.
Washing the filter in the washing machine
Fig. 28.
- Loosen the water supply hose from the rear part of the washing machine.
- Pull out the filter with long nose pliers and reinstall it back after being washed.
- Use a brush to clean the filter.
- Reconnect the water supply hose.
Warning
If the brush is not clean, pull out the filter and wash it separately. Then, reconnect it and turn on the tap.
Cleaning the detergent dispenser
- Press down the arrow on the softener cover inside the dispenser drawer.
- Lift the clip up and take out the softener cover and wash all grooves with water.
- Place the softener cover again and slightly push the detergent drawer into position.
- Pull out the dispenser drawer by pressing the A. Fig. 29.
- Clean the dispenser drawer under running water. Fig. 30.
- Clean inside the gap with an old toothbrush. Fig 31.
- Insert the dispenser drawer. Fig. 32.
Warning
Do not use alcohol, solvents or chemical products to clean the detergent dispenser.
Cleaning the drain pump filter
Warning
- Be careful with hot water!
- Allow any possible water remains to cool down.
- Unplug the machine from the power socket to avoid electric shock before washing.
- The drain pump filter can filter the yarns and small objects from the washing.
-
Clean the filter periodically to ensure proper operation of the washing machine.
-
Open the lower cover cap. Fig. 33.
- Rotate the emergency drain hose 90°C and pull it out, and remove the hose cap. Fig. 34.
- Empty the water in a suitable container, once it is completely empty, reinstall the drain hose. Fig. 35.
- Remove the filter by turning it counterclockwise. Fig. 36.
- Remove dust, dirt and other substances or objects. Fig. 37.
- Place the filter again in its original position by turning it in the other sense.
- Open the lower cover cap. Fig. 38.
Warning
- Make sure the cap and the emergency drain hose are reinstalled properly, cap plates should be inserted aligned to the plates gap.
- *Some machines do not have an emergency drain hose, so step 2 and step 3 can be skipped.
- Rotate the lower cover cap (filter) so water runs directly into a suitable container.
- When the appliance is in use and depending on the programme selected there can be hot water in the pump. Do not remove the lower cover during the wash cycle, always wait until the appliance has finished the cycle and is empty.
- When replacing the cover, ensure it is securely re-tightened.
6. TROUBLESHOOTING
| Problem | Cause | Solution |
| The washing machine does not start up | The door is not properly closed.It is not connected to a power outlet. | Close the door and restart it.Check if there are clothes stuck.Connect it to a mains socket.Check that the control and protection elements of the electrical installation are activated. |
| The door does not open | The safety lock system is active. | Unplug it and restart the product. |
| Water leakage | Bad connection between pipes and water supply hose or drain pipe. | Check and fasten the water pipes and hoses correctly.Clean the hoses ensuring they are not blocked. |
| There are detergent remains in the detergent dispenser. | The detergent is highly concentrated. | Clean and dry the detergent dispenser.Dilute the detergent with some water. |
| Indicator or display does not light | The PCB is disconnected, or the system connector has connection problems. | Check for power supply.If the problem persists, contact the official Technical Support Service of Cecotec. |
| Abnormal noise | Check if the transport bolts have been removed.Make sure the appliance is installed on a solid, level floor.Level the washing machine adjusting its feet. |
Errors
| Error | Cause | Solution |
| E30 | Door is not closed properly | Close the door and restart it. Check if there is laundry or dirt stuck. |
| E10 | Water injecting problem while washing | Check if the water pressure is too low. Stretch the water supply hose. Check if the inlet valve filter is blocked. Clean the filters. |
| E21 | Overtime water draining | Check if the drain pipe is blocked. Remove any type of object or dirt which may block the water outlet. Check there are no blockages in the water supply and/or drain hoses. |
| E12 | Water overflow | Restart the appliance. |
| EXX | Others | Contact the official Technical Support Service of Cecotec. |
- TECHNICAL SPECIFICATIONS
| Model | Bolero DressCode 6000 N |
| Reference: | 02335 |
| QR code |  |
| Maximum load (dry clothes) | 6 Kg |
| Rated power | 2000 W |
| Water pressure | 0.05 MPa~1 MPa |
| Power supply | 220-240 V~, 50 Hz |
| Rated current | 10 A |
| IPX | IPX4 |
Made in China | Designed in Spain
8. DISPOSAL OF OLD ELECTRICAL APPLIANCES

This symbol indicates that, according to the applicable regulations, the product and/or battery must be disposed of separately from household waste. When this product reaches the end of its shelf life, you should dispose of the batteries/accumulators and take them to a collection point designated by the local authorities.
Consumers must contact their local authorities or retailer for information
concerning the correct disposal of old appliances and/or their batteries.
Compliance with the above guidelines will help to protect the environment.
9. TECHNICAL SUPPORT AND WARRANTY
Cecotec shall be liable to the end user or consumer for any lack of conformity that exists at the time of delivery of the product under the terms, conditions and deadlines established by the applicable regulations.
It is recommended that repairs are carried out by qualified personnel.
If at any moment you detect any problem with your product or have any doubt, do not hesitate to contact Cecotec official Technical Support Service at +34 963 210 728.
10. COPYRIGHT
The intellectual property rights over the texts in this manual belong to CECOTEC INNOVACIONES, S.L. All rights reserved. The contents of this publication may not, in whole or in part, be reproduced, stored in a retrieval system, transmitted or distributed by any means (electronic, mechanical, photocopying, recording or similar) without the prior authorization of CECOTEC INNOVACIONES, S.L.
1. PIÈCES ET COMPOSANTS
Img. 1.
3. INSTALLATION DU PRODUIT
3. INSTALACE PRODUKTU
Fig./Img./Abb./Afb./Rys./Obr. 1

Fig./Img./Abb./Afb./Rys./Obr. 2

Fig./Img./Abb./Afb./Rys./Obr. 3
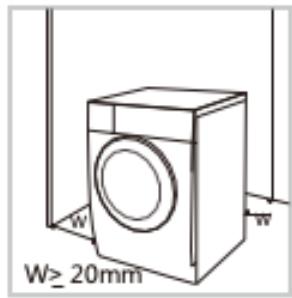
Fig./Img./Abb./Afb./Rys./Obr. 4

Fig./Img./Abb./Afb./Rys./Obr. 5

Fig./Img./Abb./Afb./Rys./Obr. 6

Fig./Img./Abb./Afb./Rys./Obr. 7
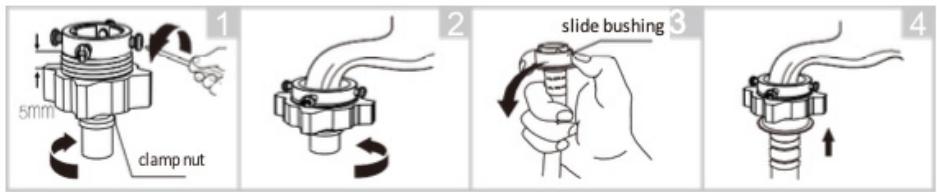
Fig./Img./Abb./Afb./Rys./Obr. 8
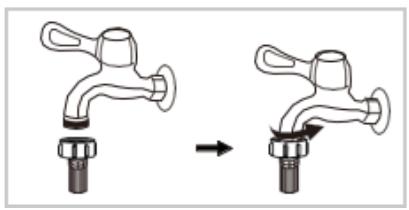

Fig./Img./Abb./Afb./Rys./Obr. 9
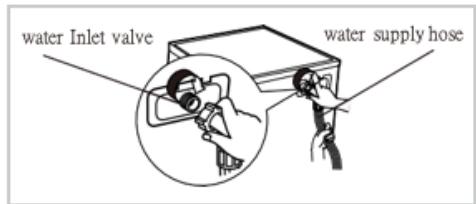
Fig./Img./Abb./Afb./Rys./Obr. 10


Fig./Img./Abb./Afb./Rys./Obr. 11

Fig./Img./Abb./Afb./Rys./Obr. 11.1
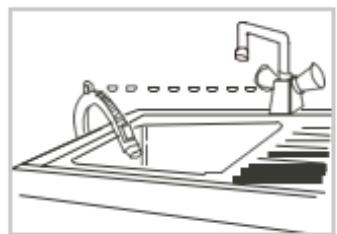
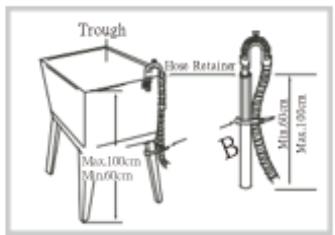
Fig./Img./Abb./Afb./Rys./Obr. 12

Fig./Img./Abb./Afb./Rys./Obr. 13

Fig./Img./Abb./Afb./Rys./Obr. 14
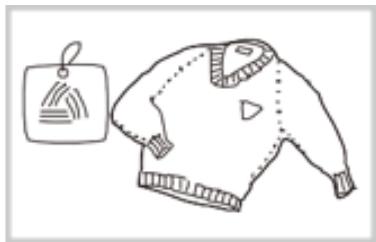
Fig./Img./Abb./Afb./Rys./Obr. 15
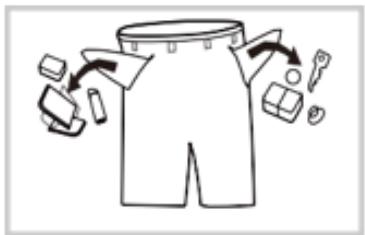
Fig./Img./Abb./Afb./Rys./Obr. 16

Fig./Img./Abb./Afb./Rys./Obr. 17

Fig./Img./Abb./Afb./Rys./Obr. 18
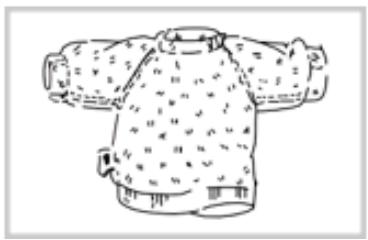
Fig./Img./Abb./Afb./Rys./Obr. 19

Fig./Img./Abb./Afb./Rys./Obr. 20

Fig./Img./Abb./Afb./ Rys./Obr. 21

Fig./Img./Abb./Afb./ Rys./Obr. 22

Fig./Img./Abb./Afb./Rys./Obr. 23
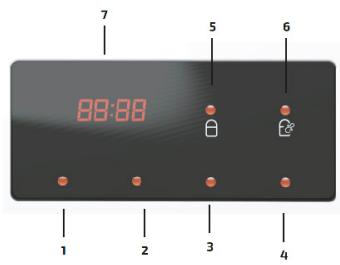
Fig./Img./Abb./Afb./Rys./Obr. 24
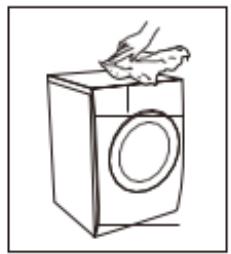
Fig./Img./Abb./Afb./Rys./Obr. 25

Fig./Img./Abb./Afb./Rys./Obr. 26
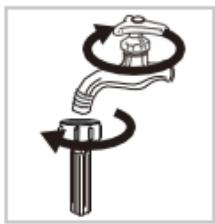
Fig./Img./Abb./Afb./Rys./Obr. 27
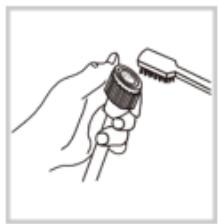

Fig./Img./Abb./Afb./Rys./Obr. 29

Fig./Img./Abb./Afb./Rys./Obr. 28
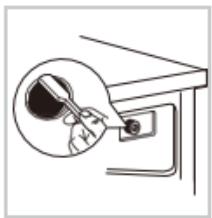
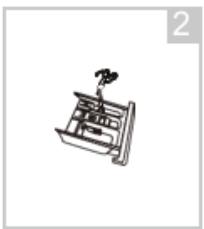
Fig./Img./Abb./Afb./Rys./Obr. 30
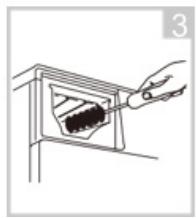
Fig./Img./Abb./Afb./Rys./Obr. 31

Fig./Img./Abb./Afb./Rys./Obr. 32

Fig./Img./Abb./Afb./Rys./Obr. 33
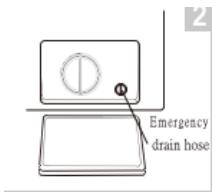
Fig./Img./Abb./Afb./Rys./Obr. 34
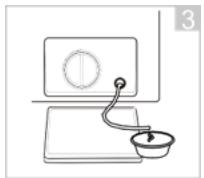
Fig./Img./Abb./Afb./Rys./Obr. 35

Fig./Img./Abb./Afb./Rys./Obr. 36
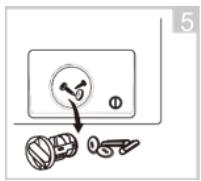
Fig./Img./Abb./Afb./Rys./Obr. 37
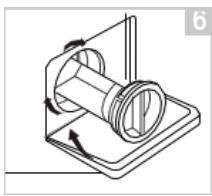
Fig./Img./Abb./Afb./Rys./Obr. 38
www.cecotec.es
- ÍNDICE
- SOMMAIRE
- Cautions during the handling of the machine
- INSTRUCTIONS DE SÉCURITÉ
- Accessories
- Fig. 2.
- BEFORE USE
- PRODUCT INSTALLATION
- Removing the transport bolts
- Levelling the washing machine
- Warning
- Water supply hose connection
- Connection between an ordinary tap and the water supply hose.
- Connection between a screw tap and the water supply hose. Fig. 9.
- Drain hose
- Note:
- OPERATION
- QuickStart
- Before washing
- Washing
- After washing
- Using the washing machine
- Before each washing
- Detergent tank
- Control panel
- On/off (1)
- Start/Pause (2)
- Option (3)
- Programmes (4)
- Display (5)
- Selectable options
- Extra Rinse (2)
- Delay (1)
- Spin Speed (3)
- Child lock
- Silent
- Display settings Fig. 24
- Speed
- Washing programmes
- Cotton/Normal
- Synthetics
- Delicate
- Spin Only
- Rinse & spin
- Drain Only
- Mix
- Quick Wash
- ECO 40-60
- Cold wash
- Warnings:
- CLEANING AND MAINTENANCE
- Cleaning the drum
- Cleaning the door gaskets and glass
- Cleaning the inlet filter
- Washing the filter in the tap
- Washing the filter in the washing machine
- Cleaning the detergent dispenser
- Cleaning the drain pump filter
- TROUBLESHOOTING
- DISPOSAL OF OLD ELECTRICAL APPLIANCES
- TECHNICAL SUPPORT AND WARRANTY
- COPYRIGHT
- PIÈCES ET COMPOSANTS
- INSTALLATION DU PRODUIT
- INSTALACE PRODUKTU
Brand : CECOTEC
Model : Lavadora Bolero Dresscode 6000n
Category : Washing machine