
AS101DWH0 - Air purifier LG - Free user manual and instructions
Find the device manual for free AS101DWH0 LG in PDF.


| Product Type | Air Purifier |
| Brand | LG |
| Model | AS101DWH0 |
| Dimensions (W x H x D) | 360 x 530 x 210 mm |
| Weight | 6.5 kg |
| Power Supply | 220-240 V ~ 50/60 Hz |
| Power Consumption | 35 W (max) |
| Coverage Area | Up to 30 m² |
| Filtration System | Pre-filter, HEPA H13, Carbon filter |
| Fan Speeds | 3 speeds + Auto |
| Noise Level | 24 - 52 dB |
| Air Quality Sensor | Yes (PM2.5, humidity, temperature) |
| Display | LED touch panel with real-time AQI |
| Special Functions | Auto mode, Sleep mode, Timer (1-8h), Turbo mode |
| Smart Features | Wi-Fi connectivity, LG ThinQ app compatibility |
| Filter Replacement Indicator | Yes |
| Maintenance | Pre-filter washable every 2 weeks, HEPA/carbon replace every 6-12 months |
| Safety Features | Child lock, automatic shut-off when front cover opened |
| Spare Parts Available | Replacement filters (LG AS101DWH0 filter set), remote control (optional) |
| Repairability | Modular design; fan motor and sensors replaceable by qualified technician |
Frequently Asked Questions - AS101DWH0 LG
User questions about AS101DWH0 LG
0 question about this device. Answer the ones you know or ask your own.
Ask a new question about this device
Download the instructions for your Air purifier in PDF format for free! Find your manual AS101DWH0 - LG and take your electronic device back in hand. On this page are published all the documents necessary for the use of your device. AS101DWH0 by LG.
USER MANUAL AS101DWH0 LG
For safe and easy use of the product please read the instruction manual before use.
AS651D Series
AS101D Series
EN ENGLISH
ES ESPAÑOL

MFL70445445
Rev.02_120121
TABLE OF CONTENTS
This instruction manual may contain images or content different from the model you purchased. This manual is subject to revision by the manufacturer.
SAFETY INSTRUCTIONS ....3
IMPORTANT SAFETY INSTRUCTIONS ....3
INSTALLATION....10
Appliance Overview....10
Unpacking the Appliance....12
Installation Location Requirements....13
Transportation Requirements....13
OPERATION 14
Control Panel 14
Status Display Panel....15
Remote controller....16
Operation starting....17
Using the Mode....17
Adjusting the Fan Speed....18
Clean Booster Fan Speed....18
Using the Extra Functions....19
Checking the Air Quality....20
SMART FUNCTIONS....23
LG ThinQ Application 23
Smart Diagnosis....24
MAINTENANCE....25
Maintaining the Product 25
Cleaning the Appliance 26
Maintaining the Filter....27
TROUBLESHOOTING....29
Before Calling for Service 29
APPLIANCE SPECIFICATIONS....32
SAFETY INSTRUCTIONS
EN
READ AND SAVE THESE INSTRUCTIONS
The following safety guidelines are intended to prevent unforeseen risks or damage from unsafe or incorrect operation of the appliance.
The guidelines are separated into ‘WARNING’ and ‘CAUTION’ as described below.

This symbol is displayed to indicate matters and operations that can cause risk. Read the text marked with this symbol carefully and follow the instructions in order to avoid risk.

WARNING
This indicates that failure to follow the instructions can cause serious injury or death.

CAUTION
This indicates that failure to follow the instructions can cause minor injury or damage to the product.
IMPORTANT SAFETY INSTRUCTIONS

WARNING
To reduce the risk of explosion, fire, death, electric shock, injury or scalding to persons when using this product, follow basic precautions, including the following:
Children in the Household
- This appliance is not intended for use by persons (including children) with reduced physical, sensory or mental capabilities, or lack of experience and knowledge, unless they have been given supervision or instruction concerning use of the appliance by a person responsible for their safety. Children should be supervised to ensure that they do not play with the appliance.
Installation
- Do not install the appliance on an uneven or inclined surface.
- Do not install the appliance in an area exposed to direct sunlight or near heat-generating equipment.
- Do not install the product in a place where combustible gas may leak or industrial oil or metallic particulates are present.
- Do not allow the appliance to push against the power cord or plug.
- Do not touch the power plug with wet hands.
- When unplugging the power cord, always pull it by the plug.
- Unplug the appliance during thunder or lightning storms or when not in use for a long time.
- Do not bend the power cable excessively or place a heavy object on top of it.
- Do not extend the length of the power cable or alter it.
- Do not use several devices on a multi-socket extension outlet.
- Make the connection securely so that screw in terminals may not be loosened when the cable is pulled.
- Make sure that the power cable cannot be pulled out or damaged during operation.
- If the supply cord is damaged, it must be replaced by the manufacturer, its service agent or similarly qualified person in order to avoid a hazard.
- Use with the power supply supplied with the device.
Operation
- If the appliance is immersed in water, stop using it and contact an LG Electronics Customer Information Center.
- If there is a gas leakage (isobutane, propane, LNG, etc.), do not touch the product or power plug and ventilate the area immediately.
- Do not clean the appliance with brushes, cloths or sponges which are abrasive or made of metal.
- If you detect any abnormal noise, odor or smoke, unplug the product immediately and contact an LG Electronics Customer Information Center.
- Only an authorized repair person should disassemble, repair, or modify the appliance.
- If the supply cord is damaged, it must be replaced by the manufacturer, its service agent or similarly qualified persons in order to avoid a hazard.
- Do not use or store fire, combustibles (ether, benzene, alcohol, drugs, propane, butane, combustible spray, insecticide, air freshener, cosmetics, etc.) or flammable materials (candles, lamps, etc.) near the product.
- Do not place the power cord under rugs, carpeting or mats.
- Do not allow animals or pets to chew on the power cord.
- Do not move the appliance when it is in operation.
• Do not hit the appliance.
- Do not insert hands or metal objects into the air inlet or outlet.
- Do not install and use broken parts.
- Do not put flammables into the appliance.
- Do not move or operate the appliance while its cover is open.
- Do not allow children to climb on or play with the appliance.
• Do not place anything on top of the appliance.
- The fan is not a toy. It should not be played with or placed where young children can reach it.
Maintenance
- Dispose of the packing materials (vinyl, styrofoam, etc.) to keep them out of reach of children.
• Take care not to injure or pinch yourself when you detach and reattach parts of the appliance.
- Turn off and unplug the appliance before cleaning it or replacing the filter.
Battery
- A button/coin-shaped battery is used in the remote controller of the appliance. If you accidentally swallow the battery, consult a doctor immediately for emergency treatment. If you fail to receive first aid within 2 hours after you swallow the battery, you may experience damage to your internal organs or death in severe cases.
- Do not swallow the battery.
- If the battery tray is not secured firmly, stop using the remote immediately and keep it away from children.

CAUTION
To reduce the risk of minor injury to persons, malfunction, or damage to the product or property when using this product, follow basic precautions, including the following:
Installation
- Do not tilt the appliance to pull or push it when transporting.
- Do not install the appliance in a vehicle, RV, or marine vessel.
- Do not place the appliance near a TV or stereo equipment.
- Do not place the appliance under bright light.
- The appliance must be installed in accordance with national wiring regulations.
- When moving or storing the appliance, wrap the power cord around the base of the appliance to prevent personal injury, damage to the cord or damage to floors.
- Do not place the appliance near curtains.
Operation
- Do not use the product for removal of toxic gas such as carbon monoxide.
- Do not use the product for ventilation purposes.
- Do not use the appliance for a long time in a region with unstable voltage.
- Do not place obstacles around the air inlet or outlet.
- For safe use of the appliance, children or others with reduced mental capabilities need to be closely monitored by a person who is responsible for their safety.
- Do not use the product for special purposes such as preserving plants, precision instruments, artworks, etc.
EN
- Do not operate the appliance with wet hands.
- Do not let the moisture from a humidifier directly touch the appliance.
- Do not use the appliance while it is not in an upright position.
- Do not use the appliance near objects vulnerable to heat.
- Do not use detergents, cosmetics, chemicals, air fresheners, or disinfectants in the appliance.
- Do not touch any internal parts while the unit is operating or immediately after operation.
- Use the filter only for its intended purpose.
- The Deodorizing Care filter and Safe Plus filter are assembled together. Do not try to detach them from each other.
- Do not insert any objects into the clean booster.
- Do not operate the product while the clean booster cover and grille are separated.
- Do not insert hands or metal objects into the moving parts of the clean booster.
- Do not press multiple buttons at the same time on the remote controller.
- Do not kick or step on the remote controller.
- Do not use the remote controller near water or in areas with high humidity.
- Do not expose the remote controller to fire or high temperatures.
Maintenance
- Do not use strong detergents or solvents to clean the product. Use a soft cloth to clean.
- Do not clean the appliance with an alkaline detergent.
- Do not wipe the appliance surface using sulfuric acid, hydrochloric acid or organic solvents (thinner, kerosene etc.) or attach a sticker on the appliance.
- For inner cleaning, contact an Authorized Service Center or a dealer.
• Do not allow water inside the appliance.
• Do not wash the filter with water.
- Be careful not to damage the ultra-fine filter when cleaning it with a vacuum cleaner.
• Do not disassemble the clean booster.
Battery
- Do not modify the battery.
• An improperly installed battery may cause an explosion.
- Do not recharge or take apart the battery.
- Do not dispose of the battery by placing it in a fire, or expose it to high temperatures.
- Remove and store the battery in a safe location if you don't intend to use the remote controller for a long time.
INSTALLATION
EN
- The exterior or components of the product may vary depending on the model.
Appliance Overview
Front View

Dual Model Single Model

1 Air outlet (top) / Clean booster
• Purified air from the filter is emitted.
- Allows you to adjust the direction of wind emission.
② Air quality light
- The current air quality is indicated by a color.
③ Air inlet (top)
- Allows you to disassemble the front and the rear covers separately.
4 Bottom air outlet
- Purified air is emitted from the bottom filter.
5 Bottom air inlet
- Allows you to disassemble the front and the rear covers separately.
6 Status Display Panel
- Use it to check the settings of the appliance and the air quality.
7 Control Panel
• Use it to set the appliance functions.
8 Receiver for remote controller signal (Only for models with remote controller)
EN
Rear View

Dual Model Single Model
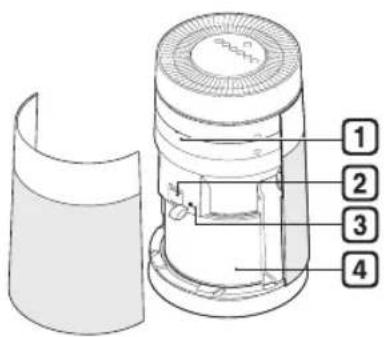
1 Smart Diagnosis Panel
- When the product malfunctions or breaks down, the product status can be checked through Smart Diagnosis.
2 PM1.0 (particles with a diameter between 1.0 and 2.5 micrometers) sensor
• It detects the concentration of particles.
3 Odor (Gas) sensor
- It detects a odor (gas).
4 Filter
- It eliminates fine particles, smog causing materials, sickening home syndrome materials, and domestic odor.
Components


Remote controller/Battery (CR2025, 1EA) Owner's manual
- The remote controller may not be provided depending on the model.
EN
Filter system

① Deodorizing Care filter
- Minimizes smog causing materials (SO 2 , NO 2 ), sickening house syndrome materials (toluene, formaldehyde), domestic odor, and sulphur compounds.
2 Safe Plus Filter
- Minimizes PM1.0, allergen materials, bacterial and viral from the air.
③ Ultra-fine filter
- Minimizes large particles floating in the air.
4 Filter handle
- Allows you to separate the filter from the product.
CAUTION
- Do not disassemble the filter forcefully when it is connected each others.
Unpacking the Appliance
Unpack the appliance and remove all packing tape and filter vinyl before using the appliance.
1 Hold the top of the rear cover of the product and pull it slightly to achieve separation.
- 'PM1.0&GAS SENSOR SYSTEM' is marked on the rear cover of the product.

2 Remove the packing support from near the filter inlet.

3 Disassemble the filter and remove the vinyl.

EN
4 Install the filter in the appliance.
• Install it with the side where the handle is attached facing up.

5 Insert the fixing part at the bottom of the cover into the fixing grooves at the bottom of the product and close the cover.

CAUTION
- In case of the dual model, remove the support and the vinyl of the filter at the bottom of the air purifier in the same way.
- Be sure to remove the filter packing support and the vinyl before using the product. Failure to do so may cause product malfunction.
- Pay attention to filter direction when installing it. Failure to do so may cause product malfunction and failure.
Installation Location Requirements
Install the appliance 1m away from a wall.
- The air inlet needs sufficient space to function properly.

The performance of the appliance may vary depending on the service environment (temperature, humidity, etc.).
- The appliance can provide the guaranteed performance in an environment with humidity ranging between 40% and 70%.
Transportation Requirements
When you relocate or store the appliance, wind the power cord onto the bottom of the product to prevent it from dragging on the floor.
- Failure to do so may damage the power plug or leave a scratch on the floor.
When carrying the product
- Do not carry the product by holding the external cover. Doing so may allow the cover to open and the product to drop. Dropping the appliance may cause personal injury or product malfunction.
Single Transport the product safely by Model holding the bottom of the product with both hands.
Dual Model Transport the product safely by having two people hold the central part of the product.
OPERATION
EN
- The exterior or components of the product may vary depending on the model.
- The remote controller may not be provided depending on the model.
Control Panel

① Start/Stop Button
② Mode Button
Use it to set the mode.
- Pressing it for 3 seconds or more will turn on/off the air quality light.
3 Speed Button
Use it to adjust the fan speed of the air purifier.
- Wi-Fi Function
- Before appliance connection: Press and hold the button for 3 seconds to activate the Wi-Fi connection mode.
- After appliance connection: Press and hold the button for 3 seconds to control the appliance from the LG ThinQ smartphone app.
- Wi-Fi function off: Press and hold the Start/Stop button and the Speed button simultaneously for 3 seconds or more.
4 Booster Speed Button
Use it to adjust the fan speed of the clean booster.
- Press and hold it for 3 seconds or more to turn on or off the ionizer. (See Using the Air Ionizer.)
5 Swing Button
Turns the clean booster left or right.
6 Indicator Button
Allows you to check the concentration of particles in the air by the size of dust particles.
7 Sleep Timer Button
Allows you to use the Off Timer function.
- Pressing and holding it for 3 seconds or more locks or unlocks the control panel buttons.
EN
Status Display Panel


① Display of air quality
① Overall air quality (color)
② The size of dust particles and the concentration of particles (color)
③ The concentration of particles and sleep timer
④ The concentration of odor (color)
② Display operating mode
③ Display speed and booster speed
Speed: Displays the air purifier's fan speed.
Booster Speed: Displays the clean booster's fan speed.
4 Sleep Timer Display
5 Icons
| Icon Description | |
 | It turns on when it is time to replace the filter. |
| [20X2] | It turns on when it is time to replace the top filter. |
 | It turns on when it is time to replace the bottom filter. |
 | It turns on when the Wi-Fi function is activated. |
 | It turns of when the On/Off Timer is set with the LG ThinQ application. |
 | It turns on when the control panel is locked. |
 | It turns on when the ionizer turns on. |
Remote controller

1 Start/Stop Button
2 Speed Button
Use it to adjust the fan speed of the air purifier.
3 Sleep Timer Button
Schedules an automatic turn off time for the appliance.
4 Booster Speed Button
Use it to adjust the fan speed of the clean booster.
5 Light Button
Turns the air quality light on/off.
6 Mode Button
Sets the operating mode.
7 Swing Button
Allows you to adjust the rotation direction of the clean booster to the left or the right.
WARNING
- This appliance, including the remote controller, is equipped with a button/coin type battery (CR2025).
- Swallowing the battery may cause serious injury or death. If the battery is swallowed, immediately go to a hospital emergency room to see a doctor.
- Make sure to keep the battery out of children's reach.
- If the battery tray is not fixed firmly, stop using it and put it out of children's reach.
CAUTION
- Do not alter the battery arbitrarily. Doing so may cause fire or a appliance failure.
- Inserting the battery incorrectly may cause explosion.
- Do not charge or disassemble the battery. Doing so may cause explosion.
- Do not discard the battery in a place with flames or heat. Doing so may cause explosion.
- Do not press a number of buttons simultaneously. Doing so may cause the appliance to become inoperable or malfunction.
- Do not use it in a place with wet or moist conditions. Doing so may cause fire or an electric shock.
- Do not use it in a place with flames or heat. Doing so may cause fire or deformation of the appliance.
- If you do not use the remote controller for a long time, store it after separating the battery. Failure to do so may cause the battery fluid to leak, resulting in malfunction.
NOTE
- If the remote controller does not operate normally, replace the battery or check the polarity of the battery (+, -).
- Position the transmitter for the remote controller facing the receiver for the appliance when using the remote controller.
- If you are away from the product (front) by more than 7 m, the remote control may not work.
Operation starting
Press the Start/Stop button to start the operation.

NOTE
- When the operation is started for the first time, the appliance operates in Booster mode.
- The most recently used mode is memorized if the power supply is cut off as a result of a power failure.
- When the operation begins, the display of sensor ready (☐) will appear for approximately 30 seconds.
Using the Mode
• Each time you press the Mode button, the mode changes in the following order:
- Single Model: Smart→Booster→Normal
- Dual Model: Smart→Booster→Dual→Single

Smart Mode
Operating mode and fan speed are adjusted automatically according to overall air quality.
NOTE
- When the appliance is operated in Smart mode, Speed, Booster Speed, and Swing buttons are not operated.
Booster Mode
Clean Booster circulates the indoor air by quickly sending purified air over an extended distance.

CAUTION
- Be careful not to allow your hands to be pinched by the moving parts of the clean booster.
NOTE
- When the power cord is unplugged before the clean booster is completely closed, plug the cord in again. The clean booster will rotate and properly close.
Rotating the Clean Booster
Press the Swing button during the Booster mode operation.

Dual mode: Only for the relevant product
The product operates air purifiers at the top and bottom simultaneously to purify indoor air quickly.
Single Mode
Single
As a basic operation mode for
Model
air purification, air speed can be adjusted.
Dual
The air purifier at the bottom purifies
Model
indoor air.
- The air purifier at the top operates at a low speed.
Adjusting the Fan Speed
Adjust the fan speed of the air purifier.
Press the Speed button during the operation.
• Each time you press the button, the speed changes in the following order: Auto → Low → Middle → High → Turbo.

Fan Speed Display
When you adjust the speed, the speed will be displayed on the status display panel. The Speed increases by 2 columns each time when the level is raised.
[Example of 'Middle' Display for Speed]

NOTE
- When the operation is started for the first time, Auto is set as the Speed. In Auto mode, the Speed is adjusted automatically according to the contamination level of indoor air.
Clean Booster Fan Speed
Adjust the fan speed of the clean booster.
Press the Booster Speed button during the Booster mode operation.
• Each time you press the button, the speed changes in the following order: Auto → Low → Middle → High → Turbo.

Booster Speed Display
When you adjust the Booster Speed, the Booster Speed will be displayed on the status display panel. The Booster Speed increases by 2 columns each time the level is raised.
[Example of 'Middle' Display for Booster Speed]

NOTE
- When the Auto mode is selected, clean booster speed is automatically adjusted to the same level as Speed.
EN
Using the Extra Functions
Using the Air Ionizer
To generate ions to minimize various bacteria from the air.
Press the Booster Speed button for more than 3 seconds while operating.
(Air ionizer) is displayed on the status display.

NOTE
- When the operation is stopped, the air ionizer function can not be used.
Setting the Sleep Timer
Stops the operation automatically after the operation for the set time.
Press the Sleep Timer button during operation.
• Each time you press the button, the setting changes in the following order: After 2 hours → After 4 hours → After 8 hours → After 12 hours → Cancel.
- When the Sleep Timer is activated, only the sleep timer icon is displayed on the status display panel.

NOTE
- Speed is changed to the 'Low' level and adjusted automatically at regular intervals according to air quality.
- Fan speed can be adjusted by pressing the Speed button while the sleep timer is activated.
- On the sleep timer setting, you can check the set time by pressing the Sleep Timer button again.
- The sleep timer setting will be maintained when the appliance is turned off and then on again as the result of a power failure.
Locking the Control Panel
You can lock the buttons on the control panel to prevent the appliance from operating due to unforeseen reasons, such as a child manipulating the buttons.
Press the Sleep Timer button for 3 seconds or longer during operation.
(Lock) is displayed on the status display panel.

NOTE
- You can turn off the lock function in the same way as turning it on.
- You can use the remote controller in locked status. (Only for models with remote controller)
- You can also lock or unlock when the operation has stopped.
Checking the Air Quality
The overall air quality can be checked through the air quality light and the status display panel.
Overview the Overall Air Quality
The overall air quality is calculated based on the particles and odor (gas) concentrations and is categorized in 4 levels depending on the contamination of the air.
| Color | Overall air quality | Concentration of PM ( µg/m3 ) Concentration of odor | ||||
| State | PM10 (Coarse particles) | PM2.5 (Fine particles) | PM1.0 (Particles with a diameter between 1.0 and 2.5 µm ) | State Level | ||
| Red Poor 255 or more | 56 or more 56 or more Very strong 4 | |||||
| Orange Unhealthy 155 ~ | 254 36 ~ 55 36 ~ 55 Strong 3 | |||||
| Yellow Moderate 55 ~ 154 13 ~ 35 13 ~ 35 Normal 2 | ||||||
| Green | Good | 54 or less | 12 or less | 12 or less | Weak | 1 |
NOTE
- The color of the overall air quality is based on the worst level detected, whether odors or particulates.
- PM (particulate matter) concentration is displayed in increments of 1 unit, from 8 to 999. PM concentration values are based on the data sheet provided by the sensor manufacturer.
- The PM concentration measurement was tested using LG Electronics' standard test materials.
- Differences in PM concentration values may be the result of different methods of measuring or differences in the actual PM concentration levels.
- If the PM concentration is high, there may be a larger difference between the displayed concentration and the actual concentration.
EN
Turning the air quality light On/Off
1 Check the overall air quality through the air quality light.

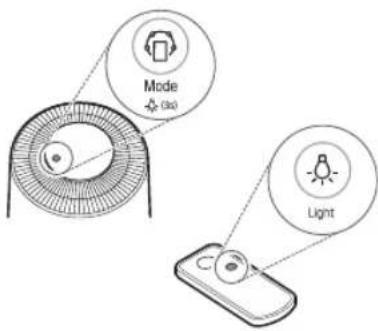
2 You can turn the air quality light on or off by pressing Mode button for 3 seconds or longer during operation.
NOTE
- The air quality light turns white during sensor stabilization time (30 seconds). The odor (gas) sensor can be stabilized 2 minutes after its operation.
Checking the Particles Concestration
You can check the concentration of particles in the air by measuring the size of dust particles. Press the Indicator button during operation.
• Each time you press the button, the setting changes in the following order: PM10 → PM2.5 → PM1.0.
- The concentration of selected dust particles will be displayed for about 10 seconds.

NOTE
- The overall air quality level is a result of both PM concentration and the odor level.
- Whether it is a different product or the same product used in the same space, the concentration measurement may vary due to air circulation.
- Unlike odors (gas), dust particles travel slowly. Therefore, the measured concentration may be lower than the actual concentration.
• Air flow near the dust sensor may interrupt normal operation of the particles sensor and indicated concentration may be different from actual particles concentration, accordingly. - When the product is used in the following environment, the measured concentration of particles may differ from the actual concentration.
- Near fabric sofas and beds, around hairy carpets, while making beds/folding clothes, while using vacuum cleaners, places with bugs and pets, and places with high humidity
- Places where outside air is available, such as construction sites, roadsides, and factories, or near outside doors, windows, and vents
EN
- Places where products generating steam or fine particles (humidifiers, kitchen tools, or sprays) are used
- The sensor may not detect particles larger than PM10 generated by activities such as dusting off blankets or cleaning, but they are removed by the filter.
- The concentration of odors (gas) may vary due to items emitting odors such as air fresheners, deodorizers, detergents, or cosmetics.
Checking the Air Status from the Status Display Panel
![graph TD 1["1"] --> 2["Tree Icon"] 2 --> 3["3 µg/m³"] 3 --> 4["4 PMT.0"] 2 --> 5["Odor Icon"]](/content/2026/07/1518756/images/7428c0624f84ef3c05b5f44e2fa43c7b1d5a6315bf392eee0866f497f917fa17.jpg)
① Overall air quality
You can check the overall air quality through indication color.
2 Concentration of odor
You can check the concentration of odor through indication color.
3 Concentration of particles
You can check the concentration of particles as a specific figure and the color displayed for the size of dust particles. The concentration of particles indicates the concentration of particles contaminated first among the PM10 / PM2.5 / PM1.0.
4 PM Size
The size of dust particles is indicated as a color based on the concentration of particles.
SMART FUNCTIONS
EN
LG ThinQ Application
The LG ThinQ application allows you to communicate with the appliance using a smartphone.
LG ThinQ Application Features
Smart Diagnosis
If you experience a problem while using the appliance, this smart diagnosis feature will help you diagnose the problem.
Settings
Allows you to set various options on the appliance and in the application.
NOTE
- If you change your wireless router, Internet service provider, or password, delete the connected appliance from the LG ThinQ application and connect it again.
- The application is subject to change for appliance improvement purposes without notice to users.
• Functions may vary by model.
Before using LG ThinQ Application
This feature is only available on models with Wi-Fi function.
1 Check the distance between the appliance and the wireless router (Wi-Fi network).
- If the distance between the appliance and the wireless router is too far, the signal strength becomes weak. It may take a long time to connect or installation may fail.
2 Turn off the Mobile data or Cellular Data on your smartphone.

3 Connect your smartphone to the wireless router.

NOTE
- To verify the Wi-Fi connection, check that the Wi-Fi 🔺 icon on the control panel is lit.
- The appliance supports 2.4 GHz Wi-Fi networks only. To check your network frequency, contact your Internet service provider or refer to your wireless router manual.
- LG ThinQ is not responsible for any network connection problems or any faults, malfunctions, or errors caused by network connection.
- If the appliance is having trouble connecting to the Wi-Fi network, it may be too far from the router. Purchase a Wi-Fi repeater (range extender) to improve the Wi-Fi signal strength.
- The Wi-Fi connection may not connect or may be interrupted because of the home network environment.
- The network connection may not work properly depending on the Internet service provider.
- The surrounding wireless environment can make the wireless network service run slowly.
- If the appliance cannot be connected due to problems with the wireless signal transmission, unplug the appliance and wait about a minute before trying it again.
- If the firewall on your wireless router is enabled, disable the firewall or add an exception to it.
- The wireless network name (SSID) should be a combination of English letters and numbers. (Do not use special characters.)
- Smartphone user interface (UI) may vary depending on the mobile operating system (OS) and the manufacturer.
- If the security protocol of the router is set to WEP, the network setup may fail. Change the security protocol (WPA2 is recommended) and connect the product again.
Installing the LG ThinQ Application
Search for the LG ThinQ application from the Google Play Store or Apple App Store on a smartphone. Follow instructions to download and install the application.
Open Source Software Notice Information
To obtain the source code under GPL, LGPL, MPL, and other open source licenses, that is contained in this product, please visit http://opensource.lge.com. In addition to the source code, all referred license terms, warranty disclaimers and copyright notices are available for download.
LG Electronics will also provide open source code to you on CD-ROM for a charge covering the cost of performing such distribution (such as the cost of media, shipping, and handling) upon email request to opensource@lge.com. This offer is valid for a period of three years after our last shipment of this product. This offer is valid to anyone in receipt of this information.
Smart Diagnosis
This feature is only available on models with the Ⓧ or Ⓧ logo.
Use this feature to help you diagnose and solve problems with your appliance.
NOTE
- For reasons not attributable to LGE's negligence, the service may not operate due to external factors such as, but not limited to, Wi-Fi unavailability, Wi-Fi disconnection, local app store policy, or app unavailability.
- The feature may be subject to change without prior notice and may have a different form depending on where you are located.
Using LG ThinQ to Diagnose Issues
If you experience a problem with your Wi-Fi equipped appliance, it can transmit troubleshooting data to a smartphone using the LG ThinQ application.
- Launch the LG ThinQ application and select the Smart Diagnosis feature in the menu. Follow the instructions provided in the LG ThinQ application.
Using Audible Diagnosis to Diagnose Issues
Follow the instructions below to use the audible diagnosis method.
- Launch the LG ThinQ application and select the Smart Diagnosis feature in the menu. Follow the instructions for audible diagnosis provided in the LG ThinQ application.
1 Press and hold the Indicator button for 5 seconds to execute the Smart Diagnosis function.

2 Hold the phone near the ⚙ or ⚙ logo on the back of the appliance.

3 After the data transfer is complete, the diagnosis will be displayed in the application.
NOTE
- For best results, do not move the phone while the tones are being transmitted.

WARNING
- Be sure to stop the appliance operation and remove the power plug from the outlet before cleaning and replacing the filter.
- Do not spray water directly on the appliance.
Maintaining the Product
Scheduled maintenance
| Component | Cleaning frequency | Replacement frequency |
 Filter Filter | Ultra-fine filterClean filter as needed | 1 year |
 PM1.0 sensor PM1.0 sensor | 2 month - |
NOTE
- The cleaning frequency may vary depending on the operating hours and environment of the appliance.
- If you do not clean the product according to the cleaning frequency, you may experience a bad odor and poor performance.
- The filter must be replaced at the end of its lifespan, and the cost of replacement filters is not covered under the warranty. To purchase new filters, contact an LG Electronics Customer Information Center or visit the website at www.lg.com
- If the PM concentration does not change on the display for a long time, clean the PM1.0 sensor even if it is not scheduled for a cleaning.
Alerts on the Status display panel
| Model Alert Measures | ||
| Single |  | Replace the filter. |
| Dual | Replace the top air purifier filter. | |
| Replace the bottom air purifier filter. | ||
NOTE
- Filter replacement alerts appear based on the maximum usage time, taking into account the operating hours of the appliance. The replacement frequency is determined by the operating hours and environment.
Storage
If the appliance is not used for a long period of time, store it at a shaded and dry place.
1 Operate the product for one hour or more on a fine day.
- This removes the moisture and prevents molds from building up inside the product.
2 Turn off the power and unplug it from the electrical outlet.
- Wind the power cord around the bottom of the appliance.
3 Package the appliance to prevent the dust or foreign substance from entering the appliance. Store the packaged appliance at a shaded place.

CAUTION
- Do not store the appliance at a humid place or at a place exposed to the direct sunlight. Otherwise the appliance may be deformed, malfunction or generate odor.
Cleaning the Appliance
Cleaning the exterior
1 Remove dust from the air inlet and the outlet using a vacuum cleaner.
2 Wipe the exterior with a soft lint-free cloth.

CAUTION
- Do not wipe the appliance with an alkaline detergent.
- Never use sulphuric acid, hydrochloric acid or organic solvent (e.g., thinner, kerosene and acetone) to wipe the appliance exterior, or affix labels on the exterior. Doing so may damage the product surface.
- Care should be exercised to prevent flowing of water into the product.
NOTE
- If dust on the front and rear covers cannot be removed, disassemble the covers and clean them with water. After cleaning, dry the covers thoroughly in the shade.
Cleaning the Particles Sensor
PM1.0 (ultra-fine particles) sensor detects fine particles as well as coarse particles. Therefore, you need to clean its lens regularly.
1 Separate the rear cover of the product.
2 Open the sensor cover.

3 Clean the lens with the cotton swab soaked with water and clean it again with a dry cotton swab.

NOTE
- Do not wipe the sensor with any substances other than water. It may cause a appliance to malfunction.
Maintaining the Filter
Cleaning the Filters
1 Separate the cover of the product.
2 Remove particles off of the ultra-fine filter with a vacuum cleaner or a soft brush.
- If contamination cannot be eliminated after cleaning, replace the ultra-fine filter.

3 Separate the ultra-fine filter from the total filter.
- How to separate the ultra-fine filter: Check the Velcro of the ultra-fine filter and carefully remove the ultra-fine filter in order to avoid it being damaged.

4 When you assemble the ultra-fine filter, follow the reverse order of the separation procedure.
CAUTION
- Do not clean the filter with water. The service life of the filter may be reduced.
- Be careful not to damage the ultra-fine filter when using a vacuum cleaner.
• Take caution because there is a risk of tearing or loss when separating or assembling the ultra-fine filter.
NOTE
- In case of the dual model, clean the bottom filter in the same way.
Replacing the filter
1 Separate the cover from the product and replace the filter.
- To avoid polluting the surroundings when replacing the filter, place a newspaper on the floor before you remove the filter.
2 Once you have replaced the filter, disable the filter replacement alert.
EN
Disabling the Filter Replacement Alert
Press and hold the Speed and Indicator buttons simultaneously for 3 seconds or more.
- The (Single Model Filter Replacement Alert) or □ (Dual Model Top Filter Replacement Alert) on the Status Display is disabled and the replacement alarm is reset.

Disabling the Filter Replacement Alert (Only for relevant models)
Press and hold the Indicator and Sleep Timer buttons simultaneously for 3 seconds or more.
- The(Bottom Filter Replacement Alert) on the Status Display is disabled and the replacement alarm is reset.

NOTE
- The filter replacement alert will be disabled automatically after 24 hours of the alert being displayed or the power supply to the appliance is cut off.
Before Calling for Service
Please check the following before you contact the service center. If the problem persists, contact your local service center.
Operation
| Symptoms Possible Causes & Solution | |
| The appliance does not operate. | The power plug in unplugged from the outlet.• Plug it into the outlet properly. |
| There is odor, but the air quality light doesn't change | Is the air quality light red or orange?• The color of the overall air quality light is determined by the worst level sensed, whether that is a PM concentration or odor. The PM concentration level may be worse than the odor level.• The odor (gas) sensor is designed to detect harmful gases. Strong food odors may not register as harmful, but the Deodorizing Care filter will minimize them. |
| The air quality light stays red. | Move the appliance to a different room and see if the color changes.• If the odor level is beyond the capacity of the product to dispel, the light may not change.• Clean the sensor area.• Remove the power plug from the outlet and reconnect it one minute later. |
| A substance was sprayed near the product.• Do not use sprays near the product. | |
| The buttons on the control panel do not work. | The (Lock) is turned on on the status display panel.• Press and hold the Sleep Timer button for 3 sec. To disable the lock function. |
| The PM concentration doesn't change. | There is a foreign substance on the sensor.• Clean the PM1.0 sensor. |
| The product is used in an enclosed space.• In an enclosed space without frequent air exchange, the air quality may stay the same. | |
| The PM concentration stays high. | The product is located in an area with frequent airflow from the outside.• In an environment where outside air is supplied continuously, the PM concentration may remain high. |
| The color of the overall air quality light does not match the PM concentration value. | The overall air quality light may be reflecting the odor level.• The overall air quality is based on both the PM concentration and the odor level, and its color is determined by which is worse.• If the PM concentration is low and the odor level is high, the overall air quality light will reflect the odor level. |
| The clean booster is not working. | The Booster mode is not selected.• The booster fan speed and booster fan rotation functions work only in the Booster mode. |
| The PM concentration levels are different between the appliance and the LG ThinQ app. | Make sure you are comparing the levels for the same size particulates.Make sure that the levels of the PM1.0/PM2.5/PM10 are displayed consistently between the LG ThinQ app and your appliance.The LG ThinQ app may not update the sensor results as quickly as the appliance display. |
Performance
| Symptoms Possible Causes & Solution | |
| The indoor air is not purified well enough. | The indoor air is very dirty.Ventilate the indoor air before you use the product. |
| The ultra-fine filter is clogged with dust.Clean the ultra-fine filter properly. | |
| The Safe Plus filter is clogged with dust.Replace the whole filter. | |
| The location is too large for the capability of the air purifier.Use a product that fits the size of the room.Place the appliance away from windows, doors, and other areas with frequent influx of outdoor air. | |
| The air inlet or outlet is blocked.Remove the obstacle. | |
| The appliance is located in a corner or an area where air circulation is blocked.Move the appliance and install it again. | |
Noise
| Symptoms Possible Causes & Solution | |
| Fan is noisy even on the lowest speed. | The ultra-fine filter is clogged with dust.• Clean the ultra-fine filter properly. |
| The Safe Plus filter is clogged with dust.• Replace the whole filter. | |
| The appliance makes a sudden loud noise while operating. | The operating mode is set to Smart mode or the fan speed is on Auto.• It may make a sudden noise as it automatically adjusts the air flow depending on indoor air quality. |
| A noise is generated when I start or stop the clean booster. | • The clean booster is looking for the correct location. |
Odor
| Symptoms Possible | Causes & Solution |
| A strange odor comes out from the air outlet as well as the filter. | Appliance is new.The odor of activated charcoal is not harmful. This is similar to the odor you may experience in a brand new car. The odor should dissipate after 1-2 weeks of use. |
| The appliance is located in an area with a lot of smoke or odors.In areas with a lot of smoke or odors, the lifespan of the filters may be greatly decreased. For best results, ventilate the room first, then use the appliance. | |
| The odor is coming from the filter.Replace the filter. The filter replacement frequency may differ depending on the usage environment. | |
| The appliance is located in an area with a lot of strong odors.If the appliance is used near where you cook or broil fish or meat, the lifespan of the filters will be greatly decreased.For best results, ventilate the area first by opening a window or using a vent hood. Use the appliance only to minimize odors left after ventilating the area. |
Wi-Fi
| Symptoms Possible | Causes & Solution |
| Your home appliance and smartphone is not connected to the Wi-Fi network. | The password for the Wi-Fi that you are trying to connect to is incorrect.Find the Wi-Fi network connected to your smartphone and remove it, then connect your appliance in LG ThinQ. |
| Mobile data for your smartphone is turned on.Turn off the Mobile data of your smartphone and connect the appliance using the Wi-Fi network. | |
| The wireless network name (SSID) is set incorrectly.The wireless network name (SSID) should be a combination of English letters and numbers. (Do not use special characters.) | |
| The router frequency is not 2.4 GHz.Only a 2.4 GHz router frequency is supported. Set the wireless router to 2.4 GHz and connect the appliance to the wireless router. To check the router frequency, check with your Internet service provider or the router manufacturer. | |
| The appliance is too far from the router.If the appliance is too far from the router, the signal may be weak and the connection may not be configured correctly. Move the router closer to the appliance. |
APPLIANCE SPECIFICATIONS
EN
- Appearance and specifications may vary without notice to improve the quality of the appliance.

Dual Model Single Model

| Name | AS651D Series, AS101D Series |
| Power | AC 110 V~ 60 Hz |
| Dual Model Exterior Dimensions(1 x 2 ) 3 | When Clean Booster is stopped: 376mm x 1073mm x 376mm |
| When Clean Booster is operating: 376mm x 1310mm x 376mm | |
| Single Model Exterior Dimensions(1 x 2 ) 3 | When Clean Booster is stopped: 343mm x 587mm x 343mm |
| When Clean Booster is operating: 343mm x 824mm x 343mm |
Memo
Memo
Memo
Memo
MANUAL DEL PROPIETARIO
PURIFICADOR DE AIRE

Modelo Doble

Modelo Soltero
1 Salida de aire (superior) / Intensificador de Limpieza (Clean booster)
1 Panel de Smart Diagnosis
PRECAUCIÓN
- Do not hold the outer cover when you carry the product. The cover may open accidentally, causing the product to drop.
Modelo Soltero


NOTA
NOTA
NOTA
3 Conecte su smartphone al router inalámbrico.

NOTA
NOTA
3 Separe el filtro ultrafino del filtro total.



- TABLE OF CONTENTS
- SAFETY INSTRUCTIONS ....3
- INSTALLATION....10
- OPERATION 14
- SMART FUNCTIONS....23
- MAINTENANCE....25
- TROUBLESHOOTING....29
- APPLIANCE SPECIFICATIONS....32
- SAFETY INSTRUCTIONS
- READ AND SAVE THESE INSTRUCTIONS
- WARNING
- CAUTION
- IMPORTANT SAFETY INSTRUCTIONS
- CHILDREN IN THE HOUSEHOLD
- INSTALLATION
- OPERATION
- MAINTENANCE
- BATTERY
- EN
- APPLIANCE OVERVIEW
- FRONT VIEW
- REAR VIEW
- 1 SMART DIAGNOSIS PANEL
- 2 PM1.0 (PARTICLES WITH A DIAMETER BETWEEN 1.0 AND 2.5 MICROMETERS) SENSOR
- 3 ODOR (GAS) SENSOR
- 4 FILTER
- COMPONENTS
- FILTER SYSTEM
- ① DEODORIZING CARE FILTER
- 2 SAFE PLUS FILTER
- ③ ULTRA-FINE FILTER
- 4 FILTER HANDLE
- UNPACKING THE APPLIANCE
- INSTALLATION LOCATION REQUIREMENTS
- TRANSPORTATION REQUIREMENTS
- WHEN CARRYING THE PRODUCT
- CONTROL PANEL
- ① DISPLAY OF AIR QUALITY
- ② DISPLAY OPERATING MODE
- ③ DISPLAY SPEED AND BOOSTER SPEED
- 4 SLEEP TIMER DISPLAY
- REMOTE CONTROLLER
- NOTE
- OPERATION STARTING
- USING THE MODE
- SMART MODE
- BOOSTER MODE
- ROTATING THE CLEAN BOOSTER
- DUAL MODE: ONLY FOR THE RELEVANT PRODUCT
- SINGLE MODE
- ADJUSTING THE FAN SPEED
- FAN SPEED DISPLAY
- CLEAN BOOSTER FAN SPEED
- BOOSTER SPEED DISPLAY
- USING THE EXTRA FUNCTIONS
- USING THE AIR IONIZER
- SETTING THE SLEEP TIMER
- LOCKING THE CONTROL PANEL
- CHECKING THE AIR QUALITY
- OVERVIEW THE OVERALL AIR QUALITY
- TURNING THE AIR QUALITY LIGHT ON/OFF
- CHECKING THE PARTICLES CONCESTRATION
- CHECKING THE AIR STATUS FROM THE STATUS DISPLAY PANEL
- SMART FUNCTIONS
- LG THINQ APPLICATION
- LG THINQ APPLICATION FEATURES
- SMART DIAGNOSIS
- SETTINGS
- BEFORE USING LG THINQ APPLICATION
- INSTALLING THE LG THINQ APPLICATION
- OPEN SOURCE SOFTWARE NOTICE INFORMATION
- USING LG THINQ TO DIAGNOSE ISSUES
- USING AUDIBLE DIAGNOSIS TO DIAGNOSE ISSUES
- MAINTAINING THE PRODUCT
- SCHEDULED MAINTENANCE
- ALERTS ON THE STATUS DISPLAY PANEL
- STORAGE
- CLEANING THE APPLIANCE
- CLEANING THE EXTERIOR
- CLEANING THE PARTICLES SENSOR
- MAINTAINING THE FILTER
- CLEANING THE FILTERS
- REPLACING THE FILTER
- DISABLING THE FILTER REPLACEMENT ALERT
- DISABLING THE FILTER REPLACEMENT ALERT (ONLY FOR RELEVANT MODELS)
- BEFORE CALLING FOR SERVICE
- PERFORMANCE
- NOISE
- APPLIANCE SPECIFICATIONS
- MANUAL DEL PROPIETARIO
- PURIFICADOR DE AIRE
- 1 PANEL DE SMART DIAGNOSIS
- PRECAUCIÓN
- MODELO SOLTERO
- NOTA
Brand : LG
Model : AS101DWH0
Category : Air purifier