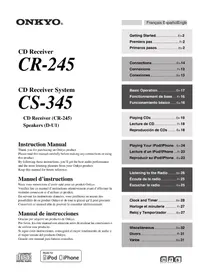
A-9377 - Audio Amplifier ONKYO - Free user manual and instructions
Find the device manual for free A-9377 ONKYO in PDF.
User questions about A-9377 ONKYO
0 question about this device. Answer the ones you know or ask your own.
Ask a new question about this device
Download the instructions for your Audio Amplifier in PDF format for free! Find your manual A-9377 - ONKYO and take your electronic device back in hand. On this page are published all the documents necessary for the use of your device. A-9377 by ONKYO.
USER MANUAL A-9377 ONKYO
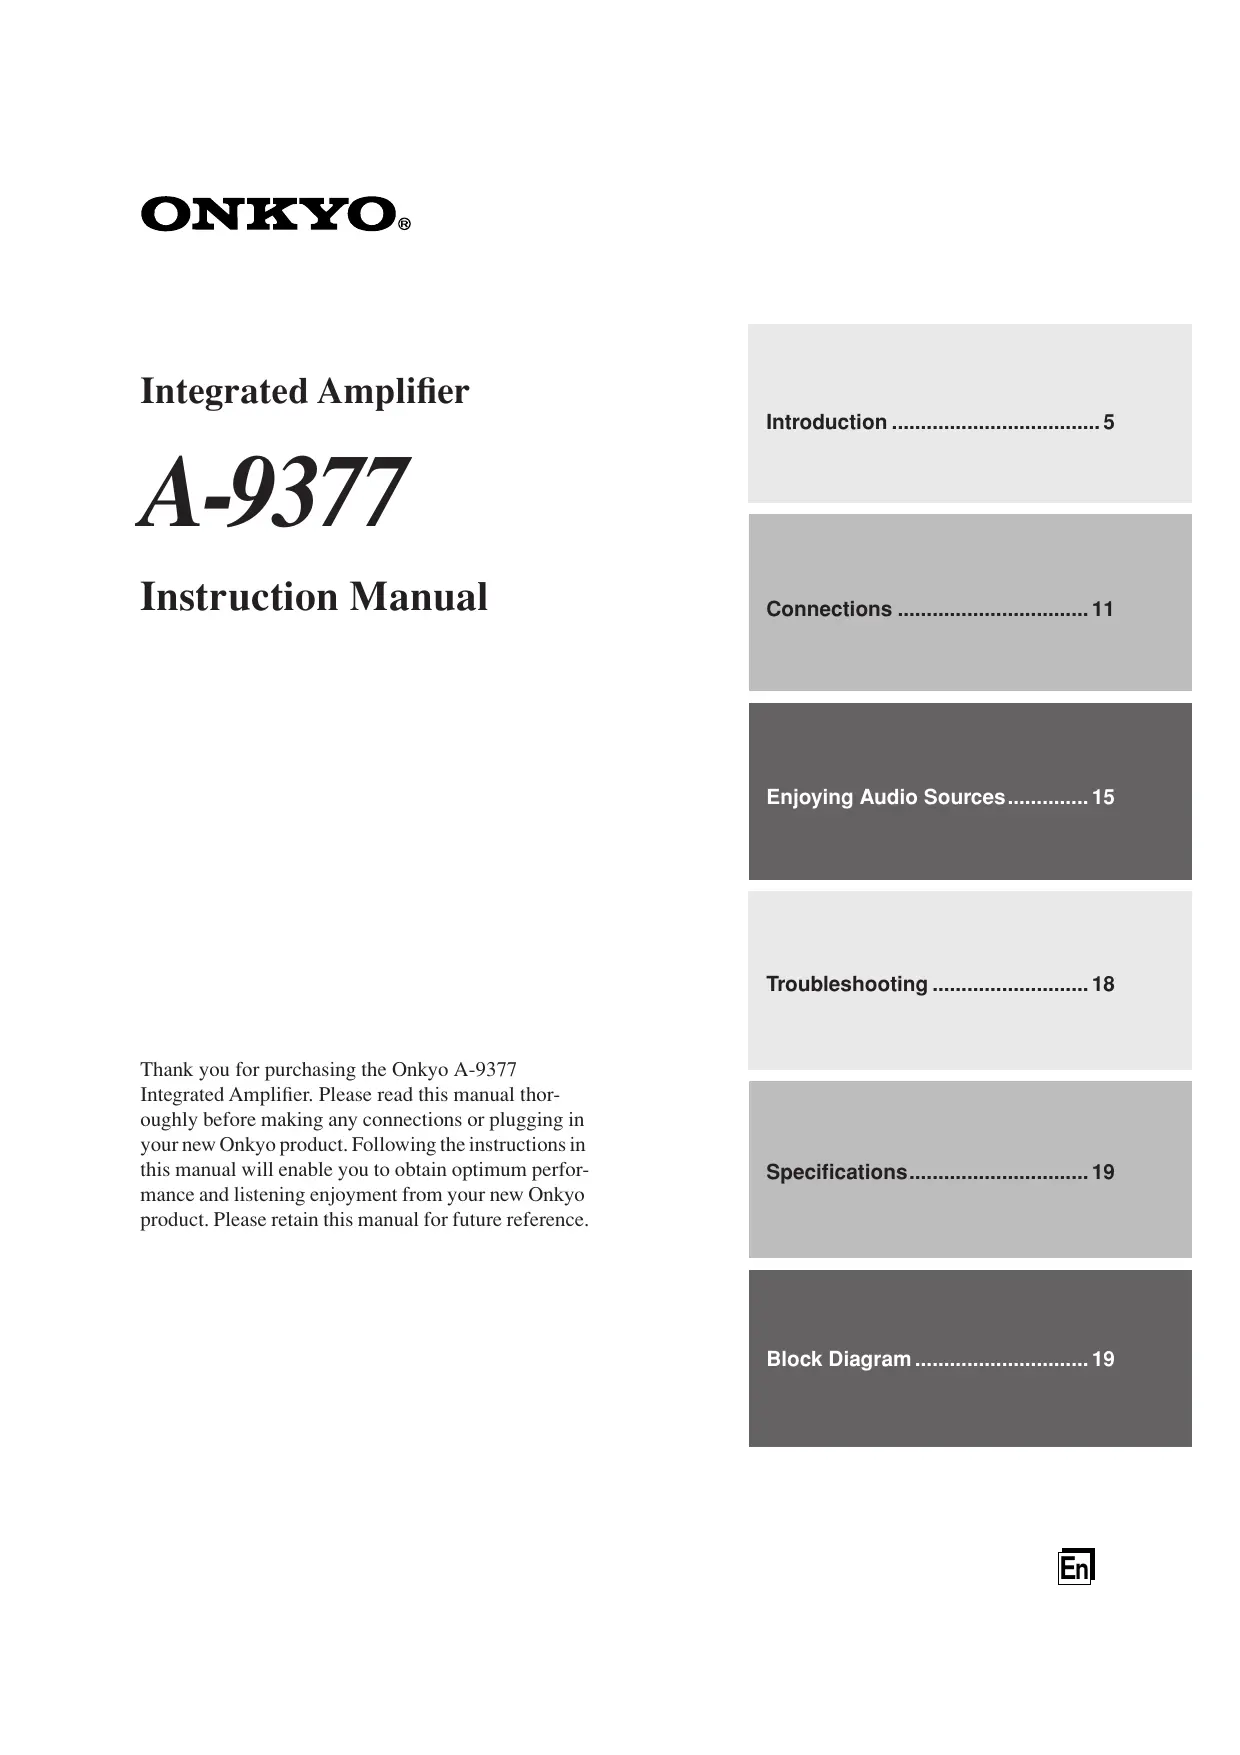
Integrated Amplifier
A-9377
Instruction Manual
Introduction 5
Connections 11
Enjoying Audio Sources. 15
Troubleshooting 18
Specifications. 19
Block Diagram 19
Thank you for purchasing the Onkyo A-9377
Integrated Amplifier. Please read this manual thoroughly before making any connections or plugging in your new Onkyo product. Following the instructions in this manual will enable you to obtain optimum performance and listening enjoyment from your new Onkyo product. Please retain this manual for future reference.
WARNING:
TO REDUCE THE RISK OF FIRE OR ELECTRIC SHOCK, DO NOT EXPOSE THIS APPARATUS TO RAIN OR MOISTURE.
CAUTION:
TO REDUCE THE RISK OF ELECTRIC SHOCK, DO NOT REMOVE COVER (OR BACK). NO USER-SERVICEABLE PARTS INSIDE. REFER SERVICING TO QUALIFIED SERVICE PERSONNEL.

WARNING
RISK OF ELECTRIC SHOCK
DO NOT OPEN
AVIS
RISQUE DE CHOC ELECTRIQUE
NE PAS OUVIR


The lightning flash with arrowhead symbol, within an equilateral triangle, is intended to alert the user to the presence of uninsulated "dangerous voltage" within the product's enclosure that may be of sufficient magnitude to constitute a risk of electric shock to persons.

The exclamation point within an equilateral triangle is intended to alert the user to the presence of important operating and maintenance (servicing) instructions in the literature accompanying the appliance.
Important Safety Instructions
-
Read these instructions.
-
Keep these instructions.
-
Heed all warnings.
-
Follow all instructions.
-
Do not use this apparatus near water.
-
Clean only with dry cloth.
-
Do not block any ventilation openings. Install in accordance with the manufacturer's instructions.
-
Do not install near any heat sources such as radiators, heat registers, stoves, or other apparatus (including amplifiers) that produce heat.
-
Do not defeat the safety purpose of the polarized or grounding-type plug. A polarized plug has two blades with one wider than the other. A grounding type plug has two blades and a third grounding prong. The wide blade or the third prong are provided for your safety. If the provided plug does not fit into your outlet, consult an electrician for replacement of the obsolete outlet.
-
Protect the power cord from being walked on or pinched particularly at plugs, convenience receptacles, and the point where they exit from the apparatus.
-
Only use attachments/accessories specified by the manufacturer.
-
Use only with the cart, stand, tripod, bracket, or table specified by the manufacturer, or sold with the apparatus. When a cart is used, use caution when moving the cart/apparatus combination to avoid injury from tip-over.

PORTABLE CART WARNING
- Unplug this apparatus during lightning storms or when unused for long periods of time.
-
Refer all servicing to qualified service personnel. Servicing is required when the apparatus has been damaged in any way, such as power-supply cord or plug is damaged, liquid has been spilled or objects have fallen into the apparatus, the apparatus has been exposed to rain or moisture, does not operate normally, or has been dropped.
-
Damage Requiring Service
Unplug the apparatus from the wall outlet and refer servicing to qualified service personnel under the following conditions:
A. When the power-supply cord or plug is damaged,
B. If liquid has been spilled, or objects have fallen into the apparatus,
C. If the apparatus has been exposed to rain or water,
D. If the apparatus does not operate normally by following the operating instructions. Adjust only those controls that are covered by the operating instructions as an improper adjustment of other controls may result in damage and will often require extensive work by a qualified technician to restore the apparatus to its normal operation,
E. If the apparatus has been dropped or damaged in any way, and
F. When the apparatus exhibits a distinct change in performance this indicates a need for service.
- Object and Liquid Entry
Never push objects of any kind into the apparatus through openings as they may touch dangerous voltage points or short-out parts that could result in a fire or electric shock.
The apparatus shall not be exposed to dripping or splashing and no objects filled with liquids, such as vases shall be placed on the apparatus.
Do not put candles or other burning objects on top of this unit.
- Batteries
Always consider the environmental issues and follow local regulations when disposing of batteries.
- If you install the apparatus in a built-in installation, such as a bookcase or rack, ensure that there is adequate ventilation.
Leave 20cm (8") of free space at the top and sides and 10cm (4") at the rear. The rear edge of the shelf or board above the apparatus shall be set 10cm (4") away from the rear panel or wall, creating a flue-like gap for warm air to escape.
-
Recording Copyright—Unless it's for personal use only, recording copyrighted material is illegal without the permission of the copyright holder.
-
AC Fuse—The AC fuse inside the unit is not user-serviceable. If you cannot turn on the unit, contact your Onkyo dealer.
-
Care—Occasionally you should dust the unit all over with a soft cloth. For stubborn stains, use a soft cloth dampened with a weak solution of mild detergent and water. Dry the unit immediately afterwards with a clean cloth. Do not use abrasive cloths, thinners, alcohol, or other chemical solvents, because they may damage the finish or remove the panel lettering.
4. Power Warning
BEFORE PLugging IN THE UNIT FOR THE FIRST TIME, READ THE FOLLOWING SECTION CAREFULLY.
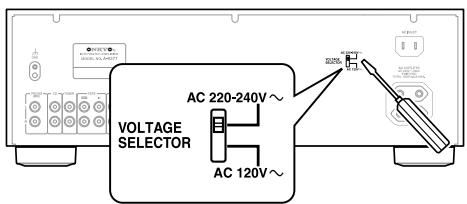
AC outlet voltages vary from country to country. Make sure that the voltage in your area meets the voltage requirements printed on the unit's rear panel (AC 120/220-240 V, 50/60 Hz).
The power cord plug is used to disconnect this unit from the AC power source. Make sure that the plug is readily operable (easily accessible) at all times.
Some models have a voltage selector switch for compatibility with power systems around the world. Before you plug in such a model, make sure that the voltage selector is set to the correct voltage for your area. If it isn't, use a small screwdriver to set it as appropriate. For example, if the voltage in your area is 120 volts, set the selector to "120V." If it's between 220 and 240 volts, set it to "220-240 V."
- Never Touch this Unit with Wet Hands—Never handle this unit or its power cord while your hands are wet or damp. If water or any other liquid gets inside this unit, have it checked by your Onkyo dealer.
6. Handling Notes
- If you need to transport this unit, use the original packaging to pack it how it was when you originally bought it.
- Do not leave rubber or plastic items on this unit for a long time, because they may leave marks on the case.
-
This unit's top and rear panels may get warm after prolonged use. This is normal.
-
If you do not use this unit for a long time, it may not work properly the next time you turn it on, so be sure to use it occasionally.
For European Models
Declaration of Conformity
We, ONKYO EUROPE ELECTRONICS GmbH LIEGNITZERSTRASSE 6, 82194 GROEBENZELL, GERMANY

declare in own responsibility, that the ONKYO product described in this instruction manual is in compliance with the corresponding technical standards such as EN60065, EN55013, EN55020 and EN61000-3-2, -3-3.
GROEBENZELL, GERMANY

ONKYO EUROPE ELECTRONICS GmbH
Introduction
Features 5
Supplied Accessories 5
Front Panel 6
Rear Panel 7
Remote Controller 8
Buttons for Controlling the A-9377 8
Buttons for Controlling Other Onkyo Components 9
Installing the Batteries 10
Aiming the Remote Controller 10
Connections
Connecting Your Speakers 11
Speaker Connection Precautions 11
Connecting the Speaker Cables 11
Connecting Your Components 12
Audio Connection Precautions 12
Connecting a Turntable 12
Connecting a CD Player 12
Connecting a Tuner 12
Connecting a Cassette Deck. 13
Connecting an Onkyo RI Dock. 13
Connecting a Component with a Line Output (TV, game console, etc.) 13
Connecting a Power Amplifier 13
Connecting RI Components 14
Power Connections 14
Connecting the Power Cords of Other Components 14
Connecting the A-9377's Power Cord 14
Enjoying Audio Sources
Turning On the A-9377 15
Selecting Speakers 15
Using Headphones 15
Listening to Components 16
Selecting the Input Source 16
Adjusting the Volume 16
Muting the A-9377 16
Using the Direct Function 16
Adjusting the Bass, Treble, and Balance 17
Recording 17
Appendix
Troubleshooting 18
Specifications 19
Block Diagram 19
Features
90 W/Ch into 4 ohms (IEC)
WRAT—Wide Range Amplifier Technology
All discrete output stage circuitry
Massive power transformer
Precision motor volume control
Tone control (bass/treble)
□ Direct mode
Rec selector
6 inputs and 2 outputs
Phono input
Preout output
Speaker A/B drive
Hi-rigidity, anti-resonant chassis
Aluminum front panel and volume knob
Headphone jack
Compatible with RI Dock for iPod
□ RI-compatible remote controller
Supplied Accessories
Make sure you have the following accessories:
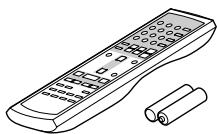
Remote controller and two batteries (AA/R6)
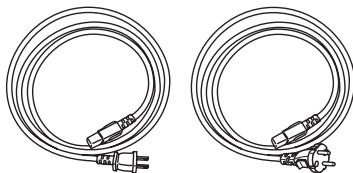
Power cord
Depending on the destination country, two power cords may be included. Use the cord that's compatible with your wall outlet.
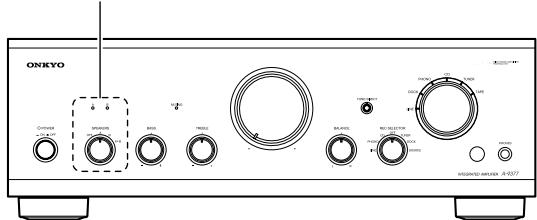
Front Panel
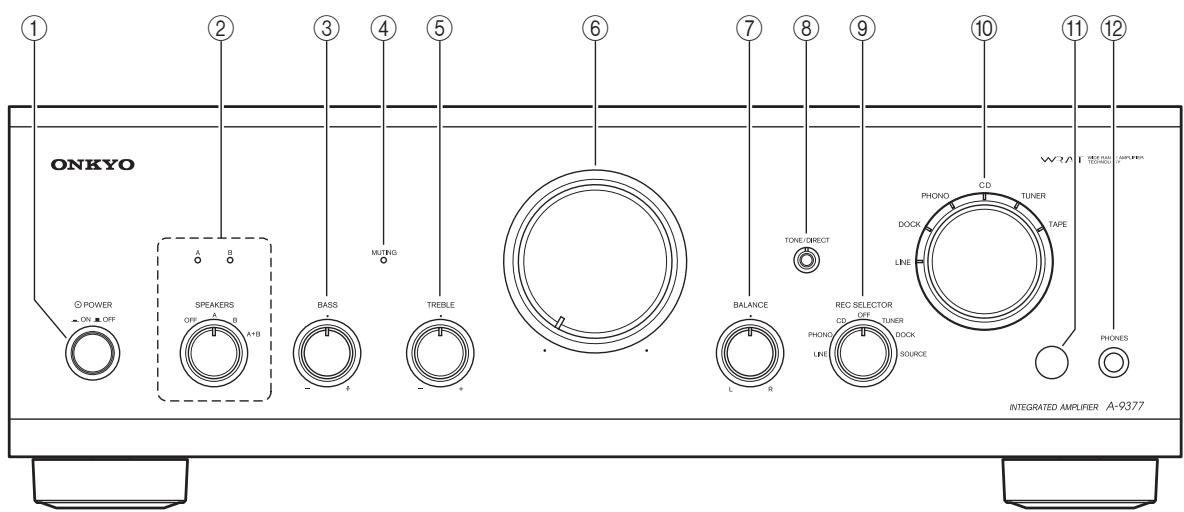
For detailed information, refer to the pages in parentheses.
① POWER ON/OFF switch (15)
Turns the A-9377 on or off.
② SPEAKERS selector and indicators (15)
Selects speaker set A, speaker set B, both sets of speakers, or turns the speakers off altogether. The A and B indicators show which speaker set is selected.
BASS control (17)
Adjusts the level of bass sounds.
④ MUTING indicator (16)
Lights up when the A-9377 is muted.
⑤ TREBLE control (17)
Adjusts the level of treble sounds.
Volume control (16)
Adjusts the volume.
⑦ BALANCE control (17)
Adjusts the balance of the left and right channels.
⑧ TONE/DIRECT button and indicator (16)
Turns the Direct function on or off. The indicator lights up when the Direct function is on.
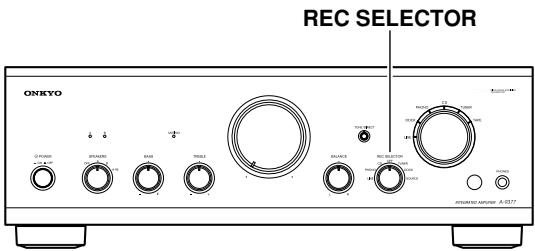
REC SELECTOR (17)
Selects the source to be recorded: LINE, PHONO, CD, OFF, TUNER, DOCK, SOURCE.
10 Input Selector and indicators (16)
Selects the input source: LINE, DOCK, PHONO, CD, TUNER, or TAPE. The indicators show which input source is selected.
① Remote control sensor (10)
Receives control signals from the remote controller.
12 PHONES jack (15)
Phone jack for connecting a pair of headphones.
Rear Panel
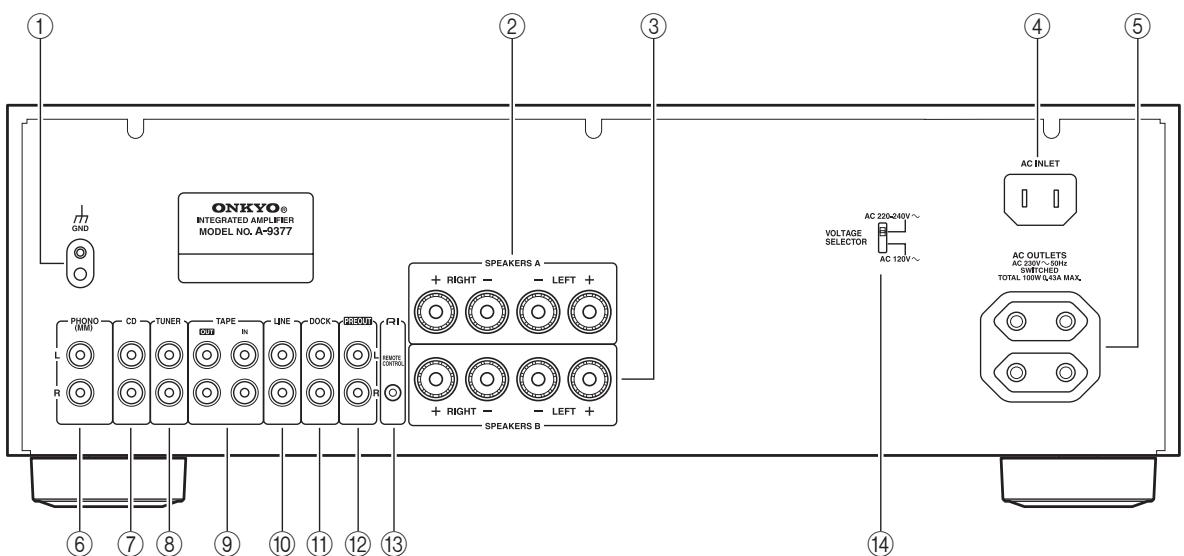
* The type and number of connectors depends on the destination country.
① GND terminal
Terminal for connecting a turntable's ground wire.
② SPEAKERS A
Terminal posts for connecting speaker set A.
③ SPEAKERS B
Terminal posts for connecting speaker set B.
(4) AC INLET
Supplied power cord connects here.
⑤ AC OUTLETS
Supply AC power to other audio components. The type of connector depends on the destination country.
⑥ PHONO (MM)
Analog audio input for connecting a turntable with a moving-magnet cartridge.
⑦ CD
Analog audio input for connecting a CD player.
(8) TUNER
Analog audio input is for connecting a tuner.
⑨ TAPE IN/OUT
Analog audio input and output for connecting a cassette deck.
10 LINE
Analog audio input for connecting a component with a line-level audio output (e.g., game console, TV, etc.)
1 DOCK
Analog audio input for connecting an RI Dock.
12 PREOUT
Analog audio output for connecting a separate power amplifier.
Note:
- Do not connect a source component to the PRE-OUT jacks.
13 RI REMOTE CONTROL
RI (Remote Interactive) jacks can be connected to RI jacks on other Onkyo audio components so that you can control them with the A-9377's remote controller. To use RI, you must also make an analog audio connection between the A-9377 and each component.
14 VOLTAGE SELECTOR (not European model)
If your A-9377 has a VOLTAGE selector, set it to match the AC voltage used in your area before plugging in the power cord. (See page 3.)
See pages 11-14 for connection information.
Remote Controller
In the illustration below, numbers in circles indicate buttons that can be used to control the A-9377. These buttons are explained on this page. Numbers in squares indicate buttons that can be used to control other Onkyo audio components connected to the A-9377 via RI. These buttons are explained on the next page.
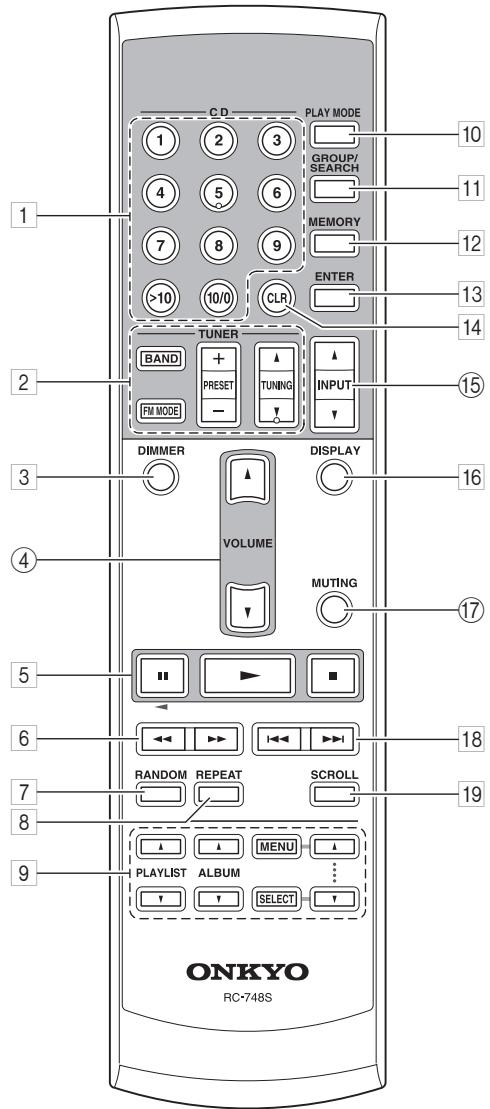
Buttons for Controlling the A-9377
The following buttons control the A-9377:
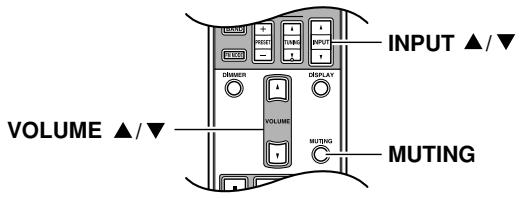
④ VOLUME [▲]/[▼] (16)
Adjusts the volume of the A-9377.
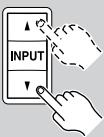
15 INPUT [▲]/[▼] (16)
Selects the input source: LINE, DOCK, PHONO, CD, TUNER, or TAPE.
⑰ MUTING (16)
Mutes the A-9377.
Buttons for Controlling Other Onkyo Components
When other Onkyo audio components are connected to the A-9377 via RI, you can control them with the A-9377's remote controller. The operation of each button depends on the selected input source. For example, when the DOCK input source is selected, the [RANDOM] button will operate an RI Dock/iPod's Shuffle function. But when the TAPE input source is selected, it will operate a cassette deck's Dolby NR function.
The following table lists the function of the remote controller's buttons for each input source. Where no function is listed, the button does nothing. Refer to each component's instruction manual for complete operating instructions.
| Remote controller button | DOCK (RI Dock) | CD (CD player) | TUNER (Tuner) | TAPE (Cassette deck) | |
| 1 | CD [1]...[9] | [1]...[9] | |||
| [>10] | [>10] | ||||
| [10/0] | [10/0] | ||||
| 2 | [BAND] | [BAND] | |||
| [FM MODE] | [FM MODE] | ||||
| PRESET [+]/[−] | PRESET [+]/[−] | ||||
| TUNING [▲]/[▼] | TUNING [▲]/[▼] | ||||
| 3 | [DIMMER] | [DIMMER] | |||
| 5 | Pause [■] | Pause [■] | Pause [■] | Reverse Play [▲]*1 | |
| Play [▷] | Play [▷] | Play [▷] | Play [▷]*1 | ||
| Stop [■] | Pause [■] | Stop [■] | Stop [■]*1 | ||
| 6 | Rew/FF [←] /[▷] | Rew/FF [←]/[▷] | Rew/FF [←]/[▷] | ||
| 7 | [RANDOM] | [SHUFFLE] | [RANDOM] | [DOLBY NR] | |
| 8 | [REPEAT] | [REPEAT] | [REPEAT] | [REV MODE] | |
| 9 | PLAYLIST [▲]/[▼] | PLAYLIST [▲]/[▼] | |||
| ALBUM [▲]/[▼] | ALBUM [▲]/[▼] | ||||
| MENU/SELECT [▲]/[▼] | MENU/SELECT [▲]/[▼] | ||||
| 10 | [PLAY MODE] | [PLAY MODE] | |||
| 11 | [GROUP/SEARCH] | [SEARCH]*2 | |||
| 12 | [MEMORY] | [MEMORY] | |||
| 13 | [ENTER] | [ENTER] | |||
| 14 | [CLR] | [CLR] | |||
| 16 | [DISPLAY] | [BACKLIGHT] | [DISPLAY] | ||
| 18 | Prev/Next [←] /[▷] | Prev/Next [←]/[▷] | Prev/Next [←]/[▷] | Rew/FF [←]/[▷] | |
| 19 | [SCROLL] | [BACKLIGHT] | |||
- On a double cassette deck, only deck B can be controlled.
- For use with MP3 CDs.
Note:
- With some components, some buttons may not work as expected. Refer to the component's instruction manual for complete operating instructions.
Installing the Batteries
1 To open the battery compartment, press the small hollow and slide open the cover.
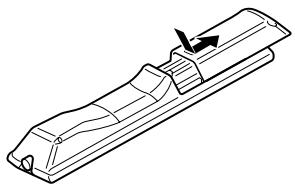
2 Insert the two supplied batteries (AA/R6) in accordance with the polarity diagram inside the battery compartment.
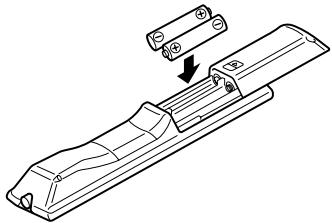
3 Slide the cover shut.

Notes:
- If the remote controller doesn't work reliably, try replacing the batteries.
- Do not mix new and old batteries or different types of batteries.
- If you intend not to use the remote controller for a long time, remove the batteries to prevent damage from leakage or corrosion.
- Expired batteries should be removed as soon as possible to prevent damage from leakage or corrosion.
Aiming the Remote Controller
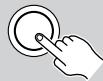
When using the remote controller, point it toward the A-9377's remote control sensor, as shown below.
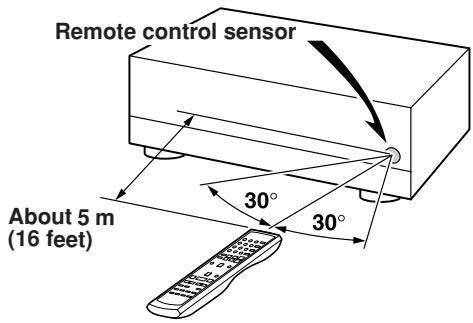
Notes:
- The remote controller may not work reliably if the A-9377 is subjected to bright light, such as direct sunlight or inverter-type fluorescent lights. Keep this in mind when installing.
- If another remote controller of the same type is used in the same room, or the A-9377 is installed close to equipment that uses infrared rays, the remote controller may not work reliably.
- Do not put anything on top of the remote controller, such as a book or magazine, because a button may be pressed continuously, thereby draining the batteries.
- The remote controller may not work reliably if the A-9377 is installed in a rack behind colored glass doors. Keep this in mind when installing.
- The remote controller will not work if there's an obstacle between it and the A-9377's remote control sensor.
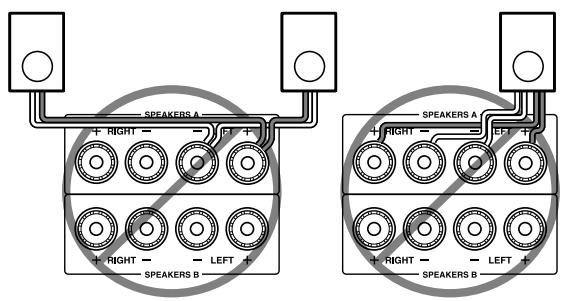
Connecting Your Speakers
You can connect one or two sets of speakers (A/B) to the A-9377 and select which set outputs sound, or use both sets simultaneously.
Speaker Connection Precautions
- Always connect speakers in pairs.
- If you want to output sound from speaker sets A and B simultaneously, you must use speakers with an impedance of 8 to 16 ohms. If you connect speakers with a lower impedance, and use the A-9377 at high volume levels for a long period, the built-in protection circuit may be activated.
- If your speakers have an impedance of 4 to 8 ohms, connect them to either the SPEAKERS A or SPEAKERS B terminals, or do not output sound from both speaker sets simultaneously.
- Disconnect the power cord from the wall outlet before making any connections.
- Read the instructions supplied with your speakers.
- Pay close attention to speaker wiring polarity. In other words, connect positive (+) terminals only to positive (+) terminals, and negative (-) terminals only to negative (-) terminals. If you get them the wrong way around, the sound will be out of phase and will sound unnatural.
- Unnecessarily long or very thin speaker cables may affect the sound quality and should be avoided.
- Be careful not to short the positive and negative wires. Make sure also the wires do not touch the rear panel. Doing so may damage the A-9377.
- Do not connect more than one cable to each speaker terminal. Doing so may damage the A-9377.
- Do not connect a speaker to more than one pair of speaker terminals.
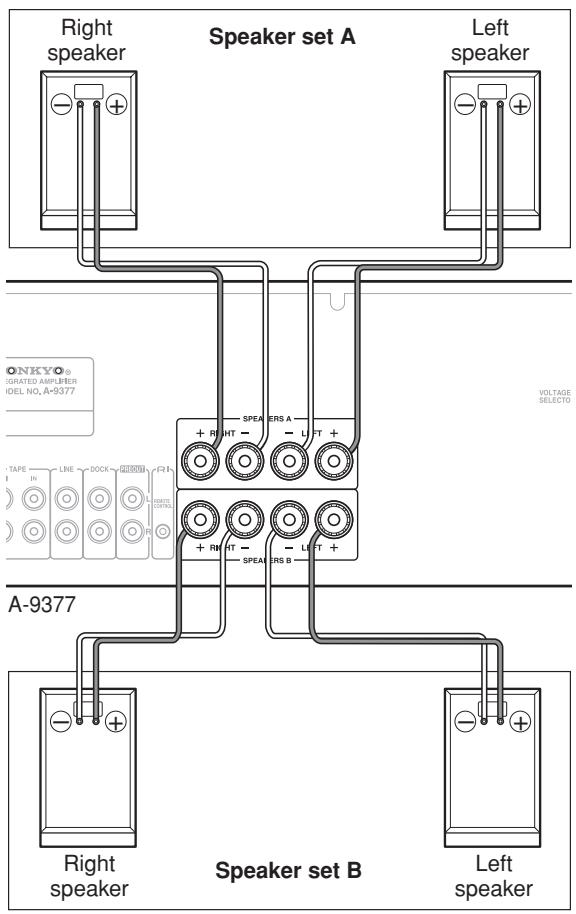
Connecting the Speaker Cables
| 1 | Strip about 15 mm (5/8 in.) of insulation from the ends of the speaker cables, and twist the bare wires tightly, as shown. | 15 mm (5/8") |
| 2 | Unscrew the terminal. | |
| 3 | Fully insert the bare wires. | |
| 4 | Screw the terminal tight. |
The following illustration shows which speaker should be connected to each pair of terminals.
Connecting Your Components
Audio Connection Precautions
- Always refer to the instruction manual that came with the component you are connecting.
- Do not plug in the power cord until all connections have been made.
RCA Connection Color Coding
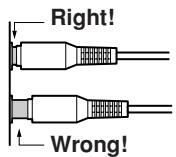
- Red connectors are used for the right channel, and white connectors are used for the left channel.
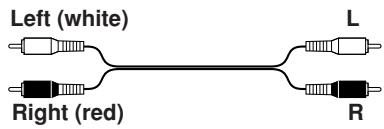
- Push each plug in all the way to make a good connection (loose connections can cause noise or malfunctions).
- Do not bind audio cables with power cords and speaker cables. Doing so may adversely affect the sound quality.
- To prevent interference, keep power cords and speaker cables away from the tuner's antenna.
Connecting a Turntable
The A-9377's PHONO input is designed for use with a turntable fitted with a moving-magnet (MM) cartridge. Use an analog audio cable to connect the A-9377's PHONO L/R jacks to the audio output jacks on the turntable, as shown. If there are RCA shorting plugs in the jacks, remove them before connecting.
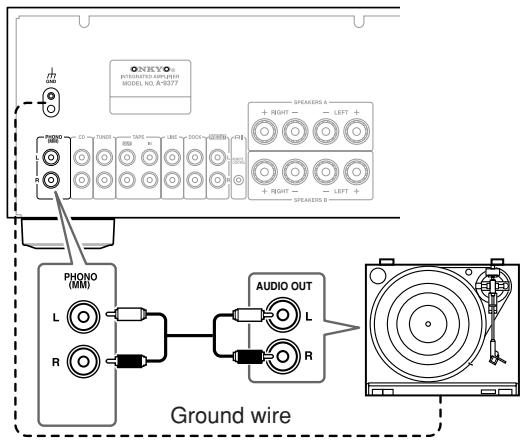
Notes:
- If the turntable has a ground wire, connect it to A-9377's GND terminal. With some turntables, connecting the ground wire may cause hum, in which case it should be disconnected.
- If the turntable has a moving-coil (MC) type cartridge, you'll need a commercially available MC head amp or transformer. In this case, connect the turntable to the head amp or transformer, and connect that to the A-9377's PHONO L/R jacks.
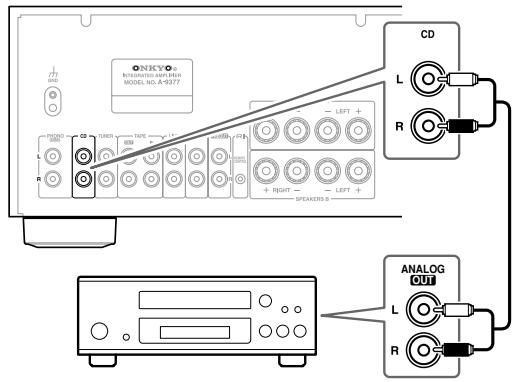
Connecting a CD Player
Use an analog audio cable to connect the A-9377's CD L/R jacks to the analog audio output jacks on the CD player, as shown.
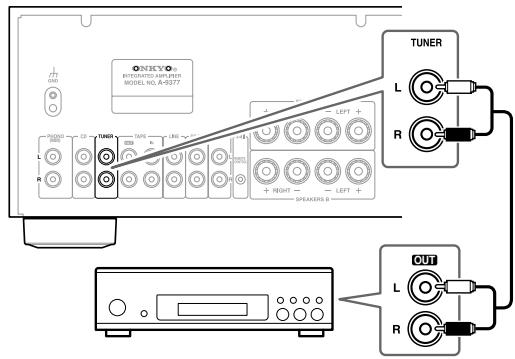
Connecting a Tuner
Use an analog audio cable to connect the A-9377's TUNER L/R jacks to the analog audio output jacks on the tuner, as shown.
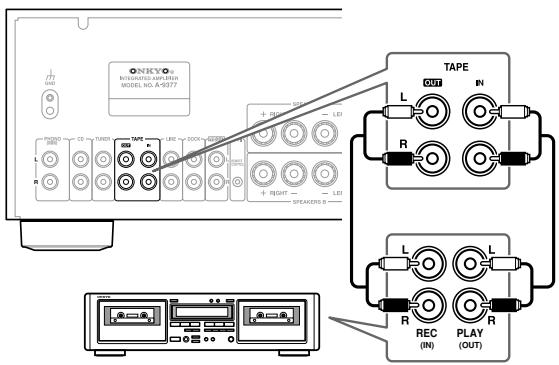
Connecting a Cassette Deck
Use an analog audio cable to connect the A-9377's TAPE IN L/R jacks to the cassette deck's analog audio output jacks, and use another analog audio cable to connect the A-9377's TAPE OUT L/R jacks to the cassette deck's analog audio input jacks, as shown.
Connecting an Onkyo RI Dock
Use an analog audio cable to connect the A-9377's DOCK L/R jacks to the RI Dock's analog audio output jacks, and use an RI cable to connect the A-9377's RI jack to the RI Dock's RI jack, as shown.
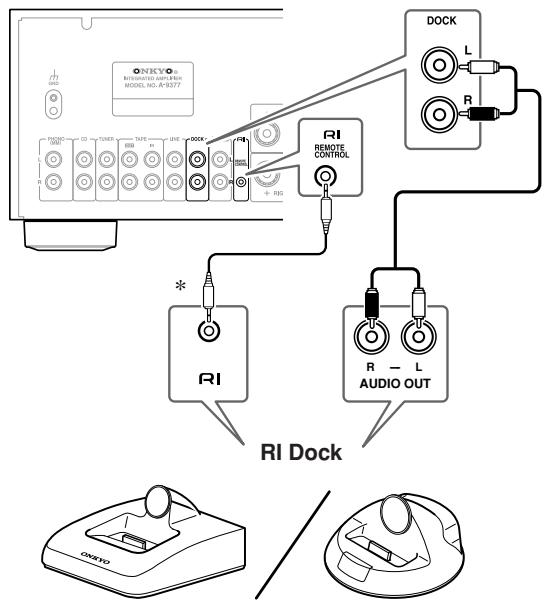
- See page 14 if you need to connect several Rl-capable Onkyo components to the A-9377.
Note:
- If you have an RI Dock such as the DS-A1 or DS-A2, set its RI MODE switch to "HDD" or "HDD/DOCK." Refer to the RI Dock's instruction manual for details.
Connecting a Component with a Line Output (TV, game console, etc.)
Use an analog audio cable to connect the A-9377's LINE L/R jacks to the line output jacks on the TV or other component, as shown.
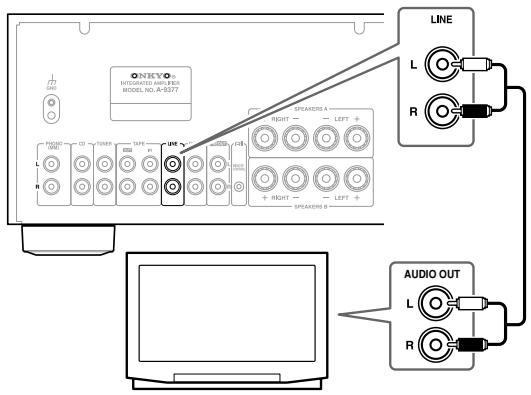
Note:
- If your TV doesn't have an audio output, connect your VCR's audio output to the A-9377, and use your VCR's tuner to listen to the TV.
Connecting a Power Amplifier
You can use the A-9377 as just a preamplifier and connect it to a more powerful power amplifier.
Use an analog audio cable to connect the A-9377's PREOUT L/R jacks to the analog audio input jacks on the power amplifier, as shown.
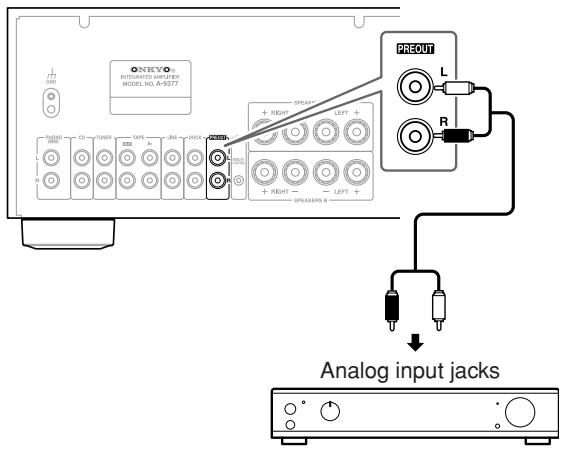
Note:
- Signals output by the PREOUT jacks are not affected by the A-9377's Volume, BALANCE, BASS, and TREBLE controls.
- When the A-9377 is connected to a power amplifier, if the power amplifier is off and the A-9377 is used on its own, the sound may be distorted. To prevent this, always turn on the power amplifier, or disconnect it from the A-9377.
Connecting R1 Components
Connecting the A-9377 to your other Onkyo R1-capable components with R1 cables allows you to control them all with the A-9377's remote controller, like an integrated system, with the following functionality.
Direct Change
When playback is started on a component connected with RI, the A-9377 will automatically select that component as the input source.
Remote Control
You can control components connected with from the A-9377's remote controller. See page 9 for details.
To use all Rl functionality, in addition to an Rl connection, each component must be connected to an analog audio input on the A-9377.
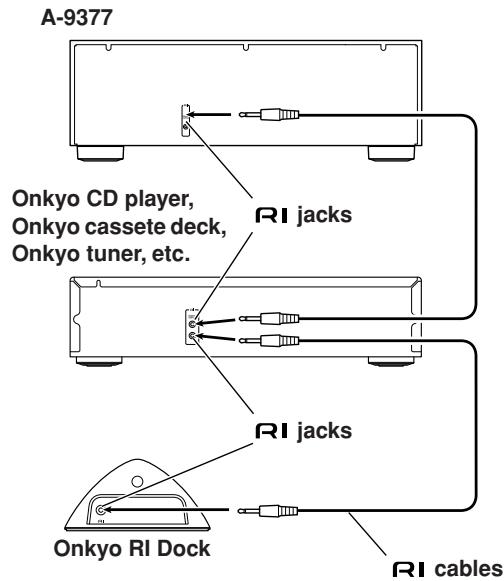
Notes:
- Push plugs in all the way to make good connections.
- RI cables are special cables solely for use with Onkyo products (no RI cables are supplied with the A-9377). Use only RI cables for RI connections.
- Connect RI jacks to only RI-capable Onkyo components. Connecting them to other manufacturers' component may cause a malfunction.
- Some RI-capable Onkyo components may not support all RI functionality. Refer to each component's instruction manual for full details.
Power Connections
Connecting the Power Cords of Other Components
The A-9377 has switched AC outlets on its rear panel that can be used to connect the power cords of other components that you intend to use with the A-9377.
These components can then be left turned on so that they turn on and off as and when the A-9377 is turned on and off.
Use the AC outlets for components that have no Standby function, such as the Onkyo CD Player. RI-capable Onkyo components with a Standby function must be connected directly to a wall outlet.
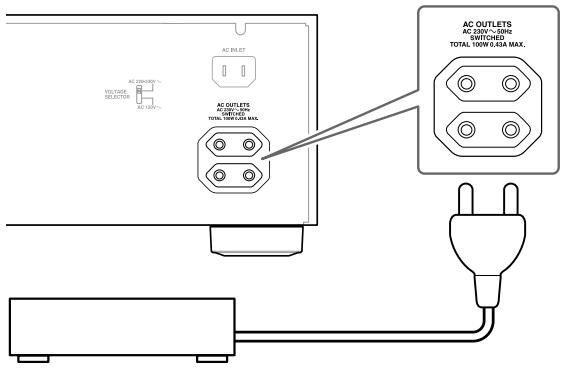
Cautions:
- Connect only audio components to the AC OUT-LETS.
- Make sure the total capacity of the components you connect to the AC OUTLETS does not exceed the maximum capacity stated on the A-9377's rear panel (TOTAL 100 W).
Connecting the A-9377's Power Cord
- Before connecting the power cord, connect all of your speakers and audio components.
- Turning on the A-9377 may cause a momentary power surge, which might interfere with other electrical equipment on the same circuit. If this is an issue, plug the A-9377 into a different branch circuit.
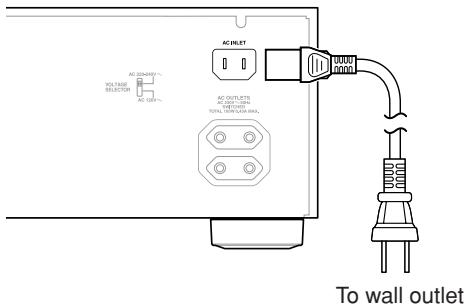
For optimum performance, plug the A-9377 into its own wall outlet. Do not connect it to a wall outlet that's also used by a high-power appliance, such as a heater.
Turning On the A-9377
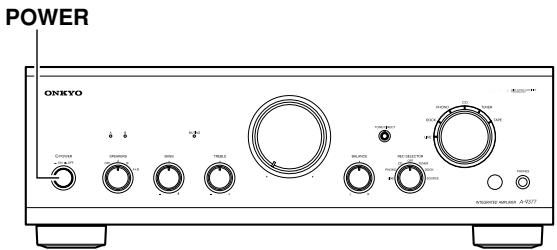
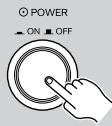
To turn on the A-9377, press the [POWER] switch.
On the Input Selector, the indicator for the currently selected source lights up.
When the A-9377 is turned on, to protect the speakers, it outputs no sound for about 5 seconds, allowing the internal circuitry time to stabilize.
To turn off the A-9377, press the [POWER] switch again.
Selecting Speakers
SPEAKERS selector
You can select which set of speakers outputs sound.
| A O B OFF A B A+B | Use the SPEAKERS selector to select the speakers. OFF: No speakers output sound. A: Speaker set A outputs sound. B: Speaker set B outputs sound. A+B: Both speaker set A and speaker set B output sound. The A and B indicators show which speaker set is selected. |
Using Headphones
You can connect a pair of stereo headphones (1/4-inch phone plug) to the A-9377's PHONES jack for private listening.

Notes:
- Always turn down the volume before connecting your headphones.
- The speakers are not turned off when the headphones plug is inserted in the PHONES jack. To turn off the speakers, set the SPEAKERS selector to OFF.

Listening to Components
Selecting the Input Source
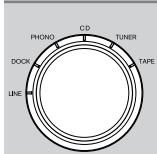
Use the Input Selector to select the source component you want to listen to.
LINE: Component connected to the LINE jacks.
DOCK: Component connected to the DOCK jacks.
PHONO: Turntable connected to the PHONO jacks.
CD: Component connected to the CD jacks.
TUNER: Component connected to the TUNER jacks.
TAPE: Component connected to the TAPE IN jacks.
Remote controller
You can also use the remote controller's INPUT [ ] / [ ] buttons to select the input source.
Adjusting the Volume

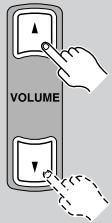
Remote controller
To adjust the volume, use the A-9377's Volume control, or the remote controller's VOLUME
[] / [] buttons.
Turn the Volume control clockwise to increase the volume; counterclockwise to decrease it.
Muting the A-9377
You can temporarily mute the output of the A-9377.
Remote controller
MUTING
Press the remote controller's [MUTING] button.
The output of the A-9377 is muted and the MUTING indicator flashes.
MUTING

To unmute the A-9377, press the [MUTING] button again.
The Mute function can also be cancelled by adjusting the Volume control or pressing the remote controller's VOLUME [ ] / [ ] buttons.
Using the Direct Function
With the Direct function, you can bypass the tone controls for a purer sound.
TONE/DIRECT

Press the A-9377's [TONE/DIRECT] button.
The tone controls are bypassed and the TONE/DIRECT indicator lights up.
TONE/DIRECT

To turn off the Direct function, press the [TONE/DIRECT] button again.
The Direct function turns off and the TONE/DIRECT indicator goes off.
Note:
- The BASS and TREBLE tone controls have no effect while the Direct function is on.
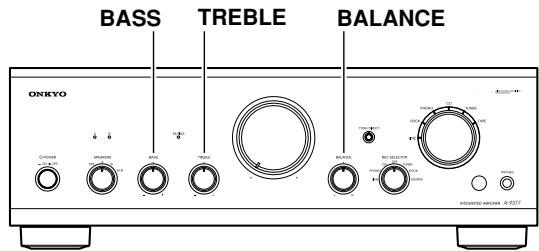
Adjusting the Bass, Treble, and Balance
| BASS - + | Use the BASS control to adjust the bass. Turn the control clockwise to increase the level of bass sounds; counterclockwise to decrease the level. |
| TREBLE - + | Use the TREBLE control to adjust the treble. Turn the control clockwise to increase the level of treble sounds; counterclockwise to decrease the level. |
| BALANCE L R | Use the BALANCE control to adjust the left/right balance. Turn the control clockwise to increase the level of right speaker; counterclockwise to increase the level of left speaker. Normally, it should be set to the central position. |
Recording
Unless you have the full consent of the copyright holder, copyright laws prohibit using your recordings for anything other than personal enjoyment!
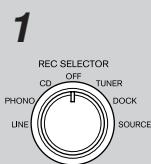
Use the REC SELECTOR to select the source you want to record.
LINE: Component connected to the LINE jacks.
PHONO: Turntable connected to the PHONO jacks.
CD: Component connected to the CD jacks.
OFF: Nothing is output by the TAPE OUT L/R jacks.
TUNER: Component connected to the TUNER jacks.
DOCK: Component connected to the DOCK jacks.
SOURCE: Component selected by the Input Selector.
2 Prepare the recorder:
- Set the recorder so that it's ready for recording.
- If necessary, adjust the recording level on the recorder.
- See the recorder's instruction manual for more information.
3 Start playback on the source component.
Notes:
- Signals output by the TAPE OUT L/R jacks are not affected by the A-9377's Volume, BALANCE, BASS, and TREBLE controls.
- If you're using an Onkyo cassette deck that's connected via R1, for dubbing or synchro recording, set the REC SELECTOR to SOURCE.
If you have any trouble using the A-9377, look for a solution here. If you cannot resolve the issue yourself, contact your Onkyo dealer.
Power
Cannot turn on the A-9377.
- Make sure that the power cord is properly plugged into the wall outlet.
- Unplug the power cord from the wall outlet, wait ten seconds or more, then plug it in again.
The SPEAKERS A and B indicators are both flashing.
- The amp protection circuit has been activated. Set the POWER switch to OFF immediately, remove the power cord from the wall outlet, and contact your Onkyo dealer.
Audio
There's no sound or it's very quiet.
- Make sure that all audio plugs are pushed in all the way (page 12).
- Make sure that the inputs and outputs of all components are connected properly.
- Make sure that the polarity of the speaker cables is correct and that the bare wires are in contact with the metal part of each speaker terminal (page 11).
- Make sure that the correct input source is selected (page 16).
- If the MUTING indicator is flashing, press the remote controller's [MUTING] button to unmute the A-9377 (page 16).
- Make sure that none of the cables are bent, twisted, or damaged.
- If your turntable uses an MC type cartridge, you must use an MC head amp or MC transformer (page 12).
- Make sure the SPEAKERS selector is set correctly. If it's set to OFF, no speakers will output sound (page 15).
Noise can be heard.
- Using cable ties to bundle audio cables with power cords, speaker cables, and so on may degrade the audio performance, so do not bundle them together.
- An audio cable may be picking up interference. Try repositioning your cables.
The tone controls have no effect.
- If the TONE/DIRECT indicator is on, the Direct function is on and the tone controls have no effect. Press the [TONE/DIRECT] button to turn the function off. The TONE/DIRECT indicator will go off (page 16).
Remote Controller
The remote controller doesn't work.
- Make sure that the batteries are installed with the correct polarity (page 10).
- Try installing new batteries. Do not mix different types of batteries or old and new batteries (page 10).
- Make sure that the remote controller is not too far away from the A-9377 and that there's no obstruction between the remote controller and the A-9377's remote control sensor (page 10).
- Make sure that the A-9377 is not subjected to direct sunshine or inverter-type fluorescent lights. Relocate if necessary (page 10).
- If the A-9377 is installed in a rack or cabinet with colored glass doors, the remote controller may not work reliably when the doors are closed (page 10).
Cannot control other components?
- If it's an Onkyo component, make sure that the RI cable and analog audio cable are connected properly. Connecting only an RI cable will not work. (page 14)
The A-9377 contains a microcomputer for signal processing and control functions. In very rare situations, severe interference, noise from an external source, or static electricity may cause it to lock up. In the unlikely event that this happens, unplug the power cord from the wall outlet, wait at least ten seconds, and then plug it back in again.
Onkyo is not responsible for damages (such as CD rental fees) due to unsuccessful recordings caused by the unit's malfunction. Before you record important data, make sure that the material will be recorded correctly.
| Rated output power European (IEC): | 2ch × 90 W at 4 Ω, 1 kHz, 2ch driven |
| Maximum output power (JEITA): | 2ch × 132 W at 4 Ω, 1 kHz, 2ch driven |
| Dynamic power: | 124 W + 124 W (4 Ω) |
| 80 W + 80 W (8 Ω) | |
| THD (total harmonic distortion): | 0.08% (1 kHz, 1 W) |
| Damping factor: | 60 (1 kHz, 8 Ω) |
| Input sensitivity and impedance: | 200 mV, 45 kΩ (LINE) |
| 2.5 mV, 45 kΩ (PHONO MM) | |
| Output level and impedance: | 150 mV, 2.2 kΩ (REC OUT) |
| Phono overload: | 50 mV (MM, 1 kHz, 0.5%) |
| Frequency response: | 10 Hz–100 kHz, +1 dB, -3 dB (CD) |
| Tone control: | +10 dB, -8 dB, 100 Hz (BASS) |
| +9 dB, -8 dB, 10 kHz (TREBLE) | |
| Signal to Noise ratio: | 96 dB (CD, IHF-A) |
| 70 dB (PHONO, IHF-A) | |
| Speaker impedance: | 4–16 Ω |
| Power supply: | AC 230 V, 50 Hz |
| AC 120/220-240 V, 50/60 Hz | |
| Power consumption: | 286 W |
| Dimensions (W × H × D): | 435 × 150 × 348 mm |
| 17-1/8 × 5-7/8 × 13-11/16 | |
| Weight: | 8.8 kg (19.4 lb.) |
| Analog inputs: | PHONO, CD, TUNER, TAPE, LINE, D |
| Analog outputs: | TAPE, PREOUT |
| Speaker outputs: | 2 (A, B) |
| Phones: | 1 |
Specifications and features are subject to change without notice.
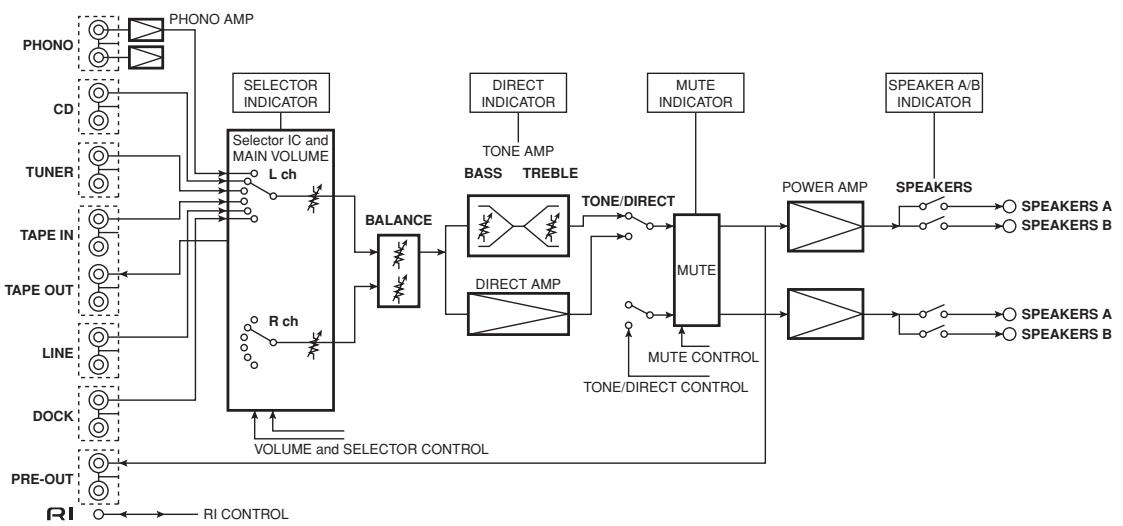
Block Diagram
ONKYO CORPORATION
Sales & Product Planning Div.: 2-1, Nisshin-cho, Neyagawa-shi, OSAKA 572-8540, JAPAN
Tel: 072-831-8023 Fax: 072-831-8163
18 Park Way, Upper Saddle River, N.J. 07458, U.S.A.
Tel: 201-785-2600 Fax: 201-785-2650 http://www.us.onkyo.com/
ONKYO EUROPE ELECTRONICS GmbH
Liegnitzerstrasse 6, 82194 Groebenzell, GERMANY
Tel: +49-8142-4401-0 Fax: +49-8142-4401-555 http://www.eu.onkyo.com/
ONKYO EUROPE UK Office
Suite 1, Gregories Court, Gregories Road, Beaconsfield, Buckinghamshire, HP9 1HQ
UNITED KINGDOM Tel: +44-(0)1494-681515 Fax: +44(0)-1494-680452
ONKYO CHINA LIMITED
Unit 1&12, 9/F, Ever Gain PlazaTower 1, 88, Container Port Road, Kwai Chung,
N.T., HONG KONG Tel: 852-2429-3118 Fax: 852-2428-9039
http://www.ch.onkyo.com/

10904-1