
mp2215 - Projector HP - Free user manual and instructions
Find the device manual for free mp2215 HP in PDF.


| Product Type | Video Projector |
| Brand | HP |
| Model | mp2215 |
| Display Technology | DLP |
| Native Resolution | XGA (1024 x 768) |
| Brightness | 2000 ANSI Lumens |
| Contrast Ratio | 2000:1 |
| Aspect Ratio | 4:3 (native), 16:9 supported |
| Projection Lens | Manual zoom and focus |
| Throw Ratio | 1.5 - 1.8:1 |
| Projection Distance | 1.2 - 10 m |
| Screen Size | 0.76 - 7.62 m (30 - 300 inches) |
| Keystone Correction | Vertical ±15° |
| Light Source | P-VIP lamp, 200W |
| Lamp Life | Up to 3000 hours (standard), up to 4000 hours (eco) |
| Input Ports | VGA (D-Sub 15-pin), Composite Video (RCA), S-Video, Audio (3.5mm) |
| Output Ports | VGA pass-through, audio out |
| Control | RS-232C |
| Power Consumption | 250W (max), <5W standby |
| Power Supply | AC 100-240V, 50/60Hz |
| Dimensions (WxDxH) | 286 x 192 x 78 mm (without feet) |
| Weight | 2.5 kg (approx) |
| Noise Level | 32 dB (standard), 28 dB (eco) |
| Features | Auto-sync, auto-image adjustment, blank function, security bar |
| Accessories Included | Power cord, VGA cable, remote control, user manual, quick start guide |
Frequently Asked Questions - mp2215 HP
User questions about mp2215 HP
0 question about this device. Answer the ones you know or ask your own.
Ask a new question about this device
Download the instructions for your Projector in PDF format for free! Find your manual mp2215 - HP and take your electronic device back in hand. On this page are published all the documents necessary for the use of your device. mp2215 by HP.
USER MANUAL mp2215 HP
© Copyright 2005 Hewlett-Packard Development Company, L.P.
The information contained herein is subject to change without notice.
The only warranties for HP products and services are set forth in the express warranty statements accompanying such products and services. Nothing herein should be construed as constituting an additional warranty. HP shall not be liable for technical or editorial errors or omissions contained herein.
Hewlett-Packard Company
Digital Projection and Imaging
1000 NE Circle Blvd.
Corvallis, OR 97330
First Edition, May 2005
Contents
1 Setting Up
Safety precautions 5
What's in the box? 6
Identifying common features.... 8
Projector at a glance 8
Projector buttons and lights 9
Back panel 10
Remote control 11
Accessories....12
Setting up the projector 13
Positioning the projector 13
Connecting power 15
Connecting a computer 16
Connecting a handheld organizer 17
Connecting a video source 18
Turning the projector on and off 21
Removing the lens cover 21
Turning the projector on 22
Turning the projector off 23
Moving the projector 23
Making basic adjustments 24
Aiming the projector 24
Adjusting the focus and zoom 25
Using the remote control 26
2 Showing Presentations
Showing a computer screen.... 29
Selecting a different source 29
Hiding or showing the picture 29
3 Adjusting the Projector
Adjusting the picture 31
Choosing the best picture mode. 31
Adjusting the shape of the picture 32
Adjusting a slanted picture 33
Adjusting the picture for best color 34
Adjusting other picture settings 35
Adjusting the projector setup 35
Using the on-screen menu 36
Changing settings using the on-screen menu 36
Quick choice menu 37
Input menu 37
Picture menu 38
Setup menu....39
Help menu 39
4 Maintaining the Projector
Performing routine maintenance 41
Getting the projector status 41
Cleaning the projector and lens. 41
Replacing the lamp module. 42
Replacing the battery in the remote control 44
Upgrading the projector 45
Updating the firmware 45
5 Installing Permanently
Installing the projector....47
Choosing cables 47
Installing on a table 47
Installing for rear projection 48
Locking the projector 48
6 Fixing Problems
Troubleshooting suggestions 49
Warning light problems 49
Start-up problems....50
Picture problems 50
Interruption problems 53
Remote control problems 53
Testing the projector 54
Running the projector diagnostics 54
7 Reference
Specifications. 55
Safety information 58
LED safety....58
Mercury safety 58
Regulatory information 59
U.S.A. 59
Canada 59
Japan. 60
Korea. 60
International 60
1 Setting Up
Safety precautions

WARNING! Read and observe these precautions and all others in this manual to reduce the risk of injury and equipment damage.
- Do not look directly into the lens when the lamp is on.
- Do not expose the projector to rain or moisture, and do not use it near water.
- Keep paper, plastic, and combustible material at least 0.5 m (2 ft) away from the projector lens and exhaust vents.
- Do not allow liquid, food, or small objects to get inside the projector. If material gets inside the projector, contact HP for assistance.
- Do not put anything on top of the projector. Do not place any liquids where they might spill on the projector.
- Do not block any vents on the projector. Do not place the projector near any source of heat, such as a radiator or amplifier.
- Use only an approved power cord rated for the voltage and current marked on the product label. Do not overload any outlet or extension cord. Do not circumvent the grounding prong on the power cord.
- Route all cables so they are not located where people can step on them or trip on them.
- Place the projector flat on its base on a sturdy surface. Do not stand the projector on its front surface.
- Do not touch the lens with your fingers. Use a soft, dry cloth to clean the projector case. See "Cleaning the projector and lens" on page 41.
- Do not open the projector except as instructed by this manual, and only after allowing the projector to cool down.
- If the projector is damaged in any way, contact HP for assistance.
What's in the box?
Before setting up your projector, be sure your shipping box includes the following items. If the shipping box does not contain any of the following items, contact HP.

TIP: After you open the box and remove the contents, save the box in case you must ship the projector.

Identifying the contents of the box
Item Function
① Projector Displays images.
② Carrying case and cable bag Protects the projector and cables during transport.
③ Remote control Controls projector.
④ Power cord Connects projector to power source.
Identifying the contents of the box (continued)
| Item Function | |
| 5 | USB cable Connects projector USB output to a computer. |
| 6 | VGA cable Connects computer video output to the projector. |
| 7 | Quick Setup Guide Provides instructions to help get started. |
| 8 | Literature package Contains documentation for the setup and use of the projector, plus support and warranty information. |
Identifying common features
Projector at a glance
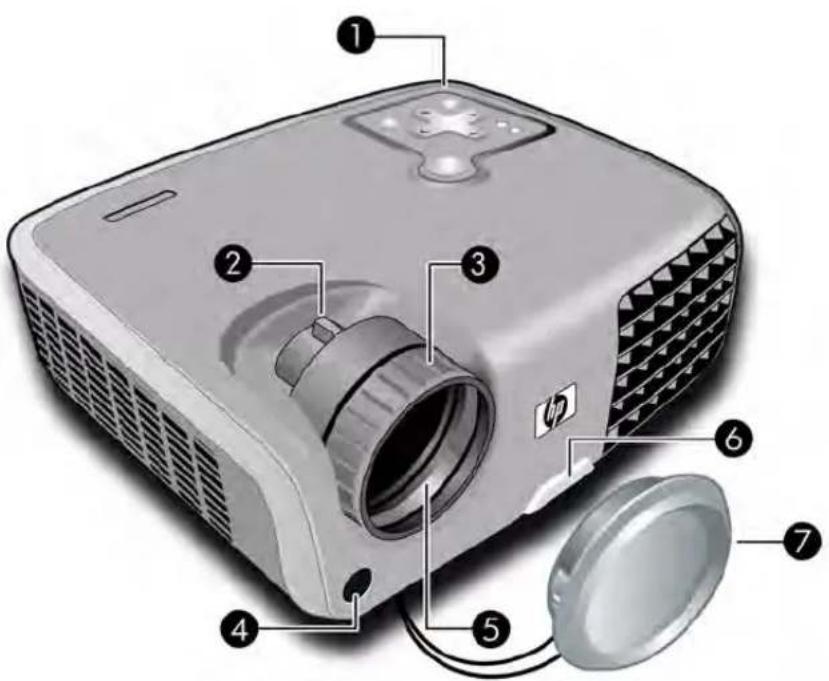
Identifying major components
Item Function
① Button panel Contains control buttons and indicator lights.
② Zoom ring Enlarges picture size from 100% to 115%.
③ Focus ring Focuses at distance of 1.5 to 10 m (5 to 33 ft).
④ Infrared port Receives signals from the remote control.
⑤ Lens Projects the image.
6 Height adjustment button Adjusts the height of the picture.
⑦ Lens cover Protects the lens.
Projector buttons and lights

Identifying the projector buttons and lights
| Item Function | |
| 1 | Power button Turns the projector on or off. |
| 2 | Page-up and Page-down buttons Scroll up and down through pages on a connected computer. |
| 3 | Lamp warning light Warns if the lamp is bad. |
| 4 | Temperature warning light Warns if the projector is too hot. |
| 5 | Source button Displays picture from the next input port. |
| 6 | Menu buttons Change settings using the on-screen menu. |
| 7 | Picture mode button Selects the next picture and color combination—can be customized. |
| 8 | Auto sync button Resynchronizes the projector to the input signal from a computer. |
Back panel
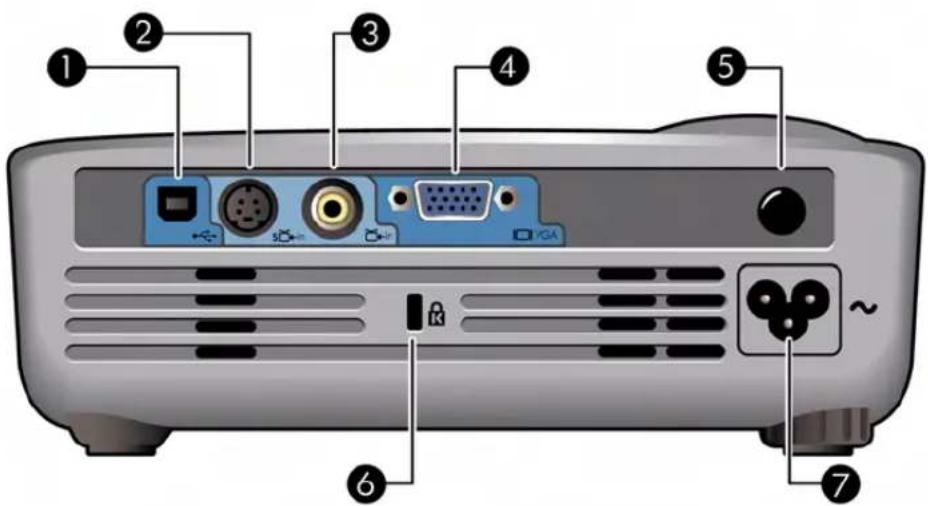
Identifying back panel components
| Item Function | |
| 1 | USB port Connects to computer and controls the mouse. |
| 2 | S-video input port Connects S-video source. |
| 3 | Composite-video input port Connects composite-video source. |
| 4 | VGA port Connects video input from computer or component-video source. |
| 5 | Infrared port Receives signals from the remote control. |
| 6 | Lock slot Locks the projector to a stationary object with the use of a cable and lock. |
| 7 | Power cord socket Connects power cord to projector. |

TIP: Before using the remote control, remove the battery protector by pulling the plastic tab until it comes out of the remote control.

Identifying components of the remote control
Item Function
① Hide button Blanks the picture.
② Mouse pad Moves the mouse pointer on a connected computer. Requires USB cable.
③ Power button Turns the projector on or off.
4 Left-click and right-click mouse buttons Perform left-click and right-click mouse functions on a connected computer. Requires USB cable.
⑤ Page-up and Page-down buttons Scroll up and down through pages on a connected computer. Requires USB cable.
Identifying components of the remote control (continued)
| Item Function | |
| 6 | Auto sync button Resynchronizes the projector to the input signal from a computer. |
| 7 | Picture mode button Selects the next picture and color combination—can be customized. |
| 8 | Menu buttons Change settings using the on-screen menu. |
| 9 | Source button Displays picture from the next input port. |
Accessories
Get more from your presentations with HP projector accessories. You can purchase accessories at http://www.hp.com or through your projector dealer.
- HP projection screens—mobile screens that are easy to carry and set up anywhere, and fixed screens for even greater convenience.
- HP premium remote control—allows you to control every aspect of your presentations.
- HP power cables—allow you to connect in any region.
• HP cables—allow you to connect all audio-video equipment. - HP replacement lamp—brings your projector up to factory-fresh brightness.
Setting up the projector
Positioning the projector

The following tables show you where to position the projector in relation to the screen.

TIP: For best picture quality, place the projector 1.5 to 5 m (5 to 16 ft) from the screen
Image size relative to distance from the screen
| Image size (diagonal) Image size (width) Distance (lens to screen) | |||||
| (inches) (meters) (inches) (meters) (feet, inches) (meters) | |||||
| 40 1.0 32 0.8 5' 4" to 6' 2" 1.6 to 1.9 | |||||
| 60 1.5 48 1.2 8' 0" to 9' 2" 2.4 to 2.8 | |||||
| 80 2.0 64 1.6 10' 8" to 12' 3" 3.3 to 3.7 | |||||
| 100 2.5 80 2.0 13' 4" to 15' 4" 4.1 to 4.7 | |||||
| 120 3.0 96 2.4 16' 0" to 18' 5" 4.9 to 5.6 | |||||
| 150 | 3.8 | 120 | 3.0 | 20' 0" to 23' 0" | 6.1 to 7.0 |
| 180 | 4.6 | 144 | 3.7 | 24' 0" to 27' 7" | 7.3 to 8.4 |
| 200 5.1 160 4.1 26' 8" to 30' 8" | 8.1 to 9.3 | ||||
| 240 | 6.1 | 192 | 4.9 | 32' 0" to 33' 0" | 9.8 to 10.0 |
If you do not want to use the distance table, you can use the following equations to help determine where to install the projector relative to the screen.
Calculating projection distances
| distance from lens to screen = A × width of screen |
| minimum and maximum distance from screen = B |
| width of screen = 0.8 × diagonal of screen (for 3:4 screen) |
| projector lens below bottom of screen = C × width of screen (for 4:3 screen) |
| A = 2.0 to 2.3 |
| B = 1.5 to 10 m (5 to 33 ft) |
| C = 0.11 to 0.50 |
Connecting power
-
Place the projector on a stable platform located 1.5 to 10 m (5 to 33 ft) in front of the screen. Ideally, the platform should be lower than the bottom of the screen.
-
Connect one end of the power cord to the back of the projector ① and the other end to a grounded electrical outlet ②.

If you want to permanently install the projector on a table or behind the screen, see "Installing the projector" on page 47.
Connecting a computer
Requires:
- VGA cable ①
• USB cable ② (optional, provides mouse and page up/down control)

The optional USB connection allows you to use the mouse and page up/down features on the remote control.
See "Showing a computer screen" on page 29.

TIP: If the computer display does not appear on the projector, you might have to press a combination of keys on the computer to turn on the computer's VGA output. For example, on some computers you must press FN+F4 or FN+F5. For instructions, refer to the user documentation provided with your computer.
Connecting a handheld organizer
Not all handhelds come with VGA-out ports. For example, an iPAQ Pocket PC may require a VGA-out PC Card with 15-pin connector. If necessary, install a VGA-out accessory card into the organizer.
Requires:
- VGA cable
1
• VGA-out accessory card ② (in some cases)

Connecting a video source
Many video devices have more than one type of output port—see the list below. When you connect the device to the projector, choose the connection that provides the best picture quality. This list shows video connections in order with highest picture quality at the top:
Highest quality Highest quality


Component-video
S-video
Composite-video
Standard quality Standard quality
Most video and audio cables shown in the following sections are available from HP.
If you want to connect a SCART video device to the projector, you will need a SCART adapter (available from HP).
Connecting a component-video source
Examples: Cable boxes, DVD players, satellite receivers, and audio-video receivers
Requires:
- Component-to-VGA cable

TIP: Many DVD players and other high-quality video devices provide component video output. The three RCA connectors might be labeled YPbPr or YCbCr.
If possible, configure the video source to use progressive scan output, such as 480p, 575p, or 720p. For additional information, refer to the user documentation provided with the video source.

Connecting an S-video source
Examples: DVD players, VCRs, cable boxes, camcorders, and video gaming devices
Requires:
- S-video cable

Connecting a composite-video source
Examples: VCRs, DVD players, audio-video receivers, and video gaming devices
Requires:
- Composite-video cable

Turning the projector on and off
Removing the lens cover
- Pull the lens cover off the lens.

Turning the projector on
-
Be sure the power cord is connected and the lens cover is removed.
-
Press the power button on the projector or on the remote control.
The projector takes a minute or so to warm up. The power button blinks during warm-up.

TIP: If the picture does not appear on the screen, try the following:
- If you are using a computer, press the key combination that turns on its video output. For example, press FN+F4 or FN+F5 on some computers.
- On the projector, press the source button one or more times to select the correct input port.


NOTE: It is normal for parts of the projector and the air coming out of the projector to be very warm. If the projector starts to overheat, the temperature warning light will turn on and the projector will shut down.
Turning the projector off
- Press the power button on the projector or remote control to turn off the projector. Do not hold the button down.
The power button blinks during the cool-down period, then the projector turns off. Even though the projector is off, it uses a small amount of power internally.
- If you want, disconnect video and audio equipment from the projector during the cooldown period or after the power button stops blinking.

CAUTION: Do not disconnect power until the projector has cooled down (the fan stops) and the power button stops blinking. Otherwise, you might shorten the life of the lamp.
- If you must unplug or remove the projector, wait until the power light stops blinking, then unplug the power cord.
If you try to turn on the projector again during the cool-down period, it will not turn on. Wait until the cool-down period ends and the power button stops blinking.
Moving the projector
When moving the projector:
- Allow the projector to cool down before moving it. Then disconnect all cables.
- Avoid bumps and jolts. Use a carrying case or padded container when possible.
- Observe temperature and humidity limits (see "Specifications" on page 55). If the projector is cold, allow it to warm gradually to avoid condensation.
Making basic adjustments
This section provides instructions for making basic adjustments to the projector.
Aiming the projector
• To raise or lower the projected picture on the screen, push in the height adjustment button ① and raise or lower the front of the projector ②. Release the button to lock the adjustment.
• To level the picture on the screen, turn the adjustable foot ③ to lengthen or shorten the foot.

Adjusting the focus and zoom
-
Rotate the zoom ring to adjust the picture size from 100 to 115%.
-
Rotate the focus ring until the image becomes clear. The projector can be focused at distances of 1.5 to 10 m (5 to 33 ft).
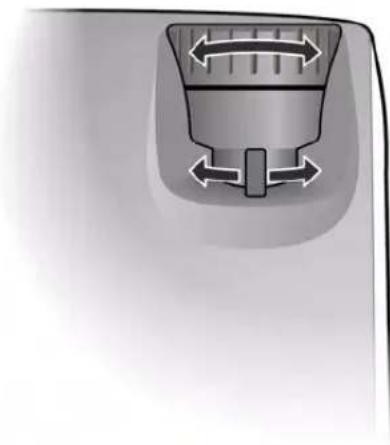
If the picture does not fit the screen, you might have to move the projector closer to or farther away from the screen.
Using the remote control

To do this... Press this...
| Hide or unhide the picture | hide button 1. |
| Move mouse pointer on computer Mouse pad | 2 at the edge in the direction you want the pointer to move. This feature requires a USB connection between the projector and computer. |
| Turn the projector on or off Power button | 3. |
| Click mouse button on computer Left-click or right-click button | 4. This feature requires a USB connection between the projector and computer. |
| Page up or page down on computer | Page-up or page-down button 5. This feature requires a USB connection between the projector and computer. |
| Readjust picture of computer screen | auto sync button 6. |
To do this... Press this...
Change picture settings for different type of input Picture mode button ⑦ one or more times. signal
Change settings using on-screen menu enter and navigation buttons ⑧. See "Using the on-screen menu" on page 36.
Exit from any on-screen menu or adjustment Exit ↔ button 8.
Switch to next input source source button ⑨ one or more times.

TIP: From within the distance of 9 m (30 ft), aim the remote control at the screen or at the front or back of the projector.
2 Showing Prese
Showing a computer screen
- Be sure the computer is connected to the projector and turned on. See "Connecting a computer" on page 16.
- Be sure the projector is set up, turned on, and adjusted. See "Making basic adjustments" on page 24.
- If a different input source is shown on the projector, press the source button on the projector or remote control one or more times to select the VGA port.
- If the computer display is not shown on the projector, you might have to turn on the computer's video output port. For example, some computers require you to press a key combination, such as FN+F4 or FN+F5. Refer to the user documentation provided with your computer.
If you want to adjust the picture, see "Adjusting the picture" on page 31.
Selecting a different source
If the picture from your video source does not appear on the screen, you can quickly select the correct source.
▲ Press the source button one or more times—until you see the picture or you see the name of the video port where the source is connected.
You should also be sure the video source is turned on and playing video.
Hiding or showing the picture
- Press the hide button on the projector or remote control to blank the picture. This does not affect the video source, which continues playing.
- Press any button to show the picture again.

TIP: If you press the hide button a second time within 5 seconds, the display becomes completely blank, without the reminder how to show the display again.
3 Adjusting the Projector
Adjusting the picture
Choosing the best picture mode
You can quickly choose a different picture mode to make adjustments to the picture. Picture modes can control properties such as color and size. They let you easily choose the best settings for ambient lighting and the type of video content (see "Adjusting the picture" on page 31).
▲ Press the picture mode 📊 button one or more times to select the picture mode that gives the best picture.

You can also customize the picture modes so they are best for your video sources:
- Press the picture mode 📁 button to select the picture mode you want to adjust.
- Press enter and go to Picture > Customize picture mode.
- Adjust the settings until you are satisfied with the picture.

TIP: To exit from any on-screen menu or adjustment, press the exit button.
Adjusting the shape of the picture
Depending on the type of video source you are viewing, the picture might or might not always look correct or fit on the screen:
- If the active video device sends widescreen output to the projector, press enter, go to Input, and set Widescreen input to Yes. See ① in the following diagram.
• If the video device sends standard output, set Widescreen input to No.

TIP: If you show widescreen pictures on a wide projection screen, a standard picture might not fit on the screen. One solution is to change the current picture mode so it makes a smaller picture. Press enter, go to Picture > Customize picture mode, and set Aspect Ratio to Reduced. See ② in the following diagram.
![graph TD A["1: Oval and Square"] --> B["2: Circle and Square"]](/content/2026/07/1517176/images/4df753cb0515e4592ec07b80329454f3af0e48760aa57f7f68d0fac02f359da6.jpg)
Adjusting a slanted picture
If the projector is tilted up or down, the sides of the picture on the screen might slant in or out, even though the top and bottom are level. The keystone adjustment corrects this problem.
- Press enter, go to Quick choice > Keystone, and press enter.
- Press left or right until the sides of the picture are not slanted.


TIP: If the top and bottom of the picture slant in different directions, move the projector until it is straight in front of the screen, not off to one side.
Adjusting the picture for best color
You can fine tune the picture settings on your projector to get the best color and image quality according to your preferences. You should perform these steps for each input source device and each input port that you use. Do them in the order shown. For some input ports, some of these settings may not be available.
- Press the picture mode button and select the picture mode you want to use for the current source.
- Press enter and go to the Picture menu.
- Go to Color settings > Brightness. Adjust to the highest setting that still gives the darkest black for black areas. You can view black objects or shadowed areas while making the adjustment.
- Go to Color settings > Contrast. Adjust to the highest setting that does not wash out fine detail in bright areas. You can view bright clouds or textured white areas while making the adjustment.
- Go to Customize picture mode > Picture enhancement. Adjust to the setting that gives the best overall mid-range brightness. This should have minimal effect on blacks and whites.
- Go to Customize picture mode > Color temperature. Adjust to the setting where whites and colors look best.
- Go to Color settings > Color saturation. Adjust to the setting where colors look most natural.
- Go to Color settings > Tint. Adjust to the setting where colors look most natural.
- Go to Customize picture mode > White intensity. Adjust this setting above 0 as needed to brighten the picture but not affect colors.
- Repeat all steps if necessary.
Adjusting other picture settings
The on-screen menu provides many settings that allow you to fine-tune the picture.
- Press enter, and go to Picture.
- Change the picture adjustments as needed.
From the Picture menu, you can change many picture options, such as brightness, contrast, and picture shape, as well as customize the picture modes.
To get descriptions for all available picture adjustments, see "Picture menu" on page 38.
Adjusting the projector setup
- Press enter, and go to Setup.
- Set the setup adjustments as needed.
From the Setup menu, you can select settings, such as menu language, power usage, and menu timeout.
To get descriptions for all available setup adjustments, see "Setup menu" on page 39.
Using the on-screen menu
Changing settings using the on-screen menu
You can change the on-screen menu settings with the buttons on either the projector or the remote control.
- Press enter on the projector or remote control. This displays the on-screen menu.
- Press up ▲ or down ▼ to highlight the desired menu icon, then press right ▶ to move into that menu.
- Press up ▲ or down ▼ to highlight a setting, then press enter to begin adjusting the setting.
- Press left ◀ or right ▶, or press up ▲ or down ▼, to adjust the setting, as prompted.
- Press enter to return to the menu.
- To go to a different menu, press left and select a menu.
- To close the on-screen menu, press the exit button.
If you do nothing for a period of time, the on-screen menu closes. To change the amount of time until the on-screen menu closes, press enter and select Setup > Timeout for menu.

TIP: To exit from any on-screen menu or adjustment, press the exit button.
Quick choice menu
Quick choice menu
| Keystone Corrects the slanted sides of the picture. This compensates for a projector that is too high or low relative to the screen. |
| Reset keystone Resets the keystone correction to zero (no correction). |
| Source Displays the picture from the next input port. |
| Picture mode Adjusts color and picture settings to one of several combinations designed for different types of viewing situations. You can use a different picture mode for each source or each viewing environment. You can also customize each picture mode. |
| Auto-sync Resynchronizes the projector to the input signal. This can compensate for any change in the signal. |
| Hide Blanks the picture. Press any button to show the picture again. |
Input menu
For a visual aid, see "Back panel" on page 10.
Input menu
VGA Shows the source connected to the VGA port.
Composite Shows the source connected to the composite-video port.
S-video Show the source connected to the S-video port.
Source scan Sets whether the projector automatically searches for input signals and displays the next one found.
Widescreen input Sets whether a widescreen (16:9) input device is in use. Adjusts the height of the picture accordingly.
Picture menu
Some picture adjustments are available only when certain input ports are in use. Unavailable adjustments are shown in gray in the on-screen menu.
Picture menu
| Color settings... Adjusts the picture and colors. | |
| Brightness Brightens or darkens the picture. | |
| Contrast Sets the difference between light and dark areas. | |
| Sharpness Sharpens or softens the picture. | |
| Color saturation Adjusts the intensity of colors. | |
| Tint Shifts colors toward red or green. | |
| Color space Selects the color standard used by the source. | |
| Reset color settings Restores these color settings to the default settings. | |
| VGA settings... Adjusts settings for a computer input. | |
| Auto-sync Resynchronizes the projector to the input signal. This can compensate for any change in the signal. | |
| Frequency Adjusts the timing of the projector relative to the computer. | |
| Tracking | Adjusts the phase of the projector relative to the computer. |
| Vertical offset | Adjusts the picture up or down within the projection area. |
| Horizontal offset | Adjusts the picture left or right within the projection area. |
| Picture mode | Adjusts color and picture settings to one of several combinations designed for different types of viewing situations. You can use a different picture mode for each source or each viewing environment. You can also customize each picture mode. |
| Customize picture mode... | Changes settings associated with the current picture mode. |
| Picture enhancement | Refines the color, lightness, and other characteristics of the picture. |
| White intensity | Increases the brightness of white areas. |
| Color temperature | Shifts color toward red or blue. |
Picture menu (continued)
Aspect ratio Selects how the picture fits on the screen:
• Best fit automatically fits the picture without stretching it.
• 1-to-1 shows each picture dot as one projected dot.
- Reduced fits a standard-shape picture onto a widescreen projection screen.
- FiFillFdtretches the picture to fill the screen.
Reset this picture mode Restores the current picture mode to its default settings.
Setup menu
Setup menu
Language Selects the language used by the on-screen menu.
Timeout for menu Sets how many seconds the on-screen menu waits for input before it closes.
Picture orientation Adjusts the orientation of the picture: upright or upside-down, in front of or behind the screen. Inverts or reverses the image accordingly.
Lamp saver Sets a lower power level for the lamp.
Power timeout Sets the length of time the projector waits for an input signal before automatically shutting down.
Clean edges Removes visible noise from the edges of the picture.
Reset lamp hours For a new lamp, resets the hours of use.
Reset all settings Restores all menu settings to factory default settings.
Help menu
Help
| Displays information and status of the projector. | |
| Diagnostics... | Show tests for checking the operation of the projector and the remote control. |
©
4 Maintaining the Projector
Performing routine maintenance
Getting the projector status
To get the projector status:
▲ Press the enter button on the projector or remote control and go to Help.
This screen shows information and status for the projector.
Cleaning the projector and lens
You can clean the projector housing using a soft, dry cloth.
You can clean the front lens of the projector using the following recommendations. You cannot clean any of the internal surfaces.
- To minimize the risk of damaging or scratching the lens surface, blow dust particles off the lens with clean, dry, deionized air.
- If this method does not work, use the following method:
a. Wipe the lens in a single direction with a clean, dry cloth. Do not wipe back and forth across the lens.
b. If the cloth is dirty or smears the lens, wash the cloth. If the cloth is still dirty after washing it or the fabric is damaged, replace it.

CAUTION: Cleaning requires special consideration:
- Do not spray any type of fluid or cleaner directly on the lens surface. Cleaners might damage the lens.
- Do not use fabric softener when washing a cleaning cloth or softener sheets when drying the cloth. Chemicals on the cloth might damage the surface of the lens.
- Do not store a cleaning cloth in contact with the lens for a long time because doing so contaminates the lens with dye from the cloth. The cloth can be contaminated if left in the open air.
Replacing the lamp module
As the projector operates over time, the brightness of the projector lamp gradually decreases and the lamp becomes more susceptible to breakage. You can install a new lamp at any time to bring the projector up to factory-fresh brightness. We recommend replacing the lamp if a warning message is displayed.

WARNING! Replacing the lamp module requires special consideration:
- To reduce the risk of injury, be careful when removing the lamp module as broken glass might be present. If the lamp is broken, contact HP about repairs that might be required due to glass fragments.
- This digital projector lamp contains a small amount of mercury. If the lamp breaks, adequately ventilate the area where the breakage occurred, discard any nearby food and drink, and thoroughly clean the table surface around the projector. Wash your hands after cleaning the area or handling a broken lamp. Disposal of this lamp may be regulated due to environmental considerations. For disposal or recycling information, please contact your local authorities or the Electronic Industries Alliance (www.eiae.org). You can find safety information about the lamp at:
www.hp.com/hpinfo/globalcitizenship/environment/productdata
- Because the lamp assembly operates at a very high temperature, wait 30 minutes before removing the lamp module.
- Turn off the projector and allow it to cool for 30 minutes.
- Unplug the power cord.
- Turn the projector over onto a soft surface.
- Loosen the two screws ① holding the lamp cover and remove the cover.

-
Loosen the two screws ② on the lamp module, and pull out the module ③.
-
Insert the new lamp module into the projector and tighten the two screws.
-
Install the cover and tighten the two screws.
-
Turn on the projector. If the lamp does not turn on after the warm-up period, try reinstalling the lamp.
-
Press enter, go to Setup > Reset lamp hours, and press enter.
Replacing the battery in the remote control
- Use a ballpoint pen to hold the battery latch toward the center, then pull out the battery holder ①.
- Insert the new battery ② in the holder.
- Push the holder ③ into the remote control.

When discarding old batteries, contact your local waste-disposal provider regarding local restrictions on the disposal or recycling of batteries.

Upgrading the projector
Updating the firmware
HP might periodically release updated versions of the projector firmware to enhance the projector performance. The projector firmware version is shown in the on-screen menu at Help.
USB method
- On a computer with a USB port, go to www.hp.com/support, select your region, select the software download option, and type your projector model number in the product box.
- Download the latest file intended for a USB upgrade.
- Connect a USB cable (available from HP) between the USB port on the projector and the USB port on the computer.
- On the computer, run the file you downloaded by double-clicking the file. Follow the on-screen instructions.
5 Installing Permanently
Installing the projector
Choosing cables
If you are permanently installing the projector or using it with long cables, consider the following suggestions when planning the installation:
- Use high-quality cables. Use only video cables that are made with 75-ohm coaxial cable and connectors. For high-resolution video, use low-loss video cables.
- Minimize cable length as much as possible. For video cables longer than 6 m (20 ft), use low-loss coaxial cables.
- Do not run audio or video cables next to power or network cables. If they must cross, cross them at 90 degrees.
- If you are installing cables in walls, use cables with necessary approvals, such as Underwriters Laboratories (UL) approval.
- If you are running cables above a dropped ceiling, you must use plenum-rated cables if the space above the ceiling is open to the space above other rooms. You must use plenum-rated cables if you are running cables in a duct.
- Before installing cables permanently, check the setup with the final cables in the open.
Installing on a table
This installation is covered in detail in Chapter 1. See "Setting up the projector" on page 13 for more information.
Installing for rear projection
- Place the projector 1.5 to 10 m (5 to 33 ft) behind a translucent screen that is designed for rear projection.
See "Setting up the projector" on page 13 for more instructions.
- Press enter, go to Setup > Picture orientation. Then select Rear Normal.
Locking the projector
The projector includes a built in slot to secure the projector with a cable and lock (such as the Kensington MicroSaver lock system, available at many computer stores).
-
Wrap the cable around a secure object, such as a table leg. Loop the cable to create a slip knot around the stationary object, and be sure it cannot slip off.
-
Insert the lock ① into the hole and twist the key ②.

6 Fixing Problem
Troubleshooting suggestions
If you have a problem with your projector, check the following statement that most closely matches the nature of the problem, then look in that section of this chapter:
- "Warning light problems" on page 49
- "Start-up problems" on page 50
• "Picture problems" on page 50 - "Interruption problems" on page 53
- "Remote control problems" on page 53

TIP: If these suggestions do not solve your problem, go to http://www.hp.com/support for additional information. To contact HP, refer to the support guide included with the projector.
Warning light problems
If both red warning lights are blinking:
- Allow the projector to cool down after it turns off. If this condition occurs after you restart the projector, an internal component has failed. Contact HP for assistance.
If the red temperature light is on or blinking:
- Allow the projector to cool down after it turns off. Be sure that nothing is near or blocking the vents on the projector, and that the vents are free of lint and other objects. Remove any sources of excess heat in the room. Observe temperature and altitude limits (see "Specifications" on page 55). If the warning light turns on or blinks after you restart the projector, contact HP for assistance.
If the red lamp light is on or blinking:
- Allow the projector to cool down after it turns off. If the warning light turns on or blinks after you restart the projector, remove and reinstall the lamp module.
- Install a new lamp. If this occurs after you install a new lamp module, remove and reinstall the lamp module. If a new lamp does not fix the problem, contact HP for assistance.
If the red lamp light is flickering quickly:
- Check that the cover over the lamp is correctly installed and fully attached.
Start-up problems
If no lights or sounds turn on:
- Be sure that the power cable is securely connected to the projector and the other end is plugged into an outlet with power.
- Press the power button again.
- Unplug the power cord for 15 seconds, then plug it in and press the power button again.
Picture problems
If a "scanning" or "waiting" message is displayed on a blank screen:
- Press the source button on the projector or remote control one or more times until the correct source name is selected.
- Be sure the external source is turned on and connected.
- For a computer connection, ensure your notebook computer's external video port is turned on. Refer to the computer manual. On some notebooks, for example, press the FN+F4 or FN+F5 function keys to turn on the external video port.
If the wrong input source is displayed:
- Press the source button on the projector or the remote control one or more times to select another active input source.
If the image is out of focus:
- Be sure the lens cover is removed.
- While displaying the on-screen menu, adjust the focus ring. (The image size should not change; if it does, you are adjusting the zoom, not the focus.)
- Ensure the projection screen is 1.5 to 10m (5 to 33 ft) from the projector.
- Check the projection lens to see if it needs cleaning.
- For a computer connection, set the display resolution as the computer to the same resolution as the projector, 1024 × 768 (see "Specifications" on page 55). If the computer has multiple monitors, adjust the resolution of the monitor assigned to the projector.
- For a computer connected to the S-video port, the picture cannot be as high resolution as what you see on the computer display.
If an upside-down or reversed image is displayed:
- The projector has been set to the wrong position setting. Press enter, go to Setup > Picture orientation, and select the correct setting.
If the image is too small or too large:
- Adjust the zoom ring on top of the projector.
- Move the projector closer to or farther from the screen.
- On the projector or remote control, press the picture mode button one or more times to see if one of the picture modes makes the image the correct size.
- Press enter, go to Picture > Customize picture mode > Aspect ratio. Try the different settings.
- If the source device sends wide-screen output, press enter, go to Input, and try setting Widescreen input to Yes. Otherwise, set it to No.
If the image has slanted sides:
- As much as possible, reposition the projector so that it is centered on the screen and below the bottom of the screen.
- Press enter and go to Quick choice > Keystone. Adjust the setting as needed.
If the image is stretched:
- On the projector or remote control, press the picture mode button one or more times to see if one of the picture modes makes the image the correct size.
- Press enter, go to Picture > Customize picture mode > Aspect ratio. Try the different settings.
- If the source device sends wide-screen output, press enter, go to Input, and try setting Widescreen input to Yes. Otherwise, set it to No.
If the projected colors seem slightly wrong:
- See "Adjusting the picture for best color" on page 34.
- Press enter, go to Help > Diagnostics, and run the color test.
If the projected colors seem completely wrong:
- Be sure the pins on the cable connectors are not bent or broken.
- Press enter, go to Picture > Color settings > Color space. Try the different settings.
- Press enter, go to Help > Diagnostics, and run the color test.
- Press enter, go to Picture > Color settings > Reset color settings, and press enter.
- Press enter, go to Setup > Reset all settings, and press enter.
If the picture is not clear (ghost images, smearing, poor quality):
- Be sure the video cable you are using is coaxial cable rated at 75 ohms. Any other cable or impedance rating can reduce picture quality.
- The video cable connecting the video source to the projector probably must be higher quality. See "Choosing cables" on page 47.
If several picture settings seem completely wrong and you cannot fix them:
- Press enter, go to Picture > Color settings > Reset color settings, and press enter.
- Press enter, go to Setup > Reset all settings, and press enter.
If a scrolling or cut-off image is displayed for a computer connection:
- Press the auto sync button on the projector or remote control.
- Turn everything off. Then power on the projector first and power on the notebook or desktop computer second.
- If the previous steps do not correct the display image, adjust the resolution of the notebook or desktop computer to the same resolution as the projector, 1024 × 768 (see "Specifications" on page 55). If the computer has multiple monitors, adjust the resolution of the monitor assigned to the projector.
If the image is flickering or unstable for a computer connection:
- Press the auto sync button on the projector or remote control.
- Press enter, go to Picture > VGA settings, and adjust Frequency or Tracking.
If the image disappears from the computer screen:
- For a notebook computer, you might be able to turn on both the external VGA port and the built-in screen. Refer to the computer manual.
If text or lines from a computer display seem rough or uneven:
- Check the focus adjustment.
- Press enter, go to Quick choice > Reset keystone, and press enter.
Interruption problems
If the projector stops responding to all controls:
- If possible, turn off the projector, then unplug the power cord and wait at least 15 seconds before reconnecting power.
If the lamp shuts off during a show:
- A minor power surge might cause the lamp to shut off. This is normal. Wait a few minutes, then power on the projector.
- If a red warning light is on or blinking, see "Warning light problems" on page 49.
If the lamp burns out or makes a popping sound:
- If the lamp burns out and makes a popping sound, the projector will not turn back on until the lamp module has been replaced.
- If the lamp breaks, contact HP about repairs that might be required due to glass fragments.
Remote control problems
If the remote control does not operate:
- Be sure nothing is blocking the remote control receiver on the front or back of the projector. Move to within 9 m (30 ft) of the projector.
- Aim the remote control at the screen or at the front or back of the projector.
- Move the remote control so it is more directly in front of or behind the projector and not as far to the side.
- Press enter, go to Help > Diagnostics, and run the remote control test.
- Replace the battery in the remote control.
Testing the projector
Running the projector diagnostics
The on-screen menu contains diagnostic tests you can use to verify the proper operation of the projector and the remote control.
- Press enter and go to Help > Diagnostics.
- Select a test and press enter.
- Follow the displayed instructions.
7 Reference
This chapter lists the specifications, safety information, and regulatory information for the projector.
Specifications
Because HP continually improves its products, the following specifications are subject to change. For the latest specifications, visit the HP website at http://www.hp.com.
Projector Specifications
Size 208.2 x 168.5 x 63.5 mm (8.2 × 6.6 × 2.5 in.)
Weight 1.1 kg (2.4 lb)
Resolution XGA (1024 × 768)
Technology DLP
Video connectors VGA (D-sub) with optional cable for component-video input S-video (mini-DIN) Composite video (RCA)
Other connectors USB 1.1 type B
Video compatibility NTSC 3.58 MHz and 4.43 MHz
PAL B, D, G, H, I, M, N
SECAM B, D, G, K, K1, L
HDTV (480i/p, 575i/p, 720p, 1080i)
PC video up to UXGA
IR receivers Front and back of projector
Lamp 156-watt lamp
2000-hour average lamp life (to half of original brightness)
Lamp saver mode reduces lamp power to 136 watts
Replacement lamp: L1809A
Projector Specifications (continued)
| Optics 1.5 to 10 m (5 to 33 ft) focus range |
| 1.15:1 optical zoom |
| 2.0 to 2.3 throw ratio (distance/width) |
| 115% offset (130% relative to half-height) |
Light engine 0.7-in. 12° DDR DMD
Vertical tilt 0° to 10°
| Vertical keystone correction | ±20% |
Remote control USB mouse
Security Kensington lock compatible
Power 100 to 240 V at 50 to 60 Hz
Environment Operating:
Temperature: 10 to 35 °C (50 to 95 °F)
Humidity: 80% RH max, non-condensing
Altitude: up to 3,000 m (10,000 ft), up to 25 °C (77 °F)
Storage:
Temperature: -20 to 55 °C (-4 to 131 °F)
Humidity: 80% RH max, non-condensing
Altitude: up to 12,000 m (40,000 ft)
Video mode compatibility
| Compatibility Resolution Refresh rates (Hz) | ||
| Analog | ||
| VGA 640 × 350 70, 85 | ||
| 640 × 400 85 | ||
| 640 × 480 60, 66.66, 66.68, 72, 75, 85 | ||
| 720 × 400 70, 85 | ||
| SVGA 800 × 600 56, 60, 72, 75, 85 | ||
| 832 × 624 74.55 | ||
| XGA 1024 × 768 60, 70, 75, 85 | ||
| 1152 × 870 75, 75.06 | ||
| 1280 × 960 75 | ||
| SXGA 1280 × 1024 | 60, 75 | |
| SXGA+ | 1400 × 1050 | 60 |
| WSXGA+ | 1680 × 1050 | 60 |
| UXGA | 1600 × 1200 | 60 |
Safety information
LED safety
The infrared ports located on the digital projector and remote control are classified as Class 1 LED devices according to International Standard IEC 825-1 (EN60825-1). This device is not considered harmful, but the following precautions are recommended:
- If the unit requires service, contact an authorized HP service center.
- Do not attempt to make any adjustment to the unit.
- Avoid direct eye exposure to the infrared LED beam. Be aware that the beam is invisible light and cannot be seen.
- Do not attempt to view the infrared LED beam with any type of optical device.
Mercury safety

WARNING! This digital projector lamp contains a small amount of mercury. If the lamp breaks, adequately ventilate the area where the breakage occurred, discard any nearby food and drink, and thoroughly clean the table surface around the projector. Wash your hands after cleaning the area or handling a broken lamp. Disposal of this lamp may be regulated due to environmental considerations. For disposal or recycling information, please contact your local authorities or the Electronic Industries Alliance (www.eiae.org). You can find safety information about the lamp at www.hp.com/hpinfo/globalcitizenship/environment/productdata.
Regulatory information
This section presents information that shows how your digital projector complies with regulations in certain regions. Any modifications to your digital projector not expressly approved by HP could void the authority to operate the digital projector in these regions.
U.S.A.
This digital projector has been tested and found to comply with the limits for a Class B digital device, pursuant to Part 15 of the FCC Rules. These limits are designed to provide reasonable protection against harmful interference in a residential installation.
This digital projector generates, uses, and can radiate radio frequency energy. If not installed and used in accordance with the instructions, it can cause harmful interference to radio communications. However, there is no guarantee that interference will not occur in a particular installation. If this digital projector does cause harmful interference to radio or television reception (which can be determined by unplugging the unit), try the following:
- Reorienting or relocating the receiving antenna.
- Relocating the digital projector with respect to the receiver.
- Connecting the digital projector's power cord to another power outlet.
Connections to peripheral devices
To maintain compliance with FCC Rules and Regulations, use properly shielded cables with this device.
For more information, consult your dealer, an experienced radio/television technician, or the following booklet prepared by the Federal Communications Commission: How to Identify and Resolve Radio-TV Interference Problems. This booklet is available from the U.S. Government Printing Office, Washington, DC 20402, Stock Number 004-000-00345-4. At the first printing of this manual, the telephone number was 202-512-1800.
Canada
This Class B digital apparatus complies with Canadian ICES-003.
Japan
For regulatory identification purposes, your product is assigned a regulatory model number. The regulatory model number for your product is listed in the declaration of conformity. This regulatory number is different from the marketing name and product number.
Regulatory model number: CRVSB-05AR
Declaration of conformity
According to ISO/IEC Guide 22 and EN 45014
Manufacturer's name: Hewlett Packard Company
Manufacturer's address: Hewlett Packard Company
Digital Projection & Imaging
1000 NE Circle Blvd.
Corvallis, OR 97330-4239
Declares, that the product(s):
Product name: Digital Projector
Model numbers: mp2210 series
Regulatory model: CRVSB-05AR
Conforms to the following product specifications:
Safety:
IEC 60950:1999/ EN 60950:2000
IEC 60825-1:1993 +A1 / EN 60825-1:1994 +A11 Class 1 LED
GB4943-1995
EMC:
EN 55022 +A1 Class B: 1998 [1]
CISPR 24:1997 / EN 55024 +A1:2001
IEC 61000-3-2:1995 / EN 61000-3-2:2000
IEC 61000-3-3:1994 / EN 61000-3-3:1995+A1:2001
GB9254-1998
FCC Title 47 CFR, Part 15 Class B/ANSI C63.4:1992
AS/NZS 3548:1995 Rules and Regulations of Class B
VCCI
Supplementary information:
The product herewith complies with the requirements of following Directives and carries the CE marking accordingly:
-Low Voltage Directive: 73/23/EEC
-EMC Directive: 89/336/EEC
[1] The product was tested in a typical configuration with Hewlett Packard Personal Computer peripherals.
This device complies with Part 15 of the FCC Rules. Operation is subject to the following two conditions: (1) this device may not cause harmful interference, and (2) this device must accept any interference received, including interference that may cause undesired operation.
Corvallis, Oregon, May 1, 2005


Steve Brown, General Manager
European Contact for regulatory topics only: Hewlett Packard GmbH, HQ-TRE, Herrenberger Straße 140, 71034 Boeblingen, Germany. (FAX:+49-7031-143143).
USA Contact: Hewlett Packard Co., Corporate Product Regulations Manager, 3000 Hanover Street, Palo Alto, CA 94304. Phone: (650) 857-1501.
Index
A
accessories 12
adjusting
color 34
picture 31
setup 35
shape of picture 32
slanted picture 33
aiming projector 24
analog video mode
compatibility 57
B
buttons
location 9
opening menu 36
C
cables
choosing 47
connections 18
choosing cables 47
cleaning 5, 41
component-video
connecting source 19
port 10
composite-video
connecting source 20
port 10
computer screen, showing 29
computer, connecting 16
connecting
component-video source 19
composite-video source 20
computer 16
handheld organizer 17
power 15
SCART source 18
S-video source 20
D
diagnostics 54
F
firmware, updating 45
focus 25
H
handheld organizer, connecting 17
hiding picture 29
|
image. See picture
installing projector 13, 47
L
lamp, replacing 42
LED safety 58
lens, cleaning 41
lights. See lamp; warning
lights
locking projector 48
M
menu
language 39
listing 36
using 36
mercury safety 58
moving projector 23
O
on-screen menu. See menu
P
PC. See computer
picture
focus 25
hiding and showing 29
quality of 13, 18, 52
troubleshooting 50
zoom 25
picture mode, choosing 31
power
connecting 15
turning off 23
turning on 22
presentations, showing 29
Q
quality of picture 13, 18, 52
R
rear projection installation 48
regulatory information 59
remote control buttons 11
installing batteries 44
opening menu 36
troubleshooting 53
using 26
replacing lamp 42
room layout 13
S
safety information 5, 58
SCART 18
screen
positioning 14
security
locking cable 48
selecting video source 29
setting up 13
shape, adjusting 32
showing picture 29
showing presentations 29
slanted picture, adjusting 33
specifications 55
S-video
connecting source 20
port 10
T
table installation 13, 47
troubleshooting
interruptions 53
picture 50
remote control 53
start-up 50
warning lights 49
turning on and off 21
U
updating firmware 45
upgrading projector 45
USB, connecting 16
using remote control 26
V
VGA
connecting source 16, 17
port 10
video mode compatibility 57
video source, selecting 29
W
warning lights
location 9
meanings 49
troubleshooting 49
Y
YPbPr. See component-video
Z
zoom 25


- CONTENTS
- SETTING UP
- SHOWING PRESENTATIONS
- ADJUSTING THE PROJECTOR
- MAINTAINING THE PROJECTOR
- INSTALLING PERMANENTLY
- FIXING PROBLEMS
- REFERENCE
- SAFETY PRECAUTIONS
- WHAT'S IN THE BOX
- ITEM FUNCTION
- IDENTIFYING COMMON FEATURES
- PROJECTOR AT A GLANCE
- PROJECTOR BUTTONS AND LIGHTS
- BACK PANEL
- ACCESSORIES
- SETTING UP THE PROJECTOR
- POSITIONING THE PROJECTOR
- CONNECTING POWER
- CONNECTING A COMPUTER
- CONNECTING A HANDHELD ORGANIZER
- CONNECTING A VIDEO SOURCE
- CONNECTING A COMPONENT-VIDEO SOURCE
- CONNECTING AN S-VIDEO SOURCE
- CONNECTING A COMPOSITE-VIDEO SOURCE
- TURNING THE PROJECTOR ON AND OFF
- REMOVING THE LENS COVER
- TURNING THE PROJECTOR ON
- TURNING THE PROJECTOR OFF
- MOVING THE PROJECTOR
- MAKING BASIC ADJUSTMENTS
- AIMING THE PROJECTOR
- ADJUSTING THE FOCUS AND ZOOM
- USING THE REMOTE CONTROL
- TO DO THIS... PRESS THIS
- SHOWING PRESE
- SHOWING A COMPUTER SCREEN
- SELECTING A DIFFERENT SOURCE
- HIDING OR SHOWING THE PICTURE
- ADJUSTING THE PICTURE
- CHOOSING THE BEST PICTURE MODE
- ADJUSTING THE SHAPE OF THE PICTURE
- ADJUSTING A SLANTED PICTURE
- ADJUSTING THE PICTURE FOR BEST COLOR
- ADJUSTING OTHER PICTURE SETTINGS
- ADJUSTING THE PROJECTOR SETUP
- USING THE ON-SCREEN MENU
- CHANGING SETTINGS USING THE ON-SCREEN MENU
- QUICK CHOICE MENU
- INPUT MENU
- PICTURE MENU
- PICTURE MENU (CONTINUED)
- SETUP MENU
- HELP MENU
- HELP
- PERFORMING ROUTINE MAINTENANCE
- GETTING THE PROJECTOR STATUS
- CLEANING THE PROJECTOR AND LENS
- CAUTION: CLEANING REQUIRES SPECIAL CONSIDERATION
- REPLACING THE LAMP MODULE
- REPLACING THE BATTERY IN THE REMOTE CONTROL
- UPGRADING THE PROJECTOR
- UPDATING THE FIRMWARE
- USB METHOD
- INSTALLING THE PROJECTOR
- CHOOSING CABLES
- INSTALLING ON A TABLE
- INSTALLING FOR REAR PROJECTION
- LOCKING THE PROJECTOR
- FIXING PROBLEM
- TROUBLESHOOTING SUGGESTIONS
- WARNING LIGHT PROBLEMS
- IF BOTH RED WARNING LIGHTS ARE BLINKING
- IF THE RED TEMPERATURE LIGHT IS ON OR BLINKING
- IF THE RED LAMP LIGHT IS ON OR BLINKING
- IF THE RED LAMP LIGHT IS FLICKERING QUICKLY
- START-UP PROBLEMS
- IF NO LIGHTS OR SOUNDS TURN ON
- PICTURE PROBLEMS
- IF A "SCANNING" OR "WAITING" MESSAGE IS DISPLAYED ON A BLANK SCREEN
- IF THE WRONG INPUT SOURCE IS DISPLAYED
- IF THE IMAGE IS OUT OF FOCUS
- IF AN UPSIDE-DOWN OR REVERSED IMAGE IS DISPLAYED
- IF THE IMAGE IS TOO SMALL OR TOO LARGE
- IF THE IMAGE HAS SLANTED SIDES
- IF THE IMAGE IS STRETCHED
- IF THE PROJECTED COLORS SEEM SLIGHTLY WRONG
- IF THE PROJECTED COLORS SEEM COMPLETELY WRONG
- INTERRUPTION PROBLEMS
- IF THE PROJECTOR STOPS RESPONDING TO ALL CONTROLS
- IF THE LAMP SHUTS OFF DURING A SHOW
- IF THE LAMP BURNS OUT OR MAKES A POPPING SOUND
- REMOTE CONTROL PROBLEMS
- IF THE REMOTE CONTROL DOES NOT OPERATE
- TESTING THE PROJECTOR
- RUNNING THE PROJECTOR DIAGNOSTICS
- SPECIFICATIONS
- SAFETY INFORMATION
- LED SAFETY
- MERCURY SAFETY
- REGULATORY INFORMATION
- U.S.A
- CONNECTIONS TO PERIPHERAL DEVICES
- CANADA
- JAPAN
- DECLARATION OF CONFORMITY
- SUPPLEMENTARY INFORMATION
- INDEX
- A
- B
- C
- D
- F
- H
- L
- M
- O
- P
- Q
- R
- S
- T
- U
- V
- W
- Y
- Z
Brand : HP
Model : mp2215
Category : Projector