
SAVA-700 - Loudspeaker SONY - Free user manual and instructions
Find the device manual for free SAVA-700 SONY in PDF.


| Product Type | Bookshelf Loudspeaker |
| Brand | Sony |
| Model | SAVA-700 |
| Dimensions (W x H x D) | 200 x 300 x 250 mm each |
| Weight | 4.0 kg each |
| Power Handling (RMS) | 50 W |
| Peak Power | 100 W |
| Impedance | 8 ohms |
| Frequency Response | 50 Hz – 20 kHz |
| Sensitivity | 88 dB |
| Driver Configuration | 2-way: 1-inch tweeter, 5-inch woofer |
| Enclosure Type | Bass reflex with front port |
| Connectivity | Binding post terminals |
| Recommended Amplifier Power | 20 – 100 W RMS per channel |
| Material | MDF cabinet with vinyl finish |
| Color | Black |
| Protection Features | Magnetic shielding, overload protection |
| Cleaning Instructions | Wipe with a dry, soft cloth. Do not use solvents. |
| Mounting Options | Bookshelf or stand mounting |
| Included Accessories | None (speaker only) |
Frequently Asked Questions - SAVA-700 SONY
User questions about SAVA-700 SONY
0 question about this device. Answer the ones you know or ask your own.
Ask a new question about this device
Download the instructions for your Loudspeaker in PDF format for free! Find your manual SAVA-700 - SONY and take your electronic device back in hand. On this page are published all the documents necessary for the use of your device. SAVA-700 by SONY.
USER MANUAL SAVA-700 SONY
Home Theater Active Speaker System
Operating Instructions
SAVA-700
SAVA-500
WARNING
To prevent fire or shock hazard, do not expose the unit to rain or moisture.


This symbol is intended to alert the user to the presence of uninsulated "dangerous voltage" within the product's enclosure that may be of sufficient magnitude to constitute a risk of electric shock to persons.

This symbol is intended to alert the user to the presence of important operating and maintenance (servicing) instructions in the literature accompanying the appliance.
INFORMATION
This equipment has been tested and found to comply with the limits for a Class B digital device, pursuant to Part 15 of the FCC Rules.
These limits are designed to provide reasonable protection against harmful interference in a residential installation. This equipment generates, uses, and can radiate radio frequency energy and, if not installed and used in accordance with the instructions, may cause harmful interference to radio communications.
However, there is no guarantee that interference will not occur in a particular installation. If this equipment does cause harmful interference to radio or television reception, which can be determined by turning the equipment off and on, the user is encouraged to try to correct the interference by one or more of the following measures:
- Reorient or relocate the receiving antenna.
- Increase the separation between the equipment and receiver.
- Connect the equipment into an outlet on a circuit different from that to which the receiver is connected.
- Consult the dealer or an experienced radio/TV technician for help.
CAUTION
You are cautioned that any changes or modifications not expressly approved in this manual could void your authority to operate this equipment.
Owner's record
The model and serial numbers are located on the rear of the unit. Record the serial number in the space provided below.
Refer to them whenever you call upon your Sony dealer regarding this product.
Model No. SAVA-700/500
Serial No. ____
For the customers in Canada
CAUTION
TO PREVENT ELECTRIC SHOCK, DO NOT USE THIS POLARIZED AC PLUG WITH AN EXTENSION CORD. RECEPTACLE OR OTHER OUTLET UNLESS THE BLADES CAN BE FULLY INSERTED TO PREVENT BLADE EXPOSURE.
This Class B digital apparatus complies with Canadian IEES-003.
Precautions
On safety
Should any solid object or liquid fall into the cabinet, unplug the speaker system and have it checked by qualified personnel before operating it any further.
On power sources
- AC power cord must be changed only at the qualified service shop.
- Before operating the speakers, check that the operating voltage is identical with your local power supply. The operating voltage is indicated on the nameplate on the rear of the speakers.
- The unit is not disconnected from the AC power source (mains) as long as it is connected to the wall outlet, even if the unit itself has been turned off.
- If you are not going to use the speakers for a long time, be sure to disconnect the speakers from the wall outlet. To disconnect the AC power cord, grasp the plug itself; never pull the cord.
- One blade of the plug is wider than the other for the purpose of safety and will fit into the wall outlet only one way. If you are unable to insert the plug fully into the outlet, contact your dealer.
On placement
- Do not install the appliance in a confined space, such as a bookcase or built-in cabinet.
- Do not place the speakers near heat sources, or in a place subject to direct sunlight, excessive dust or mechanical shock.
- Good ventilation is essential to prevent internal heat buildup. Place the speakers in a location with adequate air circulation, and in a way that does not block the rear ventilation holes.
- Do not drag the unit along the floor on installment.
On cleaning
Clean the cabinet, panel and controls with a soft cloth slightly moistened with a mild detergent solution. Do not use any type of abrasive pad, scouring powder or solvent such as alcohol or benzine.
If you have any question or problem concerning your speaker system, please consult your nearest Sony dealer.
Welcome!
Thank you for purchasing the Sony speaker system.
The SAVA-700 and SAVA-500 are home theater active speaker systems incorporating a Dolby Pro Logic decoder, 5.1-channel input jacks, and subwoofers.
These systems are easy to setup and allows you to enjoy five different types of surround sound, accommodating a variety of program sources.
About This Manual
Before operating the unit, please read this manual thoroughly and retain it for future reference.
The instructions in this manual describe the controls on the left front speaker for SAVA-700 and SAVA-500. Check your model number by looking at the rear panel of your left front speaker. The SAVA-700 is the model used for illustration purposes unless stated otherwise.
Any difference in operation is clearly indicated in the text, for example, "SAVA-700 only."
Convention
The following icons are used in this manual:

Indicates that you can use the remote to do the task.

Indicates hints and tips for making the task easier.
This speaker system incorporates the Dolby* Pro Logic Surround System.
- Manufactured under license from Dolby Laboratories Licensing Corporation. DOLBY, the double-D symbol ☐, "PRO LOGIC," and "Dolby Digital (AC-3)" are trademarks of Dolby Laboratories Licensing Corporation.
TABLE OF CONTENTS
Getting Started
Unpacking 4
Hooking Up the Speaker System 5
Hooking Up the Speaker System 5.1-channel Input 7
Choosing the Best Location 8
Turning the Speaker System On and Off 9
Home Theater Operations
Enjoying Surround Sound 10
Adjusting the Surround Sound 11
Adjusting the Sound 13
Operating Other Sony Components 14
Additional Information
Troubleshooting 15
Specifications 16
Glossary 18
Index 19
Unpacking
Check that you received the following items with your speaker system:
- Satellite speakers SS-T100 (SAVA-700 only) (3; one for the center speaker, and two for the rear speakers)
- Mounting brackets (SAVA-700 only) (2)
• Wood screws (SAVA-700 only) (4)
• Foot pads (SAVA-700 only) (12)
• Center speaker SS-CN16 (SAVA-500 only) (1)
• Rear speakers SS-SR16 (SAVA-500 only) (2)
• Foot pads (SAVA-500 only) (4) - Front L/R speaker connecting cord, 3.5 m (12 ft) (1)
- Center speaker connecting cord, 2.5 m (8 ft 21/2 in.) (1)
- Rear speaker connecting cords, 10 m (32 ft 93/4 in.) (2)
• Audio connecting cord, 1.5 m (5 ft) (1) - Remote commander (remote) RM-J70 (1)
• Sony size-AA (R6) batteries (2)
• SCART adaptor (European model only) (1)
Inserting batteries into the remote
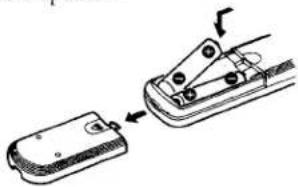
Insert two size-AA (R6) batteries with the terminals matched to the + and - on the battery compartment. When using the remote, point it at the remote sensor ☐ on the left front speaker.

When to replace batteries
Under normal use, the batteries should last for about 6 months. When the remote no longer operates the speakers, replace both batteries with new ones.
Notes
- Do not leave the remote in an extremely hot or humid place.
- Do not use a new battery with an old one.
- Do not expose the remote sensor to direct sunlight or lighting apparatuses. Doing so may cause a malfunction.
- If you do not use the remote for an extended period of time, remove the batteries to avoid possible damage from battery leakage and corrosion.
Attaching the supplied foot pads to the center speaker
Attach the supplied foot pads to the bottom of the speaker, one in each of the four corners to place the center speaker on your TV set. Make sure the speaker is solidly placed on the top of the TV set.

Note
Do not place the speaker on top of a TV set which is smaller than the speaker.
Installing the rear speakers with the supplied accessories (SAVA-700 only)
Use the supplied accessories to properly install the rear speakers in their selected locations (see page 8).
Foot pads
If you install the rear speakers on a shelf or speaker stand, attach the supplied foot pads to the bottom of the speakers, one in each of the four corners, and make sure that the speakers are solidly placed.

Note
Do not place any speaker on shelves or stands which are smaller than the speaker.
Mounting brackets
If you wish to hang the rear speakers on a wall with hooks (not supplied), use the supplied wood screws to attach the supplied mounting brackets to the upper part of the back panel of each rear speaker.

Notes
- You are responsible for the proper selection and use of mounting hardware that you purchase at hardware stores, and for the proper and safe mounting of the speakers.
- Each satellite speaker has a corresponding position for optimum sound effect. Before attaching the mounting brackets, see "Positioning the center and rear speakers for better surround effect (SAVA-700 only)" on page 8.
Hooking Up the Speaker System
This section describes how to connect the speaker system to your TV and VCR.

The arrow ⇒ indicates signal flow.
STEP 1 Connecting the front speakers
![graph LR A["Front speaker (right)"] --> B["R-ch SPEAKER INPUT"] B --> C["Switch"] C --> D["Front speaker (left)"] D --> E["R-ch SPEAKER OUTPUT"]](/content/2026/07/1516816/images/cdacb7e276755c6d175b1dfa15027db33905bafe2cf2f3a43393afb855f84471.jpg)
To disconnect a cord, hold down the release tab and pull out the connector. Never pull the cord itself.

STEP 2 Connecting the center speaker
Use the supplied 8-foot-2 1 / 2 inch (2.5 m) speaker cord to connect the center speaker.
Insert the stripped wires into the speaker terminals.

Be sure to connect matching speaker terminals (e.g., use the solid-color wire to connect + to +, and use the striped wire to connect - to -). If the connections are reversed (+ to -), the sound will lack bass.
(Continued)
Getting Started
STEP 3 Connecting the rear speakers
Use the supplied 32-foot-9 1/4 inch (10 m) speaker cords to connect the left and right rear speakers. Insert the stripped wires into the speaker terminals.

Be sure to connect matching speaker terminals (e.g., use the solid-color wire to connect + to +, and use the striped wire to connect - to -). If the connections are reversed (+ to -), the sound will lack bass.
For customers in Canada
Use only the supplied SS-T100 Satellite Speakers for connection to the CENTER SPEAKER terminal and REAR SPEAKERS terminal of SAVA-700.
Use only the supplied SS-CN16 Center Speaker for connection to the CENTER SPEAKER terminal of SAVA-500 and SS-SR16 Rear Speakers for connection to the REAR SPEAKERS terminal of SAVA-500.
STEP 4 Connecting your TV
Use the supplied a pair of audio connecting cords to connect the TV IN jacks on the left front speaker to the AUDIO OUT jacks on your TV.
Important
If your TV set has an on/off switch for its internal speaker, set this to off, and enjoy the sound of this speaker system. If your TV set does not, set the volume on your TV set to minimum.
![graph LR A["TV OUTPUT"] --> B["VIDEO"] A --> C["L"] A --> D["AUDIO"] A --> E["R"] B --> F["RF"] C --> G["RF"] D --> H["RF"] E --> I["RF"] F --> J["Front speaker (left)"] G --> J H --> J I --> J J --> K["R"] J --> L["L"] J --> M["TV"]](/content/2026/07/1516816/images/4204588bb319c62fb781a49006f99f8cbb76c057adedd0ec7da1ae0d87068b20.jpg)
If you use AUDIO OUT jacks marked VARIABLE
After making the connection as shown above, turn up the volume on the TV set. Use this speaker system's volume control for regular volume adjustment.
Turning down the volume on the TV set reduces the AUDIO OUT signal level and may cause a loss in sound quality and/or activate the auto-power on/off function (see page 9).
Connecting the SCART adaptor (European model only)
You can listen to the sound from the TV or VCR by connecting the audio signal from the TV or VCR to the left front speaker.
![graph TD A["to TV audio input"] --> B["White (L)"] A --> C["Red (R)"] D["to VCR audio input"] --> E["White (L)"] D --> F["Red (R)"] G["Euro AV cable (not supplied)"] --> H["TV"] I["to TV set"] --> J["SCART adaptor (supplied)"] K["Front speaker (left) TV IN"] --> L["Left"] M["Front speaker (left) VID…](/content/2026/07/1516816/images/ee0833b7a383b5611b51f3237fce7c1a6e36ba528a2b4f7520f3bd907af4a598.jpg)
If you have a Sony XBR 2 series TV or Sony Projection TV equipped with a speaker switch (For U.S. and Canadian customers only)
If your Sony XBR 2 series TV set or Projection TV is compatible with SAVA series speakers, you can use the TV set's menu and remote control functions to operate this speaker system.
For details, see the Operating Instructions supplied with your TV set.
Be sure to connect the TV IN jacks on the left front speaker to the TV set's FIXED AUDIO OUTPUT jacks if you make this connection.
1 Use an optional CONTROL S cord to connect the CONTROL S TV IN jack on the left front speaker to the CONTROL S OUT jack on the back of the TV.
![graph LR A["XBR² series TV set or Projection TV"] --> B["CONTROL S"] B --> C["OUT"] C --> D["(Sold separately)"] D --> E["Front speaker (left)"] E --> F["CONTROL S"] F --> G["TV IN"]](/content/2026/07/1516816/images/da2c16bbf649433920f45adeff277b5db6ce428126d09d96ddedc38bf41cff53.jpg)
2 Follow the Operating Instructions supplied with your TV set to set it to operate this speaker system.
STEP 5 Connecting the AC power cord
Connect the AC power cord from the front speaker to a wall outlet.
Connecting Other Components
With its built-in amplifier, this speaker system can be used to output sound directly from such components as CD players, DVD (2-channel) players, LD players, and VCRs.
![graph TD subgraph Left_Circuit OUT["OUT"] --> R1["R"] R1 --> Audio1["Audio"] Audio1 --> VCR["OUTPUT"] VCR --> Audio2["Audio"] Audio2 --> Video1["Video"] Video1 --> VCR2["OUTPUT"] VCR2 --> Audio3["Audio"] Audio3 --> Video2["Video"] Video2 --> Audio4["Audio"] Audio4 --> Video3["Video"] Video3 --> VCR3…](/content/2026/07/1516816/images/30b58e79f46778b10afb90b82a53d06a180ea8947d72d343a993001b4c0e7b48.jpg)
Note
Do not connect an amplified audio source. The combined amplification from the component and the speaker's built-in amplifier may damage the speakers.
Hooking Up the Speaker System 5.1-channel Input
This speaker system is equipped with the 5.1-channel input (5.1 CH INPUT) jacks. By connecting your DVD player or other digital video source through a multi-channel decoder (e.g., Dolby Digital (AC-3) decoder, DTS decoder) to these jacks, you can enjoy theater-quality Multi-Channel Surround sound in your own home. Refer to the instruction manual supplied with your Dolby Digital (AC-3) decoder etc., for details on the 5.1-channel input hookups.
Audio cords (not supplied)
Two for the 5.1 CH INPUT FRONT and REAR jacks

Monaural audio cords (not supplied)
Two for the 5.1 CH INPUT CENTER and WOOFER jacks

DVD player
incorporating
Dolby Digital (AC-3)
decoder or Dolby
![graph TD A["5.1 CH OUTPUT"] --> B["CENTER"] A --> C["REAR"] A --> D["HOV"] A --> E["L"] A --> F["R"] G["5.1 CH INPUT"] --> H["R"] G --> I["R"] G --> J["L"] G --> K["REAR"] G --> L["WOOFER CENTER"] M["Digital (AC-3) decoder etc."] --> A N["Power Supply"] --> A O["Input Signal"] --> G](/content/2026/07/1516816/images/8dcd173d646ecb3f71eb6939cc4e8ea44e1ee908a48cf94b2eda7cecee39037f.jpg)
* It is possible to use a pair of audio cords instead of two monaural audio cords to connect to the 5.1 CH INPUT CENTER and 5.1 CH INPUT WOOFER jacks.
(Continued)
Getting Started
Setting the Dolby Digital (AC-3) decoder
Specify the speaker type in the decoder's display as below:
| Specify | by selecting |
| front speaker size | LARGE |
| center speaker size | LARGE |
| rear speaker size | LARGE |
| subwoofer selection | YES |
To enjoy theater-quality Multi-Channel Surround sound
Press INPUT (or INPUT SELECT on the remote) repeatedly until "5.1 CH IN" appears in the display.
Note
When the 5.1-channel input is selected, the PRO LOGIC, THEATER, HALL, STADIUM and GAME surround modes do not function.
Choosing the Best Location
Front speakers
To obtain high sound quality and a proper sound image from the front speakers, place the speaker with the built-in operation panel to the left of your TV and the other to the right of your TV.
For the best sound image, place the left and right speakers within 8 ft (2.5 m) of each other and equidistant from the TV.

Rear speakers
Place the rear speakers so that they face directly across from each other about 2 to 3 ft (60 to 90 cm) above the listener's ear. For optimum sound, face each rear speaker as directly towards the center speaker as possible.


Positioning the center and rear speakers for better surround sound effect (SAVA-700 only)
For better surround sound quality, position each speaker as shown below. Each rear speaker should be placed as its tweeter is on the inner side.
The grille can be detached to visually verify the orientation.
The "SONY" plaque on each satellite speakers can be rotated to match the speaker's orientation.

Caution
Before disconnecting the left front speaker's AC power cord, turn the system off first.
Turning the Speaker System On and Off

Turning on the speaker system
Press ① on the lower part of the left front speaker. The ON indicator on the left front speaker lights up. When the speaker system is in standby or ready mode (i.e., the STANDBY or READY indicator on the left front speaker lights up), press INPUT (or either I/O or INPUT SELECT on the remote).
Turning off the speaker system
When you press ①, the ON indicator goes off and the speaker system is totally deactivated. When you press I/○ on the remote, the speaker system enters standby mode (the STANDBY indicator on the left front speaker lights up).
Power turns on and off automatically (Auto power on/off function)
When you turn off the TV, the speaker system automatically turns off three minutes afterwards (the READY indicator lights up).
The speaker system turns on again when you turn on the TV. The speaker system also turns on when you press INPUT (or either I/① or INPUT SELECT on the remote).
This function operates only when TV input is selected ("TV" appears in the display).
If you press I/ ① on the remote while the system is on The speaker system enters standby (the STANDBY indicator lights up). Press I/ ② on the remote to turn the speaker system on again.
Adjusting the contrast of the display window
You can dim the display or turn it off. Press DIMMER on the remote repeatedly until your favorite brightness of the display comes up. The display returns to full brightness temporarily when you press one of the buttons on the remote.
Checking the speaker connections
1 Turn on the speaker system. The ON indicator lights up.
2 Press INPUT (or INPUT SELECT on the remote) repeatedly until "5.1 CH IN" appears in the display.
3 Adjust the volume level to around 15 with MASTER VOL +/-
4 Press T.TONE on the remote.
Check that the test tone is output from each speaker in following order:
5 Press T.TONE on the remote to turn the test tone off.

If the test tone is not output in the order indicated in step 4
Turn off all components, then check the connection of the speaker that did not output the test tone.
Home Theater Operations
Enjoying Surround Sound
You can enjoy the speaker's surround sound capability simply by choosing one of the five available surround modes:
PRO LOGIC (Dolby Pro Logic) surround mode
Reproduces superb theater-like presence and surround effects from video software ercoded with Dolby Surround.
C.STUDIO surround mode
Creates a theater-like environment in your living room by adding the acoustic reflections of a theater to decoded Dolby Surround signals.
HALL surround mode
Reproduces the acoustics of a rectangular concert hall. Ideal for soft, acoustic sounds, or for giving an extra punch to debates and press conferences.
STADIUM surround mode
Provides a sense of presence similar to that of an open-air stadium. Ideal for maximum enjoyment of broadcasts of sporting events like football.
GAME surround mode
Obtains maximum audio impact from video game software.
1 Turn on the speaker system. The ON indicator lights up.
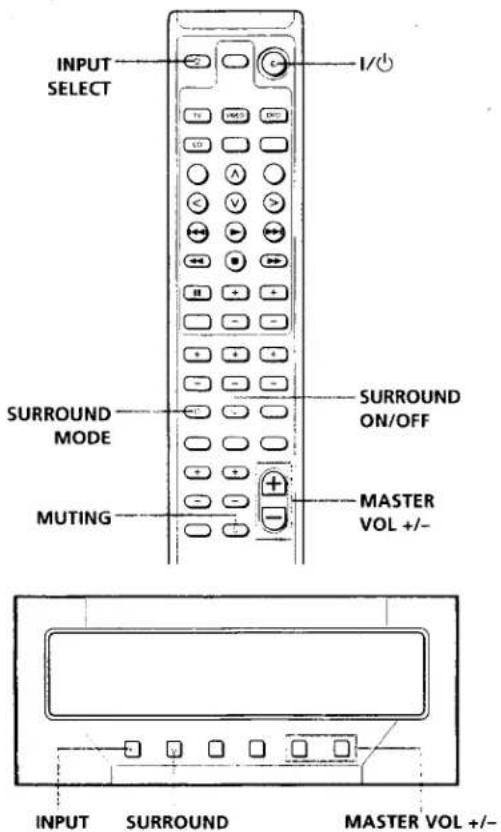
2 Press INPUT on the operation panel (or INPUT SELECT on the remote) repeatedly to select the program source. The selected program source ("TV", "VIDEO" or "AUX") appears in the display.
3 Start playback on the program source.
4 Press SURROUND on the operation panel (or SURROUND MODE on the remote) repeatedly to select the surround mode (see table below). The selected surround mode ("PRO LOGIC", "C.STUDIO", "HALL", "STADIUM", or "GAME") appears in the display. You can customize each surround mode to suit your taste. (See "Adjusting the Surround Sound" on page 11 and "Adjusting the Sound" on page 13.)
| Program | Effective modes |
| Recent movies | PRO LOGIC, C.STUDIO |
| Concerts, music | HALL, STADIUM, SUR OFF |
| Sports | HALL, STADIUM, SUR OFF |
| Old movies, monaural TV programs | GAME, SUR OFF |
| Video games | GAME, SUR OFF |
| Education programs, news | SUR OFF |
Turning off the surround effects
Press the SURROUND on the operation panel (or SURROUND MODE on the remote) repeatedly or press SURROUND ON/OFF on the remote. "SUR OFF" appears in the display when the surround sound function is off.
5 Press MASTER VOL + or - to adjust the volume.
To mute the sound
Press MUTING on the remote.
To restore the sound, press MASTER VOL + (or MUTING on the remote again).
Notes
- Some videos and laser discs may support Dolby Pro Logic Surround sound even if it is not indicated on the package.
- The surround modes do not operate when the 5.1-channel input is selected.
Adjusting the Surround Sound

This speaker system is factory set to provide balanced surround sound without the need for adjustment. You can, however, adjust the volume of each speaker and the delay time to suit the conditions of your living room or your individual tastes.

Adjusting the speaker volume
The test tone feature lets you adjust the volume of the sound coming from each speaker to the same level, so that the surround sound will be even and natural. Make the following adjustments from your listening position.
1 Select the surround mode you want to adjust.
2 Press T.TONE on the remote.
A test tone is output from each speaker in the following order:
When you select PRO LOGIC or C.STUDIO
When you select HALL, STADIUM or GAME
When you select 5.1 CH IN


(Continued)
Home Theater Operations
3 Adjust the volume levels so that the test tone from each speaker is at the same volume level from your listening position:
| To adjust the level | Press |
| of the center speaker* | CENTER + or - |
| of the rear speaker | REAR + or - |
* The center speaker volume level cannot be adjusted in the HALL, STADIUM, or GAME surround modes.
4 Press T.TONE on the remote to turn off the test tone. The adjustment levels for the selected mode are stored in the memory.
Note
Pressing buttons other than MASTER VOL +/-, CENTER +/-, or REAR +/- cancels the test tone.
Adjusting the delay time
Adjusting the delay time can enhance the spatial characteristics of the sound to obtain a theater-like presence regardless of the size of your room. If the rear speakers are close to your listening position, choose a longer delay time.
You can adjust the settings individually for PRO LOGIC, C.STUDIO, HALL, STADIUM, and GAME.
Note
The delay time cannot be adjusted for the 3 STEREO (in PRO LOGIC) mode.
1 Select the surround mode.
2 Play back a program.
3 Press DELAY on the remote once to display the current delay time.
4 Press DELAY repeatedly to choose the delay time you prefer, either 15, 20, or 30 ms.
The factory setting is 20 ms.
The delay time adjustment for the selected mode is stored in the memory.
Setting the center mode
In PRO LOGIC or C.STUDIO surround mode, you can choose from four different center modes: NORMAL, WIDE, 3 STEREO, or PHANTOM. For normal use, select NORMAL or WIDE mode. When you use the supplied center speaker, we recommend using WIDE mode.
To select the mode that you want, follow the procedure below.

1 Press SURROUND on the operation panel to choose PRO LOGIC or C.STUDIO.
2 Press CENTER MODE on the operation panel repeatedly until the center mode you want appears in the display.
Adjusting the Sound
Although this speaker system's sound quality has been pre-adjusted at the factory, you can change the settings for each surround mode to suit your taste. The adjusted settings remain stored for the respective surround mode until you change them.


S.WOOFER
1 Play back a program.
2 Make the following sound adjustments to suit your taste and/or the type of program you enjoy.
| To | press |
| select the subwoofer mode | S.WOOFER (MODE)* |
| adjust the subwoofer level | S.WOOFER + or - |
| adjust the bass level | BASS + or - |
| adjust the treble level | TREBLE + or - |
- Press S.WOOFER on the operation panel (or S.WOOFER MODE on the remote) repeatedly for this purpose. The selected subwoofer mode ("S.WF 1" or "S.WF 2") appears in the display. The S.WF 1 produces a powerful bass sound that is ideal for movies. The S.WF 2 provides more subtle effects suitable for music.
To listen without the subwoofer in the front speakers
Press S.WOOFER on the operation panel (or S.WOOFER MODE on the remote) repeatedly or press S.WOOFER ON/OFF on the remote. "S.WF OFF" appears in the display when the subwoofer is off.
The sound adjustments are stored for the selected surround mode, even when the 5.1-channel input is selected or when the surround effect is off.
Adjusting the volume with a remote of Sony XBR 2 or Sony Projection TV (For U.S. and Canadian customers only)
If your Sony XBR 2 series TV or Projection TV is compatible with the SAVA series speakers, you can make a setting on the TV so that you can control the speakers with the TV remote. Using the supplied TV remote, you can adjust the speaker volume, surround mode, and subwoofer mode.
Home Theater Operations
Operating Other Sony Components
You can use the supplied remote to operate Sony components, including TV set, VCRs, DVD players, LD players, and CD players.

Before using the remote for your Sony component
Table below shows the components that supports the remote.
| Function button | Selectable component(s) |
| TV | TV (set) |
| VIDEO | VTR 1 (Beta deck), VTR 2(8 mm deck), VTR 3 (VHS deck) |
| DVD | DVD (player) |
| CD | CD (player), LD (player), VTR 1 (Beta deck), VTR 2 (8 mm deck), VTR 3(VHS deck) |
The TV button selects only the TV set and the DVD button only the DVD player.
Use the VIDEO and CD buttons to select any of your Sony components. The VIDEO button is factory-set to VTR 3 (VHS deck) and CD button to a CD player. To reassign these buttons, press the VIDEO or CD button at the same time you press the button indicated in the table below.
| Press VIDEO and | To select |
| MENU | VTR 1 (Beta) |
| A (upward cursor button) | VTR 2 (8 mm) |
| ENTER/EXECUTE | VTR 3 (VHS) |
| Press CD and | To select |
| < (leftward cursor button) | CD (player) |
| v (downward cursor button) | LD (player) |
| MENU | VTR 1 (Beta) |
| (upward cursor button) | VTR 2 (8 mm) |
| ENTER/EXECUTE | VTR 3 (VHS) |
To restore all settings to their factory-settings
Press both I/O buttons on top of the remote together with the MASTER VOL-.
All parameters saved in the remote are cleared and restored to their factory settings.
Operating other Sony components
Do the procedure below to operate other Sony components that you may own.
1 Press the function button on the remote of the component to be used (TV, VIDEO, DVD, or CD). The component that you selected is activated.
2 Operate the components with the operation buttons. Each operation button on the remote corresponds to a basic operation on the Sony component.
For details on how to use each operation button, refer to the Operating Instructions of the respective Sony component.
When you press an operation button
The function button of the respective component (TV, VIDEO, DVD or CD) flashes to let you know what is being operated. If you press an operation button that has no corresponding operation on the Sony component being used, none of the function buttons will flash.
Turning off other Sony components
1 Press the function button of the Sony component you want to turn off.
2 Press SYSTEM CONTROL I/☐. The selected component enters standby mode.
Additional Information
Troubleshooting
If you experience any of the following difficulties while using the speakers, use this troubleshooting guide to help you remedy the problem. Should any problem persist, consult your nearest Sony dealer.
There's no sound from any of the speakers.
→ Check that components are connected securely to the speakers.
→ Make sure you selected the correct input (TV, VIDEO, AUX, or 5.1 CH IN).
→ Press MUTING to cancel the muting function.
→ Press MASTER VOL + to turn up the volume.
→If you are using the TV's VARIABLE AUDIO OUTPUT terminals, turn up the volume on the TV to increase the output level.
No sound or only a very low sound level is heard from the rear speakers.
→Surround sound is turned off.
→ Adjust the volume of the rear speakers (see page 11).
→ Check the sound image balance with T.TONE (see page 11).
There's no sound from the center speaker.
→ Make sure you selected the PRO LOGIC or C.STUDIO surround mode.
→ Set the Dolby Pro Logic Surround center mode to any other mode than PHANTOM.
Severe hum or noise is heard.
→ Make sure all connecting cords are placed away from any transformers or motors and least 10 feet (3 meters) from any fluorescent lights.
→Connect the speakers to your VCR or cable box instead of to your TV.
Remote operations cannot be performed.
→ Point the remote towards the remote sensor ☐ on the left front speaker.
→ Remove any obstructions between the remote and this system's left front speaker.
→ Replace the batteries in the remote.
Additional Information
Specifications
SAVA-700
Amplifier section
AUDIO POWER SPECIFICATIONS (The U.S model only)
POWER OUTPUT AND TOTAL HARMONIC DISTORTION:
with 8 ohm loads both channels driven, from 200 Hz - 20 kHz; rated 32 watts per channel minimum RMS power, with no more than 0.8% total harmonic distortion from 250 milliwatts to rated output.
Continuous RMS power output
| Stereo channel | 20 Hz - 20 kHz, 0.8%THD40 W × 2 (Front L/R,8 ohms) + 100 W(Subwoofer, 8 ohms) |
| Surround channel | 20 Hz - 20 kHz, 0.8%THD40 W (Center, 8 ohms)40 W × 2 (Rear,8 ohms) |
| TOTAL | 300 W |
Input sensitivity/Impedance
| TV/VIDEO/AUX | 450 mV, 45 kohms |
| 5.1 CH | 300 mV, 45 kohms |
| CONTROL S |
(for U.S. and Canadian customers only)
| Only for Sony XBR2and Sony Projection TV |
Output
| Center speaker | Accepts only supplied SS-T100 |
| Rear speaker | Accepts only supplied SS-T100 |
Wireless rear speaker
| Accepts only Sony models |
| Accepts only SAVA-700 R-ch speaker with supp exclusive speaker c |
Tone control
| Bass: ±10 dB at 100 Hz |
| Treble: ±10 dB at 10 kHz |
Speaker section
Type
| Front speaker | |
| Front: | Bass reflex type, magnetically shielded |
| Subwoofer: | Advanced SAW type, magnetically shielded |
Satellite speaker (SS-T100):
| Bass reflex type, magnetically shielded |
Speaker unit
Front speaker
| Tweeter: | 2.5 cm (1 in.) balanced drive type |
| Midbass: | 8 cm (3 in.) cone type × 2 |
| Subwoofer: | 16 cm ( 61/2 in.) cone type |
Satellite speaker (SS-T100):
| Tweeter: | 2.5 cm (1 in.) balanced drive type |
| Midbass: | 8 cm (3 in.) cone type × 2 |
General
Power requirement
| U.S.A.: | 120 V AC, 60 Hz |
| Other models: | 220-230 V AC,50/60 Hz |
Power consumption
| U.S.A.: | 210 W |
| Other models: | 240 W |
Dimensions
| Front speaker: | Approx. 281 × 1,075 × 450 mm (111/8 × 423/8 × 173/4 in.) (w/h/d, including speaker base) |
Satellite speaker (SS-T100):
| Approx. 395 × 112 × 128 mm ( 155/8 × 41/2 × 51/8 in.) each(w/h/d, including grille net) |
Mass
| Front speaker (Left): 23.5 kg (51 lb 14 oz) |
| Front speaker (Right): 17.3 kg (38 lb 2 oz) |
| Satellite speaker (SS-T100): 2.4 kg (5 lb 5 oz) each |
Supplied accessories
| Satellite speakers SS-T100 (3; one for a center speaker, and two for rear speakers) |
| Mounting brackets (2) |
| Wood screws (4) |
| Foot pads (12) |
Front L/R speaker connecting cord, 3.5 m (12 ft) (1)
| Center speaker connecting cord, 2.5 m(8 ft 21/2 in.) (1) |
| Rear speaker connecting cords, 10 m (32 ft 93/4 in.) (2) |
| Audio connecting cord, 1.5 m (5 ft) (1) |
| Remote commander (remote) RM-J70 (1) |
| Sony size-AA (R6) batteries (2) |
| SCART adaptor (European model only) (1) |
Optional
Wireless speaker system SA-IF70
The values indicated above were measured using a 230V AC, 50Hz power supply.
Design and specifications are subject to change without notice.
Additional Information
Glossary
Center mode
Speaker setting to enhance the Dolby Pro Logic Surround mode. Select one of the following four center modes according to your speaker system.
• NORMAL mode
Select NORMAL mode if you connect a small-sized center speaker to this speaker system. Since a small speaker cannot produce enough bass, the bass sound of the center channel is output from the front speakers.

The test tone is output as shown on page 11.
- WIDE mode
Select WIDE mode if you connect a center speaker equivalent to the two front speakers. With the WIDE mode, you can take full advantage of Dolby Surround sound.

The test tone is output as shown on page 11.
- 3 STEREO mode
Select 3 STEREO mode if you do not want to use the rear speakers to output sound. The sound of the rear channel is output from the front speakers to let you experience some of the surround sound effect without using rear speakers.

The test tone is output as follows:

- PHANTOM mode
Select PHANTOM mode if you do not want to use the center speaker to output sound. The sound of the center channel is output from the front speakers.

The test tone is output as follows:

Delay time
Time lag between the surround sound output from the front speakers and that from the rear speakers. By adjusting the delay time of the rear speakers, you can obtain the feeling of presence. Make the delay time longer when you have placed the rear speakers in a small room or close to your listening position, and make it shorter when you have placed them in a large room or far from your listening position.
Dolby Pro Logic Surround
As one method of decoding Dolby Surround, Dolby Pro Logic Surround produces four channels from two-channel sound. Compared with the former Dolby Surround system, Dolby Pro Logic Surround reproduces left-to-right panning more naturally and localizes sounds more precisely. To take full advantage of Dolby Pro Logic Surround, you should have one pair of rear speakers and a center speaker. The rear speakers output monaural sound.
Dolby Surround
Encoding and decoding system for Dolby Surround sound for consumer use. Dolby Surround decodes the extra channels in the Dolby Surround-encoded sound tracks of movie videos and TV programs and produces sound effects and echoes that make the action seem to envelope you.
Dolby Digital (AC-3)
This sound format for movie theaters is more advanced than Dolby Pro Logic Surround. In this format, the rear speakers output stereo sound with an expanded frequency range and a subwoofer channel for deep bass is independently provided. This format is also called "5.1" because the subwoofer channel is counted as 0.1 channel (since it functions only when a deep bass effect is needed). All six channels in this format are recorded separately to realize superior channel separation. Furthermore, since all the signals are processed digitally, less signal degradation occurs. The name "AC-3" comes from the fact that it is the third audio coding method to be developed by the Dolby Laboratories Licensing Corporation.
5.1-channel input (5.1 CH IN) jacks
These jacks are used to input decoded multi-channel format audio signals (e.g., Dolby Digital (AC-3), DTS, etc.), allowing you to enjoy 5.1 channel surround sound. Use these jacks to connect a multi-channel decoder or a DVD player with a built-in multi-channel decoder.
Index
Index
A, B
djusting
bass 13
delay time 12
speaker volume 10, 11
subwoofer level 13
treble 13
T
Test tone 9,11
3 STEREO mode 12, 18
Troubleshooting 15
TV hookups 6
U, V
Unpacking 4
W, X, Y, Z
WIDE mode 12, 18
C
Center mode
NORMAL mode 12,18
PHANTOM mode 12, 18
3 STEREO mode 12,18
WIDE mode 12, 18
Checking the connection 9
Connecting. See Hookups
CONTROL S TV IN 7
D, E
Delay time 12, 18
Dolby Digital (AC-3) 7,18
Dolby Pro Logic Surround 10,
18
Dolby Surround sound 18
F, G
5.1-channel input 7,18
H, I, J, K, L, M
Hookups
audio component 7
AC power cord 7
5.1-channel input 7
other components hookups
7
SCART adaptor 6
speakers 5
TV 6
VCR 7
N
NORMAL mode 12, 18
0
Operating other Sony
components 14
P, Q
PHANTOM mode 12,18
R
Remote 4,9,10,11,13,14
s
Speakers
connection 5
placement 8
Speaker volume 10,11
Surround sound 10,11
- HOME THEATER ACTIVE SPEAKER SYSTEM
- WARNING
- TO PREVENT FIRE OR SHOCK HAZARD, DO NOT EXPOSE THE UNIT TO RAIN OR MOISTURE
- INFORMATION
- CAUTION
- OWNER'S RECORD
- FOR THE CUSTOMERS IN CANADA
- PRECAUTIONS
- ON SAFETY
- ON POWER SOURCES
- ON PLACEMENT
- ON CLEANING
- WELCOME
- ABOUT THIS MANUAL
- CONVENTION
- TABLE OF CONTENTS
- GETTING STARTED
- HOME THEATER OPERATIONS
- ADDITIONAL INFORMATION
- UNPACKING
- INSERTING BATTERIES INTO THE REMOTE
- WHEN TO REPLACE BATTERIES
- NOTES
- ATTACHING THE SUPPLIED FOOT PADS TO THE CENTER SPEAKER
- NOTE
- INSTALLING THE REAR SPEAKERS WITH THE SUPPLIED ACCESSORIES (SAVA-700 ONLY)
- FOOT PADS
- MOUNTING BRACKETS
- HOOKING UP THE SPEAKER SYSTEM
- STEP 1 CONNECTING THE FRONT SPEAKERS
- STEP 2 CONNECTING THE CENTER SPEAKER
- STEP 3 CONNECTING THE REAR SPEAKERS
- FOR CUSTOMERS IN CANADA
- STEP 4 CONNECTING YOUR TV
- IMPORTANT
- IF YOU USE AUDIO OUT JACKS MARKED VARIABLE
- CONNECTING THE SCART ADAPTOR (EUROPEAN MODEL ONLY)
- IF YOU HAVE A SONY XBR 2 SERIES TV OR SONY PROJECTION TV EQUIPPED WITH A SPEAKER SWITCH (FOR U.S. AND CANADIAN CUSTOMERS ONLY)
- STEP 5 CONNECTING THE AC POWER CORD
- CONNECTING OTHER COMPONENTS
- HOOKING UP THE SPEAKER SYSTEM 5.1-CHANNEL INPUT
- AUDIO CORDS (NOT SUPPLIED)
- MONAURAL AUDIO CORDS (NOT SUPPLIED)
- DVD PLAYER
- SETTING THE DOLBY DIGITAL (AC-3) DECODER
- TO ENJOY THEATER-QUALITY MULTI-CHANNEL SURROUND SOUND
- CHOOSING THE BEST LOCATION
- FRONT SPEAKERS
- REAR SPEAKERS
- POSITIONING THE CENTER AND REAR SPEAKERS FOR BETTER SURROUND SOUND EFFECT (SAVA-700 ONLY)
- TURNING THE SPEAKER SYSTEM ON AND OFF
- TURNING ON THE SPEAKER SYSTEM
- TURNING OFF THE SPEAKER SYSTEM
- POWER TURNS ON AND OFF AUTOMATICALLY (AUTO POWER ON/OFF FUNCTION)
- ADJUSTING THE CONTRAST OF THE DISPLAY WINDOW
- CHECKING THE SPEAKER CONNECTIONS
- IF THE TEST TONE IS NOT OUTPUT IN THE ORDER INDICATED IN STEP
- ENJOYING SURROUND SOUND
- PRO LOGIC (DOLBY PRO LOGIC) SURROUND MODE
- C.STUDIO SURROUND MODE
- HALL SURROUND MODE
- STADIUM SURROUND MODE
- GAME SURROUND MODE
- TURNING OFF THE SURROUND EFFECTS
- TO MUTE THE SOUND
- ADJUSTING THE SURROUND SOUND
- ADJUSTING THE SPEAKER VOLUME
- ADJUSTING THE DELAY TIME
- SETTING THE CENTER MODE
- ADJUSTING THE SOUND
- ADJUSTING THE VOLUME WITH A REMOTE OF SONY XBR 2 OR SONY PROJECTION TV (FOR U.S. AND CANADIAN CUSTOMERS ONLY)
- OPERATING OTHER SONY COMPONENTS
- BEFORE USING THE REMOTE FOR YOUR SONY COMPONENT
- TO RESTORE ALL SETTINGS TO THEIR FACTORY-SETTINGS
- WHEN YOU PRESS AN OPERATION BUTTON
- TURNING OFF OTHER SONY COMPONENTS
- TROUBLESHOOTING
- THERE'S NO SOUND FROM ANY OF THE SPEAKERS
- NO SOUND OR ONLY A VERY LOW SOUND LEVEL IS HEARD FROM THE REAR SPEAKERS
- THERE'S NO SOUND FROM THE CENTER SPEAKER
- SEVERE HUM OR NOISE IS HEARD
- REMOTE OPERATIONS CANNOT BE PERFORMED
- SPECIFICATIONS
- SAVA
- AMPLIFIER SECTION
- AUDIO POWER SPECIFICATIONS (THE U.S MODEL ONLY)
- POWER OUTPUT AND TOTAL HARMONIC DISTORTION
- GLOSSARY
- CENTER MODE
- NORMAL MODE
- WIDE MODE
- STEREO MODE
- PHANTOM MODE
- DELAY TIME
- DOLBY PRO LOGIC SURROUND
- DOLBY SURROUND
- DOLBY DIGITAL (AC-3)
- CHANNEL INPUT (5.1 CH IN) JACKS
- INDEX
- A, B
- T
- U, V
- W, X, Y, Z
- C
- D, E
- F, G
- H, I, J, K, L, M
- N
- P, Q
- R
- S
Brand : SONY
Model : SAVA-700
Category : Loudspeaker