
MAESTRO 4350 - Navigation GPS MAGELLAN - Free user manual and instructions
Find the device manual for free MAESTRO 4350 MAGELLAN in PDF.
| Product Type | Car Navigation GPS |
| Brand | MAGELLAN |
| Model | MAESTRO 4350 |
| Screen Size | 4.3 inches (10.9 cm) touchscreen |
| Dimensions (W×H×D) | 121 × 76 × 20 mm |
| Weight | approx. 170 g |
| Power | Rechargeable lithium-ion battery, 5V via car charger adapter |
| Battery Life | up to 2 hours |
| Main Functions | GPS navigation with preloaded maps, voice guidance, address and POI search, route planning, 2D/3D display |
| Display | Backlit color LCD touchscreen |
| Maps | Pre-installed European road maps |
| GPS Receiver | High-sensitivity SiRFstarIII |
| Map Update | Via Magellan software (USB download) |
| Internal Memory | 2 GB (part reserved for system) |
| Connectivity | Mini-USB port, microSD card slot |
| Available Languages | French, English, German, Italian, Spanish, Dutch |
| Mounting Bracket | Suction cup for windshield and adhesive mount included |
| Box Contents | GPS, suction cup mount, USB cable, car charger, protective pouch, quick start guide |
| Care and Cleaning | Clean the screen with a soft, dry cloth. Do not use chemicals. Store away from moisture and extreme temperatures. |
| Safety | Do not use while driving. Secure the mount firmly to prevent falling. Follow local regulations regarding GPS placement. |
| Spare Parts and Repairability | Battery replaceable by a professional. Mount and cables available online. No user repair of internal components. |
| General Information | 1-year warranty. Made in China. CE, RoHS certifications. |
Frequently Asked Questions - MAESTRO 4350 MAGELLAN
User questions about MAESTRO 4350 MAGELLAN
0 question about this device. Answer the ones you know or ask your own.
Ask a new question about this device
Download the instructions for your Navigation GPS in PDF format for free! Find your manual MAESTRO 4350 - MAGELLAN and take your electronic device back in hand. On this page are published all the documents necessary for the use of your device. MAESTRO 4350 by MAGELLAN.
USER MANUAL MAESTRO 4350 MAGELLAN
The Magellan Maestro is a vehicle-navigation aide designed to assist you in arriving at your selected destinations. When using the Magellan Maestro, these safety rules must be followed to prevent accidents that can result in injury or death to yourself or others:
- Please check the applicable regulations in your state as regards windshield mounting. Go to www.magellanGPS.com for alternative mounting solutions.
- When driving, the need to view the display is minimal. Voice prompts will guide you to your destination. The driver should enter data or program the Magellan Maestro only when the vehicle is stationary. Only a vehicle passenger should enter data or program the Magellan Maestro while the vehicle is moving.
It is your responsibility to comply with all traffic laws. - Every attempt is made to ensure that the database is accurate. However, roads, points of interest (POIs) and business and service locations may change over time. The database does not include, analyze, process, consider, or reflect any of the following: legal restrictions (such as vehicle type, weight, height, width, load and speed restrictions); road slope or gradient; bridge height, width, weight or other limits; population density; neighborhood quality or safety; availability or proximity of police, emergency rescue, medical or other assistance; construction work zones or hazards; road or lane closures; road, traffic or traffic facilities' safety or condition; weather conditions; pavement characteristics or conditions; special events; traffic congestion. It is your responsibility to disregard any unsafe, hazardous or illegal route suggestions.
- Keep the Magellan Maestro safe from extreme temperature conditions. For example, do not leave it exposed to direct sunlight for an extended period of time.
Take care when mounting the Magellan Maestro in your vehicle, whether using the windshield mount or other mount or accessories, that it does not obstruct the driver's view of the road, interfere with the operation of the vehicle's safety devices such as air bags, or present a hazard to occupants of the vehicle should the Magellan Maestro be dislodged while driving. It is your responsibility to assess the risks associated with damage to your vehicle or vehicle occupants as the result of your choices in mounting the Magellan Maestro. - Laws in some states prohibit wearing stereo headphones while operating a motor vehicle. Please contact your local Motor Vehicle Authority for information.
- The battery in the Magellan Maestro is rechargeable and should not be removed. In the event that it should need to be replaced, please contact Magellan Technical Support.
- The maximum operating temperature is 140^ ( 60^ ).
About Charging the Magellan Maestro
- Use only the AC adapter that is supplied with your Magellan Maestro for charging the battery. Use of another type of AC adapter can result in malfunction and/or possible fire hazard due to battery over heating.
- Only use the car charger approved for/supplied with your Magellan Maestro. Use of another type of car charger will result in fire or electric shock.
- For safety reasons, the battery in your Magellan Maestro will stop charging when the ambient temperature is less than 32^ ( 0^ ) or more than 113^ ( 45^ ).
It will take approximately 6 hours of charging the Magellan Maestro through the cigarette lighter adapter or optional AC adapter to obtain a full battery charge.
About the Battery
- Do not attempt to replace the battery. Please contact Magellan Technical Support for issues related to the battery.
- Use only the charger approved for your Magellan Maestro.
Federal Communication Commission Interference Statement
This equipment has been tested and found to comply with the limits for class B digital devices, in accordance with part 15 of the FCC Rules. These limits are designed to provide reasonable protection against harmful interference in a residential installation. This equipment generates, uses and can radiate radio frequency energy and, if not installed and used in accordance with the instructions, may cause harmful interference to radio communications. However, there is no guarantee that interference will not occur in a particular installation. If this equipment does cause harmful interference to radio or television reception, which can be determined by turning the equipment off and on, the user is encouraged to try to correct the interference by one of the following measures:
Reorient or relocate the receiving antenna.
- Increase the separation between the equipment and receiver.
- Connect the equipment into an outlet on a circuit different from that to which the receiver is connected.
- Consult the dealer or an experienced radio/TV technician for help.
This device complies with Part 15 of the FCC Rules. Operation is subject to the following two conditions: (1) This device may not cause harmful interference, and (2) this device must accept any interference received, including interference that may cause undesired operation.
FCC Caution: Any changes or modifications not expressly approved by the party responsible for compliance could void the user's authority to operate this equipment.
IMPORTANT NOTE:
FCC Radiation Exposure Statement:
This equipment complies with FCC radiation exposure limits set forth for an uncontrolled environment. End users must follow the specific operating instructions for satisfying RF exposure compliance.
This transmitter must not be co-located or operating in conjunction with any other antenna or transmitter.
In order to maintain compliance with FCC regulations, shielded cables must be used with this equipment. Operation with non-approved equipment or unshielded cables is likely to result in interference to radio and TV reception. The user is cautioned that changes and modifications made to the equipment without the approval of manufacturer could void the user's authority to operate this equipment.
Trade Name Model Number

Tested To Comply With FCC Standards
FOR HOME OR OFFICE USE
The Magellan Maestro must be installed and operated at a distance no closer then 8 inches (20 cm) from the user.
This Class B digital apparatus meets all requirements of the Canadian Interference-Caising Equipment Regulations.
IC statement
Operation is subject to the following two conditions:
- This device may not cause interference and
- This device must accept any interference, including interference that may cause undesired operation of the device.
IMPORTANT NOTE:
IC Radiation Exposure Statement:
This equipment complies with IC radiation exposure limits established for an uncontrolled environment. End users must follow the specific operating instructions for satisfying RF exposure compliance.
This transmitter must not be co-located or operated in conjunction with any other antenna or transmitter.
Underwriters Laboratories Inc. ("UL") has not tested the performance or reliability of the Global Positioning System ("GPS") hardware, operating software or other aspects of this product. UL has only tested for fire, shock or casualties as outlined in UL's Standard(s) for Safety for Information Technology Equipment, UL60950-1. UL Certification does not cover the performance or reliability of the GPS hardware and GPS operating software. UL MAKES NO REPRESENTATIONS, WARRANTY OR CERTIFICATIONS WHATSOEVER REGARDING THE PERFORMANCE OR RELIABILITY OF ANY GPS RELATED FUNCTIONS OF THIS PRODUCT.
The information provided in this document is subject to change without notice. Improvements and enhancements to the product may occur without any formal notification. Check the Magellan website (www.magellanGPS.com/support) for product updates and additional information.
© 2008 Magellan Navigation Inc. All rights reserved. The Magellan Logo, Magellan, Magellan Maestro and OneTouch are trademarks of Magellan Navigation Inc. No part of this user manual may be reproduced or transmitted in any form or by any means, electronic or mechanical, including photocopying and recording, for any purpose other than the purchaser's personal use, without the prior written permission of Magellan Navigation Inc.
604-0246-001
Table of contents
Magellan Maestro 4350/4370 1
Magellan Maestro 4350/4370. 2
Installation Instructions 3
Selecting the Location 3
Attaching the Cradle to the Swivel Mount 3
Securing the Swivel Mount to the Windshield 3
Securing the Swivel Mount to the Dashboard 4
Attaching the Magellan Maestro to the Cradle 4
Adjusting the Mount for Optimum Viewing 4
Connecting Power 4
Connecting the Traffic Antenna 4
Checking Connection and Final Adjustments 5
Security 5
Fundamentals 6
Powering on the Magellan Maestro 6
Turning the Magellan Maestro On. 6
Turning the Magellan Maestro Off. 6
Volume 6
Changing the Volume from the Map Screen 6
Changing the Volume from User Options.. 6
Brightness 6
Accessing the Brightness Control 6
Main Menu 7
Accessing the Main Menu 7
Buttons on the Main Menu Screen 7
Keypad. 8
Keypad Overview 8
Special Keys 8
Selecting From List 8
Notes on Entering Data 9
Map Screen 10
Accessing the Map Screen 11
Setting the Map Modes (2D or 3D) 11
Displaying 3D Buildings on the Map. 11
Manipulating the Map 11
Rotating the Map 12
Tilting the Map 12
Setting Zoom Levels 12
Panning on the Map 12
Saving a Position While Panning 13
Routing to a Panned Position 14
Current Location Screen 14
Accessing the Current Location Screen 15
Saving Your Current Location to Your Address Book 15
Maneuver List (Itinerary) 16
Accessing the Maneuver List 16
Excluding a Maneuver 16
Volume 17
Changing the Volume from the Map Screen 17
Enter Address 18
Entering an Address 18
Entering an Address if House Numbering is Restarted 20
Entering a Street Midpoint 21
Entering an Intersection 22
Entering a City Center 23
Tips on Entering Addresses Quickly 24
Previous Destinations 25
Routing to a Previous Destination (Method 1) 25
Routing to a Previous Destination (Method 2) 25
Saving a Previous Destination to Your Address Book 25
Clearing the list of Previous Destinations 26
Routing to Coordinates 26
Routing with the 'Plan On Map' Feature 26
Address Book 27
Accessing an Address in Your Address Book 27
Routing to an Address in Your Address Book 27
Creating a New Entry in Your Address Book by Selecting it on the Map.....28
Creating a New Entry in Your Address Book by Entering an Address............28
Creating a New Entry in Your Address Book from a POI 29
Creating a New Entry in Your Address Book by Entering Coordinates 29
Points of Interest (POI) 31
Creating a Route to a POI by Category 31
Creating a Route to a special POI (AAA data) 32
Creating a Route to a POI by Name 34
Creating a Route to a Freeway Exit POI 34
Home Address 36
Saving the Home Address 36
Changing the Home Address 36
Creating a Route to the Home Address 36
OneTouchTM Menu (Shortcuts/Favorite) 37
Saving an Address to a OneTouch Button 37
Changing the Address of a OneTouch Button 37
Creating a Route to a OneTouch Destination 38
Saving a POI Search Criteria to a OneTouch Button 38
Multi-Destination Routes 39
Creating Multi-Destination Routes with Plan On Map 39
Creating Additional Destinations with Go To 39
Creating Additional Destinations with Add Destination 40
Editing the Destination List. 41
Saving a Multi-Destination Route 41
Loading a Saved Route 41
Traveling on a Route 43
Map Screen 43
Maneuver List. 43
Types of Routes 43
Routing Method 44
Special Routing Functions 45
Pausing a Route 45
Canceling a Route 46
Detouring off a Route 46
Smart Detour on Freeways 46
Traffic 47
Glossary 47
Understanding How The Traffic System Works 47
Subscribing to Traffic Services 48
Traffic Icon on the Map Screen 48
List of Traffic Events 48
Traffic Events in Route Calculation 49
Displaying and Suppressing Traffic Events 49
Using and Ignoring Traffic Events 49
FAQs 50
Settings 51
Accessing System Settings 51
Checking Battery Life 51
Checking GPS Reception Quality 51
Adjusting the Volume 51
Using the speakers of the car for your Magellan Maestro. 52
Adjusting the Display Brightness 52
Setting Time Zone 53
Selecting Units of Measure 53
Changing the Voice Guidance Profile 53
Speed Warning 53
Setting the 2D Map Display to Heading Up or North Up 54
Setting Auto Night Map Display. 54
Changing the Route Calculation Parameters 55
Viewing Technical GPS Information 55
Setting the GPS Position 55
Backing Up and Restoring Data 56
Viewing Map and License Information 56
Hands-free Phone 57
Connecting your Magellan Maestro to a Mobile Phone............57
Incoming Phone Calls 59
Accepting an Incoming Call 59
Rejecting an Incoming Call 60
Rejecting an Incoming Call with an SMS 60
Initiating Phone Calls 61
Entering the Home Number 61
Changing the Home Number 61
Calling Home 61
Calling a Phone Number 61
Assigning Phone Numbers to Speed Dial Buttons 61
Calling a Speed Dial Number 62
Calling a Number from Your Address Book 62
Calling the Last Called Number 62
Handling SMS messages 63
Receiving an SMS message 63
Sending an SMS message 63
Media Center 64
Audio Player 64
Starting the Audio Player 64
Playing Audio Files 64
Listening to Music during Navigation 67
Video Player 67
Picture Viewer 68
The Magellan Maestro is a vehicle navigation product that utilizes GPS signals from satellites to calculate your precise location and compute navigational information that can be used to guide you to your destination. Knowing its position and movement, it can then overlay this information on detailed maps to provide a visual representation of your location.
Be sure to install the Magellan Content Manager to update the software (operating system, application and maps) on your Magellan Maestro quickly and easily. You can download the Magellan Content Manager from www.magellanGPS.com after you have registered your Magellan Maestro.
With the Magellan Maestro you can:
- Store your home address and quickly get routing details to your home.
- Enter and save addresses in your address book that can be accessed at any time and get routing information to that address.
- Route to an address that you enter using the Smart Keyboard for easy, errorless address entry.
- Route to any point of interest (POI) that has been preloaded into your Magellan Maestro.
- Create a route with multiple destinations. Handy for business people who need routing information to many destinations.
View POIs that are ahead of you on the freeway. The Freeway Exit POIs function provides you with a list of gas stations, restaurants, hotels and auto repair shops located nearby exits you are approaching while traveling on a freeway. - Customize your Magellan Maestro to meet your needs using the Settings menu.
- With a traffic subscription, the Magellan Maestro can receive traffic information so as to avoid delays in your travel.
- Connect your compatible cell phone via Bluetooth and use your Magellan Maestro as a hands-free device: initiate and receive calls, send and receive SMS messages.
- Upload your favorite music into your Magellan Maestro and listen to music while driving.
- Upload photos and video files into your Magellan Maestro and view them while not driving.
The user interface for the Magellan Maestro is easy and simple to follow once you understand the basics. You may never need to refer to this manual, but if you do we have tried to present it in a form that makes it easy for you to access the function you are trying to use and follow the steps provided.
The Magellan Maestro has a built-in battery so, in most cases, you will be able to follow these instructions while reading them on your computer screen without plugging the Maestro to the AC power using an AC power adapter. You should note that while indoors you may not get enough satellite signals, so your location information may not be updated. However, the power of the GPS chipset installed in the Magellan Maestro will pick up satellite signals in some very demanding locations, so you will probably find that the Magellan Maestro is computing a position, even indoors.
The Magellan Maestro includes Voice Alerts (both prerecorded and Text-to-Speech) for driving instructions.
The Magellan Maestro has integrated traffic capabilities.
This document is set up to be printed on 8.5'' × 11'' paper should you desire a printed version for your reference.

(A) Power Button
(B) Microphone
(C) Traffic Antenna Connector
(D) USB connector. Power input from vehicle power adapter cable or AC power adapter (+5 VDC / 2A).
(E) SD/MMC card slot
(F) Reset Button
Installation of the Magellan Maestro is simple and easy. The hardest part will be picking the best location.
Selecting the Location
A few tips on selecting the proper location.
- Mount the Magellan Maestro in a place where it can be easily seen and will not interfere with your view of the road.
- The Magellan Maestro should be mounted in such a way that the antenna, (located in the top of the receiver), has an unobstructed view of the sky through the windshield.
- Make sure that the Magellan Maestro or any cabling will not be disturbed if the airbags are activated.
- Select whether it will be mounted using the adjustable mount to the windshield or an adhesive disk. Be sure to check your local and regional laws before mounting to the windshield. Some states, like California and Minnesota, have laws restricting the mounting of any device on the windshield.
- If planning to use the adhesive disk, a smooth surface on the dash board will need to be selected. Do not attach the adhesive disk to the windshield nor airbag covers.
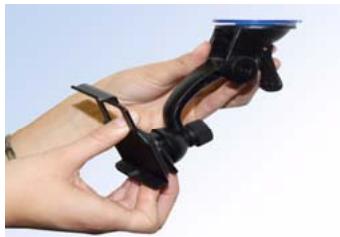
Attaching the Cradle to the Swivel Mount
Line up the two tabs on the swivel mount with the holes on the back of the cradle. Push the cradle down until it locks in place with the swivel mount.
Securing the Swivel Mount to the Windshield
Use the alcohol pad that came with the Magellan Maestro to clean the area on the windshield that has been selected for mounting the Magellan Maestro. Let the area dry completely.
Make sure that the lever at the base of the adjustable mount is in the up position. Place the base of the swivel mount firmly over the area of the windshield to be used. Push the lever at the base of the swivel mount all the way down until it snaps in place. Carefully let go of the assembly, making sure that it is securely mounted.
Please note that the swivel mount supplied with the Magellan Maestro may be different then the one shown in this document.
Securing the Swivel Mount to the Dashboard
Remove the protective tape from the back of the adhesive disk. Apply the disk with the adhesive side towards the dashboard. Maintain pressure on the disk for 5 minutes to allow it to set in place. Allow the disk 24 hours to cure before continuing.
Make sure that the lever at the base of the adjustable mount is in the up position. Place the base of the swivel mount firmly over the adhesive disk. Push the lever at the base of the swivel mount all the way down until it snaps in place. Carefully let go of the assembly, making sure that it is securely mounted.
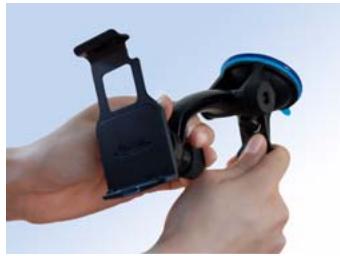
Attaching the Magellan Maestro to the Cradle
Align the tabs on the cradle to the indents on the bottom of the Magellan Maestro. Swivel the cradle up so that it is flush against the back of the receiver and snap it into place.
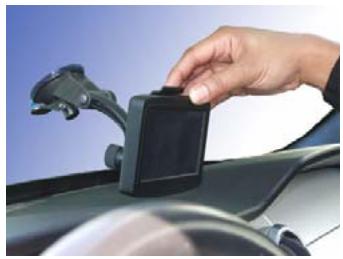
Adjusting the Mount for Optimum Viewing
Loosen the adjustment locking knobs and position the Magellan Maestro for optimum viewing. Once set, tighten the locking knobs. (Never attempt to adjust the mount while driving.)
Connecting Power
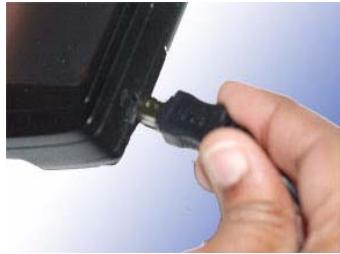
Plug the end of the vehicle power adapter into a 12V DC vehicle power receptacle. Connect the other end of the cable to the Magellan Maestro's USB connector as shown.
If there is power at the receptacle, the Magellan Maestro will power on. (Note: some vehicles apply power to the vehicle power receptacle only when the ignition is on.)
Connecting the Traffic Antenna
Attach the FM antenna connector to the receiver just above the power connector.
Checking Connection and Final Adjustments
If the power indicator light on the vehicle power adaptor is on, power is being supplied to the Magellan Maestro. If it is not on, check the cable connection to the vehicle power receptacle. If the light is still not on, turn the vehicle's ignition on.
Press the power button (located at the top right side of the Maestro) and hold down for a few seconds. The Magellan Maestro will power on. Sit in a normal driving position and make any final adjustments to the swivel mount for optimum viewing. Tighten the adjusting knobs on the swivel mount to hold the Magellan Maestro firmly in place.
Press the power button again to turn the Magellan Maestro off and turn the ignition switch of the vehicle to off. The Magellan Maestro is connected and ready for use.
Security
It is recommended that the Magellan Maestro is not left in plain view while unattended to prevent possible theft.
Please note that the Magellan Maestro is a receiver only and does not transmit GPS location signals. Neither the receiver nor the vehicle can be tracked using the Magellan Maestro.
Powering on the Magellan Maestro
The Power On/Off button is located on the top right side of the Magellan Maestro.
Turning the Magellan Maestro On
-
Press and hold the Power On/Off button for 1-2 seconds.
-
Read theWarnings and tap Done.

Turning the Magellan Maestro Off
- Press and hold the Power On/Off button for 1-2 seconds.
Volume
There are two ways to access the volume controls; one is tapping the speaker icon on the Map screen and the other is through User Options.
Changing the Volume from the Map Screen
- Tap the speaker/magnifier icon . Additional controls appear.
- Tap the Mute button to mute the volume, or tap inside the volume adjust bar below the Mute button to change the volume levels.
- Tap
Changing the Volume from User Options
- Access the Main Menu.
- Tap Settings.
- Tap Sound.
- Tap inside the Master volume adjust bar to change the volume level of the Magellan Maestro or tap inside the Navigation volume adjust bar to change the volume level of the voice guidance only.
Brightness
Accessing the Brightness Control
- Access the Main Menu.
- Tap Settings.
-
Tap System.
-
Tap Brightness.
- Tap inside the Daytime brightness adjust bar to set the desired brightness for daytime use or tap inside the Night brightness adjust bar to set the desired brightness for night use.
On the Brightness screen there is a switch. When switched to Smart Powersave, the Magellan Maestro will reduce the brightness when operating exclusively on battery power and you have not used the touch screen for a few seconds. This prolongs the battery life between charges. It can be turned off by switching to Backlight Always On.
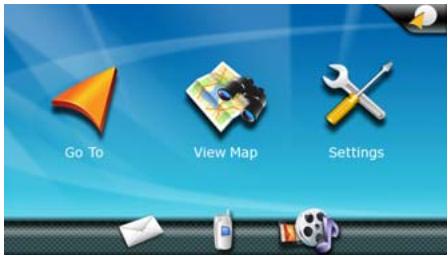
Main Menu
The Main Menu screen is the center for all available functions of the Magellan Maestro. The Main Menu contains large, easy to access icons.
Accessing the Main Menu
When you switch on the Magellan Maestro, the Main Menu is displayed. To access the Main Menu from the Map screen, do the following:
- Tap Options.
- Tap Main Menu.
Buttons on the Main Menu Screen
| Button | Name | Description |
| Go To | Displays the Destination menu. You can enter addresses, search for POIs, intersections, specify latitude/longitude or choose from the list of previous destinations. | |
| View Map | Displays the map with your current position (if computing a position from the GPS signals) indicated by the blue arrow. See the Map Screen chapter for details. | |
| Settings | Displays the Settings menu. This menu can be used to access functions used to customize the Magellan Maestro to your personal needs. | |
| OneTouchTM Menu | Displays the OneTouch menu with easy access buttons to frequently used functions such as routing to your Home address or the list of emergency services nearest to your current position. | |
| Hands-free Phone | Displays the Phone Features screen. You can connect your Magellan Maestro to a cell phone via Bluetooth to initiate and receive calls using the microphone, speaker and touch screen of the Magellan Maestro. | |
| SMS messages | Displays the Text Messages screen. You can connect your Magellan Maestro to a cell phone via Bluetooth to send and receive SMS messages with your Magellan Maestro. | |
| Media Center | Displays the Media Center. Listen to your favorite music during navigation. View pictures or watch video files while not driving. |
Keypad
Understanding the keypad while entering an address is an important part of using your Magellan Maestro. The keypad is the most common method for entering data into the Magellan Maestro.
Keypad Overview
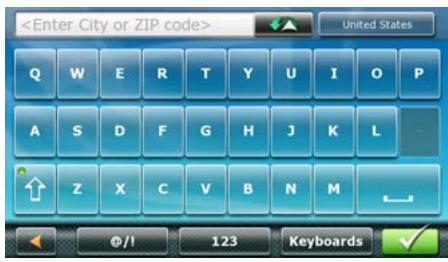
Special Keys

Alphabetic Keypad

Numeric Keypad

Symbols Keypad

International Keyboard Layouts

Spacebar

Backspace

Previously entered cities or street names

Accept

Cancel
Selecting From List
After tapping Done to accept your input, you may be presented with a list of items found in the database. Use the arrows on the right to move the list up and down and tap on the desired item in the list to continue.
Notes on Entering Data
If you are having trouble getting the results you expected, here are a few useful tips.
- Make sure that you have entered the name correctly. If you are unsure of the spelling, just enter a few characters and tap Done. A long list of names will be displayed, but you can step through the list and you will probably be able to find the correct spelling.
- Check for apostrophes and hyphens. If you do not see the POI or street name you are looking for in the list, check to see if the name has an apostrophe or hyphen.
The more characters you enter, the smaller is the list of possible options from which to choose. - When entering a street or city name it is not necessary to use accented letters. You can enter city and streets names using only the basic alphabetical keyboard.
The most commonly used screen is the Map screen. Whether you are following a route or just traveling around city, the chances are that the Map screen will be displayed. The Map screen can be displayed in two unique modes: normal and routing.
In normal mode, your position is shown on the map along with the time. As you travel, your position will be updated, giving you a clear view of your position and surrounding streets.
In routing mode additional information is displayed providing detailed information about the route you have selected.
(A) Turn instructions for next maneuver. Tap to display maneuver list (available only when routing).
(B) Current street (in normal mode) or next street and distance to next maneuver (when routing). Tap to repeat last voice instruction.
(C) Access OneTouch Menu. OneTouch Menu gives you access to your saved search criteria and favorite destinations.
(D) Speed limit (appears while exceeding the speed limit if speed warning is turned on in Settings).
(E) Turn guidance arrow.
(F) Current position and heading.
(G) Access volume and map controls.
(H) Vehicle type used in route calculation.
(I) Current time (in normal mode) or distance to destination (when routing). Tap to change content to remaining time or arrival time.
(J) Access Trip Options.
(K) Access the list of nearest Freeway Exit POIs (available only when driving on a freeway). Tap to display options to start a new trip or, when routing, to make modifications to an existing trip.
(L) Access Traffic Events.
(M) Access Phone.
(N) Access Audio Player.
Accessing the Map Screen
- On the Main Menu screen, tap View Map.
Setting the Map Modes (2D or 3D)
The map is normally displayed in 3D mode (perspective view) but you can set the map to 2D mode (top down view) if so desired. Choose the mode that suits you best.
- From the Map screen, tap anywhere on the map. Additional controls appear.
- Tap 2D to switch the map to 2D mode from 3D mode, or tap 3D to switch the map to 3D mode from 2D mode.
- Tap
Done
Displaying 3D Buildings on the Map
The map in 3D mode is normally displayed with 3D buildings (if 3D building data is available at the displayed location). You can suppress 3D buildings on the map if so desired. Choose the mode that suits you best.
-
From the Map screen, tap anywhere on the map. Additional controls appear.
-
Tap Buildings Off to suppress 3D buildings. Later you can tap Buildings On to re-enable displaying 3D buildings.
-
Tap
Done
Manipulating the Map
In both 2D and 3D modes, the map view can be modified in several ways. You can:
- rotate the map
- tilt the map (in 3D view only)
scale the map - pan on the map
Rotating the Map
During navigation, your Magellan Maestro automatically rotates the map to always face your direction of travel. You can stop and rotate the map to any desired direction.
-
While viewing the Map screen, tap anywhere on the map. Additional controls appear.
-
Tap the Map controls button.

-
Now tap the left or right arrow of the newly displayed controls to rotate the map.
-
When finished, tap and the map returns to your current position.
Tilting the Map
In 3D map view mode, you can tilt the map from a top down view to a flat perspective view.
- While viewing the Map screen, tap anywhere on the map. Additional controls appear.

-
Tap the Map controls button.
-
Now tap the up or down arrow of the newly displayed controls to adjust the tilt level.
-
When finished, tap and the map returns to your current position.
Setting Zoom Levels
In 2D map view mode, there is a wide range of zoom levels, ranging from street level to a global view. The zoom range is limited in 3D view. Select the zoom level that best suits your needs.
- While viewing the Map screen, tap anywhere on the map. Additional controls appear.
-
Tap inside the horizontal zoom adjust bar to change the zoom level.
-
When finished, tap and the map returns to your current position.
Panning on the Map
- While viewing the Map screen, slide your finger or stylus across the map.

-
The location icon changes to (a red dot with radiating red circles).
-
When finished, tap and the map returns to your current position.
Saving a Position While Panning
- Pan the map until the location icon book or in the OneTouch Menu.

is over the location you want to save to your address

button in the top left corner.
2. Tap the
3. On the newly opened screen, tap Save.
4. (optional) If you want to save this location to the OneTouch Menu, select Add to OneTouch.
5. Tap OK.
6. Edit information:
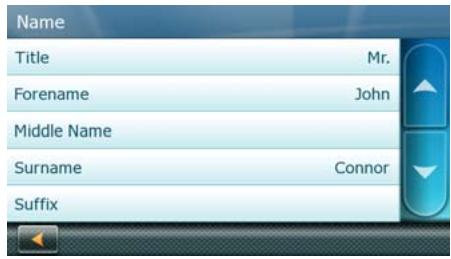
- Tap the Name field and use the keypad to enter a name for the Address Book entry. Tap the fields to enter the:
Title
- Forename
Middle Name
- Surname
and Suffix of the name.

to return.
- Tap Back
- (optional) Tap
- (optional) Tap Assign to correct the location or to add text information to the address book entry.
- When the details for this address are acceptable, tap Done. compulsory before saving the Address Book entry.)

(Note: entering a Name is
- If you have selected to save this point to the OneTouch Menu, you need to select a button for the entry.
Routing to a Panned Position

- Pan the map until the location icon
is over the location you want to route to.

- Tap the button in the top left corner.
-
If an active route already exists, first you need to define what to do with this new route point:
-
Replace Destination: the previous route is cleared, and a new route is calculated with the selected location as the destination.
- Insert Via Point: the selected location is inserted in the route as an intermediate destination before the final destination. (If this is not the first intermediate destination, the Edit Route
screen appears. Change the sequence of destinations if needed, and then tap Done to exit.)

-
Add To Trip: the selected location becomes the new destination with the previous destination as the last via point to reach.
-
A screen appears with the address of the selected location, the estimated time of arrival (ETA), the distance to travel, and the routing method (e.g. Fast).
- (optional) Tap Options if you want to change the routing method or the vehicle type.
- Tap the large GO button on the right to return to the Map screen and start navigating.
Note: if the panned position does not match an existing street address (i.e. the destination is not along a road or street that is stored in the map database), the guidance will stop on the road that is closest to your destination. A straight line to your final destination will then be displayed on the map.
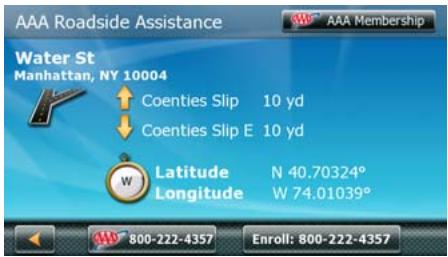
Current Location Screen
This screen is easy to access from the Trip Options screen.
The Current Location screen displays approximate address of your current position, the next and previous intersections, your latitude, longitude, altitude and heading.
Accessing the Current Location Screen
There are two ways to open the Current Location screen. From the Map screen:
- Tap Options.
- Tap Current Location.
From several other screens:

- Tap the button in the top right corner. The OneTouch Menu appears.
- Tap S.O.S. or Service.
- Tap Where Am I to display the Current Location screen.
-
Here you have new options:
-
Tap AAA Membership and enter your AAA membership number.
- Tap the AAA button below to call the toll free assistance number of the AAA. (available only when a cell phone is connected to the Magellan Maestro)
- Tap the Enroll button to call the enrollment number of the AAA. (available only when a cell phone is connected to the Magellan Maestro)
Saving Your Current Location to Your Address Book
- Access the Current Location screen from the Map screen using the Options button.
- Tap Save.
- (optional) If you want to save this location to the OneTouch Menu, select Add to OneTouch.
- Tap OK.
-
Edit information:
-
Tap the Name field and use the keypad to enter a name for the Address Book entry. (See above for details.)
-
(optional) Tap
to specify a phone number for the address book entry. -
(optional) Tap Assign to correct the location or to add text information to the address book entry.
-
When the details for this address are acceptable, tap Done. (Note: entering a Name is compulsory before saving the Address Book entry.)
- If you have selected to save this point to the OneTouch Menu, you need to select a button for the entry.
Maneuver List (Itinerary)
This screen is accessed from the Map screen and only when routing.
Each line in the Maneuver List provides details about the maneuvers in the order that they are to be made, with the next maneuver at the top.
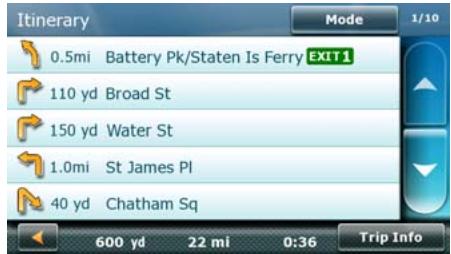
The Maneuver List can be modified if you want to exclude one of the maneuvers should you want to avoid traveling one of the streets listed. Instructions to exclude one of the maneuvers is described in this chapter.
Accessing the Maneuver List
- When actively following a route, tap the maneuver icon in the top left corner of the Map screen.
In other cases tap Options at the Map screen, and then tap Turn List.
Excluding a Maneuver
This is used to modify the route to possibly avoid routing on a particular street.
- Access the Maneuver List.
- Tap the item in the list with the street you want to try and avoid.
- The Map is displayed with the selected maneuver in the middle.
- Tap Avoid.
- Select whether to avoid only the maneuver or a part of the route after it.

- Confirm the exclusion by tapping Avoid. (Or tap the Back arrow to cancel.)
- The Magellan Maestro recalculates the route and the Map screen returns.
Volume
The volume can be adjusted or muted from the Map screen. (The volume can also be adjusted from User Options > Sound.)
Changing the Volume from the Map Screen
- Tap the speaker/magnifier icon

Additional controls appear.
- Tap on the Mute button

to mute the volume, or tap inside the volume adjust bar below the volume levels.
- Tap

If you know at least a part of the address, it is the quickest way to select the destination of the route.
This function is used to create a route from:
- an exact address, including street number
the midpoint of a street
an intersection - any of the above, starting the search with the ZIP code
the center of a city
Entering an Address
When creating an address, the first step is to indicate which city the address is in. (If the address is not in the currently selected country, you will need to change the country before entering the address.)
The city can be specified by entering the name of the city, entering the ZIP code for the city or by selecting a previously used city.

- From the Main Menu, tap the Go To icon.

- Tap the Address icon.
- Enter City:
You have three ways to do this:
To select the city from the list of previous cities, tap the button.
To enter a new city: use the keypad to enter the first few characters of any significant word
in the city name. Tap Done or continue entering characters until the list of cities found is displayed. It is not necessary to enter accented characters, for ease of use you need to use only the basic keyboard.
To enter a ZIP code: if needed, tap the 123 button to switch to the numeric keypad.
Enter the first few characters of the ZIP code. Tap Done characters until the list of cities found is displayed.

or continue entering

Tap to select the city from the list. You can enter a full address only if you select a city that is
detailed on the map: a city with or symbol.
4. Enter Street name:
With the city selected, the keypad will be displayed prompting you for the street name.
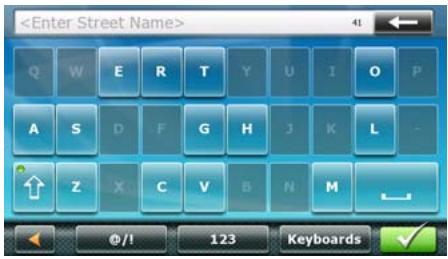
You have the following options:

- Tap the button for the list of recently used streets in the selected city.
- Use the keypad to enter the street name. It is not necessary to enter accented characters, for ease of use you need to use only the basic keyboard. Enter the first few characters of
any significant word in the street name and tap Done or continue entering characters until the list of streets is displayed. If necessary, use the arrow buttons to the right to find the correct street name.

Tap on the street name to continue.
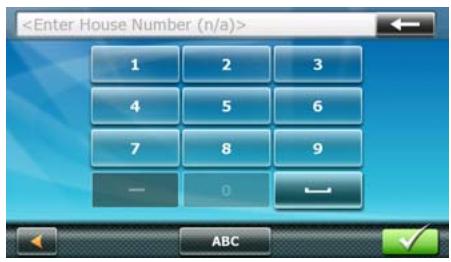
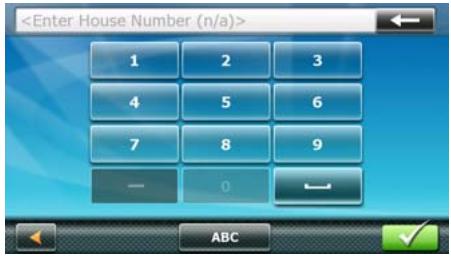
5. Enter Street number:
Use the keypad to enter the street number for the address. The range of acceptable street numbers is displayed before you start typing.
If you need to enter letters, tap

to open the alphanumeric keyboard.
- Tap Done when the address is complete. A screen appears with the address of the selected location, the estimated time of arrival (ETA), the distance to travel, and the routing method (e.g. Fast).
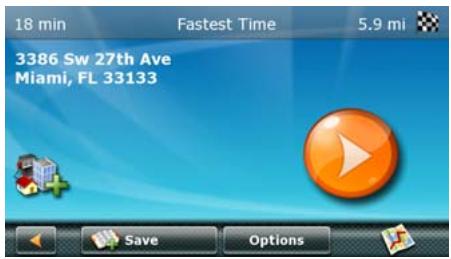
-
(optional) Tap Options if you want to change the routing method or the vehicle type.
-
Tap the large GO button on the right to return to the Map screen and start navigating
Tip: If you know that you will use a destination later, before tapping the orange button tap Save to save it in your Address Book or in the OneTouch Menu.
Entering an Address if House Numbering is Restarted
There are long roads where house numbering is restarted at some point. This way the same street number can appear twice or even more times on the same road.
If this is the case, after entering the house number, you need to select the appropriate address.
- From the Main Menu, tap the Go To icon.

- Tap the Address icon.

3. Enter City:
You have three ways to do this:

To select the city from the list of previous cities, tap the button.
To enter a new city: use the keypad to enter the first few characters of any significant word
in the city name. Tap Done

or continue entering characters until the list of cities found enter accented characters, for ease of use you need to
To enter a ZIP code: if needed, tap the 123 button to switch to the numeric keypad.
Enter the first few characters of the ZIP code. Tap Done characters until the list of cities found is displayed.

or continue entering
Tap to select the city from the list. You can enter a full address only if you select a city that is
detailed on the map: a city with

or

symbol.
4. Enter Street name:
With the city selected, the keypad will be displayed prompting you for the street name.
You have the following options:

button for the list of recently used streets in the selected city.
- Use the keypad to enter the street name. It is not necessary to enter accented characters, for ease of use you need to use only the basic keyboard. Enter the first few characters of
any significant word in the street name and tap Done or continue entering characters until the list of streets is displayed. If necessary, use the arrow buttons to the right to find the correct street name.
Tap on the street name to continue.
5. Enter Street number:
Use the keypad to enter the street number for the address. The range of acceptable street numbers is displayed before you start typing.
If you need to enter letters, tap

to open the alphanumeric keyboard.
- Tap Done

when the address is complete.
- The list of matching addresses is displayed. Tap on the desired address.
- A screen appears with the address of the selected location, the estimated time of arrival (ETA), the distance to travel, and the routing method (e.g. Fast).
-
(optional) Tap Options if you want to change the routing method or the vehicle type.
-
Tap the large GO

button on the right to return to the Map screen and start navigating.
Entering a Street Midpoint
When the street number is not known, the midpoint of the street can be used as the destination.

- From the Main Menu, tap the Go To icon.

- Tap the Address icon.
3. Enter City:
You have three ways to do this:

button.
To select the city from the list of previous cities, tap the button.
To enter a new city: use the keypad to enter the first few characters of any significant word
in the city name. Tap Done or continue entering characters until the list of cities found is displayed. It is not necessary to enter accented characters, for ease of use you need to use only the basic keyboard.
123
To enter a ZIP code: if needed, tap the 123 button to switch to the numeric keypad.
Enter the first few characters of the ZIP code. Tap Done or continue entering characters until the list of cities found is displayed.
Tap to select the city from the list. You can enter a full address only if you select a city that is
detailed on the map: a city with or symbol.
4. Enter Street name:
With the city selected, the keypad will be displayed prompting you for the street name.
You have the following options:

- Tap the button for the list of recently used streets in the selected city.
- Use the keypad to enter the street name. It is not necessary to enter accented characters, for ease of use you need to use only the basic keyboard. Enter the first few characters of
any significant word in the street name and tap Done or continue entering characters until the list of streets is displayed. If necessary, use the arrow buttons to the right to find the correct street name.
Tap on the street name to continue.
- Instead of entering the street number, tap Done immediately, and the midpoint of the street will be selected. A screen appears with the address of the selected location, the estimated time of arrival (ETA), the distance to travel, and the routing method (e.g. Fast).
-
(optional) Tap Options if you want to change the routing method or the vehicle type.
-
Tap the large GO button on the right to return to the Map screen and start navigating.
Entering an Intersection
When the street number is not known, an intersecting street can pinpoint the location.
- From the Main Menu, tap the Go To icon.

- Tap the Intersection icon.

- Enter City:
You have three ways to do this:
To select the city from the list of previous cities, tap the button.
- To enter a new city: use the keypad to enter the first few characters of any significant word in the city name. Tap Done or continue entering characters until the list of cities found
is displayed. It is not necessary to enter accented characters, for ease of use you need to use only the basic keyboard.
123
- To enter a ZIP code: if needed, tap the button to switch to the numeric keypad.
Enter the first few characters of the ZIP code. Tap Done or continue entering characters until the list of cities found is displayed.
Tap to select the city from the list. You can enter a full address only if you select a city that is
detailed on the map: a city with or symbol.
4. Enter Street name:
With the city selected, the keypad will be displayed prompting you for the name of the first street.
You have the following options:

- Tap the button for the list of recently used streets in the selected city.
- Use the keypad to enter the street name. It is not necessary to enter accented characters, for ease of use you need to use only the basic keyboard. Enter the first few characters of
any significant word in the street name and tap Done or continue entering characters until the list of streets is displayed. If necessary, use the arrow buttons to the right to find the correct street name.
Tap on the street name to continue.
5. Enter the intersecting street:
If only a few intersecting streets exist, their list is displayed. If more streets are available, the keypad will be displayed prompting you for the name of the first street. Enter the first few
characters of any significant word in the intersecting street name and tap Done or continue entering characters until the list of streets is displayed. If necessary, use the arrow buttons to the right to find the correct street name.
Tap on the street name to continue.
- A screen appears with the address of the selected location, the estimated time of arrival (ETA), the distance to travel, and the routing method (e.g. Fast).
-
(optional) Tap Options if you want to change the routing method or the vehicle type.
-
Tap the large GO button on the right to return to the Map screen and start navigating.
Entering a City Center
City Center allows you to select as your destination any city center stored in your POI database. This option is particularly useful when you want to go to the center of any city without having any specific address to select.
The City Center is not the geometric center of the city but an arbitrary point the map creators have chosen. In smaller cities, it is usually the most important intersection; in larger cities, it is an important intersection.
- From the Main Menu, tap the Go To icon.


- Tap the City Center icon.
- Change Country:
If needed, tap the button with the name of the country, and select a different country from the list.
- Enter City:
You have the following ways to do this:

button.
To select the city from the list of previous cities, tap the button.
To enter a new city: use the keypad to enter the first few characters of any significant word
in the city name. Tap Done or continue entering characters until the list of cities found is displayed. It is not necessary to enter accented characters, for ease of use you need to use only the basic keyboard.
Tap to select the city from the list.
- A screen appears with the address of the selected location, the estimated time of arrival (ETA), the distance to travel, and the routing method (e.g. Fast).
-
(optional) Tap Options if you want to change the routing method or the vehicle type.
-
Tap the large GO button on the right to return to the Map screen and start navigating.
Tips on Entering Addresses Quickly
- When you are entering the name of a city or a street, Magellan software only displays those characters that appear in possible search results. The other characters are grayed out.
-
When entering city names or street names, tap the button after a couple of letters; Magellan software lists the items that contain the specified characters.
You can speed up finding an intersection: -
Search first for the street with a less common or less usual name; fewer letters are enough to find it.
If one of the streets is shorter, search for that one first. You can then find the second one faster. -
You can search for both the type and the name of a road. If the same word appears in several names, for example in the name of streets, roads and avenues, you can obtain the result faster if you enter the first letter of the street type: For example, enter Pi A to obtain Pine Avenue and skip all Pine Streets and Pickwick Roads.
- You can also search in ZIP codes. This is useful when a street name is common and it is used several times in a city.
Previous Destinations
Routing to a Previous Destination (Method 1)

- From the Main Menu, tap the Go To icon.

-
Tap the Previous icon.
-
Select the destination from the list of previous destinations.
- A screen appears with the address of the selected location, the estimated time of arrival (ETA), the distance to travel, and the routing method (e.g. Fast).
- (optional) Tap Options if you want to change the routing method or the vehicle type.
- Tap the large GO button on the right to return to the Map screen and start navigating
Routing to a Previous Destination (Method 2)
- From the Main Menu, tap the

button in the top right corner. The OneTouch Menu appears.
- Tap the Previous icon.

- Select the destination from the list of previous destinations.
- A screen appears with the address of the selected location, the estimated time of arrival (ETA), the distance to travel, and the routing method (e.g. Fast).
- (optional) Tap Options if you want to change the routing method or the vehicle type.
- Tap the large GO button on the right to return to the Map screen and start navigating.
Saving a Previous Destination to Your Address Book
- Access the list of Previous Destinations as described above.
- Select the desired location from the list of previous destinations.
- On the newly opened screen, tap Save.
-
(optional) If you want to save this location to the OneTouch Menu, select Add to OneTouch.
-
Tap OK.

-
Edit information:
-
Tap the Name field and use the keypad to enter a name for the address book entry.
- (optional) Tap
to specify a phone number for the address book entry. -
(optional) Tap Assign to correct the location or to add text information to the address book entry.
-
When the details for this address are acceptable, tap Done.

- If you have selected to save this point to the OneTouch Menu, you need to select a button for the entry.
Clearing the list of Previous Destinations
- Access the list of Previous Destinations as described above.
-
Tap Delete All to clear the list.
-
To confirm your request, Tap OK.

Routing to Coordinates
Coordinate allows you to select as your destination any location defined by its coordinates. This option is particularly useful when your destination is not on a road or in a street that is stored in the map database.
- From the Main Menu, tap the Go To icon.

- Tap the Coordinate icon.

-
(optional) Tap Coordinate Display Format to change the way coordinates are displayed.
-
Tap on either the latitude or longitude, and enter the desired coordinate with the keypad.
-
When both are finished, tap Done.

- A screen appears with the address of the selected location, the estimated time of arrival (ETA), the distance to travel, and the routing method (e.g. Fast).
- (optional) Tap Options if you want to change the routing method or the vehicle type.
- Tap the large GO button on the right to return to the Map screen and start navigating
Note: If the coordinates you entered are for a location that doesn't match an existing street address (i.e. the destination is not along a road or street that is stored in the map database), the guidance will stop on the road that is closest to your destination. A straight line to your final destination will then be displayed on the map.
Routing with the 'Plan On Map' Feature
With the Magellan Maestro you can route to freely selected map points. This option is particularly useful when your destination is not on a road or in a street that is stored in the map database.

- From the Main Menu, tap the Go To icon.
w on the right.
-
Move down to the next page with the arrow on the right.
-
Tap the Plan On Map icon.

A special map screen appears with controls for route creation. You have the following options:
| Button | Description |
| This animated location icon shows the selected map point. Tap the map at the desired location to relocate this icon. The effect of the following four buttons apply to this location. | |
| Add Start | The selected map point becomes the start point of the route. This means that the route is not started from the current GPS position, and Automatic Off-route Recalculation needs to be turned off to keep the selected point as the start point. |
| Destination | A new route is calculated with the selected map point as the destination. The previous route is deleted. |
| Insert Via | The selected map point is added to the active route as an intermediate route point, a point to be reached before the destination. If there is already a via point in the route, the Edit Route screen opens to let you decide where the new via point is to appear in the route. |
| Continue | The selected map point is appended at the end of the route as the new destination. The previous destination is demoted, and becomes the last via point. |
| Zooms in the map. | |
| Zooms out the map. | |
| Fit to Screen | This button displays the active route in its full length on the map. |
| Save Trip | This button saves the active route. The alphabetic keypad opens to let you enter a name for the saved route. |
Address Book
Accessing an Address in Your Address Book

- From the Main Menu, tap the Go To icon.

- Tap the Address Book icon.
-
To easily find the desired address you can:
-
Tap the top left corner of the screen and narrow the list by the initials of the address book entries, or
-
Tap one of the arrows on the right to move between pages.
-
When the desired address appears on the screen, tap on it.
Routing to an Address in Your Address Book
- Access the address record from your address book as described above.
-
Tap the desired address book entry. A screen appears with the address of the selected location, the estimated time of arrival (ETA), the distance to travel, and the routing method (e.g. Fast).
-
(optional) Tap Options if you want to change the routing method or the vehicle type.
-
Tap the large GO button on the right to return to the Map screen and start navigating.
Creating a New Entry in Your Address Book by Selecting it on the Map
- Pan the map until the location icon book.

is over the location you want to save to your address

- Tap the button in the top left corner.
- On the newly opened screen, tap Save.
- (optional) If you want to save this location to the OneTouch Menu, select Add to OneTouch.
- Tap OK.
-
Edit information:
-
Tap the Name field and use the keypad to enter a name for the address book entry. (Entering the name is described in detail in chapter Map Screen.)
- (optional) Tap
to specify a phone number for the address book entry. -
(optional) Tap Assign to correct the location or to add text information to the address book entry.
-
When the details for this address are acceptable, tap Done. (Note: entering a Name is compulsory before saving the Address Book entry.)
- If you have selected to save this point to the OneTouch Menu, you need to select a button for the entry.
Creating a New Entry in Your Address Book by Entering an Address

- From the Main Menu, tap the Go To icon.

- Tap the Address icon , and enter an address as described in Entering an address.
- When the screen appears with the address of the selected location, the estimated time of arrival (ETA), the distance to travel, and the routing method (e.g. Fast), tap Save.
- (optional) If you want to save this location to the OneTouch Menu, select Add to OneTouch.
- Tap OK.
-
Edit information:
-
Tap the Name field and use the keypad to enter a name for the address book entry.
- (optional) Tap
to specify a phone number for the address book entry. -
(optional) Tap Assign to correct the location or to add text information to the address book entry.
-
When the details for this address are acceptable, tap Done.

- If you have selected to save this point to the OneTouch Menu, you need to select a button for the entry.
Creating a New Entry in Your Address Book from a POI
- From the Main Menu, tap the Go To icon.

- Tap the POI icon, and search for a POI as described in Creating a Route to a POI by Category/Name.
- When the list of POIs appear, tap on the desired POI, and tap Save.
- (optional) If you want to save this location to the OneTouch Menu, select Add to OneTouch.
- Tap OK.
-
Edit information:
-
Tap the Name field and use the keypad to enter a name for the address book entry. (Entering the name is described in detail in chapter Map Screen.)
- (optional) Tap
to specify a phone number for the address book entry. -
(optional) Tap Assign to correct the location or to add text information to the address book entry.
-
When the details for this address are acceptable, tap Done. (Note: entering a Name is compulsory before saving the Address Book entry.)
- If you have selected to save this point to the OneTouch Menu, you need to select a button for the entry.
Creating a New Entry in Your Address Book by Entering Coordinates

-
From the Main Menu, tap the Go To icon.
-
Tap the Coordinate icon , and enter the coordinate as described in Routing to Coordinates.
- When the screen appears with the address of the selected location, the estimated time of arrival (ETA), the distance to travel, and the routing method (e.g. Fast), tap Save.
- (optional) If you want to save this location to the OneTouch Menu, select Add to OneTouch.
- Tap OK.
-
Edit information:
-
Tap the Name field and use the keypad to enter a name for the address book entry.
-
(optional) Tap
to specify a phone number for the address book entry. -
(optional) Tap Assign to correct the location or to add text information to the address book entry.
-
When the details for this address are acceptable, tap Done.

- If you have selected to save this point to the OneTouch Menu, you need to select a button for the entry.
The Magellan Maestro has preloaded POIs that can be used as a destination for a route. Selecting a restaurant or finding a gas station nearby is at your fingertips.
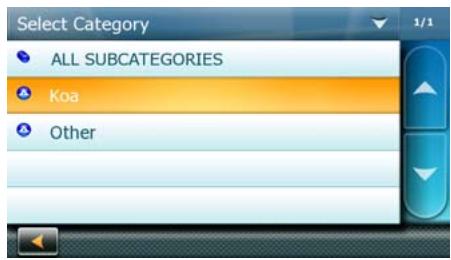
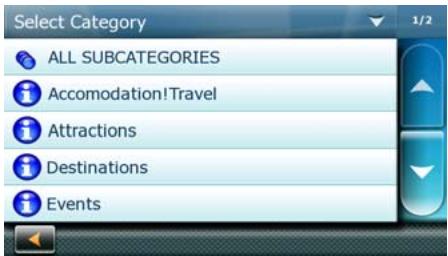
Creating a Route to a POI by Category
POIs are categorized into unique categories from gas stations to tourist attractions. Most, but not all categories are further organized into subcategories. Restaurants have, for example, several subcategories that provide a way to search for restaurants serving Chinese food, fast food, or even Swiss food.

-
From the Main Menu, tap the Go To icon.
-
Tap the POI icon.

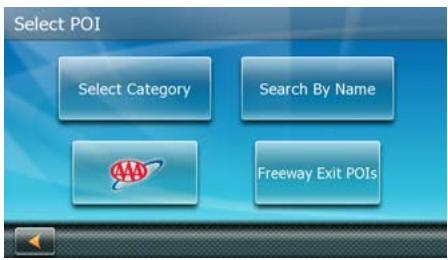
- Tap Select Category.
- Tap one of the POI categories in the list (e.g. Accommodation) or Tap ALL SUBCATEGORIES to see the list of all nearby POIs.
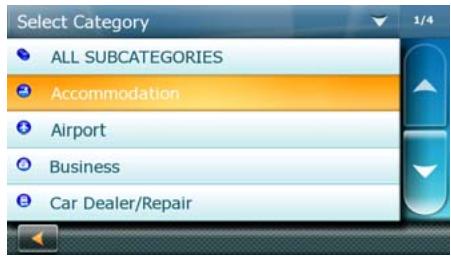
- If the next screen contains the list of subcategories, tap one of the POI subcategories in the list (e.g. Hotel or Motel) to further narrow the search, or tap ALL SUBCATEGORIES to see the list of all nearby POIs from the selected main POI category.
-
Repeat selecting subcategories until finally the list of POIs appear ordered by their name. To easily search in the list you can:
-
Tap the top left corner of the screen and narrow the list by the initials of the POI entries, or
- Tap one of the arrows on the right to move between pages.
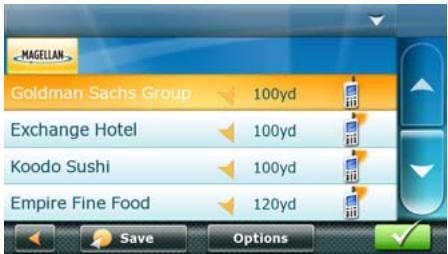
- (optional) If you want to use this exact POI search criteria later, tap Save and select a OneTouch button to access this POI category search criteria (and not the list of search results) later.

- Tap on the selected POI, and then tap OK.
- A screen appears with the address of the selected location, the estimated time of arrival (ETA), the distance to travel, and the routing method (e.g. Fast).
-
(optional) Tap Options if you want to change the routing method or the vehicle type.
-
Tap the large GO button on the right to return to the Map screen and start navigating.
Creating a Route to a special POI (AAA data)
Your Magellan Maestro is shipped with a built-in database of POIs provided by AAA. Some of these POIs are even rated by AAA.
- From the Main Menu, tap the Go To icon.

- Tap the POI icon.

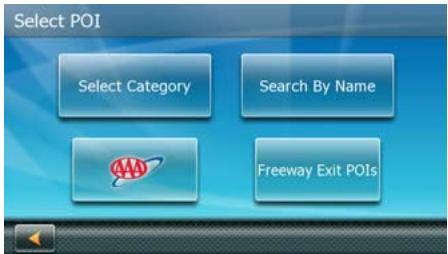
- Tap the AAA button.

- Tap one of the POI categories.
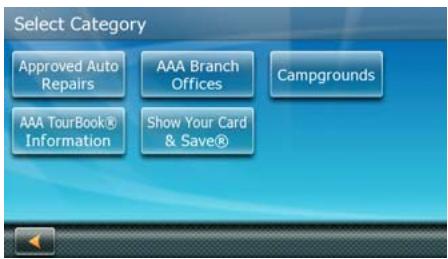
- If the next screen contains the list of subcategories, tap one of the POI subcategories in the list to further narrow the search, or tap ALL SUBCATEGORIES to see the list of all nearby POIs from the selected main POI category.
- Finally the list of POIs appear ordered by their name. On the right, you can see the AAA rating of the POIs.
To easily search in the list you can:
- Tap the top left corner of the screen and narrow the list by the initials of the POI entries, or
- Tap one of the arrows on the right to move between pages.

- (optional) If you want to use this exact POI search criteria later, tap Save and select a OneTouch button to access this POI category search criteria (and not the list of search results) later.
-
(optional) If your cell phone is connected to your Magellan Maestro and you want to call the selected POI, tap Phone, and then tap the phone icon that appears instead of the rating.
-
Tap on the selected POI, and then tap OK.

- A screen appears with the address of the selected location, the estimated time of arrival (ETA), the distance to travel, and the routing method (e.g. Fast).
-
(optional) Tap Options if you want to change the routing method or the vehicle type.
-
Tap the large GO button on the right to return to the Map screen and start navigating.

Creating a Route to a POI by Name

-
From the Main Menu, tap the Go To icon.
-
Tap the POI icon.

- Tap Search By Name.
- Spell the name of the POI to be used as the destination. You need not enter the full name, but the more characters you enter, the easier it will be to find the exact POI you are searching for.
- Tap OK. The list of matching POI names appear.
- Tap on the selected POI, and then tap OK.
- A screen appears with the address of the selected location, the estimated time of arrival (ETA), the distance to travel, and the routing method (e.g. Fast).
-
(optional) Tap Options if you want to change the routing method or the vehicle type.
-
Tap the large GO button on the right to return to the Map screen and start navigating.
Creating a Route to a Freeway Exit POI
The Freeway Exit POIs function provides a way of accessing commonly used POIs that are near an exit you are approaching while traveling on a freeway. Freeway Exit POIs include restaurants, gas stations, car repair facilities and hotels. Freeway Exit POIs can be accessed while on a route or just driving, as long as you are on a freeway.
Note: when you create a route to a POI near an exit, the original route will be canceled. You will need to reset the original route when you are ready to continue.

- From the Map screen, tap the Freeway Exit POIs button.
- The list of the next freeway exits and their distance from your current position appear.
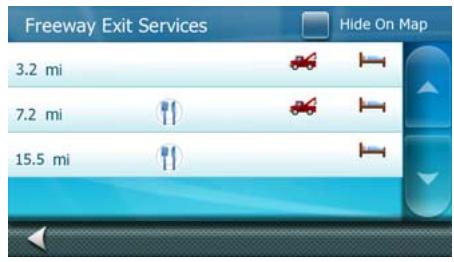
-
Small symbols represent the following service POIs near the exits:
-
Restaurants

Gas Stations

Car Repair

- Accommodation

- Tap any of the symbols to get a list of related POIs near the exits.
- Select one POI from the list, and tap OK.
- A screen appears with the address of the selected POI, the estimated time of arrival (ETA), the distance to travel, and the routing method (e.g. Fast).
-
(optional) Tap Options if you want to change the routing method or the vehicle type.
-
Tap the large GO button on the right to return to the Map screen and start navigating.
Your most frequent destination can be entered and saved in the Magellan Maestro as the Home Address for quick and easy access when you need to navigate there. This does not need to be your real home address. Choose any address you visit frequently. You can access it at any time with the first button of the OneTouch Menu (Shortcuts/Favorites).
Saving the Home Address
These instructions only apply if you have never entered a home address.

- Tap the button in the top right corner. The OneTouch Menu appears.

-
Tap the Home button.
-
Tap Yes.

-
Using the keypad, enter the desired address (country if needed, city, street and number).
-
The OneTouch Menu returns.
Changing the Home Address
These instructions only apply if a home address has already been entered.

-
Tap the button in the top right corner. The OneTouch Menu appears.
-
Tap Manage to enter editing mode.

-
Tap the Home button.
-
Using the keypad, enter the desired address (country if needed, city, street and number).
-
The OneTouch Menu returns.
-
Tap Cancel to return to normal mode.
Creating a Route to the Home Address

- Tap the button in the top right corner. The OneTouch Menu appears.

- Tap the Home button.
- A screen appears with the address of the selected location, the estimated time of arrival (ETA), the distance to travel, and the routing method (e.g. Fast).
- (optional) Tap Options if you want to change the routing method or the vehicle type.

- Tap the large GO button on the right to return to the Map screen and start navigating.
In addition to Home Address, there are other icons in the OneTouch Menu, the set of shortcuts and favorite destinations. They can be used for easy access of frequent destinations and to get local information when needed. Furthermore, you can assign POI search criteria to OneTouch buttons.
Saving an Address to a OneTouch Button
These instructions only apply if you have not yet assigned a function to a OneTouch button.

- Tap the button in the top right corner. The OneTouch Menu™ appears.

- Tap one of the Assign buttons.
- Tap the Name field.
- Using the keypad, enter a name for the button.
- Tap Set Address.
-
Using the keypad, enter the address (country if needed, city, street and number) for the OneTouch icon.
-
Tap Done.

- The OneTouch Menu returns.
Changing the Address of a OneTouch Button
These instructions only apply if you have already assigned a function to the OneTouch button.

- Tap the button in the top right corner. The OneTouch Menu appears.
- Tap Manage to enter editing mode.
- Tap the OneTouch icon you want to modify.
- (optional) Tap the Name field and using the keypad, correct the name of the button.
- Tap Set Address.
-
Using the keypad, enter the address (country if needed, city, street and number) for the OneTouch icon.
-
Tap Done.

- The OneTouch Menu returns.
- Tap Cancel to return to normal mode.
Creating a Route to a OneTouch Destination

- Tap the button in the top right corner. The OneTouch Menu appears.

- Tap one of the OneTouch buttons with an assigned address.
- A screen appears with the address of the selected location, the estimated time of arrival (ETA), the distance to travel, and the routing method (e.g. Fast).
- (optional) Tap Options if you want to change the routing method or the vehicle type.
- Tap the large GO button on the right to return to the Map screen and start navigating.
Saving a POI Search Criteria to a OneTouch Button
Besides frequently visited destinations, you can also save POI search criteria to a OneTouch button. For example you may frequently search for coffee shops near your location or gas stations along your route. You can save these criteria for later use.
- From the Main Menu, tap the Go To icon.


- Tap the POI icon.
- Tap Select Category.
- Tap one of the POI categories in the list (e.g. Accommodation) or Tap ALL SUBCATEGORIES to see the list of all nearby POIs.
- If the next screen contains the list of subcategories, tap one of the POI subcategories in the list (e.g. Hotel or Motel) to further narrow the search, or tap ALL SUBCATEGORIES to see the list of all nearby POIs from the selected main POI category.
- Repeat selecting subcategories until finally the list of POIs appear ordered by their name.
- Tap Save.
- Select a OneTouch button. With this button you can access this POI category search criteria (and not the list of search results) later.
With the Magellan Maestro you can create routes with more than one destinations. Select one destination and create a single route first. Then turn it to a multi-destination route by selecting additional destinations.
Creating Multi-Destination Routes with Plan On Map
With the Plan On Map feature you can quickly create a multi-destination route.

- From the Main Menu, tap the Go To icon.
-
Move down to the next page with the arrow on the right.
-
Tap the Plan On Map icon.

- Tap the map at the first destination to reach. The location icon

jumps there.
- Tap Destination to create a single route to this destination. (T)

jumps there.
- Tap the map at the next destination to reach. The location icon
- Tap Continue, and the new point is appended at the end of the previous route.
-
Repeat these two actions until all destinations are added.
-
Tap the GO button

to leave Plan On Map.
Creating Additional Destinations with Go To
Using the search functions of the Magellan Maestro you can easily create a route with multiple destinations.

- From the Main Menu, tap the Go To icon.
- Tap Address, POI, Previous, Address Book, Intersection, City Center or Coordinate.
- Select a new destination as described earlier.
- If a route already exists, a new screen is displayed with options:
-
You need to define what to do with this new destination:
-
Replace Destination: the previous route is cleared, and a new route is calculated with the selected location as the destination.
- Insert Via Point: the selected location is inserted in the route as an intermediate destination.
-
Add To Trip: the selected location becomes the new destination with the previous destination as the last via point to reach.
-
A screen appears with the address of the selected location, the estimated time of arrival (ETA), the distance to travel, and the routing method (e.g. Fast).
-
(optional) Tap Options if you want to change the routing method or the vehicle type.
-
(optional) Tap Add Destination to add more destinations to the route.
-
Tap the large GO button on the right to return to the Map screen and start navigating.
Creating Additional Destinations with Add Destination
The search functions of the Magellan Maestro are also accessible from the Map screen.
-
From the Map screen, tap Options.
-
Tap Add Destination.

- Tap Address, POI, Previous, Address Book, Intersection, City Center or Coordinate.
- Select a new destination as described earlier.
-
On the newly opened screen you need to define what to do with this new route point:
-
Replace Destination: the previous route is cleared, and a new route is calculated with the selected location as the destination.
- Insert Via Point: the selected location is inserted in the route as an intermediate destination.
-
Add To Trip: the selected location becomes the new destination with the previous destination as the last via point to reach.
-
A screen appears with the address of the selected location, the estimated time of arrival (ETA), the distance to travel, and the routing method (e.g. Fast).
-
(optional) Tap Options if you want to change the routing method or the vehicle type.
-
(optional) Tap Add Destination to add more destinations to the route.
-
Tap the large GO button on the right to return to the Map screen and start navigating.
Editing the Destination List
You can also edit a multi-destination route without adding new destinations.
- From the Map screen, tap Options.

- Tap Edit Destination.
- The Edit Route screen is displayed.
- Tap the destination you want to modify.
-
With the highlighted destination, you have the following options:
-
Remove: the highlighted destination is deleted from the route.
- Up: the highlighted destination moves up in the list (becomes an intermediate destination to be reached earlier).
- Down: the highlighted destination moves down in the list (becomes an intermediate destination to be reached later). Tap this button repeatedly, and the point becomes the final destination of the route.
-
Optimize: the route is optimized. The start point and the final destination remain at their position, but the intermediate destinations are reordered to make the shortest possible route.
-
When finished, tap Back.

Saving a Multi-Destination Route
Multi-destination routes can be saved for later use.

- From the Main Menu, tap the Go To icon.
- Move down to the next page with the arrow on the right.

- Tap the Plan On Map icon.
- Tap Save Trip.
-
Using the keypad, enter a name for the saved route.
-
Tap Done.

Loading a Saved Route

- From the Main Menu, tap the Go To icon.
- Move down to the next page with the arrow on the right.

-
Tap the Saved Trips icon.
-
The list of saved routes is displayed.
- Tap on one of the routes in the list.
- You need to define the starting point of the route:

to navigate from the current GPS position.

-
Tap Yes to keep the original starting point of the saved route. If you choose this option, the automatic off-route recalculation will be turned off.
-
The Plan On Map screen is displayed to let you modify the route if necessary.
-
Tap GO to start navigating.
Map Screen
When a route has been calculated, it will be displayed on the Map screen in green with small arrows indicating the direction of travel. The top of the screen displays the name of the street that comes next in your Turn List together with its distance. If you are not in the city in which the next street is, the name of the city is displayed instead.
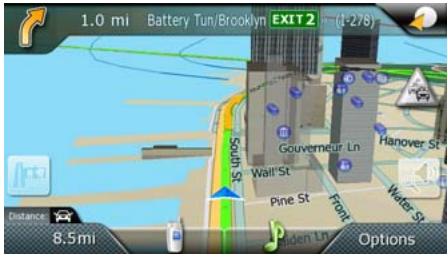
As the route progresses, voice alerts will be used to prompt you of upcoming maneuvers.
Maneuver List
The Maneuver List displays all of the maneuvers needed to be made to complete the route and arrive at the destination. To view the Maneuver List, tap on the maneuver icon in the top left corner of the Map screen. (The Maneuver List is described in detail in the Map chapter of this manual.)
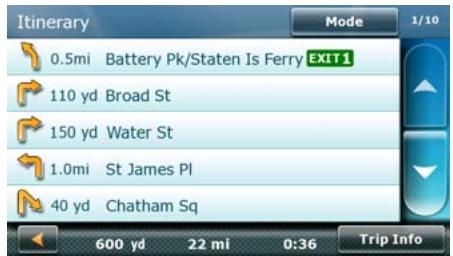
Types of Routes
There are a wide variety of methods you can use to create a route. Each method is discussed in the chapter which is associated with it. Some of the most common methods are:
A route to a new address
- A route to an address in your Address Book
A route to a previous destination
- A route to a POI preloaded in the Magellan Maestro
A route to a city center
- A route to a location defined by its coordinates (latitude and longitude)
A route with multiple destinations
A route to your home address
Routing Method
Regardless of which route type has been created, the Magellan Maestro needs to know how the route is to be calculated. Routes can be calculated by the following methods:
- Fastest Time (Fast): the fastest possible route provided the vehicle is able to travel at or near the speed limit.
- Shortest Distance (Short): the shortest possible route.
Economical (Eco): a generally fast route with possible shortcuts to save fuel.
Simple (Simple): a route with as few turns as possible.
When a destination is selected, the Magellan Maestro offers the route with the permanently selected routing method first.
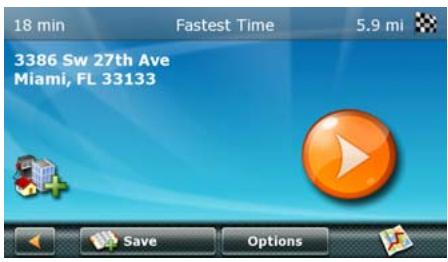
To change the routing method, tap Options. The Magellan Maestro calculates the route with different methods.
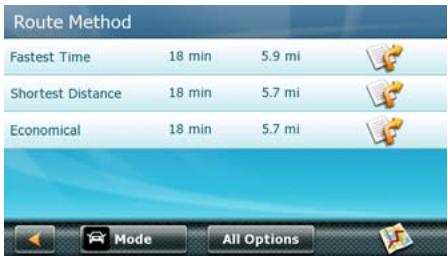
You have the following options:
To change the vehicle type used in route calculation:
- Tap Mode.
- Select the appropriate vehicle type from the list.

- Tap the Back arrow.
To temporarily change the routing method:
1. Tap the desired routing method in the list, and the previous screen returns with the new calculation.
- To permanently change the routing method (next time the Magellan Maestro will offer this one as the default):
1. Tap All Options.
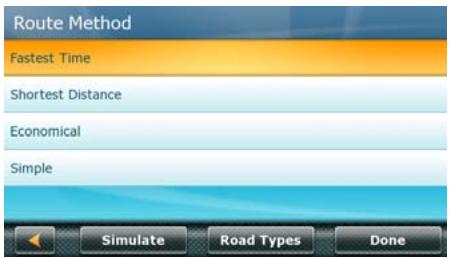
- Select one routing method from the list.
- Tap Done.
To change the road types used in route calculation:
- Tap All Options.
- Tap Road Types.
-
Select and deselect road types according to your needs.
-
Tap the Back arrow.

-
To watch the simulation of the recommended route:
-
Tap All Options.
- Tap Simulate.
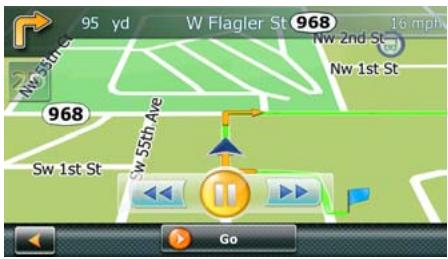
- (optional) Use the control buttons to slow down, pause or speed up the simulation.
- (optional) To abort the simulation before it reaches the destination, tap the GO button.

Special Routing Functions
When a route is active, tap Options on the Map screen, and a menu is displayed to support special routing functions.
Pausing a Route
- From the Map screen, tap Options.

- Tap Pause Trip.

- To resume the navigation later, tap the Resume Trip button screen.
in the top left corner of the Map
Canceling a Route
-
From the Map screen, tap Options.
-
Tap Cancel Trip.

- Confirm that you want to cancel the route. Tap OK.

Detouring off a Route
-
From the Map screen, tap Options.
-
Tap Detour.

- Different detours are calculated using the same routing method that was used to create the route. The list of alternate routes is displayed.
- (optional) You can check the Maneuver List of an alternate route if you tap the button on the right.
-
Tap the desired alternate route.
-
Tap the Map button.

- The map appears with the original route and the selected alternate route with an alternate color.
- Tap Accept Detour to replace the route, or tap the Back arrow to select a different alternative.
Smart Detour on Freeways
When you slow down under 20% of the speed limit on a freeway, after a few seconds the Magellan software assumes you are in a traffic jam and displays the Detour button on the Map screen.
- Tap Detour.

-
Different detours are calculated using the same routing method that was used to create the route. The list of alternate routes is displayed.
-
(optional) You can check the Maneuver List of an alternate route if you tap the button on the right.
-
Tap the desired alternate route.
-
Tap the Map button.

- The map appears with the original route and the selected alternate route with an alternate color.
- Tap Accept Detour to replace the route, or tap the Back arrow to select a different alternative.
Glossary
RDS: Radio Data System. Infrastructure that broadcasts digital information on the FM band.
TMC: Traffic Message Channel, one of the types of information that a Radio Data System can broadcast.
Public TMC Service: In some countries, there is at least one TMC service provider that broadcasts Traffic information free of charge. The Magellan Maestro automatically receives public TMC services, whichever country you are in. For the updated list of countries and providers, please, check www.magellanGPS.com.
Commercial TMC Service: In the Unites States, only prepaid TMC services exist. Your Magellan Maestro receives TMC services only after you have subscribed to the service and entered your subscription code in your Magellan Maestro.
Traffic Message: A message received by the Magellan Maestro that contains the description of a Traffic event.
Traffic Event: An event liable to disturb the flow of traffic. The list of possible Traffic events that can be received are provided below, along with the corresponding road sign:
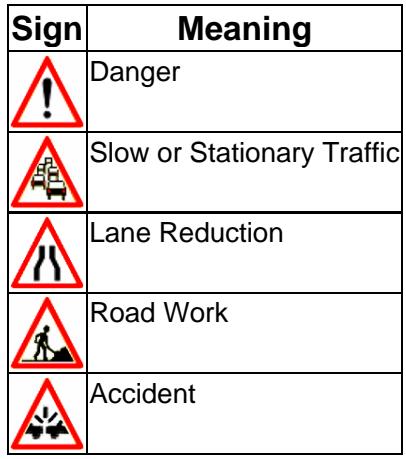
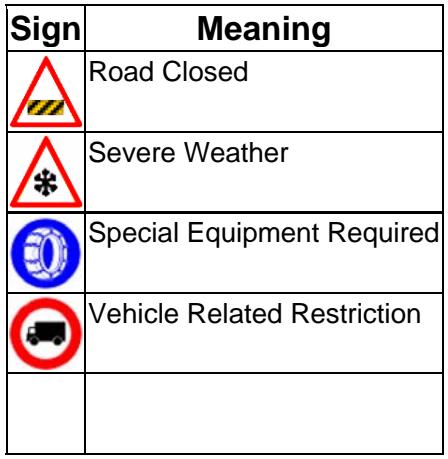
Re-routing Mode: This mode will reroute the vehicle if a Traffic event impacts the route, and a faster alternative route is available.
Understanding How The Traffic System Works
Please read the following statements before using the Magellan Maestro Traffic System:
- You can enable and disable Traffic events. By default, Traffic events are enabled.
Traffic events will alert and re-route you if re-routing mode is enabled.
All event categories will be displayed on the map screen in the form of traffic event icons.
If you are not routing to a destination, the RDS function will only display Traffic events without alert or re-routing.
Subscribing to Traffic Services
In order to receive Traffic messages, you need to subscribe to the service first.
- Visit www MAGellanGPS.com and follow the instructions to receive the subscription code.

- From the Main Menu screen, tap Settings.
- Tap Traffic.
- Tap Enter Subscription Code.
- Using the keypad, enter the subscription code you have received on www.magellanGPS.com.
- Now you are ready to receive Traffic messages.
Traffic Icon on the Map Screen
An icon is displayed on the right side of the Map screen. The color of this icon shows the status of the Traffic system. Tapping this icon leads to the list of Traffic Events.
| Color | Meaning |
| Gray | Traffic messages have not been received |
| Green | There are no Traffic events impacting the recommended route |
| Yellow | There are Traffic events impacting the route that have not been bypassed. The event only means some delay. |
| Red | There are Traffic events impacting the route that have not been bypassed. The traffic is heavy or stationary. |
List of Traffic Events
The list of Traffic Events can be accessed directly from the Map screen.
- Tap the Traffic icon.

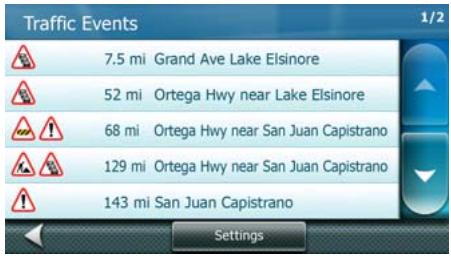
- (optional) Tap Settings to modify the content of the list.
- From the list of Traffic Events, tap any of the events to display it on the map and receive additional information.
- Tap Avoid to recalculate the route excluding the impacted road.
Traffic Events in Route Calculation
In re-routing mode Traffic messages are taken into account when calculating or recalculating the route. During navigation, when a new Traffic event impacts a part of the recommended route, a warning message is displayed with options:
- Tap No X to keep the original route.
- Tap Yes to recalculate the route using all Traffic events that impact your route.
- Tap Detailed to get a list of Traffic events that impact your route and decide which events to take into account in the new route.
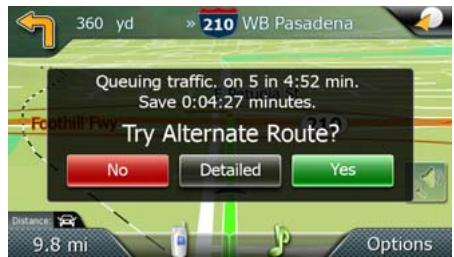
Displaying and Suppressing Traffic Events
The Magellan Maestro displays Traffic events in a list and on the map by default. To suppress Traffic events, do the following:

- From the Main Menu screen, tap Settings.
- Tap Traffic.
- Uncheck Show Traffic Messages.
Using and Ignoring Traffic Events
The Magellan Maestro uses Traffic events in route calculation by default (re-routing mode). To ignore Traffic events, do the following:

- From the Main Menu screen, tap Settings.
- Tap Traffic.
3. Uncheck Use Traffic Information.
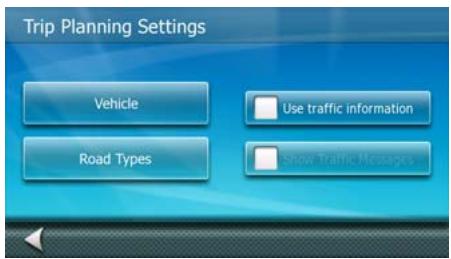
FAQs
Q1- How does the Magellan Maestro choose the frequency on which to receive Traffic data?
A1: This is an automated procedure. When you turn on the system, the Magellan Maestro analyzes the 5 best frequencies stored in its memory. These frequencies are classified in order of signal strength. The module then tests if Traffic data is available on the first station. If the first station is sending Traffic messages, the module will stay on that frequency, otherwise it will test the next one until it finds a station that delivers Traffic data.
If none of the 5 frequencies can be used, the Magellan Maestro will start scanning the entire FM band. It will search for the best five frequencies on which Traffic data is available and will tune in to the strongest station. These five best frequencies will be saved in memory to be used the next time the system is powered up.
Q2- Why do we have to wait between 2 and 5 minutes before the RDS module starts delivering RDS data?
A2: This is the average time for the module to test all the possible frequencies on the FM band and choose the best one in terms of signal level and Traffic data availability/quality.
Settings
With User Options you can customize the Magellan Maestro to better suit your personal needs and preference.

Tapping the Back arrow from any of the User Options screens will not cancel the changes. Changes take effect as soon as you make them.
Accessing System Settings
Commonly used settings are found in the System Settings section of User Options.

- From the Main Menu screen, tap Settings.
- Tap System.
Checking Battery Life
For an easy access, this function is accessible directly from the OneTouch Menu.

- Tap the button in the top right corner of several screens. The OneTouch Menu appears. The
battery status is displayed.
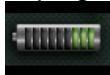
Checking GPS Reception Quality
For an easy access, this function is accessible directly from the OneTouch Menu.

- Tap the button in the top right corner of several screens. The OneTouch Menu appears. The
GPS reception quality is displayed.

Adjusting the Volume
Volume can be adjusted by tapping on the speaker/magnifier icon on the Map screen.


- From the Main Menu screen, tap Settings.
- Tap Sound.
- Tap inside the Master volume adjust bar to change the volume level of the Magellan Maestro or tap inside the Navigation volume adjust bar to change the volume level of the voice guidance only.
Using the speakers of the car for your Magellan Maestro
The sounds of the Magellan Maestro can be transmitted to the car stereo with the built-in FM modulator.

- From the Main Menu screen, tap Settings.
- Tap Sound.
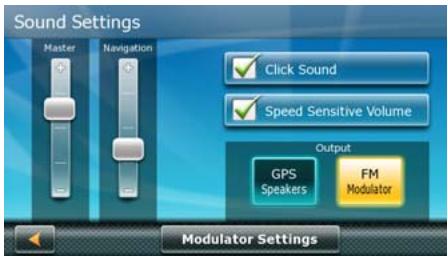
- Tap FM Modulator to turn on the radio transmitter.
- Read the warning, and tap Yes if you choose to continue.
- Tap Modulator Settings to tune the radio. Your car radio and the FM modulator need to be tuned to the same frequency in order to receive the Magellan Maestro sounds in the car radio.
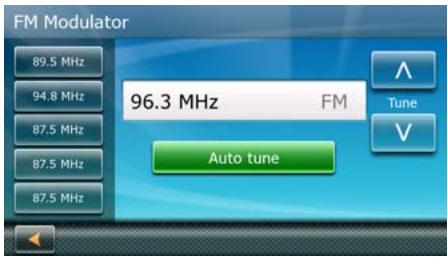
- Tune your car radio to an empty frequency (where no radio can be heard), and step to the same frequency on the FM Modulator screen with the Tune up and down arrows. (Alternatively, you can tap Auto Tune that selects an empty frequency. Now tune your car radio to the same frequency.)
- Now the sound of your Magellan Maestro is transmitted to the speakers of your car.
- (optional) If you want to use the same frequency later, tap and hold one of the memory buttons on the left of the FM Modulator screen until the selected frequency is displayed on the button. Later you can tune to this frequency by simply tapping the same button.
Adjusting the Display Brightness

- From the Main Menu screen, tap Settings.
- Tap System.
- Tap Brightness.
- Tap inside the Daytime brightness adjust bar to set the desired brightness for daytime use or tap inside the Night brightness adjust bar to set the desired brightness for night use.
Setting Time Zone
The Magellan Maestro automatically adjusts the device clock to the time zone of the location using map information. However, if you want to modify the automatic settings, do the following:

- From the Main Menu screen, tap Settings.
- Tap System.
- Tap Time Zone.
- Uncheck Use Auto Time Zone.
- Tap Set Time Zone.
- Use the arrow buttons on the right to find the desired time zone, and then tap on it.
- The Time Zone Settings screen returns with the new time zone. The device clock has been adjusted accordingly.
Selecting Units of Measure
- From the Main Menu screen, tap Settings.

- Tap System.
- Tap Distance Units.
- Select Kilometers/Meters, Miles/yards or Miles/feet.
Changing the Voice Guidance Profile
In most languages, more than one voice profiles are available for navigation guidance.
Voice profiles can either be prerecorded with only maneuver information or computed (Text-to-Speech, TTS) with the ability to announce street names.
To select a different profile, do the following:

- From the Main Menu screen, tap Settings.
- Tap System.
- Tap Voice Language.
-
Select a different voice profile from the list. A sample sound is played to help you.
-
When finished, tap Done.

Speed Warning
If the map database contains the speed limit of the road segments, the Magellan Maestro can warn you when you exceed the speed limit. Speed limit information may not be correct for all road segments. Magellan cannot be held responsible for the accuracy of speed limit information.
To turn on and to adjust this warning, do the following:

- From the Main Menu screen, tap Settings.
- TapWarnings.
- Check Warn When Speeding to receive the speed alert.
-
Now tap More right to the switch, and set the following options:
-
In Urban Areas: a relative speed for the alert in built-up areas.
In Rural Areas: a relative speed for the alert in all other areas. - Audible Warning: if turned on, a voice warning is played with the selected voice guidance profile if your speed exceeds the above set limit.
- Visible Warning: if turned on, a speed limit sign is displayed on the left side of the Map screen if your speed exceeds the above set limit.
The speed that triggers the alert is always relative to the speed limit. When set to 100% , the Magellan Maestro warns you when you exceed the speed limit. When set to 90% , the alert starts when your speed exceeds 90% of the speed limit.
Setting the 2D Map Display to Heading Up or North Up
The 2D map can be displayed with the top of the display in the direction of your heading or North.

- From the Main Menu screen, tap Settings.
- Tap Map Screen.
- Tap Head Up / North Up.
- Select North up or Heading up.
Setting Auto Night Map Display
Normally the map is displayed in vivid colors for daytime use and with dark tints for night use. You can select whether to always use daytime colors, night color or let the Magellan Maestro switch between them automatically a few minutes before sunrise and a few minutes after sunset.

- From the Main Menu screen, tap Settings.
- Tap Map Screen.
- Tap Night Mode.
- Select On or Off for a fixed color scheme or Automatic for the timed adjustment.
Changing the Route Calculation Parameters
- From the Main Menu screen, tap Settings.

-
Tap Trip Planning.
-
Tap Vehicle to select the vehicle type used in route calculation. (Vehicle types are used in route calculation. For example pedestrians are not allowed on freeways and emergency vehicles have less traffic restrictions.)
- Tap Road Types to define which road types to use and to avoid when routing. You can also define whether to cross borders during your journey.
- Tap Use Traffic Information to decide whether Traffic messages are taken into account when calculating or recalculating a route.
- Tap Show Traffic Messages to display or suppress Traffic events on the map and in the list of Traffic events.
Viewing Technical GPS Information
This screen provides technical information about the satellites being used to compute the GPS position.
- From the Main Menu screen, tap Settings.

- Tap GPS.
- Tap GPS Data.

Setting the GPS Position
It is useful to set a GPS position if you are not receiving satellite information quickly due to traveling over 500 mi/800 km with the Magellan Maestro turned off. Setting the GPS position will allow the Magellan Maestro to compute which satellites are available and calculate the position more quickly.

- From the Main Menu screen, tap Settings.
- Tap Set GPS Position.
- Use the same search methods (address, POI, Coordinate, Previous, etc.) as you were selecting a destination.
Backing Up and Restoring Data
Backup and restore provides a way of storing the address book and other data on an SD card inserted in your Magellan Maestro.
When the data has been backed up, it can be restored at any time. Please note that when you restore from backed up data, address book and other data will be replaced with the restored data. The Magellan Maestro cannot append backed up data to your existing data.
- Insert an SD card in your Magellan Maestro.

- From the Main Menu screen, tap Settings.
-
Tap Backup and Restore.
-
Tap Backup My Data to save your user data and settings on the inserted SD card.
- Tap Restore Saved Data to overwrite your user data and setting with a previous backup available on the inserted SD card.
- Tap Factory Reset to delete all user data and reset all settings to their factory defaults.
Viewing Map and License Information

- From the Main Menu screen, tap Settings.
- Tap Map Information. The installed map databases are listed.
- Tap Licenses to get information about the software and content licenses you have in your Magellan Maestro.
- Tap SWID (SoftWare IDentifier) to get the software identifier of your Magellan Maestro and/or the inserted SD card.
Your Magellan Maestro can be connected to a Bluetooth™-enabled cell phone as a hands-free set. You can initiate and receive phone calls, send and receive SMS messages using the touch screen, microphone and speaker of your Magellan Maestro.
Compatibility disclaimer: This Magellan product has been confirmed to communicate via Bluetooth™ with devices from other manufacturers. Magellan does not guarantee that use of the device will be uninterrupted or error free. Performance of this Bluetooth™-enabled product with other devices may vary, because not all Bluetooth™ devices are compatible. For a complete list of tested phones please visit: www.magellanGPS.com/support.
Once connected to a cell phone, incoming calls will pop up a message and you can decide whether to accept or reject the call. Otherwise, you can access the phone subsystem from the Main Menu or from the Map screen by tapping the phone icon.
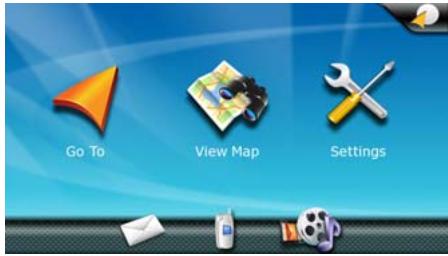
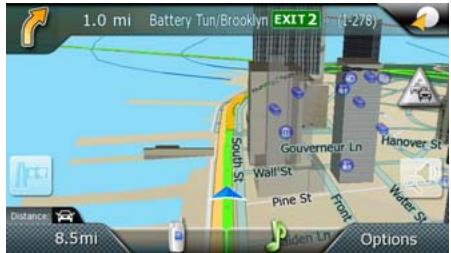
Connecting your Magellan Maestro to a Mobile Phone
- Enable Bluetooth on the phone and make it visible to other Bluetooth devices.
- Tap the phone icon in the Main Menu or on the Map screen.
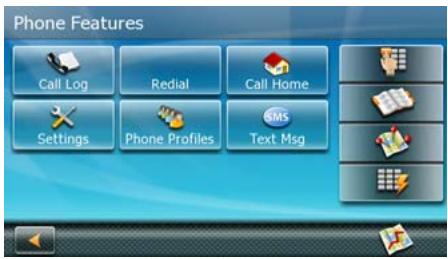
- Tap Settings.
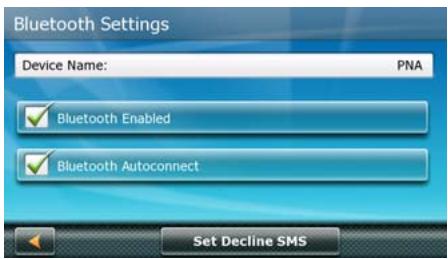
- (optional) The default Bluetooth name of your Magellan Maestro is 'PNA'. To rename it, tap Device Name and modify the name with the keypad.
-
Check Bluetooth Enabled to turn on the Bluetooth radio in your Magellan Maestro.
-
Tap Back to exit Bluetooth Settings.

- Now tap Phone Profiles to open the list of Paired Devices.
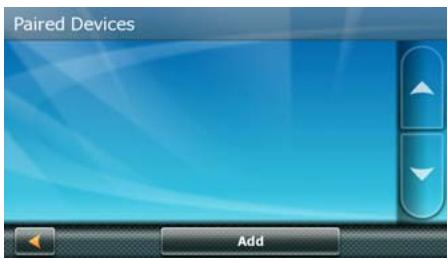
- Tap Add. The Magellan Maestro is now searching for available Bluetooth devices. This can take a few minutes.
- Be sure the phone is discovered by your Magellan Maestro. Refer to the phone manual if not.
- When finished, tap the appropriate phone name in the list.
- The Magellan Maestro displays the PIN code for the pairing.
- On the cell phone, accept the pairing request and enter the PIN code.
- The list of Paired Devices returns with the paired cell phone in the list.
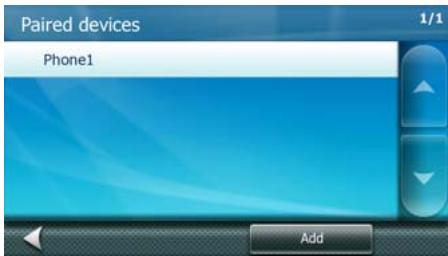
- Tap the name of the phone.
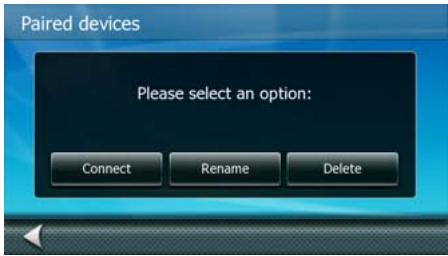
- Tap Connect.
- The Phone Features screen returns. The phone is now connected and ready to use.
Please visit the Magellan support page at www.magellanGPS.com/support if you encounter any problems while pairing your phone.
Incoming Phone Calls
Accepting an Incoming Call
- When a call is received, the Magellan Maestro pauses the Audio Player and pops up a window with options.
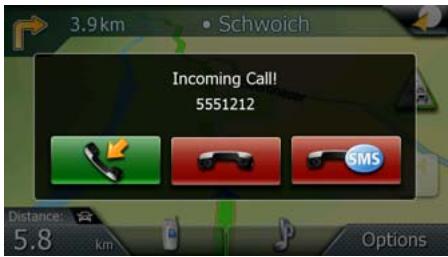
2. Tap Accept Call.

- You can talk with the caller through the microphone and speaker of the Magellan Maestro.

- You have the following in-call options:

- Tap Hang Up to finish the call.
- Tap Mute to mute the microphone. Tap again to continue talking.
- Tap Handset to disconnect the Magellan Maestro and continue the call using the cell phone.
- Tap Dial Pad to open the phone keypad to send DTMF tones to the other party.
- Adjust the speaker volume with the adjust bar.

-
Tap to close this window without ending the call. If you re-enter the phone subsystem while the call lasts, this window will appear instead of the Phone Features screen.
-
Once the call is finished, read the call summary and Tap OK.

- The window disappears and the Audio Player resumes.
Rejecting an Incoming Call
- When a call is received, the Magellan Maestro pauses the Audio Player and pops up a window with options.
2. Tap Reject Call.

- The call is rejected, the window disappears and the Audio Player resumes.
Rejecting an Incoming Call with an SMS
First, you need to set your decline SMS:
- Tap the phone icon in the Main Menu or on the Map screen.
- Tap Settings.
- Tap Set Decline SMS.
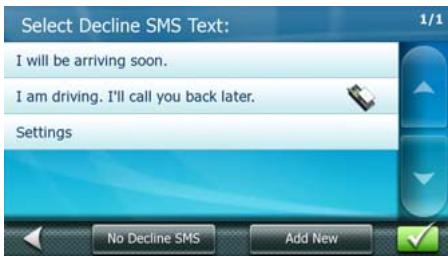
-
You have the following options:
-
Tap No Decline SMS to disable sending automated messages.
- Tap one message in the list to select it as your decline SMS.
- Tap Add New and create your own decline SMS.
5. Tap Back

6. Tap Back
again to exit Bluetooth Settings.
When an incoming call is received, do the following:
- The Magellan Maestro pauses the Audio Player and pops up a window with options.
2. Tap Reject Call with SMS.

- The call is rejected and the Magellan Maestro sends the predefined SMS to the caller.
4. Tap OK

to close the SMS confirmation.
- The window disappears and the Audio Player resumes.
Initiating Phone Calls
Entering the Home Number
- Tap the phone icon in the Main Menu or on the Map screen.
- Tap Call Home.
-
If you have not entered the Home number yet, the phone keypad is displayed and you can enter your Home number.
-
When finished, tap Done.

Changing the Home Number
- Tap the phone icon in the Main Menu or on the Map screen.
- Tap and hold Call Home.
-
The phone keypad is displayed and you can correct the phone number.
-
When finished, tap Done.

Calling Home
- Tap the phone icon in the Main Menu or on the Map screen.
- Tap Call Home.
- The in-call options are the same as described in Accepting an Incoming Call.
Calling a Phone Number
- Tap the phone icon in the Main Menu or on the Map screen.

- Tap Keypad Dial.
-
Enter the phone number to call.
-
Tap Dial.

- The in-call options are the same as described in Accepting an Incoming Call.
Assigning Phone Numbers to Speed Dial Buttons
- Tap the phone icon in the Main Menu or on the Map screen.

- Tap Speed Dial.
-
Tap any of the (Assign) buttons.
-
The Address Book is displayed. Select one Address Book entry to assign its phone number to the selected Speed Dial button:
-
To use the Home number of the contact, tap

To use the Office number of the contact, tap

- To use the Mobile number of the contact, tap

- When finished, tap Back.

Calling a Speed Dial Number
-
Tap the phone icon in the Main Menu or on the Map screen.
-
Tap Speed Dial

- Tap one of the buttons that are already assigned.
- The in-call options are the same as described in Accepting an Incoming Call.
Calling a Number from Your Address Book
-
Tap the phone icon in the Main Menu or on the Map screen.
-
Tap Address Book.

-
Select one contact from the Address Book. Tap the phone number you want to call:
-
To use the Home number of the contact, tap

To use the Office number of the contact, tap

- To use the Mobile number of the contact, tap

- The in-call options are the same as described in Accepting an Incoming Call.
Calling the Last Called Number
- Tap the phone icon in the Main Menu or on the Map screen.
- The last called number is displayed on the Redial button.
- If this is the number you intend to call, tap Redial.
- The in-call options are the same as described in Accepting an Incoming Call.
Handling SMS messages
Receiving an SMS message
When an SMS is received by the cell phone connected to the Magellan Maestro, a tune is played. The envelope icon on the Main Menu screen and the phone icon on the Map screen changes. A small SMS symbol is displayed with those icons. It only disappears after you have read the SMS. Do the following:
- Enter the Text Message subsystem:

- Tap the phone icon on the Map screen, and then tap Text Msg.
- Or tap the envelope icon on the Main Menu screen.
2. Tap Inbox.

- Tap one of the messages in the list.
-
You have the following options:
-
Tap Reply to answer the incoming message.
- Tap Forward to send this message to another party.
- Tap To Address Book to save the number of the sender in the Address Book.
5. Tap Back

repeatedly to exit the SMS subsystem.
Sending an SMS message
- Enter the Text Message subsystem:

- Tap the phone icon on the Map screen, and then tap Text Msg.
- Or tap the envelope icon on the Main Menu screen.

2. TapComposeSMS.
-
To enter the phone number, you have the following options:
-
Tap Pick Contact to select the number from the Address Book.
-
Tap Number and enter the number with the keypad.
-
To enter the text of the SMS, you have the following options:
-
Tap Insert Auto Text to select one of the predefined texts.
-
Tap inside the large empty field to enter your own text.
-
Once finished, tap Send to send the message to the given number.
You can watch movies, view photos or listen to music stored on the Magellan Maestro. The Media Center contains an Audio Player, a Video Player and a Picture Viewer application.
Insert an SD card into your Magellan Maestro with audio, video and picture files.
You can access the Media Center from the Main Menu by tapping the media icon and you can directly access the Audio Player from the Map screen by tapping the musical note icon.
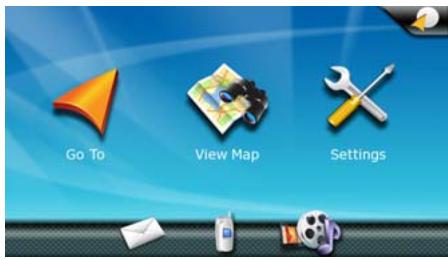
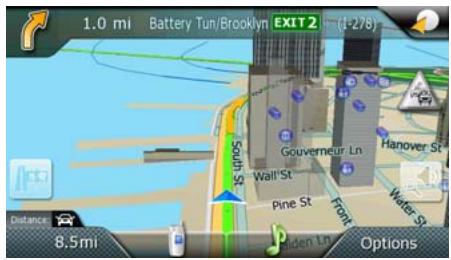
Audio Player
Starting the Audio Player
There are two ways to start the Audio Player:
- On the Map screen, tap

From the Main Menu, tap

and then tap Audio.

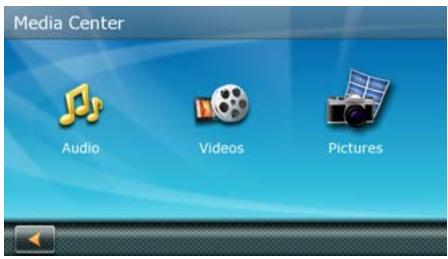
Playing Audio Files
- Access the Audio Player.
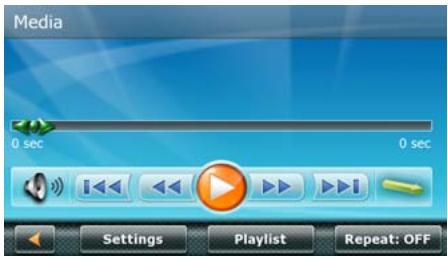
- Tap Playlist.
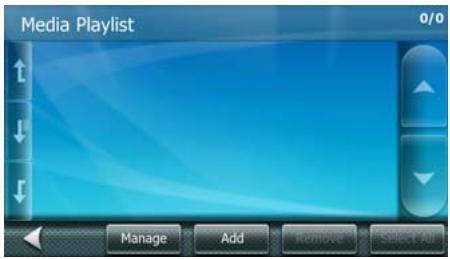
3. Tap Add.
- To add new audio files to the playlist, you have the following options:
Songs: opens the list of all audio files (for example .mp3 or .ogg) found in storage locations of your Magellan Maestro.
- Playlists: opens the list of all playlist files (for example .m3u or .pls) found in storage locations of your Magellan Maestro. Adding a playlist file adds all audio files found in the playlist.
- Artists: opens the list of all artists found in the identification tags of audio files stored in your Magellan Maestro.
Genres: opens the list of all music genres found in the identification tags of audio files stored in your Magellan Maestro.
- Albums: opens the list of all album names found in the identification tag of audio files stored in your Magellan Maestro.
- Folders: lets you browse the storage locations of your Magellan Maestro for audio files.
-
All these options lead to a list. You have the following options:
-
Tap the desired songs, playlists, artists, genres, albums or tap one or more audio files in the selected folder.
-
Or tap Select All to mark all list entries.
-
Tap OK to add the selected audio files to the playlist.
-
(optional) To save the list of the selected audio files for easy access, tap Manage and then Save As to create a new playlist file with the selected audio files.
-
Tap Back to return to the Audio Player.
- The details of the first song are displayed. Tap Play to start.

10. During playback, you have the following options:


to pause the playback. Tap Play
to resume.
- Tap Pause to pause the playback. Tap Play to resume.
- Tap the timeline at any point and the playback jumps to that position.

-
Grab and move the position marker to the desired playback position.
-
Tap Rewind or Fast Forward as an alternative to the above.

or Fast Forward

as an alternative to the above.
-
Tap Skip Back or Skip Forward to jump to the previous or next song in the playlist.
-
Tap Shuffle to play the songs in a random order. Tap Shuffle Off to play the songs in sequential order.


- Tap Volume to adjust the volume or to mute the Magellan Maestro.
-
Tap Playlist to modify the currently played set of audio files.
The status of the Repeat function is displayed on the button: -
Repeat: OFF: the Repeat function is turned off. Once you reach the end of the playlist, playback stops.
- Repeat: ONE: the currently played audio file is repeated endlessly.
- Repeat: ALL: the Audio Player repeats the whole playlist when you reach its end.
[ \text{Playlist Files} ]
You do not need to build up your playlist every time. If you have saved playlist files, you can easily load the audio files listed in them.
- Access the Audio Player.
- Tap Playlist.
- Tap Manage. The list of playlist files is displayed.
-
Tap one or more file names in the list or tap Select All to merge all their content in the current playlist.
-
Tap Back to return to the Audio Player. The content of the selected playlist files are now added to the playlist.
Listening to Music during Navigation
The Audio Player can be used during navigation. The Magellan Maestro automatically pauses the music when navigating instructions are announced.
- Access the Audio Player.
- Tap Setting.
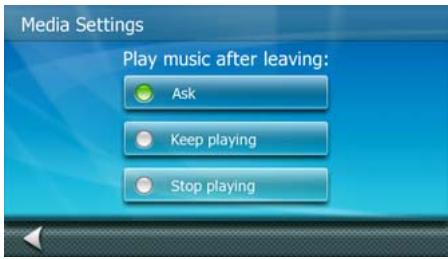
-
You have the following options:
-
Stop playing: playback is not allowed during navigation. Music will stop as soon as you exit the Audio Player.
- Keep playing: playback continues after you return to navigation.
-
Ask: every time you exit the Audio Player, the Magellan Maestro asks you whether to continue or stop the music.
-
Tap Back to return to the Audio Player.

Video Player
- From the Main Menu, tap

and then tap Videos.

- Tap Playlist.
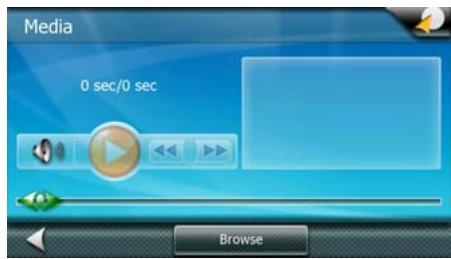
- Tap Browse.

- Tap one storage location and tap the folders to reach the video file.
-
When the desired video file appears in the list, tap it.
-
The Video Player returns with the details of the video file. Tap Play to start.
- During playback, you have the following options:

to pause the playback. Tap Play to resume.
- Tap Pause
- Tap the timeline at any point and the playback jumps to that position.

- Grab and move the position marker

as an alternative to the above.
- Tap Rewind
or Fast Forward
Tap Volume

to adjust the volume or to mute the Magellan Maestro.
- When finished, tap Back to exit the Video Player.
Picture Viewer
- From the Main Menu, tap

and then tap Pictures.

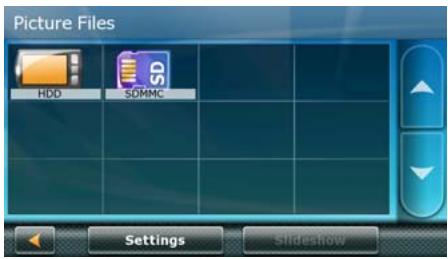
- Tap one storage location and tap the folders to reach the picture files.
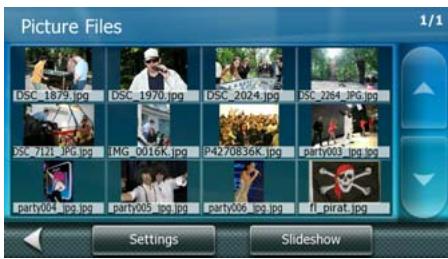
- (optional) Tap Settings to modify image quality and slideshow settings.
- You have the following options to view the pictures from the selected folder:

to return to the
- Tap any of the pictures files, and the picture is displayed. Tap Back to return to the folder view.
- Tap Slideshow to view the pictures in the selected folder one by one with a timed delay. Tap the screen to return to the folder view.
- When finished, tap Back

repeatedly to exit the Picture Viewer.
- About Charging the Magellan Maestro
- About the Battery
- Federal Communication Commission Interference Statement
- IMPORTANT NOTE:
- FCC Radiation Exposure Statement:
- IC statement
- IC Radiation Exposure Statement:
- Table of contents
- Magellan Maestro 4350/4370 1
- Installation Instructions 3
- Fundamentals 6
- Map Screen 10
- Enter Address 18
- Points of Interest (POI) 31
- Home Address 36
- OneTouchTM Menu (Shortcuts/Favorite) 37
- Multi-Destination Routes 39
- Traveling on a Route 43
- Traffic 47
- Settings 51
- Hands-free Phone 57
- Media Center 64
- Selecting the Location
- Attaching the Cradle to the Swivel Mount
- Securing the Swivel Mount to the Windshield
- Securing the Swivel Mount to the Dashboard
- Attaching the Magellan Maestro to the Cradle
- Adjusting the Mount for Optimum Viewing
- Connecting Power
- Connecting the Traffic Antenna
- Checking Connection and Final Adjustments
- Security
- Powering on the Magellan Maestro
- Volume
- Brightness
- Main Menu
- Accessing the Main Menu
- Keypad
- Keypad Overview
- Special Keys
- Selecting From List
- Notes on Entering Data
- Accessing the Map Screen
- Setting the Map Modes (2D or 3D)
- Displaying 3D Buildings on the Map
- Manipulating the Map
- Rotating the Map
- Tilting the Map
- Setting Zoom Levels
- Panning on the Map
- Saving a Position While Panning
- Routing to a Panned Position
- Current Location Screen
- Accessing the Current Location Screen
- Saving Your Current Location to Your Address Book
- Maneuver List (Itinerary)
- Accessing the Maneuver List
- Excluding a Maneuver
- Entering an Address
- Enter Street name:
- Enter Street number:
- Entering an Address if House Numbering is Restarted
- Enter City:
- Entering a Street Midpoint
- Entering an Intersection
- 123
- Enter the intersecting street:
- Entering a City Center
- Tips on Entering Addresses Quickly
- Previous Destinations
- Routing to a Previous Destination (Method 2)
- Saving a Previous Destination to Your Address Book
- Clearing the list of Previous Destinations
- Routing to Coordinates
- Routing with the 'Plan On Map' Feature
- Address Book
- Routing to an Address in Your Address Book
- Creating a New Entry in Your Address Book by Selecting it on the Map
- Creating a New Entry in Your Address Book by Entering an Address
- Creating a New Entry in Your Address Book from a POI
- Creating a New Entry in Your Address Book by Entering Coordinates
- Creating a Route to a POI by Category
- Creating a Route to a special POI (AAA data)
- Creating a Route to a POI by Name
- Creating a Route to a Freeway Exit POI
- Saving the Home Address
- Changing the Home Address
- Creating a Route to the Home Address
- Saving an Address to a OneTouch Button
- Changing the Address of a OneTouch Button
- Creating a Route to a OneTouch Destination
- Saving a POI Search Criteria to a OneTouch Button
- Creating Multi-Destination Routes with Plan On Map
- Creating Additional Destinations with Go To
- Creating Additional Destinations with Add Destination
- Editing the Destination List
- Saving a Multi-Destination Route
- Loading a Saved Route
- Map Screen
- Maneuver List
- Types of Routes
- Routing Method
- Special Routing Functions
- Pausing a Route
- Canceling a Route
- Detouring off a Route
- Smart Detour on Freeways
- Glossary
- Understanding How The Traffic System Works
- Subscribing to Traffic Services
- Traffic Icon on the Map Screen
- List of Traffic Events
- Traffic Events in Route Calculation
- Displaying and Suppressing Traffic Events
- Using and Ignoring Traffic Events
- Uncheck Use Traffic Information.
- FAQs
- Settings
- Accessing System Settings
- Checking Battery Life
- Checking GPS Reception Quality
- Adjusting the Volume
- Using the speakers of the car for your Magellan Maestro
- Adjusting the Display Brightness
- Setting Time Zone
- Selecting Units of Measure
- Changing the Voice Guidance Profile
- Speed Warning
- Setting the 2D Map Display to Heading Up or North Up
- Setting Auto Night Map Display
- Changing the Route Calculation Parameters
- Viewing Technical GPS Information
- Setting the GPS Position
- Backing Up and Restoring Data
- Viewing Map and License Information
- Connecting your Magellan Maestro to a Mobile Phone
- Incoming Phone Calls
- Accepting an Incoming Call
- Tap Accept Call.
- Rejecting an Incoming Call
- Tap Reject Call.
- Rejecting an Incoming Call with an SMS
- Tap Back
- Tap Back
- Tap Reject Call with SMS.
- Tap OK
- Initiating Phone Calls
- Entering the Home Number
- Changing the Home Number
- Calling Home
- Calling a Phone Number
- Assigning Phone Numbers to Speed Dial Buttons
- Calling a Speed Dial Number
- Calling a Number from Your Address Book
- Calling the Last Called Number
- Handling SMS messages
- Receiving an SMS message
- Tap Inbox.
- Sending an SMS message
- TapComposeSMS.
- Audio Player
- Playing Audio Files
- Tap Add.
- During playback, you have the following options:
- [ \text{Playlist Files} ]
- Listening to Music during Navigation
- Video Player
- Picture Viewer
Brand : MAGELLAN
Model : MAESTRO 4350
Category : Navigation GPS