
LASC55 - Soundbar LG - Free user manual and instructions
Find the device manual for free LASC55 LG in PDF.
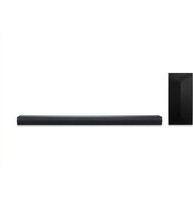


| Product Type | Soundbar |
| Model | LASC55 |
| Brand | LG |
| Total Power Output | 300 W RMS |
| Number of Channels | 2.1 |
| Speaker Configuration | 2 full-range drivers + wireless subwoofer |
| Frequency Response | 40 Hz – 20 kHz |
| Audio Decoding | Dolby Digital, DTS Digital Surround |
| Connectivity | HDMI (ARC), Optical, USB, Bluetooth 4.0 |
| Bluetooth Version | 4.0 |
| Wireless Subwoofer | Yes (included) |
| Sound Modes | Standard, Cinema, Bass Boost, Night Mode |
| Control Methods | Remote control, buttons on soundbar |
| Dimensions (Soundbar W x H x D) | 900 x 85 x 120 mm |
| Weight (Soundbar) | 2.5 kg |
| Dimensions (Subwoofer W x H x D) | 200 x 390 x 300 mm |
| Weight (Subwoofer) | 4.0 kg |
| Power Consumption (Soundbar) | 30 W |
| Power Consumption (Subwoofer) | 40 W |
| Standby Power Consumption | < 0.5 W |
| Power Supply | AC 100-240 V, 50/60 Hz |
| Mounting Options | Wall-mountable (brackets included) |
| Remote Control Battery Type | CR2025 (coin cell) |
| Cleaning Instructions | Wipe with a soft, dry cloth; avoid solvents |
| Safety Features | Overheat protection, short-circuit protection |
| Spare Parts Availability | Remote, subwoofer, power adapter (contact support) |
Frequently Asked Questions - LASC55 LG
User questions about LASC55 LG
0 question about this device. Answer the ones you know or ask your own.
Ask a new question about this device
Download the instructions for your Soundbar in PDF format for free! Find your manual LASC55 - LG and take your electronic device back in hand. On this page are published all the documents necessary for the use of your device. LASC55 by LG.
USER MANUAL LASC55 LG
Please read this manual carefully before operating your set and retain it for future reference.
This lightning flash with arrowhead symbol within an equilateral triangle is intended to alert the user to the presence of uninsulated dangerous voltage within the product's enclosure that may be of sufficient magnitude to constitute a risk of electric shock to persons.

The exclamation point within an equilateral triangle is intended to alert the user to the presence of important operating and maintenance (servicing) instructions in the literature accompanying the product.
WARNING: This product contains chemicals known to the State of California to cause cancer and birth defects or other reproductive harm. Wash hands after handling.
WARNING: TO PREVENT FIRE OR ELECTRIC SHOCK HAZARD, DO NOT EXPOSE THIS PRODUCT TO RAIN OR MOISTURE.
CAUTION: The apparatus shall not be exposed to water (dripping or splashing) and no objects filled with liquids, such as vases, shall be placed on the apparatus.
WARNING: Do not install this equipment in a confined space such as a book case or similar unit.
CAUTION: Do not use high voltage products around this product. (ex. Electrical swatter) This product may malfunction due to electrical shock.
CAUTION: Do not block any ventilation openings. Install in accordance with the manufacturer's instructions.
Slots and openings in the cabinet are provided for ventilation and to ensure reliable operation of the product and to protect it from over heating. The openings shall be never be blocked by placing the product on a bed, sofa, rug or other similar surface. This product shall not be placed in a built-in installation such as a bookcase or rack unless proper ventilation is provided or the manufacturer's instruction has been adhered to.
CAUTION concerning the Power Cord
Most appliances recommend they be placed upon a dedicated circuit;
That is, a single outlet circuit which powers only that appliance and has no additional outlets or branch circuits. Check the specification page of this owner's manual to be certain. Do not overload wall outlets. Overloaded wall outlets, loose or damaged wall outlets, extension cords, frayed power cords, or damaged or cracked wire insulation are dangerous. Any of these conditions could result in electric shock or fire. Periodically examine the cord of your appliance, and if its appearance indicates damage or deterioration, unplug it, discontinue use of the appliance, and have the cord replaced with an exact replacement part by an authorized service center. Protect the power cord from physical or mechanical abuse, such as being twisted, kinked, pinched, closed in a door, or walked upon. Pay particular attention to plugs, wall outlets, and the point where the cord exits the appliance. The Power Plug is the disconnecting device. In case of an emergency, the Power Plug must remain readily accessible
NOTICE: For Product Identification and Compliance/Safety labeling information please refer to Main Label on the bottom of Unit.
This device is equipped with a portable battery or accumulator.
Safety way to remove the battery from the equipment: Remove the old battery or battery pack, follow the steps in reverse order than the assembly. To prevent contamination of the environment and bring on possible threat to human and animal health, the old battery or the battery put it in the appropriate container at designated collection points. Do not dispose of batteries or battery together with other waste. It is recommended that you use local, free reimbursement systems batteries and accumulators. The battery should not be exposed to excessive heat such as sunshine, fire or the like.
IMPORTANT SAFETY INSTRUCTIONS
- Read these instructions.
- Keep these instructions.
- Heed all warnings.
- Follow all instructions.
- Do not use this apparatus near water.
- Clean only with dry cloth.
- Do not block any ventilation openings. Install in accordance with the manufacturer's instructions.
- Do not install near any heat sources such as radiators, heat registers, stoves, or other apparatus (including amplifiers) that produce heat.
- Do not defeat the safety purpose of the polarized or grounding-type plug. A polarized plug has two blades with one wider than the other. A grounding type plug has two blades and a third grounding prong. The wide blade or the third prong are provided for your safety. If the provided plug does not fit into your outlet, consult an electrician for replacement of the obsolete outlet.
-
Protect the power cord from being walked on or pinched particularly at plugs, convenience receptacles, and the point where they exit from the apparatus.
-
Only use attachments/accessories specified by the manufacturer.
- Use only with the cart, stand, tripod, bracket, or table specified by the manufacturer, or sold with the apparatus. When a cart is used, use caution when moving the cart/apparatus combination to avoid injury from tip-over.

-
Unplug this apparatus during lightning storms or when unused for long periods of time.
-
Refer all servicing to qualified service personnel. Servicing is required when the apparatus has been damaged in any way, such as power-supply cord or plug is damaged, liquid has been spilled or objects have fallen into the apparatus, the apparatus has been exposed to rain or moisture, does not operate normally, or has been dropped.
FCC Compliance Statement
This device complies with part 15 of the FCC rules. Operation is subject to the following two conditions:
(1) This device may not cause harmful interference, and
(2) This device must accept any interference received, including interference that may cause undesired operation.
NOTE: This equipment has been tested and found to comply with the limits for a Class B digital device, pursuant to Part 15 of the FCC Rules. These limits are designed to provide reasonable protection against harmful interference in a residential installation. This equipment generates, uses, and can radiate radio frequency energy and, if not installed and used in accordance with the instructions, may cause harmful interference to radio communications. However, there is no guarantee that interference will not occur in a particular installation. If this equipment does cause harmful interference to radio or television reception, which can be determined by turning the equipment off and on, the user is encouraged to try to correct the interference by one or more of the following measures:
• Reorient or relocate the receiving antenna.
- Increase the separation between the equipment and receiver.
- Connect the equipment into an outlet on a circuit different from that to which the receiver is connected.
- Consult the dealer or an experienced radio/TV technician for help.
CAUTION: Any changes or modifications not expressly approved by the party responsible for compliance could void the user's authority to operate this equipment.
FCC WARNING: This equipment may generate or use radio frequency energy. changes or modifications to this equipment may cause harmful interference unless the modifications are expressly approved in the instruction manual. The user could lose the authority to operate this equipment if an unauthorized change or modification is made.
FCC RF Radiation Exposure Statement: This equipment complies with FCC radiation exposure limits set forth for an uncontrolled environment. This equipment should be installed and operated with minimum distance 20 cm between the radiator and your body. End users must follow the specific operating instructions for satisfying RF exposure compliance. This transmitter must not be co-located or operating in conjunction with any other antenna or transmitter.
CAUTION: Regulations of the FCC and FAA prohibit airborne operation of radio-frequency wireless devices because their signals could interfere with critical aircraft instruments.
Responsible Party :
LG Electronics USA, Inc. 1000 Sylvan Avenue Englewood Cliffs, NJ 07632
TEL.: +1-800-243-0000
Table of Contents
1 Getting Started
2 Safety Information
6 Unique features
6 Introduction
6 - Symbols used in this manual
6 Accessories
7 Remote control
8 Front panel
8 Rear panel
9 Installing the sound bar
9 - Installing the cover foot
10 Mounting the main unit on a wall
2 Connecting
12 Wireless subwoofer connection
13 Connecting to your TV
13 - Using an OPTICAL cable
13 - Using an HDMI cable
14 - Enjoy rich sound broadcast of the channel with the sound bar
15 - ARC (Audio Return Channel) function
15 - Additional information for HDMI
16 Optional equipment connection
16 - HDMI connection
17 - OPTICAL IN connection
17 - PORTABLE IN connection
18 - USB connection
18 - Compatible USB devices
18 - USB device requirement
19 - Playable file
3 Operating
20 Basic operations
20 - USB operation
21 Other operations
21 - AV Sync
21 - Turn off the sound temporarily
21 - Displaying file and input source
21 - Auto Dimmer
22 - Using your TV remote control
23 - AUTO POWER On/Off
24 - Auto function change
25 - LG Sound Sync
26 Using BLEUTOOTH® technology
27 - Listening to music stored on the Bluetooth devices
28 Using BLUETOOTH App
28 - Install "Music Flow Bluetooth" App onto Your BLUETOOTH Device
29 - Activate BLUETOOTH with "Music Flow Bluetooth" App
30 Sound adjustment
30 - Setting sound effect
30 - Adjust volume level automatically
31 - Adjust the Treble/Bass/Sub-woofer
31 - Night mode
4 Troubleshooting
32 Troubleshooting
5 Appendix
34 Trademarks and licenses
35 Specifications
37 Maintenance
37 - Handling the unit
Unique features
Auto power down
This unit will turn off by itself for energy saving consumption.
Portable In
Listens to music from your portable device. (MP3, Notebook, etc)
LG Sound Sync
Controls volume level of this unit by the remote control of your LG TV that is compatible with LG Sound Sync.
Introduction
Symbols used in this manual

Note
Indicates special notes and operating features.

Indicates cautions for preventing possible damages from abuse.
Accessories
Please check and identify the supplied accessories. Designs and specifications of the accessories are subject to change without prior notice.


Remote control (1) Batteries (2)


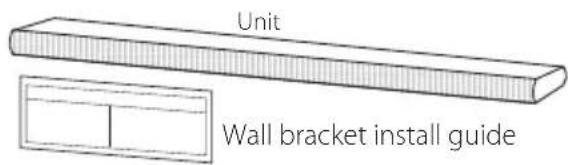
Wall bracket (2) Wall bracket install guide (1)


Screws (2) Cover foot (2)

Optical cable (1)
Remote control

Battery Installation

Remove the battery cover on the rear of the Remote Control, and insert two R03 (size AAA) batteries with +nd -matched correctly.
1 (Power): Switches the unit ON or OFF. / Switches to the standby mode.
F: Selects the function and the input source.
SOUND EFFECT : Selects a sound effect mode.
VOL + /—: Adjusts speaker volume.
* ) (Night mode): Turns on or off Night mode.
(Mute): Mutes the sound.
: Adjusts sound level of Treble, Bass and Subwoofer.
2
◀◀/▶◀ (Skip/Search):
- Skips Fast backward or Forward.
- Searches for a section within a file.
▶ II (Play/Pause) : Starts playback. / Pauses playback.
FOLDER +/—: Searches a folder on USB device.
REPEAT :
- Listen to your files repeatedly or randomly.
- Displays the information of a file or an input source. (Refer to the page 21)
AUTO VOL : Turns on and off the AUTO VOLUME mode.
AV SYNC :
- Synchronizes the audio and video.
- Controls TV remote (Refer to the page 22)
AUTO POWER : Turns on or off AUTO POWER function. (Refer to the page 23.)
Front panel

1 Display window
Standby LED
It lights up in red on standby mode.
2 Remote sensor
3 ⏻/I(Standby/On)
4 F (Function)
Selects the function and input source.
5-/+ (Volume)
Adjusts volume level.
Rear panel

1 Power cord
② HDMI IN / OUT (TV ARC) : HDMI input / output
3 USB port
4 PORTABLE IN: Portable input
5 OPTICAL IN: Optical input
Installing the sound bar
You can hear the sound by connecting the unit to the other device: TV, Blu-ray disc player, DVD player, etc.
Place the unit in front of the TV and connect it to the device you want. (Refer to pages 13 - 18.)

Caution
- For best performance of wireless connection such as Bluetooth or wireless subwoofer, do not install the unit on Metallic furniture because wireless connection communicates through a module positioned on the bottom of the unit.
- Be careful not to make scratches on the surface of the Unit /Sub-Woofer when installing or moving them.
Installing the cover foot
You can extend the height of the unit by using cover foot (height: 17 mm)
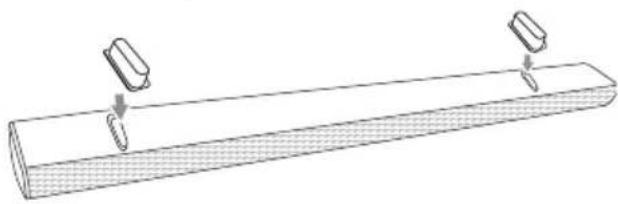
- Turn the unit upside down.
- Peel off a sticker attached to the cover foot. Then place it on the existing foot of the unit.
- Press the cover foot with adequate force to get it firmly fixed.
Mounting the main unit on a wall
You can mount the main unit on a wall.

Caution
Because it is difficult to make a connection after installing this unit, you should connect the cables before installation.
Preparation materials
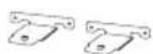
Wall bracket

(Not supplied)

Screws (A)

Wall plug
- Match the TV's BOTTOM EDGE of Wall bracket install guide with the bottom of TV and attach to the position.

- When you mount it on a wall (concrete), use the wall plugs. You should drill some holes. A guide sheet (Wall bracket install guide) is supplied to drill. Use the sheet to check the point to drill.

-
Remove the Wall bracket install guide.
-
Fix the brackets with screws (A) as shown in the illustration below.

Note
Screws (A) and Wall Plugs are not supplied for mounting the unit. We recommend the Hilti (HUD-1 6 x 30) for the mounting.
- Put the unit on the brackets to match screw holes on the bottom of the unit.

- Fix the unit with the screws firmly.
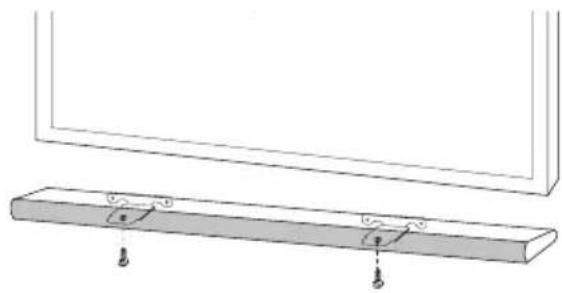
Note
To detach the unit, perform it in reverse order.
Caution
- Do not install this unit upside down. It can damage the parts of this unit or be the cause of personal injury.
- Do not hang onto the installed unit and avoid any impact to the unit.
- Secure the unit firmly to the wall so that it does not fall off. If the unit falls off, it may result in an injury or damage to the product.
- When the unit is installed on a wall, please make sure that a child does not pull any of connecting cables, as it may cause it to fall.
Wireless subwoofer connection
LED indicator of wireless subwoofer
LED Color Status
| Yellow-green (Blink) | The connection is trying. |
| Yellow-green The connection is completed. | |
| Red The wireless subwoofer is in standby mode or the connection is failed. | |
| Off (No display) | The power cord of wireless subwoofer is disconnected. |
Setting up the wireless subwoofer for the first time
- Connect the power cord of the wireless subwoofer to the outlet.
- Turn on the main unit: The main unit and wireless subwoofer will be automatically connected.
Manually pairing wireless subwoofer
When your connection is not completed, you can see the red LED or the blinking of yellow-green LED on the wireless subwoofer and the subwoofer does not make sound. To solve the problem, follow the below steps.
- Adjust volume level of the main unit to minimum.
- "VOL MIN" appears on the display window.
- Press and hold ⚙ (Mute) on the remote control for about 3 seconds.
-
"WL RESET" appears on the display window briefly and Red LED on the main unit is blinking
-
If the LED of the wireless subwoofer already blinks in yellow-green continually, you can skip this step.
Press and hold PAIRING on the back of the wireless subwoofer for more than 5 seconds.
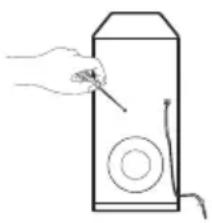
- The LED of the wireless subwoofer lights up alternately in red and yellow-green.
- Disconnect the power cord of the main unit and the wireless subwoofer.
- Connect them again after the LED of the main unit and the wireless subwoofer is fully turned off.
The main unit and the wireless subwoofer will be paired automatically when you turn on the main unit.
- When the connection is completed, you can see the yellow-green LED on the subwoofer.
Note
- It takes a few seconds (and may take longer) for the main unit and the subwoofer to communicate with each other and make sounds.
- The closer the main unit and the subwoofer, the better sound quality. It is recommended to install the main unit and the subwoofer as close as possible and avoid the cases below.
- There is a obstacle between the main unit and the subwoofer.
- There is a device using same frequency with this wireless connection such as a medical equipment, a microwave or a wireless LAN device.
Connecting to your TV
Please connect with this unit and TV using the optical digital cable or HDMI cable considering the state of the TV.
Using an OPTICAL cable
- Connect the OPT. IN jack on the back of the unit to OPTICAL OUT jack on the TV using an OPTICAL cable.
![graph TD A["Computer monitor"] --> B["Optical IN"] B --> C["Optical cable"] C --> D["Optical OUT"]](/content/2026/07/1511607/images/b31bec3a68068d927bf2fe4eb957e976b10aa5debf101c1252843ab0770bdb55.jpg)
- Select the input source to OPTICAL by pressing F button repeatedly.

Note
- Before connecting the optical cable, be sure to remove the protection plug cover if your cable has the cover.
- You can enjoy the TV audio through the speakers of this unit. In the case of some TV models, you must select the external speaker option from the TV menu. (For details, reference your TV user manual.)
- Set up the sound output of TV to listen to the sound through this unit:
TV setting menu → [Sound] → [TV Sound output] → [External speaker (Optical)]
• Details of TV setting menu vary depending on the manufacturers or models of your TV.
Using an HDMI cable
If you connect this unit to a TV that supports HDMI CEC and ARC (Audio Return Channel), you can enjoy the TV audio through the speakers of this unit without connecting the optical cable. Please refer to your TV user manual when you check HDMI CEC/ARC function of your TV.
![graph TD A["Computer"] --> B["ARC"] B --> C["HDMI cable"] C --> D["OUT (TV ARC)"] D --> E["Device with cable"]](/content/2026/07/1511607/images/15c5a80035a0ca4dad22e46228b4fc12812a11447fa78774d781d543f93a206d.jpg)

Note
- HDMI CEC (Consumer Electronics Control): Using a single remote control, you have the ability to operate CEC compatible devices (TV, Sound Bar, Blue-ray player, etc.)
- You can also enjoy extra functions such as USB / Bluetooth with F pressing button on the remote or unit. When you go back to live TV channel after using the extra functions (USB / Bluetooth) of this audio system, you should choose your preferred speaker on TV to enjoy the sound from this audio system again.
HDMI cable Checklist
Some HDMI cables do not support the ARC function, this can result in no sound output.
When connecting this unit to the TV, if there is no sound, there might be a problem with the HDMI cable. Therefore connect this unit to the TV and check whether the Type A, High speed HDMI™ Cable with Ethernet.
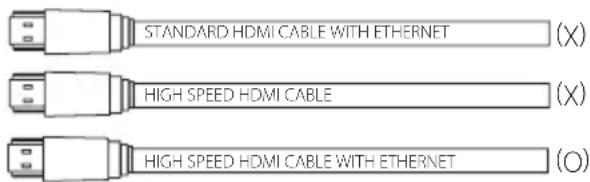
Enjoy rich sound broadcast of the channel with the sound bar
Connection through HDMI Cable
Your television must support the newest HDMI features (HDMI CEC 1) / ARC (Audio Return Channel)) to fully enjoy the Live broadcasting channel with audio system through an HDMI cable. Unless your TV supports these HDMI features, the audio system should be connected through an OPTICAL cable.
1) HDMI CEC (High-Definition Multimedia Interface Consumer Electronics Control)
Consumer Electronics Control (CEC) is an HDMI feature designed to allow the user to command and control the CEC-enabled devices, that are connected through HDMI by using only one of their remote controls.
※Trade names for CEC are SimpLink (LG), Anynet+ (Samsung), BRAVIA Sync/ Link (Sony), EasyLink (Philips), EZ-Sync/ VIERA Link (Panasonic), etc..
What is SIMPLINK?
SIMPLINK
Some functions of this unit are controlled by the TV's remote control when this unit and LG TV's with SIMPLINK are connected through HDMI connection.
Controllable functions by LG TV's remote control : Power on/off, volume up/down, mute, etc.
Refer to the TV owner's manual for the details of SIMPLINK function.
LG TV's with SIMPLINK function has the logo as shown above.
Note
- Depending on the state of the unit, some SIMPLINK operation may differ from your purpose or not work.
- Depending on a TV or a player which is connected with this unit, SIMPLINK operation may differ from your purpose.
ARC (Audio Return Channel) function
The ARC function enables an HDMI capable TV to send the audio stream to HDMI OUT of the unit.
To use this function :
- Your TV must support the HDMI-CEC and ARC function and the HDMI-CEC and ARC must be set to On.
- The setting method of HDMI-CEC and ARC may differ depending on the TV. For details about ARC function, refer to your TV manual.
- You must use the HDMI cable (Type A, High Speed HDMI™ cable with Ethernet).
- You must connect the HDMI OUT on the unit with HDMI IN of the TV that supports ARC function using an HDMI cable.
- You can connect only one Sound bar to TV compatible with ARC.
Note
- ARC function is automatically selected when ARC signal comes in from TV, no matter what kind of the function you are using.
- You can enjoy the TV audio through the speakers of this unit. In the case of some TV models, you must select the external speaker option from the TV menu. (For details, reference your TV user manual.)
- Set up the sound output of TV to listen to the sound through this unit:
TV setting menu → [Sound] → [TV Sound output] → [External speaker (HDMI ARC)]
• Details of TV setting menu vary depending on the manufacturers or models of your TV. - If you change to other function while you are using ARC function, you need to adjust ARC setting on TV setting again to use ARC function.
Additional information for HDMI
- When you connect an HDMI or DVI compatible device make sure of the following:
- Try switching off the HDMI/DVI device and this player. Next, switch on the HDMI/DVI device and leave it for around 30 seconds, then switch on this player.
- The connected device's video input is set correctly for this unit.
- The connected device is compatible with 720 x 576p (or 480p), 1280 x 720p, 1920 x 1080i, 1920 x 1080p or 4096 x 2160p video input.
- Not all HDCP-compatible HDMI or DVI devices will work with this player.
- The picture will not be displayed properly with non-HDCP device.
Note
- If a connected HDMI device does not accept the audio output of the player, the HDMI device's audio sound may be distorted or may not output.
- Changing the resolution when the connection has already been established may result in malfunctions. To solve the problem, turn off the player and then turn it on again.
- When the HDMI connection with HDCP is not verified, TV screen is changed to black screen. In this case, check the HDMI connection, or disconnect the HDMI cable.
- If there are noises or lines on the screen, please check the HDMI cable (length is generally limited to 4.5 m(15 ft).
- You cannot change the video resolution in the HDMI IN mode. Change the video resolution of the connected component.
- If the video output signal is abnormal when your personal computer is connected to HDMI IN jack, change the resolution of your personal computer to 576p (or 480p), 720p, 1080i or 1080p.
Optional equipment connection
HDMI connection
You can enjoy the sound and picture from HDMI connection on external device.
For enjoying sound only
You can enjoy the sound from the external device you connect.
![graph TD A["Device 1"] --> B["HDMI IN"] C["Device 2"] --> B D["Device 3"] --> B B --> E["Output"]](/content/2026/07/1511607/images/bfc39079603f0dee7a32e25c702f2ce70069e1fc0053718d8f41d7789eabe35a.jpg)
To the Blu-ray disc player, DVD player, etc.
- Connect HDMI IN jack on the back of the unit to HDMI OUT jack on the audio device such as Blu-ray disc player, DVD player, etc.
- Select the input source to HDMI IN by pressing F button repeatedly.
For enjoying both sound and picture
You can enjoy both sound and picture from the external device you connect.
![graph TD A["Server"] --> B["HDMI OUT"] B --> C["Internal Module 1"] C --> D["HDMI IN"] D --> E["Internal Module 2"] E --> F["Computer"]](/content/2026/07/1511607/images/07cb08d10b5ac0d4b4ca7a627c321a8009e7176e45f8f5d13af4a1d8794e0f96.jpg)
- Connect HDMI IN jack on the back of the unit to HDMI OUT jack on the external device such as Blu-ray disc player, DVD player, etc.
- Connect HDMI OUT jack on the back of the unit to HDMI IN jack on the TV.
- Select the input source to HDMI IN by pressing F button repeatedly.
Note
- With the unit connected to external devices and TV as above illustration, TV will output picture and sound from external devices
when the unit is turned off in HDMI IN mode. - HDMI OUT jack is for TV connection. Even though multi channel is inputted to the unit through an HDMI cable, the unit can only output 2 channel to TV.
- When this unit is turned off, multi channel audio sources will be passed through without transformation.
OPTICAL IN connection
Connect an optical output jack of external devices to the OPTICAL IN jack.

- Connect the OPTICAL IN jack on the back of the unit to optical out jack of your TV (or digital device etc.)
- Select the input source to OPTICAL by pressing F button repeatedly.
- Listen to sound.
- Press F to exit from OPTICAL.
Note
Before connecting the optical cable, be sure to remove the protection plug cover if your cable has the cover.
PORTABLE IN connection
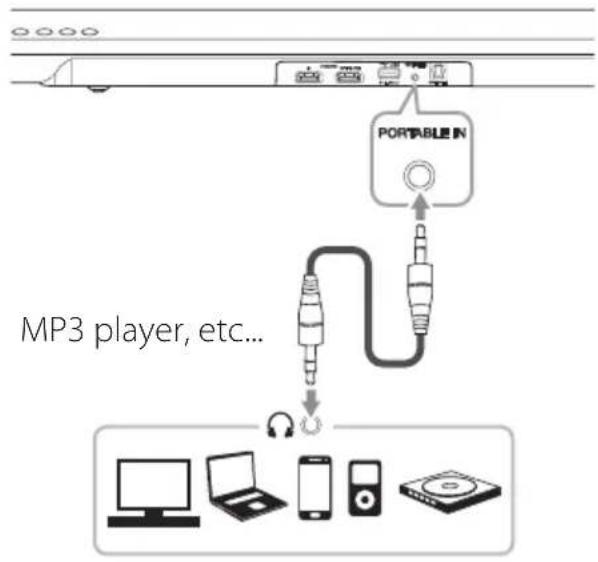
Listening to music from your portable player
The unit can be used to play the music from many types of portable players or external devices.
- Connect the portable player to the PORTABLE IN connector of the unit by using 3.5 mm stereo cable.
- Turn the power on by pressing ⏻ (Power).
- Select the input source to PORTABLE by pressing F button repeatedly.
- Turn on the portable player or external device and start playing it.
USB connection
Connect USB memory device to the USB port on the back of the unit.

For more information of playing files on a USB, refer to the page 20.
Removing the USB Device from the unit.
- Choose a different function/mode.
- Remove the USB device from the unit.
Compatible USB devices
• MP3 Player : Flash type MP3 player.
• USB Flash Drive : Devices that support USB 2.0.
- The USB function of this unit does not support some USB devices.
USB device requirement
• Devices which require additional program installation connected to a computer, are not supported.
- Do not extract the USB device while in operation.
- For a large capacity USB, it may take longer than a few minutes to be searched.
• To prevent data loss, back up all data.
- This unit is not supported when the total number of files is 2000 or more.
- The unit's USB Port cannot be connected to PC. The unit can not be used as a storage device.
- The exFAT file system is not supported on this unit. (FAT16/FAT32/NTFS systems are available.)
- Depending on some devices, it may not available to recognize the followings on this unit.
- External HDD
- Card readers
- Locked devices
- Hard type USB devices
- USB hub
- Using USB extension cable
- iPhone/iPod/iPad
- Android device
playable file
Sampling Frequency
MP3: within 32 to 48 kHz
WMA: within 32 to 48 kHz
OGG: within 32 to 48 kHz
FLAC: within 32 to 192 kHz
WAV: within 32 to 48 kHz
Bitrate
MP3: within 80 to 320 kbps
WMA: within 56 to 128 kbps
OGG: within 64 to 500 kbps
FLAC: within 500 to 5000 kbps
WAV: within 500 to 5000 kbps
• Maximum files : Under 2000
- A protected file by DRM (Digital rights management) cannot be played on the unit.
• Video files in the USB storage device can not be played.
- Depending on the performance of your USB device, playback may not work well.
Note
- Folders and files on the USB are recognized as below.
![graph TD A["*ROOT"] --> B["1"] A --> C["3"] A --> D["4"] A --> E["5"] A --> F["6"] A --> G["7"] A --> H["8"] A --> I["9"] A --> J["10"] B --> K["Music Note ③"] B --> L["Music Note ④"] B --> M["Music Note ⑤"] C --> N["Music Note ②"] C --> O["Music Note ③"] C --> P["Music Note ④"] C --> Q["Music Note…](/content/2026/07/1511607/images/39a75f72fcc0f657b78cfae66555588f840d354354577540fdac386fd246c2f8.jpg)
- If there is no file in a folder, the folder will not appear.
- File will be played from file ⌘① to file ⌘⑩ one by one.
- Files and folders will be presented in order recorded and may be presented differently depending on the record circumstances.
- This unit can display file or folder names that contain numbers or English characters only.
- *ROOT: The first screen you can see when a computer recognize the USB is "ROOT".
Basic operations
USB operation
- Connect the USB device to the USB port.
- Select the USB function by pressing F button repeatedly unit until the function is selected.
| To Do this | |
| Playback Press | ▶II. |
| Pause | During playback, press ▶II. |
| Skip to the next/ previous file | During playback, press ▶▶I on the remote control to go to the next file.Playing less than 2 seconds, press ◀◀◀ on the remote control to go to the previous file.Playing after 3 seconds, press ◀◀◀ on the remote control to go to the beginning of the file. |
| Search for a section within a file | Press and hold ◀◀◀/▶▶Iduring playback and release it at the point you want to listen to. |
| Play repeatedly or randomly | Press REPEAT on the remote control repeatedly, the display will be changed in the following order, OFF→ONE→FOLDER→ALL →RANDOM. |
| Search a folder | Press FOLDER +/— on the remote control. |
| Resume playback | This unit memorizes a current song which is played before changing the function or turning off the unit. |
Note
- The resume point may be cleared when you pull out the power cord or removing the USB device from the unit.
- Repeat/Random playback operates as follows.
| On Display Description | |
| OFF | Plays songs on USB device in order. |
| ONE | Plays a same song repeatedly. |
| FOLDER | Plays songs in a folder repeatedly. |
| ALL | Plays all the songs on USB device repeatedly. |
| RANDOM Plays | songs randomly. |
Other operations
AV Sync
When receiving audio signals from TV, sound and images may not be matched. In the case, this function can adjust the delay time.
- Press AV SYNC.
- Use ◀◀◀/▶▶▶ to scroll up and down through the delay amount, which you can set at anything between 0 and 300 ms.

Note
This function does not operate on USB function.
Turn off the sound temporarily
Press (mute) to mute your unit.
You can mute your unit, for example, to answer the telephone, "MUTE" is displayed in the display window.
To cancel it, press ⚙ (Mute) again on the remote control or change the volume level.
Displaying file and input source
You can display various information of the input source. Press and hold REPEAT for 3 seconds.
USB : File information contained on a USB (MP3/WMA/OGG/FLAC/WAV)
OPTICAL/ARC/HDMI IN : Audio format, Audio channel
BT (Bluetooth): The address of the connected
Bluetooth device.
Auto Dimmer
Display window will be darkened automatically if there is no key input for 3 seconds.
Using your TV remote control
You can control some functions of this unit by your TV remote control even by other company's product.
Controllable functions are volume up/down and mute.
Press and hold AV SYNC on the remote control for about 3 seconds. "ON - TV REMOTE" appears and you can control this unit by your TV remote control.
To check the status of this function, press and hold AV SYNC.
To turn off this function, press and hold AV SYNC and press it once again while "ON - TV REMOTE" is scrolled.
Note
• Supported TV brands
LG Panasonic Philips Samsung
Sharp Sony Toshiba Vizio
- Make sure that the sound output of your TV is set to [External speaker].
- Depending on the remote control, this function may not work well.
- This function may not work well when some TV control functions such as CEC, SIMPLINK and LG Sound Sync set to ON.
Auto power down
This unit will be off itself to save electric consumption in the case main unit is not connected to external device and is not used for 20 minutes.
So does this unit after six hours since Main unit has been connected to other device using analog input. (Ex : Portable, etc..)
How to disconnect the wireless network connection or the wireless device
Set up the AUTO POWER ON/OFF function to off and turn off the unit.
AUTO POWER On/Off
This unit automatically turns on by an input source: Optical, LG TV or Bluetooth.
When you turn on your TV or an external device connected to this unit, this unit recognizes the input signal and select the suitable function. You can hear the sound from your device.
If you try to connect your Bluetooth device, this unit turns on and ready to pair. Connect your Bluetooth device and play your music.
This function turns on or off each time you press AUTO POWER.
Note
- After the unit is turned on by AUTO POWER function, it will be automatically turned off if there is no signal for a certain period of time from the TV connected by LG Sound Sync (Optical/Wireless).
• After the unit is turned on by AUTO POWER function, it will be automatically turned off if there is no signal for a certain period of time from the external device. - If you turned off the unit directly, it cannot be turned on automatically by AUTO POWER function. However the unit can be turned on by AUTO POWER function when optical signal comes in after 5 seconds of no signal.
- Depending on the connected device, this function may not operate.
- If you disconnect Bluetooth connection by this unit, some Bluetooth devices try to connect to the unit continually. Therefore it is recommended to disconnect the connection before turn off the unit.
- If you want to use AUTO POWER, SIMPLINK must be turned off. It takes for about 30 seconds to switch on or off SIMPLINK.
- When you turn on this unit for the first time, Auto Power function is turned on status.
Auto function change
This unit recognizes input signals such as optical, Bluetooth and LG TV and then changes suitable function automatically.
When optical signal comes in
When you turn on the external device connected to this unit by an optical cable, this unit change the function to optical. You can hear the sound from your device.
When you try to connect Bluetooth device
When you try to connect your Bluetooth device to this unit, Bluetooth function is selected. Play your music on the Bluetooth device.
When LG TV signal comes in
When you turn on your LG TV connected by LG Sound Sync (Wireless connection), this unit changes the function to LG TV. You can hear the sound from your TV.
Note
- To change to optical function, it needs 5 seconds of no signal.
- This unit does not change the function to optical if SIMPLINK of the connected TV, Blu-ray disc player, set-top box or etc. device set to on or connected CEC supported device is turned on.
- If you want to use the auto function change, SIMPLINK must be turned off. It takes for about 30 seconds to turn off SIMPLINK.
LG Sound Sync
Sound Sync® Wireless
You can control some functions of this unit by your TV's remote control with LG Sound Sync. It is compatible with the LG TV that is supported LG Sound Sync. Make sure of the LG Sound Sync logo on your TV.
Controllable function by LG TV's remote control : Volume up/down, mute
Refer to the TV's instruction manual for the details of LG Sound Sync.
Make one of the following connections, depending on the capabilities of your equipment.
Note
- You can also use the remote control of this unit while using LG Sound Sync. If you use TV's remote control again, the unit synchronizes with the TV.
- When the connection fails, make sure of the condition of the TV and power.
- Make sure of the condition of this unit and the connection in the cases below when using LG Sound Sync.
- Turn off the unit.
- Changing the function to the others.
- Disconnecting the optical cable.
- Disconnecting the wireless connection caused by interference or a distance.
- The amount of time to turn off this unit is different depending on your TV when you set AUTO POWER function to ON.
• Details of TV setting menu vary depending on the models of your TV.
With wired connection
- Connect your LG TV to the unit by using an optical cable.
![graph TD A["Computer monitor"] --> B["OPTICAL IN"] A --> C["OPTICAL OUT"] B --> D["Optical cable"] C --> D style A fill:#f9f,stroke:#333 style B fill:#ccf,stroke:#333 style C fill:#ccf,stroke:#333](/content/2026/07/1511607/images/eeba35b8030a82e6f3d508eba8fd6810b3ea8a27b872c5bdaa6eb7e583017f22.jpg)
- Set up the sound output of TV to listen to the sound through this unit:
TV setting menu → [Sound] → [TV Sound output] → [LG Sound Sync (Optical)]
- Turn on the unit by pressing ⏻ (Power) on the remote control.
- Select the input source to OPTICAL by pressing F button repeatedly.
You can see "LG OPT" on the display window if connecting normally between this unit and your TV.
With wireless connection
- Turn on the unit by pressing ⏻ (Power) on the remote control.
- Select the input source to LG TV by pressing F button repeatedly.
- Set up the sound output of TV to listen to the sound through this unit:
TV setting menu → [Sound] → [TV Sound output] → [LG Sound Sync (Wireless)]
"PAIRED" appears on the display window for about 3 seconds and then you can see "LG TV" on the display window if connecting normally between this unit and your TV.
Note
- If you turned off the unit directly by pressing ⏻ (Power), LG Sound Sync (Wireless) will be disconnected. To use this function again, you should reconnect the TV and the unit.
Using BLEUTOOTH® technology
About BLUETOOTH
Bluetooth is wireless communication technology for short range connection.
The sound may be interrupted when the connection interfered by the other electronic wave or you connect the Bluetooth in the other rooms.
Connecting individual devices under Bluetooth wireless technology does not incur any charges. A mobile phone with Bluetooth wireless technology can be operated via the Cascade if the connection was made via Bluetooth wireless technology.
Available Devices : Mobile phone, MP3, Laptop, PDA etc.
BLUETOOTH Profiles
In order to use Bluetooth wireless technology, devices must be able to interpret certain profiles. This unit is compatible with following profile.
A2DP (Advanced Audio Distribution Profile)
Listening to music stored on the Bluetooth devices
Pairing your unit and BLUETOOTH device
Before you start the pairing procedure, make sure the Bluetooth feature is turned on in to your Bluetooth device. Refer to your Bluetooth device's user guide. Once a pairing operation is performed, it does not need to be performed again.
- Select the input source to BT (Bluetooth) by pressing F button repeatedly. Appears "BT" and then "BT READY" in display window.
- Operate the Bluetooth device and perform the pairing operation. When searching for this unit with the Bluetooth device, a list of the devices found may appear in the Bluetooth device display depending on the type of Bluetooth device. Your unit appears as "LG LAS551H (XX) / LG LASC55".
Note
- XX means the last two digits of Bluetooth address. For example, if your unit has a Bluetooth address such as 9C:02:98:4A:F7:08, you will see "LG LAS551H (08) / LG LASC55 (08)" on your Bluetooth device.
- Depending on the Bluetooth device type, some device have a different pairing way. Enter the PIN code (0000) as needed.
- You can connect this unit with up to 3 Bluetooth device simultaneously same method as above description.
- The multi pairing connection is only supported on Android or iOS devices. (Multi pairing connection may not be supported depending on the connected device specifications.)
-
Removable/detachable Bluetooth device (Ex : Dongle etc..) doesn't supported multi pairing.
-
When this unit is successfully connected with your Bluetooth device, "PAIRED" will be appear on the display window and change to Bluetooth device name soon.
Note
- "PAIRED" will be momentarily appear on the display when you connect other devices for multi pairing.
-
If it is unavailable to display device name on the unit, "_" will be displayed.
-
Listen to music.
To play a music stored on your Bluetooth device, refer to your Bluetooth device's user guide.
Note
- When using Bluetooth technology, you have to make a connection between the unit and the Bluetooth device as close as possible and keep the distance. However it may not work well in the case below:
- There is a obstacle between the unit and the Bluetooth device.
-
There is a device using same frequency with Bluetooth technology such as a medical equipment, a microwave or a wireless LAN device.
-
You should connect your Bluetooth device to this unit again when you restart it.
- Even if this unit connected up to 3 Bluetooth devices, you can play and control music by using only one of the connected devices.
- Only one device which you are playing keeps Bluetooth connection when you change the function to the others.

Note
- The sound may be interrupted when the connection interfered by the other electronic wave.
- You may not control the Bluetooth device with this unit.
- Depending on the type of the device, you may not be able to use the Bluetooth function.
- You can enjoy wireless system using phone, MP3, Notebook, etc..
- The more distance between the unit and the bluetooth device, the lower the sound quality becomes.
- Bluetooth connection will be disconnected when the unit is turned off or the bluetooth device gets far from the unit.
- When Bluetooth connection is disconnected, connect the bluetooth device to the unit again.
- When not connected the Bluetooth, "BT READY" appears on the display window.
- When you connect Bluetooth device (iOS device etc.) to this unit or operate the device, the volume level can be synchronized with each other.
Using BLUETOOTH App

Note
Only Android OS is available to use "Music Flow Bluetooth" app with this unit.
About "Music Flow Bluetooth" App
"Music Flow Bluetooth" app brings a suite of new features to this unit.
To enjoy more features, you are recommended to download and install free "Music Flow Bluetooth" app.
Install "Music Flow Bluetooth" App onto Your BLUETOOTH Device
There are two ways to install "Music Flow Bluetooth" App onto Your Bluetooth Device.
Install "Music Flow Bluetooth" App through QR code
- Install "Music Flow Bluetooth" app through QR code. Use the scanning software to scan the QR code.

- Tap an icon for installation.
- Tap an icon for downloading.

Note
• Make sure that your Bluetooth device is connected to the Internet.
- Make sure that your Bluetooth device has a scanning software application. If you don't have one, download one from "Google Android Market (Google Play Store)".
- Depending on the area, QR code may not work.
Install "Music Flow Bluetooth" App through "Google Android Market (Google Play Store)"
- Tap the "Google Android Market (Google Play Store)" icon.
- In the search bar, type in the "Music Flow Bluetooth" and search it.
- In the search result list, find and tap "Music Flow Bluetooth" to start downloading Bluetooth app.
- Tap an icon for installation.
- Tap an icon for downloading.

Note
• Make sure that your Bluetooth device is connected to the Internet.
- Make sure that your Bluetooth device is equipped with "Google Android Market (Google Play Store)".
Activate BLUETOOTH with "Music Flow Bluetooth" App
"Music Flow Bluetooth" app helps to connect your bluetooth device to this unit.
- Tap "Music Flow Bluetooth" app icon on the home screen to open "Music Flow Bluetooth" app, and go to the main menu.
- Tap [Menu] and select the unit you want.
- If you want to get more information to operate, tap [Setting] and turn on the User guide.

Note
- "Music Flow Bluetooth" app will be available in the software version as follow;
- Android O/S : Ver 4.0.3 (or later)
- If you use "Music Flow Bluetooth" app for operation, there would be some differences between "Music Flow Bluetooth" app and the supplied remote control. Use the supplied remote control as necessary.
- Depending on the Bluetooth device, "Music Flow Bluetooth" app may not work.
- After connection of "Music Flow Bluetooth" app, music may be output from your device. In this case, try connecting procedure again.
- If you operate the other applications or change the settings on your Bluetooth device while using "Music Flow Bluetooth" app, "Music Flow Bluetooth" app may operate abnormally.
- When "Music Flow Bluetooth" app operates abnormally, check your Bluetooth device and the connection of "Music Flow Bluetooth" app and then try to connect again.
- Depending on the smart phone's operating system, you have some differences for "Music Flow Bluetooth" operation.
- Even though Bluetooth connection will be disconnected, you can use "Music Flow Bluetooth" app when you change the function.
Sound adjustment
Setting sound effect
This system has a number of pre-set surround sound fields. You can select a desired sound mode by using SOUND EFFECT.
The displayed items for the equalizer may be different depending on sound sources and effects.
| On Display Description | |
| STANDARD | You can enjoy optimized sound. |
| MUSIC | You can enjoy comfortable and natural sound. |
| CINEMA | You can enjoy more immersive and cinematic surround sound. |
| FLAT Provides balanced sound. | |
| BOOST | Boosts the mid-range for sound reinforcement. |
| TREBLE / BASS Reinforces the treble and bass. | |
Note
- In some of sound effect mode, some speakers, there's no sound or low sound. It depends on the mode of surround and the source of audio, it is not defective.
- You may need to reset the sound effect mode, after switching the input, sometimes even after the sound file changed.
Adjust volume level automatically
This unit supports Auto volume function that automatically adjusts the volume level.
When the output sound is too loud or too low, press AUTO VOL on the remote control. So you can enjoy the sound with appropriate levels.
To cancel this function, press the button again.
Adjust the Treble/Bass/Sub- woofer
You can adjust the sound level of Treble, Bass and Sufwoofer as your preference.
TREBLE/BASS: -5 dB to 5 dB
SUBWF (Subwoofer) : -20 dB to 6 dB
- Press 🎨 button repeatedly to select TREBLE, BASS or SUBWF (Subwoofer).
- Press VOH+/- to adjust the sound level.
Night mode
This function is useful when you want to watch movies at low volume late at night.
Press *) button on the remote control. So you can activate Night mode. To cancel it, press *) button again.
Troubleshooting
| PROBLEM CAUSE & CORRECTION | |
| The unit does not work properly. | Turn off the power of this unit and the connected external device (TV, Woofer, DVD-player, Amplifier, etc.) and turn it on again.Disconnect the power cord of this unit and the connected external device (TV, Woofer, DVD-player, Amplifier, etc.) and then try connecting again.Previous setting may not be saved when device power is shut off. |
| No Power | The power cord is unplugged.Plug in the power cord.Check the condition by operating other electronic devices. |
| No sound | Incorrect input source is selected.Check the input source and select the correct input source.The mute function is activated.Press 📋 (Mute) or adjust the volume level to cancel the mute function.When you are using connection with a external device (set top box,Bluetoothdevice etc.), adjust volume level of the device. |
| No woofer sound | The power cord of the subwoofer is not connected.Plug the power cord into the wall outlet securely.Pairing between the unit and the subwoofer gets disconnected.Connect the unit and the subwoofer. (Refer to the page 12.) |
| The remote control does not work properly. | The remote control is too far from the unit.Operate the remote control within about 7 m.There is an obstacle in the path of the remote control and the unit.Remove the obstacle.The batteries in the remote control is exhausted.Replace the batteries with new one. |
| The AUTO POWER function does not work. | Check connection of the external device such as TV, DVD/Blu-Ray player orBluetoothdevice.Check the state of SIMPLINK and turn off SIMPLINK.Depending on the connected device, this function may not operate. |
| LG Sound Sync does not work. | Check whether your LG TV supports LG Sound Sync.Check connection of LG Sound Sync (Optical or wireless).Check sound setting of your TV and this unit. |
| When you feel the output sound of the unit is low. | Check the details below and adjust the unit according to them.With the sound bar connected with TV, change the AUDIO DIGITAL OUT setting on TV Setup Menu from [PCM] to [AUTO] or [BITSTREAM].With the sound bar connected with Player, change the AUDIO DIGITAL OUT setting on Player Setup Menu from [PCM] to [PRIMARY PASS-THROUGH] or [BITSTREAM].Change Audio DRC setting on Player setup menu to [OFF] state. |
Trademarks and licenses
All other trademarks are trademarks of their respective owners.

DOLBY. DIGITAL
Manufactured under license from Dolby Laboratories. Dolby and the double-D symbol are trademarks of Dolby Laboratories.
dts®
Digital Surround
For DTS patents, see http://patents.dts.com. Manufactured under license from DTS Licensing Limited. DTS, the Symbol, & DTS and the Symbol together are registered trademarks, and DTS Digital Surround is a trademark of DTS, Inc. © DTS, Inc. All Rights Reserved.

Bluetooth®
Bluetooth ® wireless technology is a system which allows radio contact between electronic.
Connecting individual devices under Bluetooth® wireless technology does not incur any charges. A mobile phone with Bluetooth® wireless technology can be operated via the Cascade if the connection was made via Bluetooth® wireless technology.
The Bluetooth ® word mark and logos are owned by the Bluetooth ® SIG, Inc. and any use of such marks by LG Electronics is under license.
Other trademarks and trade names are those of their respective owners.
HDMI TM
HIGH-DEFINITION MULTIMEDIA INTERFACE
The terms HDMI and HDMI High-Definition Multimedia Interface, and the HDMI logo are trademarks or registered trademarks of HDMI Licensing LLC in the United States and other countries.
Specifications
| General (LAS551H/LASC55) | |
| Power requirements 120 V ~ 60 Hz | |
| Power consumption | 27 W |
| Networked standby : 2.5 W(If all network ports are activated.) | |
| Dimensions (W x H x D) 890 mm X | 51 mm X 85 mm (35.0 inch x 2.0 inch x 3.3 inch) |
| Net Weight (Approx.) 2.8 kg (6.2 lb) | |
| Operating temperature 41 °F to 95 | °F (5 °C to 35 °C) |
| Operating humidity 5 % to 90 % | |
| Input/Output | |
| OPT. IN 3 V (p-p), Optical jack x 1 | |
| PORT. IN 0.5 Vrms (3.5 mm stereo jack) x 1 | |
| HDMI IN 19 Pin (Type A, HDMITM connector) x 1 | |
| HDMI OUT 19 Pin (Type A, HDMITM connector) x 1 | |
| Available Digital Input Audio Sampling Frequency | 32 kHz, 44.1 kHz, 48 kHz, 96 kHz |
| USB | |
| Version 2.0 | |
| Bus Power Supply 5 V | --- 500 mA |
| Amplifier | |
| Total 320 W | |
| Front Middle/ Tweeter 40 W x 2 (4 Ω at 1 kHz) / 20 W x 2 (8 Ω at 12 kHz) | |
| Subwoofer | 200 W (3 Ω at 80 Hz) |
| THD | 10 % |
| Wireless subwoofer (S55A1-D) | |
| Power requirements 120 V ~ 60 Hz | |
| Power consumption 33 W | |
| Type | 1 Way 1 Speaker |
| Impedance | 3 Ω |
| Rated Input Power | 200 W |
| Max. Input Power | 400 W |
| Dimensions (W x H x D) 171 mm x 390 mm x 261mm (6.7 inch x 15.3 inch x 10.2 inch) | |
| Net Weight (Approx.) 5.6 kg (12.3 lb) | |
| Bluetooth | |
| Codec SBC | |
- Designs and specifications are subject to change without prior notice.
Maintenance
Handling the unit
When shipping the unit
Please save the original shipping carton and packing materials. If you need to ship the unit, for maximum protection, re-pack the unit as it was originally packed at the factory.
Keeping the exterior surfaces clean
- Do not use volatile liquids such as insecticide spray near the unit.
- Wiping with strong pressure may damage the surface.
- Do not leave rubber or plastic products in contact with the unit for a long period of time.
Cleaning the unit
To clean the player, use a soft, dry cloth. If the surfaces are extremely dirty, use a soft cloth lightly moistened with a mild detergent solution. Do not use strong solvents such as alcohol, benzine, or thinner, as these might damage the surface of the unit.

LG
Life's Good
LG Customer Information Center
Register your product Online!
www.lg.com
- CAUTION CONCERNING THE POWER CORD
- IMPORTANT SAFETY INSTRUCTIONS
- FCC COMPLIANCE STATEMENT
- RESPONSIBLE PARTY
- TABLE OF CONTENTS
- GETTING STARTED
- CONNECTING
- OPERATING
- TROUBLESHOOTING
- APPENDIX
- UNIQUE FEATURES
- AUTO POWER DOWN
- PORTABLE IN
- LG SOUND SYNC
- INTRODUCTION
- SYMBOLS USED IN THIS MANUAL
- ACCESSORIES
- REMOTE CONTROL
- BATTERY INSTALLATION
- REPEAT
- AV SYNC
- FRONT PANEL
- REAR PANEL
- INSTALLING THE SOUND BAR
- CAUTION
- INSTALLING THE COVER FOOT
- MOUNTING THE MAIN UNIT ON A WALL
- NOTE
- WIRELESS SUBWOOFER CONNECTION
- LED INDICATOR OF WIRELESS SUBWOOFER
- SETTING UP THE WIRELESS SUBWOOFER FOR THE FIRST TIME
- MANUALLY PAIRING WIRELESS SUBWOOFER
- CONNECTING TO YOUR TV
- USING AN OPTICAL CABLE
- USING AN HDMI CABLE
- HDMI CABLE CHECKLIST
- ENJOY RICH SOUND BROADCAST OF THE CHANNEL WITH THE SOUND BAR
- CONNECTION THROUGH HDMI CABLE
- WHAT IS SIMPLINK
- SIMPLINK
- ARC (AUDIO RETURN CHANNEL) FUNCTION
- ADDITIONAL INFORMATION FOR HDMI
- OPTIONAL EQUIPMENT CONNECTION
- HDMI CONNECTION
- FOR ENJOYING SOUND ONLY
- FOR ENJOYING BOTH SOUND AND PICTURE
- OPTICAL IN CONNECTION
- PORTABLE IN CONNECTION
- LISTENING TO MUSIC FROM YOUR PORTABLE PLAYER
- USB CONNECTION
- COMPATIBLE USB DEVICES
- USB DEVICE REQUIREMENT
- PLAYABLE FILE
- SAMPLING FREQUENCY
- BITRATE
- BASIC OPERATIONS
- USB OPERATION
- OTHER OPERATIONS
- TURN OFF THE SOUND TEMPORARILY
- DISPLAYING FILE AND INPUT SOURCE
- AUTO DIMMER
- USING YOUR TV REMOTE CONTROL
- HOW TO DISCONNECT THE WIRELESS NETWORK CONNECTION OR THE WIRELESS DEVICE
- AUTO POWER ON/OFF
- AUTO FUNCTION CHANGE
- WHEN OPTICAL SIGNAL COMES IN
- WHEN YOU TRY TO CONNECT BLUETOOTH DEVICE
- WHEN LG TV SIGNAL COMES IN
- SOUND SYNC® WIRELESS
- WITH WIRED CONNECTION
- WITH WIRELESS CONNECTION
- USING BLEUTOOTH® TECHNOLOGY
- ABOUT BLUETOOTH
- BLUETOOTH PROFILES
- LISTENING TO MUSIC STORED ON THE BLUETOOTH DEVICES
- PAIRING YOUR UNIT AND BLUETOOTH DEVICE
- USING BLUETOOTH APP
- ABOUT "MUSIC FLOW BLUETOOTH" APP
- INSTALL "MUSIC FLOW BLUETOOTH" APP ONTO YOUR BLUETOOTH DEVICE
- INSTALL "MUSIC FLOW BLUETOOTH" APP THROUGH QR CODE
- INSTALL "MUSIC FLOW BLUETOOTH" APP THROUGH "GOOGLE ANDROID MARKET (GOOGLE PLAY STORE)
- ACTIVATE BLUETOOTH WITH "MUSIC FLOW BLUETOOTH" APP
- SOUND ADJUSTMENT
- SETTING SOUND EFFECT
- ADJUST VOLUME LEVEL AUTOMATICALLY
- ADJUST THE TREBLE/BASS/SUB- WOOFER
- NIGHT MODE
- TRADEMARKS AND LICENSES
- MAINTENANCE
- HANDLING THE UNIT
- WHEN SHIPPING THE UNIT
- KEEPING THE EXTERIOR SURFACES CLEAN
- CLEANING THE UNIT
Brand : LG
Model : LASC55
Category : Soundbar