F4A F4E - Coffee maker Fiorenzato - Free user manual and instructions
Find the device manual for free F4A F4E Fiorenzato in PDF.


| Product Type | Professional espresso machine |
| Brand | Fiorenzato |
| Model | F4A / F4E |
| Dimensions (L x D x H) | 400 x 500 x 450 mm |
| Weight | 30 kg |
| Power supply | 230 V / 50 Hz / 2000 W |
| Boiler type | Copper, water boiler |
| Water tank capacity | 10 liters |
| Operating pressure | 9 bars |
| Number of groups | 1 group |
| Main functions | Espresso extraction, steam, hot water |
| Maintenance and cleaning | Daily cleaning of the group and steam wand, regular descaling with appropriate product |
| Safety | Safety thermostat, automatic shutdown in case of overheating |
| Spare parts and repairability | Gaskets, filters, portafilter, steam wand available from dealer |
| General information | Italian manufacturing, professional use |
Frequently Asked Questions - F4A F4E Fiorenzato
User questions about F4A F4E Fiorenzato
0 question about this device. Answer the ones you know or ask your own.
Ask a new question about this device
Download the instructions for your Coffee maker in PDF format for free! Find your manual F4A F4E - Fiorenzato and take your electronic device back in hand. On this page are published all the documents necessary for the use of your device. F4A F4E by Fiorenzato.
USER MANUAL F4A F4E Fiorenzato
EN Coffee grinder-doser and coffee-grinder
Warnings for installation and electrical connections .....20
Operating the grinder-doser....20
Preliminaries....20
Switching on and off .....20
Adjusting grinding .....20
F4A....21
Coffee dose adjustment and operating the grinder-doser . . 21
Pressing....21
F4E V2 21
Selection buttons ..... 21
Display....21
Operating the grinder-doser. . 21
Menù 22
Settings Menù....22
Coffe Dose adjustment .....22
Mills replacement .....22
Safety devices....22
Noise level....22
Maintenance....23
Cleaning the appliance. . . . . . . 23
DEUTSCH....25
Warnungen 6
Einleitung. 26
Abmessungen....26
Verpackung 26
Entsorgung 26
- Read thoroughly and stick closely to the instructions and warnings.
- Before use, ensure that the mains voltage is the same as the voltage indicated on the data plate of the machine.
- Connect the grinder-doser only to 10 A sockets that are efficiently earthed.
- Always remove the plug from the socket before carrying out any maintenance or cleaning of the grinder-dosers.
- Singlephase models are supplied complete with cable and plug for connection to the socket.
- Any tampering with the grinder-doser or connections not complying with the above indications invalidate the manufacturer's guarantee.
- Do not operate the grinder-doser without coffee in the hopper.
- Never tamper with the machines in any way.
- For any intervention on the machines, always apply only to the authorized service centre.
- Never pull the power cable to remove the plug from the socket.
- Only use the grinder-doser for the purposes it is meant for.
- Position the grinder-doser a minimum of 5 cm from walls so as to allow good ventilation.
- Keep the grinder-doser away from sinks and jets of water.
- Never leave the grinder-doser unguarded when switched on.
- This grinder-doser is not to be used by people with limited mental or physical abilities or by children less than aged 8, or by people lacking in the appropriate knowledge or experience, unless properly supervised by someone responsible for their safety.
- Children must be supervised to make sure they don't play with the appliance.
- Cleaning and maintenance must not be done by children without supervision.
- Never switch on the grinder-doser if it seems to be faulty.
- Use only original accessories and parts.
-
To avoid the danger of fire, never cover the grinder-doser.
-
If the power cable is damaged, it must be replaced by the manufacturer, its technical department or a person with similar experience in order to avoid any risk.
- Unplug the grinder-doser from the mains when not in use for a long period.
- Let the grinder-doser cool down before moving it.
- In the interest of safety, the grinder-doser must always be considered connected and live.
- Take care, as the grinding blades may continue rotating for a short while even after the grinder-doser is switched off.
- Do not let liquids of any kind come into contact with the internal or external parts of the grinder-doser.
- Never put ground coffee in the hopper intended only for coffee beans.
- Do not tamper with the grinder-doser.
- Do not touch the grinder-doser with damp or wet hands or feet.
- The hopper must be fastened to the grinder-dosers grinding system by means of the relevant screw which must be inserted in the threaded hole located on the upper grinding blade holder and in the hole on the neck of the hopper.
- Make sure that the coffee outlet is free from any obstruction otherwise the appliance will stop.
- The manufacturer cannot be held responsible for bodily injury or damage to property if these regulations are not complied with.
- Operating temperature: -10°C + 60°C Storage temperature: -40°C + 70°C
- USA & CANADA - duty cycle: 25s "ON" | 60s "OFF"
If the grinder-doser is to remain inactive for a long period, clean it carefully, wash and dry the hopper and leave it open.
ATTENTION: Moving parts.
DE - WARNUNGEN
INTRODUZIONE
F4E V2
Tasti di selezione
Fig. A
LA DIRETTIVA 2002/96EC (RAEE): INFORMAZIONI AGLI UTENTI
Declaration of EC conformity
The company Fiorenzato M.C S.r.l, Via Rivale, 18 - 30036 Santa Maria di Sala (VE) Italy, declares that the coffee grinder-dosers and its produces comply with the essential requirements of the following EC directives:
Low voltage directive 2006/95/EC
Machine directive 2006/42/EC
EMC directive 2004/108/EC
The coffee grinder-dosers: F4A, F4E V2 have been tested in compliance with the standards EN60335-1 (Household and similar electrical appliances - Safety) and EN60335-2-75 (Part II: Particular requirements for commercial electric kitchen machines).
Fiorenzato M.C.
C.E.O.
Christian Oddera

INTRODUCTION
Making coffee is an art. Precise rules need to be followed in order to succeed. The formula for a perfect cup of expresso coffee involves various steps and the coffee machine plays a very important role. For a successful result and unquestionable quality, it is necessary to correctly combine three factors:
• A high-quality blend.
- The appropriate use of available appliances.
- The skill and professionalism of the person who makes it. Contrary to belief, to enjoy a good cup of coffee, it is not enough to choose the right blend.
The operator's experience and skills in following the right procedures for making a coffee and the use of suitable appliances strongly influence the creation of a small masterpiece. Therefore, professionals place crucial importance on the espresso machine and grinder-doser. Knowing how to use these appliances well, maintaining them in perfect working order and using them at their best, is a skill belonging to professional coffee makers. The quality of a good espresso coffee comes from a series of operations, including grinding which plays an important role. Therefore, for the operator, the grinder-doser is one of the fundamental appliances, whose structure must meet certain characteristics of sturdiness, resistance and functionality.
DIMENSIONS
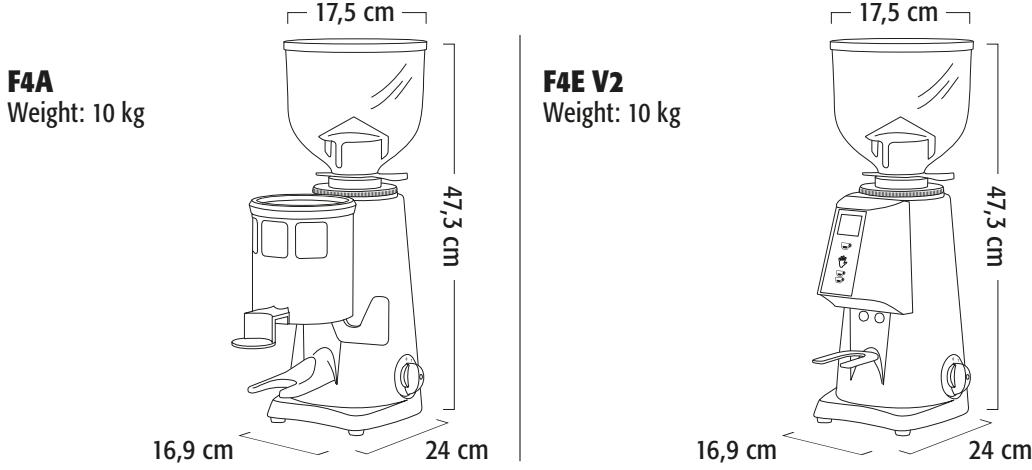
PACKAGING
On opening the packaging, check carefully to make sure the grinder-doser is intact and that there are no signs of damage. If in any doubt, do not use the appliance and contact personnel with the appropriate professional skills. Packaging materials must be kept out of the reach of children, as they are a potential source of danger. Keep the packaging until the warranty has expired.
DISPOSAL
Do not, dispose of the packaging materials in any way other than according to the laws in force. If you decide not to use the grinder-doser anymore, remember to unplug it so it cannot be used, and then cut the cable at the point where it comes out of the grinder-doser. Contact specialized firms for information on the disposal of the grinder-doser components.
GENERAL DESCRIPTION
F4A
Hopper cover
Hopper (coffee bean container)
Locking slide
Coffee grinding adjustment disk
Doser cover
Doser
Coffee pressing device
Filter holder fork
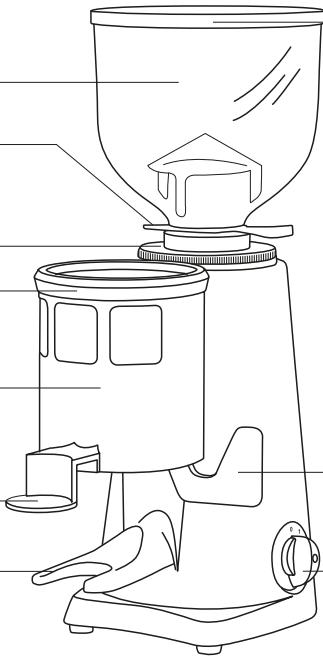
Dosing level
On/Off switch
F4E V2
Hopper cover
Hopper (coffee bean container)
Locking slide
Coffee grinding adjustment disk
Display
Single dose
Grinding
Double dose
Filter holder fork
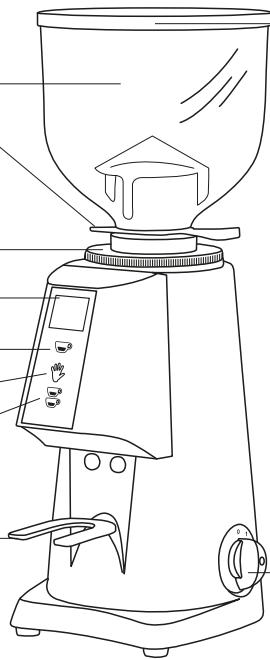
On/Off switch
USE
This grinder-doser has been designed solely for grinding coffee beans. Any other use must be understood as improper, and consequently hazardous. The manufacturer cannot be held responsible for any damage as a result of improper or incorrect use. Do not use the grinder-doser for grinding other types of food, or anything else. The grinder-dosers and coffee grinders manufactured by our company are intended for skilled personnel for professional use only, not for household use.
WARNINGS FOR INSTALLATION AND ELECTRICAL CONNECTIONS
The grinder-doser must be installed by skilled technical personnel in compliance with the safety regulations in force. Incorrect installation may result in injury to people, animals or things, for which the manufacturer cannot be held responsible.
- The grinder-doser must be placed on a stable, flat surface.
- Before plugging in the grinder-doser, make sure the voltage and frequency values of the supply mains correspond to the ratings indicated on the label featuring the grinder-doser technical data.
- The wall socket must be fitted with an efficient earth contact. Consequently, it is essential to make sure the earth system is efficient and in conformity with current safety regulations. If in any doubt, have the system thoroughly checked by personnel with the appropriate professional skills.
- It is compulsory to earth the grinder-doser. The manufacturer cannot be held responsible in the event of non-observance of this regulation.
- It is essential to make sure the ratings of the system are suitable for the power absorbed by the grinder-doser (as indicated on the label featuring the technical data) and that the wall socket is protected against over currents.
- Do not use extension cables, plug adapters for multiple sockets or makeshift connections.
- The motor must rotate clockwise. If the rotation of three-phase motors is to be inverted,
by inverting the two power supply wires inside the plug, this must be carried out by skilled personnel.
OPERATING THE GRINDER-DOSER Preliminaries
Make sure the hopper is positioned correctly on the coffee grinder-doser and is fastened to the upper grinding blade holder by means of the relevant screw. Close the locking slide and fill the hopper with coffee beans. Open the locking slide so that the beans are allowed to drop into the grinding system.

Switching on and off
On: set the switch to 1.
Off: set the switch to 0.
ADJUSTING GRINDING
In order to achieve finer or coarser grinding and therefore vary the granulometry, use the adjustment disk located under the hopper. To increase the coarseness of the ground coffee, the adjustment disk must be rotated clockwise, pressing the adjustment disk lock downwards, to decrease turn the disk anticlockwise. The adjustment must be performed with the motor on, and possibly without coffee between the grinding blades.
It is advisable to grind small amounts of coffee to facilitate a visual check of optimum granulometry and, if required, adjust the grinding adjustment disk. If the coffee comes out of the espresso coffee machine very quickly, it means

that the coffee is ground too coarse. Vice versa, if it comes out too slowly, it means the coffee is ground too fine. Nonetheless, bear in mind that there are many conditions liable to influence the correct supply, such as the weight of the portions, the compacting, the espresso machine settings and the cleaning of the filters.
F4A
COFFEE DOSE ADJUSTMENT AND OPERATING THE GRINDER-DOSER
In order to adjust the size of the portion dispensed, the small knob located in the centre of the ground coffee storage container must be turned while holding still the star shaped dosing unit. By turning the small knob anti-clockwise, the portion is reduced. Turning it clockwise results in an increase. In order to collect the portions of ground coffee dispensed, insert the coffee machine's filter holder all the way onto the fork-shaped support under the ground coffee outlet. In order to release a portion of ground coffee, the doser lever must be pulled all the way (never only partly) and allowed to return on its own. Pull twice in a row for a double portion.
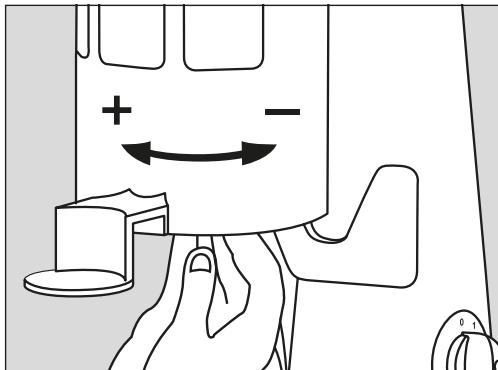
PRESSING Fixed device
To press the ground coffee in the filter holder, push the latter upwards against the pressing device.

F4E V2
Selection buttons
The control panel has three buttons:
: Single dose.
💡 : Continuous manual grinding.
: Double dose.
Display
When the grinder-doser is switched on, the display shows, on the left, the time, the number of coffees made throughout the day (Today), during the current week (Week) and the Total. On the right, it shows the date.
10:30
1Oct2018
Fiorenzato
Today: 76
Week: 355
Tot.: 1571
OPERATING THE GRINDER-DOSER
Access the settings menu, select Grinding Mode and then Direct. Press the required dose by using the button 📋 or 🌐. When the button 🔒 is pressed, continuous grinding is activated until the button is released. In this way, the start microswitch is deactivated and the buttons light up.
- During the grinding process, the time is displayed in seconds and tenths of a second.
- The button for the selected dose flashes during dispensing.
• After dispensing, the counters are updated. - For counting purposes, continuous grinding corresponds to a single dose.
USER MENU
To access the user menu, keep the 📋 button pressed until an intermittent sound starts (about 5 secs.). Three yellow buttons will light up. Use the buttons 📋 and 📋 to move through the menu and change the setting. Use the button 🔊 to select and confirm. Exit the menu after confirming by pressing the button 🔊.
- Language
English, Italiano, Español, Français, Deutsch, Português, Chinese, Russian, Korean, Malaysian, Thai, Greek.
- Time
Set time.
- Time Layout
12 or 24 hours.
- Date
Set date.
- Brightness
Percentage.
- Information
Firmware version and Serial Number.
SETTINGS MENU
To access the user menu, keep the 📄 button pressed until an intermittent sound starts (about 5 secs.). Three yellow buttons will light up. Use the buttons 🎋 and 🌐 to move through the menu and change the setting. Use the button 🔊 to select and confirm. Exit the menu after confirming by pressing the button 🔊.
- Grinding Time
Single and double grinding secs.
- Mills Replacement
Hours.
- Mills Reset
Reset mills timer.
- Factory Reset
Restore factory settings.
- Statistics
Show statistics.
- Manual Grinding
Activate manual grinding 🎨 button.
COFFEE DOSE ADJUSTMENT
Access the settings menu, select Grinding Time. Then select the seconds for single grinding option and confirm. Adjust the seconds for the double grinding option and confirm again.
MILLS REPLACEMENT
When the grinding mills need to be replaced, a warning appears on the display. The state of wear can be monitored by accessing the settings menu and selecting Mills Replacement.
Important: After replacing the grinding mills, the replacement timer needs to be reset. To do this, access the settings menu, select Mills Reset and confirm the reset.
SAFETY DEVICES
Thermal overload protection
The grinder-doser motor is protected against overheating resulting from overcurrents by a thermal overload protection which, when tripped, cuts off the power supply to the motor. If the thermal protection device should automatically turn on in the event of anomalous operation (such as the grinding blades jamming), turn off grinder-doser using the On-Off switch, unplug it from the mains, and contact skilled technical personnel. Never perform any work on the grinder-doser while it is attached to the mains, in order to prevent the motor from turning on suddenly. If the grinder-doser overheats as a result of the motor stopping, allow the grinder-doser to cool down before performing any repair work.
Coffee outlet guard
The coffee outlet guard must always be fixed to the doser unit using the relevant screws, which must never be removed by the user. The removal of the coffee outlet guard can be done by skilled technical personnel only after disconnecting the grinder-doser from the power supply by unplugging. Before reconnecting the grinder-doser to the power supply, replace the safety device.
NOISE LEVEL
EEC Countries - The maximum noise emission of our coffee grinders and grinders/dosers
measured in UNI EN ISO 3741 reverberating chamber in compliance with the EN 60704-1 regulations, is compliant with the EN 60704-1 : 1998 and EN 607043 : 1996 regulations. The equivalent level of noise exposure of a worker, exclusively related to limit of 240 min. per eight hours of use of the appliance, is equal to 78 dB(A), in compliance with ED 86/188/EEC and ED 200311 0/EEC. Therefore, when operating the appliance, no provisions need to be taken in order to prevent such risks arising from noise exposure in the workplace (articles 3-8 of ED 2003/10/EEC).
MAINTENANCE
It is essential to periodically check the state of the supply cable and plug. In the event the supply cable or plug are damaged, call in skilled technical personnel to replace them, in order to prevent any risk. In CE-certified appliances a special tool is required to open the base plate to access the cable. We recommend using original spare parts only. In order to assure the lasting efficiency of the appliance, skilled technical personnel must be called in to perform periodical maintenance, including detailed checks of the state of those components subject to wear. The state of the grinding blades must be checked periodically. Keeping the grinding blades in an excellent state assures high-quality grinding, resulting in greater productivity and limited overheating.
CLEANING THE APPLIANCE
Disconnect the power supply from the grinder-doser by unplugging it before cleaning. The appliance must not be cleaned using water jets. Do not install the grinder-doser in rooms where water jets are used for cleaning. The grinder-doser must be cleaned periodically by skilled technical personnel only. Use perfectly clean, disinfected cloths or brushes for cleaning. Do not use abrasive products as these are liable to take the sheen off shiny parts.
Hopper
Wash the hopper once it has been removed from the appliance (unscrewing the relevant fastening screw), using neutral soap and water, rinse abundantly with lukewarm water and dry thoroughly. It is advisable to clean the hopper periodically. Once the hopper has been cleaned, it must be attached to the upper grinding blade holder using the relevant screw.
Grinding system
Remove the safety screw which prevents the adjustment disk from being removed. Unscrew the adjustment disk by turning it clockwise. Having removed the upper grinding blade holder, clean the grinding blades, the threads and the entire grinding system thoroughly using a clean brush and cloth. Having refitted the upper grinding blade holder in the relevant slot, screw the adjustment disk back on, and after refitting and securing the hopper adjust the grinding as required.
DIRECTIVE 2002/96EC (RAEE): INFORMATION FOR USERS
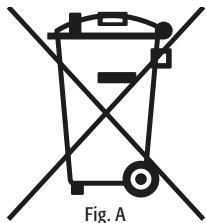
This information is addressed only to the owners of appliances bearing the symbol (Fig. A) on the adhesive label with the technical data applied to the product (serial number label): This symbol means that, according to the current regulations, this is an electrical or electronic unit and complies with EU Directive 2002/96/EC (RAEE). Therefore, at the end of its life, it must be disposed of separately from domestic waste, by delivering it free of charge to a recycling centre for electrical and electronic appliances, or by returning it to the retailer when you purchase a similar unit. The user is responsible for delivering the unit, at the end of its life, to the appropriate recycling centre otherwise he/she will incur the penalties pro-
vided for by the waste regulations in force at the time. The recycling centre will then decide whether the unit has to be recycled, treated or disposed of in an environmentally friendly manner, limiting its effect on the environment and public health. For more detailed information regarding available recycling centres, contact your local waste department or the store where the unit was purchased. Manufacturers and importers comply with their responsibility for the recycling, treatment or disposal both directly or by taking part in a collective system.
Fiorenzato
EINLEITUNG
Schalter
VERWENDUNG
F4E V2
Auswahltasten
Abb. A
DIE RICHTLINIE 2002/96/EG (RAEE): INFORMATIONEN FÜR DIE BENUTZER
Directiva CEM 2004/108/CE
INTRODUCCIÓN
Interruptor
USO
F4E V2
Fig. A
INTRODUCTION
PRESSAGE Pressoir fixe
F4E V2
REPLACEMENT DES MEULES
Fig. A
LA DIRECTIVE 2002/96EC (RAEE): INFORMATIONS POUR LES UTILISATEUR





- DEUTSCH....25
- DE - WARNUNGEN
- INTRODUZIONE
- F4E V2
- TASTI DI SELEZIONE
- INTRODUCTION
- PACKAGING
- DISPOSAL
- GENERAL DESCRIPTION
- F4A
- USE
- WARNINGS FOR INSTALLATION AND ELECTRICAL CONNECTIONS
- OPERATING THE GRINDER-DOSER PRELIMINARIES
- SWITCHING ON AND OFF
- ADJUSTING GRINDING
- COFFEE DOSE ADJUSTMENT AND OPERATING THE GRINDER-DOSER
- PRESSING FIXED DEVICE
- SELECTION BUTTONS
- DISPLAY
- OPERATING THE GRINDER-DOSER
- USER MENU
- SETTINGS MENU
- COFFEE DOSE ADJUSTMENT
- MILLS REPLACEMENT
- SAFETY DEVICES
- THERMAL OVERLOAD PROTECTION
- COFFEE OUTLET GUARD
- NOISE LEVEL
- MAINTENANCE
- CLEANING THE APPLIANCE
- HOPPER
- GRINDING SYSTEM
- FIORENZATO
- EINLEITUNG
- VERWENDUNG
- AUSWAHLTASTEN
- DIE RICHTLINIE 2002/96/EG (RAEE): INFORMATIONEN FÜR DIE BENUTZER
- INTRODUCCIÓN
- USO
- PRESSAGE PRESSOIR FIXE
- REPLACEMENT DES MEULES
Brand : Fiorenzato
Model : F4A F4E
Category : Coffee maker