
SA-SPC5 - Loudspeaker SONY - Free user manual and instructions
Find the device manual for free SA-SPC5 SONY in PDF.



| Product Type | Loudspeaker |
| Brand | Sony |
| Model | SA-SPC5 |
| Speaker Type | Bookshelf / Standmount |
| Color | Black |
| Dimensions (W x H x D) | 200 x 300 x 250 mm |
| Weight | 4.5 kg per speaker |
| Power Handling (RMS) | 100 W |
| Impedance | 8 ohms |
| Sensitivity | 88 dB (1W/1m) |
| Frequency Response | 50 Hz - 20 kHz |
| Driver Configuration | 1 x 5.25" woofer, 1 x 1" tweeter |
| Enclosure Type | Bass reflex (ported) |
| Connectivity | Binding posts (banana plugs compatible) |
| Recommended Amplifier Power | 20 - 150 W per channel |
| Placement | Bookshelf or dedicated stands |
| Cleaning | Wipe with a soft, dry cloth |
| Safety Precautions | Place on stable surface; avoid moisture and direct sunlight |
| Spare Parts / Repairability | Drivers and crossover may be replaceable by qualified technician |
Frequently Asked Questions - SA-SPC5 SONY
User questions about SA-SPC5 SONY
0 question about this device. Answer the ones you know or ask your own.
Ask a new question about this device
Download the instructions for your Loudspeaker in PDF format for free! Find your manual SA-SPC5 - SONY and take your electronic device back in hand. On this page are published all the documents necessary for the use of your device. SA-SPC5 by SONY.
USER MANUAL SA-SPC5 SONY
Active Monitor Speaker System
Operating Instructions
SA-SPC5
© 1997 by Sony Corporation
WARNING
To prevent fire or shock hazard, do not expose the unit to rain or moisture.
For the customers in the U.S.A.


This symbol is intended to alert the user to the presence of uninsulated "dangerous voltage" within the product's enclosure that may be of sufficient magnitude to constitute a risk of electric shock to persons.

This symbol is intended to alert the user to the presence of important operating and maintenance (servicing) instructions in the literature accompanying the appliance.
Owner's Record
The model number and serial numbers are located at the rear. Record these numbers in the spaces provided below. Refer to these numbers whenever you call upon your Sony dealer regarding this product.
Model No. SA-SPC5
Serial No. ____
CAUTION
You are cautioned that any changes or modifications not expressly approved in this manual could void your authority to operate this equipment.
CAUTION
Use of this appliance with some systems may present a shock or fire hazard. Do not use with any units which have the following marking located near output. WARNING: HAZARDOUS ENERGY!
Note to CATV system installer:
This reminder is provided to call CATV system installer's attention to Article 820-40 of the NEC that provides guidelines for proper grounding and, in particular, specifies that the cable ground shall be connected to the grounding system of the building, as close to the point of cable entry as practical.
For detailed safety precautions, see the leaflet "IMPORTANT SAFEGUARDS" included with this manual in the vinly bag.
IMPORTANT
If the plug supplied is not suitable for the socket outlets in your home, it should be cut off and an appropriate plug fitted in accordance with the following instructions.
The wires in this mains lead are coloured in accordance with the following code:
Blue: Neutral
Brown: Live
As the colours of the wires in the mains lead of this apparatus may not correspond with the coloured markings identifying the terminals in your plug, proceed as follows: the wire which is coloured blue must be connected to the terminal which is marked with the letter N or coloured black. The wire which is coloured brown must be connected to the terminal which is marked with the letter L or coloured red. Do not connect either wire to the earth terminal in the plug which is marked by the letter E or by the safety earth symbol 1/2 or coloured green or green-and-yellow.
WARNING
To prevent shock hazard, do no insert the plug cut off from the mains lead into a socket outlet. This plug cannot be used and should be destroyed.
Welcome!
Thank you for purchasing the Sony Active Monitor Speaker System. Before operating this system, please read this manual thoroughly and retain it for future reference.
TABLE OF CONTENTS
Getting Started
Unpacking 4
Installation 4
Hooking Up the System 5
Basic Operations
Names and Functions of Parts 6
Additional Information
Precautions 7
Troubleshooting 7
Specifications back cover
Unpacking
Check that you received the following items:
• Main speakers (L.ch/Rch)
- Super woofer
• Audio connecting cords (3)
Installation
- Do not install the system near heat sources such as radiators or air ducts, or in a place subject to direct sunlight, excessive dust, mechanical vibration or shock.
- Good ventilation is essential to prevent internal heat buildup in the main speakers and super woofer. Place the speakers in a location with adequate air circulation. Do not place the speakers on a soft surface or too close to a wall.
- To obtain a better bass reproduction, we recommend that you install the super woofer on a solid floor where resonance is unlikely to occur.
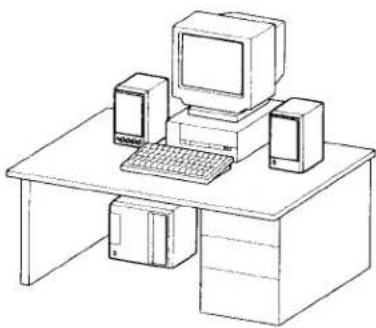
Notes
• Always install the system vertically, keeping a few centimeters away from the wall.
- Do not place an object on the system or sit on it.
- If the super woofer is installed in the center of a room, the bass could be extremely weakened. This is due to the influence of the standing wave of the room. If this happenes, move the super woofer away from the center of a room.
Hooking Up the System
Before you get started
- Turn off the power of the unit (pre-amplifier, personal computer, MIDI sound source) main speakers to be connected and the super woofer before making any connection.
- Use the supplied connecting cords. If the cords are not enough or suitable to make the necessary connections, you need to purchase some optional audio connecting cords.
- Be sure to make connections firmly to avoid noise.
Turning the system on
SA-SPC5's system power switch is on the right main speaker.
1 Turn the super woofer power switch on.
2 Turn the right main speaker switch on.
You can leave the super woofer power switch on and turn the entire system on or off by using the right main speaker power switch.
Connecting the system

Connecting to the source equipment (e.g., personal computer, CD player, MIDI UNIT, etc.)
![graph LR A["ght main speaker (rear)"] --> B["Connecting cord (supplied)"] C["Super woofer (rear)"] --> D["Connecting cord (supplied)"] E["Left main speaker (rear)"] --> F["to an audio output jack (stereo mini jack) (supplied)"] F --> G["to INPUT 1 or INPUT 2"] G --> H["Personal computer"] I["CD play…](/content/2026/07/1508632/images/cd2ae3c2614337d15f3b1c6caf545f8d590dc06e06212e0bd56576c88384138f.jpg)
Power requirement

Note
Never connect the AC power cord of left speaker and woofer to a wall outlet.
Basic Operations
Names and Functions of Parts
Left main speaker (front)

Right main speaker (front)

Super woofer (front)

1 PHONES jack
2 LOW-BOOST knob
Turn to the right to increase the level of the bass. (Increasing the level of the bass when listening at high volumes may cause the sound to distort.)
3 HI-BOOST knob
Turn to the right to increase the level of the treble.
4 VOLUME 1 and VOLUME 2 knobs
Turn the VOLUME 1 or VOLUME 2 knob to the right to increase the volume of the source connected to the respective input. If nothing is connected to one of the input terminals, set the respective knob to the "0" position. These knobs can also be used to adjust the mix balance of sound sources connected to INPUT 1 and INPUT 2.
5 POWER switch (right speaker)
Turn the power of the main speaker ON/OFF. Indicator lights when the POWER switch is set to the ON position. (Before turning the power ON, be sure the VOLUME 1 and VOLUME 2 knobs are set to the "0" position.)
6 POWER switch (super woofer)
Turn the power of the super woofer ON/OFF. Indicator lights when the POWER switch is set to the ON position. (Before turning the power ON, be sure the VOLUME 1 and VOLUME 2 knobs are set to the "0" position.)
7 HI-CUT knob
Turn the HI-CUT control, depending on the reproduction frequencies of the speakers.
8 LOW-BOOST knob
Turn to the right to increase the level of the bass. (Increasing the level of the bass when listening at high volumes may cause the sound to distort.)
9 LEVEL knob
Turn to the right to increase the volume.
Precautions
On safety
- Before operating the system, be sure that the operating voltage of your system is identical with that of your local power supply.
- Unplug the left speaker from the wall outlet if it is not to be used for an extended period of time. To disconnect the cord, pull the cord by grasping the plug. Never pull the cord itself.
- Should any liquid or solid object fall into the system, unplug the system and have the system checked by qualified personnel before operating it any further.
- AC power cord must be changed only at the qualified service shop.
When turning on or off an amplifier or other equipment
Lower the volume of the amplifier to minimum.
To avoid damaging the system
- Be careful in setting the volume control of the left speaker and woofer to avoid an excessive input power.
- Do not attempt to open the enclosuer or remold speaker units and amplifier.
In case color irregularity is observed on the nearby TV screen
With the magnetically shielded type of the speaker system, the speakers can be installed near a TV set. However, color irregularity may still be observed on the TV screen depending on the type of your TV set.
If color irregularity is observed...
→Turn off the TV set once, then turn it on after 15 to 30 minutes.
If color irregularity is observed again...
→Place the speakers further apart from the TV set.
On cleaning the cabinet
Clean the cabinet with a soft cloth lightly moistened with water. Do not use any type of abrasive pad, scouring powder or solvent such as alcohol or benzine.
If you have any questions or problems concerning your system that is not covered in this manual, please consult your nearest Sony dealer.
Troubleshooting
If you experience any of the following difficulties while using the system, use this troubleshooting guide to help you remedy the problem. Should any problem persist, consult your nearest Sony dealer.
There's no sound.
→ Check that this system and components are connected correctly and securely.
→ Rotate LEVEL clockwise to turn the volume up.
The sound has suddenly stopped.
→ The speaker cords may have short-circuited. Connect the cords properly.
The sound is distorted.
→ The input signal is imperfect.
→ The input signal level is too high.
Severe hum or noise is heard.
→ The contacts between the plugs of the connecting cords and the corresponding jacks have not been made properly. Connect the plugs firmly.
→ The audio system is picking up some noise from a TV set. Move the audio system away from the TV set or turn the TV set off.
Specifications
For the U.S.A. model
Main Speaker
AUDIO POWER SPECIFICATIONS POWER OUTPUT AND TOTAL HARMONIC DISTORTION:
With 4 ohm lord driven, from 100 Hz - 20 kHz; rated 15 watts minimum RMS power, with more than 9 % total harmonic distortion from 250 mW to the rated output.
Amplifier Section
| Power output | 15 W + 15 W (4 ohms at 100 Hz - 20 kHz,9 % THD) |
| Input sensitivity/Impedance |
| -10 db, 10 kilohms |
| Tone control | Low-Boost: 0 - +6 db at 80 HzHi-Boost: 0 - +6 db at 15 kHz |
Speaker Section
| Type | Bass reflex type |
| Speaker unit | 10 cm cone type |
| Frequency range | 70 Hz - 20 kHz |
General
| Power requirement | 120 V/60 Hz |
| Power consumption | Left: 17 W |
| Right: 17 W |
| Dimensions | Left: Approx. 132 × 210 × 245 mm(w/h/d) ( 51/4 × 83/8 × 93/4 inches)Right: Approx. 132 × 210 × 245 mm(w/h/d) ( 51/4 × 83/8 × 93/4 inches) |
| Mass | Left: Approx. 3.4 kg (7 lb 8 oz) |
| Right: Approx. 3.3 kg (7 lb 4 oz) |
| -Supplied accessories Audio connecting cord |
| 1 phono plug - 1 phono plug monaural (1.5 m) × 1 |
| 1 phono plug - 1 phono plug monaural (2 m) × 1 |
| 2 phono plug - 1 mini plug stereo (1.5 m) × 1 |
Super Woofer
AUDIO POWER SPECIFICATIONS POWER OUTPUT AND TOTAL HARMONIC DISTORTION: With 2 ohm lord driven, from 50Hz - 250Hz ; rated 27 watts minimum RMS power, with more than 9% total harmonic distortion from 250mW to the rated output.
Amplifier Section
| Power output | 27 W (2 ohms at 50 Hz - 250 Hz,9 % THD) |
| Input sensitivity/Impedance |
| -10 db, 10 kilohms |
| Tone control | Low-Boost: 0 - +6 db at 50 Hz |
| Frequency adjust range of High cut-off |
| 80 Hz - 250 Hz |
Speaker Section
| Type | Bass reflex type |
| Speaker unit | 13 cm cone type |
| Frequency range | 50 Hz - 250 Hz |
General
| Power requirement 120 V/60 Hz |
Power consumption 28 W
| Dimensions | Approx. 267 × 210 × 294 mm (w/h/d) (105/s × 83/s × 115/s inches) |
| Mass | Approx. 6.6 kg (14 lb 9 oz) |
| Design and specifications are subject to change without notice. |

- ACTIVE MONITOR SPEAKER SYSTEM
- WARNING
- OWNER'S RECORD
- CAUTION
- NOTE TO CATV SYSTEM INSTALLER
- IMPORTANT
- WELCOME
- TABLE OF CONTENTS
- GETTING STARTED
- BASIC OPERATIONS
- ADDITIONAL INFORMATION
- UNPACKING
- INSTALLATION
- NOTES
- HOOKING UP THE SYSTEM
- BEFORE YOU GET STARTED
- TURNING THE SYSTEM ON
- NOTE
- NAMES AND FUNCTIONS OF PARTS
- PHONES JACK
- LOW-BOOST KNOB
- HI-BOOST KNOB
- VOLUME 1 AND VOLUME 2 KNOBS
- POWER SWITCH (RIGHT SPEAKER)
- POWER SWITCH (SUPER WOOFER)
- HI-CUT KNOB
- LEVEL KNOB
- PRECAUTIONS
- ON SAFETY
- TO AVOID DAMAGING THE SYSTEM
- IF COLOR IRREGULARITY IS OBSERVED
- ON CLEANING THE CABINET
- TROUBLESHOOTING
- THERE'S NO SOUND
- THE SOUND HAS SUDDENLY STOPPED
- THE SOUND IS DISTORTED
- SEVERE HUM OR NOISE IS HEARD
- SPECIFICATIONS
- MAIN SPEAKER
- SUPER WOOFER
Brand : SONY
Model : SA-SPC5
Category : Loudspeaker