
GV65260AU - Dishwasher GORENJE - Free user manual and instructions
Find the device manual for free GV65260AU GORENJE in PDF.
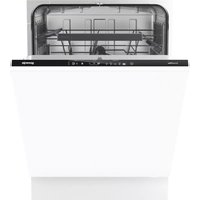


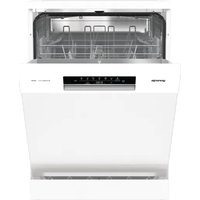
| Product Type | Built-in Dishwasher |
| Brand | Gorenje |
| Model | GV65260AU |
| Category | Dishwasher |
| Height (mm) | 820 - 870 |
| Width (mm) | 600 |
| Depth (mm) | 550 - 570 |
| Weight (kg) | 45 |
| Power Supply | 220-240 V, 50 Hz, 10 A |
| Energy Class | A+++ |
| Water Consumption (L/cycle) | 9.5 |
| Noise Level (dB) | 46 |
| Capacity (Place Settings) | 14 |
| Number of Programs | 6 |
| Programs | Auto, Eco, Intensive, Normal, Quick, Rinse |
| Functions | Delay Start, Half Load, Extra Dry, Self-Clean |
| Safety Features | Child Lock, AquaStop, Overfill Protection |
| Maintenance | Self-Cleaning Filter, Rinse Aid Indicator, Salt Indicator |
| Spare Parts Availability | Authorized service centers and online retailers |
| Repairability Index | 8.0/10 |
| Warranty | 2 years (standard) |
Frequently Asked Questions - GV65260AU GORENJE
User questions about GV65260AU GORENJE
0 question about this device. Answer the ones you know or ask your own.
Ask a new question about this device
Download the instructions for your Dishwasher in PDF format for free! Find your manual GV65260AU - GORENJE and take your electronic device back in hand. On this page are published all the documents necessary for the use of your device. GV65260AU by GORENJE.
USER MANUAL GV65260AU GORENJE
OPERATING INSTRUCTIONS DISHWASHER
gorenje
Contents
Front panel 2.
Safety instructions 3.
Before washing for the first time 4.
Loading the dishwasher 4
Using the dishwasher 6...
Settings 10
Care and cleaning 11
Troubleshooting ....13
Installation 1.6
Service 18
Information for test institute ....18....
Technical information 20.
Front panel

1 Main power switch
2 Auto wash
3 Intensive wash
4 Eco wash
5 Quick wash
6 Rinse
7 SpeedWash
8 Auto open
9 Hygiene
10 Delayed start
11 Display
12 Rinse aid indicator
13 ION
14 Self Cleaning Program
General
- Read the operating instructions and keep in a safe place!
- Never use the dishwasher for any purpose than that specified in these operating instru
- Do not load the dishwasher door or dishw baskets with anything other than dishes.
- Never leave the dishwasher door open as someone may trip on it.
• Use only dishwasher detergent!
• This appliance is not intended for use by Winters storage/transport
(including children) with reduced physical, sensoStore the dishwasher where the temperature remain or mental capabilities, or lack of experience above freezing. and knowledge, unless they have been given Avoid long transport distances in very cold weather supervision or instruction concerning use of the Transport the dishwasher upright or laying on its appliance by a person responsible for their safety.
- If the supply cord is damaged, it must by a special cord or assembly available manufacturer or its service agent.
- Damaged mains cables must only be replaced by a qualified electrician.
- Only use the dishwasher in domestic house environments for dishwashing household dishes. All other use is prohibited.
- Never place dishes with solvent residues in dishwasher due to the risk of explosion. I dishes that contain ash, wax or lubricants washed in the dishwasher.

WARNING!
Knives and other pointed items must be p with the points down in the cutlery basket zontally in other baskets.
Installation
See the chapter Installation.
Child safety
• Always start the dishwasher immediately after adding detergent.
- Keep children away from the dishwasher who the door is open. Some detergent may remain inside!
- Do not allow children to use or play with the dishwasher. Be especially vigilant when the door is open.

WARNING!
Dishwasher detergents are strongly alkaline. The can be extremely dangerous if swallowed. Avo other contact with skin and eyes and keep children ctons from the dishwasher when the door is open. a verbal attention if swallowed.
Check that the detergent compartment is empty after completion of the wash cycle.
Winters storage/transport
nsoStore the dishwasher where the temperature remain above freezing.
ven Avoid long transport distances in very cold weather • the Transport the dishwasher upright or laying on its
safety Overflow guard function
The overflow protection starts pumping out the machir from times off the water supply if the water level in washer exceeds the normal level. If the overflow pro is triggered, turn off the water supply and call the department.
Racking material
The packaging protects the product during transport. Packaging material is recyclable. Separate the different packaging materials to help reduce raw material use waste. Your dealer can take the packaging for recycle direct you to the nearest recycling centre. The packa is comprised of:
- Corrugated cardboard made from up to 100% recy material.
- Expanded polystyrene (EPS) with no added chlorine-acided fluorine.
or Supports made from untreated wood.
• Protective plastic made from polyethylene (PE).
Disposal
- When the dishwasher has reached the end of its life and is to be disposed of, it should immediat made unusable. Pull out the power cable and cu short as possible.
The dishwasher is manufactured and labelled for recycling.
When contact your local authority for information about \ and how your dishwasher should be correctly recy emain
Checking water hardness
Contact the local water utility to check the water in your area. This is important with regard to heterogeneous and rinse aid to use.
Top up with rinse aid
By using rinse aid you will improve your drying will also achieve a better dishwashing result with and dishes.
1 Open the rinse aid compartment lid.
2 Carefully top up with rinse aid. Only add rinse level marked max.
3 Wipe up any splashes of rinse aid around the ment.
4 Close the lid firmly.
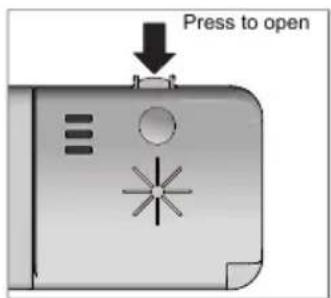
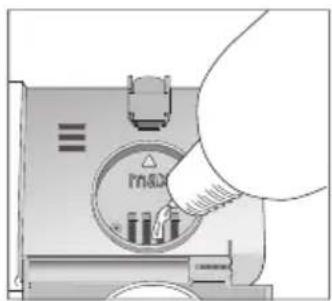

Refill rinse aid indicator
When the rinse aid needs topping up, the above lights on the display.
After topping up, it may take a while before the out.
Setting the rinse aid dosage
The chapter Settings describes how to set the rin dosage. Rinse aid dispensing can be set from 0 (High dose). (Factory settings: 5)
Decrease the rinse aid dosage:
• If the dishes have a sticky white/blue film.
• If the dishes are streaked.
• Build-up of foam. If you have very soft water, aid can be diluted 50:50 with water.
For water with a hardness greater than 10–12 °dH, ought to use rinse aid with citric acid (known as aid).
Energy-efficient dishwashing
hardDess not start the dishwasher until it is fully loaded, much save-energy.
- Do not rinse dishes first under running water. Sir scrape off large food particles before loading them the dishwasher.
result Choose an environment-friendly detergent. Read the glass environmental declaration on the packaging!
- If the dishes are only slightly dirty, you can select program with a low temperature.
- Better drying results are achieved if you use the aid to the open option, which automatically opens the dish was door at the end of the programme. (If the dish is part in the surrounding furnishings must be resistant any condensation.)
Fragile dishes
Some cookware is not dishwasher safe. This can be several reasons. Some materials cannot withstand stor heat, others can be damaged by dishwashing deterge
Exercise caution with, for example, handmade items, f decoration, crystal/glassware, silver, copper, tin, aluminium wood and plastic. Look for the "Dishwasher safe" ma
The dishwasher's baskets
The dishwasher is equipped with an upper basket or lower basket with a cutlery basket.
Upper basket
\$ symbol glasses, cups, bowls, side plates and saucers upper basket. All dirty surfaces should face inwards downwards! Place wine glasses on the wine glass sh symbol goes knives in the knife stand on the right (if fitted).


Raising and lowering the upper basket
1 Pull out the upper basket.
2 Grab the sides of the upper basket with both lift it up.
3 Lift the basket repeatedly with both hands in change its position. (The upper basket can be three positions.) When the upper basket is in position, lifting it will return it to its lowest point that both sides of the basket must always be same height (position).

Lower basket
Place plates, side plates, serving dishes, pots and (in the cutlery basket) in the lower basket.

Foldable tines
Fold down the foldable tines (plate supports) when dising pots. Release the foldable tines by pressing the inwards before adjusting their position.

Certlety basket
\$ place in cutlery with the handles facing down, except for \$ aniv hes and spread them out as much as possible. \$ itan. Notes do not stack inside each other. set to the Place the cutlery basket in the lower basket.
Points to consider
• All dirty surfaces should face inwards and downwa
- Dishes should not be placed in or on each other
- Angle dishes with hollows, such as cups, so that rinse water will run off. This is also important for items.
• Make sure small items cannot fall through the dis er basket; place them in the cutlery basket.
NOTE!
Check that the spray arms can rotate freely. cutlery
Add detergent

1 Prewash detergent compartment
2 Main wash detergent compartment
Detergent is added according to water hardness.
Follow the instructions on the detergent packaging.
Too much detergent can result in less effective dishwashing. An effective program for slightly dried leftovers. (This and also entails greater environmental impact. gram is not intended for burnt food, such as on ov
The detergent compartment must be dry when adding detergent. There is one compartment for the prewash and one
for the main wash. If powder or liquid dishwasher detergentive wash
is used, add a small amount of the detergent to program wash very dirty dishes, such as pans, cassero compartment. Contact the detergent manufacturer if yelishes and oven dishes. If these dishes do not con have questions about the detergent. fill the dishwasher, you can add plates and the like
NOTE!
Use only dishwasher detergent! Washing up liquid not be used as the foam that forms prevents their from operating effectively.
PROGRAMS - Choose program
Choose a programme to suit the type of dishes and dirty they are.
Press the desired program until the program symbol up.
auto
45-65° Auto wash
The dishwasher can measure how dirty the dishes a adjust water consumption and temperature accordingly. When newly installed, the program needs to be run times before it is fully adapted and can provide the suits.
auto 45-65° Auto wash + SpeedWash + Auto open
An effective program for slightly dried leftovers. (This washing gram is not intended for burnt food, such as on ov
ng de- and one
detergensive wash
the program wash very dirty dishes, such as pans, cassero dishes and oven dishes. If these dishes do not con fill the dishwasher, you can add plates and the like
eco
must Eco wash
Use when you want to save water and energy. For soiled load, such as plates, serving dishes, cups, gla and so on.
Dishwasher tablets
Halve the tablet if it is difficult to close the dispenser lid.
There is a risk that the detergent will not be released prop- wash
erly if the lid is tight and will not open correctly. This program is used for glasses and porcelain that slightly dirty, such as coffee cups.
NOTE!
Dishwasher tablets are not recommended for short grams (less than 75 minutes). Use powder or liquid washer detergent instead.
1
35° Quick wash
This program is used for glasses and porcelain that slightly dirty, such as coffee cups.
In combination with SpeedWash, a shorter program is achieved (15 minutes).
id...dish-

* ° Rinse
Used to rinse dishes while you wait for the dishwas become fully loaded.
the dish-
EXTRA - Selecting Options
To select an option, press one of the option buttons. The option is showing as activated. The available option vary between programs and some options cannot be bined (available options glow dimly).
3-in-1/All-in-one detergent
If the detergent tablets you use contain rinse aid, washer's rinse aid dosing can be deactivated. See chapter Settings.
Read through the directions for these products caret anything is unclear, contact the detergent manufacture
SpeedWash
splay turns This option shortens the program time, but uses mor gy and water.

Press and hold the main power switch until the on. Also check that the water tap is on.
1) This combination (Auto wash + SpeedWash + Auto open) is also known as Rapid Intensive (90 minutes).

Auto open
The dishwasher door opens automatically at the end of the program, which improves the drying results. (If the dishwasher is built-in, the surrounding fixtures must be resistant to any condensation.)
NOTE!
The dishwasher door must not be blocked when open automatically. This can cause a malfunction door lock.


Hygiene
This option is intended for situations where demand hygiene are especially high, such as when dishwas baby bottles and chopping boards. The temperature higher in both the main wash and the final rinse.
of the
Stopping or changing a program
If you want to change program after starting the dis open the door, then press and hold the main power until the display turns off. Add more detergent if the the detergent dispenser has opened. Then press the power switch, choose a new program, and close the

Delayed start
When you select Delayed start the dishwasher will 24 hours after you close the door.
Do you want to add more dishes?
Open the door. The dishwasher stops automatically. A the dishes and close the door. After a while, the continues the program.
start 1-
If the dishwasher is turned off due power failure
If the diswashing program was not finished, the inte program continues when power is restored.
1 Press the button once to activate Delayed start. the button several times - or hold it in - to sired number of hours.
| 1 hour NOTE! |
2 Close the door and the dishwasher counts down at a time and starts after the selected delay.
During drying, the program is interrupted if the power cut or the door is open for more than 2 minutes.
If you want to cancel the Delayed start option, op and press and hold the main power switch until t turns off.
Starting the dishwasher
Close the door to start the dishwasher. If the main switch is on, the dishwasher will start automatically the door is closed.
TIME - Time remaining
Once you have chosen a program and options, the program took when last used is displayed.
Status light
The status light on the bottom part of the dishwasher indicates that a program has started. Once
Flashing light
This indicates a fault. See further in the chapter bleshooting.
How to get the best drying results
n Fully load the dishwasher.
-whemgle dishes with hollows, such as cups, so that rinse water will run off. This is also important for items.
- Top up with rinse aid or increase the rinse aid time the
- Activate the Auto open option.
- Allow the dishes to cool before unloading the diser.
Once the program has finished
The end of the program is indicated by one short: the buzzer. The chapter Settings describes how to do the settings for this function.
Moreover, the end of the programme is indicated by status light turning off. See Status light in the chap the dishwasher.
The dishwasher switches off automatically after the pro ends. Turn off the water tap after each use.
Drying
For additional drying the door should be opened upon completion of the drying cycle. For more in see page 20 in the chapter Technical information.
Unloading the dishwasher
Hot porcelain is more fragile. Leave the dishes to the dishwasher before unloading them.
Unload the lower basket first to avoid any water the upper basket falling onto the dishes in the
Special programmes

ing programme is run. The fan and ioniser are active intervals for 72 hours. (Do not use this programme finationspaces with insufficient ventilation).
| TIP! |
| If you want to deactivate the ION programme cool in dishwashing programme, open the door then pr hold the main power switch until the display Restart the dishwasher. drops from |
ver_ basket.
Self Cleaning Program (CLn)
Self-cleaning programme for hygienic cleaning of the washer tub, spray arms and spray pipes.
This programme can be run (with no dishes in the using normal dishwasher detergent or citric acid. Spec dishwasher cleaners are also available on the market. the removal of limescale deposits, see The dishwasher in the chapter Care and cleaning.
Press and hold the appropriate option buttons to activate a special programme. The programme starts when the door is closed.
ION
This programme prevents bad odours from dirty dishes left in the dishwasher. Activate the programme until a dishwash-
Program chart
| PROGRAMS- Program | Detergent, compartment 1 / (ml) | Options | Main wash | Prewashes EXTRinses | Rinal rinse | Number of consumption values1) | |||
| Dishwashing time (approx. hrs:min) | Energy (approx. kWh) | Water cons. (L) | |||||||
| 11-200.9-1.52: | |||||||||
| Intensive wash | 10 / 25 | 2 | 70 °C | 2 | 70 °C | 2:55 | 1.7 | 17 | |
| Eco wash2) | --- / 25 | Auto open | 1 | 55 °C | 2 | 53 °C | 2:30 | 0.74 | 12.7 |
| --- / 10Quick wash | 35 °C25 °C1 | 100.20:20 | |||||||
| Rinse | --- / --- | 1 | --- °C | 0:07 | 0.01 | 3 | |||
1) Consumption values vary depending on the temperature of the incoming water, room temperature, load size, selected additional functions and more.
2) The energy label performance figures are based on this program which is recommended for normally soiled load (Auto open).
°C.
Open the Settings menu:


-
First, open the door. Turn off the machine. Press and hold the main power switch lights up.
-
Within 10 seconds:
- press the program button for Auto wash and the option button for SpeedWash.
The display shows the Settings menu (current setting and its currently set value).3.
(Exit the menu by browsing through the menu or pressing the main power switch.)
Navigate the Settings menu:

You can now adjust the following settings:
| OptionsSettings | |||
| Rinse aid dosage setting.1:00 - 1:05Rinse aid1.Increase the rinse aid dosage:If the dishes have water marks.Decrease the rinse aid dosage:If the dishes have a sticky white/blue film.If the dishes are streaked.Build-up of foam. If you have very soft water, rinse aid can be diluted 50:50 with water. | |||
| 4:00 - 4:03Buzzer volume4.The dishwasher uses a buzzer to indicate when a gram is finished or when a fault has occurred. | |||
Coarse filter
The coarse filter traps larger food particles, which get past the drainage pump. Empty the coarse fi necessary.
Spray arms
docket and bearings can sometimes become blocked.
move any debris using a pin or something similar. T arms also have holes on their undersides.

1 Lift the coarse filter by the handle.
2 Empty the coarse filter. Remember to replace
Fine filter
Debris that collects on the fine filter is automatically away during each wash. Clean the fine filter when sary.

1 Turn the handle anticlockwise.
2 Lift the filter straight up using the handle. Free filter to clean the fine filter.
3 Replace in reverse order. Check that the edges properly when replacing the fine filter.
4 Lock the filter in place by turning the handle to the stop position. The handle should point out from the dishwasher.
NOTE!
The dishwasher must not be used without the place!
Diswashing efficiency can be affected if the course is incorrectly fitted. After cleaning ensure that filter is fully locked with the handle pointing out of the er.

To facilitate cleaning, you can remove the spray arm member to fit them firmly back into place after clea
Lower spray arm
• Pull the lower spray arm straight up to release y rinsed

Upper spray arm
1 Pull out the upper basket.
2 Unscrew the spray arm bearings counterclockwise to remove the spray arm from the upper basket. the coarse

filter in
The door and the door seal
Regularly clean the sides of the door and the door a slightly damp cloth (with a little cleaner if necessary handle
dishwash The dishwasher tub
The dishwasher tub is made of stainless steel and clean through normal use.
Limescale deposits
If you have hard water, limescale deposits may build the dishwasher. If this happens, run a self-cleaning gramme with two tablespoons of citric acid in the d
compartment (with no dishes in the machine). See Cleaning Program in the chapter Using the dishwas
Self NOTE!
Do not forget to replace the drainage pump stop.
Front panel
Keep the buttons clean and free from grease. Wipe them
clean with a dry or slightly damp cloth. Never use uncleaners
- they can scratch the surface. Use the main power switch to turn off the dishwasher before cleaning the buttons to avoid activating any buttons unintentionally. If the water supply contains small particles, the outer on the inlet hose may become blocked, which results in water inlet fault.
Unblocking the drainage pump
1 Turn off the machine using the main power switch
If the dishwasher still contains water after the program plug it from the wall socket.
has finished, something may be blocking the drainage pump off the water tap.
Such items are easily removed.
3 Unscrew the inlet hose.
1 Turn off the machine using the main power switch unplug it from the wall socket.
and Carefully remove the outer filter from the inlet ho clean it.
2 Remove the coarse filter and the fine filter.
Replace the filter and check that the gasket is positioned.
3 Scoop out the water from the dishwasher tub.
4 In order to inspect the drainage pump, remove ⑥ coloured stop on the right in the bottom drain.
Screw the inlet hose firmly into place.
5 Turn the pump wheel located behind the drainage stop by hand. Carefully remove any items.
Plug the machine into the wall socket and turn
6 Replace the drainage pump stop along with the fine and coarse filters.
water tap. Allow the pressure to settle for a whi check that the connection is watertight.
7 Plug the machine in again.
If the dishwasher still does not start and a whirring is heard, the overflow protection has been activated.

- Shut off the water.
- Remove the plug from the wall socket.
- Call the service department.

| ActionType of fault on the display | ||
| OverfillingF10 | Clear the drainage pump. See the chapter Care and cleaning. If persists, call the service department. | |
| Water outlet faultF11 | See “Water remains in the dishwasher” in the table “Problem” be persists, call the service department. | |
| Water inlet faultF12 | Check whether dishwasher inlet hose is connected to a pressure (some pressure limiting valves may restrict the supply of water to Check that the water tap is on. If the problem persists, call the | |
| Turn off the water tap and call the service department.Inlet valve | ||
| Call the service department.Water level faultF52 | ||
| Turn off the water tap and call the service department.OverfillingF5 | ||
| Call the service department.Circulation pump faultF56 | ||
Press any button to clear the error message.
| ActionPossible causesProblem | ||
| The buttons do not react when | pressed.after opening the door. | Wait a moment then try again.Y |
| The buttons are dirty. | Clean with a dry or slightly dar | |
| The door is closed. | Open the door. The buttons only to use when the door is open. | |
| Cannot close door. | The baskets are not correctly posted. | Check that the baskets are correa sitioned horizontally. |
| Check that the dishes are not the baskets from sliding properly place. | ||
| The door lock does not click into and lock. | Check the door lock. If it does into place and lock, open the c and hold the button for the Aut option for 15 seconds. Then wait seconds. Close the door. Check door lock clicks into place andCheck.The door is not properly closed. | |
| You have opened the dishwasher more dishes while a program is progress. | Close the door and wait. After a wh the dishwasher continues the program. | |
| The door lock has not clicked and locked. | Check the door lock. If it has not c into place and locked, open the door. Press and hold the button for the A open option for 15 seconds. Then wa 30 seconds. Close the door. Check th the door lock clicks into place and I | |
| Check.A fuse/circuit breaker has been | ||
| socket. | Check.The plug is not plugged into th | |
| Check.The water tap is turned off. | ||
| Check.Overflow/leaks | ||
| A whirring sound (the drainage pump) is heard from the dishwasher and do call the service department. not stop when the main power switch is turned off. | switch is | |
| Check that the Delayed start opt Bress has and hold the main power until the display turns off if you want cancel the Delayed start option. Resta the dishwasher. | ||
| Remove the arms and clean them.The blockin | ||
| Check that the dishes are not the spray arms. | ||
| product. | Avoid large packages.Old detergent. De | |
| Incorrect detergent dosage. | Dose according to water hardness. Far too much or far too little detergent re in poorer dishwashing results. | |
| Choose a longer programme.Unsuitable | ||
| Dishes loaded incorrectly. | Do not cover porcelain with large bov or the like. Avoid placing very tall gl es in the corners of the baskets. | |
| during the program. | Place dishes to sit steady.Glasses and | |
| The filter is not correctly fitted. | Screw the filter firmly into place. See chapter Care and cleaning. | |
| Spots on stainless steel or silver | Some foodstuffs, such as mustard Rinse off these types of foodstuffs if mayonnaise, lemon, vinegar, salt starting the dishwasher immediately dressings, can mark stainless steel Use the Rinse program. for too long. | |
| All stainless steel can cause spots order to avoid marks and tarnishing silver if they come into contact depagate dishes made from different dishwashing. Aluminium can also spots on dishes. | caetals, such as silver, stainless steel and aluminium.See the chapter Settings.Incorrect rinse | |
| Too high temperature and/or too detergent can cause etching on Unfortunately, this cannot be repa only prevented. | Wash crystal at a low temperature ar cristala conservative amount of detergen contact the detergent manufacturer. | |
| Rinse aid dosage setting too high | Rebecedishes anavent.a Stickythewhedlines Before washing for the first time and Settings. If you have very soft water, may want to dilute the rinse aid 50:! with water. | |
| Spots left after washing. | off. | Use a detergent with a bleaching age |
| Detergent residue in the detergent partment after dishwashing. | Theondetergent compartment was when adding detergent. | Thep detergent compartment must be dr when adding detergent. |
| Rattling sound when dishwashing. | The dishes are not correctly placed the spray arms are not rotating. | Check that the dishes are placed secu ly. Spin the spray arms to make sur they can rotate. |
| The sound of a fan is heard even when no dishwashing program is running. | The special programme ION is activated. | See the chapter Using the dishwasher. |
| Water remains in the dishwasher. | The filter is not locked in complete handle pointing towards the door. | Ensure filter is completely locked with |
| Clean the coarse and fine filters.The | ||
| Debris in the drainage pump. | Clean the drainage pump. See the chapter Care and cleaning. | |
| Kink in drainage hose. | Check that the hose is free from kin and sharp bends. | |
| Blocked drainage hose. | Disconnect the drainage hose where it connects to the sink unit's water trap. Check that no debris has fastened ar that the connection has an inner diam ter of at least 14 mm. | |
| Dirt around the seals and in co | ClearBawithodwashing-dishwasher.and low foaming cleaner. | |
| Low temperature programs have selected for a prolonged period. | Ben a program with a higher tempera ture about once a month. | |
| Dirty dishes have been left in washer for some time. | thActivish- the special programme ION. See the chapter Using the dishwasher. | |
| Bad odour outside the dishwasher. | The special programme ION is advativate the special programme ION. in a confined space with insufficient the chapter Using the dishwasher. ventilation. | Activate the chapter Using the dishwasher. |
| The dishes are not dry enough. | The Auto open option is not activated. | Activate the Auto open option. |
| The dishwasher is not fully | Falkledload the dishwasher. | |
| Rinse aid needs topping up or is set too low. | Dosagep with rinse aid or increase th rinse aid dosage. See the sections B fore washing for the first time and S tings. | |
![596 573 196 54 444 720-800* 817-867 1252* [mm] 556 520 670 700 125-175 55 31 107 * Door length Cover door with slide function fitted, which means the cover door slides upwards when the dishwasher is opened. Nominal dimensions. Actual measurements may vary.](/content/2026/07/1501567/images/62027de40d7e9e62788a9612f3993d8852a8669e49c1357821e68e893dd865cc.jpg)
It is important that you read through and follow the idistractions and connections are correct before cor- tions and directions below. Conduct installation and connecencing the installation. Note that the height of t tion in accordance with the separate installation instructionterior panel can be adjusted to match other fitting
Safety instructions
- Connections to electricity, water and drainage performed by a qualified professional.
• Always follow applicable regulations for water, and electricity.
• Take care during installation! Wear protective There must always be two people!
• Before screwing the dishwasher into place, dishwasher by running the Rinse program.
the dishwasher fills with water and drains. that none of the connections leak.

WARNING!
Turn off the water supply when installing the

WARNING!
The plug must be disconnected or power to turned off while the work is carried out!
• Make sure the surface on which the dishwasher installed is firm. Adjust the adjustable feet so that must be dishwasher is level.
- Attach the protective film (packed in the document drainage) the underside of the worktop. The protective fi to protect the worktop from moisture.
gloves! Check that the machine is installed such that the opens freely, otherwise door lock functionality may
test the disrupted.
Check that
Drainage connection
See the separate installation instructions for necessary formation.
This dishwasher is suitable for installing in a raised (to attain an ergonomic working height). This means the dishwasher can be placed so that the drainage runs to a lower level than the bottom of the dishw such as by routing it directly to a floor drain. The is fitted with an integrated anti-siphon device to prev machine from being emptied of water during the wasl the socket
The drainage hose can also be connected to a con nipple on the sink unit's water trap. The connection must have an internal diameter of at least 14 mm.
Setup
- The dimensions and connection information are in the separate installation instructions. Check
The drainage hose may be extended by a maximum included total length of the drainage hose must not exceed them) All Any joins and connecting pipes must have an i
diameter of at least 14 mm. However, the drainage should ideally be replaced with a new hose without
hose NOTE! joins.
Repairs and maintenance must be carried out 950 mm fied professional.
by a
No part of the drainage hose may be more than above the bottom of the dishwasher.
Ensure that the drainage hose has no kinks.
Connection to water supply
Use only the inlet hose supplied with the dishwasher. Do not re-use old or other spare hoses.
The supply pipe must be fitted with a water tap (stopcock). The water tap must be easily accessible, so that the water can be shut off if the dishwasher has to be moved.
Once the installation is complete, turn on the water tap and allow the pressure to settle for a while. Check that all connections are watertight.
Connection to cold water supply
Connect the dishwasher to the cold water supply if the building is heated using oil, electricity or gas.
Connection to hot water supply
Connect the dishwasher to the hot water supply (max. 70°C) if the building is heated using an energy-efficient means such as district heating, solar power or geothermal power. Choosing a hot water connection cuts dishwashing times and reduces the dishwasher's energy consumption.
NOTE!
Do not exceed the permitted water supply temperature. Certain materials used in some cookware cannot withstand strong heat. See Fragile dishes in the chapter Loading the dishwasher.
NOTE!
Connecting a dishwasher to the water supply via certain types of pressure limiting valves may restrict the water supply!
This may cause F12 error code/ Water inlet fault to be displayed.
Electrical connection
Information about the electrical connection can be found on the compliance plate. This specification must match the electricity supply.
The dishwasher must be connected to an earthed wall socket.
The electric wall socket must be placed outside of the installation area to be easily accessible after installing the dish-washer. Do not use an extension cord!
Read the chapter Troubleshooting before contacting the Request test institute information via e-mail service department. If you have encountered a probleishwashers@appliance-development.com.
you cannot resolve, please contact your nearest dealer, see
www.gorenje.com.
When making contact, provide the details on the number plate. Include the article number (1) and number (2).
The request should include the details on the productial number plate. Include the article number (1) and serial number (2).


Information on energy labelling
Energy labelling
AS/NZS 2007 Australian standard:
14Number of place settings:
Eco wash 1 , option Auto openDishwashing programs:
2:30 hours:minutesProgram time:
Cold water 20 °CConnection:
IEC 60704-2-3Test method for noise measurement:
1) This dishwashing program is the standard cleaning cycle used to compile the energy labelling information. It is intended for washing normally dirty dishes and is the most effective program in terms of combined energy and water consumption.
Technical data
817-867 mmHeight:
596 mmWidth:
556 mmDepth:
Weight: 34 kg 1)
0.03–1.0 MPaWater pressure:
See compliance plateElectrical connection:
See compliance plateRated power:
1) Weight can vary due to different specifications.
- OPERATING INSTRUCTIONS DISHWASHER
- CONTENTS
- FRONT PANEL
- GENERAL
- WARNING
- INSTALLATION
- CHILD SAFETY
- WINTERS STORAGE/TRANSPORT
- SAFETY OVERFLOW GUARD FUNCTION
- RACKING MATERIAL
- DISPOSAL
- CHECKING WATER HARDNESS
- TOP UP WITH RINSE AID
- REFILL RINSE AID INDICATOR
- SETTING THE RINSE AID DOSAGE
- DECREASE THE RINSE AID DOSAGE
- ENERGY-EFFICIENT DISHWASHING
- FRAGILE DISHES
- THE DISHWASHER'S BASKETS
- UPPER BASKET
- RAISING AND LOWERING THE UPPER BASKET
- LOWER BASKET
- FOLDABLE TINES
- CERTLETY BASKET
- POINTS TO CONSIDER
- NOTE
- ADD DETERGENT
- PROGRAMS - CHOOSE PROGRAM
- AUTO
- ° AUTO WASH
- ECO
- MUST ECO WASH
- DISHWASHER TABLETS
- ° RINSE
- EXTRA - SELECTING OPTIONS
- IN-1/ALL-IN-ONE DETERGENT
- AUTO OPEN
- HYGIENE
- STOPPING OR CHANGING A PROGRAM
- DELAYED START
- DO YOU WANT TO ADD MORE DISHES
- IF THE DISHWASHER IS TURNED OFF DUE POWER FAILURE
- STARTING THE DISHWASHER
- TIME - TIME REMAINING
- STATUS LIGHT
- FLASHING LIGHT
- HOW TO GET THE BEST DRYING RESULTS
- ONCE THE PROGRAM HAS FINISHED
- DRYING
- UNLOADING THE DISHWASHER
- SELF CLEANING PROGRAM (CLN)
- ION
- OPEN THE SETTINGS MENU
- NAVIGATE THE SETTINGS MENU
- YOU CAN NOW ADJUST THE FOLLOWING SETTINGS
- COARSE FILTER
- SPRAY ARMS
- FINE FILTER
- LOWER SPRAY ARM
- UPPER SPRAY ARM
- THE DOOR AND THE DOOR SEAL
- DISHWASH THE DISHWASHER TUB
- LIMESCALE DEPOSITS
- UNBLOCKING THE DRAINAGE PUMP
- SAFETY INSTRUCTIONS
- DRAINAGE CONNECTION
- SETUP
- CONNECTION TO WATER SUPPLY
- CONNECTION TO COLD WATER SUPPLY
- CONNECTION TO HOT WATER SUPPLY
- ELECTRICAL CONNECTION
- INFORMATION ON ENERGY LABELLING
- ENERGY LABELLING
- TECHNICAL DATA
Brand : GORENJE
Model : GV65260AU
Category : Dishwasher