
SRS-N100 - Loudspeaker SONY - Free user manual and instructions
Find the device manual for free SRS-N100 SONY in PDF.


| Product Type | Wireless Speaker |
| Brand | Sony |
| Model | SRS-N100 |
| Dimensions (W x H x D) | Approx. 180 x 60 x 70 mm |
| Weight | Approx. 0.7 kg |
| Power Source | Built-in rechargeable battery / AC adapter |
| Battery Life | Up to 12 hours |
| Bluetooth Version | Bluetooth 5.0 |
| Wireless Range | Approx. 10 meters |
| Speaker Type | Full range mono speaker |
| Output Power | 10 W |
| Hands-Free Function | Yes (built-in microphone) |
| NFC | Yes |
| Water Resistance | IPX4 (splash proof) |
| Inputs | USB-C (charging), 3.5mm audio input |
| Wireless Multi-Room | Compatible with Sony Music Center app |
| Cleaning Instructions | Wipe with a soft dry cloth; avoid liquids |
| Safety Warning | Do not disassemble; keep away from water and heat |
Frequently Asked Questions - SRS-N100 SONY
User questions about SRS-N100 SONY
0 question about this device. Answer the ones you know or ask your own.
Ask a new question about this device
Download the instructions for your Loudspeaker in PDF format for free! Find your manual SRS-N100 - SONY and take your electronic device back in hand. On this page are published all the documents necessary for the use of your device. SRS-N100 by SONY.
USER MANUAL SRS-N100 SONY
Stereo Active Speaker System
SRS-N100
Operating Instructions
Before operating the system, please read this manual thoroughly and retain it for future reference.
Owner's Record
The model and serial numbers are located at the bottom of the woofer module. Record the serial number in the space provided below. Refer to them whenever you call upon your Sony dealer regarding this product.
Model No.SRS-N100 Serial No.
WARNING
CAUTION
RISK OF ELECTRIC SHOCK DO NOT OPEN

CAUTION: TO REDUCE THE RISK OF ELECTRIC SHOCK,
DO NOT REMOVE COVER (OR BACK).
NO USER-SERVICEABLE PARTS INSIDE.
REFER SERVICING TO QUALIFIED SERVICE PERSONNEL.

This symbol is intended to alert the user to the presence of uninsulated "dangerous voltage" within the product's enclosure that may be of sufficient magnitude to constitute a risk of electric shock to persons.
This symbol is intended to alert the user to the presence of important operating and maintenance (servicing) instructions in the literature accompanying the appliance.
INFORMATION
This equipment has been tested and found to comply with the limits for a Class B digital device, pursuant to Part 15 of the FCC Rules. These limits are designed to provide reasonable protection against harmful interference in a residential installation. This equipment generates, uses, and can radiate radio frequency energy and, if not installed and used in accordance with the instructions, may cause harmful interference to radio communications. However, there is no guarantee that interference will not occur in a particular installation. If this equipment does cause harmful interference to radio or television reception, which can be determined by turning the equipment off and on, the user is encouraged to try to correct the interference by one or more of the following measures:
— Reorient or relocate the receiving antenna.
— Increase the separation between the equipment and receiver.
— Connect the equipment into an outlet on a circuit different from that to which the receiver is connected.
— Consult the dealer or an experienced radio/TV technician for help.
You are cautioned that any changes or modifications not expressly approved in this manual could void your authority to operate this equipment.
WARNING
To prevent fire or shock hazard, do not expose the system to rain or moisture.
To avoid electrical shock, do not open the cabinet. Refer servicing to qualified personnel only.
Table of Contents
Features 2
Precautions 2
Connections 3
Attaching the full-range speakers ....3
Power source of the connected equipment 3
Notes on the insulators....4
Connecting to a stereo phone-type headphones jack 4
Connecting to an RCA pin jack 5
Connecting to a Discman equipped with a PHONES/REMOTE jack 5
Operation 6
Operating the remote commander 6
Troubleshooting guide .... back cover
Specifications .... back cover
Features
The Sony SRS-N100 consists of two full-range speakers and a woofer. Positioning these speakers close to the listener so that he is facing them, the listener will be able to experience the ambience of the music source. This system can be connected directly to a Discman, DAT player, Mini Disc player, etc. With the supplied remote commander, you can operate the connected Sony CD player or Discman as well as this speaker system.
• The cabinets of the full-range speakers are composed of the developed P.P. composite material to realize good acoustics.
• The combination of soft biocellulose and light-weight solid mica for the diaphragm of the full-range speakers
• R-core transformer, schottky barrier diodes and quality capacitors are employed for the low noise power supply section.
- DC output terminal (4.5 V) for the power supply for a Discman etc.
Precautions
- Operate the system only on 120 V AC, 60 Hz.
- The system is not disconnected from the AC power source (mains) as long as it is connected to the wall outlet, even if the system itself has been turned off.
- Unplug the system from the wall outlet when it is not to be used for an extended period of time. To disconnect the cord, pull it out by grasping the plug. Never pull it out by the cord.
- Do not open the speaker cabinets. Refer servicing to qualified personnel only.
- Do not leave the system in a location near heat sources, or in a place subject to direct sunlight, excessive dust, moisture, rain or mechanical shock.
- Should any solid object or liquid fall into the system, disconnect the AC power cord and have the system checked by qualified personnel before operating it any further.
- When the speaker cabinet becomes soiled, clean it with a soft cloth slightly moistened with a mild detergent solution. Never use alcohol, benzine or thinner as they may mar the finish.
- Although the woofer module is magnetically shielded, do not leave recorded tapes, watches, personal credit cards or floppy disks using magnetic coding in front of the system for an extended period of time as a precaution.
If you have any questions or problems concerning your system that are not covered in this manual, please consult your nearest Sony dealer.
Connections
Attaching the Full-range Speakers
Mount the full-range speakers to the woofer module.

1 Attach the joint of the full-range speaker arms to the woofer module by matching the joint and the rectangle holes on the woofer module. Be sure to connect them firmly.
2 Tighten the arm fixing screws.
3 Connect the plugs of the speaker cords to the speaker terminals on the woofer module.
Note
Mount both the right and left of the full-range speakers correctly to the woofer module.
Positioning
- Place the system on a solid location such as on a desk or an audio rack.
- Do not rotate the full-range speaker arms forcibly. (The arms can be rotated almost 50 degrees.)
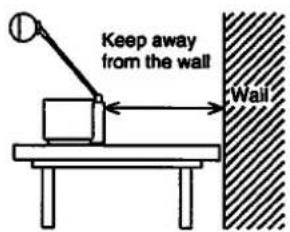
- To obtain the maximum performance of the system, keep the system away from the wall behind it. Especially when you use the system on top of a desk etc., place it close to the edge of the desk as illustrated.
Power Source of the Connected Equipment

When you use portable equipment (power requirement: 4.5 V, current drain: less than 500 mA) like a Discman, the power of the portable equipment could be supplied from the system. Remove the protection cover first from the system. Connect the portable equipment and the system with the supplied DC output cord as illustrated. (The portable equipment may be placed on top of the woofer module as illustrated.) The DC output is not operated by the POWER switch of the system. When you disconnect the plug of the DC output cord from the woofer module, pull the plug out while pressing down the catch on the plug.
Connections
Notes on the Insulators
Use the supplied insulators when you place the portable equipment such as Discman on top of the woofer module. Attach the supplied insulators on the top side of the woofer module as illustrated.
When you place equipment such as a Discman etc. Attach the insulators with their projecting parts pointing outwards.
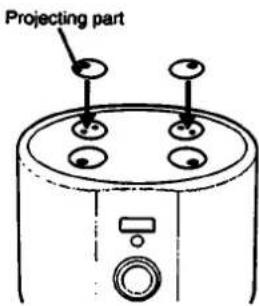
When you place equipment such as a Mini Disc player etc.
Attach the insulators with their projecting parts pointing inwards.

Notes
- When you detach the insulators, do not pull them by holding the projecting parts.
- A dirty or defective disc or some player may cause sound drop-outs in playing. In such a case, place the portable equipment further away from the system.
- When you use the Discman equipped with the ESP function and the ESP function is activated, some discs may cause the Discman unit to vibrate. In such a case, turn the ESP function off.
Connecting to a Stereo Phone-type Headphones Jack
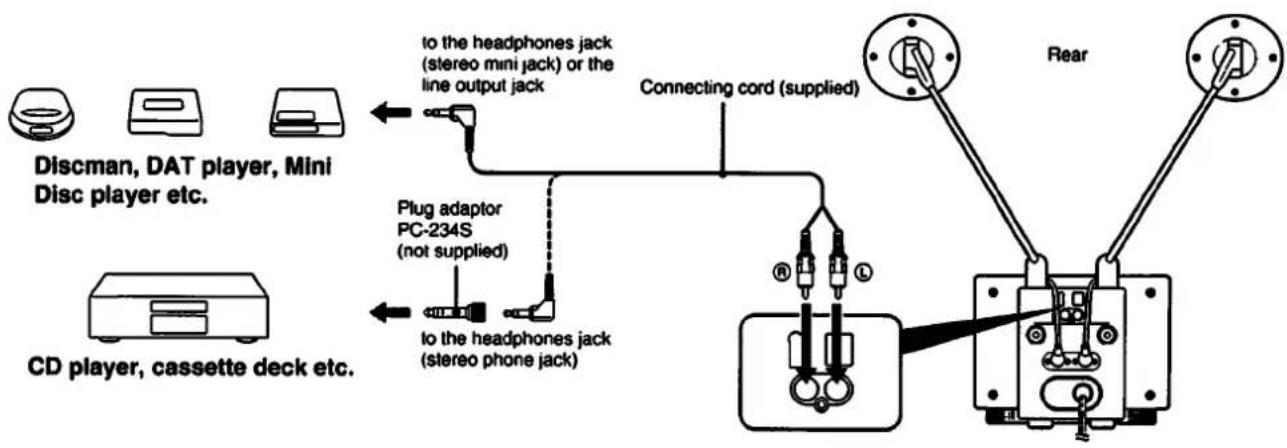
Connecting to an RCA Pin Jack

Note
When two types of audio equipment are connected to the system (with the supplied connecting cord and the optional connecting cord) and are played at the same time, the sound from both of them will come out of the speakers. Therefore, make sure that either of the
equipment is always turned off. When you connect only one audio equipment, make sure that the connecting cord not being used is disconnected from the system. Otherwise, it may cause some noise.
Connecting to a Discman Equipped With a PHONES/REMOTE Jack

Operation

1 Press the POWER switch to turn on the system. (Be sure to turn on the connected equipment before operating this switch.) The power indicator lights up.
2 Adjust the volume on the full-range speakers and woofer with the VOLUME control. Turn clockwise (to MAX) to increase. Adjust the volume of the connected equipment to your preference in advance.
3 Adjust the bass with the BASS control. Turn clockwise (to MAX) to boost the bass.
4 Adjust the angle of the full-range speakers horizontally.
After use
Press the POWER switch to turn off the system.
Operating the Remote Commander

Speaker operation buttons
Note
When you operate the following buttons, point the remote commander towards the receptor on the front of the woofer module.
① POWER switch
Press to turn on the system.
Press again to turn off the system.*
- If a Discman equipped with a PHONES/REMOTE jack is connected to the system, the Discman will be turned off as well.
② VOL button
CD player or Discman operation buttons
Note
The supplied remote commander is designed for operating the Sony CD players and Discman only. When you connect other manufacturers' equipment to the system, you will not be able to operate the equipment with the supplied remote commander.
Operating a CD player or a Discman connected with the optional remote control kit
Note
When you operate the connected equipment, point the remote commander towards the receptor on the connected equipment.
③ Numeric buttons
During CD play, press the numeric button(s) to locate a desired track.
For example:
To locate the 12th track: Press the ⏻ button and then press the Ⓡ button.
To locate the 24th track: Press the Ⓞ button twice and then press the Ⓔ button.
4 ▶ (play) button
Press to start CD play.
⑤ ↕/▶▶ buttons
Press the ◀ button to locate the beginning of a current track.
Press the ▶▶ button to locate the beginning of a succeeding track. Each time you press the ◀◀ button, the CD player or the Discman will locate the current and previous tracks. Each time you press the ▶▶ button, the CD player or the Discman will locate the next tracks.
6 II button
Press to pause CD play.
Press again to release the pause mode.
⑦ ◀◀/▶▶ buttons*
Keep the ◀ button pressed to fast-reverse at high speed.
Keep the ▶ button pressed to fast-forward at high speed.
•The ◀◀/▶▶ buttons may not function when operating some models of CD player.
8 ■ (stop) button
Press to stop CD play.
Operating a Discman equipped with a PHONES/REMOTE jack
Note
When you operate the following buttons, point the remote commander towards the receptor on the front of the woofer module.
The function of some buttons do not correspond with some models of Discman. Refer to the operation instructions manual supplied to your Discman.
- The II button does not function. (The ▶ button functions in the same way as the ▶II button on the Discman.)
- When you press the ▶ button as long as the AC plug is being connected to the AC outlet, the system and the connected Discman are turned on automatically and CD play starts.
- The ◀◀/▶▶ buttons function in the same way as the ◀◀/▶▶▶ I buttons being held pressed. (The ◀◀/▶▶▶ I buttons function in the same way as the ◀◀/▶▶▶ I buttons on the Discman.)
Operating a Discman equipped with the key mode function In same mode, the ◀◀/▶▶I buttons function in the same way as the ◀◀/▶▶ buttons.
Operating a Discman equipped with the infrared receptor for the remote commander
Note
4
When you operate the Discman, point the remote commander towards the receptor on the Discman.
When operating this type of a Discman, an initial setting is required so that all the buttons on the remote commander become operative with the Discman.
Press the POWER switch and the ② button simultaneously.
To cancel this setting
Press the POWER switch and the ① button simultaneously.
Inserting batteries
Open the battery compartment lid of the remote commander and insert two size AA (R6) batteries (not supplied).

Note on the remote commander
Do not let direct sunlight or powerful artificial light fall directly onto the receptor on the front of the woofer module as it may interfere with operation or damage the receptor.
Battery life
In normal operation, batteries will last for about six months. If the operating range of the remote commander becomes noticeably short, replace both batteries with new ones.
If the remote commander is not to be used for a long period of time
Remove the batteries to avoid possible damage from battery leakage and the subsequent corrosion.
Troubleshooting Guide
| Problem | Solution |
| No sound | Connect the AC plug to the AC outlet.Press the POWER switch.Turn up the volume of the system.Turn up the volume on the connected equipment.Connect the speaker cord and connecting cord securely.Operate the connected equipment correctly. |
| No sound from one speaker | Connect the connecting cord with a plug adaptor (mini plug ↔ stereo mini jack) (not supplied) to a monaural earphone jack.Connect the speaker cord and connecting cord securely. |
| Weak bass | Adjust the BASS control. |
| No stereo image | Adjust the angle of both of the full-range speakers. |
| Hum is heard. | Disconnect either of the connecting cord not being used from the system. |
Specifications
AUDIO POWER SPECIFICATIONS
POWER OUTPUT AND TOTAL HARMONIC DISTORTION:
Full-range speakers
With 4 ohm loads, both channels driven, from 200 – 30,000 Hz; rated 6 watts per channel minimum RMS power, with no more than 10% total harmonic distortion.
Woofer
With 4 ohm loads, driven from 60 — 200 Hz; rated 18 watts minimum RMS power, with no more than 10% total harmonic distortion.
Amplifier section
| Power output | 30 W (at 10% harmonic distortion)Full-range: 6 W x 2Woofer: 18 W x 1 |
| Input | RCA pin jack (L/R x 1)PHONES/REMOTE jack (1) |
| Input impedance | 47 kilohms |
| DC output | DC 4.5 V, 500 mA |
| Speaker section | |
| System | Full-range + woofer |
| Speaker unit | Full-range: ø 65 mmWoofer (magnetically shielded): ø 90 mm |
| Nominal impedance | 4 ohms |
| General | |
| Power requirements | 120 V AC, 60 Hz |
| Power consumption | 30 W |
| Dimensions | Approx. 700 x 500 x 350 mm (w/h/d) (275/8 × 193/4 × 137/8 in.) incl. projecting parts and controls |
| Mass | Approx. 5 kg (11 lb.) |
Remote commander
| Remote control system | |
| Infrared pulse control | |
| Power requirements | 3 V DC |
| Dimensions | Approx. 44 x 20 x 185 mm (w/h/d) (13/4 × 13/16 × 73/8 in.) incl. projecting parts and controls |
| Mass | Approx. 100 g (4 oz.) incl. batteries |
| Supplied accessories | Remote commander RM-N100 (1)Connecting cord (PHONES/REMOTE plug ↔ PHONES/REMOTE plug) (1)Connecting cord (RCA pin plug ↔ stereo mini plug) (1)DC output cord (1)Arm fixing screws (2)Insulators (4) |
| Optional accessories | PC-234S (plug adaptor)(stereo phone plug ↔ stereo mini jack)RK-C515HG (RCA pin plug ↔ RCA pin plug) (1.5 m) |
Your dealer may not handle some of the above listed optional accessories. Please ask the dealer for detailed information.
Design and specifications are subject to change without notice.
- STEREO ACTIVE SPEAKER SYSTEM
- SRS-N
- OPERATING INSTRUCTIONS
- OWNER'S RECORD
- WARNING
- CAUTION
- INFORMATION
- TABLE OF CONTENTS
- FEATURES
- PRECAUTIONS
- CONNECTIONS
- ATTACHING THE FULL-RANGE SPEAKERS
- NOTE
- POSITIONING
- POWER SOURCE OF THE CONNECTED EQUIPMENT
- NOTES ON THE INSULATORS
- NOTES
- OPERATION
- AFTER USE
- SPEAKER OPERATION BUTTONS
- ① POWER SWITCH
- ② VOL BUTTON
- CD PLAYER OR DISCMAN OPERATION BUTTONS
- ③ NUMERIC BUTTONS
- (PLAY) BUTTON
- ⑤ ↕/▶▶ BUTTONS
- II BUTTON
- ⑦ ◀◀/▶▶ BUTTONS
- (STOP) BUTTON
- INSERTING BATTERIES
- NOTE ON THE REMOTE COMMANDER
- BATTERY LIFE
- IF THE REMOTE COMMANDER IS NOT TO BE USED FOR A LONG PERIOD OF TIME
- SPECIFICATIONS
- AUDIO POWER SPECIFICATIONS
- POWER OUTPUT AND TOTAL HARMONIC DISTORTION
- WOOFER
Brand : SONY
Model : SRS-N100
Category : Loudspeaker