
CanoScan D660U - Scanner CANON - Free user manual and instructions
Find the device manual for free CanoScan D660U CANON in PDF.


| Product Type | Flatbed Scanner |
| Brand | Canon |
| Model | CanoScan D660U |
| Interface | USB 1.1 |
| Optical Resolution | 1200 x 2400 dpi |
| Color Depth | 48-bit input / 24-bit output |
| Scan Speed (color, 300 dpi) | Approx. 12 seconds per page |
| Maximum Document Size | 216 x 297 mm (A4/Letter) |
| Dimensions (W x D x H) | 256 x 372 x 60 mm |
| Weight | 1.5 kg |
| Power Source | AC adapter (100-240 V) |
| Power Consumption | 5 W (operating), 0.5 W (standby) |
| Supported Operating Systems | Windows 98/Me/2000/XP; Mac OS 9.1 or later |
| Main Functions | Scan documents, photos, film (with optional transparency unit) |
| Maintenance | Clean glass platen with soft dry cloth; avoid liquids. |
| Safety Precautions | Keep away from moisture; do not disassemble. |
| Spare Parts & Repairability | Contact Canon support; limited spare parts availability. |
| General Information | Compact design; easy plug-and-play setup. |
Frequently Asked Questions - CanoScan D660U CANON
User questions about CanoScan D660U CANON
0 question about this device. Answer the ones you know or ask your own.
Ask a new question about this device
Download the instructions for your Scanner in PDF format for free! Find your manual CanoScan D660U - CANON and take your electronic device back in hand. On this page are published all the documents necessary for the use of your device. CanoScan D660U by CANON.
USER MANUAL CanoScan D660U CANON
for CanoScan D660U Color Scanner
User's Guide

Top Page
Glossary
Contents
Index
Copyright Notice
Copyright ©2000 Canon Inc.
This manual is copyrighted with all rights reserved. Under the copyright laws, this manual may not be copied, in whole or in part, without written consent of Canon Inc. Under the law, copying includes translating into another language or format.
Microsoft and Windows are registered trademarks or trademarks of the Microsoft Corporation in the United States and other countries.
Canon, and CanoScan are registered trademarks of Canon, Inc.
ColorGear and ImageTrust are registered trademarks of Canon Inc.
All other names are trademarks of their respective companies.
In this manual, screen shots are taken with Windows 98. When you use Windows 2000 Professional, different screens may appear from this manual.
Top Page
Glossary
Contents
Index
Chapter 1 Before You Begin .... 5
Welcome to ScanGear CS-U 6
System Requirements 8
Hardware 8
Software 9
Getting Help in ScanGear CS-U.... 10
Chapter 2 Installing ScanGear CS-U.... 11
Installing ScanGear CS-U 12
Installing ScanGear CS-U 13
Uninstalling ScanGear CS-U 16
Uninstalling ScanGear CS-U using the CanoScan Setup Utility CD-ROM 16
Uninstalling ScanGear CS-U (Windows 98) 17
Chapter 3 Simple Mode and Advanced Mode . 19
What are the Simple Mode and Advanced Mode? 20
Switching Between the Simple and Advanced Modes ..... 21
Simple Mode Main Window 22
Advanced Mode Main Window.... 23
Chapter 4 What is on the screen? ...... 25
Toolbar 27
Scanning Buttons.... 30
Simple Mode Main Window 31
Advanced Mode Main Window.... 37
The Main Sheet 37
The Tone Sheet 41
Contrast/Brightness Sheet 44
Gamma Sheet 45
Histogram Sheet 47
Special Tone Curves Sheet 49
Editing a Special Tone Curve Directly 50
The Halftone Sheet 52
The Scanner Sheet 53
Top Page
Glossary
Contents
Index
Chapter 5 Scanning an Original .... 56
Preparing for the Scanning Job 57
Quick Start 58
Previewing and Scanning an Original 60
Scanning in the Simple Mode 60
Scanning in the Advanced Mode 65
Scanning Film 69
Chapter 6 Settings in the Windows Control Panel ..... 71
Opening Scanners and Cameras Properties 72
General Settings 74
Events Settings.... 75
Preferences Settings 77
Color Management Settings 79
Setting for Energy Saving....79
Chapter 7 Troubleshooting.... 80
Pre-Scan Checklist 81
How to Avoid Problems 82
Troubleshooting Checklist 84
Glossary 89
Index 103
Customer Support Help Desk 108
Top Page
Glossary
Contents
Index
Before You Begin
Welcome to ScanGear CS-U
System Requirements
Getting Help in ScanGear CS-U
Top Page
Glossary
Contents
Index
Welcome to ScanGear CS-U
Welcome to Canon ScanGear CS-U 5.8 software for Windows 98 and Windows 2000 Professional.
ScanGear CS-U 5.8 (hereafter referred to as ScanGear CS-U) will provide flexible, efficient image enhancement tools for scanning with your CanoScan D660U Scanner by providing an interface with a variety of TWAIN-compliant software applications. (TWAIN p.101)
ScanGear CS-U has a number of powerful features that help you achieve peak performance with your scanner. Using ScanGear CS-U, you can preview and adjust an image before the image is scanned and acquired by the parent software application.
Here is a quick summary of the important features of ScanGear CS-U:
- Two operation modes: Simple mode, which allows you to select all optimum settings with one selection, and Advanced mode, which allows you to create professional color and other enhancements for artistic effects.
- Flexible, fully automatic image acquisition, and pre-scan image manipulation prior to passing data to the image application
- TWAIN 1.6 compliant
• Text Enhanced mode for OCR applications - Canon ColorGear (color matching software technology)
• Automatic preview or preview image cache - ScanGear CS-U can run with or without its main window, depending on the acquiring application.
- 35 mm film can be scanned using the film adapter unit attached to the scanner.
chapter 1
Before You Begin
Top Page
Glossary
Contents
Index
Normally when you start a scanning job, you will see the ScanGear CS-U main window with its toolbar, Preview Area, and tabs.
However, some software applications may not open the ScanGear CS-U main window. When this occurs you cannot use the settings described in this user's guide because the host software application will provide the settings so you can change the image after it is acquired. When a software application uses ScanGear CS-U without opening the ScanGear CS-U main window, this is called the windowless mode.
Top Page
Glossary
Contents
Index
System Requirements
The hardware and software listed below is required to use ScanGear CS-U.
Hardware
- You can use following scanner with ScanGear CS-U: CanoScan D660U.
- IBM PC or its compatible on which Windows 98 or Windows 2000 Professional can run
- Memory (RAM) required is determined by your system: Windows 98 32 MB (64 MB or more recommended) Windows 2000 Professional 32 MB (64 MB or more recommended)
- 10 MB of free disk space for ScanGear installation
- Free disk space, at least 50 MB. The amount of space required depends on the scanning area and the Color Mode or Resolution settings (color images scanned at higher resolution require more storage space).

Note
Before you scan an image, check the file size in the status bar. You should have at least twice that amount of free space available on the hard disk.
- Minimum requirement for monitor: 800 x 600 resolution (minimum), High Color (16 bit) or greater.
chapter 1
Before You Begin
Top Page
Glossary
Contents
Index
Software
- Microsoft Windows 98 or Microsoft Windows 2000 Professional
- TWAIN-compliant parent software application
chapter 1
Before You Begin
Top Page
Glossary
Contents
Index
Getting Help in ScanGear CS-U
For information about using ScanGear CS-U, open the on-line Help by clicking the Help button on the toolbar or in the dialog boxes.
Click the Contents or Index tab to see if the topic you are looking for is covered elsewhere in on-line Help.
Top Page
Glossary
Contents
Index
Installing ScanGear CS-U
Installing ScanGear CS-U
Uninstalling ScanGear CS-U
Top Page
Glossary
Contents
Index
Installing ScanGear CS-U
Before you install ScanGear CS-U, make sure that you have accomplished the following tasks:
- Make sure that the computer is equipped with an enabled USB port. In My Computer - Control Panel - System icon, click the Device Manager tab and double-click "Universal serial bus controller". If you can see the names of the Host Controller and USB Root Hub displayed, the computer is equipped with an enabled USB port. Some computers may require enabling the USB function with a BIOS setting. For details about enabling the USB port with the BIOS setting, see your computer manual.
- Make sure the scanner is connected to a computer.
- If a previous version of ScanGear CS is installed on your computer, uninstall it before you install ScanGear CS-U 5.8.

Note
- With Windows 2000 Professional, ensure that you log on as an Administrator to install/uninstall the software.
- If ScanGear CS-U has already been installed according to the instructions in the Getting Started guide that came with the scanner, there is no need to perform the installation procedures described on the following pages.
chapter 2
Installing
ScanGear CS-U
Top Page
Glossary
Contents
Index
Installing ScanGear CS-U
Follow this procedure to install ScanGear CS-U. To perform this procedure you need CanoScan Setup Utility CD-ROM.
- Connect the scanner and computer with the USB cable. Then turn on the computer.
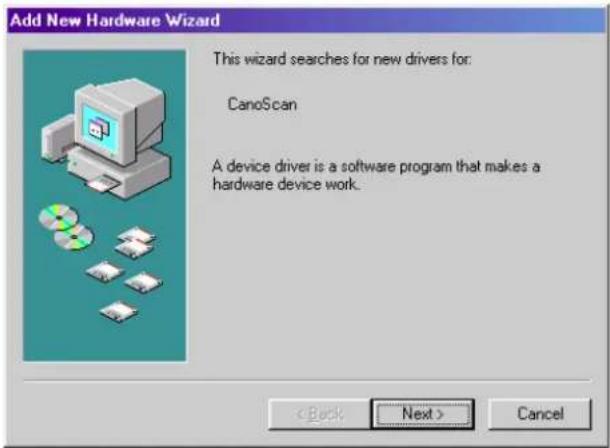
A brief message will tell you that an unknown device has been detected, then the Add New Hardware Wizard dialog box opens.
- Click the Next button.
chapter 2
Installing
ScanGear CS-U
Top Page
Glossary
Contents
Index
- Confirm that the first button is selected (Search for the best driver for your device) and click the Next button.

- Insert the CanoScan Setup Utility CD-ROM into the CD-ROM drive.
- If you use the English version (uni-language) CanoScan Setup Utility CD-ROM, select the "CD-ROM drive" then click the Next button. If you use the multi-language CanoScan Setup Utility CD-ROM, select the "Specify a location:" and click the Browse button. In the Browse for Folders dialog, navigate in the CD-ROM drive to find the Scangear folder and select the English folder then click the OK button. Finally click the Next button.

chapter 2
Installing
ScanGear CS-U
Top Page
Glossary
Contents
Index
- Confirm the name of the scanner is displayed, and click the Next button to start copying the files.

- When you are prompted to insert the Windows 98 CD-ROM, after clicking the OK button, click the Browse button. Specify the CanoScan Setup Utility CD-ROM drive as the file source, then click the OK button.
- Click the Finish button to complete the installation procedure.

chapter 2
Installing
ScanGear CS-U
Top Page
Glossary
Contents
Index
Uninstalling ScanGear CS-U
Uninstalling ScanGear CS-U using the CanoScan Setup Utility CD-ROM

Always uninstall ScanGear CS-U with this procedure if you are using Windows 2000 Professional.
Note
-
Place the CanoScan Setup Utility CD-ROM in the drive.
-
Click the [Uninstall the Software] button in the CD-ROM's menu window.

- Click the [Uninstall ScanGear CS-U] button in the Uninstall menu window.

- Follow the on-screen instructions to complete the procedure.
chapter 2
Installing
ScanGear CS-U
Top Page
Glossary
Contents
Index
Uninstalling ScanGear CS-U (Windows 98)
Follow the procedure below if you use Windows 98 and cannot uninstall ScanGear CS-U using the Uninstall menu of the CanoScan Setup Utility CD-ROM.
-
Click the Start button, point to Settings, and click Control Panel.
-
Double-click the Scanners and Cameras icon.

- Click the name of the scanner to highlight it then click the Remove button.

chapter 2
Installing
ScanGear CS-U
Top Page
Glossary
Contents
Index
When the scanner is not connected to the computer, the name of the scanner will not be displayed so it cannot be uninstalled. Before you uninstall the scanner, make sure that it was connected to the computer when the system was started up.
- Click the OK button to close the dialog box.
- Double-click the "System" icon in the Control Panel, click the "Device Manager" tab and search for the "Other Devices" category. If "CanoScan" appears, select it and click the "Remove" button. Click the "OK" button after "CanoScan" is removed.
- Delete the Canon Inc.D066U.INF file from the following folder: C:\Windows\Inf\Other
- Delete the scanner folder: C:\Windows\Twain_32\D66u

Note
To delete the files above from the Recycle Bin, right-click the scanner icon 3:56PM on the lower right corner of the screen and select [Close] from the pop-up menu. The scanner icon will disappear. While this icon is being displayed, you cannot delete files from the Recycle Bin.
Top Page
Glossary
Contents
Index
Simple Mode and Advanced Mode
What are the Simple Mode and Advanced Mode?
Simple Mode Main Window
Advanced Mode Main Window
Top Page
Glossary
Contents
Index
What are the Simple Mode and Advanced Mode?
You can run ScanGear CS-U in either of two modes: the Simple Mode and Advanced Mode.
Simple Mode
The Simple Mode, as its name implies, is easy to use and fast. You can set up a scanning job quickly just by selecting from the name that best describes the job you want to execute: Color Photo, Color Photo Fine, B&W Photo, and so on. All you have to do is select one Image Type setting which sets up the scanning job for you automatically. You can accept the settings and start the scanning job, or you can make small adjustments to the settings before you begin. For routine scanning jobs you can create your own Image Types and save them under a name that will listed among the pre-defined selections.
Advanced Mode
The Advanced Mode presents more options which allow you to set up professional quality scanning jobs. You can use precise settings to select the scanning area in the Preview Area, adjust Color Mode and Resolution, and take advantage of the wide selection of Tone options (adjusting Contrast/Brightness, Gamma, Histogram, Special Tone Curve, and Threshold).
chapter 3
Simple Mode and Advanced Mode
Top Page
Glossary
Contents
Index
Switching Between the Simple and Advanced Modes
You can switch between the Simple and Advanced Modes simply by clicking a button.
- In the Simple Mode main window, click the Advanced Mode button to open the Advanced Mode main window.
- In the Advanced Mode main window, click the Simple Mode button to open the Simple Mode main window.

Note
If you change the settings in either the Simple Mode or Advanced Mode, the changes will be reflected in the settings of the other mode.

Simple Mode
Advanced Mode

chapter 3
Simple Mode and Advanced Mode
Top Page
Glossary
Contents
Index
Simple Mode Main Window

The ScanGear CS-U main window in the Simple Mode has only one sheet, named "Simple Mode" followed by the name of your scanner. Use the Simple Mode sheet settings to select the settings for a scanning job.
chapter 3
Simple Mode and Advanced Mode
Top Page
Glossary
Contents
Index
Advanced Mode Main
Window

The ScanGear CS-U main window in the Advanced Mode has more sheets to perform the settings for scanning.
In the Advanced Mode click the Main tab, Tone tab (or Halftone tab), or the Scanner tab to open the Main sheet, Tone sheet (or Halftone sheet) or Scanner sheet. Use the settings on each sheet to perform important settings for scanning.

In the Advanced Mode, the name of your scanner (D660U) is displayed on the tab of the Scanner sheet.
Note
chapter 3
Simple Mode and Advanced Mode
Top Page
Glossary
Contents
Index
If you select Black and White or Text Enhanced(OCR) for the Color Mode on the Main sheet, the Tone tab is replaced with the Halftone tab.

4
Top Page
Glossary
Contents
Index
What is on the screen?
Main Window
Toolbar
Scanning Buttons
Simple Mode Main Window
Advanced Mode Main Window
chapter 4
What is on the Screen?
Top Page
Glossary
Contents
Index
Main Window

chapter 4
What is on the Screen?
Top Page
Glossary
Contents
Index
Toolbar
Buttons on the toolbar help you to perform important tasks like, cropping images, moving images, zooming, and so on.

Crop Button
Click the Crop button and drag the pointer in any direction to draw a rectangle around the area you want to select for scanning. This reduces the time it takes to scan an image because you are pre-scanning or scanning only the necessary section of the image, not the whole area. To un-crop the image simply click outside the cropped area.
Move Image Button
Use the Move Image button to scroll the image up/down or left/right when the previewed image has been enlarged with the Zoom Tool button and is too large to be viewed all at once. Click the Move Image button and drag the image with the hand image pointer.

Note
The Move Image button is not available when the previewed image has not been enlarged and is displayed entirely in the Preview Area.
chapter 4
What is on the Screen?
Top Page
Glossary
Contents
Index

Zoom Tool Button
Click the Zoom Tool button and then click the left or right mouse button to change the size of the Preview image.
- To increase the magnification of the image, click the Zoom Tool button then click the left mouse button on the area of the previewed image to view. You can repeat this procedure to magnify the image up to 4 times its previewed size.
- To decrease the magnification of the image, click the Zoom Tool button then click the right mouse on the magnified image.

Auto Crop Button
After clicking the Crop button and drawing a rectangle around the part of the image that you want to scan, click the Auto Crop button to size the rectangle for the best fit around the object enclosed by the rectangle.

Negative/Positive Button
Click the Negative/Positive button to invert the colors and create a negative of the image.

Mirror Button
Click the Mirror button to flip the image horizontally like a mirror image.

Rotate Left Button
Click the Rotate Left button to rotate a scanned image left 90 degrees (counterclockwise). Click this button repeatedly to continue rotating the image left.
chapter 4
What is on the Screen?
Top Page
Glossary
Contents
Index

Rotate Right Button
Click the Rotate Right button to rotate a scanned image right 90 degrees (clockwise). Click this button repeatedly to continue rotating the image right.

Rulers Button
Click the Rulers button to display a ruler in the Preview Area to help with sizing and cropping the image. To select the gradations for rulers, click the down-arrow for Units on the Main sheet and then select the units of measure from the drop-down list.

Auto Tone Button
Click the Auto Tone button to have ScanGear CS-U automatically adjust the tone of a pre-scanned color image within the cropped area. The Auto Tone feature is on when the button on the toolbar is depressed. The Auto Tone button is available only when Color has been selected for Color Mode on the Main sheet and when ColorGear Color Matching is not selected for Color Adjustment in the Preferences settings. To reset to its default settings, click the All Reset button on the Tone sheet.

Help Button
Click the Help button to display the ScanGear CS-U on-line Help.
chapter 4
What is on the Screen?
Top Page
Glossary
Contents
Index
Scanning Buttons
Preview
Preview Button
Click the Preview button to pre-scan the image and display it in the Preview Area so you can decide whether the image needs any adjustments or if you want to apply any special effects.

Note
After you click the Preview button, the Preview button becomes a Cancel button. Click this Cancel button to cancel the pre-scan operation.
Scan
Scan Button
Click the Scan button to scan the image on the scanner with any special effects or adjustments that have been applied and send the scanned image to the software application from which you launched the ScanGear CS-U.

Note
After you click the Scan button, the Scanning dialog box is displayed. Click the Cancel button in this dialog box to cancel the scan operation.
Clear
Clear Button
Click the Clear button to clear the image in the Preview Area and cancel the setting you performed on for the preview image. If the preview image cache feature has been enabled on the Preferences sheet, clicking the Clear button also erases the image saved for the next time ScanGear CS-U is launched.
chapter 4
What is on the Screen?
Top Page
Glossary
Contents
Index
Simple Mode Main Window
In the Simple Mode, only the Simple Mode sheet is available in the main window.

Image Type
When you select the Image Type based on how you intend to use the scanned image, the Color Mode and Resolution settings are selected for you automatically for optimum scanning results. Here is a summary of the available Image Type settings for the image Color Mode and Resolution.
• Color Screen (Color, 75 dpi):
Use to scan the original as it appears on the monitor.
•Color Photo (Color, 150 dpi):
Use to scan color photographs.
• Color Photo Fine (Color, (Photos) 300 dpi):
Use to scan color photographs for best quality in the scanned image.
• BJ Printer (Color, 360 dpi):
Use to scan a color original that you intend to print on a Bubble Jet printer for maximum quality in the printed image.
chapter 4
What is on the Screen?
Top Page
Glossary
Contents
Index
• B/W Photo (Grayscale, 150 dpi):
Use to scan black-and-white photographs with varying shades of gray.
• B/W Photo Fine (Grayscale, 300 dpi):
Use to scan black-and-white photographs with varying shades of gray for best quality in the scanned image.
• Line Art (Black and White, 300 dpi):
Use to scan of a black-and-white original that contains a graphic illustration.
- Laser Printer (Black and White, 600 dpi):
Use to scan a black-and-white original that you intend to print on a black-and-white laser beam printer.
• FAX (Text Enhanced(OCR), 200 dpi):
Use to scan an original that you intend to send by facsimile.
•OCR (Text Enhanced(OCR), 300 dpi.):
Use to scan pages of text that you intend to capture with an OCR software application.
Color Mode
Displays the Color Mode setting for the currently selected Image Type. And the Mode can be set to one of the settings provided. In this case, a new Image Type can be saved under a new name.
- Black and White
- Grayscale
•Color
•Text Enhanced(OCR)
chapter 4
What is on the Screen?
Top Page
Glossary
Contents
Index

Note
- The Text Enhanced (OCR) and Grayscale selections require more time that the Black and White setting in order execution digitization of the scanned images.
- Selecting the Color Mode setting automatically resets the Advanced Mode Tone tab settings.
- Selecting Black and White or Text Enhanced (OCR) sets the Resolution setting to 300 dpi. If you select any setting other than Black and White or Text Enhanced, the Resolution setting is re-set automatically to the base setting for the Image Type selection. However, if either Black and White or Text Enhanced (OCR) is selected when ScanGear CS-U is started and then another Image Type selected, then the Resolution setting remains set for 300 dpi.
- When you select "Film Adapter" as the Image Source, the options for "Image Type" are the following four; Color Screen, Color Printer, B&W Screen, B&W Printer. Also in this case, the options for "Color Mode" are following two; Graysclae, Color.
chapter 4
What is on the Screen?
Top Page
Glossary
Contents
Index
Resolution
Displays the Resolution setting for the currently selected Image Type. And the Resolution can be set to one of the settings provided. In this case, a new Image Type can be saved under a new name.
Edit Image Type Button
Click the down-arrow for Image Type and select Custom (or select a previously saved custom selection) and click the Edit Image Type button to open the Image Type Settings dialog box. You can create and save up to 12 custom settings of your own.


Note
The Edit Image Type button is not enabled until you select Custom (or a custom setting previously saved) from the Image Type drop-down list. This button is also enabled after you select one of the pre-defined Image Types and change the Color Mode or the Resolution setting.
Width
Displays the width of the scanning area currently selected in the Preview Area. You can change the units to measure the scanning area.
Height
Displays the height of the scanning area currently selected in the Preview Area. You can change the units to measure the scanning area.
Size
Displays the estimated file size of the image in the Preview Area.
chapter 4
What is on the Screen?
Top Page
Glossary
Contents
Index
Image Source
Specifies the source of the original.
- Platen Scans the photos or documents.
- Film Adapter Scans films from the FAU (Film Adapter Unit).

Note
Changing the Image Source clears the image from the Preview area and clears all settings set with the Toolbar and Tone sheet buttons.
Paper Size
Specifies the paper size of the image to be scanned.

Note
Changing the Paper Size clears the Preview area and clears all settings set with the Toolbar and Tone sheet buttons.
- Business Card
- Statement
• B5 - Executive
- Letter
- Full Platen
• A4
chapter 4
What is on the Screen?
Top Page
Glossary
Contents
Index
Film Type
Specifies the film type to be captured from the Film Adapter. This item is displayed only when Film Adapter has been selected for the Image Source.
- Color Positives
- Color Negatives
• B & W Positives
• B & W Negatives
Magazine
Click this check box if you want ScanGear CS-U to conduct moiré reduction to improve the overall image quality. Moiré are dot patterns that interfere with processing images for professional use and are usually caused by poor dithering resulting from scanning images from newspapers, books, magazines, etc.
This function is the same as the Descreen function in the Advanced mode.
chapter 4
What is on the Screen?
Top Page
Glossary
Contents
Index
Advanced Mode Main Window
The Main Sheet

Color Mode
The Color Mode determines how the original will be scanned: Black and White, Grayscale, Color, etc. Click the down-arrow and select a setting from the drop-down list.
- Black and White The image is scanned in black and white.
- Grayscale The image is scanned in black and white but if the original is in color most of the colors will be shaded.
chapter 4
What is on the Screen?
Top Page
Glossary
Contents
Index
• Color The image is scanned in color.
- Text Enhanced(OCR) Converts grayscale images to black and white using Canon ImageTrust technology. This setting produces sharper text which will be easier for OCR software to read.

Note
- The Text Enhanced (OCR) and Grayscale selections require more time that the Black and White setting in order execution digitization of the scanned images.
- Selecting the Color Mode setting automatically resets the Tone tab settings.
- When you select "Film Adapter" as the Image Source, the options for "Color Mode" are the following two; Grayscale, Color.
chapter 4
What is on the Screen?
Top Page
Glossary
Contents
Index
Output Resolution
Click the down-arrow and select one of the pre-set Resolution settings to set the resolution for the scanning job. The default setting is 75 dpi.
Resolution can be set within the range of 25 dpi - 2400 dpi (entering a value into the entry box adjusted in increments of 1 dpi is also possible), or values of 4800, 7200 or 9600 can be entered directly.
- The higher the resolution, the better the quality of the displayed image but the slower the scanning speed. Make sure you select a setting based on the capability of your output device.
- You can enter the following values directly into the entry box to scan a very small area at high resolution. The maximum size of the scanning area is as follows. In this case, the Scale value is set to 100%.
Resolution Scanning Area
| 4800 dpi 2 x 2 in. |
| 7200 dpi 1.3 x 1.3 in. |
| 9600 dpi 1 x 1 in. |
chapter 4
What is on the Screen?
Top Page
Glossary
Contents
Index
Selection
Use the Selection options to set the exact size of the image output.

Note
To select the area to scan, use the Crop button or Auto Crop button or enter the desired dimensions in the text box.
- Keep Proportions button Click this button to maintain the Width and Height proportions. If you change Width or Height, the other setting will be adjusted automatically to maintain the proportion of the original image. When this button is clicked, a chain appears between the Width and Height boxes. As you enlarge or reduce the selection, note that the Width and Height of the selection remain in correct proportion.
- Units Click the down-arrow and select a unit to measure the scanning area. Changing the Units setting does not affect the image in the Preview Area.
- Width and Height The width and height of the current selection, or if there is no selection, the maximum output size, measured from the upper left corner of the image in the Preview Area and based on the current paper size. To change the Width and Height settings, click the Crop button on the toolbar and select a section of the image in the preview area, or just type the desired dimensions into the Width and Height text boxes.
- Scale Allows you to specify the image size after scanning 25% to 200% (preset to 100%) as a percentage of the specified scan area. The resolution of the scanned image is kept to the specification so that the resolution when scanning changes according to the setting here.

Note
- When the resolution is set to 4800, 7200 or 9600, the Scale value is set to 100% .
- Scale setting sets the scale for the image sent to the parent software application and has no effect on the image displayed in the preview area.
chapter 4
What is on the Screen?
Top Page
Glossary
Contents
Index
The Tone Sheet
The Tone sheet is displayed only when Color or Grayscale has been selected for Color Mode on the Advanced Mode Main sheet and when Canon ColorGear Color Matching is not selected for Color Setting in the Preferences settings.
- Changing the Color Mode selection or clicking the Clear button restores the default settings on the Tone sheet.
- Tone sheet adjustment is conducted with the Preview Area.
- Settings can be selected even when there is no image in the Preview Area. In this case the settings take effect on the next scanned image.

These are the Tone sheet buttons that open each tool chart and allow you to enhance images in the Preview Area.
Samples and detailed descriptions of each sheet are provided on the following pages.
Tone Sheet Buttons
Auto Tone button
Found on both the toolbar and the Tone sheet, the Auto Tone button turns the automatic tone correction feature on. Automatic tone correction automatically adjusts the image tone to produce a better image.
chapter 4
What is on the Screen?
Top Page
Glossary
Contents
Index

Contrast/Brightness button
Opens the Contrast/Brightness sheet and allows you to adjust the brightness and contrast of the entire image.

Gamma button
Opens the Gamma sheet and allows you to shift mid-tones so lighter colors are lightened and darker colors are darkened.

Histogram button
Opens the Histogram sheet and allows you to adjust tone intensity to enhance an image that is either too light or too dark.

Special Tone Curves buttons
Opens the Special Tone Curves sheet and allows you to adjust the tones for one or all of the three primary colors (RGB) by selecting a special tone curve or editing a tone curve.

Note
The Contrast/Brightness, Gamma, Histogram, and Special Tone curves can be set even if there is no image in the Preview Area. The setting will remain in effect for the next image previewing or scanning.
chapter 4
What is on the Screen?
Top Page
Glossary
Contents
Index
Common Buttons
The Tone sheet settings are commonly set with the Load, Save, Reset and All Reset buttons described below.

Load Button
When Color Mode is set for Color, a user-saved file (*.adc) is opened and used for color adjustment.
When Color Mode is set for Grayscale, user-saved file (*.adg) is opened and used for gray adjustment.

Save Button
When Color Mode is set for Color, the user-defined settings are saved to a file (*.adc) for color adjustment.
When Color Mode is set for Grayscale, the user-defined settings are saved to a file (*.adg) for color adjustment.
The system determines the path and file name for the saved file. The target folder for the temporary image file cannot be changed.
Reset
Reset button
Resets displayed settings of the channel (M, R, G or B) of the function (Contrast/Brightness, Gamma, Histogram or Special Tone Curve) to their default.
All Reset
All Reset button
Resets all the settings of the channels (M, R, G and B) of all functions (Contrast/Brightness, Gamma, Histogram and Special Tone Curve) to their default.
chapter 4
What is on the Screen?
Top Page
Glossary
Contents
Index
Contrast/Brightness Sheet

When the Contrast/Brightness button is clicked, the Contrast/Brightness sheet is displayed.
The shape of the tone curve changes to reflect the current Contrast/Brightness setting for the current Channel, and the image in the Preview Area changes to reflect the adjustment.
Channel
If you want to select one of the primary colors (RGB) for adjusting the contrast or brightness, click the Channel down-arrow and select the color, or leave the settings at Master to adjust all the colors.
Contrast
Drag the Contrast slider to the left to decrease the contrast of the image or to the right to increase the contrast of the image.
Brightness
Drag the Brightness slider to the left to darken the image or to the right to lighten the image.
chapter 4
What is on the Screen?
Top Page
Glossary
Contents
Index
Gamma Sheet

When the Gamma button is clicked, the Gamma sheet is displayed.
Gamma refers to a process where mid-tones are shifted so that the lighter colors are lightened and darker colors are darkened. For example, let us say you scanned a photograph of a subject in a boat in a tree-lined lake and the shadows of the trees are dark enough and the white of the boat is light enough, but the blue in the sky, the blue of the water, and the blue of the subject's clothing all look the same. By increasing the Scanner Gamma value of the image, the sky might become lighter and the water darker, giving a better contrast to the image. The Monitor Gamma value is a reciprocal number of the Scanner Gamma value.
Channel
If you want to select one of the primary colors (RGB) for adjusting the gamma value, click the Channel down-arrow and select the color or leave the settings at Master to adjust all the colors.
chapter 4
What is on the Screen?
Top Page
Glossary
Contents
Index
Gamma (Scanner Gamma)
Drag the Gamma slider to the left or right to set the scanner gamma value or you can type the value directly into the boxes. Entering a value into either boxes of the scanner gamma or the monitor gamma will display a respective value in the other box. The allowed range of values are 0.10 to 10.00, inclusive. The shape of the tone curve changes to reflect the current gamma setting for the current Channel, and the image in the Preview Area changes to reflect the adjustment. When the Scanner Gamma value is modified, the Monitor Gamma value changes automatically.
chapter 4
What is on the Screen?
Top Page
Glossary
Contents
Index
Histogram Sheet

When the Histogram button is clicked, the Histogram sheet is displayed.
Use the histogram to enhance an image when the image is either too light or too dark, like an overexposed or underexposed photograph. Increasing the darker tones with the histogram improves the contrast of the image.
Channel
If you want to select one of the primary colors (RGB) for adjusting the histogram, click the Channel down-arrow and select the color, or leave the setting at Master to adjust all colors.
chapter 4
What is on the Screen?
Top Page
Glossary
Contents
Index
Eyedroppers (Black-point, Mid-point, White-point)
Click one of the three eyedroppers then click the portion of the image in the Preview Area that you want to sample, or enter values in the text boxes, or drag one of the three triangles at the bottom of the graph to adjust the value. The shape of the tone curve and histogram changes to reflect the current Histogram setting for the current Channel, and the image in the Preview Area changes to reflect the adjustment.

A White-point value must be larger than a Black-point, and a Mid-point value must be between the Black-point and White-point.
Reset
Resets the default values:
- Black-point: 0
- Mid-point: 128
- White-point: 255
chapter 4
What is on the Screen?
Top Page
Glossary
Contents
Index
Special Tone Curves Sheet

When the Special Tone Curves button is clicked, the Special Tone Curves sheet is displayed.
Channel
Click the down-arrow and select one of the primary colors (RGB) for adjustment or leave the setting at Master to adjust all the colors.
Select Special Curve
Click the down-arrow and select a setting from the drop-down list. These settings are designed to solve some of the most common problems with scanned images: overexposure, underexposure, or poor contrast:
- No correction
• Fix an image that is underexposed
• Fix an image that is overexposed
• Fix an image that is low contrast
• Fix an image automatically - Edit Custom Curve
chapter 4
What is on the Screen?
Top Page
Glossary
Contents
Index
Editing a Special Tone Curve Directly
In the Special Tone Curves graph you can edit the curve directly.
- Click on the curve and drag each curve anchor point until the desired effect is achieved.

- To remove an anchor point altogether, drag the anchor point off the graph area.
chapter 4
What is on the Screen?
Top Page
Glossary
Contents
Index

Note
Here are some hints for editing curves:
- Curve handles are drawn on a white background as a red dot to signify that they are editable. When the cursor is over the handle, it changes to a crosshair.
- Curve end points can be selected and dragged to any point in the curve but cannot be deleted.
- Up to 15 points can be added to a curve by clicking anywhere in the curve box.
- If you drag a point outside of a curve box, it will be deleted from the curve and a new curve will form with the remaining points.
- The x and y axes on the curve chart represent the input image color and output image color. When you add a handle to the curve and drag that handle toward the white areas, the preview image tones are adjusted to reflect the change.
- More than one handle cannot be positioned on a vertical line but more than one handle can be positioned on a horizontal line so you can have several handles on a horizontal line.
chapter 4
What is on the Screen?
Top Page
Glossary
Contents
Index
The Halftone Sheet
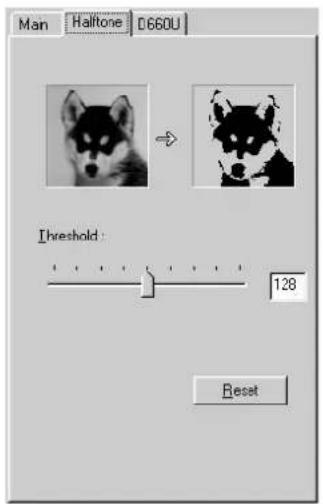
The Halftone sheet is displayed only when Black and White or Text Enhanced(OCR) has been selected for the Color Mode on the Advanced Mode Main window.

Note
- If you selected Text Enhanced(OCR), you cannot make any changes on this sheet.
- You can set only Threshold in this sheet.
Halftoning
Threshold
Threshold determines whether portions of an original are scanned as black or white. Drag the slider left to make the image lighter or drag it right to make the image darker. Or you can also enter a value (0 - 255) directly into the entry box to the right of the slider.
chapter 4
What is on the Screen?
Top Page
Glossary
Contents
Index
The Scanner Sheet

When you click on the Scanner tab (D660U) the Scanner sheet opens.
Image Source
Specifies the source of the original.
- Platen Scans the photos or documents.
• Film Adapter Scans films from the FAU (Film Adapter Unit).

Note
Changing the Image Source setting clears the image from the Preview Area and clears all the settings set with the Toolbar or the buttons on the Tone Sheet.
chapter 4
What is on the Screen?
Top Page
Glossary
Contents
Index
Paper Size
Specifies from the drop-down list the paper size of the image to be scanned.
- Business Card
- Statement
• B5 - Executive
- Letter
• A4 - Full Platen

Note
Changing the Paper Size clears the Preview area and clears all settings set with the Toolbar or the buttons on the Tone sheet buttons.
Film Type
Specifies the film type to be captured from the Film Adatper. This item is displayed when Film Adapter has been selected for the Image Source.
• Color Positives
• Color Negatives
• B & W Positives
• B & W Negatives
Descreen
Click this check box if you want ScanGear CS-U to conduct moiré reduction to improve the overall image quality. Moiré are dot patterns that interfere with processing images for professional use and are usually caused by poor dithering resulting from scanning images from newspapers, books, magazines, etc.
chapter 4
What is on the Screen?
Top Page
Glossary
Contents
Index
Unsharp Mask
Click this check box to switch the Unsharp Mask feature on and off. Sharpens an image, such as a photograph that is slightly out of focus, by emphasizing the contrast to make outlines clearer.

Note
- When the image would not be improved with Descreen, try to switch the Unsharp Mask function off.
- The effects by Descreen and Unsharp Mask will not show in the Preview area.
Test Scanner
Click this button to open the Scanner Diagnostics dialog box. Click the Start button in the Scanner Diagnostics dialog box to test your Scanner. After the test is complete, a message is displayed here to inform you of the results. If a problem is reported after the test, use your scanner instructions to troubleshoot the problem. During the test, do not open the document cover of the scanner.
Top Page
Glossary
Contents
Index
Scanning an Original
Preparing for the Scanning Job
Quick Start
Previewing and Scanning an Original
chapter 5
Scanning an Original
Top Page
Glossary
Contents
Index
Preparing for the Scanning Job
These are some points you should check before you start scanning:
- If you have not yet installed the parent software application you intend to use with the scanner and ScanGear CS-U, install the application.
- Before you start scanning, make sure the scanner is connected correctly.
• Always position the original squarely on the scanner platen with the image side down.
- ScanGear CS-U lets you correct many undesirable features in scanned images, but you will save time and effort by starting with the best possible original. If you are scanning a photograph, for example, make sure the original is in the sharpest possible focus.
- If you are scanning text, make sure the printed text is sharp and clean.
chapter 5
Scanning an Original
Top Page
Glossary
Contents
Index
Quick Start
Follow the procedure below if you want to get started scanning right away.
The referenced page numbers provide more details about the steps below. If you need more information about a procedure, go to that page number.
- Install ScanGear CS-U. (p. 12)
- Start ScanGear CS-U. (p.61, 65)

- Set the original.
- Select the desired Simple or Advanced mode and set the desired settings (resolution, etc.) (p.31, 37)

Simple Mode

Advanced Mode
chapter 5
Scanning an Original
Top Page
Glossary
Contents
Index
- Preview the original. (p.63, 67)

-
Adjust image as required. (p.64, 67-68)
-
Set the scanning area. (p.64, 68)
![Timeline (10) Name: [ ] [ ] [ ] [ ] File Edit View Insert Add View Insert Delete Delete Delete Delete Delete Delete Delete Delete Delete Delete Delete Delete Delete Delete Delete Delete Delete Delete Delete Delete Delete Delete Delete Delete Delete Delete Delete Delete Delete Delete Delete Delete De…](/content/2026/07/1494312/images/b234294e54af65aeef5c59d1abe83bb6c317dc11fd31a4aae810088c0e2b6f89.jpg)
- Scan the document. (p.64, 68)
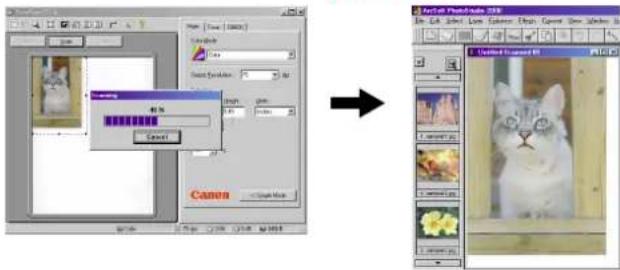
- The image is processed. (For details, the application manual)
Top Page
Glossary
Contents
Index
Previewing and Scanning an Original
You can preview and scan an image in either the Simple Mode or the Advanced Mode. This section describes both procedures.
Scanning in the Simple Mode
This is a brief overview of the general procedure for previewing and scanning an original in the Simple Mode.
- Place the original on the scanner.

For details about positioning the original on the scanner, see your scanner user's manual.
Note
-
Start the software application you are going to use. (for example PhotoStudio 2000)
-
If other TWAIN driver is installed on your computer, you must choose this scanner. Click the [File] menu and select [Select Source], and select [CanoScan D660U] on the dialog box.

chapter 5
Scanning an Original
Top Page
Glossary
Contents
Index
- Start ScanGear CS-U as a TWAIN driver.
The methods for starting TWAIN drivers vary between application programs. For example of PhotoStudio 2000, click the [File] menu and select [Acquire]. See the respective manuals for other programs.
- The ScanGear CS-U main window opens.

If the Advanced Mode main window appears, click the Simple Mode button.
Note
If you see an image in the Preview Area this means one of the preview settings has been switched on with the Preferences sheet. Otherwise, the Preview Area is empty.
chapter 5
Scanning an Original
Top Page
Glossary
Contents
Index
- Click the down-arrow for Image Type and select a setting from the drop-down list. (p.31)

Note
Your selection automatically sets the mode for the scanning job.
- Review the settings you see below the Image Type selection (Color Mode, Resolution, Width, Height, Size, Paper Size). (p.32-35)
If you are satisfied with these settings go on to the next step.
Note
- On the Simple Mode sheet you click one of the flat buttons (the black inverted triangles) to open a pop-up menu and select another setting.
- You can click the Edit Image Type button and define up to 12 custom Image Types in the Image Type Settings dialog box. (p.34)
- Click the Magazine check box (p.36) on when scanning magazine pages to enable moiré reduction and reduce dot patterns.
chapter 5
Scanning an Original
Top Page
Glossary
Contents
Index
- Click the Preview button to pre-scan the image and display it in the Preview Area.

chapter 5
Scanning an Original
Top Page
Glossary
Contents
Index
- Click a button in the Toolbar (p.27) to manipulate the image.

Note
You can click the Auto Tone button (p.29) to have ScanGear CS-U automatically adjust the color tones of the scanned image. This is the only color adjustment you can make in the Simple Mode. To perform more detailed color adjustments, click the Advanced Mode button then click the Tone tab to open the Tone Sheet.(p.41)
- Specify the scanning area.
Point to one corner of the area of the image that you want to scan. Click the left mouse button and, while holding the mouse button down, drag the mouse pointer to the opposite corner of the area you want to scan. Release the mouse button.
The area will be boxed in by a rectangle.

- Click the Scan button to scan the image.
The image is acquired in the software application.
- Close the ScanGear CS-U window. You can edit or save the image with the application software.
chapter 5
Scanning an Original
Top Page
Glossary
Contents
Index
Scanning in the Advanced Mode
This is a brief overview of the general procedure for previewing and scanning an original in the Advanced Mode.
- Place the original on the scanner.

For details about positioning the original on the scanner, see your scanner user's manual.
Note
-
Start the software application you are going to use.
-
Confirm that your scanner is selected in the Select Source (or its equivalent) dialog box. (p.60)
-
Start ScanGear CS-U as a TWAIN driver.
The methods for starting TWAIN drivers vary between application programs. See the respective manuals for application programs.
chapter 5
Scanning an Original
Top Page
Glossary
Contents
Index
- The ScanGear CS-U main window opens.

If the Simple Mode main window appears, click the Advanced Mode button.

Note
If you see an image in the Preview Area this means one of the preview settings has been switched on with the Preferences sheet. : Otherwise, the Preview Area is empty.
- In the Main sheet adjust the settings for the Color Mode, Output Resolution, Selection (Scanning area), and Scale.
chapter 5
Scanning an Original
Top Page
Glossary
Contents
Index
-
In the Scanner sheet, specify a variety of settings for operation of the scanner. (p.53)
-
Click the Preview button to pre-scan the image and display it in the Preview Area.

- Click a button in the Toolbar (p.27) to manipulate the image.
chapter 5
Scanning an Original
Top Page
Glossary
Contents
Index
-
Adjust the image quality with the tools and options provided on the Tone (p.41) or Halftone (p.52) sheet.
-
Specify the scanning area.
Point to one corner of the area of the image that you want to scan. Click the left mouse button and, while holding the mouse button down, drag the mouse pointer to the opposite corner of the area you want to scan. Release the mouse button.
The area will be boxed in by a rectangle.

- After performing all the settings, click the Scan button to scan the image.
The image is acquired in the software application.
- Close the ScanGear CS-U window. You can edit or save the image with the application software.
chapter 5
Scanning an Original
Top Page
Glossary
Contents
Index
Scanning Film
Use the following procedures to scan 35 mm film with the film adapter unit built into the scanner.

Please see the Getting Started guide supplied with the scanner to learn how to set film on it.
Note
-
Place the film in the film guide, set the loaded film guide on the platen and close the document cover.
-
Select Film Adapter as the Image Source.
In Advanced mode, click the Scanner tab and select it.
The Preview area shape will change to a horizontal rectangle and allow you to set the film type.


Simple Mode Advanced Mode
chapter 5
Scanning an Original
Top Page
Glossary
Contents
Index
3. Select the film type.
Select positive or negative, color or monochrome to match your film.


Advanced Mode
Simple Mode
4. Click the Preview button.
The image is displayed in the preview area. Specify the scan area of the preview image.

- Set the color mode, resolution, magnification and color adjustments as required.
6. Click the Scan button.
The image will be sent to the application started by ScanGear CS-U.
Top Page
Glossary
Contents
Index
Settings in the Windows Control Panel
Opening Scanners and Cameras Properties
General Settings
Events Settings
Preferences Settings
Color Management Settings
Top Page
Glossary
Contents
Index
Opening Scanners and
Cameras Properties
You can specify some settings for ScanGear CS-U with using Scanners and Cameras properties in Windows Control Panel.
Scanners and Cameras Properties dialog can be opened with the following procedures. Be sure to close ScanGear CS-U for this operation.
- On the Windows desktop click the Start button, point to Settings, and click Control Panel.
- In the Control Panel window double-click the Scanners and Cameras icon.
- In the Scanners and Cameras Properties window, click the name of the scanner, and click the Properties button.

chapter 6
Preferences Settings
Top Page
Glossary
Contents
Index
- In the Properties window, click the appropriate tab (General, Events, Preferences or Color Management) to open the respective sheet.

- Confirm that the settings are appropriate. Otherwise make changes as necessary. After the changes are made, click the Apply button to validate the changes.
- Click the OK button. The dialog is closed and the Scanners and Cameras properties dialog is activated.
- Click the OK button. The setting are completed. The changes will be effective the next time you launch the ScanGear CS-U.
chapter 6
Preferences Settings
Top Page
Glossary
Contents
Index
General Settings
The General sheet provides details the name of the connected scanner, its current status, and a button for diagnostic testing.

Executing a Diagnostic Test
Follow the procedure below to execute the scanner diagnostic test.
- Click the Test Scanner button.
The scanner diagnostic test begins. If the test detects no problems, a message will tell you that the scanner has passed the diagnostic test.
- Click the OK button.

You cannot perform the scanner diagnostic test while ScanGear CS-U is starting.
Note
chapter 6
Preferences Settings
Top Page
Glossary
Contents
Index
Events Settings
The Event sheet allows you to select the software application that you want to start when you press the Start button on the scanner.

Scanner events
Select the button for which the scanner events will be set.
Select Canon Scanner Push Button for the button on the front of the scanner, or select Canon FAU Push Button for the film scan button on top of the document cover.
Send to this application
The list box provides the names all of the TWAIN-compliant software applications which can be started when you press the Start button on the scanner. Click the check box to select the software application to be started by pressing the Start button on the scanner.
After installing all the software using the CanoScan Setup Utility CD-ROM, when the Canon Scanner Push Button is selected, only CanoScan Toolbox CS has a check mark beside it, and when the Canon FAU Push Button is selected, only CanoScan Toolbox FAU has a check mark beside it.
chapter 6
Preferences Settings
Top Page
Glossary
Contents
Index
Disable device events
Click this check box off to disable this feature. Clicking this check box off disables the Start button on the scanner (nothing will happen if the button is pressed).

Note
The settings will become effective for the button for which the scanner events have been selected.
To set both buttons, click the Apply button after you have finished the settings for one button and then adjust the settings for the other button.
Top Page
Glossary
Contents
Index
Preferences Settings
When application hides the driver user interface
Some application softwares such as an OCR software will not display the ScanGear CS-U main window while scanning. With such application softwares, scanning is executed with the settings of the application software so that the Color Mode setting cannot be changed.
In this setting sheet, placing a check mark in the check box of Text Enhanced (OCR) instead of B&W will execute the scan in the Text Enhanced (OCR), regardless of the application software setting.
• Text Enhanced (OCR) instead of B&W
When you place a check mark in this check box, the scan will be executed in Text Enhanced (OCR), if even the application software sets the Color Mode to Black and White. The default setting is Off.
Color Settings
When the Color Mode is set to Color, you can select the color adjusting method for scanning from Standard, Canon ColorGear Color matching or None. The default setting is Standard.
- Standard
This setting adjusts the colors of the scanned original to match colors displayed on the monitor. This setting is suitable when you are viewing the scanned image on the monitor with album softwares or such.
- Canon ColorGear Color matching
The adjustment is automatically made in order to make the colors of the scanner, monitor and printer the same. This reduces the inconvenience for color adjustments of the monitor and printer. Select this setting when you output the scanned image to a color printer.
chapter 6
Preferences Settings
Top Page
Glossary
Contents
Index
•None
No adjustment is made. Select this setting when you yourself will adjust the image with the color adjustment function of the ScanGear CS-U or with other graphic softwares.

Note
When you specify "Canon ColorGear Color Matching" setting, the Auto Tone button will be grayed out and the Tone sheet in the Advanced Mode will not be displayed.
Preview at opening of ScanGear CS-U
The preview opening settings determine what is displayed in the Preview Area every time ScanGear CS-U is launched from the parent software application.
• Automatically execute a preview
This setting switches the automatic preview feature on. When this feature is selected, a preview is executed automatically when ScanGear CS-U is launched, and an image of the original on the scanner is displayed in the Preview Area.
- Display saved preview image
This setting switches the preview image cache feature on. When this feature is selected, the image in the Preview Area is saved when ScanGear CS-U is closed and then displayed again the next time ScanGear CS-U is launched. Clicking the Clear button clears the cached image from the previous launch. Any changes performed on the image in the Preview Area are reflected in the image saved for the next preview.
• None
Click this button to switch the automatic preview and preview image cache features off.
Automatically quit ScanGear CS-U after scanning
Click the check box if you want ScanGear CS-U to close every time you click the Scan button to scan an image.
chapter 6
Preferences Settings
Top Page
Glossary
Contents
Index
Color Management Settings
The Color Management sheet allows you to add or remove basic profiles for Canon ColorGear Color Matching.
- Click the Canon ColorGear Color Matching check box on in the Preferences sheet.
- The sRGB Color Space Profile is added automatically when ScanGear CS-U is installed.
- If several profiles have been added, only the most recent profile added is enabled.
- Even if you delete all profiles, the sRGB Color Space Profile will remain automatically selected.

Setting for Energy Saving
When you are not using the scanner for the preset period of time, the scanner lamp will automatically switch off for energy saving.
-
Right-click the scanner icon on the lower right corner of the screen and select [Set] from the pop-up menu. The dialog will appear.
-
Place a check mark in the [Shut Off Scanner Lamp] check box and specify [Whenever it's inactive] in increment of one minute.
As soon as you start ScanGear CS-U again, the lamp will switch back on.

Top Page
Glossary
Contents
Index
Troubleshooting
Pre-Scan Checklist
How to Avoid Problems
Troubleshooting Checklist
Top Page
Glossary
Contents
Index
Pre-Scan Checklist
Perform the checks on this short list before you begin troubleshooting specific problems.
- Make sure that the ScanGear CS-U software was installed successfully.
- Confirm that the cables between your computer and scanner are connected securely.
- Before scanning or previewing, check that the data source has been selected. If your scanner does not appear as an option when you select a TWAIN source to scan from your imaging software, you have to install ScanGear CS-U again. (p.12)
Top Page
Glossary
Contents
Index
How to Avoid Problems
Here is some general advice on avoiding problems in your scanning jobs:
- Start with the best possible original image to scan.
- Select only the part of the image you want to scan. Preview the image and select it with the Crop and Auto Crop buttons. Not only does a more precise selection save file space, but your image quality will be much higher.
- Check the output file size before beginning the scan. Make sure you have enough room if you are scanning files that require a large amount of disk space.
- Match your Color Mode to the output purpose. If you are scanning text, use the Text Enhanced mode. If you are scanning line art, use the Black and White setting, and so on.
- Match your scan resolution to the type of file you need. If you are scanning images for use as .GIF or .JPG files on the Web, you do not have to scan at 600 dpi. Although it is recommended that you scan at a higher resolution than you need for high-quality color images, you should balance that factor against your planned use for the image.
- Take advantage of the Tone sheet features to enhance your images. (p.41)
- Try to use TrueColor mode on your monitor so you can view your preview image as accurately as possible.
chapter 7
Troubleshooting
Top Page
Glossary
Contents
Index
- If you are using OCR software, scan in Text Enhanced at 300 dpi or higher.
• Take advantage of the preview feature and preview as much as you want before scanning.
Top Page
Glossary
Contents
Index
Troubleshooting Checklist
The scanner diagnostics test fails.
Problem: The Scanner Diagnostics test, started with the Test Scanner button on the Scanner sheet, returns a Test Failed message.
Cause: The scanning unit may not be in its home position.
Solution: Close the ScanGear CS-U window if it is open. Try turning the scanner off and back on again by unplugging and plugging in the USB cable. Then restart your computer.
Colors not what you expect.
Problem: The colors in the preview image appear different from the colors in the original image.
Cause1: The scanned colors need to be adjusted.
Solution: Make sure the Auto Tone button is selected. If further adjustments are necessary, use the Tone sheet buttons.
Cause2: The calibration slot on the film guide is obstructed.
Solution: Clear the item blocking the calibration slot.
The preview image of a photograph appears blurred but the scanned image of the same photograph appears sharp.
Problem: When zooming in on a photograph in the Preview area, the enlarged image appears blurred.
Cause: The preview scan uses a lower resolution than the final scan. If you zoom in on a preview image so it is enlarged, the image will not maintain its resolution in the same way as the final scanned image.
Solution: Select a magnified area and preview the image again. The scan should display a sharper image.
Top Page
Glossary
Contents
Index
The colors differ between the Preview and the Print
Problem: When printing the image, its color differ from the one in the Preview area.
Cause1: The toner of the printer is going short.
Solution: Confirm the toner of the printer.
Cause2: Canon ColorGear Color Matching may have not been selected when it was necessary.
Solution: Check that Canon ColorGear Color Matching is selected on the Preferences sheet.
Cause3: The settings of the printer driver, such as color balance or Gamma, do not match to the printer.
Solution1: Adjust the color balance in the printer driver manually.
Solution2: Change the Gamma value setting of the printer driver.
The software application cannot find the scanner.
Problem: When trying to scan, an error message says the scanner cannot be found.
Cause: Windows may not recognize your scanner.
Solution: Make sure the scanner is connected to your computer before you turned on the computer and started Windows. If not, connect the scanner. Then restart your computer. If this does not correct the problem, consult the scanner user manual for additional information about how to properly set up your scanner.
Some buttons are grayed-out.
Problem: Buttons in the Toolbar are grayed-out and not available.
Cause: Some functions are not available until an image has been previewed.
Solution: Preview an image.
chapter 7
Troubleshooting
Top Page
Glossary
Contents
Index
ScanGear CS-U does not launch.
Problem: ScanGear CS-U does not launch, the screen freezes, or another software application launches.
Cause1: The scanner may not be connected correctly.
Solution: Make sure the scanner is properly connected to your computer before you turn on the computer and start Windows. If not, connect the scanner. Then restart your computer.
Cause2: You may have chosen the wrong scanner source in your software application.
Solution: Make sure you selected the correct scanner in the parent software application. For details, see your software application documentation for instructions.
Cause3: The scanner configuration file may have been changed.
Solution: Uninstall ScanGear CS-U (p.16) then reinstall ScanGear CS-U (p.13).
Can't scan with the film adapter unit.
Problem: Can't scan with the film adapter unit.
Cause: Film adapter unit's connector cable is detached.
Solution: Attach the film adapter unit's connector cable correctly.
Top Page
Glossary
Contents
Index
Scanning is too slow.
Problem: The scanner is taking an unusually long time to print or scan.
Cause1: The selected output resolution of the image may be too high for the resolution of your printer, or your computer may be low on memory.
Solution: Before scanning the image, make sure you have set the Scan Resolution on the Main tab to not exceed the resolution of your printer. Also check to see if there is enough memory available in your computer. Before scanning, quit other applications that are not in use.
Cause 2: DMA option for computer's hard disk drive is not turned on.
Solution: Windows 98: Turn on the DMA option in the System Properties dialog as described below.
Right-click the [My Computer] icon on the Windows desktop, select [Properties] from the pop-up menu and click the [Device Manager] tab in the System Properties dialog. In the [Disk Drives] category, select the appropriate hard disk and click the [Properties] button on the Device Manager tab. Click the [Settings] tab and place a check in the [DMA] option. Restart the computer. (Please consult the manufacturer of your computer for confirmation that the DMA function is supported.)
Windows 2000: Turn on the DMA option. The procedures are similar to those for Windows 98 with a few variations.
chapter 7
Troubleshooting
Top Page
Glossary
Contents
Index
Parts of images are missing or not aligned.
Problem: Some characters are missing from the image in the Preview Area, or the image is not aligned in the Preview Area.
Cause: The page has been placed on the scanner improperly.
Solution: Check the scanner and place the original correctly to adjust the image.
Image is too light or too dark compared to the original.
Problem: Scanned or printed image is much lighter or darker than the original.
Cause: Image and color adjustments may not have been set properly.
Solution: The best solution is to scan the image using all default settings again. Then make imaging and color adjustments as necessary.
The preview image is too small on the monitor
Problem: The image in the Preview Area is very small, and cannot be viewed in the Preview Area for adjustment.
Cause: If you have a high-resolution setting on your monitor, the ScanGear CS-U window is smaller than if you had a lower-resolution setting.
Solution: Drag the Window Resize Corner (p.26) on the lower right of the ScanGear CS-U window to enlarge the entire window or lower your monitor's resolution with the Control Panel.
Top Page
Glossary
Contents
Index
Glossary
Glossary
Top Page
Glossary
Contents
Index
Acquired Images
Images sent from your scanner software to the host graphics application.
Auto Crop
After you select an area of the screen by clicking the Crop button and dragging a rectangle around the object or text you want to crop, click the Auto Crop button to size the rectangle exactly to the size of the object or block of text enclosed in the rectangle.
Auto Tone Adjustment
Automatic analysis and adjustment of the image using Contrast/Brightness and Gamma settings.
Automatic Preview
When the automatic preview feature is switched on, the original on the scanner is pre-scanned immediately as ScanGear CS-U is launched from the parent software application. To switch this feature on and off, open the Preferences sheet for your scanner and click the button for "Automatically execute a preview". (p.78)
Bits and Bit Depth
A bit (Binary digit) is the smallest possible unit of information on a computer; it represents yes or no; on or off; 1 or 0. Bit Depth is used to describe the complexity of a graphic image.
One-bit, or bi-level, images are black and white. This is the Black and White setting in ScanGear CS-U. Eight-bit grayscale uses 256 shades of gray to accurately represent most black and white photographs or gray interpretations of color images. This is the
Grayscale setting in ScanGear CS-U. Twenty-four-bit color, also called True Color, uses three eight-bit channels, one channel each for Red, Green and Blue, to create up to 16.7 million colors. This is the Color setting in ScanGear CS-U.
Glossary
Top Page
Glossary
Contents
Index
Black-point
The darkest portion of an image scanned as Color or Grayscale. When you click on the image with the Black-point eyedropper, all tones darker than the selected sample tones are adjusted to black.
Brightness
The overall amount of lightness or darkness in an image. An image with maximum brightness tends toward white; an image with minimum brightness tends toward black. While contrast refers to the range and number of tones in an image, brightness refers to the intensity of tones.
Calibration
Calibration refers to the adjustment of color processing for input and output devices on a computer, so that the colors match throughout the process. For example, calibration ensures that the color image scanned on a scanner matches the original image when it is displayed on the computer monitor, as well as printed on a color printer.
Canon ColorGear Color Matching
Canon's process of matching the color profile of the input device (scanner) with the color profile of the output device (monitor), to yield the most accurate color image.
Canon ImageTrust
Canon's process of converting grayscale image (8 bits per pixel) to a black and white image (1 bit per pixel) to yield a more effective scan for optical character recognition (OCR) applications.
Channel
See Color Channels.
Glossary
Top Page
Glossary
Contents
Index
Clear button
The button that removes the current image from the Preview Area.
Color Channels
The red, green, or blue components of a color image. Color images contain 8 bits per pixel each for red, green, and blue channels, therefore each pixel has 24 bits. If you are scanning a color image, you can change the brightness and contrast of the individual red, green, and blue tones in your image. The Master channel is a combination of the three.
Color Matching
The range of colors your scanner can see may not match the range of colors your video monitor can produce. Color matching lets your system display colors so that the color on your monitor and printer matches the colors scanned. See also Canon ColorGear Color Matching.
Color Mode
The type of scan used to scan an image, differentiated by the number of bits per pixel. ScanGear CS-U has the following Color Modes: Color, Grayscale, Text Enhanced(OCR), and Black and White.
Contrast
Contrast refers to the difference between the lightest light and the darkest dark in the image. A low contrast value indicates that the difference between dark shades and light shades is not very great. A high value indicates a great difference between dark and light shades. While brightness refers to the intensity of tones in an image, contrast refers to the range and number of tones in an image.
Glossary
Top Page
Glossary
Contents
Index
Crop
The action of selecting part of an image. The Crop button on the ScanGear CS-U main window lets you select part of a preview image and re-preview or scan only that selected part.
Curve chart
The graph displayed in the Tone tab settings for the Auto Tone, Contrast/Brightness, Gamma, Histogram, and Special Tone Curves features. This graph describes the relationship between the color characteristics of the previewed image and the available feature settings.
Curve file
A file containing Special Tone Curve settings. (Tone tab-Special Tone Curves)
Custom curves
A user-defined Special Tone Curve that may be saved in a file. (Tone tab-Special Tone Curves)
Default
The preset factory settings on hardware or software.
Digitizing
The process of converting an image into computer-usable (digital) information that can be saved as a file, printed, faxed, or otherwise manipulated on your computer.
dpi
The abbreviation for dots per inch. The resolution of a monitor or printer is measured in how many dots per horizontal inch it can display or print. See also Pixel, Optical resolution, Resolution.
Glossary
Top Page
Glossary
Contents
Index
End points
The points at each end of a preset or custom tone curve. The curve end points cannot be deleted. If they are dragged to or past an edge, they remain on the edge. Add points to the curve by clicking anywhere in the curve box.
Executive
A standard U.S. paper size measuring 7.25 x 10.5 in (184.2 x 266.7 mm)
Eyedropper
A Histogram tool used to sample the Black-point, Mid-point, and White-point areas in the previewed image. (Tone tab - Histogram)
FAU
An acronym for Film Adapter Unit, an optional backlighting device that allows you to scan film negatives or slides to create photographic images. The CanoScan D660U features an ultra-compact film adapter unit built into the document cover. Provided as standard equipment, the film adapter unit can scan a single frame of 35 mm film.
Full Platen
The maximum scanning area on the scanner's document glass, 216 x 297 mm (width of U.S. Letter and length of A4 paper sizes).
Gamma Curve
The Gamma Curve lets you change the midtones of colors to increase the contrast between colors and enhance the overall image. When you increase the Gamma value, light colors are made lighter, and dark colors are made darker. The graphed curve represents the relationship between input and output values for the midtones of the preview image.
Glossary
Top Page
Glossary
Contents
Index
Grayscale
Grayscale refers to a single-channel image made up of 256 shades of gray, ranging from white to black, that represent all tones in an image.
Halftoning
A method of simulating intermediate tones in black-and-white images by varying the patterns dots and lines. Halftoning is usually used for photographs, or other images with intermediate tones, scanned in Black and White.
Height
The Height text box contains the height of the current selection, or, if there is no selection, the maximum vertical output size, based on the currently selected Paper Size.
Histogram
The Histogram displays the distribution of bright and dark pixels for each color channel in the previewed image. The Eyedropper tool on the histogram graph lets you redefine the tonal profile.
Keep Proportions button
The Keep Proportions button affects the selection and the Width and Height text boxes. When you click the Keep Proportions button, the image size is maintained in the same proportion whenever you change either the width or the height.
Low contrast
An image that has low contrast does not have many distinct differences between tones.
Glossary
Top Page
Glossary
Contents
Index
Mid-point
The mid-tone portion of the image scanned as Color or Grayscale. When you click on the image with the Mid-point eyedropper, all tones between the black-point and white-point are adjusted in relation to the mid-point setting.
Mid-tone
Mid-tones are the middle range of tones in an image, between highlights and shadows. Midtones can be adjusted for color and grayscale images with the Gamma tool.
moiré reduction
Moiré reduction can be switched on with the Descreen button on the Scanner sheet. Moiré patterns are caused by poor dithering as a result of scanning images from published materials like newspapers, magazines, books, etc. When the Descreen feature is on, moiré reduction smoothes the overall appearance of the image and enhances image quality.
OCR (Optical Character Recognition)
OCR (Optical Character Recognition) software converts text images into actual text characters readable by a word-processing program or similar application. The Text Enhanced scan setting sharpens black and white contrast to assist in the accurate recognition of characters in OCR software.
Optical resolution
A scanner's resolution capability. See also dpi, Resolution.
Output Dimensions
The final dimensions of the scanned image, based on paper size, cropping, and scaling.
Glossary
Top Page
Glossary
Contents
Index
Output size
The size of the acquired image, calculated by multiplying the width and height by the scale percentage.
Overexposed
An image that was exposed to too much light while it was being photographed.
Paper Size
An option on the Scanner sheet that determines the initial scanning area. Business card, Statement, B5, Executive, Letter, A4 and Full Platen are available.
Pixel
An acronym for "picture element," a pixel is the smallest element used to create a screen image. It can contain up to 42 bits of color information.
Platen
The scanner's document glass, where originals are placed for scanning.
Preset Curves
A set of curves designed to fix common photographic image problems such as underexposure, overexposure, or low contrast.
Preview Area
The area located to the left of the ScanGear CS-U main window where the image is displayed before the scan occurs. When you click the Preview button, the image on the scanner is scanned into the Preview Area, but not acquired by the application.
Preview image cache
When the preview image cache feature is switched on, the image in the Preview Area from the previous session with ScanGear CS-U is saved and displayed the next time ScanGear CS-U is launched from the parent software application. To switch this feature on and off, open the Preferences sheet for your scanner and click the button for "Display saved preview image".
Proportion
The ratio of width to height. When you click the Keep Proportions button, the image size is maintained in the same proportion whenever you change either the width or the height.
Resolution
The degree of detail, translated into the number of pixels or dpi, which a device such as a scanner, video monitor, printer, or other image-displaying device, can display or reproduce. See also dpi, Pixel, Scan Resolution.
Rotate Left
The Rotate Left tool rotates the preview display 90 degrees counterclockwise. If the Preview Area is in portrait orientation, it becomes landscape and vice versa.
Rotate Right
The Rotate Right tool rotates the preview display 90 degrees clockwise. If the Preview Area is in portrait orientation, it becomes landscape and vice versa.
Sampling
In scanning, sampling is the process of measuring and recording the tonal or color value in an image and converting it to digital information.
Glossary
Top Page
Glossary
Contents
Index
Scale
The Scale setting lets you specify an output size for the selected image as a percent of the original width and height.
Scan button
Clicking the Scan button scans the original and sends it to the host software application.
Scanner
An input device that scans an original with a light source, and converts the image tones to digital information for computer applications. The digital information can be saved as a file, or converted to a text file using OCR software.
Scan Resolution
A list of preset levels of detail, expressed in dots per inch (dpi), for the scanned image, available from the Resolution list. See also dpi, Pixel, Resolution.
Sliders
On some of the controls in ScanGear CS-U, for example, the Contrast/Brightness tool you click the slider and move it to the left or to the right to change the values.
Statement
A U.S. standard paper size measuring 5.5 x 8.5 in (139.7 x 215.9 mm).
Status Bar
The information line at the lower border of the ScanGear CS-U main window which provides helpful information about the current image and settings.
Glossary
Top Page
Glossary
Contents
Index
Test Scanner button
The Test Scanner button on the Scanner sheet starts diagnostic tests and reports if there are any problems with the scanner.
Text Enhanced(OCR)
A feature used by ScanGear CS-U to increase the accuracy of text scans. When Text Enhanced is selected for the Color Mode, images are scanned as Grayscale (8 bits per pixel) and converted to Black and White (1 bit per pixel) using Canon ImageTrust processing software.
Threshold
In a black-and-white image, the point at which a gray pixel is determined to become either black or white. The Threshold slider is on the Halftone sheet. Adjust the Threshold value when you are scanning a grayscale or halftone original with the Black and White setting.
Tone Curve
The curve displayed with the Tone tab tools to indicate the Black-, Mid-, and White-point tones in a color or grayscale preview image. You cannot edit the curve except with the Special Tone Curves tool.
Tone sheet
The Tone sheet contains tools that let you adjust and correct the image tone. The Tone sheet tools include Auto Tone, Contrast/Brightness, Gamma, Histogram, and Special Tone Curves.
Toolbar
A set of ScanGear CS-U tool buttons, located above the Preview Area, for image selection, orientation, and other basic adjustments.
Glossary
Top Page
Glossary
Contents
Index
TWAIN
TWAIN refers to an industry standard for transferring information from devices (such as a scanner or digital camera) to your computer. One interpretation of the acronym is "Technology Without An Interesting Name."
Underexposed
A dark photographic image that was exposed to too little light when it was photographed.
Unsharp Mask
Sharpens an image, like a photograph that is slightly out of focus, by emphasizing the contrast to make outlines more clear.
USB
An abbreviation of Universal Serial Bus, an interface for external devices connected to a computer and easily used simply by plugging and unplugging the USB cable while the computer is switched on.
White-point
The lightest portion of the image scanned as Color or Grayscale. When you click on the image with the White-point eyedropper, all tones lighter than the selected sample tone are adjusted to white.
Width
The Width text box contains the width of the current selection or, if there is no selection, the maximum horizontal output size, based on the currently selected paper size.
Width-Height ratio
Proportion of the image. To keep the width-height ratio intact, click the Keep Proportions button before changing the width or height values.
Glossary
Top Page
Glossary
Contents
Index
X and Y Axes
The X and Y axes on the Tone sheet curve chart represent, respectively, the input image color and output image color.
Zooming
Enlarging an image or a selected part of the image in the preview window or in a graphics application.
Top Page
Glossary
Contents
Index
Index
Index
Top Page
Glossary
Contents
Index
A
Acquired Images ... 90
Advanced Mode ... 20
Advanced Mode button ... 21
Advanced Mode Main Window ... 23, 37
All Reset button ... 43
Auto Crop ... 90
Auto Crop Button ... 28
Auto Tone Adjustment ... 90
Auto Tone Button ... 29
Auto Tone button ... 41
Automatic Preview ... 90
B
Bits and Bit Depth ... 90
Black-point ... 48, 91
Brightness ... 44, 91
C
Calibration ... 91
Canon ColorGear Color
Matching ... 79, 91
Canon ImageTrust ... 91
CanoScan Setup Utility CD-ROM ... 13, 16
Channel ... 44, 45, 47, 49, 91
Clear Button ... 26, 30
Clear button ... 92
Close Box ... 26
Close the ScanGear CS-U ... 64, 68
Color Channels ... 92
Color Management Settings ... 79
Color Matching ... 92
Color Mode ... 32, 37, 92
Black and White ... 37
Color (photos) ... 38
Grayscale ... 37
Text Enhanced(OCR) ... 38
Contrast ... 44, 92
Contrast/Brightness button ... 42
Contrast/Brightness Sheet ... 44
Crop ... 93
Crop Button ... 27
Curve chart ... 93
Curve file ... 93
Custom curves ... 93
D
Default ... 93
Descreen ... 54
Digitizing ... 93
dpi ... 93
E
Edit Image Type Button ... 34
End points ... 94
Energy Saving Mode ... 55
Index
Top Page
Glossary
Contents
Index
Events Settings ... 75
Disable device events ... 76
Scanner events ... 75
Send to this application ... 75
Executing a Diagnostic Test ... 74
Executive ... 94
Eyedropper ... 94
Eyedroppers ... 48
F
FAU ... 94
Film Adapter ... 69
Film Type ... 36, 54
Film type ... 70
Full Platen ... 94
G
Gamma ... 46
Gamma button ... 42
Gamma Curve ... 94
Gamma Sheet ... 45
Grayscale ... 95
H
Halftone Sheet ... 52
Halftoning ... 95
Height ... 34, 95
Help Button ... 29
Histogram ... 95
Histogram button ... 42
Histogram Sheet ... 47
|
Image Source ... 35, 53, 69
Image Type ... 31
Install ... 12
K
Keep Proportions button ... 40, 95
L
Load Button ... 43
Low contrast ... 95
M
Magazine ... 36
Main Sheet ... 37
Mid-point ... 48, 96
Mid-tone ... 96
Mirror Button ... 28
Mode Switching Button ... 26
moiré reduction ... 96
Move Image Button ... 27
Index
Top Page
Glossary
Contents
Index
N
Negative/Positive Button ... 28
0
OCR (Optical Character Recognition) ... 96
On-line Help ... 10
Optical resolution ... 96
Output Dimensions ... 96
Output Resolution ... 39
Output size ... 97
Overexposed ... 97
P
Paper Size ... 35, 54, 97
Pixel ... 97
Platen ... 97
Pre-scan ... 63, 67
Preferences Settings ... 77
Automatically quit ScanGear CS-U after scanning ... 78
Color Settings ... 77
Preview at opening of ScanGear CS-U ... 78
When application hides the driver user interface ... 77
Preset Curves ... 97
Preview ... 63, 67, 70
Preview Area ... 26, 97
Preview Button ... 26, 30
Preview image cache ... 98
Proportion ... 98
R
Reset ... 48
Reset button ... 43
Resolution ... 34, 98
Rotate Left ... 98
Rotate Left Button ... 28
Rotate Right ... 98
Rotate Right Button ... 29
Rulers Button ... 29
S
Sampling ... 98
Save Button ... 43
Scale ... 40, 99
Scan ... 64, 68, 70
Scan Button ... 26, 30
Scan button ... 99
Scan Resolution ... 99
ScanGear CS-U main window ... 61, 66
Scanner ... 99
Scanner Gamma ... 46
Scanner Sheet ... 53
Scanners and Cameras properties ... 72
Scanning area ... 64, 68
Scanning Film ... 69
Select Special Curve ... 49
Index
Top Page
Glossary
Contents
Index
Selection ... 40
Setting Tab ... 26
Shut Off Lamp Time ... 55
Simple Mode ... 20
Simple Mode button ... 21
Simple Mode Main Window ... 22, 31
Simple Mode sheet ... 31
Size ... 34
Sliders ... 99
Special Tone Curves ... 50
Special Tone Curves buttons ... 42
Special Tone Curves Sheet ... 49
Start ScanGear CS-U ... 61, 65
Statement ... 99
Status Area ... 26
Status Bar ... 99
T
Test Scanner ... 55
Test Scanner button ... 100
Text Enhanced(OCR) ... 100
Threshold ... 52, 100
Title Bar ... 26
Tone Curve ... 100
Tone Sheet ... 41
Tone sheet ... 100
Tool Bar ... 26
Toolbar ... 27, 100
Troubleshooting ... 80
TWAIN ... 101
TWAIN driver ... 61, 65
U
Underexposed ... 101
Uninstall ... 16
Uninstall (Windows 98) ... 17
Units ... 40
Unsharp Mask ... 55, 101
USB ... 101
USB port ... 12
W
White-point ... 48, 101
Width ... 34, 101
Width and Height ... 40
Width-Height ratio ... 101
Window Resize Corner ... 26
Windows 2000 Professional ... 8
Windows 98 ... 8
X
X and Y Axes ... 102
Z
Zoom Tool Button ... 28
Zooming ... 102
CANON COMPUTER SYSTEMS, INC.
2995 Redhill Avenue
Costa Mesa, CA 92626, U.S.A.
1-800 OK CANON
http://www.ccsi.canon.com
CANON (UK) LTD.
Woodhatch, Reigate
Surrey RH2 8BF, United Kingdom
For technical support, please contact Canon
Helpdesk.
Helpdesk:
P.O. Box 431, Wallington, Surrey SM6 0XU
TEL: (08705) 143 723
FAX: (08705) 143 340
For sales enquiries: (0121) 666-6262
CANON FRANCE S.A.
1 Thomas Holt Drive, North Ryde, Sydney N.S.W.
2113, Australia
Info-Line: (02) 9805 2864
Fred Thomas Drive, Takapuna
P.O. Box 33-336, Auckland, New Zealand
Info-Line: 0900-522666
CANON HONGKONG CO., LTD.
9/F, The Hong Kong Club Building
3A Chater Road, Central, Hong Kong
TEL: (852) 2739 0802
FAX: (852) 2739 6428
CANON SINGAPORE PTE. LTD.
79 Anson Road #09-01/06
Singapore 079906
CANON MARKETING SERVICES PTE. LTD.
2, Alexandra Road, #04-01A
Delta House Singapore 159919
Tel: 65 2735311 Fax: 65 2733317
CANON MARKETING (MALAYSIA) SDN. BHD.
Wisma General Lumber, Block D, Peremba Square
Saujana Resort, Section U2, 40150 Shah Alam
Selangor Darul Ehsan, Malaysia
Tel: 603-744-6000
Fax: 603-745-0505
CANON MARKETING (THAILAND) CO. LTD.
2nd Floor, Indosuez House
152 Wireless Road, Bangkok 10330 Thailand
Tel: 66-2-6514000 Fax: 66-2-6514096
CANON MARKETING (PHILIPPINES) INC.
Marvin Plaza Building, 2153 Don Chino Roces Ave,
Makati City, Metro Manila, Philippines
Tel: 632-812-6047 Fax: 632-812-0067/810-9797
CANON CANADA, INC.
6390 Dixie Road, Mississauga
Ontario L5T 1P7, Canada
1-800 OK CANON
http://www.canon.ca
CANON LATIN AMERICA, INC.
6505 Blue Lagoon Drive, Suite 325
Miami, Florida 33126, U.S.A.
CANON EUROPA N.V.
P.O. Box 2262 1180 EG Amstelveen,
The Netherlands
CANON INC.
30-2, Shimomaruko 3-chome, Ohta-ku
Tokyo 146-8501, Japan
- FOR CANOSCAN D660U COLOR SCANNER
- USER'S GUIDE
- COPYRIGHT NOTICE
- TOP PAGE
- GLOSSARY
- CONTENTS
- INDEX
- CHAPTER 1 BEFORE YOU BEGIN
- CHAPTER 2 INSTALLING SCANGEAR CS-U
- CHAPTER 3 SIMPLE MODE AND ADVANCED MODE
- CHAPTER 4 WHAT IS ON THE SCREEN
- CHAPTER 5 SCANNING AN ORIGINAL
- CHAPTER 6 SETTINGS IN THE WINDOWS CONTROL PANEL
- CHAPTER 7 TROUBLESHOOTING
- CUSTOMER SUPPORT HELP DESK
- BEFORE YOU BEGIN
- WELCOME TO SCANGEAR CS-U
- CHAPTER
- SYSTEM REQUIREMENTS
- HARDWARE
- SOFTWARE
- GETTING HELP IN SCANGEAR CS-U
- INSTALLING SCANGEAR CS-U
- INSTALLING
- SCANGEAR CS-U
- UNINSTALLING SCANGEAR CS-U
- UNINSTALLING SCANGEAR CS-U (WINDOWS 98)
- SIMPLE MODE AND ADVANCED MODE
- WHAT ARE THE SIMPLE MODE AND ADVANCED MODE
- SIMPLE MODE
- ADVANCED MODE
- SWITCHING BETWEEN THE SIMPLE AND ADVANCED MODES
- SIMPLE MODE MAIN WINDOW
- ADVANCED MODE MAIN
- WINDOW
- WHAT IS ON THE SCREEN
- MAIN WINDOW
- TOOLBAR
- CROP BUTTON
- MOVE IMAGE BUTTON
- ZOOM TOOL BUTTON
- AUTO CROP BUTTON
- NEGATIVE/POSITIVE BUTTON
- MIRROR BUTTON
- ROTATE LEFT BUTTON
- ROTATE RIGHT BUTTON
- RULERS BUTTON
- AUTO TONE BUTTON
- HELP BUTTON
- SCANNING BUTTONS
- PREVIEW BUTTON
- SCAN BUTTON
- CLEAR BUTTON
- IMAGE TYPE
- COLOR MODE
- RESOLUTION
- EDIT IMAGE TYPE BUTTON
- WIDTH
- HEIGHT
- SIZE
- IMAGE SOURCE
- PAPER SIZE
- FILM TYPE
- MAGAZINE
- ADVANCED MODE MAIN WINDOW
- OUTPUT RESOLUTION
- SELECTION
- THE TONE SHEET
- TONE SHEET BUTTONS
- CONTRAST/BRIGHTNESS BUTTON
- GAMMA BUTTON
- HISTOGRAM BUTTON
- SPECIAL TONE CURVES BUTTONS
- COMMON BUTTONS
- LOAD BUTTON
- SAVE BUTTON
- RESET
- RESET BUTTON
- ALL RESET
- ALL RESET BUTTON
- CHANNEL
- CONTRAST
- BRIGHTNESS
- GAMMA (SCANNER GAMMA)
- EYEDROPPERS (BLACK-POINT, MID-POINT, WHITE-POINT)
- SELECT SPECIAL CURVE
- EDITING A SPECIAL TONE CURVE DIRECTLY
- HERE ARE SOME HINTS FOR EDITING CURVES
- THE HALFTONE SHEET
- HALFTONING
- THRESHOLD
- THE SCANNER SHEET
- DESCREEN
- UNSHARP MASK
- TEST SCANNER
- SCANNING AN ORIGINAL
- PREPARING FOR THE SCANNING JOB
- QUICK START
- PREVIEWING AND SCANNING AN ORIGINAL
- SCANNING IN THE SIMPLE MODE
- SCANNING IN THE ADVANCED MODE
- SCANNING FILM
- SELECT THE FILM TYPE
- CLICK THE PREVIEW BUTTON
- CLICK THE SCAN BUTTON
- SETTINGS IN THE WINDOWS CONTROL PANEL
- OPENING SCANNERS AND
- CAMERAS PROPERTIES
- PREFERENCES SETTINGS
- GENERAL SETTINGS
- EXECUTING A DIAGNOSTIC TEST
- EVENTS SETTINGS
- SCANNER EVENTS
- SEND TO THIS APPLICATION
- DISABLE DEVICE EVENTS
- WHEN APPLICATION HIDES THE DRIVER USER INTERFACE
- TEXT ENHANCED (OCR) INSTEAD OF B&W
- COLOR SETTINGS
- STANDARD
- CANON COLORGEAR COLOR MATCHING
- NONE
- PREVIEW AT OPENING OF SCANGEAR CS-U
- AUTOMATICALLY EXECUTE A PREVIEW
- DISPLAY SAVED PREVIEW IMAGE
- AUTOMATICALLY QUIT SCANGEAR CS-U AFTER SCANNING
- COLOR MANAGEMENT SETTINGS
- SETTING FOR ENERGY SAVING
- TROUBLESHOOTING
- PRE-SCAN CHECKLIST
- HOW TO AVOID PROBLEMS
- TROUBLESHOOTING CHECKLIST
- THE SCANNER DIAGNOSTICS TEST FAILS
- COLORS NOT WHAT YOU EXPECT
- THE PREVIEW IMAGE OF A PHOTOGRAPH APPEARS BLURRED BUT THE SCANNED IMAGE OF THE SAME PHOTOGRAPH APPEARS SHARP
- THE COLORS DIFFER BETWEEN THE PREVIEW AND THE PRINT
- THE SOFTWARE APPLICATION CANNOT FIND THE SCANNER
- SOME BUTTONS ARE GRAYED-OUT
- SCANGEAR CS-U DOES NOT LAUNCH
- CAN'T SCAN WITH THE FILM ADAPTER UNIT
- SCANNING IS TOO SLOW
- PARTS OF IMAGES ARE MISSING OR NOT ALIGNED
- IMAGE IS TOO LIGHT OR TOO DARK COMPARED TO THE ORIGINAL
- THE PREVIEW IMAGE IS TOO SMALL ON THE MONITOR
- ACQUIRED IMAGES
- AUTO CROP
- AUTO TONE ADJUSTMENT
- AUTOMATIC PREVIEW
- BITS AND BIT DEPTH
- BLACK-POINT
- CALIBRATION
- CANON IMAGETRUST
- COLOR CHANNELS
- COLOR MATCHING
- CROP
- CURVE CHART
- CURVE FILE
- CUSTOM CURVES
- DEFAULT
- DIGITIZING
- DPI
- END POINTS
- EXECUTIVE
- EYEDROPPER
- FAU
- FULL PLATEN
- GAMMA CURVE
- GRAYSCALE
- HISTOGRAM
- KEEP PROPORTIONS BUTTON
- LOW CONTRAST
- MID-POINT
- MID-TONE
- MOIRÉ REDUCTION
- OCR (OPTICAL CHARACTER RECOGNITION)
- OPTICAL RESOLUTION
- OUTPUT DIMENSIONS
- OUTPUT SIZE
- OVEREXPOSED
- PIXEL
- PLATEN
- PRESET CURVES
- PREVIEW AREA
- SCALE
- SCANNER
- SCAN RESOLUTION
- SLIDERS
- STATEMENT
- STATUS BAR
- TEST SCANNER BUTTON
- TEXT ENHANCED(OCR)
- TONE CURVE
- TONE SHEET
- TWAIN
- UNDEREXPOSED
- USB
- WHITE-POINT
- WIDTH-HEIGHT RATIO
- X AND Y AXES
- ZOOMING
- A
- B
- C
- D
- E
- F
- G
- H
- K
- L
- M
- N
- P
- R
- S
- T
- U
- W
- X
- Z
- CANON COMPUTER SYSTEMS, INC
- CANON (UK) LTD
- HELPDESK
- CANON FRANCE S.A
- CANON HONGKONG CO., LTD
- CANON SINGAPORE PTE. LTD
- CANON MARKETING SERVICES PTE. LTD
- CANON MARKETING (MALAYSIA) SDN. BHD
- CANON MARKETING (THAILAND) CO. LTD
- CANON MARKETING (PHILIPPINES) INC
- CANON CANADA, INC
- CANON LATIN AMERICA, INC
- CANON EUROPA N.V
- CANON INC
Brand : CANON
Model : CanoScan D660U
Category : Scanner