Skyris 132M - Camera CELESTRON - Free user manual and instructions
Find the device manual for free Skyris 132M CELESTRON in PDF.


| Product Type | Monochrome Astronomy Camera |
| Brand | Celestron |
| Model | Skyris 132M |
| Sensor | 1/3" CMOS (Aptina MT9M032) |
| Resolution | 1280 x 1024 pixels (1.3 MP) |
| Pixel Size | 3.75 µm x 3.75 µm |
| Frame Rate | Up to 30 fps at full resolution |
| Interface | USB 2.0 |
| Mount | C/CS-mount (1.25" adapter included) |
| Dimensions (Camera Only) | 62 mm x 35 mm (diameter x length) |
| Weight | Approx. 90 g |
| Power Supply | USB bus-powered |
| Back Focus | 12.5 mm |
| Cooling | Passive (no active cooling) |
| Software | Compatible with Celestron Skyris software, ASCOM, and third-party capture apps |
| Functions | Planetary and lunar imaging, solar (with filter), guide camera |
| Maintenance | Keep sensor dust-free; use blower or dry cleaning with care |
| Safety | Never point at sun without approved solar filter |
| Spare Parts | 1.25" nosepiece, dust cap, USB cable available |
| Repair | Refer to authorized service center; no user-replaceable parts |
Frequently Asked Questions - Skyris 132M CELESTRON
User questions about Skyris 132M CELESTRON
0 question about this device. Answer the ones you know or ask your own.
Ask a new question about this device
Download the instructions for your Camera in PDF format for free! Find your manual Skyris 132M - CELESTRON and take your electronic device back in hand. On this page are published all the documents necessary for the use of your device. Skyris 132M by CELESTRON.
USER MANUAL Skyris 132M CELESTRON
USB 3.0 ASTRONOMICAL CMOS CAMERA
INSTRUCTIONAL MANUAL
INCLUDED ITEMS

SYSTEM REQUIREMENTS
// Computer with Windows XP, Vista, 7, or 8 (32-bit and 64-bit supported)
// Pentium ® M processor equivalent or higher, 1.7 GHz or higher
// USB 3.0 (for maximum performance) or USB 2.0
// 1 GB or more of system memory
// 20 GB or more hard disk space (recommended)
// Telescope with a 1.25" eyepiece holder or adapter with C-threads
// Motorized Mount, Altitude-Azimuth or German Equatorial (recommended)
CAMERA DRIVER INSTALLATION
- Insert the software CD into your computer's CD-ROM drive.

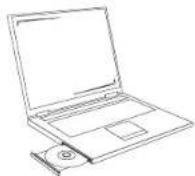
The language selection screen will appear.
- Select your language and click OK. The iCap Software launch screen will appear.

- Click Install Driver. The Driver Installation Wizard will appear and prompt you to connect your camera.

- Plug the Skyris camera into the computer's USB port using the included cable. If equipped, use a USB 3.0 port. The Driver Installation Wizard will automatically detect your Skyris model. Click Next and proceed through the prompts until the driver installation is complete.

Skyris will also operate in USB 2.0 at a reduced frame rate.
SOFTWARE INSTALLATION
- Click Install iCap and follow the prompts to complete installation.
- Click Install RegiStax and follow the prompts to complete installation.
CONNECTING THE CAMERA TO A TELESCOPE
- Remove the dust cap on the camera body and thread the 1.25" nosepiece to the camera body. The threaded ring on the camera body should still be attached.
- Insert the camera into the 1.25" eyepiece holder on your telescope. The camera body can also attach to a camera adapter with C-threads, typically requiring the use of a T-to-C adapter.


Optional T-to-C adapter (not included)

CAPTURING IMAGES
Detailed Solar System images are created by stacking several individual images or "frames" to one master image. The images are captured in video, allowing you to accumulate hundreds of frames in just a few seconds. The video fi les will later be exported to RegiStax and processed as shown in "Processing Images."
-
Set up your telescope and point it at a bright target such as the Moon or Jupiter. Center the target in your eyepiece, then remove the eyepiece. Remove the diagonal if you are using one. Some refractor telescopes may require an extension tube when used without the diagonal.
-
Plug the camera into your computer's USB port. If equipped, use the USB 3.0 port on your computer, which may also bear the USB SuperSpeed logo (see right). When connecting the cable to Skyris, use the threaded fasteners to provide the most secure connection.
-
Insert the camera into the 1.25" eyepiece holder on your telescope as shown previously in this manual, "Connecting the Camera to a Telescope."
-
Locate the iCap shortcut on your desktop and open iCap.


iCap 2.3
-
Select your Skyris camera from the Available Video Capture Devices window and click OK.
-
The live video window will automatically appear and display the framerate. Gain and exposure are set to automatic by default, but you may need to make adjustments for the object you are imaging.
-
If a defocused image appears, focus the telescope until it appears sharp on your screen. If no image appears, confirm your telescope is still centered on a bright object and proceed to step 8.
-
Go to the Device menu and select Properties. Click the Exposure tab to access the Gain and Exposure. Uncheck the Auto box for each to allow for adjustments.


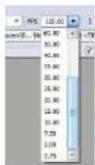
Video framerate will depend on the Skyris model used and the exposure. If the exposure time is slower than the camera's maximum frame rate, the FPS count will closely match the exposure time (1/exposure time).
For iCap version 2.3, use the dropdown menu to select the framerate closest to the exposure time used. For example, if the exposure time is 1/34 sec, select 30 FPS.
9. In the Capture menu, select Toggle Recording Info Dialog.
10. Click on the Codec icon to access the Recording Settings window.
We highly recommend selecting Uncompressed to retain the full image quality and size. Note that Uncompressed will consume a significant amount of hard disk space in a very short time. Be mindful of the file sizes when creating AVI files.
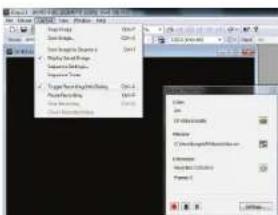
ChooseRGB32 or Y800. For Skyris color cameras, choose RGB32 which will record in color, making export easier. You can also select Y800 in color models; however, you must debayer (color convert) the image later when processing. RegiStax is included with your software CD and will debayer the images.
You may also capture in Y16 mode to retain the full bit depth of the camera. Y16 video must be exported to a program that supports 16-bit video, which is not included with Skyns.

-
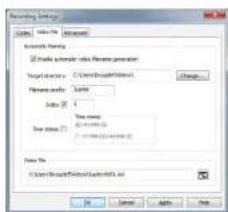
Click on the Video File tab to access the file naming convention settings. Choose the folder path you wish to save your video, and select an object name and time stamp if desired. Check the Index box to automatically number your video files.
-
Click the Advanced tab to access custom video recording limits. You can choose to limit the recording by the number of frames or length of time. Remember that these AVI files will consume hard disk space very quickly. Click OK when finished.
-
Click the red record icon to begin recording.



ROI SUBFRAMING
If the object you are imaging does not consume most of the field of view, you can select an ROI (region of interest) to increase the framerate and save disk space. Go to the Device menu and select ROI -Specify, or click on the ROI icon. Draw the ROI with your mouse, then click inside the red box to set the ROI. The ROI can be reset any time by clicking the reset icon or going back to the Device menu.
PROCESSING IMAGES
Now that your video file is recorded, you can export it to RegiStax to stack and process a final image.
- Double-click the RegiStax icon on your computer's desktop to start the program.


Familiarize yourself with the initial RegiStax screen.
- Press the Select button (A) and select the video that was just recorded.
- Press the Set Alignment Points button (B) to have RegiStax automatically select the alignment positions over your image.
- Press the Align button (C) to begin the alignment process.
- Select the Best Frame option under the Limit Setup box (D) and enter a number that represents one-half of the number of image frames that were captured, i.e. if 300 frames were captured, then enter 150. Press the Limit button (E).
- You will automatically advance to the Stack screen. Accept the default settings and press the Stack button (F).
- Next move to the wavelet processing screen by clicking on the Wavelet tab (G).

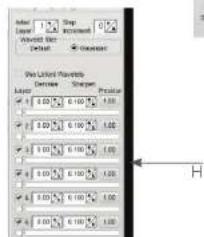

- On the Wavelet page, use the wavelet sliders (H) to enhance the image. The power of RegiStax is in the usage of wavelets. This is a special filtering technique that is very good for enhancing details in images. Each wavelet layer carries part of the image within it. The lower numbered wavelets control the fine detail stored in the image, while the larger numbered wavelets control the coarse detail. Each layer can be adjusted individually to reveal the desired amount of detail for your image.
- Finally, press the Save Image button to save the final image.
To explore the many other features of RegiStax and view helpful tutorials, go to the RegiStax homepage at: http://www.astronomie.be/registax/index.html
COLOR AND MONOCHROME ACCESSORIES
An optional IR-Block filter is available for Skyris color cameras. Digital cameras are very sensitive across visual and infrared spectrums. While imaging in infrared (IR) can be desired in some cases, consider blocking the IR to keep the best sharpness and color balance in your astroimages.
Skyris monochrome cameras require the use of Red, Green, and Blue (RGB) imaging filters to achieve a color image. A filter wheel helps you easily toggle between the filters while imaging. A Skyris Filter Wheel is available from Celestron (filters not included).
TIPS
FOCUSING
To achieve best focus, concentrate on a high contrast feature of the object you are imaging. Focusing on small features such as a moon's shadow on Jupiter or Cassini's division in the ring of Saturn will guarantee best focus across the entire image.
Once the frames of your video are stacked, the overall brightness of the composite (stacked) image is usually brighter than its individual component frames. For this reason, it is best to keep the brightness of the video image seen on the screen dimmer than you would normally desire. It is important that no part of the image is over-exposed to assure the maximum amount of detail in the final composite image.
COLLIMATION
No matter what type of telescope you image with, poor collimation (alignment of the optics) will ruin your chances for a good image. Before you begin imaging, always check the collimation of your instrument and make adjustments if necessary. Refer to your telescope's owner's manual for instructions on collimating the optics.
FINDING OBJECTS
At first it can be difficult to locate individual planets due to their relative brightness. To make it easier to initially find your object in the imaging window, increase the brightness and gain controls on the Device Menu Properties. This will allow you to better see the object as it passes through the imaging window. Once the object is located and centered, you can adjust the setting until the object is at the desired brightness and contrast.
You may think that the more frames you record the better. However, there are
some limitations to the duration of video and the amount of frames you can acquire. Resolution and file size can both limit the length of your video.
Since RegiStax combines as many sharp frames as possible to achieve one high-quality image, you don't want to take too many images that you start to detect the rotation of the planet, especially on Jupiter which makes one complete rotation in under 10 hours!
Even one frame of a high-resolution video can use a large amount of disk space. Hundreds or thousands of frames will quickly consume much of a hard disk. We recommend storing your large video files on removable media, such as an external hard drive or DVD.
SOLAR IMAGING
Skyris cameras work well with solar telescopes or telescopes equipped with solar filters, including Hydrogen-Alpha or white-light filters.
AUTOGUIDING
Your Skyris can be utilized as an autoguiding camera when used in junction with an off-axis guider or piggyback guidescope. Skyris is compatible with many autoguiding software programs such as MetaGuide (www.astrogeeks.com/Bliss/MetaGuide), and PHD Guiding (www.stark-labs.com/phdguiding.html) using a guider port interface such as GPUSB from Shoestring Astronomy (www.store.shoestringastronomy.com). Celestron mounts can be used without a GPUSB, simply by interfacing the PC to the hand controller and connecting to the mount via ASCOM. An RS-232 to USB adapter and serial cable is required.
C-MOUNT LENSES
Skyris cameras can be used with an optional C-mount lens (not included). The threaded ring on the camera body provides C-mount distancing at 17.5mm.
SPECIFICATIONS
| Mounting 1.25" barrel and | C-thread | Software compatibility | iCap, IC Capture, DirectShow, FireCapture |
| Backfocus Distance w/Nosepiece, w/C-thread | 19mm, 17.5mm | A/D Conversion | 12-bit |
| Power Requirements | USB, 5V 500mA | ||
| Shutter CMOS Rolling Shutter | |||
| Subframing Hardware Selectable | Weight | 3.6 oz | |
CAMERA-SPECIFIC SPECIFICATIONS
| Skyris 132M (95508) Skyris 132C (95509) | |
| Max frame rate 200 fps | |
| Imaging sensor Aptina AR0132AT | |
| Operating environment 40°C to -40°C (104°F to -40°F) | |
| Camera resolution 1280x960 | |
| Sensor size 4.8 mm x 3.6 mm | |
| Pixel size 3.75 micron square | |
CELESTRON, LLC. 2835 Columbia Street
Torrance, CA • 90503 U.S.A.
Telephone: 800.421.9649 • www.celestron.com
FCC Note: This equipment has been tested and found to comply with the limits for a Class B digital device, pursuant to part 15 of the FCC Rules. These limits are designed to provide reasonable protection against harmful interference in a residential installation. This equipment generates, uses, and can radiate radio frequency energy and, if not installed and used in accordance with the instructions, may cause harmful interference to radio communications. However, there is no guarantee that interference will not occur in a particular installation. If this equipment does cause harmful interference to radio or television reception, which can be determined by turning the equipment off and on, the user is encouraged to try to correct the interference by one or more of the following measures:
• Reorient or relocate the receiving antenna.
- Increase the separation between the equipment and receiver.
- Connect the equipment into an outlet on a circuit different from that to which the receiver is connected.
- Consult the dealer or an experienced radio/TV technician for help.
This product is designed and intended for use by those 14 years of age and older.
©2014 Celestron. Celestron and Symbol are trademarks of Celestron, LLC. All rights reserved.
www.CELESTRON.COM


- INCLUDED ITEMS
- SYSTEM REQUIREMENTS
- CAMERA DRIVER INSTALLATION
- SOFTWARE INSTALLATION
- CONNECTING THE CAMERA TO A TELESCOPE
- CAPTURING IMAGES
- IN THE CAPTURE MENU, SELECT TOGGLE RECORDING INFO DIALOG
- CLICK ON THE CODEC ICON TO ACCESS THE RECORDING SETTINGS WINDOW
- ROI SUBFRAMING
- PROCESSING IMAGES
- COLOR AND MONOCHROME ACCESSORIES
- TIPS
- FOCUSING
- COLLIMATION
- FINDING OBJECTS
- SOLAR IMAGING
- AUTOGUIDING
- C-MOUNT LENSES
Brand : CELESTRON
Model : Skyris 132M
Category : Camera