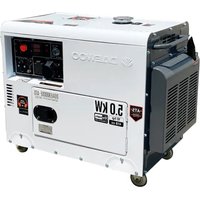
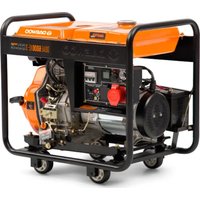
DDAE8000SE - Generator DAEWOO - Free user manual and instructions
Find the device manual for free DDAE8000SE DAEWOO in PDF.


| Product Type | Portable Generator |
| Brand | Daewoo |
| Model | DDAE8000SE |
| Rated Power | 7000 W |
| Peak Power | 8000 W |
| Engine Type | 4-Stroke, Single Cylinder |
| Displacement | 420 cc |
| Fuel Type | Petrol |
| Fuel Tank Capacity | 25 L |
| Run Time at 50% Load | 10 hours |
| Output Voltage | 230 V / 110 V |
| Number of Sockets | 2 x 230V, 1 x 12V DC |
| Dimensions (L x W x H) | 67 x 52 x 55 cm |
| Weight | 70 kg |
| Noise Level | 96 dB(A) |
| Starting System | Electric & Recoil |
| Cooling System | Air-cooled |
| Oil Capacity | 1.1 L |
| Spark Plug Type | F7RTC |
| Maintenance | Oil change every 50 hours, air filter cleaning |
| Safety Features | Low oil shutdown, overload protection |
| Accessories Included | Spark plug wrench, oil funnel, user manual |
Frequently Asked Questions - DDAE8000SE DAEWOO
User questions about DDAE8000SE DAEWOO
0 question about this device. Answer the ones you know or ask your own.
Ask a new question about this device
Download the instructions for your Generator in PDF format for free! Find your manual DDAE8000SE - DAEWOO and take your electronic device back in hand. On this page are published all the documents necessary for the use of your device. DDAE8000SE by DAEWOO.
USER MANUAL DDAE8000SE DAEWOO
USER'S MANUAL
www.daewoopowerproducts.com
Manufactured under license of Daewoo International Corporation, Korea
INDEX
- TECHNICAL SPECIFICATIONS AND DATA 3
- OPERATING THE DIESEL GENERATOR.... 3
- MAINTENANCE 12
- OVERHAULING AND TROUBLESHOOTING 16
- PART LISTINGS ...... 17
- REMOTE CONTROL INSTRUCTIONS....22
WARRANTY 23
The following manual is only a guide to assist you and is not a complete or comprehensive manual of ali aspects of maintaining and repairing your generator. The equipment you have purchases is a complex piece of machinery. We recommend that you consult with a dealer if you have doubts or concerns as to your experience or ability to properly maintain or repair your equipment. You will save time and the inconvenience of having to go back to the store if you choose to write or call us concerning missing parts, service question, operating ad vice, and/or assembly questions.
Our air-cooled diese) generators have some of the following feature:
• Lightweight construction
- Air cooled
- Four-stroke diesel internal combustion engine
- Direct fuel injection system
• Recoil starter or an optional electric starter
- Large fuel tank
• Automatic voltage stabilizer
- NFB circuit protector
- AC and DC outputs
- Low oil pressure sensor
The air-cooled diese! generators are widely used when electrical power is scarce. Our generators provide a portable mobile solution in supplying power for field operations during project construction. Some other known applications include pipeline construction and metal welding when electrical power is not available.
This manual will explain how to operate and service your generator set.
If you have any questions or suggestions about this manual. please contact your local dealer or us directly. Consumers should notice that this manual might differ slightly from the actual product as more improvements are made to our products. Some of the pictures in this manual may differ slightly from the actual product as well. We reserves the right to make changes at any time without notice and without incurring any obligation.
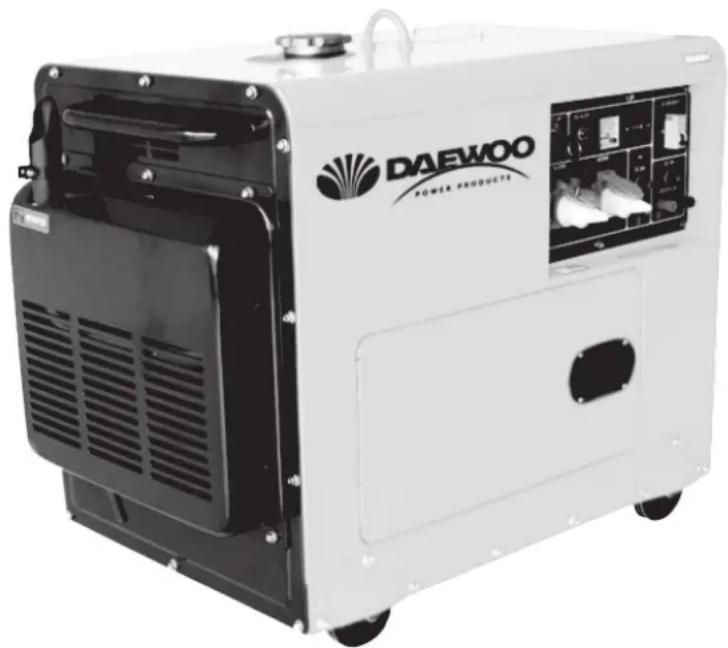
1. TECHNICAL SPECIFICATIONS AND DATA
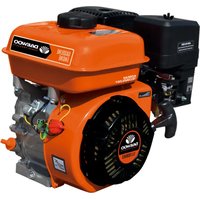
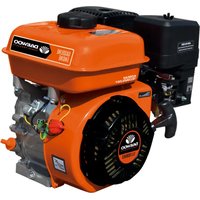
Engine type: Single cylinder, Vertical, 4 Stroke, Direct injection, Air-cooled
Displacement: 418 cc
Max power: 5.5 kw
Rated power: 5.0 kw
Engine power: 10 hp / 3000 rpm
Borexstroke: 86×72 mm
Fuel tank capacity: 15 L
Fuel tank capacity: 1.65 L
Compression ratio: 19:01
Starting system: Electric start
Starting motor capacity: 12 V - 0.8 kW
Charging generator capacity: 12 V - 8.3 A
Battery capacity: 12V - 30 Ah
Fuel consumption: ≤370 g/kW.h
Insulation Grade: F
Power factor: 1
Noise level at 7M: 72 dBA
Phase NO.: Single phase
Continuous running time: 6 hr
2. OPERATING THE DIESEL GENERATOR
2-1 General main points of safety during operation of the generator set.
In order to operate the generator set safely, please follow all the instructions provided in this manual carefully. Doing so otherwise may lead to accidents and or equipment damage.
2-1.1 Fire prevention
The proper fuel for the diesel generator set is light diese! fuel. Do not use gasoline, kerosene and or other fuels other than light diesel fuel. Keep all flammable fuels away from the generator as the generator may spark and ignite these gases. In order to prevent fires from occurring and to provide enough ventilation for people and the machine, keep the diesel generator at least 1.5 meters or 5 feet away from buildings and or other equipment. Always operate your diesel generator on a level site. If the generator is operated on an incline, the lubricating system within the engine will not perform well and may lead to failure of the engine.
2-1.2 Prevention from inhaling exhaust gases
Never inhale exhaust gases emitted by the engine. The exhaust gases contain toxic carbon monoxide. Never operate your generator in places with poor ventilation. In order to operate this machinery indoors, a suitable ventilation system for the building is required to draw the poisonous exhaust gases out.
2-1.3 Prevention from accidental bums
Never touch the muffler and its cover when the diesel engine is running .Never touch the muffler and cover after the diesel engine has been used, as the muffler remains hot for a good period of time.
2-1.4 Electris shock and short circuits
Never touch the generator if the generator is wet. Also never touch the generator if your hand is wet. Never operate your generator if the weather conditions call for any type of precipitation such as rain, snow or fog. To prevent electrical shocks, the generator should be grounded. Use a lead to connect the grounding end of the generator to the grounding surface of choice.
NOTE: When connection devices to the generator, make sure all other devices are rated lower than the generators output. Any generator socket should not be overloaded over its regulated limit.
2-1.5 Other safety points
Before operating this generator, all operators should have a good knowledge of how to break the circuit if any accidents occur. Also, all operators should be familiar with all the switches and functions of the generator before using this machine. While operating the generator, wear safe shoes and suitable clothes during operation. Always keep children and animals away from the generator.
2-1.6 Battery
The electrolytic liquid of the battery contains sulfuric acid. In order to protect your eyes, skin and clothing, wear protective gear when working with the battery. If you come in contact with the electrolytic liquid, wash it immediately with clean water. Also, if the electrolytic liquid comes in contact with your eyes, see a doctor immediately.
2-2 Preparation before operation
2-2. I Fuel choices and fuel treatment
Fuel tank
Use only light diesel fue I. The fuel should be filtered clean. Never Jet dust and water mix with fuel in the fuel tank. Otherwise it will clog the fuel lines and oil nozzles. It may also damage your pressure pump.
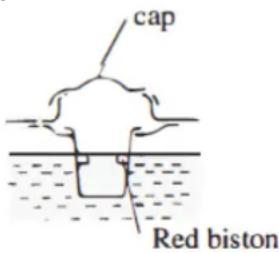
NOTE: It is dangerous to overfill the fuel
the red piston in the filter.
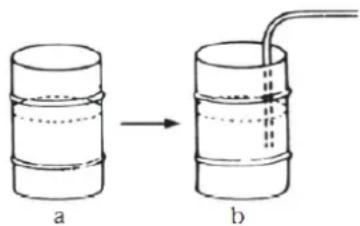
a. After purchasing fuel, put it into a drum and let it sit for 3-4 days.
b. 3-4 days later, insert half of the fuel sucker into the drum (water and impurities stay in the lower portion of the drum).
Air filter element
Do not wash the air filter. The element is made of dry material, which does not permit washing. When the output of the diesel engine is bad or the color of the exhaust gas is abnormal, replace the air filter element. Never start the diesel engine without the air filter.
gearlever
NOTE: Never smoke near the opening of the fuel tank. Do not let sparks get near the fuel or fuel tank and do not overfill tank. After filling, tighten the fuel cap.
2-2.2 Fill engine oil
Fabrication Oil Filling Inlet
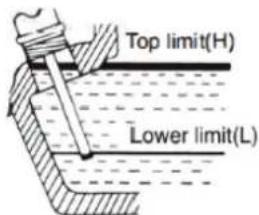
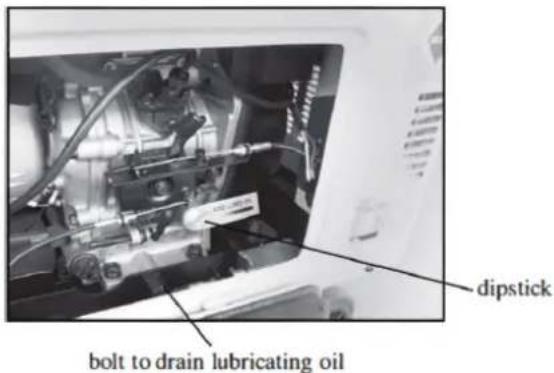
Put the generator set in level state. Fill the oil into the oilfilling inlet. At the time of checking the oil level, it is necessary only to lightly insert the oil ruler. Please pay attention to that you should not rotate the oil ruler.
| Volume\Type | 186FG |
| Volume(L)England gallon | 1.65 (0.36) |
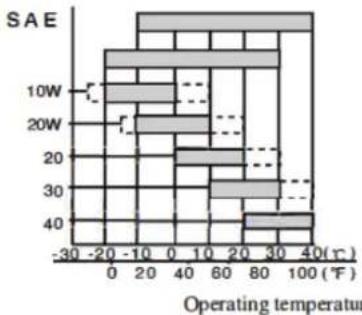

Recommended value
Applicable limit
A.P.I. Diesel engine maintenance classification The lubricating oil should be CC or CD grade.
Engine oil is the most important factor in determining the life of your generator engine. If you use poor engine oil or if you don't change the oil regularly, the piston and cylinder will wear easily or seize up. Also, the life of the other parts in your engine such as bearings, and other rotating parts will shorten considerably.

Time to change engine oil
Although there is an alarm system to check for low oil pressure, it is always a good idea to check the amount of oil inside the engine. If the oil level is low, fill it before starting the engine. A good time to drain the oil from the engine is when the diese! engine is still hot. If the engine is fully cooled, it is more difficult to drain all the oil out or some impurities will remain in the engine.
WARNING: Don't fill engine oil when diesel is operating.
2-2.3 Check air filter
(1) Loosen the butterfly nut, take the cover of the air filter off and take the air filter element out.
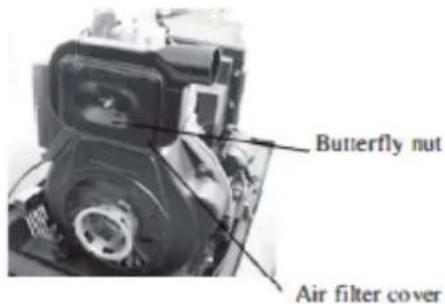
Do not use detergent to wash the air filter element. When the performance of the engine decreases or when the color of the exhaust gases is bad, exchange the filter element. Never start the engine without the air filter as foreign objects may enter the intake and damage the engine.
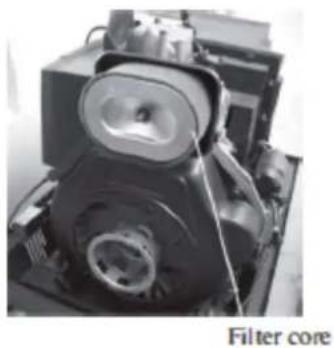
(2) After replacing the air filter element, replace the cover and tighten the butterfly nut firmly.
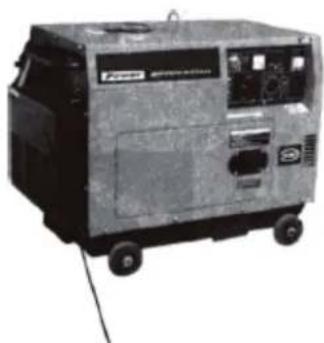
Cover at the check mouth for air filter
2-2.4 Checking the generator welder
Before starting the generator, make sure the air switch is in the "off" position. Starting the generator with the switch in the "on" switch is very dangerous. The generator should be grounded in order to prevent electric shock. Use dry compressed air (with pressure about (1.96 × 10⁵Pa) to blow the dust out in the electric control cabinet and at the surface of the generator. Check to see how clean the surfacc of the sliding ring is. Check the pressure of the carbon bmsh. Also, check whether the position of the carbon brush at the slide rig is correct and the fixture is reliable with a good contact.
According to the electric wiring diagram, check to see whether the connecting wire is correct and the connected place is firm. Use a 500 MΩ meter to measure the insulation resistance of the electrical part. The resistance should be less than 2MΩ. When measuring devices, make sure the capacitor is turned off. Otherwise, it will burn tpe capacitor. (For silent set, the inspection may not be carried out).
2-2.5 The fuel and oil in a new engine is drained before sold.
Before you start the engine, please fill the fuel tank snd oil first. Then, check to see if there are air bubbles in the engine. If there are, follow these procedures. Loosen the connecting nut between the oil injection pump and oil pipe. Bleed the air from the system until there are no more bubbles. Then replace the connecting nut and tighten it.
2-3 Checking the operation of the diesel engine
2-3.1 Low-pressure alarm system.
The diese! engines have a low-pressure sensor system where if the oil pressure drops to low, the sensor will shut the engine off. The purpose of having this system is to ensure that the engine <loes not seize up. If there is not enough oil in the engine, the temperature of the oil will be raised too high. On the contrary, if there is too much oil in the engine, the engine oil can slow the engine down considerably. (Note: The 2 GF-L model cannot automatically stop itself).
2- 3.2 How to open the case door/cover
(1) Open the case door: turn the handle counterclockwise and open the door. Do these checks daily.
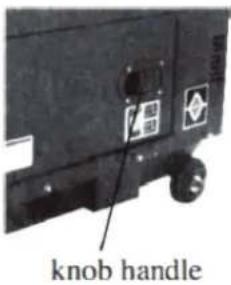
(2) Loosen the outer cover bolt of the air filter and outer cover of the oil nozzle, and then check the air filter.
(3) Check the outer cover of the oil nozzle. Loosen the butterfly nut and open the outer cover.
2-3.3 Engine break in
When you purchase a brand new engine, the engine must be properly broken in. The break in period is about 20 hours.
( I ) Avoid overloading the engine when brand new.
(2) Change the engine oil according to specifications. An oil change for a brand new engine is about
20 hours or every month, an older engine, the oil change is about 100 hours or three months.
2-4 Starting the generator set
2-4. 1 Manual starting.
Start the engine in accordance with procedures below:
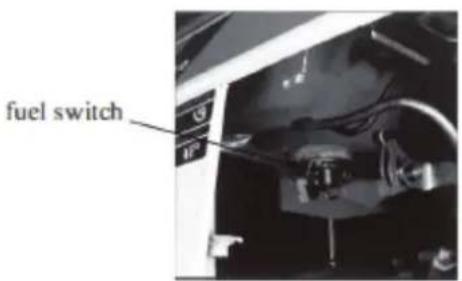
(1) Put the fuel switch in the "ON" position.
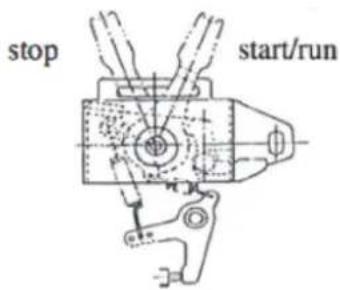
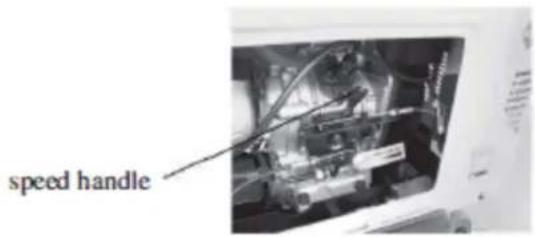
(2) Tum the handle of the engine to the "RUN" position.
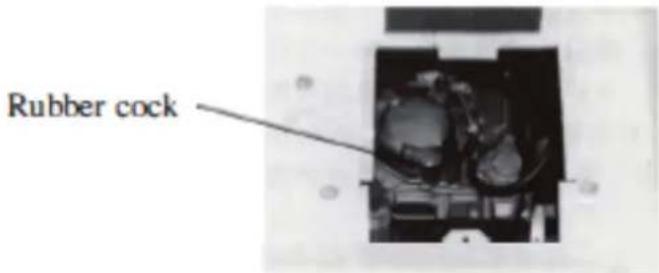
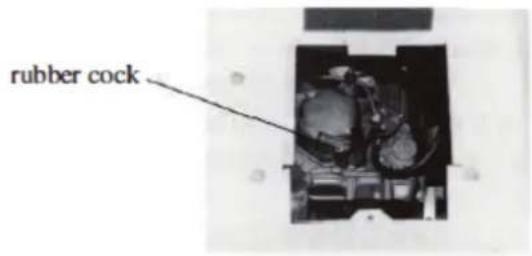
(3) Pull the recoil starter handle out until you feel resistance. It will reset to its original position automatically. The handle should be reset into its recoil device slowly to prolong the life of the life of the engine starter. (4) In cold climate, it is difficult to start the engine. To remedy this, pull the rubber plug out from the rocker of the diesel engine and fill 2 ml of engine oil. Before starting, put the rubber plug back in place. If you don't put the rubber plug back in place, rain, dust and other dirt can enter into the diesel engine. It will cause the parts inside the diesel engine to wear quickly and lead to engine failure.
2-4.2 Electric starting
The procedures for preparing to start eh engine are the same as the manual starting engine.
2-4.3 Battery
- Insert key into ignition and put it in the "off" position.
- Put the speed handle the "Run" position.
- Tum the start switch clockwise to the "START" position; To set the silent type, first turn it clockwise to the "RUN" (ON) position for 1-2 seconds. The electromagnetic iron will be triggered, now turn it clockwise to the "START" position.
- After the diesel engine is started, remove your hand from the switch handle; the switch will automatically reset itself to the "ON" position.
- If the engine is not starting after 10 seconds of cranking, wait about 15 seconds before trying it again. If you crank to long, the voltage of the battery will drop. This can lead to improper ignition.
When the diesel engine is operating, let the ignition retain on the'
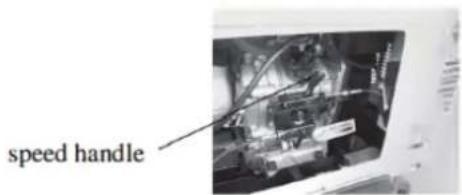
NOTE: If you crank the starter to long, the battery may be drained too much to provide enough energy for proper engine ignition. Also, when the diesel engine is operating, let the key retain in the "ON" position.
Check the height of the electrolytic solution in the battery once a month. If the level of the liquid drops to low, fill it with distilled water until it reaches the high mark. If there is not enough electrolytic solution, then the diesel engine cannot be started. It is important to keep the liquid level between the high and low limits.
If the level in the battery is too high, the liquid may flow out and end up on surrounding parts resulting in corrosion of these parts.
NOTE: Avoid too much or to little of electrolytic solution. Check and fill it once a month.
2-5 Proper operation of the generator set
2-5.1 Operating the diesel engine
- Pre-heat the diesel engine for 3 minutes under no load conditions.
- First check the height of the lubricating oil level, if it is low, refill it. Our diesel engines are equipped with an alarm system that will notify you if the oil pressure is to low. The alarm system will shut down the engine if the oil pressure is to low.
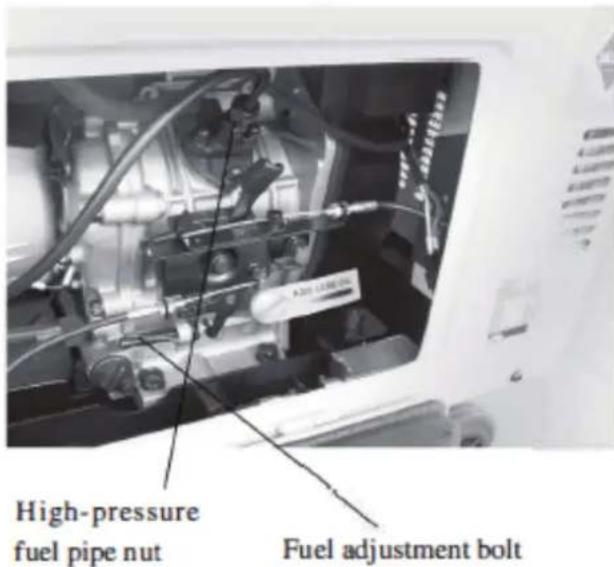
- Do not adjust the speed limit regulation nut or the fuel adjustment bolt. These bolts have been set by the factory already, changing them will affect the porperties of the engine performance.
2-5.2 Checks during engine operation
- Check to see if there are abnormal noises.
- Check to see if the performance is good or bad.
- Check the color of the exhaust gases (whether it is too black or too white). If any of these conditions exist, stop the engine and find the cause of the problem. If no problems are found, please contact your local dealer or our nearest company branch.
2-6 Loading
2-6.1 Load conditions
Exert loads in accordance with the specified parameters.
2-6.2 Output of electricity
- Raise the revolutions per minute (turn the speed handle to the max setting) of the generator to get the maximum power out of the generator. If not, the automatic voltage regulator device will excite and doing this for long periods of time will cause the capacitar to burn.
- For the rated speed of the generator, please refer to Chapter 1, item 1-1 technical specification and data.
- Observe the pointer of the voltmeter, it should point to 220V ± 5 % (50Hz). (For 60Hz set, it will be 240V ± 5%). This is the reading of the voltage at the ac socket.
CAUTION: Do not start more than two machines at the same time. The machines should be started one ty one. Do not use the floodlight at the same time when using other devices.
-
When connecting devices to the generator, make sure to connect these devices in order. Connect the large loads onto the generator first. If everything is functional, smaller loads can then be added. If the generator shuts off, it may be because the load being drawn by all the various devices are too high. In this event, decrease the number of small devices until everything is functional. The total drawn power should not exceed the maximum output power of the generator. Please see Table 1-1 for technical specifications of what the generator can output. In order to reset the generator after overdrawn power, let it sit for several minutes. If the indication of the voltemeter is too high or too low, adjust the speed accordingly. If there are problems, stop the generator immediately and fix the issue.
-
Make sure you are operating your generator in a well-ventilated area. The generator should never be covered with anything to prevent overheating the generator.
2-6.3 Charging the battery
- For the electric starter generator, the 12V battery is automatically charged through the regulator on the generator when it is running.
- If the generator is not used for long periods of time, the battery should be disconnected to avoid energy loss from the battery.
- Do not connect the negative and positive terminals of the battery together at any time. Doing so will damage the battery.
- Do not reverse the polarities when attaching the battery cables to the battery. Doing so will damage both the battery and the electric starter.
- When charging the battery, the battery produces flammable gases. Do not smoke, flames, and sparks get near the battery while it is charging as this may cause a fire. To avoid sparking while connecting the cables to the battery, first, connect the cables to the battery then to the motor. To disconnect battery cables, first disconnect the motor end of the cable.
2-7 Stopping the generator
- Take the electrical load off the generator.
- Tum generator air switch off.
- Put the speed handle in the "RUN" position and let the engine run for 3 minutes after unloading. Do not stop the diesel engine immediately let it warm down. Stopping the diesel engine suddenly may raise the temperature of the engine abnormally and lock the nozzle and damage the diesel engine.
- Press down on the brake handle.
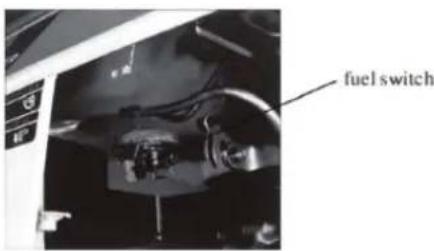
NOTE: 1. If the speed handle is in the "Stop position and the engine is still running, turn the fuel switch to the "OFF" position or loosen the high pressure oil pipe nut. The engine could be stopped more than oneway other than the speed handle way.
- If you cannot stop the engine with a load on it, then remove the load first than stop the engine.
- If equipped with an electric starter, turn the key to the "Off" position.
- Put the fuel handle to the "S" position.
- Finally, pull slowly on the recoil handle until you feel resistance (this is when the piston is on the compression stroke, where the intake and exhaust valves are closed). What this does is prevent the engine from rustiong when not in use.
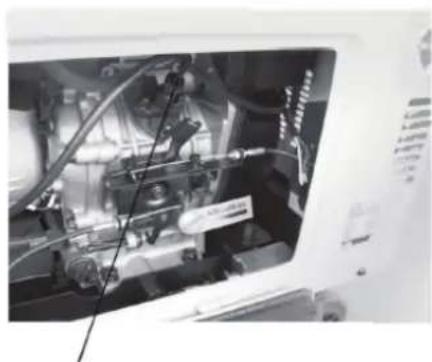
Loose the nut (nut of high pressure oil pipe)
3. MAINTENANCE
3-1 Maintenance schedules
Keeping your generator well maintained will prolong the life of your generator. Everything needs to be checked including the diesel engine, welder, generator, control cabinet, and frame. For overhauling procedures, please refer to the instruction manual of the relative subassembly. If you need these manuals, plsaes call our company and we will send you one. Before starting the maintenance, make sure the diesel engine is off.
Please refer to the Table 3-1 for the proper maintenance schedule.
Table 3-1. Ma intenance schedule for dies el generator set
| Intervaimaintenance Item | Everyday | 1st month or after 20 hours | 3rd month or 100 hours | 6th month or 500 hours | Every year or 1000 hours |
| Check and fill enough fuel | ○ | ||||
| Discharge fuel | ○ | ||||
| Check and fill enough engine oil | ○ | ||||
| Check whether it leaks oil | ○ | ||||
| Check and screw each fastened part | ○ | ●Screw the bolt of cylinder head firmly) | |||
| Exchange engine oil | ○(1st time) | ○(2nd time late) | |||
| Clean filter of engine oil | ○(Exchange) | ||||
| Exchange air filter element | If operated at dusty region, the period of maintenance should be shorten) | ○(Exchange) | |||
| Clean filter of fuel | ○ | ●(Exchange) | |||
| Check high pressure oil pump | ● | ||||
| Check nozzle | ● | ||||
| Check fuel pipe | ●(If necessary, exchange it) | ||||
| Adjust the gaps of air intake and air exhausted gate | ●(1st time) | ● | |||
| Grind air intake and air exhausted gate | ● | ||||
| Exchange piston ring | ● | ||||
| Check electrolytic solution of accumulator | (each month) | ||||
| Check electric brush and slide ring | ● | ||||
| Check insulation resistance | The time of stop is over 10 days. ○ | ||||
Note: "• "mark indicates that it needs special wrench, please contact with dealer.
3-1.1 Changing the engine oil (every 100 hours)
Take the oil cover out. Take off the oil drain plug when the diese! engine is still hot.
Be careful of hot oil and hot engine as you may get burned. The bolt is located at the bottom of the cylinder. After draining the oil, put the bolt back and tighten it. Then fill with the proper engine oil to the proper level.
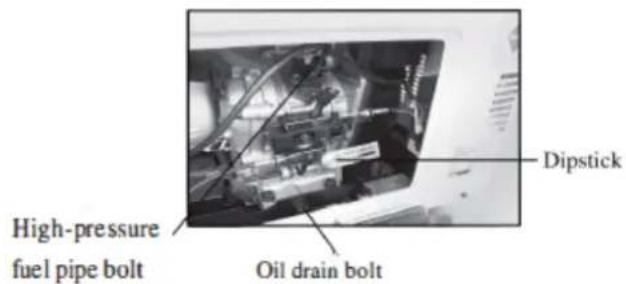
3-1.2 Replacing the oil filter
- Replacing the oil filter every 6 months or 500 hours of operation.
3-1.3 Air filter maintenance schedule
- Clean air-filter every 6 months or 500 hours of operation.
- If necessary, exchange it.
- Do not use detergent to clean air filter element.
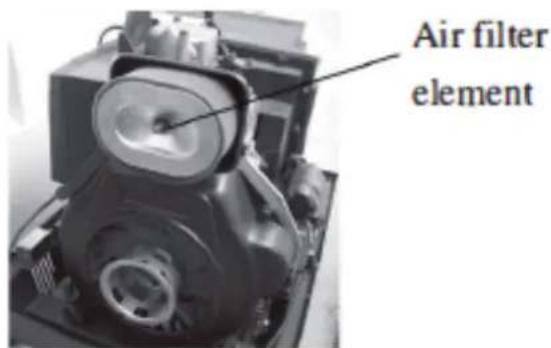
NOTE: start the engine without the air filter. This can cause serious damage to the engine if foreign objects enter the intake system. Always change the air filter on time.
3-1.4 Fuel filter maintenance
- The fuel fil ter should be cleaned often to keep the engine running at maximum performance.
- The recommended time period for cleaning the fuel filter is 6 months or 500 hours of operation.
a. To do this, first drain the fule from the fuel tank.
b. Loosen the small screws on the fuel switch and remove the fuel filter form the port. U se diesel fuel to clean the fuel filter. Also, remove the fuel injector and clean the carbon deposit around it. The recommended time period for this is 3 months or 100 hours.
3-1.5 Cylinder head bolt tensions
The cylinder head bolts should be tightened to specifications please refer to the diesel engine manual for specifications and the special tools required to do this.
3-1.6 Battery check
Make sure the electrolytic solution of the battery is full. The engine uses a 12V battery. Due to numerous starting cycles, the electrolytic solution may be u ed up. Also,
before filling, verify that the battery is not damaged in any way. Add distilled water to the battery when filling. Perform checks on the battery once a month.
3-2 Storing for long periods of time
If your generator needs to be stored for long periods of time, the following preparations should be made.
- Start the diesel engine for 3 minutes then stop it.
- When the engine is still hot, change the engine oil with new engine oil of the proper grade.
- Pull the tubber plug out of the cylinder head cover and put 2CC of lubricating oil in it, ten cover the plughole up again.
- For manual starting generators, press the decompression handle down and pull the recoil handle 2 or 3 times. This pushes the intake out. (Do not start the engine).
- For electric started generator, press the decompression handle down and crank the engine for 2-3 seconds. To do this, put the starter switch in the "Start" position. (Do not start the diesel engine).
- Finally, pull the recoil starter until you feel resistance; this is when the piston is on the compression stroke where the intake and exhaust valves are closed. Having the intake and exhaust valves closed will prevent rust, as moisture cannot get inside the combustion chamber.
- Clean the engine and store it in a dry place.
4. OVERHAULING AND TROUBLESHOOTING
4-1 Overhauling and troubleshooting procedures
| Causes of malfunction | Remedy | |
| Diesel cannot be started. | Not enough fuel | Add enough fuel |
| The switch of fuel is not at “OPEN” position | Turn the switch of fuel to “OPEN” position | |
| High-pressure pump and nozzle do not inject fuel or the injected amount is less. | Disassemble the nozzle and adjust it at test table. | |
| Speed control lever is not at “RUN” position. | Turn speed control lever to “RUN” position. | |
| Check level of lubrication oil. | The standard oil amount of lubricating oil should be between high graduation “H” and low graduation “L” | |
| It is not quick and powerful to pull reactive starter. | Start diesel engine in accordance with the requirements of “start operation procedures” | |
| Nozzle exists dirt. | Clean the nozzle. | |
| Accumulator has not electricity. | Charge the accumulator or exchange it. | |
| Generator cannot generate electricity and has not welding voltage | Master switch (NFB) is not be switched on | Turn master switch handle to “ON” position. |
| Carbon brush of generator was worn. The contact is bad. | Exchange the carbon brush. | |
| The contact of socket is bad. | Adjust the contact feet of socket. | |
| The rated revolution of engine cannot be reached. | Make it reach to the rated revolution in accordance with the requirements. | |
| AVR automatic governor is damaged. | Exchange it. | |
| The potentiometer of current regulation for electric welding is damaged. | Exchange it. | |
If cannot generate electricity still, please contact with dealer of our company or with our company directly.
4-2 Questions and Answers
If you do not understand anything or have any questions, please feel free to contact your local dealer or with our company directly. Below is a list of some information you should have ready before contacting your local dealer or us.
- Model of diesel engine generator and engine model number.
- State of residency
- Number of hours of operating equipment along with the problem that occurred.
- A detailed condition and time when the problem occurred, in other words, climate and atmosphere.
5. PART LISTINGS
Overall view of engine generator assembly
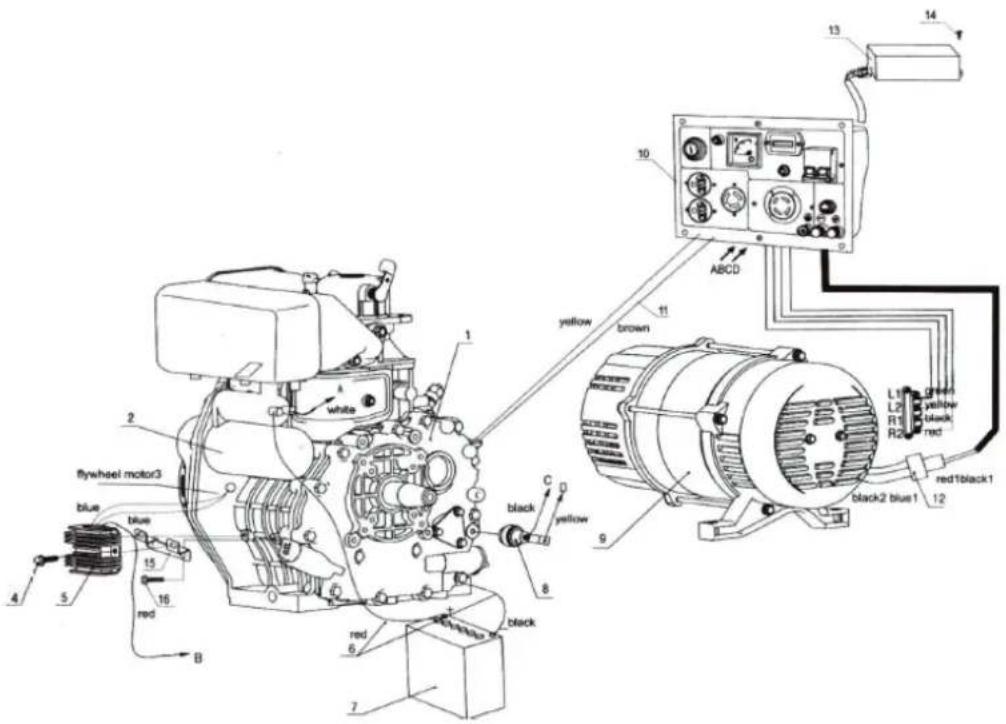
Number Part Description Quantity
1 Series diesel engine 1
2 Starter Motor 1
3 Flywheel generator 1
4 Bolt 2
5 Voltage Regulator 1
6 Battery Cable(red, black) 2
7 Battery 1
8 Oil level sensor 1
9 Generator 1
10 Output panel assembly 1
11 Throttle cable 2
12 Connector assembly 1
13 Capacitor 1
14 Bolt 2
15 Voltage Regulator Bracket 1
16 Bolt 2
Exploded view of frame assembly
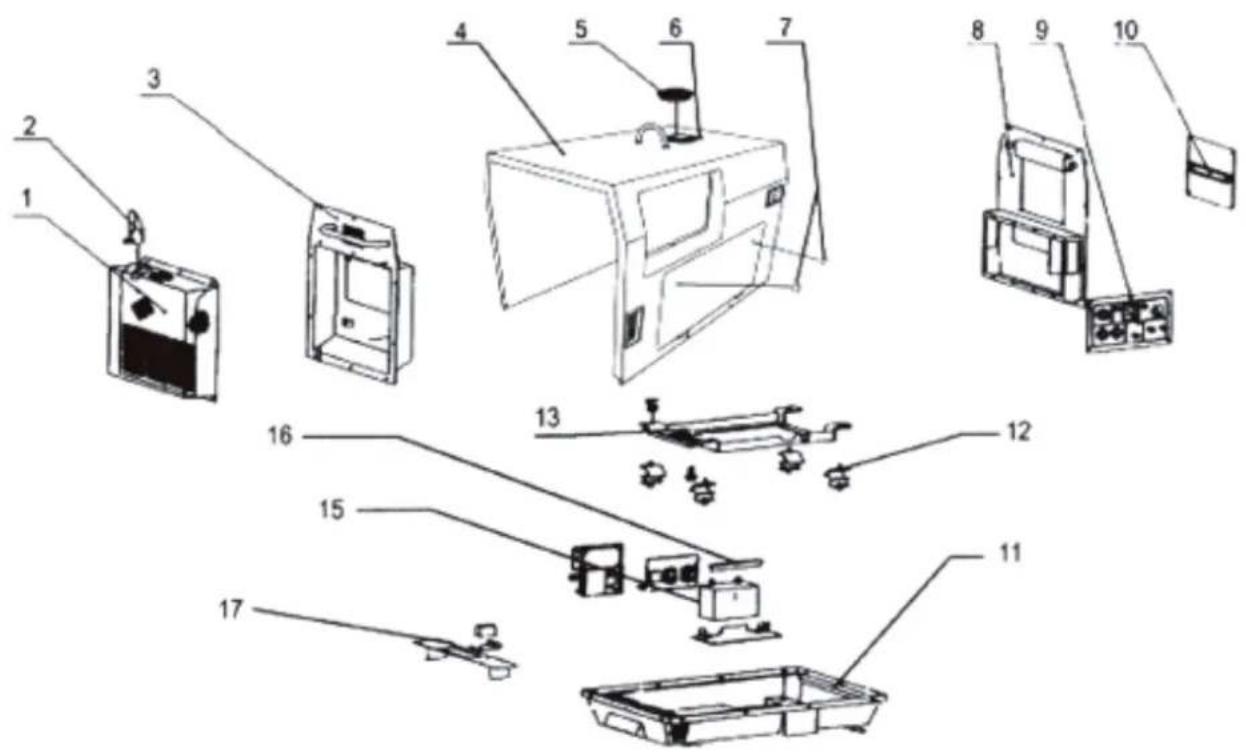
Number Part Description Quantity
| 1 | Muffler cover plate | 1 | |||
| 2 | Muffler | elbow | 1 | ||
| 3 | Left | outer | cover | 1 | |
| 4 | Fuel | gauge | 1 | ||
| 5 | Fuel | tank | sleeve | 1 | |
| 6 | Main | cover | 1 | ||
| 7 | Door | knob | 1 | ||
| 8 | Right | outer | cover | 1 | |
| 9 | Output panel assembly | 1 | |||
| 10 | Air | cleaner | cover | 1 | |
| 11 | Lower | chassis | 1 | ||
| 12 | Engine | tray | mounts | 4 | |
| 13 | Engine/Generator | tray | 1 | ||
| 14 | Wheels | 4 | |||
| 15 | Battery | 1 | |||
| 16 | Battery tie down | 1 | |||
| 17 | Long | cover | plate | 1 | |
Electric panel parts drawing
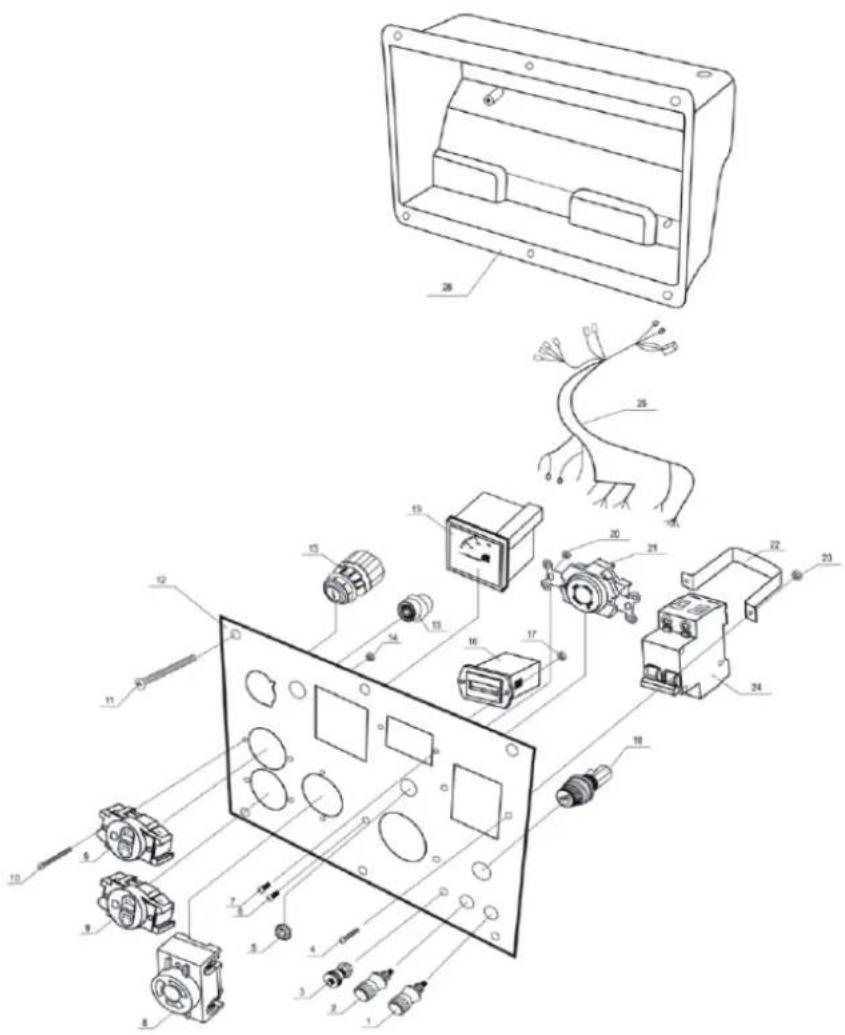
| Number | Part Description | Quantity | ||
| 1 | Positive DC port | 1 | ||
| 2 | Negative DC | port | 1 | |
| 3 | Grounded | bolt | 1 | |
| 4 | Bolt | 2 | ||
| 5 | Large | nut | 1 | |
| 6 | Bolt | 2 | ||
| 7 | Boly | 2 | ||
| 8 | Large | nut | 1 | |
| 9 | Current adjusting switch | 1 | ||
| 10 | 3 Prong socket | 6 | ||
| 11 | Bolt | 6 | ||
| 12 | Electric | panel | bolt | 1 |
| 13 | Electric | panel | 1 | |
| 14 | Starter | switch | 6 | |
| 15 | Large | nut | 1 |
| 16 | Oil alert lamp | 1 |
| 17 | Hour meter | 2 |
| 18 | Hour meter bolts | 1 |
| 19 | DC fuse | 1 |
| 20 | Voltmeter | 1 |
| 21 | Nut | 2 |
| 22 | 4 prong socket | 1 |
| 23 | Breaker bracket | 1 |
| 24 | Nut | 2 |
| 25 | Breaker | 1 |
| 26 | Wiring harness | 1 |
| 27 | Electrical box | 1 |
Generator head assembly
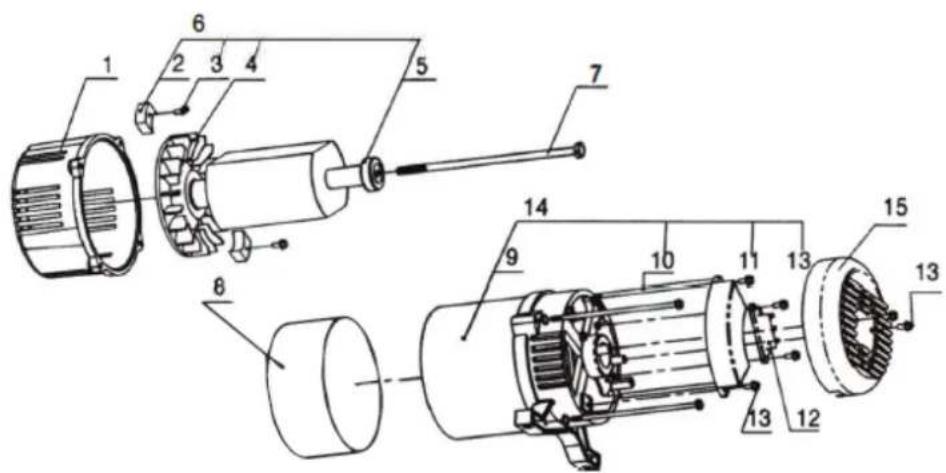
| Number | Part Description | Quantity |
| 1 | Front end cover 1 | |
| 2 | Diode | 2 |
| 3 | M4 x 8 Bolt 2 | |
| 4 | Fan Blade | 1 |
| 5 | Bearing | 1 |
| 6 | Rotor Unit | 1 |
| 7 | Center bolt | |
| 8 | Motor cover | 1 |
| 9 | Stator | 1 |
| 10 | Long bolt | |
| 11 | Capacitar | 1 |
| 12 | Wiring Seat | 1 |
| 13 | M5 x 15 Bolt 6 | |
| 14 | Stator Unit | 1 |
| 15 | Dust Cover | 1 |
Fuel system components
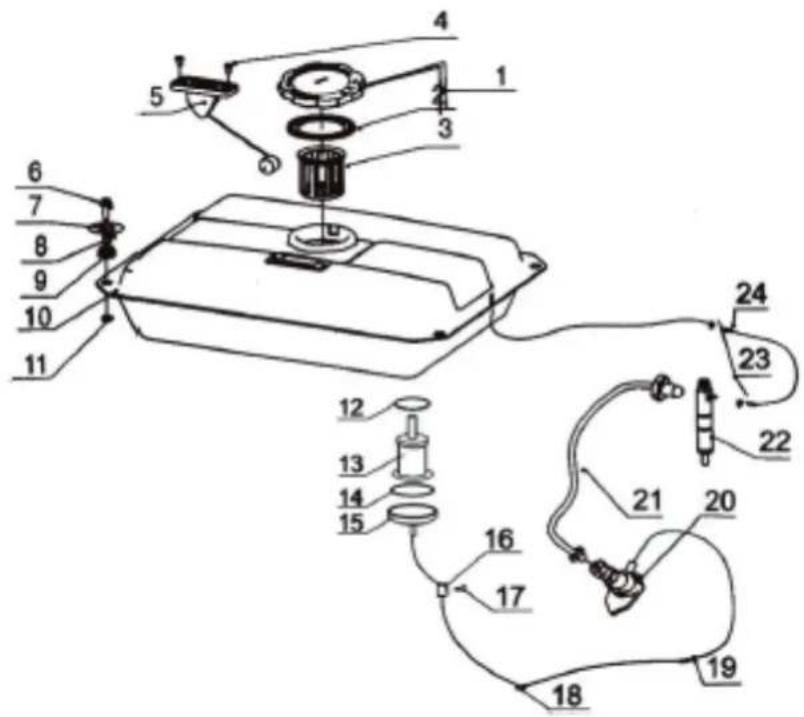
Number Part Description Quantity
| 1 | Fuel | Cap | 1 |
| 2 | Seal | 1 |
| 3 | Filtering cup | 1 |
| 4 | M5 x 10 screw | 2 |
| 5 | Fuel lever indicator | 1 |
| 6 | M6 x 2 5 Bolt | 4 |
| 7 | Large flat washer 6 | 4 |
| 8 | Fuel tank lining | 4 |
| 9 | Shock absorbing gasket | 4 |
| 10 | Fuel tank | 1 |
| 11 | M6 Nut | 4 |
| 12 | O ring seal | 1 |
| 13 | Fuel tank filter | 1 |
| 14 | O ring gasket | 1 |
| 15 | Fuel filter cover | 1 |
| 16 | Cover | 1 |
| 17 | Wing | nut | 1 |
| 18 | Fuel | line | 2 |
| 19 | Fuel | inlet | pipe | 1 |
| 20 | High pressure fuel pump | 1 |
| 21 | High pressure fuel pipe | 1 |
| 22 | Fuel injector | 1 |
| 23 | Overfill | tube | 2 |
| 24 | Fuel overfill pipe | 1 |
6. REMOTE CONTROL INSTRUCTIONS
I. Basics
1). Be careful with the remote control and do not drop it as the remote control is a precision-fabricated device.
2). If you decide to use the remote control for starting, you cannot use the start switch on the generator, or else you may blow the fuse out.
3). If the distance for the remote control reduces and or if the light is dark, you should replace the battery in the remote control1 (23A, 12V).
2. Operation procedures
I). Remote control starting(DO NOT USE THE STARTING SWITCH). The generator will automatically start when you press the "I" key twice. If starting in cold weather, please repeat this procedure severa] times. NOTE: If the battery power is low, the remote control feature will not work properly.
2). If the remote control was chosen to start the generator, the remote control should be chosen to stop the unit. To stop the unit, press the number "2" key and the generator will automatically stop.
3. Description of keys
1). Remote control start.
2). Remote control stop.


WARRANTY CARD
![graph TD A[" "] --> B["Product model"] B --> C["Serial number"] C --> D["Username"] D --> E["Client's signature"] F[" "] --> G["Date of sale"] H[" "] --> I["Company"]](/content/2026/07/1490780/images/021a1c18639f02787d87492f21371e3dc7558eaf9b165e73498aa3b1ac7515c8.jpg)
The product is in good conditions and fully complete. Read and agree the terms of the warranty.
GUARANTEE
The warranty period starts from the date of sale of the products and covers 1 year for all power products.
During the warranty period, free failures caused due to the use of poor-quality materials in the production and manufacturer workmanship admitted fault are removed. The guarantee comes into force only when warranty card and cutting coupons are properly filled. The product is accepted for repair in its pure form and full completeness.
WARRANTY DOES NOT COVER
- Mechanical damage (cracks, chips, etc.) and damage caused by exposure to aggressive media, foreign objects inside the unit and air vents, as well as for damage occurred as a result of improper storage (corrosion of metal parts);
- Failures caused by overloading or product misuse, use of the product for other purposes. A sure sign of overload products is melting or discoloration of parts due to the high temperature, simultaneous failure of two or more nodes, teaser on the surfaces of the cylinder and the piston or destruction of piston rings. Also, the warranty does not cover failure of the automatic voltage regulator due to incorrect operation;
- Failure caused by clogging of the fuel and cooling systems;
- Wearing parts (carbon brushes, belts, rubber seals, oil seals, shock absorbers, springs, clutches, spark plugs,
mufflers, nozzles, pulleys, guide rollers, cables, recoil starter, chucks, collets, removable batteries, filters and safety elements, grease, removable devices, equipment, knives, drills, etc.);
• Electrical cables with mechanical and thermal damage;
- Product opened or repaired by a non-authorized service center.
- Prevention, care products (cleaning, washing, lubrication, etc.), installation and configuration of the product;
• Natural wear products (production share);
- Failures caused by using the product for the needs related to business activities;
- If the warranty card is empty or missing seal (stamp) of the Seller;
- The absence of the holder's signature on the warranty card.


DAEWOO
POWER PRODUCTS


- INDEX
- TECHNICAL SPECIFICATIONS AND DATA
- OPERATING THE DIESEL GENERATOR
- GENERAL MAIN POINTS OF SAFETY DURING OPERATION OF THE GENERATOR SET
- 2-1.1 FIRE PREVENTION
- 2-1.2 PREVENTION FROM INHALING EXHAUST GASES
- 2-1.3 PREVENTION FROM ACCIDENTAL BUMS
- 2-1.4 ELECTRIS SHOCK AND SHORT CIRCUITS
- 2-1.5 OTHER SAFETY POINTS
- 2-1.6 BATTERY
- PREPARATION BEFORE OPERATION
- 2-2. I FUEL CHOICES AND FUEL TREATMENT
- FUEL TANK
- AIR FILTER ELEMENT
- 2-2.2 FILL ENGINE OIL
- FABRICATION OIL FILLING INLET
- 2-2.3 CHECK AIR FILTER
- 2-2.4 CHECKING THE GENERATOR WELDER
- 2-2.5 THE FUEL AND OIL IN A NEW ENGINE IS DRAINED BEFORE SOLD
- CHECKING THE OPERATION OF THE DIESEL ENGINE
- 2-3.1 LOW-PRESSURE ALARM SYSTEM
- 3.2 HOW TO OPEN THE CASE DOOR/COVER
- 2-3.3 ENGINE BREAK IN
- STARTING THE GENERATOR SET
- 2-4. 1 MANUAL STARTING
- 2-4.2 ELECTRIC STARTING
- 2-4.3 BATTERY
- PROPER OPERATION OF THE GENERATOR SET
- 2-5.1 OPERATING THE DIESEL ENGINE
- 2-5.2 CHECKS DURING ENGINE OPERATION
- LOADING
- 2-6.1 LOAD CONDITIONS
- 2-6.2 OUTPUT OF ELECTRICITY
- 2-6.3 CHARGING THE BATTERY
- STOPPING THE GENERATOR
- MAINTENANCE
- MAINTENANCE SCHEDULES
- 3-1.1 CHANGING THE ENGINE OIL (EVERY 100 HOURS)
- 3-1.2 REPLACING THE OIL FILTER
- 3-1.3 AIR FILTER MAINTENANCE SCHEDULE
- 3-1.4 FUEL FILTER MAINTENANCE
- 3-1.5 CYLINDER HEAD BOLT TENSIONS
- 3-1.6 BATTERY CHECK
- STORING FOR LONG PERIODS OF TIME
- OVERHAULING AND TROUBLESHOOTING
- QUESTIONS AND ANSWERS
- PART LISTINGS
- REMOTE CONTROL INSTRUCTIONS
- BASICS
- OPERATION PROCEDURES
- DESCRIPTION OF KEYS
- WARRANTY CARD
- GUARANTEE
- WARRANTY DOES NOT COVER
- DAEWOO
- POWER PRODUCTS
Brand : DAEWOO
Model : DDAE8000SE
Category : Generator