BV735BLC - Car radio BOSS - Free user manual and instructions
Find the device manual for free BV735BLC BOSS in PDF.


| Product Type | Car Radio Receiver |
| Brand | Boss |
| Model | BV735BLC |
| Form Factor | Single DIN |
| Dimensions (H x W x D) | 2 x 7 x 6 inches (approx.) |
| Weight | 1.5 lbs (approx.) |
| Power Supply | 12V DC (negative ground) |
| Maximum Power Output | 4 x 50 Watts |
| RMS Power Output | 4 x 20 Watts |
| Display Type | LCD with LED backlight |
| Supported Media | AM/FM Radio, USB, AUX, Bluetooth Audio Streaming |
| Bluetooth Version | 4.0 or later (typical) |
| FM Frequency Range | 87.5 - 107.9 MHz |
| AM Frequency Range | 530 - 1710 kHz |
| Preset Stations | 30 (18 FM, 12 AM) |
| Front USB Input | Yes (for music playback and charging) |
| Front AUX Input | 3.5mm jack |
| Built-in Amplifier | Yes (Class A/B) |
| Equalizer Settings | Preset EQ (Rock, Pop, Classic, Flat, etc.) |
| Steering Wheel Control Compatible | Yes (with optional adapter) |
| Security Features | Removable faceplate with carry case |
| Included Accessories | Wiring harness, mounting sleeve, faceplate case, user manual |
| Maintenance | Clean with soft dry cloth; avoid liquids |
| Repairability | Parts available; consult professional installer |
Frequently Asked Questions - BV735BLC BOSS
User questions about BV735BLC BOSS
0 question about this device. Answer the ones you know or ask your own.
Ask a new question about this device
Download the instructions for your Car radio in PDF format for free! Find your manual BV735BLC - BOSS and take your electronic device back in hand. On this page are published all the documents necessary for the use of your device. BV735BLC by BOSS.
USER MANUAL BV735BLC BOSS
BLUETOOTH® | MP3-COMPATIBLE
DIGITAL MEDIA AM/FM RECEIVER
FEATURING 6.2" (157 mm) WIDESCREEN
TOUCHSCREEN DIGITAL TFT MONITOR

Congratulations on your purchase of a Boss Audio Systems ELITE® Multimedia Receiver.
It has been designed, engineered and manufactured to bring you the highest level of performance and quality, and will offer you years of entertainment pleasure.
CONTENTS
Specifications....1
Safety Notice....2
Accessories....3
Unit Installation....3
Remote Control Operation....4
Wires Connection Description....5
Panel Introduction......6
Main Menu Operation Instruction....7
Access Setup Interface....8
General Settings....7
Camera Settings....8
Clock Settings....8
Audio Settings....8
Tuner Settings....9
Illumination Settings....9
About Settings....10
Tuner Operation....10
USB/Micro SD Playback....11
USB/Micro SD Video/Music/Picture Operation....11
Video Operation....11
Music Operation....12
Photo Operation....12
Bluetooth Operation....13
Bluetooth Operation Menu....13
Bluetooth Dialing....13
Bluetooth Call....13
Bluetooth Phone Book....14
Bluetooth Phone Call History....14
Bluetooth Device....14
Bluetooth Music Steaming-A2DP....14
Bluetooth Pair device....14
A-LINK(Screen Mirroring) Operation....15
PTT(Push-To-Talk) Operation....15
Steering Wheel Control Compatibility....16
Troubleshooting....17
| Model No. | BV735B | ||
| General features | Fixed front panel 6.2 inch TFT screenFM/AM RadioRBDSA-Link (Screen Mirroring)USB Charging (1A)Front USB and Micro SD supportBluetooth audio stream and hands-free phone callPush-To-Talk (PTT)AUX inputAV inputVideo outputFront/Rear view camera supportFront, rear and subwoofer pre-amp outputsMax. 4 x 80W power outputSteering wheel control (SWC) | ||
| 800 x 480 pixelTFT screen | |||
| USB/Micro SD | 64G | ||
| Working power | 12V | ||
| Max Output | 4 x 80W | ||
| Working Temperature | -20°C ~ 70°C/ -4°F ~ 158°F | ||
| Size | 7.01" x 3.86" x 3.94" / 178 x 98 x 100 mm | ||
| Weight | 1.54 lbs / 0.7 kg | ||
| Compatible Media | |||
| Picture JPG/JPEG/BMP | |||
| Audio file | MP3/WAV/FLAC | ||
| Video file | Format | Video code | Audio code |
| .MPEG1 | MPEG1 | MP2 | |
| .MPG | MPEG2 | MP2 | |
Please read and understand the following safety information before operating this unit.
WARNING!
To ensure safety while driving and to comply with laws, drivers should not watch video or operate the video device while driving.
The unit is suitable for 12V power supply (requires grounding). Do not connect it to 24V power supply in trucks or buses, or else it will be damaged.
Do not replace the fuse without the guidance of qualified personnel or the unit may be damaged and/or catch fire.
⚠️ Please follow the traffic laws and regulations and do not watch programs or operate the unit when you are driving to avoid accidents (excluding passengers watching through rear monitor).
To ensure safety and normal unit operation, please ask qualified personnel to install the unit. Do not disassemble or repair the unit without authorization. To avoid damage and accidents, please contact a local car audio distributor for details.
Do not put the unit in a moist environment or water to avoid electric shock, damage, and/or fire due to a short circuit.
The mechanical drive part of the monitor uses an automatic precision transmission component. Do not pull, push or rotate the unit by force or impact the TFT screen to avoid damaging the unit.
Do not insert the audio plug of the vehicle into the master unit directly. Please convert with the dedicated end cable provided by our company.
When installing the unit, prevent metal objects from falling into the master unit from the vents to avoid a short circuit and damaging the unit.
Safety Statement
For the safety of yourself and others, do not watch programs or operate the unit when you are driving. It is prohibited by law.
The back up camera function should be used as an auxiliary view only. We are not responsible for any accidents occurred during backing.
Remote control....1
Wire harness....1
Mounting brackets.... 2
Bracket screws. 4
Trim ring....1
UNIT INSTALLATION

- Put the 2 brackets to the left and right side of the unit.
- Use the supplied screws to attach the brackets to the unit.
- Once the screws are attached, the brackets can be adjusted forward or backward depending on the installation requirements.

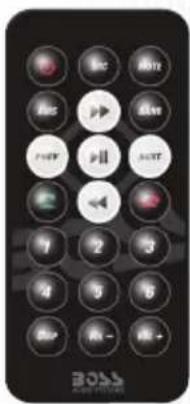
1 SRC
Select a source.
2
Switch the unit on or to standby.
3 /◀◀ ▶▶
- In radio mode, press briefly to tune to a station; press and hold to enter manual seeking mode to fine tune frequencies.
- During media playback, search forward and backward.
4 AMS
Auto search and store radio stations.
5
Start, pause or resume playback.
6 PREV / NEXT
- In radio mode, select a preset radio station.
- During media playback, skip to the previous or next track.
7
Dial/answer a Bluetooth phone call.
8 Numeric buttons
In radio mode, select a preset radio station (1-6).
9 DISP
Display screen backlight setting.
10 VOL +/-
Adjust volume.
11
Eject or end a Bluetooth phone call.
12 BAND
Select a tuner band.
13 MUTE
Mute or restore volume.
Notes for battery
- Replace only with the same type battery (CR2025). Observe correct polarity while inserting the battery.
- Remove the battery from the remote control if not used for a long time.
- The remote control contains a coin/button type battery, which can be swallowed. Keep the battery out of reach of children at all times!
- Batteries contain chemical substances, so they should be disposed of properly.
The Description of the Input/Output Interface

Audio/Video Inputs and Outputs
R.CAM...... Rear Camera Input (Yellow)
SUB1...... Subwoofer Output 1 (Green)
SUB2...... Subwoofer Output 2 (Green)
F.CAM...... Front Camera Input (Yellow)
R L..... Rear Left PRE-AMP Output (White)
R R..... Rear Right PRE-AMP Output (Red)
V-IN......Video Input (Yellow)
L-IN......Left Audio Input (White)
R-IN......Right Audio Input (Red)
V-OUT...... Video Input (Yellow)
F L..... Front Left PRE-AMP Output (White)
F R..... Front Right PRE-AMP Output (Red)
Wire Harness
| Power | Speaker Outputs |
| Yellow...... Constant (+12v) | White...... Left Front (+) |
| Red...... Accessory (+12v) | White/Blk...... Left Front (-) |
| Black...... Ground (-) | Gray...... Right Front (+) |
| Orange...... Illumination Input (+12v) | Gray/Blk...... Right Front (-) |
| Violet/Wht...... Reverse Input (+12v) | Green...... Left Rear (+) |
| Blue...... Ant. Output (+12v, 500 mA) | Green/Blk...... Left Rear (-) |
| Blue/Wht...... Rem. Output (+12v, 500 mA) | Purple...... Right Rear (+) |
| Lt.Green...... Parking Brake Input | Purple/Blk...... Right Rear (-) |
| Control | Camera Power |
| 3.5mm...... SWC Input | Red/Blue...... Front Output (+12v, 500 mA) |
| Red/White...... Rear Output (+12v, 500 mA) |

1 Remote sensor
Aim the remote control directly at the sensor.
2 Built-in microphone
Pick up sound in Bluetooth operation.
3
Return to the previous menu screen.
4 MODE
Select a system mode (source).
5 PTT (Push-To-Talk)
Press to access smartphone voice assistant capability via Bluetooth.
6 Function knob
- Press and hold to turn the unit on or off.
- Rotate to adjust volume.
- In power on mode, press briefly to mute or restore volume.
7 BAND
Select a tuner band.
8 Reset/AUX/USB/SD cover
Open to access the following button or connectors.
- Reset button
Press the reset button if the unit fails to operate properly.
- AUX jack (3.5mm)
Connect to an external audio device for audio input.
- USB port
Connect to a USB flash drive for media play.
- SD card slot
Connect to a Micro SD card for media play.
MAIN MENU 1
- Tuner Interface
- Streaming Interface
- Phone Interface
- USB Interface
- Micro SD Interface
- Front/Rear Camera Interface
- AV INPUT Interface
- AUX IN Interface
MAIN MENU 2
- Setting Interface
- A-LINK(Autolink) Interface


There are seven Setting Menus
GENERAL SETTINGS-Menu 1

- Touch to set wall paper for the home menu background.
- Retain ACC Power: select how many seconds to delay shut down of the unit after the vehicle powers down.
- When turned on, an audible beep tone confirms each function selection.
- Touch to select Spanish or English.
CAMERA SETTINGS-Menu 2

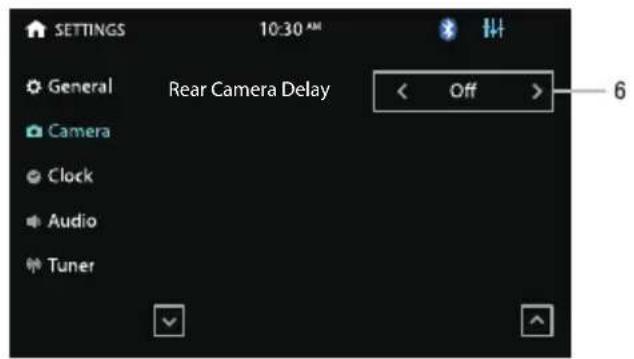
- Camera Trigger: Touch to select Front/Rear/Off. Select to display the front or rear camera view, or no camera view when reversing.
- Rear Camera: Touch to enable or disable the rear camera input.
- Rear Cam Pwr: Touch to enable or disable power output to the rear camera.
- Front Camera: Touch to enable or disable the front camera input.
- Front Cam Pwr: Touch to enable or disable power output to the front camera.
- Rear Camera Delay / Front Camera Delay: Touch to delay trigger of the rear/front camera view by a set time (1/2/3 seconds or off) when shifting the gear to the reverse position. Due to varying vehicle configuration, the rear/front view trigger can be delayed to suit the vehicle.
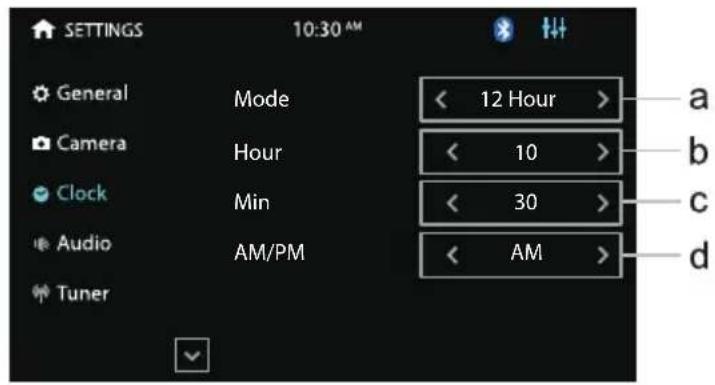
CLOCK SETTINGS-Menu 3
a. Touch to set clock mode: 12/24 hour.
b. Touch to set hour.
c. Touch to set minute.
d. Touch to set AM/PM at 12 hour mode.
AUDIO SETTINGS-Menu 4


- Touch to select whether to output sound from an external amplifier.
- Startup volume: default volume.
① If the volume at the last shutdown is less than this volume, the volume at the last shutdown will be used when rebooting;
② if the volume at the last shutdown is greater than this volume, this default volume will be used when rebooting
3-9. Touch to set a particular volume level for each source.
10. Slide up or down to enter the previous or next menu interface.
Position: Touch to access setup of balance, fader and subwoofer.
Equalizer: Touch to access setup of equalizer and loudness.
TUNER SETTINGS -Menu 5
- Select America or EU region you are in to receive radio stations.
- Perform radio search and store radio stations in each radio band.
- Select "Local" to receive strong signal only. Select "Distance" to receive both strong and weak signals
- Turn on or off RBDS function. Select "Set" to access RBDS setting options.
- Select "Stereo" or "Mono" sound effect.
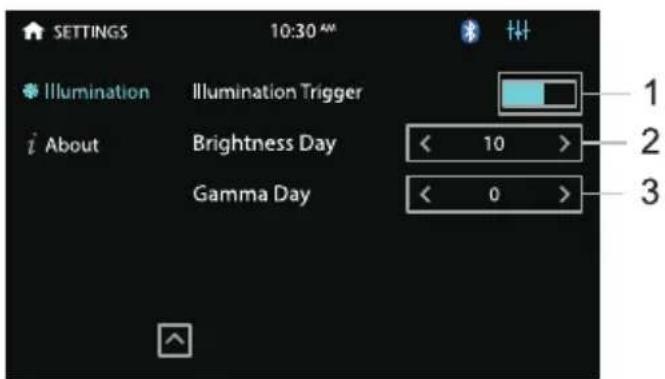
ILLUMINATION SETTINGS -Menu 6
- Touch to turn on the illumination detection function.
- Touch to set screen brightness.
- Touch to set gamma brightness.

ABOUT SETTINGS -Menu 7
- Touch to enter the touch calibration interface.
- Touch to view the version number of the machine.
- Touch to restore the machine to factory settings.
- Touch to select whether it is necessary to display the End User License Agreement when booting up.

TUNER OPERATION
- Touch ↑ to go back to the home page.
- Show PS, PTY and RT messages from RBDS
- Short press to seek backwards, long press to enter manual mode.
- Short press to seek forward, long press to enter manual mode.
- Short press to select the preset station, long press to save current Freq.

RBDS: Touch Setting >Tuner > RBDS > Set to enter the RBDS setup menu. Choose what program type you'd like to listen to: news, sports, information, etc.
a. CT (Clock Time)
Turn on to automatically correct the current time every time the RBDS is enabled.
b. TA (Traffic Announcement)
ON: When turned on, the radio will automatically search for traffic stations. The unit will automatically switch to radio mode to broadcast traffic announcement,
even if the unit is in other mode. Once the traffic announcements are complete, the unit will automatically switch back to the previous mode.
OFF: TA function is turned off.

c. AF (Alternative Frequencies)
When the AF function is turned on, the radio will automatically fine tune to other frequencies when the received station becomes weak. A warning message will be displayed on the screen when receiving emergency announcements.
d. PTY (Programming Type)
Touch an on-screen button to select a program type. The unit will search for the selected program and broadcast it.
NOTE: If RBDS is turned OFF, CT/TA/AF/PTY will not function.
Touch the USB/SD icon in the main menu to enter the USB or Micro SD playback interface.
VIDEO OPERATION

NOTE: When properly installed, a video cannot be displayed unless the parking brake is applied. If the parking brake wire is not installed correctly, a warning message will appear.
- Keypad: Enter the number to select video.
- Short press to move to the previous video, long press to rewind quickly.
- Touch to playback/pause.
- Short press to move to the next video, long press to fast forward quickly.
- List: Touch to enter video file list.
- Go to the next page of the menu bar.
- Go to the previous page of the menu bar.
- Touch to change the repeat mode in the following sequence: repeat track, repeat all, repeat cancel.
- Touch to change random play mode.
- Touch to enter video adjust page to adjust Gamma and contrast of video.
- Touch to enter video title list
- N/A
- Touch to switch aspect ratio of video between 4:3 and 16:9
- Touch to select audio language for video.
- View the Music files
- View the Photo files
- View the Video files
- Enter the previous or next page of list.

MUSIC OPERATION

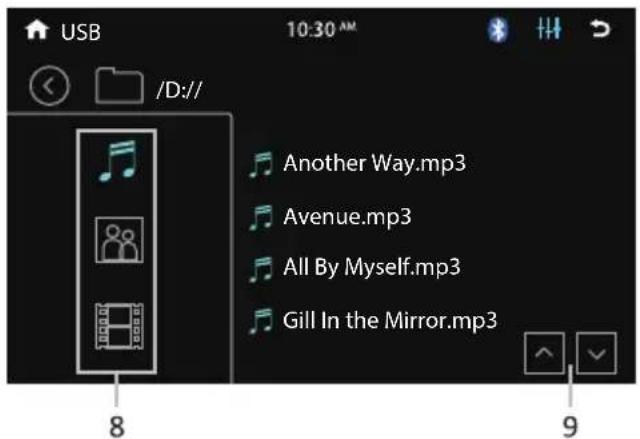
- Show the music's ID3 information
- Time bar: show the elapsed time and total time of the current song, track number.
- Change play mode: repeat all, repeat single, sequential play and shuffle play.
- Skip to the previous song
- Play/Pause
- Skip to the next song
- List: Touch to enter song file list.
- View the Music/Photo/Video files
- Go to the previous or next page of list.
PHOTO OPERATION

13

- Keypad: Enter the number to select photo
- Skip to the previous photo
- Play/Pause
- Skip to the next photo
- List: Touch to enter photo file list.
-
Go to the next page of the menu bar
-
Go to the previous page of the menu bar
- Repeat single, repeat all, repeat cancel
- Sequential play and shuffle play
- Touch to enter video adjust page to adjust Gamma and contrast of image.
- Turn right 90 degree
- Zoom In / Out
- View the Music/Photo/Video files
- Go to the previous or next page of list.
Click the phone icon to enter the Bluetooth function interface.
1. Bluetooth setting menu:
a. Turn Bluetooth on and off.
Turn on and the display loops
between the gray Bluetooth icon,
the white Bluetooth icon. The icon
will turn blue when a phone is paired.
b. Connect automatically.
c.Answer automatically.
d.PIN code: The default password is "0000".
e.Default Bluetooth name for this unit: BOSS AUDIO BV735B

2. Function area:
a.Click to see the dialing keypad. Users can dial phone numbers and make calls.
b.Click to see the Bluetooth phonebook menu.
c.Click to see the Bluetooth call history.
d. Bluetooth pairing interface.
e. Bluetooth setting menu.
BLUETOOTH DIALING
- Shows the number dialed in.
Press ✗ to delete wrong numbers.
2.Key area. - Touch to call out.

BLUETOOTH CALL
1.Show contact name.
2. Touch to select talk through phone or through Bluetooth.
3.Keypad area.
4. Press to hang up the phone call.

BLUETOOTH PHONE BOOK
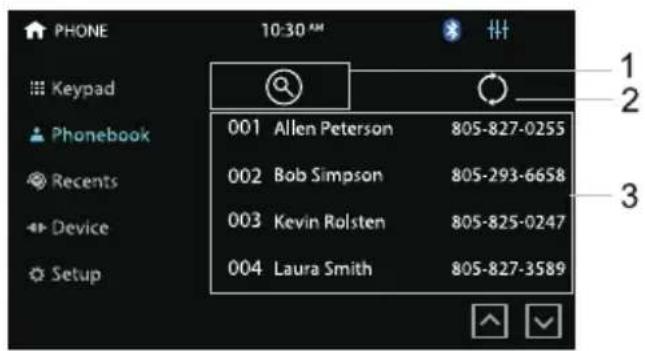

- Touch to search for a name or phone number.
- Click to sync phonebook.
- Contact list.
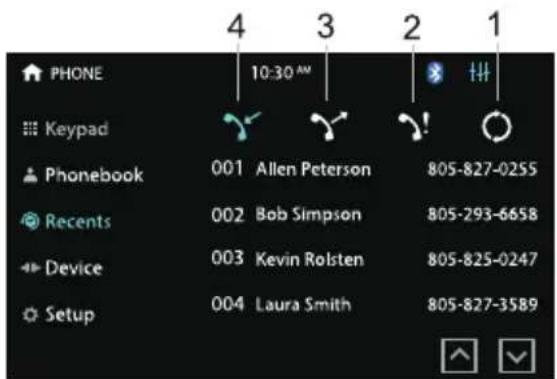
BLUETOOTH PHONE CALL HISTORY
- Click to sync phone call history.
- Touch to show missed calls.
- Touch to show the dialed phone number.
- Touch to show the received phone number.
BLUETOOTH DEVICE
- Click to view the device connected to this unit.
- Click the device name to disconnect the device.

- Skip to the previous song.
2.Play/pause.
3.Skip to the next song.
4.Enter EQ setting menu.

A-LINK App allows you to mirror the screen of certain Android smartphones on the screen of this unit.
Scan either of the QR codes to download the "A-LINK" App in Amazone App Store or Google Play Store and install it to your smartphone.
Simply connect your smartphone to the USB port on the front panel using the original cable of your smartphone. You will see the favorite smartphone apps directly on the screen of this unit.
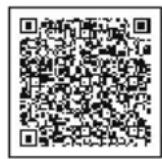
Amazon
App Store

Google
Play Store
Note:
- Supports 2 way control for Android device.
- Supports Android 8.0+ or higher, not all apps are supported.
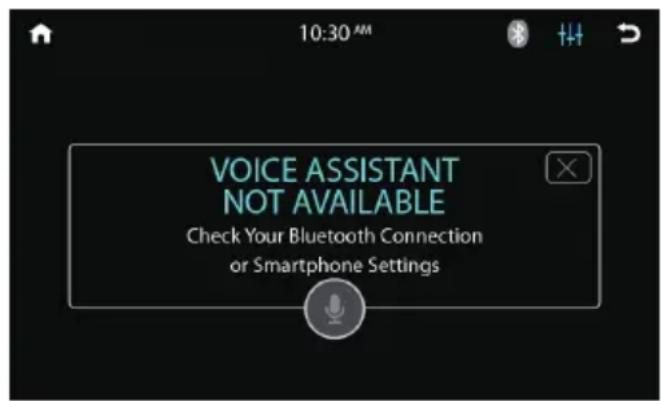
This Push-To-Talk feature allows direct access to Android and IOS smart-phones voice assistant capability when you establish the Bluetooth connection between your smartphone and this unit. Press the 📋 button on the front panel to use the function when Bluetooth connection is made.
Note:
Before using the Push-To-Talk, you must enable the mobile data on your smartphone.
To use the navigation feature, switch to the BT Audio source to hear voice commands over the speakers of your vehicle.

A third-party adapter must be used in order for this unit to be compatible with your OEM steering wheel controls. We recommend PAC SWC Series.
This unit has a built-in 3.5mm SWC interface that is compatible with many popular 3rd party SWC control modules, such as PAC, METRA, and others.

* Your product design may differ
RED or BLACK color
3.5mm SWC port is located on the rear of the unit, on the MAIN POWER I/O Harness
The following Radio / Audio function controls are available:
Source
Mute
Home
Seek + / Next Track
Seek - / Previous Track
Volume +
Volume -
Band
Phone Menu
BT Talk
BT End Call
Voice Assistant / PTT
Note: Not all OE steering wheel
functions may be supported
SWC INSTALLATION / PROGRAMMING
Contact your local installation expert for the correct adaptor for your specific vehicle.
- For most SWC adaptors select program using "Pioneer/Sony/Other" mapping order as described above.
- When programming, if a function is not supported (or not desired), then the function MUST be skipped as per the SWC module instructions.
- The SWC function MUST be programmed in the correct order as per the function mapping order instructions.
For SWC programming technical assistance call the number in your SWC instruction manual
SPECIFICATIONS SUBJECT TO CHANGE WITHOUT NOTICE
v2.0
Table 1: General problem
| Problem | Casue | Corrective Action |
| Unit does not power on | Radio fuse blown | Install new fuse with right rating |
| Car battery fuse blown | Install new fuse with right rating | |
| Illegal operation | Press the Reset button | |
| Screen touch is insensitive | Place of touch screen is offset | Go to setup menu and set the calibration |
| No audio output | Improper audio output connection | Check wiring and correct |
| VOLUME 0 | Turn up the volume | |
| Low audio output | Volume set too low Increase the volume | |
| Heavily biased volume balance | Check and adjust the channel balance to the center position | |
| Poor sound quality or distortion | Speaker power rating not compatible with unit | Connect proper speakers |
| Speaker is shorted Check speaker contrast | ||
Table 2: Tuner problem
| Problem | Casue | Corrective Action |
| Weak station searching | Auto antenna is not fully extended | Connect the auto antenna properly |
| Local function is activated | Turn Local function OFF |
Table 3:TFT monitors problem
| Problem | Casue | Corrective Action |
| No image | Incorrect connection to parking wire Check wiring and correct | |
| Parking brake is not engaged | Stop vehicle in safe place and parking brake ON | |
| Flashing image or interference appears on screen | Improper video signal connections Check wiring and correct | |
| Improper image, improper height/ width ratio display | Improper aspect ratio setup Use correct aspect ratio setting | |
BOSS Audio Systems
3451 Lunar Court · Oxnard, CA 93030
www.bossaudio.com
805-751-4853 Customer Service
Tech Support: www.bossaudio.com/support


1221
- CONGRATULATIONS ON YOUR PURCHASE OF A BOSS AUDIO SYSTEMS ELITE® MULTIMEDIA RECEIVER
- CONTENTS
- WARNING
- SAFETY STATEMENT
- UNIT INSTALLATION
- 1 SRC
- 2
- 3 /◀◀
- 4 AMS
- 5
- 6 PREV / NEXT
- 7
- 8 NUMERIC BUTTONS
- 9 DISP
- 10 VOL
- 11
- 12 BAND
- 13 MUTE
- NOTES FOR BATTERY
- 1 REMOTE SENSOR
- 2 BUILT-IN MICROPHONE
- 3
- 4 MODE
- 5 PTT (PUSH-TO-TALK)
- 6 FUNCTION KNOB
- 7 BAND
- 8 RESET/AUX/USB/SD COVER
- RESET BUTTON
- AUX JACK (3.5MM)
- USB PORT
- SD CARD SLOT
- MAIN MENU 1
- MAIN MENU 2
- GENERAL SETTINGS-MENU 1
- CLOCK SETTINGS-MENU 3
- TUNER SETTINGS -MENU 5
- ILLUMINATION SETTINGS -MENU 6
- ABOUT SETTINGS -MENU 7
- TUNER OPERATION
- CT (CLOCK TIME)
- TA (TRAFFIC ANNOUNCEMENT)
- AF (ALTERNATIVE FREQUENCIES)
- PTY (PROGRAMMING TYPE)
- BLUETOOTH SETTING MENU
- FUNCTION AREA
- BLUETOOTH DIALING
- BLUETOOTH CALL
- BLUETOOTH PHONE CALL HISTORY
- BLUETOOTH DEVICE
- NOTE
- SWC INSTALLATION / PROGRAMMING
Brand : BOSS
Model : BV735BLC
Category : Car radio