CZ202E - Car stereo CLARION - Free user manual and instructions
Find the device manual for free CZ202E CLARION in PDF.
Download the instructions for your Car stereo in PDF format for free! Find your manual CZ202E - CLARION and take your electronic device back in hand. On this page are published all the documents necessary for the use of your device. CZ202E by CLARION.
USER MANUAL CZ202E CLARION
usiBua AUTIONS: This applance contains à laser system and is classified as a "CLASS 1 LASER PRODUCT". To use this model proper, read this Ouners Manual carefuly and keep this manual for your future reference. In case of any trouble with this player, please contact your nearest"AUTHORIZED service station” To prevent direct exposure to the laser beam, do not ty to open the enclosure. ICAUTION
USE OF CONTROLS OR ADJUSTMENTS
OR PERFORMANCE OF PROCEDURES
OTHER THAN THOSE SPECIFIED IN THE.
OWNER'S MANUAL MAY RESULT IN
HAZARDOUS RADIATION EXPOSURE. AOVARSEL| Denne mærking er anbragt udvendigt pà apparatet og indikerer, at apparatet arbejder med lasersträler af lasse 1, hviket betyder, At der anvendes lasersträler af svageste Hlasse, og at man Ikke pa apparalets yderside kan blive udsat for utiladelig kratig String. APPARATET BOR KUN ÂBNES AF.
FAGFOLK MED SÆRLIGT KENDSKAB TIL
APPARATER MED LASERSTRALER! Indvendigt apparatet er anbragt den her gengivne advarselsmækning, som advarer imod at foretage sädanne indgreb i apparatet, At man kan komme til at udsaætte sig for laserstrling. cz202E/Cz202ER/C2202EG ‘Apparaten innehller laserkomponenten som avger lasersträlning éverstigande grânsen fôr lasorkass 1 Suojakoteloa si saa avata. Laite sisältää lasardiodin, joka lähettä nâkymätôntà simille vaaralista lasersäteilyä. Contents ‘Thank you for purchasing this Clarion product.
- Please fully read this owners manual before operating this equipment. + Check ihe contents of the enclosed warranty card and store i in a sale place with this manual. About the Registered Marks, etc. Front Panel / Generalties USB Po Remove the DCP Atlach the DCP Storing the DCP in the DGP Case 3.OPERATIONAL PANEL . Operational Panel Names of Buttons.
4. CAUTIONS ON HANDLING
Basic Operations: 5 System Setup. 5 Audio Setup. 5 Radio Operations q Radio Data System Operations. q
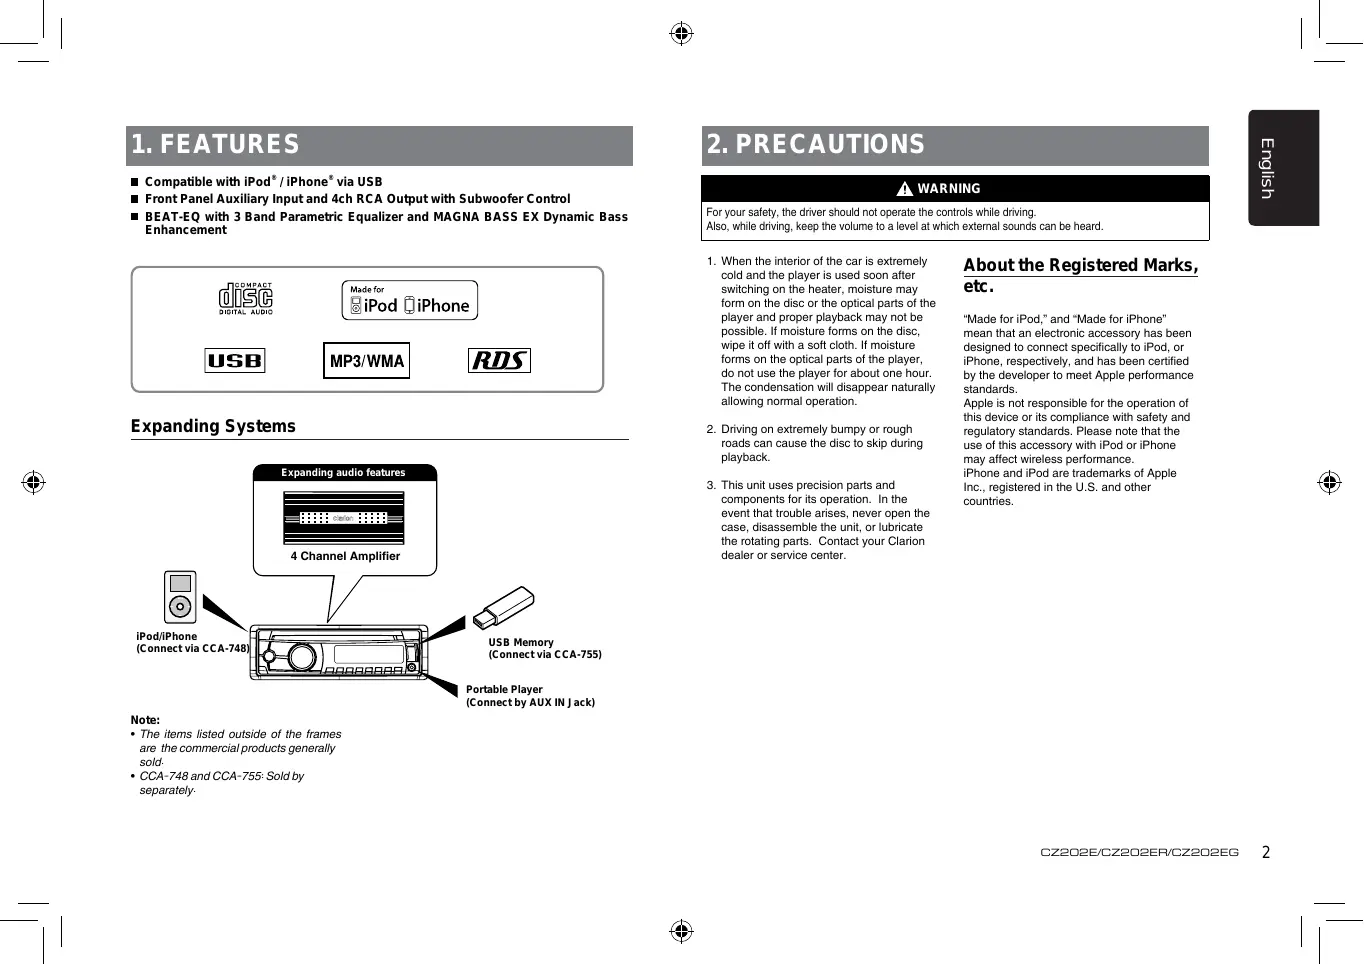
m Front Panel Auxiliary Input and 4ch RCA Output with Subwoofer Control M BEAT-EQ with 3 Band Parametric Equalizer and MAGNA BASS EX Dynamic Bass Enhancement
Expanding Systems Expanding audio features (ss
SB Memory. {Connect via CCA-748) {Connect via CCA-755) Portable Player {Connect by AUX IN Jack) Note: + The items listed outside of the frames are the commercial products generaly sold. + CCA-748 and CCA-755 Sold by Separate. PRECAUTIONS À WARNING For your safet, the driver Should not operate the controls while drving Also, while drving, keep he volume o a level at which extemal sounds can be heard. ea an be por sud mater” AbOUt the Registered Marks, suiching on ine nealer, molsure may EC form on he disc orne opcal pars of the player and proper playback may not be possile. motsure forms on the dis, pe of wi a sof clin moisure Forms on te opial pars of he payer do nat use ie payer for about one hour. The condensation wil dsappear natural allowing nomal operation. “Made for iPod," and “Made for iPhone" mean that an electronic accessory has been designed to connect specficaly te iPod, or iPhone, respectively, and has been certiied by the developer lo meet Apple performance standards. Apple is not respansible for the operation of this device or its compliance with safety and reguiatory standards. Please note that the use of this accessory with iPod or iPhone may affect wireless performance. iPhone and iPod are trademarks of Apple Inc. registered in the U.S. and other countries.
2. Diving on extremely bumpy or rough
road can cause 1he disc Lo skip during playback This unit uses precision parts and components for its operation. In the event hat trouble arises, never open the case, disassemble the unit or lubricate he rotating parts. Contact your Clarion dealer or service center. cz202e/cz202Er/c2202EG
Front Panel / Generalities USB Port For a longer service life, be sure to read the following cautions. + Do not allow any liquids on the unit from drinks, umbrellas, etc. Doing so may. damage the internal cicuitry. +_ Do not disassemble or modify the unit in any way. Doing so may result in damage. Do nat let cigarettes bum he display. Doing so may damage or deform he body. I a problem should occur, have the unit inspacted at your store of purchase. Cleaning the body +” Use a soft, dry clin and gent wipe off Ahe any dr or dust. For ough din, apply some neutral detergent diluted in water 1 a soft cloth, vwipe off ne dit gent, en vipe again with a dry cioth Do not use benzene, hinner, car cleaner, etc. as these substances may damage Ahe body or cause the paint to peel. Also, Aeaving rubber or plasic products in contact with the body for long periods of Aime may cause stains. cz202E/Cz202ER/C2202EG For a longer service lie, be sure to read the following cautions. +_ The USB memory stick may stick out when inserted,so it may cause danger during driving. When connect USB memory Stick to the main unit, please use a USB ‘extension cable(CCA-755). ‘The USB memory slicks must be recognized as “USB mass storage class” to work proper. Some models may not perate correct. When the memorized data is lost or damaged by any chance, Clarion shall not be liable for any damage. When using an USB memory stick, we recommend that you backup your data stored on it before using a personal computer etc. Data files may be broken when using USB memory sticks in the following Situation:When disconnecting the USB memory Stick or tuming the power off during reading data.When affected by static electricity or electric noise. Comnectisconnect the USB memory stick wihen itis not accessed. + Connecting with the computer is not covered.
Remove the DCP ‘The control panel can be detached to prevent theft. When detaching the control panel, store it in the DCP (DETACHABLE CONTROL PANEL) case to prevent scratches. We recommend taking the DGP with you wihen leaving the car. Press the [SRC / ] button (1 sec. to turn of ihe power. Deepiy push in [OPEN] button to unlock the DCP. Hold the side popped out, remove the DCP. Attach the DCP Hold the DCP and ensure that the panel faces towards you. Set the right side of the DGP into the DCP bracket. Press the left side of the DGP until it locks. Storing the DCP in the DCP Case Hold the DCP, as shoum in the figure below, and put it into the supplied DCP case. DCP case Note: Hthe DCP is dirty, wipe off the dir with a soft, dry cloth oniy. The DCP can easily be damaged by Shocks. Alter removing it, be carelully not 0 drop it or subject it to strong shocks. Once the [OPEN] button is pressed and DGP is unlocked, car vibrations can cause the DCP to fall The connector for the main unit and DCP is extremely important. Be careful not to damage if by pressing on it with fingemails, screwdrivers, etc.
4. CAUTIONS ON HANDLING
Disc Slot 1 USB Connector 10000 EH SRE 101 orange" Names of Buttons ivoLume] © (DISP]
- [1 Button: Scan play / Preset station 1 : [2] Button: Repsat pay / Preset station 2. + [8] Button: Random play / Preset station 3. + [él Button: Play / Pause / Top play (long press) / Preset station 4. 5] Button: Previous folder / Preset station 5; 10 tracks doun (long press) 2 6) Button: Next folder / Preset station 8. 10 tracks up (long press) IDISP] Button + Display switch + System selup (long press) Handling + New discs may have some roughness around the edges. I such discs are used, the player may not work or the sound may skip. Use a bal-point pen or the like to remove any roughness from the edge of the disc. Ball-point pen Never stick labels on the surface of the disc or mark the surface with a penci or pen. Never play a disc with any cellophane tape er other glue on it or with peeling off marks. I you ty lo play such a disc, you may not be able to get it back out of he player orit may damage the player. Do not use discs that have large Scratches, are misshapen, cracked, etc. Use of such discs may cause misoperation or damage. ‘To remove a disc from ts storage case, press doum on the center of the case and Hfthe disc out, holding it carefully by 1he edges. + De not use commercial available disc protection sheels or discs equipped with Stabilzers, etc. These may damage the disc or cause breakdown of the internal mechanism. Storage + Do not expose dises to direct sunlight or any heat source. + Do not expose dises to excess humidity or dust + Do not expose dises to direct heat from hoater. Cleaning +_ To remove fingermarks and dust, use a soft Cloth and wie in a straight line from the center of the disc to the circumference. Do not use any solvents, such as commercilly available clsaners, ant-static spray, or thinner lo clean discs. Aer using special disc cleaner, let the disc dry off well before playing i. On Discs +_ Never tum off the power and remove the unit from the car with a disc loaded, A CAUTION For your safety, the driver should notinsert or eject a disc while driving. Cz202e/cz202ERr/CZ2202EG
Basic Operations Note: + Refer lo the diagrams in “8. CONTROLS" when reading this chapter. À CAUTION Volume adjustment Turn the [VOLUME] knob on the front panel. The adjustable range of volume is 0 to 40. When the unitis tumed on, starting and stopping the engine with its volume raised to the maximum level may harm your hearing. Be careful about adjusting the volume. Power on / off Notes: + Star the engine before using this unit. + Be careful about using this unit for a long time without running the engine. lf you drain the cars battery to far, you may not be able to star the engine and this can reduce the service life of the battery. Star the engine. The power bution / knob ilumination on the uni wil light up. Engine ON position Press the [SRC / ] button on the front panel to tum on the power under standby mode. The unit goes back to Ihe last Status after power on. Press and hold the [SRC / 6] button on the front panel to tu off the power. CT (Clock Time) display + The displayed clock data is based on the GT {cock time) dat in the RDS signal. cz202E/Cz202ER/C2202EG À CAUTION While driving, keep the volume level at which external sounds can still be heard. Playing source selection Press [SRC /( ] button on the front panel repeated to choose desired playing source. Note: + Playing source selection means selecting which mode, such as DISC mode, RADIO mode and AUX mode. Display system time Press the [DISP] button on the front panel to switch he display information between RDS information, system time and playing source RESET I you have below problems, pls press IRESET) button. + Unit can not power on + Nothing happens when buttons are pressed + Display is not aceurate Note: When the [RESET] button is pressed, preset radio stations, audio seting, et. Stored in memory are kept. System Setup In any mode, press and hold [DISP] button to enter system setup. Press [44 . mi] buttons to select options, rotate the [VOLUME] knob to adjust AF: ONOFF Rolate ie [VOLUME] knob t choose AF ON or REG: ONJOFF Role he [VOLUME] knob to choose REG ON DX/LO (RADIO mode) Rotate the [VOLUME] knob to choose radio local or distant at RADIO m 1 L9 ,Ony stations with DS goal can be LADX Stations tn strong and woak signals can be recsived AUX SENS (AUX mode) Rotate the [VOLUME] knob to choose AUX Input sensitivity LOW, MID or HIGH at AUX
Rotate the [VOLUME] knob to choose SCRN SVR (screen saver) ON or OFF.
For track information that is longer than the dsplay panel When SCROLL is ON, the LCD will display 103 AG information ylely.e.g: TRACK- >FOLDER->FILE->ALBUM-> TITLE => ARTIST. STRACK. When SCOLL is OFF, the LCD will scroll the ID3 TAG information across the display, the defaul is TRACK, but user can adjust À Lo other 1D3 TAG information by press [DIS P] button. Audio Setup S-CTRL (IPOD mode) : ONJOFF Rotate the [VOLUME] knob to choose S-CTRL. {Smple Con) ON or OFF. © Aoferto REAR/S-W Rotate the [VOLUME] knob to choose REAR or S-WOOFER (SUB-WOOF ER). TEL-SW Rotate the [VOLUME] knob to choose MUTE, ON or OFF. The sound from this unit is muted during telephone cal. “OFF. ‘This unit continues normal operation even when the cellular phone is used. Yeu can listen to your telephone call from he speakers connected to Ihis uni. “When listening to your calls on your car speakers, you can adjust the volume by Aüming the (VOLUME) kncb. BEEP: ONJOFF Rotate the (VOLUME) knob to choose button bcep sound ON or OFF. RESET:
2. Press and hold the [VOLUME] knob to
4. The unit wil be tumed of automatically.
Note: + When the [RESET] is selected and you press and hold the [VOLUME] knob, radio station frequencies, titles, and ler data stored in memory are cleared Press the [ PJ button to enter sound effect setting mode. First press shows current EQ. Rotate the [VOLUME] knob to change the BEAT. EQ in this order OFF -> B-BOOST -> IMPACT -> EXCITE => CUSTOM Rotate the [VOLUME] knob to change the CUSTOM setting, and press the [VOLUME] Knob, he press [HA] or [ee button to select it including: BAS-G -> BAS-F -> BAS-Q
Radio Operations Press the [D J button, then press [ 4] or LB J buttons to select USER presot including BALANCE -> FADER -> MB EX -> LPFlow pass file > SW VOL (Subwoofer Volume), rotate the [VOLUME] knob to select a value.
BALANCELET 1-7->CENTER->AIGHT 1-7
FADER:FRONT 1-7->CENTER->REAR 1-7 M-BEX: ONOFF LPF: THROUGH/80/120/160 SUBW VOL: (-6)-(+6) Select tuner as playing source Press [SRC / db ] button once or more to enter RADIO mode. Select the radio band Press the [BAND] button on the panel to select one radio band among FM1, FM2, F3, MW and LW. Manual tuning During manual tuning, the frequency wil be changed in steps. Press the [14-41] / | pe] buttons on tho panel to select a higher {lower station. Auto tuning Press and hold the | 1e | | mg ] buttons on he panel to seek a higher / lower station To stop searching, repeat the operation above or press other butons having radio functions, Not When a station is received, searching stops and he station is played. Preset scan Preset scan receives the stations stored in preset memory in order. This function is usetul when searching for a desired station in memory. Press the [PS/AS] button. When a desired station is tuned in, press the [PS/AS] button again to Continue receiving that station. Note: + Be careful not to press and hold the IPS/AS) button for 1 second or longer, otherwise the auto store function will begin and the uni stars storing stations. Auto store Only stations with sufficient signal strength will be detected and stored in the memory Press and hold the [PS/AS] button (1 sec.) to start automatic station search To stop auto store, press other buttons having radio functions. Note:
1. After auto store, the previous stored
stations vil be overwriten.
2. The unit has 5 bands, such as FMI,
FM2, FM3, MW, LW. FMS and MW, LW can store by AS function. Each bands can store 6 stations, CZ202E/CZ202ER/ GZ202EG can store 30 stations in total Manual store When one expected radio station has been detected, press and hold number button 1-6 to store it in Îne memory. Recall the stored stations Press one numerc button among 1 106 en 1he panel to selecl the corresponding stared station. Local seeking When LOCAL secking is ON, oniy those radio stations with strong radio signal could be received. Radio Data System Operations To select LOCAL function, press and hold he (DISP] button on the frant panel, then press { pe] button repeatediy until LO or DX displays on the screen, and rotate the IVOLUME] knob to select Local or Distant mode. Note: The number of radio stations that can be received will decrease after the local seeking mode is ON. Radio Data System This unit has à buil-in “Radio Data System” decoder system hat supports broadcast stations franemiting “Radio Data System” data. When using 1ne “Radio Data System” function, amays set he radio to FM mode. AF function The AF function switches Lo a different frequency on the same network in order to maintain optimum reception. The factory defauit setting is ON.
1. Setto system setup by long pressing [DISP]
3. Rotate the [VOLUME] knob to select ON or
OFF. + AF ON: ‘AF"indicator appears in the display and AF function turms on. + AF OFF: ‘AF" indicator disappaars in the display and AF function turns of. REG (Regional programme) function ihen he REG function is ON, the optimum regional station can be received. When is function is OFF, ie regional station area suilches as you drive, a regional station for {hat region is received
- The factory defaut seting is ON. Notes: + This function is disabled when a national station such as BBC R2 is being received + The REG function ONJOFF setting is valid when the AF function is ON
1. Set to system setup by long pressing
usiBua Radio Data System Operations Manually tuning a regional station in the same network This function is valid when the AF function is ON andthe REG function is OFF. Manually tuning a regional station in the same network This function is valid when the AF function is ON and the REG function is OFF. Note: This function can be used when à regional broadcast of the same network Is received. TA (Traffic Announcement) In the TA standby mode, when a raie announcement broadeast start, he raie announcement broadeast à received as 1op priotiy regardiess of he function mode s0 you Éan listen to. Traffic programme (TP) automatic tuning is also avalable This function can only be used wen TP appears in the display, When “TP” appears, 1n$ means that the “Radio Data System broadcast station being received has trafic announcement programmes. Setting the TA standby mode H you press the [TA] button, ‘TA’ lights in the display and the unit is set into the TA standby mode until a traffic announcement is broadcast. CD/MP3/WMA Operations When a traffic announcement broadcast starts, TRAF INF” appears in the display. If you press the [TA] button while a traffic announcement broadcast is being received, îhe traffic announcement broadcast reception is cancelled and the unit goes into the TA Slandoy mode. Cancelling the TA standby mode As TA" ls in the display, press the [TA] button. The “TA” in the display goes off and the TA standby mode is cancelled. PTY (Programme Type) This function enables you to listen to a broadcast of the selected programme type even if the unit is on a function mode other than radio. Some countries do not yet have PTY broadcas In the TA standby mode, a TP station has priority over a PTY broadcast station. Selecting PTY Press [MENU] button, then rotate the IVOLUME] knob to select PTY type, press the [VOLUME] knob, the unit begin Searching This unit can playback MP3/WMA files Notes: + you play a WMA file with active DRM (Digital Righis Management), there will be no audio. ‘To disable DRM (Digital Rights Management) When using Windows Media Player 9/10/11, click on Tool -> Options -> Copy music tab, then under Copy settings, unclick the Check box for copy protected music. Then, reconstruct les, Personally constructed WMA files are used at your on responsibility. cz202E/Cz202ER/C2202EG Precautions when creating MP3/ WMA file Usable sampling rates and bit rates
1. MPS: Sampling rate 8 kHz-48 kHz,
BIT rate 8 kbps-320 kbps / VBR
2. WMA: Bit rate 8 Kbps-320 kbps
1. Always add a file extension “MP3",
WMA” to MP3, WMA file by using single byte letters. 1f you add a file extension other than specified or forget 10 add the le extension, the file cannot be played. CD/MP3/WMA Operations
2. Files without MPS/WMA data will not play.
The files will be played soundlessiy if you attempt to play files without MPSWMA data.
- When VBR fes are played, the play time display may difer the play location.
- When MPSAWMA files are played, a lle no Sound par is caused between tunes. Logical format (Fil system) When wrting MPSMMA fle on a CD-R disc or CD-RW dis, please select 1508660 level 1, 2 or Joliet or Apple ISO as the writing software format. Normal play may not be possible if the disc is recorded on another format.
2. The folder name and file name can be
displayed as the ütle during MPSWMA play but the tile must be within 32 single byte alphabetical letters and numerals (including an extension)
8. Do not aff à name to a file inside a folder
having the same name. Folder structure A dise with a folder having more than 8 hierarchical levels wi be impossible. Number of files or folders
1. Up lo 999 files can be recagnized per folder.
Up to 3000 files can be played. 2." Tracks are played in the order that they were recorded onto a disc. (Tracks may not alrays be played in the order displayed on the PC.)
3. Some noise may oceur depending on the type
of encoder sofiiare used while recording. Eject function Just pressing the Notes: + I you force a CD into before auto reloading, this can damage the CD. + Ifa CD (12 cm) is ef ejected for 15 seconds, the CD Is automatically reloaded (Auto reload). button, ejects the disc. Listening to a disc already loa ded in the ur Press the [SRC / (D ] button to select the CD/ MPSMMA mode. When the unit enters the CD/MP3/WMA mode, play starts automaticaly Loading a CD Insert a CD into 1ne center of the CD SLOT with label facing up. The CD plays automaticaly alter loading Notes: +" Never insen foreign objects into the CD SLOT. + Ie CD is not inserted gasiy, thore may be another CD in the mechanism or tne unit may require service. + Dises without the QE or LEE mark and CD-ROMS cannot be played by this. unit + Some CD-R/CD-AW discs may not be usable. Pausing play
1. Press the | 4 ] button to pause play.
“PAUSE” appears in the display.
2. To resume CD play, press the {4 button
again. Displaying CD titles This unit can display title data for MPS/ WMA disc. When SCROLL is OFF, each time you press the [DISP] button to change the title display. MP3MMA disc Track > Folder -> Fill tie -> Album -> Title > Arist-> Track Notes: + IÉMPSAWMA disc has no ID8 TAG, "NO “TITLE” appears in the display. + Only ASCII characters can be displayed in Tags.
CD/MP3/WMA Operations USB Operations Selecting a track Trackup
1. Press the [ pi] button to move ahead to
he beginning of he next track.
2. Each time you press the { M | button, the
track advances ahead lo the beginning of the next track.
3. For MP3/WMA disc, press and hold the [6]
button (1 sec. to move ahead to +10 tracks. ‘Track-doun
1. Press the [ 4] button to move back to the
beginning of he current track.
2. Press the | #4] button twice to move back
Lo the beginning of the previous track.
3. For MP3/WMBA disc, press and hold the [5]
button (1 sec. to move back to -10 tracks. Fast-forward/Fast-reverse Fastforward Press and hold the {] button Fastreverse Press and hold the | éd] button
- For MPSAWMA discs, i takes some time until the start of searching and between tracks. In addition, some error may occur in the play time. Folder Select This function allows you to select a folder containing MPS/WMA files and star playing from he first track in he folder. Press he [5 ]or[ 6] button. Press the [6 | button to move the next folder. Press the [ 5 ] button to move the previous folder.
1. Press the [MENU] button to enter FOLD
SCH mode. Press the [VOLUME] button to ‘nter the folder list search mode. ‘Tum the [VOLUME ] knob to select a folder. Press the [VOLUME] button to enter the file list search mode. And thon the track list appears in the display. ‘Turn the [VOLUME] knob to select a track.
5. Press the [VOLUME] knob to play.
When play back MPS / WMA file, this: function is performed in the current folder. Top function he top function resets the CD player to he Hit irack of ne dise. Press and hold the [4 ] butin {1 500.) to pla the frst rack (rack No.
- in case of MPAWMA, the first track of Ahe eurent older wi be played. Other various play functions Scan play This function allows you to locate and play the first 10 seconds of al the tracks recorded on a disc. Press the { 1 ] button to perform scan play. Repeat play This function allows you lo play Ihe current track repeatediy or play a track currently being played in the MP3/WMA folder repeatediy.
until "RPT ON" appears on ihe LCD to perform repeat play. Press { 2 | button repeatediy until *RPT OFF" appears on the LCD to cancel repeat playback MP3MWMA:
1. Press the { 2] button once or more until
“TRACK RPT- appears on the display to perform repeat play, and'RPT" segment lights on
2. For MPSWWMA files, press { 2 ] button
repeatedly until “FOLDER RPT- appears on the display for folder repeat pla.
3. Press {2 ] button repeatediy until "APT.
OFF" appears on the display to cancel repeat playback, and "APT" segment goes of. Random play This function allows you to play all tracks recorded on a disc in a random order. Press the [ 3 ] button lo perform random play.
1. Open the cover of the USB connector ta the
right. Insert a USB cable (CCA-755) into the USB connecter. Insert a USB device into the USB cable. When connecting a USB device, the unit wil read the fles automaticaly. To remove the USB device, you should first Select another source or turn off the pour, in order ta avoid damaging the USB device. Then take off te USB device. Open the cover to the left
3. Operation is same as MPSAWMA operation.
Connect Connect an iPod or iPhone to the USB connector via CCA-748 cable. When connecting a device, the unit will read the files automatically. The track information display on the screen once playback sta. MENU In the S-CTAL OFF mode, press [MENU] button,rotate the [VOLUME] knob select “MUSIC” or "VIDEO" Select “MUSIC”, press the [VOLUME] knob, then rotate the [VOLUME] knob to show PLAY
SONGS / COMPOSERS, press and rotate the IVOLUME] knob to select a desired option, then press the [VOLUME] knob to confim. Select “VIDEO”, press the [VOLUME] knob, then rotate the [VOLUME] knob to show
VIDEO PODCASTS / RENTALS, press and rotate the [VOLUME] knob to select a desired option, then press the [VOLUME] knob to conti. NOTE: +_ VIDEO MENU item is different by the model of connected iPod and language setting.
to monitor CCA-748 Repeat play This function allows you to play the current track rapeatediy or play al tracks in your iPod/Phone repeatcd.
1. Press the [2 ] button once or more until
“RPT ON" appoars on the LCD to perlorm repoat play.
2. Press [2 ] button repeatediy until ‘RPT
OFF" appears on he LGD to cancel ropeat playback. cz202e/cz202Er/c2202EG usiBua
usiBua Pod & iPhone Operations Random play This function allows you to play all tracks recorded on a disc in a random order. Press [ 3 ] button repeatediy until ALBUM RDM' appears on the LCD for album random pl. Press the [ 3 ] button once or more until “SONG RDM appears on the LOD to pororm random play. Press [ 3 ] button repeatedly until "RDM OFF" appears on the LCD to cancel random playback Setting iPod simple control mode Use this function if you wish to operate through eur iPod connected to this unit via. the USB cable.
- The factory default setting is * OFF *
1. Press and hold [DISP] button to enter
2. Press [4] or [4 ] button to select
3. Rotate the [VOLUME] knob to select
“ ON" or" OFF* + ON: Operations are made through your iPod. + OFF: Operations cannot be made through your iPod. Notes: + When performing iPod operations using Simple control mode, make the operations slowly. If repetitive operations are AUX Operations performed too quick, unforeseen errors may occur. +_ When performing iPod operations using simple control mode, please do not operate the iPod and the unit at the same time, otherwise there may be. unexpected event happened Some iPod models do not support his function. Consult your nearest Clarion dealer or website to confimm which models do not support this function. iPod menu alphabet search This function searches the subfolders for desired aphabetcal letter.
2. Press the [VOLUME] knob to switch
of he category are displayed)
4. Press and hoïd the [ DISP ]button (1 sec
5. Rotate the [VOLUME] knob to select the
desired letor to scarch
6. Press the [DISP] button again to next
7. Press the | VOLUME | knob to contirn.
Press [SRC / 6 ] button on the panel to select ‘AUX AUX is just for audio content with 3.5mm Jack connector plugged into audio-in Socket on the front panel AUX Input sensitivity setting
1. Press and hold the [DISP] button (1 sec.).
cz202E/Cz202ER/C2202EG
2. Tum the [VOLUME] knob to select “AUX
audio player is *HIGH', rotate [VOLUME] knob and choose “LOW". And if the output level is "LOW", choose “HIGH”.
GENERAL Problem Cause Messure [Unit cannot [Unit use bloun. [Replace with new fuse of correct rating. poner on (Car battery fuse blown. [Replace with new fuse of correct rating. Hum of the power and remove the DCP. [Unit can not Press the [RESET) button with a thin rod. poner on. [Nothing happens Lvhon buttons are Pressed [The microprocessor has, Imalfunctiencd due to noise, et. INote: [When the [RESET] button is pressed, tum off the ACC power Display is not : When the [RESET button is pressed, Éceurate presetracho satons, les, lc storedin memory are kept. proper audio output Check wiing and correct. Volume set too lon Increase volume level [oow aucio [Speakers damagec. oplace speakers. output. Heavy biaseuvotune baance. Aug ie channel balance o center Speaker wings in contact win SRREREE Insulate al speaker wirig connections [Non-standard disc used [Use a standard aise x sound [Speaker power raling does not Poorsouns [ane Replace speakers. istorhon. … rongconnections Check wiing and correct Speaker is shored Check wiing and correct [reilute … |MUTE wire is grounded. (Check the MUTE wiring and correct [Unit reset iseit Lvhon engine Incorrect connection between JAGG and Battery. \Check wiring and correct.
DISC Player Problem Cause bise cannot be JAnother disc is already loaded. Eject the disc before loading the new loaded. There is an object instal inside the uni Remove the object inside the uni. [Compact disc is dirty. (Clean the compact disc with a soit cloth ÉSound skips or is Inoisy |Compact disc is heavy scratched|Replace with a compact disc with no or warped. Éscratches. ÉSound is bad Junen power is first furned on. |Condensation may form on the intemal lens when the car is \parked in à humid place. Let dry for about 1 hour with power on. USB Devices Problem Cause [USB device cannot| be insertod. [The USB device has been inserted with wrong direction. IReversing he connection direction of the [USB device, try it again. The USB connectar is broken. \Replace with a new USB device. USE device is not recognized. [The USB device is damaged. \Connectors are 100se. JDisconnect the USB device and reconnect. the device is st not recognized, try lreplacing with a different USB device. No sound heard with the display No File” shoun INo MPSAWMA fie is stored in he USB device. [Store these files proper in the USB device. IMPSMMA files are not ÉSound skips oris Inoisy Jencodea propery. \Use MP3AWMA files encoded proper.
If an error oceurs, one of te following displays is displayed. Take the measures described below to sole the problem. Display Cause Measure Disc is inserted incorrecty. IEject the disc then reload it proper. EnRoR 3 [The disc formats not supported. |Try another disc. ERRORS [This is a failure of decks mechanism |Consult your store of purchase. If an error display other than the ones described above appears, press the [RESET] button. If the problem persists, tum off the power and consult your store of purchase. When the [RESET) button is pressed, preset radio stations, tes, el. stred in memory are Kept. usiBua cz202e0z202ERCz202e6 10
Le rs Weight of the Mai Uni: 1.30kg Note: + Specifications and design are subject to change without notice for furiher improvement.
6) Removing the Source Unit.
7) Wiring and Connections
8) Connecting the Accessories
1. This set is exclusively for use in cars with a
negative ground 12 V power supply.
2. Read these instructions caretully.
8. Be sure to disconnect the battery “terminal”
before starting. This is to prevent short circuits during installation. (Figure 1)
Car battery Figure 1 Source unit. Front panel. TTrim ring … Mounting bracket.. Special screw (M4x42) Screws M5x6 mm. Rubber cap.
1. Do not open the case. There are no
user serviceable parts inside. 1 you drop anything into the unit during installation, consult your dealer or an authorized Clarion service center.
2. Use a soft, dry cloth to clean the case.
Never use a rough cloth, thinner, benzine, or alcohol etc. For tough dirt, apply a little cold or warm water to a soft cloth and wipe off the dirt gentiy.
installing the source unit before starting,
2. Install the unit within 80° of the
horizontal plane. (Figure 2)
8. you have to do any work on the car
body, such as driling holes, consult
5) Installing the Source Unit
your car dealer beforehand.
4. Use the enclosed screws for
installation: Using other screws can cause damage. (Figure 8) Chassis Chassis [_[Ù Max 6 mm (us scrou) Figure 3
1. Place the mounting bracket into the instrument panel, use a screwdriver to bend
each stopper of the mounting bracket inward, then secure the stopper.
2. Wire as shown in Section 7)
8. Insert the source uni into the mounting bracket until it locks.
4. Take care of the top and bottom of the trim ring and mount it so that all the hooks
1. Some car models require special mounting kits for proper installation:
Consul your Clarion dealer for details.
2. Fasten the front stopper securely to prevent the source unit from coming loose.
+ Console opening dimensions {182 mm) Hole 53m Notes of installation Before installation, please make sure proper connections are conducted and the unit operates nommally. Improper connection may result in damage to the unit. Use only accessories designed and manufactured for this unit and other unauthorized accessories may resul in damage ta the uni. Before installation, please fasten al power cables.
4. DO NOT install the unit in the place were
lose to hot area to prevent damage to electrical components such as the laser head Install the unit horizontal. Installing the unit more than 30 degree vertically may resul in worse performance. To prevent electric spark, connect the positive pole fist and then the negative pole.
7. DO NOT bleck the cooling fan exit to
ensure suffcient heating dissipation of this unit or it may result in damage to this unit. Unit Installation Method À
1. Insert mounting bracket into dash board,
choose appropriate mounting tab according to the gap widih, bending the mounting tab outwards with a sorewdriver t fix Ine mounting bracket in place.
2. Screw in 1 piece of MAx42 to the hole of
he unit back and put on a rubber cap over the screw. (see picture below) Slide the unit into the bracket until you hear à click sound. Screuriver Dashboard Mouning Bracket
Method B Dashboard Mounting Frame
1. Insert this unit directly to the opening of
2. Place M5x6 cylndrical screw through the
holes of the mounting frame located inside the opening to holes of the unit and fasten the screws Lo left & right Trim Ring Installation Atlach the trim ring around the front panel. Disassemble trim ring
1. Push the tm ring to right and pul out the
CŸ mme Bottom 13 czeoeeczeoeer/czeoeec
6) Removing the Source Unit
7) Wiring and Connections
2. Push the trim ring o left and pull out he
4. Insert the removal keys straight back until
they lock, then pull the uni out.
8) Connecting the Accessories
+ Connecting to the external amplifier External amplifiers can be connected to the 4 channel RCA output connections, Ensure that the connectors are not grounded or shorted to prevent damage to the unit Cz202#0z202ERCz202e6 14