
A72920GNW3 - Freezer AEG - Free user manual and instructions
Find the device manual for free A72920GNW3 AEG in PDF.


| Product Type | Freezer |
| Brand | AEG |
| Model | A72920GNW3 |
| Energy Efficiency Class | E |
| Annual Energy Consumption | 232 kWh |
| Total Net Capacity | 269 L |
| Freezing Capacity | 20 kg/24h |
| Storage Time During Power Failure | 21 h |
| Noise Level | 42 dB |
| Climate Class | SN-T |
| Dimensions (H x W x D) | 177.2 cm x 59.5 cm x 63.5 cm |
| Weight | 62 kg |
| Voltage / Frequency | 230 V / 50 Hz |
| Current | 1.2 A |
| No Frost Technology | Yes |
| Fast Freeze Function | Yes |
| Temperature Alarm | Yes |
| Door Hinge | Right, reversible |
| Refrigerant Type | R600a |
| Adjustable Shelves | Yes, 5 shelves |
Frequently Asked Questions - A72920GNW3 AEG
User questions about A72920GNW3 AEG
0 question about this device. Answer the ones you know or ask your own.
Ask a new question about this device
Download the instructions for your Freezer in PDF format for free! Find your manual A72920GNW3 - AEG and take your electronic device back in hand. On this page are published all the documents necessary for the use of your device. A72920GNW3 by AEG.
USER MANUAL A72920GNW3 AEG
CONTENTS
- SAFETY INFORMATION....3
- SAFETY INSTRUCTIONS......4
- OPERATION....6
- DAILY USE....8
- HINTS AND TIPS....9
- CARE AND CLEANING.... 10
- TROUBLESHOOTING....11
- INSTALLATION.... 13
- NOISES....16
- TECHNICAL INFORMATION......17
FOR PERFECT RESULTS
Thank you for choosing this AEG product. We have created it to give you impeccable performance for many years, with innovative technologies that help make life simpler features you might not find on ordinary appliances. Please spend a few minutes reading to get the very best from it.
Visit our website for:

Get usage advice, brochures, trouble shooter, service information:
www.aeg.com

Register your product for better service:
www.registeraeg.com

Buy Accessories, Consumables and Original spare parts for your appliance:
www.aeg.com/shop
CUSTOMER CARE AND SERVICE
Always use original spare parts.
When contacting our Authorised Service Centre, ensure that you have the following data available: Model, PNC, Serial Number.
The information can be found on the rating plate.

Warning / Caution-Safety information

General information and tips

Environmental information
Subject to change without notice.
1. SAFETY INFORMATION
Before the installation and use of the appliance, carefully read the supplied instructions. The manufacturer is not responsible if an incorrect installation and use causes injuries and damages. Always keep the instructions with the appliance for future reference.
1.1 Children and vulnerable people safety
- This appliance can be used by children aged from 8 years and above and persons with reduced physical, sensory or mental capabilities or lack of experience and knowledge if they have been given supervision or instruction concerning use of the appliance in a safe way and understand the hazards involved.
- Do not let children play with the appliance.
- Cleaning and user maintenance shall not be made by children without supervision.
- Keep all packaging away from children.
1.2 General Safety
- This appliance is intended to be used in household and similar applications such as:
- Farm houses; staff kitchen areas in shops, offices and other working environments - By clients in hotels, motels, bed and breakfast and other residential type environments
- Keep ventilation openings, in the appliance enclosure or in the built-in structure, clear of obstruction.
- Do not use mechanical devices or other means to accelerate the defrosting process, other than those recommended by the manufacturer.
- Do not damage the refrigerant circuit.
- Do not use electrical appliances inside the food storage compartments of the appliance, unless they are of the type recommended by the manufacturer.
- Do not use water spray and steam to clean the appliance.
- Clean the appliance with a moist soft cloth. Only use neutral detergents. Do not use abrasive products, abrasive cleaning pads, solvents or metal objects.
- Do not store explosive substances such as aerosol cans with a flammable propellant in this appliance.
- If the supply cord is damaged, it must be replaced by the manufacturer, its service agent or similarly qualified persons in order to avoid a hazard.
2. SAFETY INSTRUCTIONS
2.1 Installation

WARNING!
Only a qualified person must install this appliance.
- Remove all the packaging.
- Do not install or use a damaged appliance.
- Obey the installation instruction supplied with the appliance. • Always be careful when you move the appliance because it is heavy. Always wear safety gloves.
- Make sure the air can circulate around the appliance.
- Wait at least 4 hours before connecting the appliance to the power supply. This is to allow the oil to flow back in the compressor.
- Do not install the appliance close to radiators or cookers, oven or hobs.
- The rear of the appliance must stand against the wall.
- Do not install the appliance where there is direct sunlight.
- Do not install this appliance in areas that are too humid or too cold, such as construction appendices, garages, or wine cellars.
- When you move the appliance, lift it by the front edge to avoid scratching the floor.
2.2 Electrical connection

WARNING!
Risk of fire and electrical shock.
• The appliance must be earthed. - Make sure that the electrical information on the rating plate agrees with the power supply. If not, contact an electrician. - Always use a correctly installed shockproof socket. - Do not use multi-plug adapters and extension cables. - Make sure not to cause damage to the electrical components (e.g. mains plug, mains cable, compressor). Contact the Service or an electrician to change the electrical components. - The mains cable must stay below the level of the mains plug. - Connect the mains plug to the mains socket only at the end of the installation. Make sure that there is access to the mains plug after the installation. - Do not pull the mains cable to disconnect the appliance. Always pull the mains plug.
2.3 Use

WARNING!
Risk of injury, burns, electrical shock or fire.
- Do not change the specification of this appliance.
- Do not put electrical appliances (e.g. ice cream makers) in the appliance unless they are stated applicable by the manufacturer.
- Be careful not to cause damage to the refrigerant circuit. It contains isobutane (R600a), a natural gas with a high level of environmental compatibility. This gas is flammable.
- If damage occurs to the refrigerant circuit, make sure that there are no flames and sources of ignition in the room. Ventilate the room.
- Do not let hot items touch the plastic parts of the appliance.
- Do not put soft drinks in the freezer compartment. This will create pressure on the drink container.
- Do not store flammable gas and liquid in the appliance.
- Do not put flammable products or items that are wet with flammable products in, near, or on the appliance.
- Do not touch the compressor or the condenser. They are hot.
- Do not remove or touch items from the freezer compartment if your hands are wet or damp.
- Do not freeze again food that has been thawed.
- Obey the storage instructions on the packaging of frozen food.
2.4 Care and cleaning

WARNING!
Risk of injury or damage to the appliance.
- Before maintenance, deactivate the appliance and disconnect the mains plug from the mains socket.
- This appliance contains hydrocarbons in the cooling unit. Only a qualified person must do the maintenance and the recharging of the unit.
- Regularly examine the drain of the appliance and if necessary, clean it. If the drain is blocked, defrosted water collects in the bottom of the appliance.
2.5 Disposal

WARNING!
Risk of injury or suffocation.
- Disconnect the appliance from the mains supply.
- Cut off the mains cable and discard it.
- Remove the door to prevent children and pets from being closed inside the appliance.
- The refrigerant circuit and the insulation materials of this appliance are ozone-friendly.
- The insulation foam contains flammable gas. Contact your municipal authority for information on how to discard the appliance correctly.
- Do not cause damage to the part of the cooling unit that is near the heat exchanger.
3. OPERATION
3.1 Control panel
![graph TD A["1"] --> B["Mode"] B --> C["OK"] C --> D["-"] D --> E["+"] F["56"] --> G["Square"] H["3"] --> I["Square"]](/content/2026/07/1471871/images/dd4abc61ab3d3c755d862fd52caaabea07946c56311196465753dc4cdff7baac.jpg)
1 Display 2 Temperature warmer button 3 Temperature colder button 4 OK button
It is possible to change the predefined sound of buttons by pressing together
5 Mode button 6 ON/OFF button
Mode and Temperature colder button for some seconds. Change is reversible.
3.2 Display
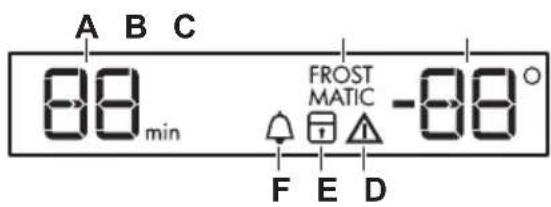
A) Timer indicator B) FROSTMATIC function C) Temperature indicator D) Alarm indicator E) ChildLock function F) MinuteMinder function
3.3 Switching on
- Connect the mains plug to the power socket.
- If the display is off, press ON/OFF. If DEMO appears on the display, the appliance is in demonstration mode. Refer to "What to do if...".
The temperature indicators show the set default temperature.

To select a different set temperature refer to "Temperature regulation".

CAUTION!
If the door remains open for some minutes, the light will turn off automatically. The light is reset by closing and opening the door itself.
3.4 Switching off
- Press ON/OFF for a few seconds. The display switches off.
- Disconnect the mains plug from the power socket.
3.5 Temperature regulation
The set temperature of the freezer may be adjusted by pressing the temperature button.
Default temperature:
- -18°C for the freezer
The temperature indicator shows the set temperature.

The set temperature will be reached within 24 hours. After a power failure the set temperature remains stored.
3.6 MinuteMinder function
The MinuteMinder function is to be used to set an acoustic alarm at the preferred time, useful for example when a recipe requires to cool down food products for a certain length of time.
It is also useful when a reminder is needed in order not to forget the bottles placed in the freezer for fast cooling.
- Press Mode until the corresponding icon appears.
The MinuteMinder indicator flashes.
The Timer shows the set value (30 minutes) for a few seconds.
- Press the Temperature colder or Temperature warmer button to change the Timer set value from 1 to 90 minutes.
- Press OK to confirm.
The MinuteMinder indicator is shown. The Timer starts to flash (min).
It is possible to change the time at any time during the countdown and at the end by pressing the Temperature colder button and the Temperature warmer button.
At the end of the countdown, the MinuteMinder indicator flashes and an audible alarm sounds. Press OK to switch off the sound and terminate the function.
It is possible to deactivate the function at any time during the countdown by repeating the function steps, until the indicator turns off.
3.7 ChildLock function
Activate the ChildLock function to lock the buttons from unintentional operation.
- Press Mode until the corresponding icon appears.
The ChildLock indicator flashes.
- Press OK to confirm.
The ChildLock indicator is shown.
To deactivate the ChildLock function, repeat the procedure until the ChildLock indicator goes off.
3.8 FROSTMATIC function
The FROSTMATIC function accelerates the freezing of fresh food and, at the same time, protects foodstuffs already stored from undesirable warming.
- Press Mode until the corresponding icon appears.
The FROSTMATIC indicator flashes.
- Press OK to confirm.
The FROSTMATIC indicator is shown.

The FROSTMATIC function shuts off automatically after 52 hours.
To switch off the function before its automatic end, repeat the steps until the FROSTMATIC indicator goes off.

The function switches off by selecting a different freezer set temperature.
3.9 High temperature alarm
Temperature increase in the freezer compartment (for example due to an earlier power failure or door is open) is indicated by:
- flashing the alarm and freezer temperature indicators;
- sounding of buzzer.
Press any button.
The buzzer switches off.
The freezer temperature indicator shows the highest temperature reached for a few seconds. Then show again the set temperature.
The alarm indicator continue to flash until the normal conditions are restored.
3.10 Door open alarm
An acoustic alarm will sound if the door is left open for a few minutes. The door open alarm conditions are indicated by:
• a flashing Alarm indicator; - an acoustic buzzer.
When normal conditions are restored (door closed), the alarm will stop. The buzzer can also be switched off by pressing any button.
4. DAILY USE

WARNING!
Refer to Safety chapters.
4.1 Storage of frozen food
When first starting up or after a period out of use, let the appliance run at least 2 hours before putting products in the freezer compartment.
The freezer baskets ensure that it is quick and easy to find the food packages you want. If large quantities of food are to be stored, remove all drawers except for the bottom basket which secures good air circulation.
It is possible to place food that protrudes 15 mm from the door on all shelves except the top one.

In the event of accidental defrosting, for example due to a power failure, if the power has been off for longer than the value shown in the technical characteristics chart under "rising time", the defrosted food must be consumed quickly or cooked immediately and then re-frozen (after cooling).
4.2 Freezing fresh food
The freezer compartment is suitable for freezing fresh food and storing frozen and deep-frozen food for a long time.
To freeze small amounts of fresh foods it is not necessary to change the present setting.
To freeze fresh food activate the FROSTMATIC function at least 24 hours before placing the food to be frozen in the freezer compartment.
Place the fresh food to be frozen in all compartments except the lowest one.
The maximum amount of food that can be frozen in 24 hours is specified on the rating plate, a label located on the inside of the appliance.
The freezing process lasts 24 hours: during this period do not add other food to be frozen.
When the freezing process is completed, return to the required temperature (see "FROSTMATIC Function").
4.3 Thawing
Deep-frozen or frozen food, prior to being used, can be thawed in the refrigerator compartment or at room temperature, depending on the time available for this operation.
Small pieces may even be cooked still frozen, directly from the freezer: in this case, cooking will take longer.
4.4 Removal of freezing baskets and glass shelves from the freezer
The freezing baskets have a limit stop to prevent their accidental removal or falling out. At the time of its removal from the freezer, pull the basket towards yourself and, upon reaching the end point, remove the basket by tilting its front upwards.

At the time of putting it back, slightly lift the front of the basket to insert it into the freezer. Once you are over the end points, push the baskets back in their position.
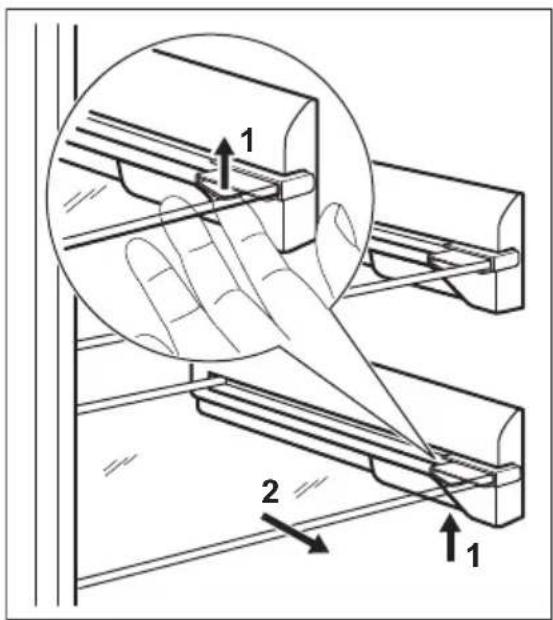
The appliance is equipped with shelf stops to secure the shelves.
The shelves must be lifted up (1) on each side and then pulled outwards (2).
4.5 Cleaning the interior
- Before using the appliance for the first time, wash the interior and all
5. HINTS AND TIPS
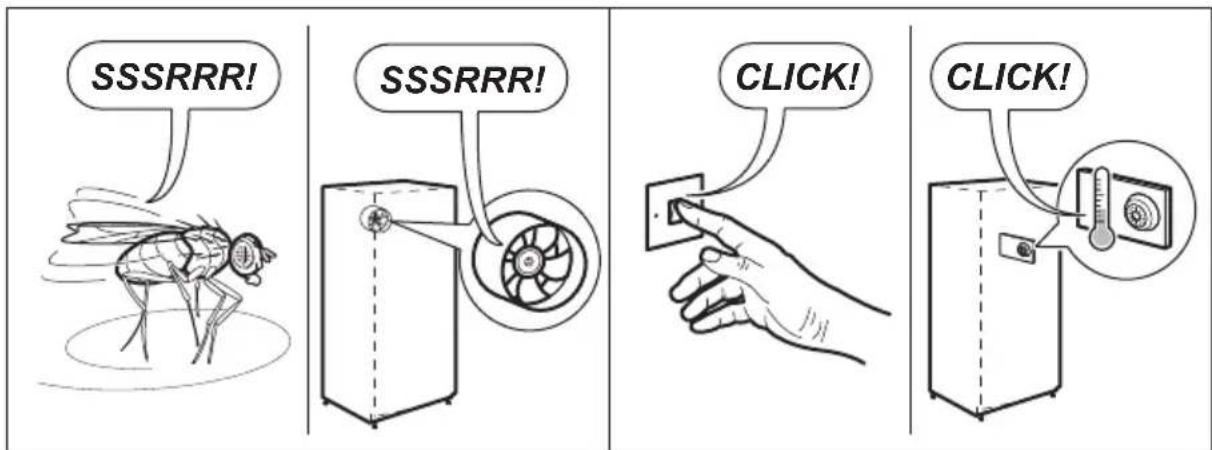
5.1 Normal operating sounds
The following sounds are normal during operation:
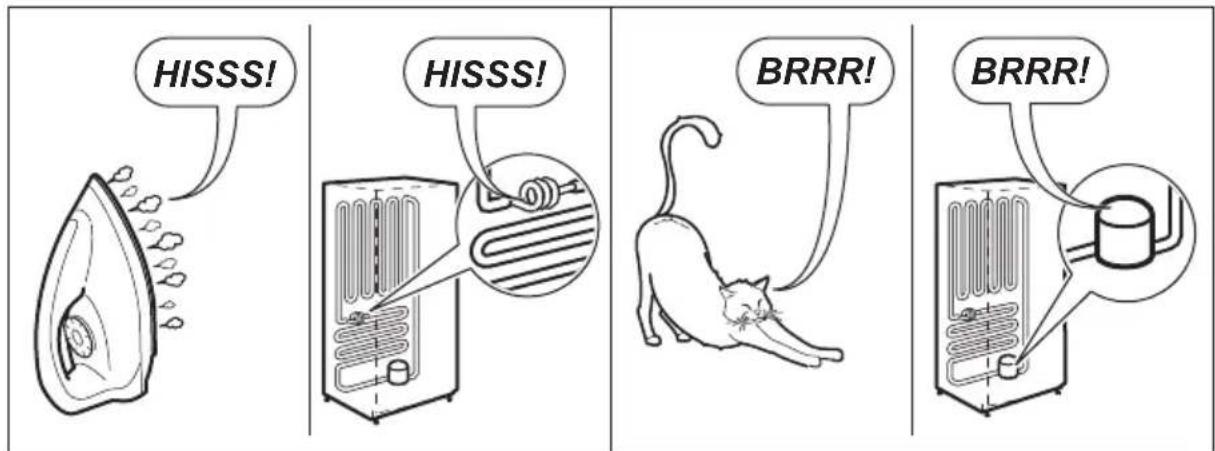
- A faint gurgling and bubbling sound from coils sound when refrigerant is pumped.
- A whirring and pulsating sound from the compressor when refrigerant is pumped.
- A sudden cracking noise from inside appliance caused by thermic dilatation (a natural and not dangerous physical phenomenon).
- A faint click noise from the temperature regulator when the compressor switches on or off.
5.2 Hints for energy saving
- Do not open the door frequently or leave it open longer than absolutely necessary.
- If foreseen, do not remove the cold accumulators from the freezer basket.
Clean internal accessories with lukewarm water and neutral soap to remove the typical smell of a brand-new product, then dry thoroughly.
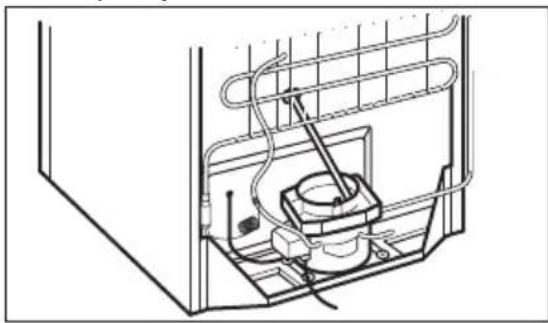
- Check that the drain hose at the rear of the cabinet discharges into the drip tray.

CAUTION!
Do not use detergents or abrasive powders, as these will damage the finish.
5.3 Hints for freezing
To help you make the most of the freezing process, here are some important hints:
- The maximum quantity of food which can be frozen in 24 hours is shown on the rating plate.
- The freezing process takes 24 hours. No further food to be frozen should be added during this period.
- Freeze only top quality, fresh and thoroughly cleaned foodstuffs. Prepare food in small portions to enable it to be rapidly and completely frozen and to make it possible subsequently to thaw only the quantity required.
- Wrap up the food in aluminium foil or polythene and make sure that the packages are airtight.
- Do not allow fresh, unfrozen food to touch food which is already frozen, thus avoiding a rise in temperature of the latter.
- Lean foods store better and longer than fatty ones; salt reduces the storage life of food.
• Water ices, if consumed immediately after removal from the freezer compartment, can possibly cause the skin to be freeze burnt; - It is advisable to show the freezing-in date on each individual pack to enable you to keep track of the storage time.
5.4 Hints for storage of frozen food
To obtain the best performance from this appliance, you should:
• Make sure that the commercially frozen foodstuffs were adequately stored by the retailer; - Be sure that frozen foodstuffs are transferred from the food store to the freezer in the shortest possible time; • Do not open the door frequently or leave it open longer than absolutely necessary; - Once defrosted, food deteriorates rapidly and cannot be refrozen; • Do not exceed the storage period indicated by the food manufacturer.
6. CARE AND CLEANING

WARNING!
Refer to Safety chapters.
6.1 General warnings

CAUTION!
Unplug the appliance before carrying out any maintenance operation.

This appliance contains hydrocarbons in its cooling unit; maintenance and recharging must therefore only be carried out by authorized technicians.

The accessories and parts of the appliance are not suitable for washing in a dishwasher.
6.2 Periodic cleaning

CAUTION!
Do not pull, move or damage any pipes and/or cables inside the cabinet.

CAUTION!
Take care not to damage the cooling system.

CAUTION!
When moving the cabinet, lift it by the front edge to avoid scratching the floor.
The equipment has to be cleaned regularly:
- Clean the inside and accessories with lukewarm water and some neutral soap.
- Regularly check the door seals and wipe clean to ensure they are clean and free from debris.
- Rinse and dry thoroughly.
- If accessible, clean the condenser and the compressor at the back of the appliance with a brush. This operation will improve the performance of the appliance and save electricity consumption.
6.3 Cleaning the ventilation grille
Make sure the door is open.
The ventilation grille can be removed for washing.
- Loosen the edge of the grille by pulling it according to the figure.
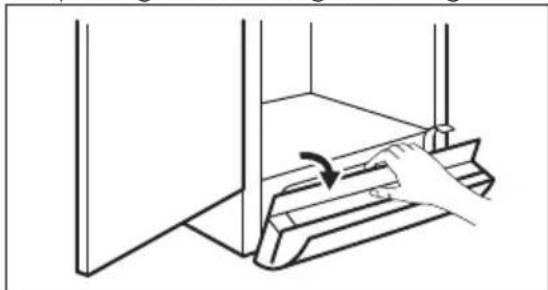
- Pull the grille straight out to completely remove it.
- Vacuum clean under the cabinet.
6.4 Defrosting the freezer
The freezer compartment is frost free. This means that there is no build up of frost when it is in operation, neither on the internal walls nor on the foods.
The absence of frost is due to the continuous circulation of cold air inside the compartment, driven by an automatically controlled fan.
6.5 Periods of non-operation
When the appliance is not in use for long periods, take the following precautions:
- Disconnect the appliance from electricity supply.
- Remove all food.
- Clean the appliance and all accessories.
- Leave the door/doors open to prevent unpleasant smells.

WARNING!
If the cabinet will be kept on, ask somebody to check it once in a while to prevent the food inside from spoiling in case of a power failure.
7. TROUBLESHOOTING

WARNING!
Refer to Safety chapters.
7.1 What to do if...
| Problem Possible cause Solution | ||
| The appliance does not operate. | The appliance is switched off. | Switch on the appliance. |
| The mains plug is not connected to the mains socket correctly. | Connect the mains plug to the mains socket correctly. | |
| There is no voltage in the mains socket. | Connect a different electrical appliance to the mains socket. Contact a qualified electrician. | |
| The appliance is noisy. The appliance is not supported properly. | Check if the appliance stands stable. | |
| Audible or visual alarm is on. The cabinet has been recently switched on or the temperature is still too high. | Refer to "Door Open Alarm" or "High Temperature Alarm". | |
| The temperature in the appliance is too high. | Refer to "Door Open Alarm" or "High Temperature Alarm". | |
| The door is left open. Close the door. | ||
| The temperature in the appliance is too high. | Contact a qualified electrician or contact the nearest Authorized Service Centre. | |
| A rectangular symbol is shown instead of numbers on the Temperature Display. | Temperature sensor prob- lem. | Contact the nearest Author- ized Service Centre (the cool- ing system will continue to keep food products cold, but temperature adjustment will not be possible). |
| The lamp does not work. The lamp is in stand-by. Close and open the door. | ||
| The lamp does not work. The lamp is defective. Contact the nearest Author- ized Service Centre. | ||
| The compressor operates continually. | Temperature is set incor- rectly. | Refer to "Operation" chapter. |
| Many food products were | put in at the same time. | Wait some hours and then check the temperature again. |
| The room temperature is | too high. | Refer to climate class chart on the rating plate. |
| Food products placed in | the appliance were too warm. | Allow food products to cool to room temperature before stor- ing. |
| The door is not closed cor- rectly. | Refer to "Closing the door". | |
| The FROSTMATIC function is switched on. | Refer to "FROSTMATIC func- tion". | |
| There is too much frost and ice. | The door is not closed cor- rectly or the gasket is de- formed/dirty. | Refer to "Closing the door". |
| The compressor does not start immediately after pressing the FROSTMATIC, or after changing the tem- perature. | This is normal, no error has occurred. | The compressor starts after a period of time. |
| Water flows on the floor. The melting water outlet is not connected to the evaporative tray above the compressor. | Attach the melting water out- let to the evaporative tray. | |
| Temperature cannot be set. The FROSTMATIC function is switched on. | Switch off FROSTMATIC man- ually, or wait until the function resets automatically to set the temperature. Refer to "FROSTMATIC function". | |
| DEMO appears on the dis-play. | The appliance is in demonstration mode. | Keep the Mode pressed for approximately 10 seconds until a long sound is heard and display shuts off for a short time. |
| Door is misaligned or interferes with ventilation grill. | The appliance is not level-led. | Refer to "Levelling". |
| The temperature in the appliance is too low/too high. | The temperature regulator is not set correctly. | Set a higher/lower temperature. |
| Food products placed in the appliance were too warm. | Allow food products to cool to room temperature before storing. | |
| The door has been opened often. | Open the door only if necessary. | |
| The FROSTMATIC function is switched on. | Refer to "FROSTMATIC function". | |
| There is no cold air circulation in the appliance. | Make sure that there is cold air circulation in the appliance. | |

If the advice does not lead to the desired result, call the nearest Authorized Service Centre.
7.2 Closing the door
- Clean the door gaskets.
- If necessary, adjust the door. Refer to "Installation".
- If necessary, replace the defective door gaskets. Contact the Authorised Service Centre.
7.3 Replacing the lamp
The appliance is equipped with a longlife LED interior light.
Only service is allowed to replace the lighting device. Contact your Authorised Service Centre.
8. INSTALLATION

WARNING!
Refer to Safety chapters.
8.1 Positioning
This appliance can be installed in a dry, well ventilated indoor where the ambient temperature corresponds to the climate class indicated on the rating plate of the appliance:
| Climate Ambient temperature class |
| SN +10°C to + 32°C |
| N +16°C to + 32°C |
| ST +16°C to + 38°C |
| T +16°C to + 43°C |

Some functional problems might occur for some types of models when operating outside of that range. The correct operation can only be guaranteed within the specified temperature range. If you have any doubts regarding where to install the appliance, please turn to the vendor, to our customer service or to the nearest Service Centre
8.2 Location
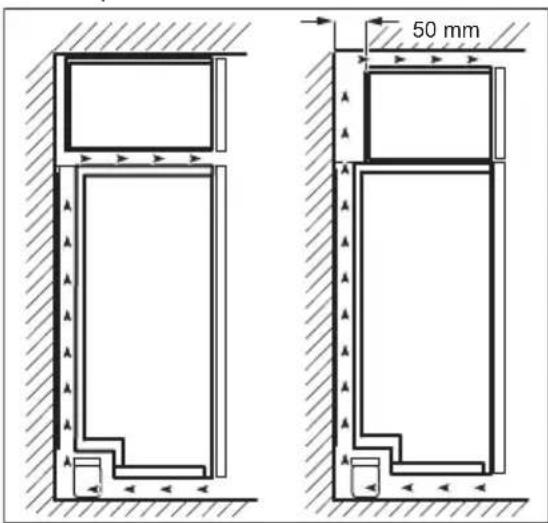
To ensure best performance, if the appliance is positioned below an overhanging wall unit, the minimum distance between the top of the cabinet and the wall unit must be at least 40 mm. Ideally, however, the appliance should not be positioned below overhanging wall units.
The ventilation space can be:
• directly above the appliance • behind and above the top cupboard. In this case, the space behind the top cupboard must be at least 50 mm deep.
8.3 Electrical connection
- Before plugging in, ensure that the voltage and frequency shown on the rating plate correspond to your domestic power supply.
- The appliance must be earthed. The power supply cable plug is provided with a contact for this purpose. If the
domestic power supply socket is not earthed, connect the appliance to a separate earth in compliance with current regulations, consulting a qualified electrician.
• The manufacturer declines all responsibility if the above safety precautions are not observed. • This appliance complies with the E.E.C. Directives.
8.4 Removing the transport support
Your appliance is equipped with transport support to secure the door during transportation.
- Open the door.
- Remove the transport support from the door sides.
- Remove the transport support from the lower hinge (some models).

CAUTION!
Some models are fitted with a silencing pad under the cabinet. Do not remove this pad.

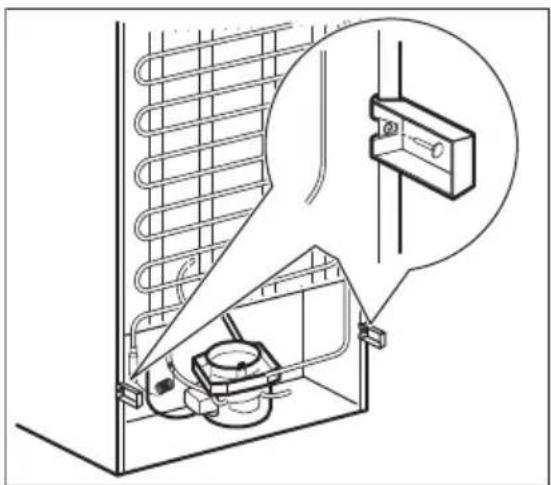
8.5 Rear spacers
Install the two spacers and the locking pins provided within the accessory bag as shown in the figure.
8.6 Levelling
When placing the appliance ensure that it stands level. If necessary adjust the feet using the adjustment spanner supplied. Door alignment is dependent on proper levelling.

8.7 Door reversibility

WARNING!
Before carrying out any operations, remove the plug from the power socket.
- Remove the ventilation grille. Remove the upper filling and install it on the opposite side of the grille.
- Lay down the appliance back side down on a wooden support.
- Unscrew the handle from the bottom and the top of the door (1, 3) and the screw on top of the handle (2).
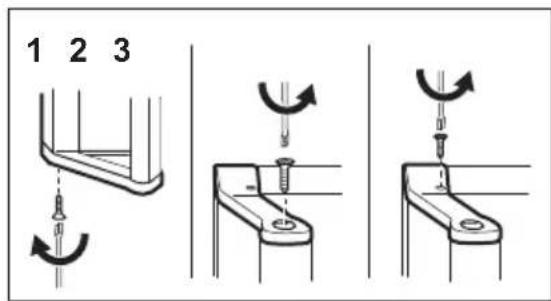
- Unscrew the hinge (1) and remove the cover plate (2).
- Remove the support (3) and install the cover plate and hinge on the opposite side. Install the support on the opposite side.

- Unscrew and move the lower hinge (1).
- Move the pin to the opposite side (2).
- Unscrew the support (3).
- Screw on the lower hinge and the support on the opposite side (4, 5).
- Tighten the pin with the adjustment spanner supplied.

- Install the handle on the opposite side.
- Raise the appliance and install the ventilation grille.
- Put the cabinet in position.

CAUTION!
Reposition, level the appliance, wait for at least four hours and then connect it to the power socket.

Do a final check to make sure that:
- All screws are tightened. • The magnetic seal adheres to the cabinet. • The door opens and closes correctly.
If the ambient temperature is cold (i.e. in Winter), the gasket may not fit perfectly to the cabinet. In that case, wait for the natural fitting of the gasket.
In case you do not want to carry out the above mentioned operations, contact the nearest
Authorised Service Centre.
The Authorised Service specialist will carry out the reversibility of the doors at your cost.
9. NOISES
There are some sounds during normal running (compressor, refrigerant circulation).


10. TECHNICAL INFORMATION
10.1 Technical data
| Height mm 1800 |
| Width mm 595 |
| Depth mm 623 |
| Rising time Hours 12 |
| Voltage Volts 230 - 240 |
| Frequency Hz 50 |
The technical information are situated in the rating plate, on the external or
internal side of the appliance and in the energy label.
11. ENVIRONMENT CONCERNS
Recycle the materials with the symbol Put the packaging in applicable containers to recycle it. Help protect the environment and human health and to
recycle waste of electrical and electronic appliances. Do not dispose appliances marked with the symbol with the household waste. Return the product to
your local recycling facility or contact your municipal office.
CE
- CONTENTS
- FOR PERFECT RESULTS
- CUSTOMER CARE AND SERVICE
- SAFETY INFORMATION
- CHILDREN AND VULNERABLE PEOPLE SAFETY
- GENERAL SAFETY
- SAFETY INSTRUCTIONS
- INSTALLATION
- WARNING
- ELECTRICAL CONNECTION
- USE
- CARE AND CLEANING
- DISPOSAL
- OPERATION
- CONTROL PANEL
- DISPLAY
- SWITCHING ON
- CAUTION
- SWITCHING OFF
- TEMPERATURE REGULATION
- MINUTEMINDER FUNCTION
- CHILDLOCK FUNCTION
- FROSTMATIC FUNCTION
- HIGH TEMPERATURE ALARM
- DOOR OPEN ALARM
- DAILY USE
- STORAGE OF FROZEN FOOD
- FREEZING FRESH FOOD
- THAWING
- REMOVAL OF FREEZING BASKETS AND GLASS SHELVES FROM THE FREEZER
- CLEANING THE INTERIOR
- HINTS AND TIPS
- NORMAL OPERATING SOUNDS
- HINTS FOR ENERGY SAVING
- HINTS FOR FREEZING
- HINTS FOR STORAGE OF FROZEN FOOD
- GENERAL WARNINGS
- PERIODIC CLEANING
- CLEANING THE VENTILATION GRILLE
- DEFROSTING THE FREEZER
- PERIODS OF NON-OPERATION
- TROUBLESHOOTING
- WHAT TO DO IF
- CLOSING THE DOOR
- REPLACING THE LAMP
- POSITIONING
- LOCATION
- REMOVING THE TRANSPORT SUPPORT
- REAR SPACERS
- LEVELLING
- DOOR REVERSIBILITY
- NOISES
- TECHNICAL INFORMATION
- TECHNICAL DATA
- ENVIRONMENT CONCERNS
Brand : AEG
Model : A72920GNW3
Category : Freezer