POSBSW7595EBN - Refrigerator Point - Free user manual and instructions
Find the device manual for free POSBSW7595EBN Point in PDF.


| Product Type | Fridge-Freezer |
| Installation | Freestanding |
| Energy Class | A+ |
| Noise Level | 42 dB |
| Total Net Capacity | 300 L |
| Fridge Net Capacity | 200 L |
| Freezer Net Capacity | 100 L |
| Dimensions (H x W x D) | 185 x 59.5 x 65 cm |
| Weight | 70 kg |
| Climate Class | SN-ST |
| Power Supply | 220-240 V, 50 Hz |
| Defrosting | Automatic fridge, manual freezer |
| Reversible Door | Yes |
| Shelves Material | Glass |
| Interior Light | LED |
| Temperature Range Fridge | 0°C to 8°C |
| Temperature Range Freezer | -18°C |
Frequently Asked Questions - POSBSW7595EBN Point
User questions about POSBSW7595EBN Point
0 question about this device. Answer the ones you know or ask your own.
Ask a new question about this device
Download the instructions for your Refrigerator in PDF format for free! Find your manual POSBSW7595EBN - Point and take your electronic device back in hand. On this page are published all the documents necessary for the use of your device. POSBSW7595EBN by Point.
USER MANUAL POSBSW7595EBN Point
Thank you for purchasing your new POINT refrigerator.
These operating instructions will help you use it properly and safely. We recommend that you spend some time reading this instruction manual in order that you fully understand all the operational features it offers.
Read all the safety instructions carefully before use and keep this instruction manual for future reference.
NO
This product is for household use only!
Please read these instructions carefully before the first use of this product and save this manual for your future reference.
IMPORTANT SAFETY INSTRUCTIONS
When using an electrical appliance, basic precautions should always be followed, including the following:
- This appliance can be used by children aged 8 years and older and persons with reduced physical, sensory or mental capabilities or lack of experience and knowledge if they are supervised or instructed on the safe use of the appliance and understand the hazards involved. Children shall not play with the appliance. Cleaning and user maintenance shall not be carried out by children without supervision.
- Children aged between 3 to 8 years are allowed to load and unload refrigerating appliances.
- If the supply cord is damaged, it must be replaced by the manufacturer, its service agent or similarly qualified persons in order to avoid a hazard.
- WARNING: Keep ventilation openings, in the appliance enclosure or in the built-in structure, clear of obstruction.
- WARNING: Do not use mechanical devices or other means to accelerate the defrosting process, other than those recommended by the manufacturer.
- WARNING: Do not damage the refrigerant circuit.
- WARNING: Do not use electrical appliances inside the food storage compartments of the appliance, unless they are of the type recommended by the manufacturer.
- Do not store explosive substances such as aerosol cans with a flammable propellant in this appliance.
- This appliance is intended to be used in household and similar applications such as:
- staff kitchen areas in shops, offices and other working environments;
- farm houses and by clients in hotels, motels and other residential type environments;
- bed and breakfast type environments;
- catering and similar non-retail applications.
- Place the appliance against a wall with a free distance between 50 and 75mm.
- WARNING: When positioning the appliance, ensure the supply cord is not trapped or damaged.
- WARNING: Do not locate multiple portable socket-outlets or portable power supplies at the rear of the appliance.
- To avoid contamination of food, please respect the following instructions:
- Opening the door for long periods can cause a significant increase of the temperature in the compartments of the appliance.
- Clean regularly surfaces that can come in contact with food and accessible drainage systems.
- Clean water tanks if they have not been used for 48h; flush the water system connected to a water supply if water has not been drawn for 5 days.
- Store raw meat and fish in suitable containers in the freezer, so that it is not in contact with or drip onto other food.
- Two-star frozen-food compartments are suitable for storing pre-frozen food, storing or making ice cream and making ice cubes.
- One-, two- and three-star compartments are not suitable for the freezing of fresh food.
- If the refrigerating appliance is left empty for long periods, switch off, defrost, clean, dry, and leave the door open to prevent mould developing within the appliance.
- Unplug the appliance from outlet when not in use, before putting on or taking off parts, before cleaning.
- Make sure to place the plug all the way into socket when connecting your appliance.
- Insert the plug into a single grounded socket.
- Never use the appliance in place where combustible and inflammable materials are kept.
- For safety reason, be sure to repair or replace parts at authorized service dealers.
- The motor is permanently lubricated and will require no oil.
- The appliance must be positioned so that the plug is accessible.
- Please follow local regulations regarding disposal of the appliance for its flammable blowing gas. Before you scrap the appliance, please take off the doors to prevent children trapped.
- Ensure the appliance is unplugged before cleaning or if the product is not in use.
- To clean the appliance, use only mild detergents or glass cleaning products. Never use harsh detergents or solvents.
- It is not recommended to use this appliance with an extension cord or power board. Please ensure that the appliance is plugged directly into the electrical outlet.
- Do not place hot food or drink into the appliance before it cools down to room temperature.
- Close the door immediately after putting in any items so the inside temperature will not rise dramatically.
- Keep appliance away from any heat source or direct sunlight.
- To fix stably, the appliance must be placed on a flat and solid surface. It should not be laid on any soft material.
- Do not place any other appliance on top of the appliance, and do not wet it.
- To avoid injury or death from electrical shock, do not operate the appliance with wet hands, while standing on a wet surface or while standing in water.
- Do not use outdoors or in wet conditions.
- Never pull the cord to disconnect it from the outlet. Grasp the plug and pull it from the outlet.
- Keep the cord away from heated surfaces.
- Check that the voltage of the power supply in your home is the same as the voltage shown on the rating label of this product.
- Connect your appliance to an independent electrical socket and use a safe ground wire.
- When the frost in appliance is removed, or when there is no electricity or when appliance ceases to be used, it should be cleaned in order to prevent it from smelling.
- Children should be supervised to ensure that they do not play with the appliance.
- The appliance is not intended to be operated by means of an external timer or a separate remote control system.
- This appliance has been incorporated with a grounded plug. Please ensure the wall outlet in your house is well earthed.
- It is recommended to check regularly the supply cord for any sign of possible deterioration, and the appliance should not be used if the cable is damaged.
- Any replacement or maintenance of the LED lamps is intended to be made by the manufacturer, its service agent
or similar qualified person. Switch off the power before replacement.

- WARNING! Risk of fire – flammable material. Please keep the product far away from fire source during using, service and disposal. There are flammable materials at the back of the appliance.
PRODUCT PARTS & FEATURES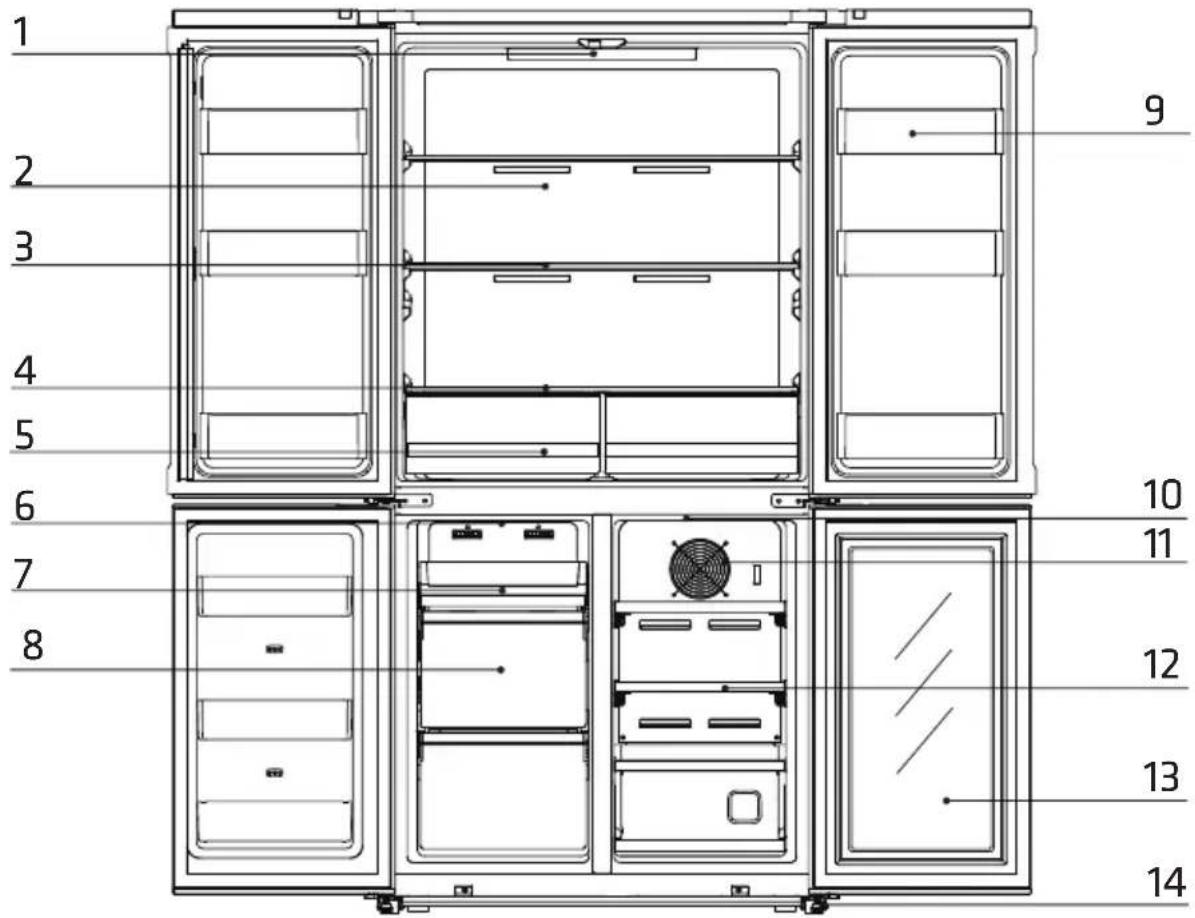
- LED light
- Surface light source
- Glass shelf
- Vegetable box cover
- Vegetable box
- LED light
- Freezer tray
- Freezer box
- Door balcony
- LED light
- Fan of wine zone
- Wood wine shelf
- Glass door
- Adjustable feet
NOTE: Pictures in this manual are only for reference, different models may be different. Prevail in kind.
PACKING AND MOVING
Before unpacking the product, memorize the position of each accessory, in case you must pack it again in the future.
Do not lift or pull the door or the door handle during transport and do not use it as a holder.
When moving, the device can not be tilted more than 45 degrees (the angle with respect to the vertical direction). Please avoid strong vibrations and blows to the device as they could affect its operation.
Do not place the appliance horizontally or upside down.
INSTALLATION
- The refrigerator should be placed on a completely flat surface, leaving 5-10 cm between each side of the appliance, 7.5 cm from the back and the wall, and 10 cm between the top of the appliance and the ceiling.
- Incorrect placement may increase the noise of the appliance.
- Choose a well-ventilated place, which is not exposed to sunlight, high temperature or humidity, as humidity can cause stains. • The unit can be moved easily thanks to its wheels.

Before first use
Before using the device, remove all wrappings, including corks and rubber straps. Adjust the feet and clean the outside and inside of the refrigerator with a warm cloth. Do not start the refrigerator immediately after installation; it must be started after 2-6 hours
of standing to ensure proper operation. To avoid damage to the power cable and any consequential incidents, the power cable should not be covered by the appliance itself or other objects. Before switching on, please check if the voltage range of the refrigerator is the same as the power supply. When the refrigerator is first installed, allow it to stabilize at normal operating temperatures for 2-3 hours before filling with fresh or frozen food. If the operation is interrupted, wait 5 minutes before restarting.
LEVELLING FEET
Use the adjustable feet for proper levelling and for proper air circulation in the lower sectors of the appliance. Adjust the feet using a suitable spanner.
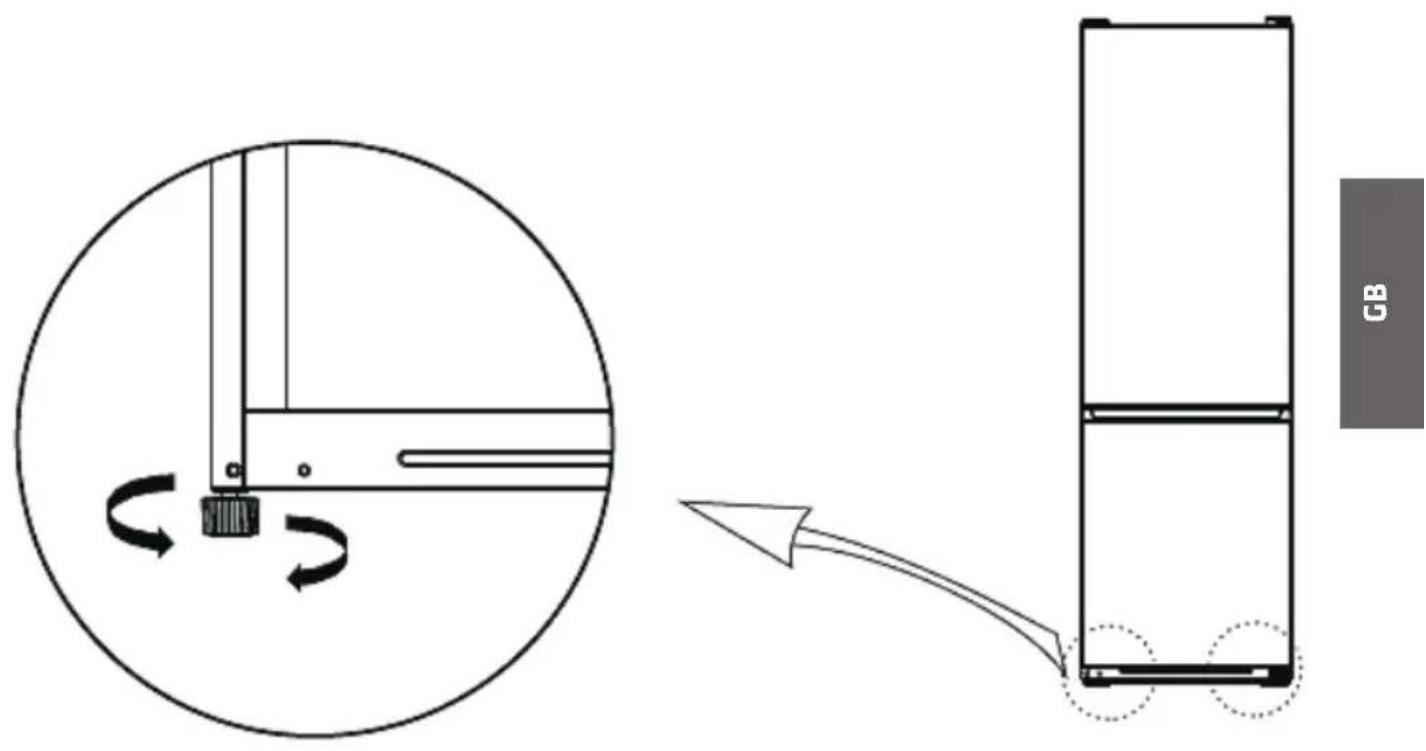
The figure above is an example only.
You can adjust an inclination of 0.5° to allow the doors to close by themselves. If you have to move the appliance, set the adjustable feet to minimum position so the appliance can be moved on its rollers easily. Readjust the appliance when transport has been completed.
NOTICE! The rollers are not castors and are intended to move the appliance forward and backwards only. Lateral movements can damage your floor and the rollers.
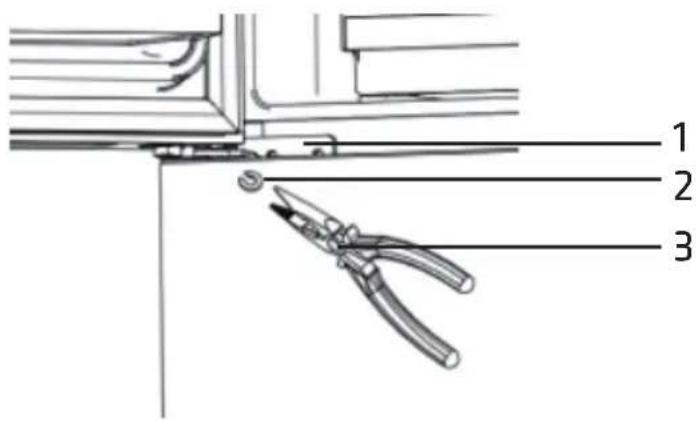
LEVELLING DOOR OF FRIDGE COMPARTMENT

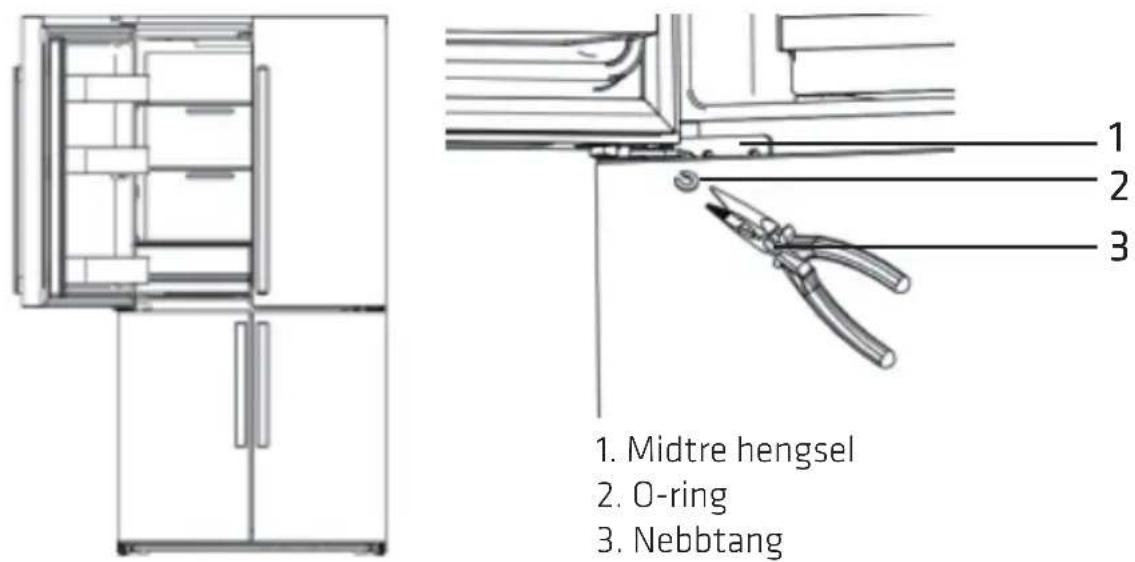
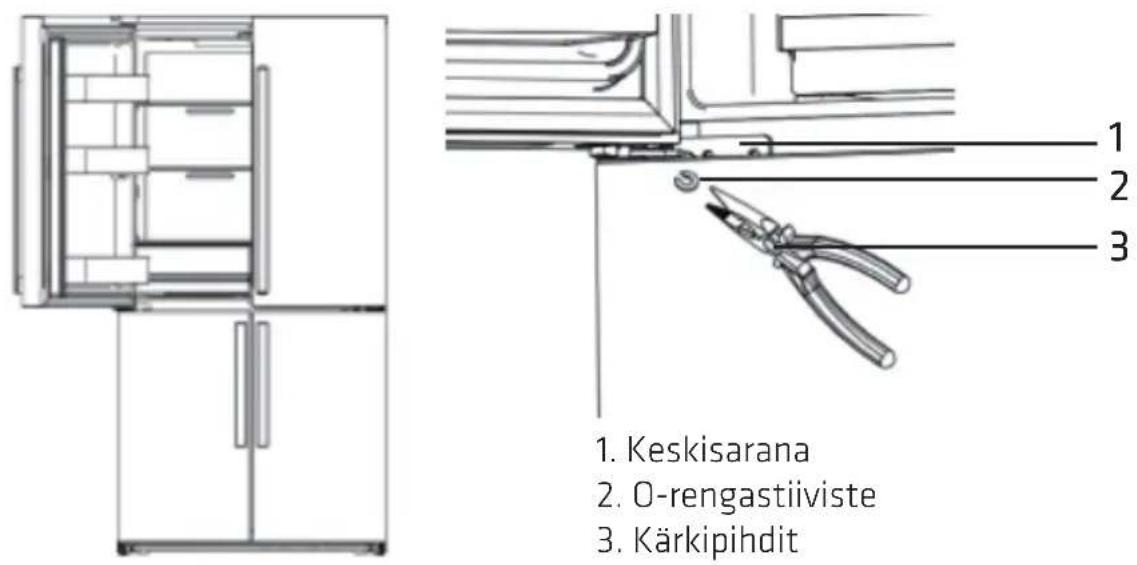
- Middle hinge
- O-ring seal
- Needle-nose pliers
To ensure that the door of the fridge compartment is absolutely level, the refrigerator must first be placed horizontally.
When the left door is lower than the right door: Open the left door of the refrigerator and adjust it step by step according to the following instructions:
- Lift the left door upwards until there is a certain gap between the hinge shaft (1) and the door body.
- Use the needle-nose pliers (3) to hold the O-ring seal (2) and insert the opening side into the middle hinge shaft. When the right door is lower than the left door, the same method can be used for adjustment.
DISPLAY AND USE
Before starting to use this device and in order to reach the best performance, please read the display's instructions carefully. When you turn on the device for the first time, the light of the panel icons will start to work. If you have not pressed any buttons and the doors are closed, the lights will turn off.
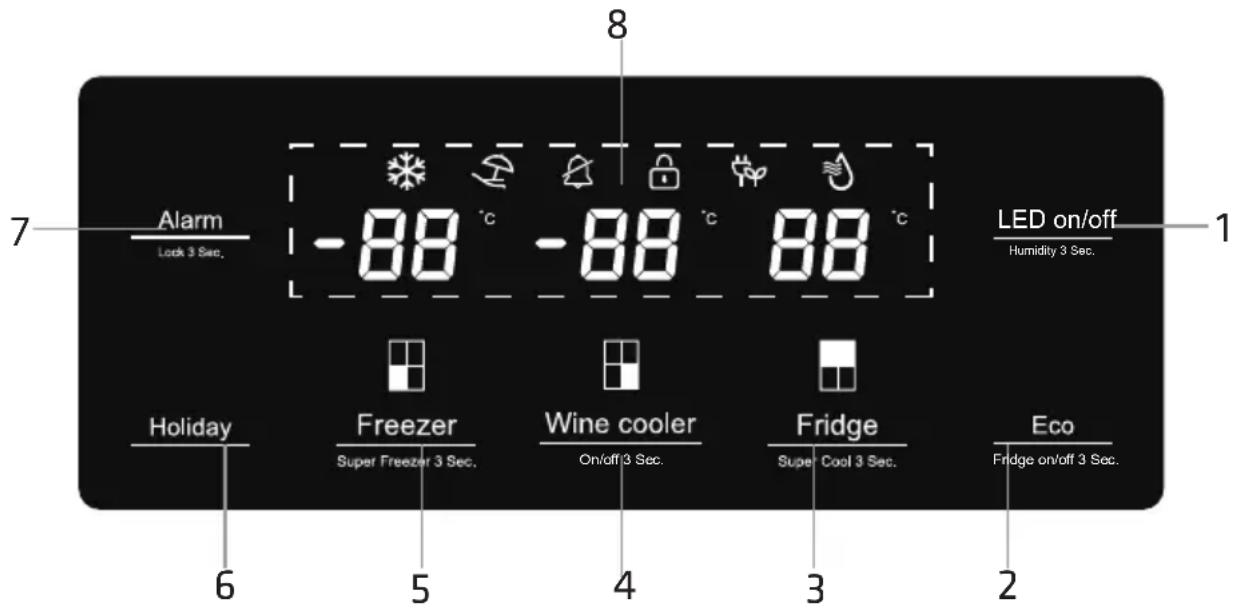
- LED button
- Eco button
- Fridge button
- Wine cooler button
- Freezer button
- Holiday button
- Alarm button
- Display space
Please note that:
- When the product is connected with electricity, the display will be on for 3 seconds with a long buzz.
- A short buzz will be activated every time a button is pressed effectively.
- If the appliance is not being used or the door has been closed for more than 1 minute, the display enters screen save mode. Once the door is opened again or any button on the display is pressed, it will light up again.
Temperature control
This appliance has electronic temperature control for both the fridge and freezer compartments.
When the appliance is used for the first time, it is recommended to set the temperature at 5°C for the fridge compartment, -18°C for the freezer compartment, and 12°C for the wine zone.
If you wish to change the temperature, follow the instructions below.
Important! You must hold the Alarm button for 3 seconds to unlock the appliance first.
Hold down this button for about 3 seconds to activate or deactivate the child lock function. When the child lock function is activated, the icon “💡” will light up. When the icon lights up, all control panel buttons will be locked.
Changing Fridge temperature:

Press the Alarm button for 3 seconds to unlock first, then press the "Fridge" button to change the temperature (see sequence below). The temperature will be shown on the display.
Temperature range is 2 to 8°C.
Press the button as many times as necessary until the temperature you want is shown on the display.
After 10 seconds the light stops flashing and the temperature has been established.
![graph LR A["8"] --> B["7"] B --> C["6"] C --> D["5"] D --> E["4"] E --> F["3"] F --> G["2"] G --> H["1"]](/content/2026/07/1471233/images/f5a69f93ee6a18a2534c2ddf584b5f953a05db1877e33c6a1d955eb9664930c0.jpg)
Changing Freezer temperature:

Press the Alarm button for 3 seconds to unlock first, then press the "Freezer" button to change the temperature (see sequence below). The temperature will be shown on the display.
Temperature range is -15 to -25°C.
Press the button as many times as necessary until the temperature you want is shown on the display.
After 10 seconds the light stops flashing and the temperature has been established.
![graph LR A["-15"] --> B["-16"] B --> C["-17"] C --> D["-18"] D --> E["-19"] E --> F["-20"] F --> G["-21"] G --> H["-22"] H --> I["-23"] I --> J["-24"] J --> K["-25"] K --> A](/content/2026/07/1471233/images/9474562e08880e95ab40a9cd6bca5962a739f312087b5e08e8db3cce0909bba9.jpg)
Changing Wine cooler temperature:
Press the "Wine cooler" button to change the temperature (see sequence below). The temperature will be shown on the display.
Temperature range is 5 to 18°C.
Press the button as many times as necessary until the temperature you want is shown on the display.
After 10 seconds the light stops flashing and the temperature has been established.
![graph LR A["18"] --> B["17"] B --> C["16"] C --> D["15"] D --> E["14"] E --> F["13"] F --> G["12"] G --> H["11"] H --> I["10"] I --> J["9"] J --> K["8"] K --> L["7"] L --> M["6"] M --> N["5"]](/content/2026/07/1471233/images/52ece272b112a582bbfc4be6e9a97ab6f1d60191bceb0e2093989d27c91c6a12.jpg)
Important! Hold the "Wine cooler" button for 3 seconds, the wine cooler will stop work and display 'OFF'.
Super Cooling mode:

Press the "Fridge" button for more than 3 seconds, the super cooling icon will light up.
This mode can refrigerate your food faster, keeping food fresh for a longer period. When the super cooling function is set, the temperature in the freezer compartment and wine zone do not change and the temperature fridge compartment is set to 2°C. The icon light comes on.
The fridge compartment will automatically exit the super cooling mode after 6 hours and will return to the previous setting.
Super freeze mode:

Press the "Freezer" button for more than 3 seconds, the super freeze icon will light up.
This mode will quickly lower the temperature of the freezer compartment, so vitamins and nutrients in the food will freeze faster, keeping the food fresh for longer time.
When the super freeze function is set, the temperature of the fridge compartment and wine zone do not change and the freezer compartment temperature is set at -25°C. The icon light will come on.
In case maximum amount of food are frozen, please wait about 24h. The freezer compartment will automatically exit the super freeze mode after 26 hours and will return to the previous setting.
Holiday mode:

If you are going to be away for a long period of time, you can activate this function by pressing the "Holiday" button and the temperature of the fridge compartment is automatically switched to 15°C to minimize the energy consumption.
Important! Do not store any food in the fridge compartment during this time. When the holiday function is on, you can switch it off by pressing the "Holiday" button and the fridge compartment temperature setting will revert back to the previous setting.
Eco mode:

To lower energy consumption, you can press the "Eco" button to enter the Eco mode, then the Eco icon will light up and temperature of the fridge compartment is automatically switched to 8°C and temperature of the freezer compartment is automatically switched to -15°C, no change in wine zone.
When the Eco function is on, you can switch it off by pressing Eco button and the temperature setting in fridge compartment and freezer compartment will revert back to the previous setting.
Important! If you hold the "Eco" button for 3 seconds, the fridge compartment will stop working and display 'OFF'.
LED button:

Press the LED button once to turn on or turn off the LED light in wine cooler. Press the LED button for 3 seconds, display space will show the humidity in wine cooler.
Alarm off mode:

If door is opened for more than 2 minutes, the buzzer will sound and this alarm icon will light up, in this case, you can press the "Alarm" button or close door, or else, it will alarm for 10 minutes.
Wine loading plan:
The wine cabinet can accommodate up to 34 bottles with a stack based on 4 wooden shelves.
The way you load your wine cabinet determines capacity. Below you will find an explanatory diagram for loading.
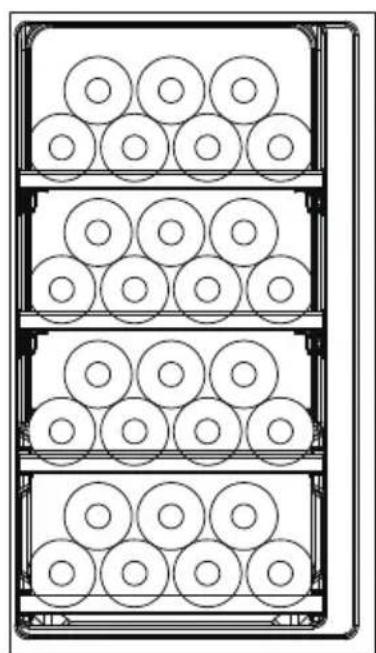

The indoor fan helps keep the temperature consistent throughout the wine cabinet. The wine cabinet door should not be kept open for long periods of time as it will impact the wine cabinet's ability to remain cool.
This wine cabinet is called mono temperature, which means that you have a single choice of temperature.
If storing red, rose and white wines together, set the thermostat on average between 11°C and 13°C and store the red wines on the top shelves and whites at the bottom. This will make the most of the ‘hot air rises’ phenomenon. Consider the ambient temperature of your room when setting the thermostat.
USING YOUR APPLIANCE
In order to use the appliance as best as you can, please read carefully the following tips on food placement:
- Keep space between the food to facilitate air circulation.
- Food should be stored in an airtight package to prevent drying or odor.
- Hot food should cool down before putting in the appliance. Otherwise the temperature and therefore the electrical consumption will increase.
- Vegetables should be placed in the drawers of the refrigerator. Do not store fresh fruit or vegetables in the freezer compartment; most produce will lose quality when thawed.
- Reducing the frequency of door opening can lower energy consumption.
- Freeze fresh foods (e.g., meat or fish) promptly to best preserve vitamins and flavor.
- Wrap items for freezing in aluminum foil or freezer paper, or place them in airtight freezer bags/containers.
- Do not place unfrozen food in direct contact with already frozen food.
- If you buy frozen foods, take them home and place them in the freezer as quickly as possible.
- Do not refreeze food once it has thawed (unless it has been cooked first).
- Do not freeze liquids in sealed bottles or cans. Never freeze carbonated drinks—containers may burst.
ERROR CODE
In the event of the machine not operating correctly, an error code will appear. This list will help you understand and find the problem.
| No. Error Code Display zone | |||
| 1 Communication failure EC Freezer Display | |||
| 2 Fridge sensor failure E1 Fridge Display | |||
| 3 Wine cooler sensor failure E2 Wine cooler Display | |||
| 4 Freezer sensor failure E3 Freezer Display | |||
| 5 Fridge defrost sensor failure E4 Fridge Display | |||
| 6 Wine cooler defrost sensor failure E5 Wine cooler Display | |||
| 7 Freezer defrost sensor failure E6 Freezer Display | |||
| 8 Environment sensor failure | E7 Fridge Display | ||
| 9 Environment humidity failure | E8 Fridge Display | ||
| 10 | Wine cooler humidity failure E9 Wine cooler Display | ||
| 11 | Fridge fan failure | F1 Fridge Display | |
| 12 | Freezer fan failure | F2 Freezer Display | |
| 13 | Condenser fan failure | F3 Freezer Display | |
| 14 | Wine cooler fan failure | F4 Wine cooler Display | |
| 15 | Fridge door switch failure | dR | Fridge Display |
| 16 | Freezer door switch failure FL Freezer Display | ||
| 17 | Wine cooler door switch failure | FR | Wine cooler Display |
CLEANING AND MAINTENANCE
The appliance should be maintained and cleaned frequently. For your safety, unplug the appliance before cleaning.
To clean the refrigerator's interior, please consider the following notes:
- Clean it with clean water or a neutral cleaner. Then dry with a dry cloth.
- Clean the door seals carefully.
For external cleaning, clean the dust with a dry cloth.

The LED light cannot be replaced by the end user. If the light is damaged or does not switch on, please contact the shop where you bought the appliance.
Electronic components should be cleaned dry.
Do not use cleaning products such as washing powder, cleaning powder, abrasive and alkaline cleaning products, chemical cloths, thinners, alcohol, petroleum products, and hot water to clean the refrigerator, as they can damage the painted cover and plastics.
Storage after power failure
After an interruption of the power supply, the appliance can store food for several hours even in summer. To keep the temperature in the appliance, please:
- Do not put more food in the appliance.
- Do not open the door frequently.

If you disconnect the appliance from the power supply, please wait for at least 5 minutes to connect it again.
Defrosting
Although this appliance defrosts automatically, a layer of frost may occur in the freezer compartment inside walls if the freezer door is opened frequently or stays open too long. If the frost is too thick, choose a time when the food supply is low and proceed as follows:
- Remove existing food and accessories, unplug the appliance from the mains and leave the doors open. Ventilate the room thoroughly to speed up the defrosting process.
- When defrosting is complete, clean your appliance as described above.
Caution!
Do not use sharp objects to remove frost from the freezer compartment. Only after the interior has dried out completely should the appliance be turned back on and plugged into the power outlet.
AFTER SALES SERVICE
The following simple issues can be handled by the user. Please call the after-sale service department if the issues are not solved.
| Problem Solution | |
| The appliance does not work | Make sure that the device is correctly plugged in, that the fuse is not blown or that a power failure has not occurred.The room temperature is too low. Try adjusting the temperature to a cooler level to solve this problem. |
| The device does not work properly | It is normal for the freezer compartment not to operate during the automatic defrost cycle or for a short period of time after the appliance is turned on to protect the compressor. |
| The appliance is cooling more than expected | Temperature control is not set correctly, set the temperature higher.If you have placed food that contains a lot of moisture under the cooling vents, remove the food from the area. |
| The appliance is not cooling as expected | The food may be too close which will block the air circulation.You may have placed hot foods or too many foods inside the refrigerator.The door may not be closed correctly.The rubber on the door maybe damaged.The refrigerator may not be ventilated.There may not be enough free space between the top and side of the refrigerator and other surfaces. Temperature control is not set correctly, set the temperature lower.The set temperature is colder than necessary.A large amount of hot food is fed into the device. The room temperature is too high.The doors have been left open for a long time or they open and close continuously. |
| Odours come out of the device | The interior may need to be cleaned.Check any food, container or wrapping is in poor condition and causes odors. |
| There is thawing water inside the appliance and on the floor | Make sure that the tube and drain hose are not blocked. Make sure that the drainage compartment is correctly positioned. |
| A layer of ice has formed | Check that the air outlets are not blocked by food and make sure that the food is placed in a way that allows sufficient ventilation. Make sure the door is completely closed. To remove frost, see the cleaning and maintenance chapter. |
| Condensation formed on the outside of the device | This can happen when humidity is high, during cold seasons, for example. The phenomenon is the same when cold water is placed in a glass, and it does not represent any problem. wipe with a dry cloth. |
| The temperature of the device is too high/low | High: you may have left the doors open too long or too often; or the doors are held open by an obstacle; or the appliance has insufficient space on the sides, back and top. Low: increase the temperature by following the steps in the "DISPLAY" section. |
| You hear a noise | It may be the noise of coolant passing through the tubes. It's not a problem.Compressor running noise.Air movement noise from the fan motor in the freezer or other compartments.Gurgling sound similar to boiling water. Clicking noise during the defrosting.A click before the compressor starts is normal. Other unusual noises may be due to the following; check and correct as needed:The unit is not level.The back of the unit is touching the wall. Bottles or containers have fallen, are rolling, or are rattling against each other. |
| The side panel of the refrigerator is hot | This can happen when the door is opened and closed frequently, when it is running in high ambient temperatures (e.g., in summer). The side panel may feel warm because heat is dissipated through the cabinet walls. This is normal and not a fault. If the panel feels very hot, avoid touching it. |
| Water drips on the floor | The water tank (located at the bottom rear of the appliance) may not be correctly positioned to collect water, or the water spout is blocked. You may need to remove the appliance from the wall to check the container and outlet pipe. |
| Light does not work | The LED light may be damaged. Call the service center for help.The control system may have deactivated it because the doors have been open for a long time. Close and open the door to reactivate the light. |

This symbol on the product or in the instructions means that your electrical and electronic equipment should be disposed of at the end of its life separately from your household waste. There are separate collection systems for recycling in the EU. For more information, please contact the local authority or your retailer where you purchased the product.
Specification:
Rated Voltage: AC220-240V
Rated Frequency: 50 Hz
Refrigerant: R600a (68g)
Noise: 41dB, C class
Power International AS,
PO Box 523, N-1471 Lørenskog, Norway
Power Norge:
https://www.power.no/kundeservice/
T: 21 00 40 00
Power Danmark:
https://www.power.dk/kundeservice/
T: 70 33 80 80
Punkt 1 Danmark:
https://www.punkt1.dk/kundeservice/
T: 70 70 17 07
Power Finland:
ADJUST THE REFRIGERATOR DOOR
- Middle hinge
- O-ring
- Pliers
- LED button
- ∅ko button
- Refrigerator button
- Wine cooler button
- Freezer button
- Vacation button
- Alarm button
- Display area
Note:

PRODUCT PARTS AND FUNCTIONS
ALIGNING THE REFRIGERATOR COMPARTMENT DOOR

- WARNING! Fire risk – flammable materials. Keep the appliance away from ignition sources during use, maintenance, and disposal. There are flammable materials on the back of the appliance.
PRODUCT COMPONENTS AND FUNCTIONS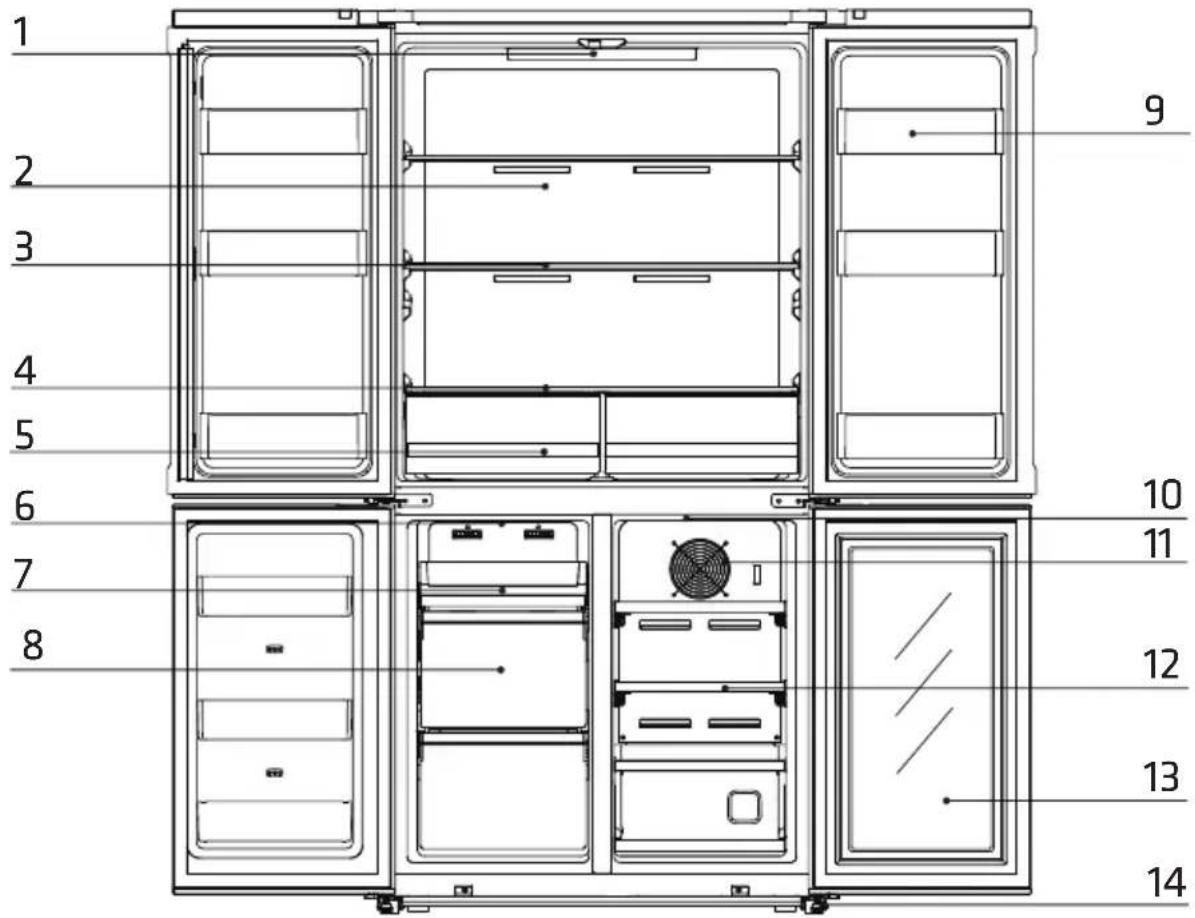
Before first use


- NO
- THIS PRODUCT IS FOR HOUSEHOLD USE ONLY
- IMPORTANT SAFETY INSTRUCTIONS
- PACKING AND MOVING
- INSTALLATION
- BEFORE FIRST USE
- LEVELLING FEET
- THE FIGURE ABOVE IS AN EXAMPLE ONLY
- LEVELLING DOOR OF FRIDGE COMPARTMENT
- DISPLAY AND USE
- PLEASE NOTE THAT
- TEMPERATURE CONTROL
- CHANGING FRIDGE TEMPERATURE
- CHANGING FREEZER TEMPERATURE
- CHANGING WINE COOLER TEMPERATURE
- SUPER COOLING MODE
- SUPER FREEZE MODE
- HOLIDAY MODE
- ECO MODE
- LED BUTTON
- ALARM OFF MODE
- WINE LOADING PLAN
- USING YOUR APPLIANCE
- ERROR CODE
- CLEANING AND MAINTENANCE
- STORAGE AFTER POWER FAILURE
- DEFROSTING
- CAUTION
- AFTER SALES SERVICE
- ADJUST THE REFRIGERATOR DOOR
- NOTE
- ALIGNING THE REFRIGERATOR COMPARTMENT DOOR
Brand : Point
Model : POSBSW7595EBN
Category : Refrigerator