
NXTPAPER 60 Ultra - Smartphone TCL - Free user manual and instructions
Find the device manual for free NXTPAPER 60 Ultra TCL in PDF.
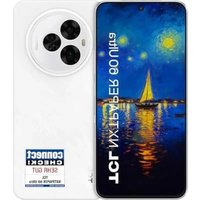


| Product Type | Smartphone |
| Brand | TCL |
| Model | NXTPAPER 60 Ultra |
| Display | 6.78-inch NXTPAPER, 1080x2460 pixels, 120Hz |
| Processor | MediaTek Dimensity 8020 |
| RAM | 8 GB |
| Storage | 256 GB (expandable via microSD) |
| Rear Camera | 108 MP + 8 MP + 2 MP |
| Front Camera | 32 MP |
| Battery | 5000 mAh (non-removable) |
| Dimensions | 164.3 x 75.0 x 8.0 mm |
| Weight | 203 g |
| Power Supply | USB-C charging (33W fast charge) |
| Main Functions | NXTPAPER eye-care display, 5G connectivity, GPS, NFC, fingerprint sensor, face unlock |
| Care and Cleaning | Wipe with soft dry cloth; avoid liquids and abrasive cleaners |
| Safety | Do not expose to extreme temperatures; use only authorized chargers |
| Spare Parts and Repairability | Battery, display, and back cover replaceable by authorized service centers |
| General Information | Android 14, TCL UI 5.0, dual SIM, IP54 dust and splash resistant |
Frequently Asked Questions - NXTPAPER 60 Ultra TCL
User questions about NXTPAPER 60 Ultra TCL
0 question about this device. Answer the ones you know or ask your own.
Ask a new question about this device
Download the instructions for your Smartphone in PDF format for free! Find your manual NXTPAPER 60 Ultra - TCL and take your electronic device back in hand. On this page are published all the documents necessary for the use of your device. NXTPAPER 60 Ultra by TCL.
USER MANUAL NXTPAPER 60 Ultra TCL
TCL NXTPAPER 60 Ultra
Note:
This is a user manual for TCL T951K.
This document is for reference only. The actual product (including but not limited to color, size, screen layout, etc.) may differ from the description depending on the region, service provider, or software version. This document is subject to changes without prior notice. Please refer to the actual product for accurate details. All statements, information and recommendations in this document do not constitute any form of warranty, whether express or implied.
Help
Refer to the following resources to get more FAQ, software, and service information:
Consulting FAQ
Go to www.tcl.com/global/en/service-support-mobile/faq.html
Finding your serial number or IMEI
You can find your serial number or International Mobile Equipment Identity (IMEI) on the packaging materials. Alternatively, choose Settings > My device > Status > IMEI on the phone itself.
Obtaining warranty service
First follow the advice in this guide or go to https://www.tcl.com/global/en/mobile-support.html. Then check hotlines and repair centre information.
For more information about limited warranty, please go to https://www.tcl.com/global/en/warranty
Viewing legal information
On the phone, go to Settings > My device > Legal information.
Cybersecurity requirements
To comply with the cybersecurity requirements of the Radio Equipment Directive 2014/53/EU, please set a strong password upon the device's first use.
Viewing information about energy labelling
For detailed information about energy label, please go to https://eprel.ec.europa.eu/screen/product/smartphonestablets20231669/2408150
Table of Contents
1 Basics....4
1.1 Device overview....4 1.2 Accessibility....6 1.3 Getting started 7 1.4 Home screen.... 10 1.5 Text input.... 18
2 Multimedia applications 20
2.1 Camera 20 2.2 Photos....24
3 Apps and features 26
3.1 Phone....26 3.2 Contacts....31 3.3 Messages 34 3.4 Switch Phone 37 3.5 Clock....38 3.6 TCL apps 39 3.7 Other applications 39 3.8 Google applications.... 39
4 Settings.... 42
4.1 My device 42 4.2 Wi-Fi 42 4.3 Bluetooth....43 4.4 Network & internet....44 4.5 Connections 44
4.6 Home screen & lock screen.... 47 4.7 NXTPAPER zone 47 4.8 Display....48 4.9 Sound & vibration....50 4.10 Notifications....51 4.11 Smart Manager....51 4.12 Storage 51 4.13 Apps....52 4.14 Advanced features....52 4.15 Security & privacy.... 53 4.16 Location....55 4.17 Safety & emergency 55 4.18 Accounts 55 4.19 Digital Wellbeing and parental controls 55 4.20 Google 56 4.21 Accessibility....56 4.22 System....59
5 Making the most of your phone 61
6 Troubleshooting.... 62
7 Specifications 68
8 ECO design technical information.... 70
9 Accessories 71
10 Licences 71
1 Basics
1.1 Device overview


Power key/Fingerprint key
- Press: Lock the screen/Light up the screen.
- Long press the Power key: Sign in to use Gemini
- Press and hold the Power key and Volume down key to take a screenshot.
- Double-press the Power key to open the camera.

Volume Keys
- In call mode, adjusts the earpiece or headset volume.
- In Music/Video/Streaming mode, adjusts the media volume.
- In general mode, adjusts the media volume.
- Mutes the ringtone of an incoming call.
- In camera preview mode, press the Volume up or down key to take a photo or press and hold to take burst shots.

NXTPAPER key
- Slide this key up to turn on NXTPAPER mode.
- Slide this key down to turn off NXTPAPER mode.

1.2 Accessibility (1)

To turn on hearing assistance, press the Volume up and Volume down keys simultaneously for 3 seconds or go to Settings > Accessibility > TalkBack.
To activate more accessibility features, go to Settings > Accessibility.
Hearing assistance is based on TalkBack technology, a gesture-based screen reader that lets you use the device without looking at the screen. TalkBack provides spoken audio of the screen content, from battery level and caller information to the app your finger is on.
1.3 Getting started
Setting up
Inserting or removing the SIM card
① Insert the provided SIM pin into the hole. ② Pull out the SIM tray. ③ Place the SIM card into the tray slot and carefully close the SIM tray.


You must insert your SIM card to make phone calls. You do not need to power off your phone before inserting or removing the SIM card as this phone supports hot swap.

Your phone only supports nano-SIM cards. Do not attempt to insert other SIM types; otherwise this may cause damage to your phone.
Charging the battery

You are advised to fully charge the battery. Charging status is indicated by a percentage displayed on screen while the phone is powered off. The percentage increases as the phone is charged.
Learn more about battery life and proper use to maximize your battery's performance.
- Don't use or place your device in extreme temperatures. Extreme temperatures, whether too high or too low, can accelerate battery degradation and reduce its overall lifespan. For optimal performance, the manufacturer's recommended operating temperature range is 0°C (32°F) to 40°C (104°F).
- Deactivate Wi-Fi, GPS, Bluetooth when not in use.
- Deactivate auto-syncing of apps, close unnecessary apps.
- Turn display off by pressing the power key when the device is not in use.
- Set Screen timeout to a short interval.
- Lower the screen brightness.
- After charging 100%, disconnect charger from the plug. Do not keep device constantly under charge; this will reduce the battery life.
- Think of activating your phone's Intelligent charging mode (Settings > Smart Manager > Battery > Battery health > Intelligent charging mode) to stop charging at 80% battery level, for a longer battery life.
- To minimize the effect, it is recommended to use fast charging only when necessary and avoid keeping the battery at high charge levels for extended periods.
Battery capacity and usage hours may vary depending on device settings and usage patterns.
Note: For environmental reasons this package may not include a charger, depending on the device you purchased. This device can be powered with most USB power adapters and a cable with USB Type-C plug.
To correctly charge your device you can use any charger as long as it meets all applicable standards for safety of information technology equipment and office equipment with minimum requirements as above listed.
Please do not use chargers which are not safe or do not meet the above specifications.
Powering on your phone
Hold down the Power key until the phone powers on, unlock your phone (Swipe, PIN, Password, Pattern, Fingerprint or Face) if necessary and confirm. The Home screen is displayed.
If you do not know your PIN code or forget it, contact your network operator. Be sure to keep your PIN code secure.
Powering off your phone
Press the Power key and Volume up key until options appear, then select Power off.
1.4 Home screen
You can bring all the items (applications, shortcuts, folders and widgets) you love or use most frequently to your Home screen for quick access. To return to the Home screen, swipe up from the bar at the bottom edge of the screen.

Status bar
• Status/Notification indicators - Swipe down from the left side of the status bar to open the notification panel
Search bar
- Touch ① to enter text search screen
- Touch ② to enter voice search screen
Touch an icon to open an application, folder, etc.
Favourite tray applications
- Touch to enter the application.
- Touch and hold to move or remove applications.
The Home screen is provided in an extended format to allow more space for adding applications, shortcuts, etc. Slide the Home screen horizontally left and right to get a complete view.
Using the touchscreen
Touch

To access an application, touch it with your finger.
Touch and hold

To enter the available options for an item, touch and hold the item. For example, select a contact in Contacts and touch and hold it. An options list will then appear.
Drag

Place your finger on the screen to drag an object to another location.
Slide/Swipe

Slide the screen to scroll up and down the applications, images, and web pages. You can slide the screen horizontally too.
Flick

Similar to swiping, but flicking makes it move quicker.
Rotate

Automatically change the screen orientation from portrait to landscape by turning the phone sideways to have a better screen view.
Status bar
From the status bar, you can view both phone status and notification information.
Notification panel
When there are notifications, swipe down from the left side of the status bar to open the Notification panel to read more detailed information.

Touch to clear all event-based notifications (other ongoing notifications will remain).
Quick settings panel
Swipe down from the right side of the status bar to open the Quick settings panel.
You can enable or disable functions or change modes by touching the icons.
Touch the Edit icon 📋 to customise your Quick settings panel.

Touch to customise your Quick settings panel.
Touch to access Settings, where you can set more items.
Lock/Unlock your screen
To protect your phone and privacy, you can lock the screen with a pattern, PIN, password, fingerprint or face.
To create a screen unlock pattern, touch Settings > Security & privacy > Device unlock > Face & Fingerprint unlock.
To lock the phone screen
- If your phone remains inactive for a period of time, it will automatically lock the screen and enter sleep mode to save power. Go to Settings > Display > Sleep and select a screen timeout period.
- You can also manually lock the screen by pressing the Power key once.
To unlock the phone screen
Press the Power key once to light up the screen, swipe up and unlock the screen with the method you have set.

Enter a password to unlock the screen
Once the screen is turned on, swipe up from any position on the screen to display the password input panel. Then enter your lock screen password.
Use pattern unlock
Draw the same pattern you have set to unlock the screen.
Use face unlock
- From the app list, touch Settings > Security & privacy > Device unlock > Face & fingerprint unlock > Face unlock. Before using the face key, you need to set a pattern/PIN/password.
- Hold your phone 8-20 inches from your face. Position your face in the square shown on the screen. For best results, we suggest that the face key is enrolled indoors and away from direct sunlight.
- Enable face unlock when your screen turns on, otherwise you will have to swipe up on the screen first of all.
Use fingerprint unlock
- Touch the fingerprint sensor (Settings > Security & privacy > Device unlock > Face & fingerprint unlock > Fingerprint) with an enrolled finger to unlock the screen.
Personalizing your Home screen
Add
You can touch and hold a folder, an application or a widget and drag the item to your preferred Home screen.
Reposition
Touch and hold an item and drag it to the desired position and then release. You can move items both on the Home screen and the Favourite tray. Hold the icon on the left or right edge of the screen to drag the item to another Home screen.
Remove
Touch and hold the item and drag it up to the top of the remove icon, and release after it turns white.
Create folders
To improve the organisation of shortcuts or applications on the Home screen and the Favourite tray, you can add them to a folder by stacking one item on top of another. To rename a folder, open it and touch the folder's title bar to input the new name.
Wallpaper customisation
Touch and hold an empty area on the Home screen, then touch Wallpaper & style to customise wallpaper.
Widgets and recently used applications
Consult widgets
Touch and hold the empty area in the Home screen, then touch Widgets to display all widgets.
Touch and hold the widget and slide it to move to your preferred screen.
Consult recently used applications
To consult recently used applications, swipe up from the bottom of the device and hold. Touch a thumbnail in the window to open the application.

Touch one thumbnail and slide it up to close the application, slide it right/left to switch between the applications.
Touch Clear all at the bottom of the screen to close all the running applications.
Volume adjustment

Press the Volume key to adjust the volume.
Touch the ••• icon to adjust Alarm, Notification, Ring and Media volume.
1.5 Text input
Using the Onscreen Keyboard
Onscreen Keyboard settings
Touch Settings > System > Keyboard, touch the keyboard you want to set up and a series of settings will become available.
Adjust the Onscreen Keyboard orientation
Turn the phone sideways or upright to adjust the onscreen keyboard orientation. You can adjust it by changing the settings (Touch Settings > Display > Auto-rotate screen).
Gboard

Text editing
You can edit text which you have entered.
- Touch and hold or double touch within the text you want to edit.
- Drag the tabs to change the amount of text to edit.
You can also insert new texts if preferred.
- Touch where you want to type, or touch and hold a blank area. The cursor will blink and the tab will appear. Drag the tab to move the cursor.
- If you have cut or copied any text, touch the tab to show the Paste and Select all option which allows you to complete pasting immediately.
2 Multimedia applications
2.1 Camera....

Before using the camera, make sure that you remove the protective lens cover to avoid it affecting your picture quality.
Launch Camera
There are multiple ways to open the Camera app.
From the Home Screen
From the Home screen, touch Camera 📄.
From the Lock Screen
When the screen is locked, press the Power key once to light up the screen, then long press the camera icon in the lower right corner to open the camera.
Using a shortcut key
Simply double-press the Power key to open the camera.

1 Touch to access settings. 2 Zoom in/out 3 Switch between front/back camera 4 Take a photo 5 Pinch fingers together to zoom out, or spread fingers apart to zoom in 6 Super macro: Touch to access super macro mode. 4cm is the best macro shooting distance. 7 View the photos or videos you have taken
To take a photo
The screen acts as the viewfinder. First, position the object or landscape in the viewfinder, touch the screen to focus if necessary. Touch to capture. The photo will be automatically saved. You can also touch and hold to take burst shots.
To take a video
Touch VIDEO to change the camera mode to video. Touch 📷 to start video recording. Touch the left part of this icon 📷 to take a picture during video recording.
Touch the right part of this icon to pause video recording and touch to continue. Touch to stop recording. The video will be automatically saved.
Further operations when viewing a photo/video you have taken
- Slide left or right to view the photos or videos you have taken.
- Touch 📁, you can select Bluetooth, Messages, Gmail, etc. to share the photo or video.
Modes and settings
Modes
Slide left or right to switch between modes.
- MOTION: Capture wonderful moments effortlessly. • VIDEO: Touch to access video mode.
SLOW MOTION: Make slow-motion videos.
NORMAL: Make normal videos.
TIME LAPSE: Speed up the playback of the footage to create a sense of time elapsing. This is suitable for shooting slowly changing scenes.
• PHOTO: Default mode for Camera. - PORTRAIT: Touch to create a depth of field effect. You can compose an image that highlights your subject while producing a gorgeously blurred background. - More: Tap MORE to access more modes.
Settings
Touch to set more options:
- AI scene detection: Touch the switch to activate/deactivate the function. With plenty of different scene detection, the camera will intelligently analyse the scene to optimize the parameters for a perfect shot.
- Intelligent mode recommendation: Touch the switch to activate/deactivate the function of recommending appropriate modes based on scenarios.
• Watermark: Touch to turn on/off watermark.
- Photo size: Touch to select photo size.
• Auto HDR: Touch to turn on/off HDR.
- Prioritise fast shooting: Enable this mode to prioritize capturing split-second moments, automatically adjusting shutter speed and minimizing processing delay for seamless action shots.
- Quick snap: Set the device to take a photo by pressing the volume down key twice quickly when screen is off.
• Video quality: Touch to select video quality.
- Video HDR: Enable this mode to optimize video quality, especially in backlit scenes.
- Microphone: Touch to turn the microphone on or off.
- Touch to shoot: Tap the preview area to take a photo.
- Mirror camera: Touch to turn the mirror camera on or off.
- Gesture to capture: Use the "palm" gesture to take a photo or start/stop a video.
- Gridlines: Touch to turn the gridlines on or off.
- Camera leveler: Touch to turn the leveler on or off.
- Volume button function: Touch to customize the volume button to act as the shutter, zoom, or volume control when using the camera.
- Storage: Touch to choose between phone storage and SD card storage when an SD card is inserted. The default is internal storage.
- Save location information: Turn on to tag photos and videos with your location. This option is available when the GPS location service is enabled.
- Shutter sound: Touch to turn the shutter sound on or off when capturing.
- QR code: Touch to turn the QR code scanner on or off.
- Reset settings: Touch to reset the camera to its factory default settings.
- Feedback: Provide feedback about the app.
2.2 Photos

Photos acts as a media player for you to view photos and play videos. In addition, a set of further operations to pictures and videos are available for selection.
To view the photos you have taken, swipe up from Home screen and then touch

Working with pictures
You can work with pictures by rotating or cropping them, sharing them with friends, setting them as a contact photo or wallpaper, etc.
Find the picture you want to work on, then tap the picture.

- Tap to share the picture.
- Tap to edit the picture.
- Tap to access Google Lens.
- Tap to delete the picture.
- Tap: > Use as to set the picture as a Contact photo or Wallpaper.
3 Apps and features
3.1 Phone......

Making a call
To make a call, swipe up from Home screen and touch


Enter the desired number from the dial pad and touch 📞 to place the call or select a contact from Contacts or Call logs by touching tabs, then make the call.
The number you entered can be saved to Contacts by touching Create new contact or Add to a contact.
If you make a mistake, you can delete the incorrect digits by touching ✗.
To hang up a call, touch 📞.
International call
To dial an international call, touch and hold O to enter “+”, then enter the international country prefix followed by the full phone number and touch 📞.
Emergency call
If your phone has network coverage, dial the emergency number and touch to make an emergency call. Depending on your network and country this could even work without a SIM card and without typing in the SIM PIN code.
Answering or rejecting a call


When you receive a call:
- Press Answer, or swipe up the icon 📞 to answer;
- Press Decline, or swipe down the icon to reject;
- Touch Message ☐ to reject the call by sending a preset message.
Calling your voicemail
Your voicemail is provided by your network to avoid missing calls. It works like an answering machine that you can consult at any time.
To access your voicemail, touch and hold 1.
If you receive a voicemail, 🔒 appears on the Status bar. Open the Notification panel and touch New voicemail.
During a call
To adjust the volume during a call, press the Volume up/down key.


End the current call.

Display the dial pad.

Touch to mute the current call. Touch this icon again to unmute the call.

Touch to activate the speaker during the current call. Touch this icon again to deactivate the speaker.

Tap to show more options.

To avoid accidental operation of the touchscreen during a call, the screen will be locked automatically when you put the cellphone close to your ear; and it will be unlocked when the cellphone is taken away from your ear.
Managing multiple calls
With this phone you can handle multiple calls at the same time.

Swap calls
When you accept two calls, touch and then icon to switch between two lines. The current call will be put on hold and you are able to join the other call.
Conference calls (1)
You can set up a conference call as follows.
- Place a call to the first participant of the conference call.
- Touch: and then to add another call.
- Enter the phone number of the person you want to add to the conference and touch 📞. You can also add participants from Call logs or Contacts.
- Touch ↑ to start the conference.
- Touch 📞 to end the conference call and disconnect all callers.
Call settings
Touch : from the Phone screen, then touch Settings to set phone and contact settings.
(1) Depending on your network operator.
Call log
You can access your call logs by touching from the Phone screen to view missed calls, outgoing calls and incoming calls.
Touch one call to view information or further operations. You can launch a new call, send a message to the contact or number, or view detailed information of the call.
To delete the call history of a selected contact or number, touch and hold the contact and choose Delete.
3.2 Contacts

Contacts enables quick and easy access to the contact you want to reach.
You can view and create contacts on your phone and synchronize these with your Gmail contacts or other applications on the web or on your phone.
Consult your Contacts
To see your contacts, touch from the Home screen.


Deleted contacts will also be removed from other applications on the phone or web the next time you synchronize your phone.
Adding a contact
Touch in the contact list to create a new contact.
You are required to enter the contact's name and other contact information. By scrolling up and down the screen, you can move from one field to another.

Add to/remove from Favourites
To add a contact to Favourites, you can touch a contact to view details then touch ☆ to add the contact to Favourites.
To remove a contact from Favourites, touch ★ on the contact details screen.
Editing your contacts
To edit contact information, touch in the contact details screen.
When finished, touch Save.
Using the Quick contact panel
Touch a contact to open the Quick contact panel.

- Touch or the number to make a call.
- Touch 🔔 to send a message.
- Touch ☐ to make a video call.
The icons available on the Quick contact panel depend on the information you have for the contact and the applications and accounts on your phone.
Sharing contacts
You can share a single contact or contacts with others by sending the contact's vCard to them via Bluetooth, Gmail, etc.
- From the Contacts screen, touch and hold a contact and touch
- Select the application to perform this action.
Accounts
Contacts, data or other information can be synchronised from multiple accounts, depending on the applications installed on your phone.
To add an account, touch 🙏 from the contacts list and touch Add another account, or from the Home screen, touch Settings > Accounts > Add account.
You are required to select the kind of account you are adding, like Google, etc.
As with any other account setup, you need to enter detailed information, like username, password, etc.
You can remove an account and all associated information from the phone. Touch the account you want to delete, touch Remove account, then confirm.
Auto-sync
On the Accounts screen, turn on Automatically sync app data. When activated, all changes to information on the phone or online will be automatically synchronised with each other.
3.3 Messages

Writing a new message
You can create, edit, send and receive SMS and MMS with this phone.
To access Messages, touch the Messages icon from the App drawer.
On the message list screen, touch Start chat to write text/multimedia messages.

Sending a text message
- To add recipients, enter a mobile phone number or select a contact in the To bar.
- Touch the Text message bar to enter the text of the message.
- When finished, touch the Send icon to send the text message.

Specific letters (accented) will also increase the size of the SMS. This may cause multiple SMS to be sent to your recipient.
Sending a multimedia message
MMS enables you to send video clips, images, photos, animations, slides and sounds to other compatible mobiles and e-mail addresses.
An SMS will be converted to MMS automatically when media files (image, video, audio, slides, etc.) are attached or subject or email addresses are added.
- To send a multimedia message, enter the recipient's phone number in the To bar.
- Write the text of the message in the Text message bar.
- Touch ⭕ to access your location, send a voice message, or attach files.
- Touch to take a photo/video or attach a photo/video you have taken.
- When finished, touch ▶ to send the multimedia message.
Manage messages
When receiving a message, a notification will appear on the Status bar. Drag down the Status bar to open the Notification panel. Touch the new message to open and read it. You can also access the Messages application and touch the message to open it.
Messages are displayed as a conversation.
Touch a message to enter the message composing screen:

① Touch for more options ② Touch to call the number ③ Touch to save the number to Contacts or view the contact details if the number has been saved
To adjust message settings, touch the round icon in the upper right of the message list screen and then select Messages settings.
3.4 Switch Phone

Switch Phone offers an efficient and convenient way to transfer data from your old device to your new one.
To access this menu, swipe up on the home screen or open the Tool folder to find Switch Phone 📋, then transfer data by following the onscreen instructions.

3.5 Clock
Your mobile phone has a built-in clock.
To view the current time, swipe up the Home screen, then touch Clock.

Alarm
From the Clock screen, touch Alarm to enter.
- Turn on to enable the alarm.
- Touch + to add a new alarm, touch OK to save.
- Touch a currently existing alarm to enter the alarm editing screen.
- Touch Delete to delete the selected alarm.
3.6 TCL apps
Support Centre.

Support Centre helps you to learn more about Hot FAQs, operation instructions, troubleshooting, etc. Use it to send us your feedback.
3.7 Other applications (1)
The previous applications in this section are preinstalled on your phone. To download and install more 3rd party applications, use the Google Play Store application.
3.8 Google applications (1)
Google apps are preinstalled on your phone to improve work efficiency and help you enjoy life.
This manual briefly introduces the apps. For detailed features and user guides, refer to the related websites or the introduction provided in the apps.
You are recommended to register with a Google account to enjoy all the functions.
Gmail
As Google's web-based email service, Gmail is configured when you first set up your phone. With this application you can send and receive emails, manage emails by labels, archive emails, etc. Emails can be automatically synchronised with your Gmail account.
Maps
Google Maps offers satellite imagery, street maps, 360° panoramic views of streets, real-time traffic conditions, and route planning for traveling by foot, car, or public transportation. By using this application, you can find your own location, search for a place, and get suggested route planning for your trips.
Photos
Google Photos stores and backs up your photos and videos. It also automatically analyses photos and organizes them into groups, so that you can quickly find the photos you need.
Meet
Stay connected and collaborate effortlessly with the Meet menu on your smartphone. Join or schedule video meetings and group calls with ease.
YouTube
YouTube is an online video-sharing application where users can upload, view, and share videos. Available content includes video clips, TV clips, music videos, and other content such as video blogging, short original videos, and educational videos. It supports a streaming function that allows you to start watching videos almost as soon as they begin downloading from the internet.
Play Store
Serves as the official app store for the Android operating system, allowing users to browse and download applications and games. Applications are either free of charge or at a cost.
In Play Store, search for the app you need, download it and then follow the installation guide to install the app. You can also uninstall, update an app, and manage your downloads.
A web browser with which you can surf the internet.
Your bookmarks, browsing history, and settings across all devices on which the browser is installed can be synchronised with your Google account.
Files
Files displays all data stored on the phone, such as applications, media files downloaded from Google Play Store, YouTube or other locations; Videos, pictures or audios you have captured; other data transferred via Bluetooth, USB cable, etc.
Find Device
Find Device helps you to find your lost device, wipe lost device data remotely, and perform a host of other security functions.
Keep Notes
Keep Notes allows you to create, manage, and access your notes effortlessly. Capture your ideas, to-do lists, and important reminders with ease.
4 Settings

To go to Settings, touch from the Home screen.
You can also swipe down from the right side of the status bar to open the Quick settings panel and touch the Settings icon.
4.1 My device
View specifications for your phone, including the device software version, Android OS version, CPU type, camera, and storage.
You can also view legal information, build number, status and other specs.
4.2 Wi-Fi
You can connect to the internet when your phone is within range of a wireless network. Wi-Fi can be used on your phone even without a SIM card inserted.
To turn Wi-Fi on and connect to a wireless network
- Touch Settings > Wi-Fi.
- Turn on
- Once Wi-Fi is turned on, detected Wi-Fi networks are listed.
- Touch a Wi-Fi network to connect to it. If the network you selected is secured, you are required to enter a password or other credentials (you should contact the network operator for details). When finished, touch Connect.
To add a Wi-Fi network
When Wi-Fi is on, you can add new Wi-Fi networks according to your preference.
- Touch Settings > Wi-Fi > Add network.
- Enter the name of the network and any required network information.
- Touch Connect.
To forget a Wi-Fi network
The following steps prevent automatic connection to networks which you no longer wish to use.
- Turn on Wi-Fi, if it's not already on.
- On the Wi-Fi screen, touch the name of the saved network.
- Touch Forget in the dialog that opens.
4.3 Bluetooth
Bluetooth is a short-range wireless communication technology that you can use to exchange data, or connect to other Bluetooth devices for various uses.
To turn on Bluetooth
- Touch Settings > Bluetooth.
- Turn on
Your device name will appear on screen.
To rename your device
- Touch Settings > Bluetooth.
- Touch Device name.
- Enter a name, and touch Rename to confirm.
To pair/connect your phone with a Bluetooth device
To exchange data with another device, you need to turn Bluetooth on and pair your phone with the Bluetooth device with which you want to exchange data.
- Touch Settings > Bluetooth.
- Touch a Bluetooth device you want to pair your phone with in the list.
- In the dialog that pops up, touch Pair to confirm.
- If the pairing is successful, your phone will be connected to the device.
To unpair from a Bluetooth device
- Touch the icon beside the device you want to unpair from.
- Touch Forget in the dialog that opens, and then touch Forget device to confirm.
4.4 Network & internet
Manage your mobile connectivity effortlessly. View detailed SIM card information and set up eSIM profiles directly from your phone's menu for flexible network configurations.
4.5 Connections
Aeroplane mode
Turn on Aeroplane mode to simultaneously disable Wi-Fi and other wireless connections.
NFC
Turn on to enable NFC.
This function allows data exchange when the phone touches another device.
Cast
You can use Cast to display your device's screen on your TV, and display content like TV shows, movies, photos, games, and websites from supported apps.
USB
With a USB cable, you can charge your device, transfer files or photos (MTP/PTP) between your phone and a computer.
To connect your phone to the computer
- Use the USB cable that came with your phone to connect the phone to a USB port on your computer. You will receive a notification that the USB is connected.
- Open the Notification panel and choose the way in which you want to transfer files, or touch Settings > Connections > USB to select. By default, No data transfer is selected.

Before using MTP, make sure that the driver (Windows Media Player 11 or higher version) has been installed.
Printing
You can select your default print service and add service.
Hotspot & tethering
To share your phone's data connection via Wi-Fi, Bluetooth, and USB, or as a mobile hotspot, go to Settings > Connections > Hotspot & tethering to activate these functions.
To rename or secure your mobile hotspot
When your mobile hotspot is activated, you can rename your phone's Wi-Fi network (SSID) and secure its Wi-Fi network.
- Touch Settings > Connections > Hotspot & tethering > Mobile hotspot.
- Touch Hotspot name to rename the network SSID or set your network security.
- Touch OK.

The functions above may incur additional network charges from your network operator. Extra fees may also be charged in roaming areas.
Data usage
Check your mobile data consumption details and set a mobile data limit. Your mobile data connection will be disabled when the specified limit is reached. You can also choose a data usage cycle to view the statistics and related applications of data used by your phone.

Data usage is measured by your phone, and your operator may count differently.
VPN
Virtual private networks (VPNs) allow you to connect to the resources inside a secured local network from outside that network. VPNs are commonly deployed by corporations, schools, and other institutions so that their users can access local network resources when not inside that network, or when connected to a wireless network.
To add a VPN
- Touch Settings > Connections > VPN and then touch +.
- On the screen that opens, follow your network administrator's instructions to configure each component of the VPN settings.
- Touch SAVE.
The VPN is added to the list on the VPN settings screen.

Before adding a VPN, you should set a screen lock for your phone.
To connect to/disconnect from VPN
To connect to a VPN:
- Touch Settings > Connections > VPN.
- The VPNs you have added are listed. Touch the VPN you want to connect with.
- In the dialog that opens, enter any requested credentials and touch Connect.
To disconnect from a VPN:
- Touch the VPN you want to disconnect from. In the dialog that opens, touch Disconnect.
To edit/delete a VPN
To edit a VPN:
- Touch Settings > Connections > VPN.
- The VPNs you have added are listed. Touch the edit icon next to the VPN you want to edit. After editing, touch Save.
To delete a VPN:
- Touch the delete icon next to the selected VPN, then touch Forget to delete it.
Private DNS
Touch to select private DNS mode.
Chromebook
You can connect your phone to a Chromebook to instantly access your phone's data on the computer.
Quick Share
Share files with nearby devices.
Android Auto
Android Auto makes it possible to control many of the functions available in your phone via the car's centre display.
4.6 Home screen & lock screen
With this menu, set your home apps, choose your Favourite wallpapers and theme styles, etc.
4.7 NXTPAPER zone
NXTPAPER mode offers superior image quality with reduced glare and reflections.
Switch NXTPAPER key
Slide NXTPAPER key up/down to turn NXTPAPER mode on/off. When the NXTPAPER key is on, the selected mode can be directly entered.
NXTPAPER mode
Switch between three modes to optimize screen colours, brightness, and reduce eye strain for different activities.
Max Ink Mode
In this mode, the device will close all applications except those selected by the user, enabling an immersive, low-power reading experience within your dedicated library without distractions.
Ink Paper Mode
Paper-like display effect with black ink on white paper, which brings an immersive e-ink like reading experience.
Colour Paper Mode
Low saturation and soft colour display effect, bringing a paper-like experience to improve all-round eye comfort.
NXTPAPER mode switch sound
Touch to turn on/off NXTPAPER mode switch sound.
NXTPAPER key
If you activate Enter immediately, the selected NXTPAPER mode will be directly entered when the NXTPAPER key is on.
Eye care
Eye Care allows for alerts to appear if the device detects unhealthy use habits. Enable an alert to Rest your eyes during continuous screen time and specify the rest period, and if the device detects when your eyes are too close to the screen. You can receive this alert as a notification in the status bar (Alert mode: Weak), or as a full-screen alert that interrupts app use (Alert mode: Strong).
4.8 Display
Brightness level
Adjust screen brightness manually.
Adaptive brightness
When enabled, optimizes screen brightness for the light available in your environment.
Darker display mode
In a low-light environment, turn on darker display mode to achieve lower screen brightness.
Mode
Select Light mode or Dark mode to adapt to different preferences and environments.
Eye comfort mode
Eye comfort mode can effectively reduce blue light radiation and adjust the color temperature to relieve eye fatigue. You can also create a custom schedule to turn it on.
Reading mode
Optimize the screen display to make the reading experience as comfortable as physical books.
NXTVISION
Image enhancement
Enhance image contrast automatically, sharpness and dark details.
Video enhancement
Enhance the color, contrast and depth of detail of video to bring a cinema-grade visual experience.
Game enhancement
Improve the shadow detail and enhance overall gaming graphics.
Colour mode & temperature
Change the display gamut to vivid, natural or advanced based on content.
Sleep
Set screen timeout.
Refresh rate
Select the refresh rate of the screen. When a high refresh rate is set, the screen will scroll more smoothly. When you select a standard refresh rate, you can use the battery longer.
High brightness mode
This feature enhances screen visibility in bright environments, such as direct sunlight, by making the screen easier to read.
Display size and text
Adjust font size, display size and text manually.
Auto-rotate screen
Select whether the screen rotates automatically or not.
Status bar & dotch
Set the style of the status bar, select whether notification icons are folded and how the battery percentage is displayed.
Turn on the dotch for full screen apps to get the best experience on the phone.
Smart resolution
Smart Resolution enables the device to adjust screen resolution smartly to save power.
Screen saver
Choose a screen saver and use it while charging.
4.9 Sound & vibration
Use the Sound settings to configure many aspects of call ringtones, music, and other audio settings.
Phone ringtone
Set your incoming call ringtone.
Notification ringtone
Set the default sound for notifications.
Alarm ringtone
Set your alarm ringtone.
3D Boom Sound
Touch to activate 3D surround sound, which creates an immersive sound experience.
Live Caption
To detect speech on your device and automatically generate captions, turn this feature on by following the instructions on your device.
Do Not Disturb
If you do not want to be disturbed by your phone or information ringtones during work or rest, you can set the Do Not Disturb mode.
Swipe down from the right side of the status bar to access the Quick Settings panel and touch ☑ to turn on Do Not Disturb.
Vibration & haptics
Set vibration for calls, notifications, etc.
More sound settings
Set dial pad tones, screen locking sound, touch sounds, etc.
4.10 Notifications
In the Notifications menu, you can configure whether to block the notifications from this app, hide sensitive content, etc.
4.11 Smart Manager
Smart Manager ensures your phone is operating in top form by automatically scanning and optimizing data usage to preserve battery levels, manage storage and protect against security threats.
Restricting auto-launch apps can make the system run faster and extend battery life.
You can also do some options manually for further optimization.
4.12 Storage
Enter Settings > Storage to check the usage of storage space and free up more when necessary.
4.13 Apps
Touch to view details about the applications installed on your phone, to manage their data usage or force them to stop.
4.14 Advanced features
NXTURBO & RAM expansion
Boost your phone's performance with NXTURBO, optimizing speed and efficiency for smoother multitasking. RAM expansion allows you to allocate storage as virtual RAM, enhancing overall system performance for demanding apps and games. Customize settings to suit your usage needs.
Quick Gestures
To set some gestures for convenient use, such as 3-finger screenshot.
Power key
Quickly open camera
To quickly open camera, press the power button twice. It works from any screen.
Power button ends call
Press the power button to end a call.
Long press power key
To access digital assistant, long press the power key.
TCL AI
Text Assist
Once you activate this feature, in some apps, long press the text and drag it to the shortcut to quickly summarize, translate or rewrite, making your interaction with text more efficient and convenient.
Writing Assist
Turn on Gesture wake-up, then swipe up with three fingers on the screen to quickly let AI help you to write.
Smart Voice Memo
You can record meetings using Smart Voice Memo, which allows you to transcribe recordings into text and generate summaries and mind maps.
Real-time Subtitles
Support real-time audio to text conversion and multi-language translation. You can open the subtitle floating window in the control centre or sidebar.
Smart Translator
It supports text translation, dialogue translation, image translation and simultaneous interpretation, offering convenience and efficiency.
Screen Recorder
Set the video resolution, sound, etc. To use Screen Recorder, swipe down the Status bar to access the Quick Settings panel and touch the edit icon, then drag the Screen Recorder icon up to the quick settings panel, exit from edit screen and touch the new added icon.
Sidebar
Access your favourite apps, tools, and shortcuts instantly with the Sidebar. This convenient feature allows you to multitask efficiently by keeping essential functions within easy reach. Customise the Sidebar to suit your preferences and streamline your mobile experience.
4.15 Security & privacy
App security
Play Protect regularly checks your apps and device for harmful behavior. You'll be notified of any security risks found.
Device unlock
Screen lock
Select one method such as Swipe, Pattern, PIN or Password to unlock the screen.
Face & Fingerprint unlock
- Face unlock
Face unlock allows you to unlock your device with your facial data. Set it according to the on-screen steps.
Ensure that you are facing the phone screen when using face recognition.
- Fingerprint
Use your fingerprint to unlock the screen.
Set it according to the on-screen steps.
NOTE: You need to set a pattern, PIN, or password before using face & fingerprint unlock.
Theft Protection
Safeguard your device with advanced theft protection features. Remotely lock, track, or wipe your phone in case of loss or theft, ensuring your personal data remains secure.
Account security
Touch to check up Google account security.
Device finders
Find My Device helps you locate this device remotely. If you lose this device, it also helps you keep your data safe.
System and updates
Touch to check for security updates and update Google Play system.
Privacy controls
To protect your privacy, you can set an app to be allowed or forbidden access to your location, SMS, phone, etc. Also whether or not to show passwords, choose the activities and info that you want Google to save.
Privacy dashboard
Gain full visibility into your app permissions and data access with the Privacy Dashboard. Easily monitor and manage which apps are accessing your location, camera, microphone, and more. Take control of your privacy with clear insights and quick actions to protect your personal information.
More security and privacy
More security and privacy settings are available under this menu.
4.16 Location
Touch to set whether to allow an app to access your device's location. You can set to allow continual access, or only while the app is in use.
4.17 Safety & emergency
To protect yourself in emergency, you can set emergency information such as medical information, emergency contacts in advance. You can also use SOS or turn on location and wireless emergency alerts.
4.18 Accounts
Touch to add, remove, and manage your email and other supported accounts. You can also use these settings to control the options for how all applications send, receive and synchronize data; i.e. if this is done automatically, according to a schedule for each app, or not at all.
Touch Add account to add an account for the selected app.
4.19 Digital Wellbeing and parental controls
In this menu you can find how much time you have spent on the phone and even on each app. You can customise the time limit for using the phone to ensure a healthy and balanced life.
In addition, parents are able to restrict their children's usage time to manage their browsing habits.
4.20 Google
Touch to configure your Google account and service settings.
4.21 Accessibility (1)
Accessibility Menu
The Accessibility Menu offers quick access to frequently used accessibility features, such as quick settings adjustments for display brightness or volume, take screenshots, etc.
Select to Speak
Once this feature is activated, as you select each item on the screen, the device provides spoken feedback, describing aloud what appears.
Switch Access
Switch Access enables you to control your device if it is difficult to directly interact with the touch screen. A switch can be externally connected to your device, like a keyboard or large button.
TalkBack
TalkBack is a screen reader that provides spoken feedback to help you navigate your device. With TalkBack, you can interact with your phone entirely by touch, as it describes each element you tap and guides you through your actions, so that you can use your device without looking at the screen.
Display size and text
Adjust the display size and text settings to customize the size of on-screen elements to suit your visual preferences and needs.
Colour and motion
The Colour and motion settings allow you to modify how colors are displayed on your screen and control visual animations. You can choose from various color filters to enhance color perception, reduce eye strain, or accommodate color blindness. Additionally, you can disable unnecessary animations for a smoother visual experience.
Extra dim
Extra dim lowers the screen brightness beyond the normal minimum level, providing a softer display for use in low-light environments or for users who are sensitive to bright screens. This feature helps reduce eye fatigue and makes it more comfortable to use your phone in the dark.
Magnification
Magnification lets you zoom in on specific areas of your screen. You can activate magnification using gestures or the Accessibility Menu. Once enabled, you can magnify text, images, and other content to see details more clearly, which is particularly helpful for users with low vision.
Timing controls
Timing controls allow you to adjust the timing of system feedback, such as button presses or keyboard responses, to better suit your needs, especially if you require more time to interact with on-screen elements.
System controls
System controls provides alternative ways to control system settings, such as navigation mode, power button ends call, and Auto-rotate screen.
Vibration & haptics
You can set the vibration for notifications, calls, touch interactions, and so on, or choose to disable vibrations altogether if you prefer.
Live caption
Live caption automatically generates captions for audio content, such as calls, videos, or podcasts. This feature makes audio content more accessible for users with hearing impairments or those who prefer to read along while listening.
Caption preference
Caption preference allows you to customize caption size and style to make the captions more readable and visually appealing according to your preferences.
Audio description
Audio description provides spoken descriptions of the visual content in videos, movies, and other media, making visual media more accessible and enjoyable for users with visual impairments.
Flash notification
Uses your phone's camera flash or screen flash to alert you of incoming calls, messages, and other notifications. When enabled, the flash will blink whenever a new notification arrives, providing a visual cue that can be especially useful for users with hearing impairments or in noisy environments.
Hearing devices
The Hearing devices section allows you to connect and manage compatible hearing aids or other audio assistive devices with your phone. Improves audio quality and accessibility for users with hearing aids.
Audio adjustment
Turn on/off mono audio and adjust the balance between left and right audio channels to make audio content clearer and more comfortable to listen to.
Accessibility shortcuts
Accessibility shortcuts provide quick ways to enable or disable specific accessibility features.
Text-to-speech output
Text-to-speech output converts written text into spoken words, allowing you to customize the speech rate, pitch, and language for the function. This feature benefits users who prefer auditory feedback or have difficulty reading.
4.22 System
System Update
If you want to update the system, touch Check for updates (refer to "5 Making the most of your phone > FOTA upgrade").
Update apps
Check app update information.
Navigation mode
Select your favorite navigation button layout.
Languages
Touch to configure language settings, voice input settings, etc.
Keyboard
Touch to configure the on-screen keyboard, pointer speed, etc.
Date & time
Use Date & time settings to customise your preferences for how date and time are displayed.
Backup
Select and confirm to back up your phone's settings and other application data to Google servers. If you replace your phone, the settings and data you've backed up will be restored onto the new phone when you sign in with your Google account.
Multiple users
Allow multiple users and share your device by adding new users. Each user has a personal space on your device for custom Home screens, accounts, apps, settings and more.
Reset options
Touch to reset all network settings and app preferences, you won't lose your data with these settings.
If Erase all data (factory reset) is selected, all data in your phone's internal storage will be erased, please back up your data before reset.
Regulatory & safety
Touch to view product information such as Product model, Manufacturer address, IMEI, CU reference, Bluetooth Design Number, etc.
User Experience Improvement Programme
Touch to join the User Experience Improvement Program so we can continue to improve our product design and overall user experience.
5 Making the most of your phone
FOTA upgrade
Use the FOTA (Firmware Over The Air) upgrade to update your phone's software.
To access updates, from the app list, touch Settings > System > System Update. Turn on data connection or Wi-Fi before searching for updates.
With Wi-Fi turned on, the system is able to discover if a new firmware version is available and if so, begin to download and install it automatically.
If Settings > System > System Update > ▪ > Update settings > Automatically update is turned off, a pop-up dialog will ask if you want to download a new firmware version that the phone has discovered, or if you want to ignore it.
During FOTA downloading or updating, to avoid errors in locating the correct update packages, do not change your default storage location.
6 Troubleshooting
Before contacting the service center, here are some instructions to help you troubleshoot your device:
- For optimal operation, fully charge the battery.
- To improve the phone's performance, remove unnecessary files or apps on your phone.
- Update your phone's software via Settings > System > System Update.
- Reset your phone via Settings > System > Reset options > Erase all data (factory reset). All your phone data will be lost permanently. It is strongly advised to fully back up your phone data before resetting.
and carry out the following checks:
My phone can't be switched on or is frozen
- When the phone can't be switched on, charge for at least 20 minutes to ensure the minimum battery power needed. Then switch it on again.
- When the phone falls into a loop during power-on animation and the user interface can't be accessed, press and hold the Power key to reset. This eliminates any abnormal OS booting issues caused by third-party applications.
My phone has not responded for several minutes
- If your phone doesn't respond, turn off your phone by pressing and holding the Power key until it turns off and then restart it again.
- If it still doesn't work, reset the phone.
My phone turns off by itself
- Check that your screen is locked when you are not using your phone, and make sure that the Power key is not accidentally pressed while the screen is unlocked.
- Check the battery charge level.
- If it still doesn't work, reset the phone or update software.
- If the issue occurs while using a certain third-party app, make sure the app is compatible with your device and Android version. Try uninstalling the third-party app.
My phone can't charge properly
- Make sure that you are using the charger it meets all applicable standards.
- Make sure that your battery is not completely discharged; if the battery power has been empty for a long time, it may take around 20 minutes to display the battery charging indicator on the screen.
- Make sure that charging is carried out under normal conditions 0° C ( 32° F) to 45° C ( 113° F).
- When abroad, check that the voltage input is compatible.
My phone can't connect to a network or "No service" is displayed
- Check your phone's internet connection settings.
- Make sure that you are in a place with network coverage.
- Try connecting to the network by moving to another physical location.
- Verify the network coverage with your operator.
- Check with your operator that your SIM card is valid.
- Try connecting at a later time if the network is overloaded.
- Try to turn on "Aeroplane mode" for a few seconds, then turn Aeroplane mode off.
Invalid SIM card
- Make sure that the SIM card has been correctly inserted.
- Make sure that the chip on your SIM card is not damaged.
- Make sure that the service of your SIM card is available.
My phone can't make outgoing calls
- Make sure that you have dialed a valid number and have touched Call.
- For international calls, check the country and area codes.
- Make sure that your phone is connected to a network, and the network is not overloaded or unavailable.
- Check your subscription status with your operator (credit, SIM card valid, etc.).
- Make sure that you have not barred outgoing calls.
- Make sure that your phone is not in Aeroplane mode.
My phone can't receive incoming calls
- Make sure that your phone is switched on and connected to a network (check for overloaded or unavailable network).
- Check your subscription status with your operator (credit, SIM card valid, etc.).
- Make sure that you have not forwarded incoming calls.
- Make sure that you have not barred certain calls.
- Make sure that your phone is not in Aeroplane mode.
The caller's name/number doesn't appear when a call is received
- Check that you have subscribed to this service with your operator.
- Your caller may have concealed his name or number.
I can't find my contacts
- Make sure that your SIM card is not broken.
- Make sure that your SIM card is inserted properly.
The sound quality of the calls is poor
- Adjust the volume during a call by pressing the Volume key.
- Check the network strength. Move to a location with stronger signal strength.
- Make sure that the receiver, connector and speaker on your phone are clean.
I can't use the features described in the manual
- Check with your operator to make sure that your subscription includes this service.
- Make sure that this feature doesn't require a TCL accessory.
When I select a number from my contacts, the number can't be dialed
- Make sure that you have correctly recorded the number in your contacts.
- Make sure that you have selected the country code when calling an international number.
I can't add a contact
- Make sure that your SIM card contacts are not full; delete some contacts or save the contacts to the phone.
My callers can't leave messages on my voicemail
- Contact your network operator to check service availability.
I can't access my voicemail
- Make sure that your operator's voicemail number is correctly entered in Voicemail number.
- Try later if the network is busy.
I can't send and receive MMS
- Check your phone storage as it might be full.
- Contact your network operator to check service availability and MMS parameters.
- Verify the server centre number or your MMS profile with your operator.
- The server centre may be swamped. Try again later.
SIM card PIN locked
- Contact your network operator to obtain the PUK (Personal Unblocking Key) code.
I can't connect my phone to my computer
- Check to make sure the USB port is not broken. If it's not working, try another USB port on your computer.
- Make sure USB drivers are properly installed.
- If you are using a Windows computer, make sure it supports MTP mode. If you are using a Mac, make sure to install Android File Transfer from www.android.com/filetransfer/.
I can't download new files
- Make sure that there is sufficient phone storage space for your download.
- Check your subscription status with your operator.
The phone can't be detected by others via Bluetooth
- Make sure that Bluetooth is turned on and your phone is visible to other users.
- Make sure that the two phones are within Bluetooth's detection range.
The battery drains too fast
- Make sure that you follow the complete charge time (minimum 120 minutes).
- After a partial charge, the battery level indicator may not be exact. Wait for at least 20 minutes after removing the charger to obtain an exact indication.
- Adjust the brightness of screen as appropriate.
- Extend the email auto-check interval for as long as possible.
- Update news and weather information on manual demand, or increase their auto-check interval.
- Exit background-running applications if they are not being used for extended periods of time.
- Turn off Bluetooth, Wi-Fi, or GPS when not in use.
The phone becomes warm following prolonged calls, game playing, internet surfing or running other complex applications
- This heating is a normal consequence of the CPU handling excessive data. Ending the above actions will make your phone return to normal temperature.
After a factory data reset is performed, I can't use my phone without entering Google account credentials
- After a reset is performed, you must enter the original Google account credentials that were used on this phone.
- If you don't remember your Google account credentials, complete Google account recovery procedures.
- If you still cannot access your phone, apply to the authorized repair centre, but remember that it will not be regarded as a warranty case.
I forgot some passwords/codes/keys on my phone
- Perform a factory data reset.
- If you still cannot access your phone, take it to an authorized repair center, but note that this will not be considered a warranty case.
No response when touching the touchscreen
- Check if the screen is damaged. If so, back up your data and take your device and proof of purchase to our repair center for professional technical assistance.
- If the issue occurs while using a third-party app, ensure the app is compatible with your device and Android version. Try uninstalling the third-party app.
- Check if the issue occurs during charging. If so, we recommend using the official charger and data cable.
(Note: Voltage instability from non-standard chargers and data cables may cause the touchscreen to become unresponsive).
- Ensure the device is used in an environment that is neither too hot nor too cold. The standard operating temperature for the capacitive touchscreen is -10°C to 60°C. Extremely high or low temperatures can cause the touchscreen to become unresponsive.
- If a screen protector is applied, check if the touchscreen works after removing it.
- Make sure there are no stains, such as water or sweat, on the touchscreen. If there are, wipe the screen and try again.
- If the issue persists, reset the phone or update the software.
Cannot turn on camera flash mode
- Charge your device until the battery level is at least 30%. The camera flash cannot be used when the battery is low.
- Clear the cache of the Camera app.
To clear an app's cache: go to the main menu, select Settings > Apps > See all apps > Camera > Storage & cache, then select Clear storage and Clear cache.
- Drag down the quick settings bar in any interface, touch the flashlight icon to check whether the flash on your device works.
- Check whether the camera is set to the special shooting mode. In order to achieve a certain effect, the program will prohibit the use of the flash. Please revert to normal camera shooting mode.
How to back up my device data
- Go to Settings > System > Backup (refer to "4.22 System > Backup")
7 Specifications
Platform:
• MediaTek Dimensity 7400
OS:
- Android 15
Memory (1):
- 12+256GB
- 12+512GB
Dimensions (LxWxT):
• 174.45 * 81.23 * 7.57 mm
Weight:
• 227g
Display:
• 7.2" FHD+ (1080x2340), 120Hz
Network:
• 2G GSM: 850/900/1800/1900 • 3G-WCDMA: B1/B2/B4/B5/B8 • 4G-FDD LTE: B1/B2/B3/B4/B5/B7/B8/B12/B13/B17/B18/B19/B20/B26/B28/B32/B66 • 4G-TDD LTE: B38/B39/B40/B41/B42 • 5G NSA: n1/n3/n5/n7/n8/n20/n26/n28/n38/n40/n41/n77/n78 • 5G SA: n1/n3/n5/n7/n8/n20/n26/n28/n38/n40/n41/n66/n75/n77/n78
Connectivity:
- Bluetooth 5.4
(1) Depending on the device you purchased.
• 802.11 a/b/g/n/ac/ax WiFi 6, Wi-Fi 6e - Type C, simulate audio jack
Camera:
- Rear Camera: 50M (1.0um OIS) +50M 3X Tel (OIS) + 8UW
- Front camera: 32M
Battery (1):
• Capacity: 5200mAh
Sensors:
• G-Sensor (accelerometer) - E-compass • P sensor (ultrasonic wave sensor) - L sensor (light sensor, supports RGB sensor) - Gyro - Hall sensor - Barometer: Compatible
Note: Specifications are subject to change without prior notice.
(1) The original battery has undergone rigorous safety inspections to meet qualification standards. The use of non-original batteries may be dangerous.
8 ECO design technical information
Cobalt in the battery:
• x < 2 g
Tantalum in capacitors:
• x < 0.01 g
Neodymium in loud speakers, vibration motors, and other magnets:
• x > 0.2 g
Gold in all components:
• x < 0.02 g
Recyclability rate Rcyc:
• 82.9%
The indicative percentage of recycled content for the product or a part thereof:
- not known
Ingress protection rating:
• IP68
Minimum battery endurance in cycles (number of cycles):
• 1000
9 Accessories
Standard accessories (Plastic-free packaging)
- Type-C 2.0 Cable
- SIM Card PIN
- Quick Start Guide
- Wrap Sticker
- Phone Case
Optional accessories
- Flip cover
- Flip cover wrap sticker
- Stylus case
- EMR stylus
- Charger

- Accessories may vary by countries and operators.
- Only use the TCL batteries and accessories included with your device.
10 Licences

Bluetooth SIG, Inc. licensed and certificated TCL T951K Bluetooth Design Number Q364697

Wi-Fi Alliance certificated
INSPIRE GREATNESS
- TCL NXTPAPER 60 ULTRA
- NOTE
- HELP
- CONSULTING FAQ
- FINDING YOUR SERIAL NUMBER OR IMEI
- OBTAINING WARRANTY SERVICE
- VIEWING LEGAL INFORMATION
- CYBERSECURITY REQUIREMENTS
- VIEWING INFORMATION ABOUT ENERGY LABELLING
- TABLE OF CONTENTS
- BASICS
- MULTIMEDIA APPLICATIONS
- APPS AND FEATURES
- SETTINGS
- DEVICE OVERVIEW
- POWER KEY/FINGERPRINT KEY
- VOLUME KEYS
- NXTPAPER KEY
- ACCESSIBILITY (1)
- GETTING STARTED
- SETTING UP
- INSERTING OR REMOVING THE SIM CARD
- CHARGING THE BATTERY
- POWERING ON YOUR PHONE
- POWERING OFF YOUR PHONE
- HOME SCREEN
- STATUS BAR
- SEARCH BAR
- FAVOURITE TRAY APPLICATIONS
- USING THE TOUCHSCREEN
- TOUCH
- TOUCH AND HOLD
- DRAG
- SLIDE/SWIPE
- FLICK
- ROTATE
- NOTIFICATION PANEL
- QUICK SETTINGS PANEL
- LOCK/UNLOCK YOUR SCREEN
- TO LOCK THE PHONE SCREEN
- TO UNLOCK THE PHONE SCREEN
- ENTER A PASSWORD TO UNLOCK THE SCREEN
- USE PATTERN UNLOCK
- USE FACE UNLOCK
- USE FINGERPRINT UNLOCK
- PERSONALIZING YOUR HOME SCREEN
- ADD
- REPOSITION
- REMOVE
- CREATE FOLDERS
- WALLPAPER CUSTOMISATION
- WIDGETS AND RECENTLY USED APPLICATIONS
- CONSULT WIDGETS
- CONSULT RECENTLY USED APPLICATIONS
- VOLUME ADJUSTMENT
- TEXT INPUT
- USING THE ONSCREEN KEYBOARD
- ONSCREEN KEYBOARD SETTINGS
- ADJUST THE ONSCREEN KEYBOARD ORIENTATION
- GBOARD
- TEXT EDITING
- YOU CAN ALSO INSERT NEW TEXTS IF PREFERRED
- CAMERA
- LAUNCH CAMERA
- FROM THE HOME SCREEN
- FROM THE LOCK SCREEN
- USING A SHORTCUT KEY
- TO TAKE A PHOTO
- TO TAKE A VIDEO
- FURTHER OPERATIONS WHEN VIEWING A PHOTO/VIDEO YOU HAVE TAKEN
- MODES AND SETTINGS
- MODES
- PHOTOS
- WORKING WITH PICTURES
- PHONE
- MAKING A CALL
- INTERNATIONAL CALL
- EMERGENCY CALL
- ANSWERING OR REJECTING A CALL
- CALLING YOUR VOICEMAIL
- DURING A CALL
- MANAGING MULTIPLE CALLS
- SWAP CALLS
- CONFERENCE CALLS (1)
- CALL SETTINGS
- CALL LOG
- CONTACTS
- CONSULT YOUR CONTACTS
- ADDING A CONTACT
- ADD TO/REMOVE FROM FAVOURITES
- EDITING YOUR CONTACTS
- USING THE QUICK CONTACT PANEL
- SHARING CONTACTS
- ACCOUNTS
- AUTO-SYNC
- MESSAGES
- WRITING A NEW MESSAGE
- SENDING A TEXT MESSAGE
- SENDING A MULTIMEDIA MESSAGE
- MANAGE MESSAGES
- SWITCH PHONE
- CLOCK
- ALARM
- TCL APPS
- SUPPORT CENTRE
- OTHER APPLICATIONS (1)
- GOOGLE APPLICATIONS (1)
- GMAIL
- MAPS
- MEET
- YOUTUBE
- PLAY STORE
- FILES
- FIND DEVICE
- KEEP NOTES
- MY DEVICE
- WI-FI
- TO TURN WI-FI ON AND CONNECT TO A WIRELESS NETWORK
- TO ADD A WI-FI NETWORK
- TO FORGET A WI-FI NETWORK
- BLUETOOTH
- TO TURN ON BLUETOOTH
- TO RENAME YOUR DEVICE
- TO PAIR/CONNECT YOUR PHONE WITH A BLUETOOTH DEVICE
- TO UNPAIR FROM A BLUETOOTH DEVICE
- NETWORK & INTERNET
- CONNECTIONS
- AEROPLANE MODE
- NFC
- CAST
- USB
- TO CONNECT YOUR PHONE TO THE COMPUTER
- PRINTING
- HOTSPOT & TETHERING
- TO RENAME OR SECURE YOUR MOBILE HOTSPOT
- DATA USAGE
- VPN
- TO ADD A VPN
- TO CONNECT TO/DISCONNECT FROM VPN
- TO EDIT/DELETE A VPN
- PRIVATE DNS
- CHROMEBOOK
- QUICK SHARE
- ANDROID AUTO
- HOME SCREEN & LOCK SCREEN
- NXTPAPER ZONE
- SWITCH NXTPAPER KEY
- NXTPAPER MODE
- MAX INK MODE
- INK PAPER MODE
- COLOUR PAPER MODE
- NXTPAPER MODE SWITCH SOUND
- EYE CARE
- DISPLAY
- BRIGHTNESS LEVEL
- ADAPTIVE BRIGHTNESS
- DARKER DISPLAY MODE
- MODE
- EYE COMFORT MODE
- READING MODE
- NXTVISION
- AUTO-ROTATE SCREEN
- STATUS BAR & DOTCH
- SMART RESOLUTION
- SCREEN SAVER
- SOUND & VIBRATION
- PHONE RINGTONE
- NOTIFICATION RINGTONE
- ALARM RINGTONE
- D BOOM SOUND
- LIVE CAPTION
- DO NOT DISTURB
- VIBRATION & HAPTICS
- MORE SOUND SETTINGS
- NOTIFICATIONS
- SMART MANAGER
- STORAGE
- APPS
- ADVANCED FEATURES
- NXTURBO & RAM EXPANSION
- QUICK GESTURES
- POWER KEY
- QUICKLY OPEN CAMERA
- POWER BUTTON ENDS CALL
- LONG PRESS POWER KEY
- TCL AI
- TEXT ASSIST
- WRITING ASSIST
- SMART VOICE MEMO
- REAL-TIME SUBTITLES
- SMART TRANSLATOR
- SCREEN RECORDER
- SIDEBAR
- SECURITY & PRIVACY
- APP SECURITY
- DEVICE UNLOCK
- SCREEN LOCK
- FACE & FINGERPRINT UNLOCK
- FACE UNLOCK
- FINGERPRINT
- THEFT PROTECTION
- ACCOUNT SECURITY
- DEVICE FINDERS
- SYSTEM AND UPDATES
- PRIVACY CONTROLS
- PRIVACY DASHBOARD
- MORE SECURITY AND PRIVACY
- LOCATION
- SAFETY & EMERGENCY
- DIGITAL WELLBEING AND PARENTAL CONTROLS
- ACCESSIBILITY MENU
- SELECT TO SPEAK
- SWITCH ACCESS
- TALKBACK
- DISPLAY SIZE AND TEXT
- COLOUR AND MOTION
- EXTRA DIM
- MAGNIFICATION
- TIMING CONTROLS
- SYSTEM CONTROLS
- CAPTION PREFERENCE
- AUDIO DESCRIPTION
- FLASH NOTIFICATION
- HEARING DEVICES
- AUDIO ADJUSTMENT
- ACCESSIBILITY SHORTCUTS
- TEXT-TO-SPEECH OUTPUT
- SYSTEM
- SYSTEM UPDATE
- UPDATE APPS
- NAVIGATION MODE
- LANGUAGES
- KEYBOARD
- DATE & TIME
- BACKUP
- MULTIPLE USERS
- RESET OPTIONS
- REGULATORY & SAFETY
- USER EXPERIENCE IMPROVEMENT PROGRAMME
- MAKING THE MOST OF YOUR PHONE
- FOTA UPGRADE
- TROUBLESHOOTING
- MY PHONE CAN'T BE SWITCHED ON OR IS FROZEN
- MY PHONE HAS NOT RESPONDED FOR SEVERAL MINUTES
- MY PHONE TURNS OFF BY ITSELF
- MY PHONE CAN'T CHARGE PROPERLY
- MY PHONE CAN'T CONNECT TO A NETWORK OR "NO SERVICE" IS DISPLAYED
- INVALID SIM CARD
- MY PHONE CAN'T MAKE OUTGOING CALLS
- MY PHONE CAN'T RECEIVE INCOMING CALLS
- THE CALLER'S NAME/NUMBER DOESN'T APPEAR WHEN A CALL IS RECEIVED
- I CAN'T FIND MY CONTACTS
- THE SOUND QUALITY OF THE CALLS IS POOR
- I CAN'T USE THE FEATURES DESCRIBED IN THE MANUAL
- WHEN I SELECT A NUMBER FROM MY CONTACTS, THE NUMBER CAN'T BE DIALED
- I CAN'T ADD A CONTACT
- MY CALLERS CAN'T LEAVE MESSAGES ON MY VOICEMAIL
- I CAN'T ACCESS MY VOICEMAIL
- I CAN'T SEND AND RECEIVE MMS
- SIM CARD PIN LOCKED
- I CAN'T CONNECT MY PHONE TO MY COMPUTER
- I CAN'T DOWNLOAD NEW FILES
- THE PHONE CAN'T BE DETECTED BY OTHERS VIA BLUETOOTH
- THE BATTERY DRAINS TOO FAST
- THE PHONE BECOMES WARM FOLLOWING PROLONGED CALLS, GAME PLAYING, INTERNET SURFING OR RUNNING OTHER COMPLEX APPLICATIONS
- AFTER A FACTORY DATA RESET IS PERFORMED, I CAN'T USE MY PHONE WITHOUT ENTERING GOOGLE ACCOUNT CREDENTIALS
- I FORGOT SOME PASSWORDS/CODES/KEYS ON MY PHONE
- NO RESPONSE WHEN TOUCHING THE TOUCHSCREEN
- CANNOT TURN ON CAMERA FLASH MODE
- HOW TO BACK UP MY DEVICE DATA
- SPECIFICATIONS
- PLATFORM
- OS
- MEMORY (1)
- DIMENSIONS (LXWXT)
- WEIGHT
- NETWORK
- CONNECTIVITY
- BATTERY (1)
- SENSORS
- ECO DESIGN TECHNICAL INFORMATION
- ACCESSORIES
- LICENCES
- INSPIRE GREATNESS
Brand : TCL
Model : NXTPAPER 60 Ultra
Category : Smartphone