HC 6 - Mixer Rane - Free user manual and instructions
Find the device manual for free HC 6 Rane in PDF.


| Product Type | Professional DJ Mixer |
| Model | HC 6 |
| Brand | Rane |
| Number of Channels | 6 |
| Frequency Response | 20 Hz - 20 kHz |
| Signal-to-Noise Ratio | > 90 dB |
| Total Harmonic Distortion | < 0.005% |
| Input Impedance | 10 kOhm (line) |
| Output Impedance | 100 Ohm (balanced) |
| Dimensions (W x D x H) | 19 x 10 x 3.5 inches (483 x 254 x 89 mm) |
| Weight | 10.5 lbs (4.8 kg) |
| Power Supply | 100-240 VAC, 50/60 Hz, 30W |
| Power Consumption | 30W |
| Main Functions | 6-channel mixing, 3-band EQ per channel, crossfader, cue system, balanced XLR outputs |
| Inputs | 6x RCA line, 2x phono, 1x microphone (XLR) |
| Outputs | 2x XLR balanced master, 1x RCA record out, 1x headphones (1/4") |
| Maintenance | Clean with a dry cloth; avoid liquids; check cables regularly |
| Safety Features | Grounding pin, fuse protection, ventilation slots |
| Spare Parts & Repairability | Contact Rane support for authorized service; fuses and knobs are user-replaceable |
| General Information | Designed for professional use; rack-mountable; includes power cord and manual |
Frequently Asked Questions - HC 6 Rane
User questions about HC 6 Rane
0 question about this device. Answer the ones you know or ask your own.
Ask a new question about this device
Download the instructions for your Mixer in PDF format for free! Find your manual HC 6 - Rane and take your electronic device back in hand. On this page are published all the documents necessary for the use of your device. HC 6 by Rane.
USER MANUAL HC 6 Rane
Okay, you're in a hurry. Well this section's just for you. It explains enough of the HC 6's workings to keep you out of trouble. It allows operation without reading the whole manual. Please read at least this section to ensure reasonable operation of the unit.
The HC 6 operates from either a common stereo or mono source, or from individual stereo sources. For a common stereo source, plug the left and right input plugs into the respective MASTER INPUTS jacks. The Inputs accept balanced or unbalanced sources. Just plug them in. This source is now routed to each of the six input Channels to drive all Outputs.
For a single mono source feeding all headphones, connect it to one of the MASTER INPUT jacks and engage the STEREO/MONO switch. Set the overall input level with the MASTER CONTROL, and use the CHANNEL LEVEL controls for individual headphone levels.
Use the separate stereo IN jacks when driving a pair of headphones with different program material than what is on the MASTER INPUTS. Connecting a plug into these jacks automatically disconnects that Channel from the Master Input program material.
Never connect anything except a Rane power supply to the thing that looks like a telephone jack on the rear of the unit. This is an AC input and requires special attention if you do not have a power supply exactly like the one originally packed with your unit. See the full explanation of the power supply requirements elsewhere in this manual.
HC 6 CONNECTION
When first connecting the HC 6 to other components, leave the power supply for last. This gives you a chance to make mistakes and correct them without damage.
- With the power switch in the off position, plug the power supply line cord into the appropriate AC power source indicated on the rear panel. Locate the power supply away from the HC 6 and other hum sensitive equipment.
- Plug the outputs from a mono or stereo source into the MASTER INPUTS. For unbalanced systems use a standard 1/4 " mono patch cord. For balanced operation, use a stereo 1/4 " TRS connector with pin 2 (+) wired to the Tip; pin 3 (−) wired to the Ring; and pin 1 (ground) wired to the Sleeve. Please consult Rane Note 110 (enclosed) for additional wiring arrangements.
-
When rack mounting the HC 6, you may wish to permanently wire the rear headphone Outputs to remote jack locations, such as in walls of a studio or other rooms. Use the front panel Outputs for local or control room monitoring.
-
You might also consider wiring the six direct stereo INs permanently to a patch bay or monitor mixer, but only if you do not plan to use the MASTER INPUTS as well.
Whenever a plug is inserted into any individual stereo IN, the MASTER INPUTS are bypassed for that particular Channel. So for maximum flexibility, it is suggested that only the MASTER INPUTS be permanently wired and that the direct stereo INs be patched as necessary during regular use. - The HC 6 may be installed into any rack which utilizes EIA standard mounting hole spaces. The front panel of the HC 6 is heavy gauge steel, which adequately supports the unit. For portable rack mounting, where extreme vibration and/or shock is anticipated, it is recommended that the rear of the HC 6, along with any other heavy product in the rack, be stabilized to prevent possible damage to the chassis should the rack be dropped, beamed up, or spindled.
FRONT PANEL DESCRIPTION

① POWER switch. Your basic, straightforward power switch. When the yellow LED is lit, the HC 6 is ready to go.
② Front panel PHONE Output jacks are in parallel with the rear panel stereo Output jacks. Use them to monitor any of the six Channels for level or mix adjustments, or for easy access when the HC 6 is rack mounted. Plugging into these front jacks does not disengage the rear Outputs.
③ Individual LEVEL controls set the volume for each set of headphones, regardless of whether they are driven from the MASTER INPUTS or from the direct stereo INs. When using the front and rear panel headphone jacks together, this control varies the level of each headphone simultaneously.
④ SIGNAL PRESENT indicators light (green) with any input signal above -20 dBu. See OPERATING INSTRUCTIONS (on page Manual-4) for additional details.
⑤ STEREO/MONO switch converts the MASTER INPUTS from stereo to mono so that a single input cable drives both sides of the headphones.
⑥ MASTER CONTROL sets the volume simultaneously to all headphones driven from the MASTER INPUTS. This does not alter the volume on any headphones driven from the direct stereo INs.

① MASTER INPUTS are automatic balanced/unbalanced Inputs, which accept either a stereo 1/4 " plug for balanced operation, or a mono 1/4 " plug for mono operation. You do nothing different when hooking up balanced or unbalanced lines. The HC 6 is one smart dude. He knows what you are doing so you better watch out.
② Direct stereo INPUTS allow each stage to be driven separately, from any source. Whenever a plug is inserted into one of these Inputs, the MASTER INPUTS are disconnected from that stage (and only that stage). I told you the dude be smart!
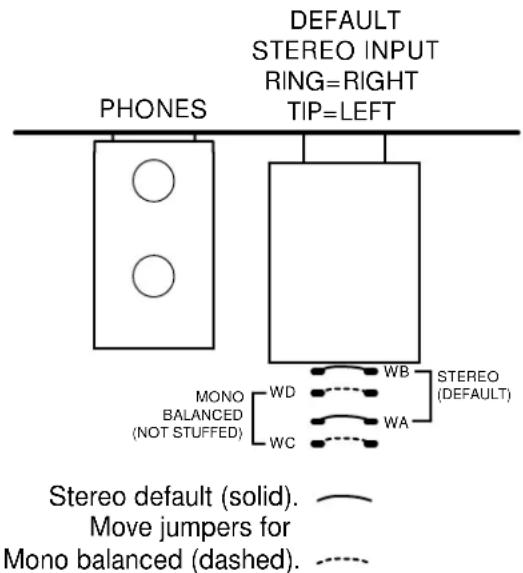
These are 1/4 " TRS (tip-ring-sleeve) Input jacks, each accepting both left and right channels. If you plug a regular mono TS (tip-sleeve) into this jack, you will only connect the left channel. If you want to feed this input with an unbalanced mono signal, use a TRS plug and wire the tip and ring together. When using balanced mono sources please consult the factory for the required modification. Hint: this can be accomplished by moving the internal jumpers by the input jacks as shown on the assembly diagram.
To build a cable that will transfer separate left and right cables to a single 1/4 " TRS, follow the diagram below, connecting all shields. RCA connectors can be substituted for the 1/4 " connectors.
③ Stereo headphone OUTPUTS allow any headphone with an impedance from 32 to 600 ohms. Then kick back and enjoy. (Lower and higher impedance headphones may be used; they just won't be very loud. Refer to RaneNote 100, "Understanding Headphone Power Requirements" for headphone loudness listings.)
④ Remote POWER supply input. The unit is supplied from the factory with a Model RS 1 remote power supply suitable for connection to this input jack. The power requirements of the unit call for an 18 volt AC center-tapped transformer only. This is not a telephone jack. Never use a power supply with your unit other than the one supplied or a replacement approved by Rane Corporation. Using any other type of supply may damage the unit and void the warranty.
⑤ Chassis ground point. A #6-32 screw used for chassis grounding purposes. See the CHASSIS GROUNDING note below.

Figure 1. Dual Mono to Stereo TRS Wye Cable. See ② Above, Direct Stereo INPUTS.
IMPORTANT NOTE
CHASSIS GROUNDING
Units with outboard power supplies do not ground the chassis through the line cord. Make sure that these units are grounded either to another chassis which is earth grounded, or directly to the grounding screw on an AC outlet cover by means of a wire connected to the chassis grounding screw.
OPERATING INSTRUCTIONS
PLUG IN
Once connected as described in the SYSTEM CONNECTION section on page Manual-2, the HC 6 is ready to drive any impedance headphones from 32 to 600 ohms. Plug your headphones into any of the six Outputs on the front or rear.
MASTER STEREO INPUTS
Apply a source program to the MASTER INPUTS and turn up the MASTER CONTROL until the green signal-present LEDs light up. Further adjustment of this control raises or lowers the volume level in all headphones simultaneously, i.e., all those being driven from the MASTER INPUTS. The MASTER CONTROL does not affect Channels driven from the direct stereo INs.
INDIVIDUAL LEVEL CONTROLS
These adjust the level in each set of headphones to the desired loudness. When using the direct stereo IN, only this control affects the volume in the headset—the MASTER CONTROL is bypassed.
DIRECT STEREO INPUTS
These allow completely independent operation of up to six different stereo programs. These Inputs are stereo only, and wired to accept unbalanced signals, using the tip=left, ring=right convention. Unbalanced mono sources require using a stereo TRS plug and shorting the tip and ring together.
When using balanced mono sources, internal jumpers must be moved. See the schematic below if you feel confident enough to solder. Jumpers are wired across WA and WB at the factory for stereo. Jumpers must be cut or moved to WC and WD locations for balanced mono operation. Each jack is jumpered separate, so any combination of input types is possible within a single HC 6.
Any Channel not directly driven is automatically driven from the MASTER INPUTS.
SIGNAL-PRESENT LEDS
These light up with any signal input above -20 dBu. They are located in the signal path after the MASTER INPUTS and before the individual LEVEL controls. This means that adjusting the MASTER CONTROL affects the SIG LEDs, while adjusting the individual LEVEL controls does not. When using a direct stereo IN, the LED responds to that Input only. This means these indicators aid in quickly identifying which stages are driven by the MASTER INPUTS and which by the direct stereo INs: Simply turn the MASTER CONTROL up and down and observe which LEDs respond. These are the Channels being driven by the MASTER INPUTS.
STEREO/MONO SWITCH
This serves the basic function of allowing both Left and Right channels of all headphones to be driven from a mono MASTER INPUT. In some instances a stereo program can be confusing for live monitoring purposes, due to extreme separation and the increased difficulty in perceiving several different volume levels. Using the STEREO/MONO switch converts the system to mono operation to better suit these particular monitoring needs.
FRONT PANEL OUTPUT JACKS
These jacks parallel the rear OUTPUTs, providing easy access patching into any Channel for cueing or additional monitoring. When using more than six sets of headphones at once, keep two things in mind:
A. There are still only six LEVEL controls. Additional headsets must double up with those already in use. To avoid intolerable volume differences to two listeners on the same Channel of the HC 6, use headphones of the same make and model.
B. The HC 6 has limited power output. The more headphones you connect to it, the less power there is available to each set, and the more strain on the HC 6. Blasting 10 or 12 sets of low impedance headphones is asking too much from the HC 6. To lessen the power drain from the HC 6, use only high impedance (100 ohms or greater) headphones when paralleling. Refer to the RaneNote “Understanding Headphone Power Requirements” (available from your dealer or the factory) for a listing of headphones and loudness levels.
Brand : Rane
Model : HC 6
Category : Mixer