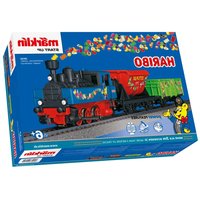
29132 - Model making Märklin - Free user manual and instructions
Find the device manual for free 29132 Märklin in PDF.


| Product type | Railway model |
| Brand | Märklin |
| Model | 29132 |
| Category | Model railroading |
| Scale | H0 (1:87) |
| Dimensions (L x W x H) | 30 x 15 x 10 cm |
| Weight | 0.5 kg |
| Power supply | DC 12V (via Märklin transformer) |
| Main functions | Motorized movement, front/rear lighting, coupler |
| Maintenance and cleaning | Clean with a dry cloth, avoid moisture |
| Safety | Do not disassemble or expose to water |
| Spare parts and repairability | Available from Märklin, professional repair recommended |
| General information | PDF manual available on notice-facile.com |
Frequently Asked Questions - 29132 Märklin
User questions about 29132 Märklin
0 question about this device. Answer the ones you know or ask your own.
Ask a new question about this device
Download the instructions for your Model making in PDF format for free! Find your manual 29132 - Märklin and take your electronic device back in hand. On this page are published all the documents necessary for the use of your device. 29132 by Märklin.
USER MANUAL 29132 Märklin
- Using the Product as Intended 9
- Safety Notes 9
3.Contents 9 - Technical Information 10
5Notes about Using this Model for the First Time 10 - Preparations 10
- Operating 12
- Locomotive Functions 13
- Information about Operating the Train 13
- Trouble Running the Train 13
- Cleaning and Maintenance 14
- Disposing 14
- Symbols and Their Meaning 14
- Warranty / Customer Service 14
- Service and maintenance 27
- Spare parts 30
Carefully read through the operating instructions before using the model for the first time. The current version of these operating instructions can be found at www.maerklin.de on the page for this product under „Downloads“. The operating instructions come with the product and must therefore be kept as well as passed on when giving the product to a third party.
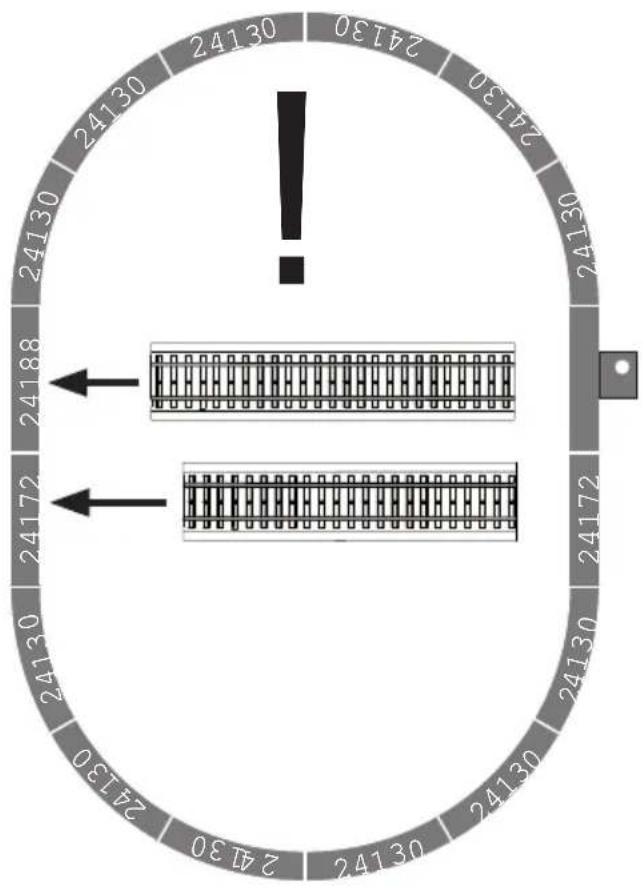
Gleisbild
6.4 IR-Controller
7. Inbetriebnahme
We are pleased that you have decided to purchase a product from the Märklin Company. With its 160+ year company history Märklin proves every day repeatedly that each of our individual products stands for tradition, quality, technical innovation, and successful market leadership. You will see that there are many arguments in favor of Märklin.
We hope you will have much pleasure and fun with your new Märklin product that we have manufactured for you with the greatest of care and passion.
Should you have comments and ideas, we would be happy to hear from you.
Your Märklin Team
1. Using the Product as Intended
This product is an H0 gauge (1:87 scale) model train for children ages 6 and above.
- This train can be operated on model railroad layouts equipped with Märklin C Track (see set contents).
• This train can be run on Märklin K-track.
2. Safety Notes
Carefully read the safety notes before using the model for the first time.
Switched power packs for toys are not suitable to be used as toys. The use of
■ switched power packs must always be done under the supervision of adults.
- Make sure you teach your children to use the switched power pack only in the manner described in the instructions.
- Make sure that you teach your children about the dangers of the household current system.
- Make sure you inspect the condition of the switched power pack and its connections to the wall outlet for damage at regular intervals (depending on how often the switched power pack is used to play with the train), at least once a week. This must be done with the switched power pack unplugged from the wall outlet. If you have the slightest suspicion that there is damage, the switched power pack may not be used again until it has been checked and repaired by the Märklin Repair Department).
- The toy shall only be used with a switching power supply for toys.
- The switched power pack may only be connected to a wall outlet with voltage that is the same as indicated on the specifications plate on the switched power pack.
- The switched power pack is designed for use in a dry area only.
- The switched power pack is not a toy. It is used to supply current to a model railroad layout.
- Never hold the switched power pack by its cord when carrying it.
• This product may only be used indoors. - Do not store this product in direct sunlight or exposed to extremes of temperature or to high humidity.
- This locomotive must never be supplied with power from more than one switched power pack.
- WARNING! Not suitable for children under 3 years. Sharp edges and points required for operation. Danger of choking due to detachable small parts that may be swallowed. Misuse of the switched mode power pack can cause an electrical shock.
- WARNING! Remove damaged cars and locomotive from the train and have them repaired. Defective cars and a defective locomotive must not be used any more.
- The LEDs in this item correspond to Laser Class 1 according to Standard EN 60825-1.
- The operating instructions are a component part of the product and must therefore be kept in a safe place as well as included with the product, if the latter is given to someone else.
- Only the 66201 switched mode power pack included with this starter set may be used.
- Maintenance, servicing, and repairs may only be done by adults.
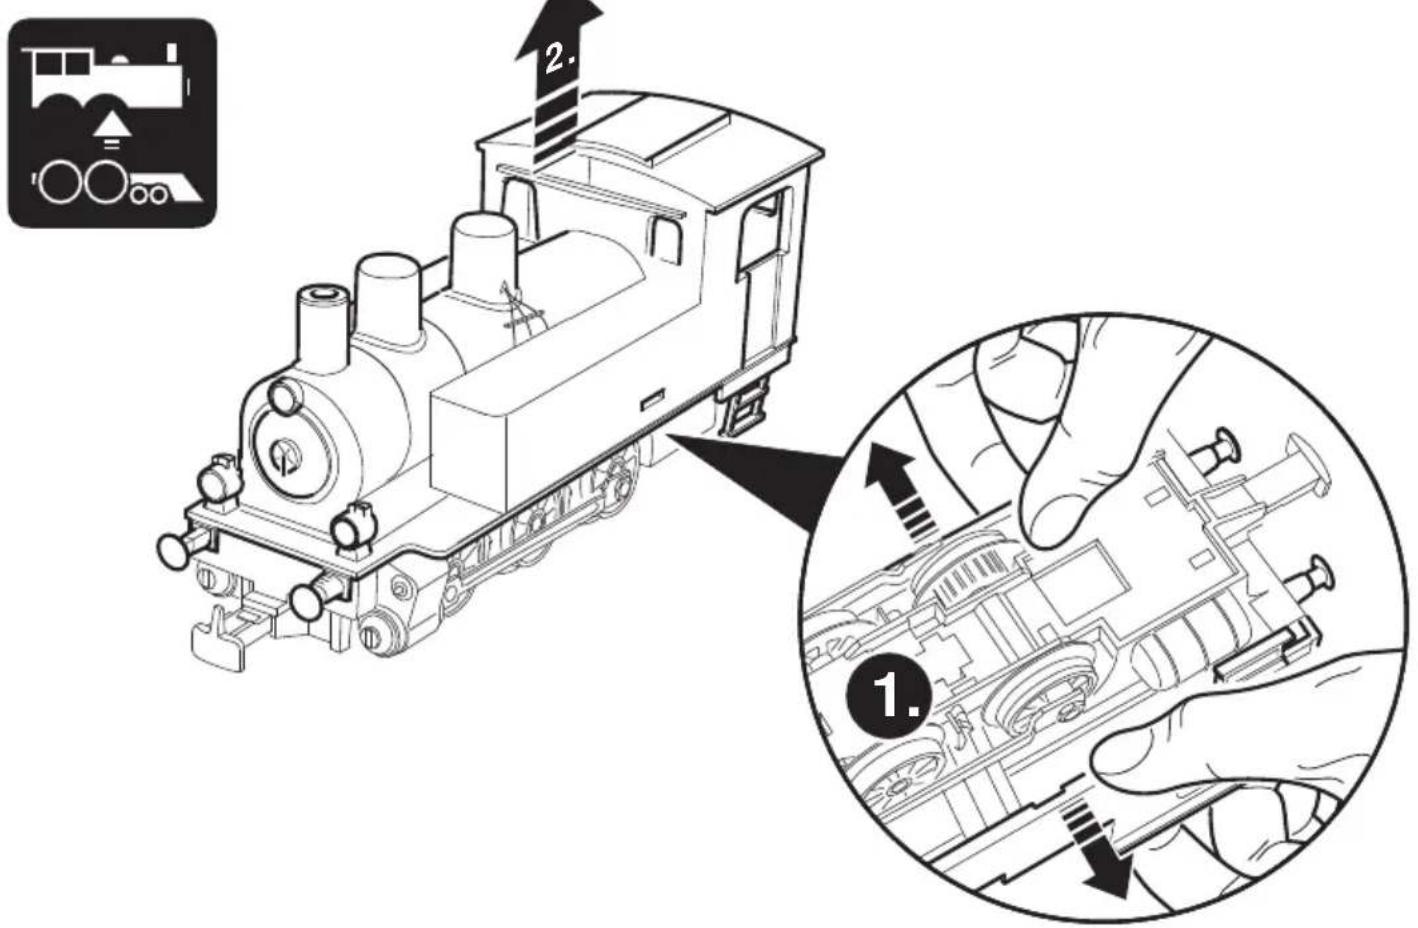
- The locomotive may be run only when it has the body on it.
- Please see your authorized Märklin dealer for repairs or spare parts.
2.1 Important Notes
3. Contents
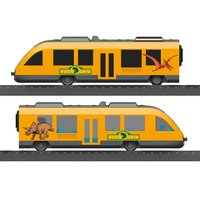
3-part train
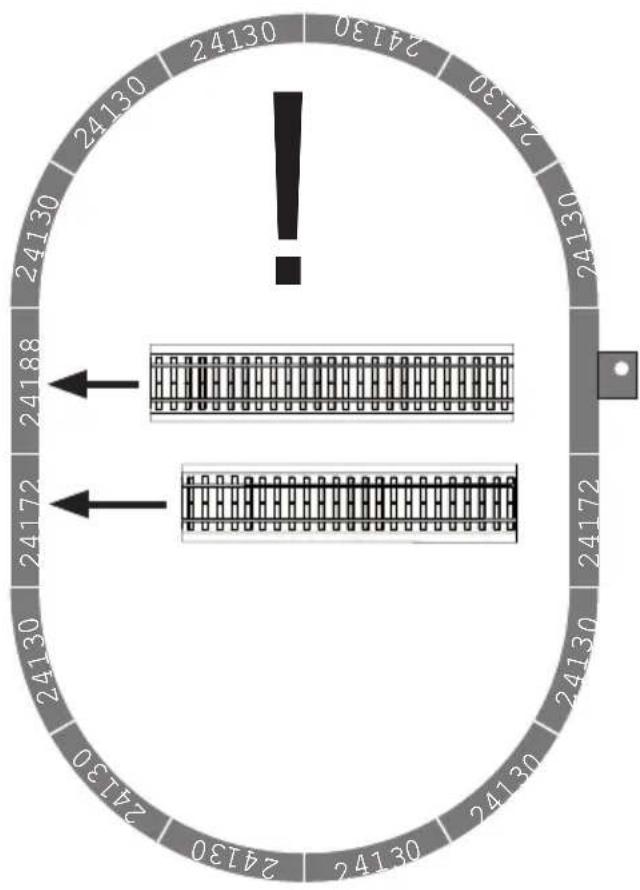
12 no. 24130 sections curved C Track
1 no. 24188 sections straight C Track 188 mm
1 Basistation C Track 188 mm
2 no. 24172 sections straight C Track 172 mm
1 no. 66201 switched power pack
1 IR Controller
2 type AAA/LR 03 1.5 volt batteries
Operating instructions D GB F NL
Operating instructions E I S DK
Warranty card
4. Technical Information
Switched power pack: input 230 volts AC output 18 volts DC/18 VA
Voltage supply train: max 22 volts DC Power consumption of train max 13 VA H0 Gauge (1:87 scale)
4.1 Overload Protection
A built-in overload protection protects the switched power pack from damage in the event of an overload or a short circuit. All lokomotives will be stopped. See also point 10.
5. Notes about Using this Model for the First Time
- The switched power pack may not be plugged into the wall outlet yet.
- Set up the layout as shown in Part 6.
6. Preparations
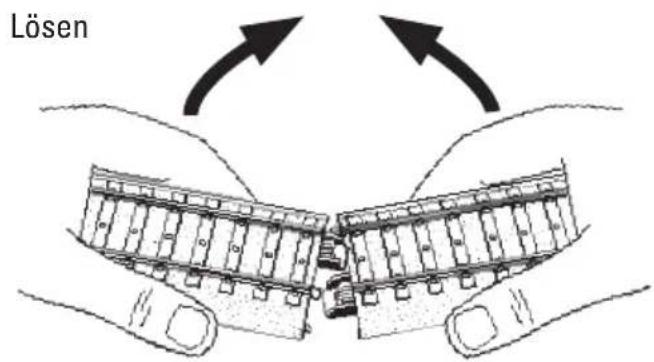
6.1 Joining Track Sections and Setting up Track
When setting up the track, please note the track numbers and the sequence for the track sections.
Putting track together

Taking
track apart

Layout

6.2 Switched Mode Power Pack • IR Controller • Base Station
1 - Switched mode power pack
2 - Feeder wires
3 - Base station with socket
4 - Lens
Base Station
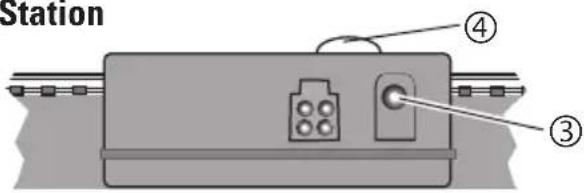
6.3 Connections for the Base Station
Important Information:

The connections for the Base Station may only be made to the switched mode power pack included with this starter set. Other switched mode power packs or transformers may not be used!
The Base Station requires the power pack as a source of power. Therefore, only the power pack (1) with the cable (2) may be plugged into the socket on the Base Station (3).

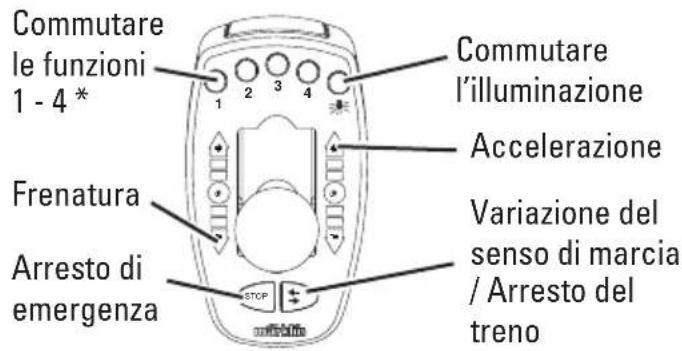
6.4 IR Controller
4 - Lens
5 – Function buttons
6 - Speed controller
7 – Changing direction / Train stop
8 - Light button
9 - Address selector switch

6.5 Operating the IR Control for the First Time
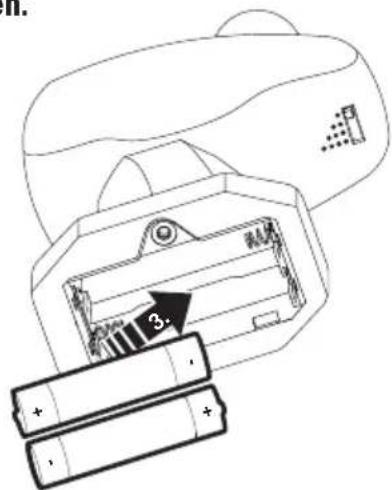
Before operating this controller for the first time, 2 type AAA batteries must be installed in the controller. Please see the following illustration.
Unscrew the battery holder and lift up the cover.

Install 2 type AAA (micro size) batteries as shown in the drawing.


Insert or change batteries only in pairs! Pay attention to polarity!
Notes about Batteries and Rechargeable Batteries
- Batteries should only be used and replaced by adults.
- Non-rechargeable batteries may not be charged up.
- Exhausted batteries are to be removed from the toy.
- Rechargeable batteries are to be removed from the toy before being charged!
- Rechargeable batteries should be charged up only under the supervision of adults.
- Inequality of battery types, or new and used batteries may not be used together.
- Batteries with the correct polarity insert.
- Contacts should not be shorted.
• Batteries do not belong in the garbage! - Every user in the European Union is legally responsible for disposing of batteries at a collection point in his community or at the dealer. The batteries are then passed on for environmentally friendly processing.
- Batteries containing dangerous materials are identified by these marks and chemical symbols (Cd = cadmium,
Hg = mercury, Pb = lead).
Please keep these instructions. They contain important information.
Put the cover for the battery holder back in place and screw it down.

7. Operating
7.1 Selecting an address:
(See Section 8 for the appropriate address for your locomotive.)
Correct address selected? (See section 8). When operating the IR Control, always line it up with the lens in the direction of the Base Station. Press the desired button.


* if the locomotive is designed for this
If no other commands are sent within 3 minutes of the last command, the base station shuts off the voltage in the track for safety reasons.
If the IR Control is activated again after that, the base station will turn itself on automatically.
If a short circuit occurs, the Base Station will shut off and will turn itself on again after the short circuit has been corrected.
7.2 Changing an Address:
If you have 2 locomotives with the same address, you can change the address for one locomotive as follows:
Unplug the transformer. Set the address switches to the desired address. Press the button „Change Direction“ Hold this button pressed down while the lens on the IR Control is pointed at shows to the receiver, and plug the transformer back into the wall outlet.
Release the button as soon the light comes on. The programming procedure is displayed when the light comes on or blinks. As soon as the light goes out, the programming is turned off. The locomotive can now be run with the new address.
8. Locomotive Functions
- Recognition of the mode of operation: automatic.
- Addresses that can be set: 1 - 255
- Address set at the factory: 78 ≧
• Name set at the factory: KLVM HARIBO
• ABV — Adjustable acceleration/braking delay. - Adjustable maximum speed.
- Setting the locomotive parameters (address, acceleration/braking delay, maximum speed): with the Control Unit, Mobile Station or Central Station.
8.1 Function Switch
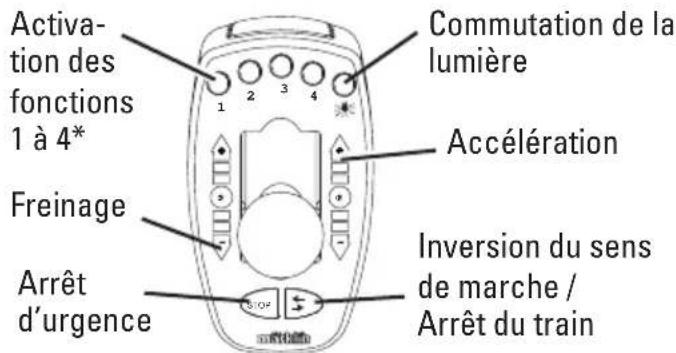
The IR Controller can activate 5 digital functions on the locomotives.
| Controllable Functions: |  |
| ABV, off Function 4 |
8.2 Controlling the Locomotive
Button STOP on the IR Controller means Emergency Stop. Current is turned off in the track with this button (all locomotives come to a stop and all functions are interrupted).
This button serves to prevent locomotive accidents on the model railroad layout.
The Emergency Stop can be released again with any other button.
The direction of the locomotive under control can be changed with Button ☐ on the IR Controller. This button also serves to stop the locomotive.
This button must then be pressed 2 times so that the locomotive can continue to run in the same direction.
The control knob for operating locomotives always controls only the locomotive that has just been selected with the address selector switch. All other locomotives or powered rail cars continue to run at the speed last set for them.
Important: When a new address is selected and the control knob is already set at a speed position (any speed position), the locomotive just selected will immediately run at this speed. You must select this locomotive address a second time, before you can control the locomotive.
After you switch to a new address, it takes a moment before the newly selected locomotive can actually be controlled. This feature makes it possible for you to skip over other addresses when switching to a new address, without the locomotives assigned to these addresses being affected by the current setting for the control knob. Control of the locomotive is assumed with the last settings in use. The locomotive now reacts to the controller.
9. Information about Operating the Train
Running 2 Trains
Only one switched mode power pack and one Base Station may be used.
The switched mode power pack included with the starter set provides power sufficient for a maximum of 2 trains.
The locomotive to be controlled can be selected with the switch on the controller (see Sections 7 and 8).
10. Trouble Running the Train
- If the train does not run, check to make sure that the connections have been done as shown in Section 6.
- Check to make sure that the batteries in the IR Controller have been installed correctly or whether they are run down.
-
Check to see if there a short circuit or an overload on the layout or if a locomotive or car is derailed. Correct the short circuit or the overload by reducing the number of power consumers (locomotives, lighted cars, etc.), and set the derailed locomotive or car back on the rails.
-
Remove damaged cars and locomotive from the train and have them repaired. Defective cars and a defective locomotive must not be used any more.
- Mechanical resistance by the model is recognized by the decoder. The decoder then switches the motor off with blinking headlights. When the mechanical problems have been corrected, the model, after it had been without current, can be put back into operation.
11. Cleaning and Maintenance
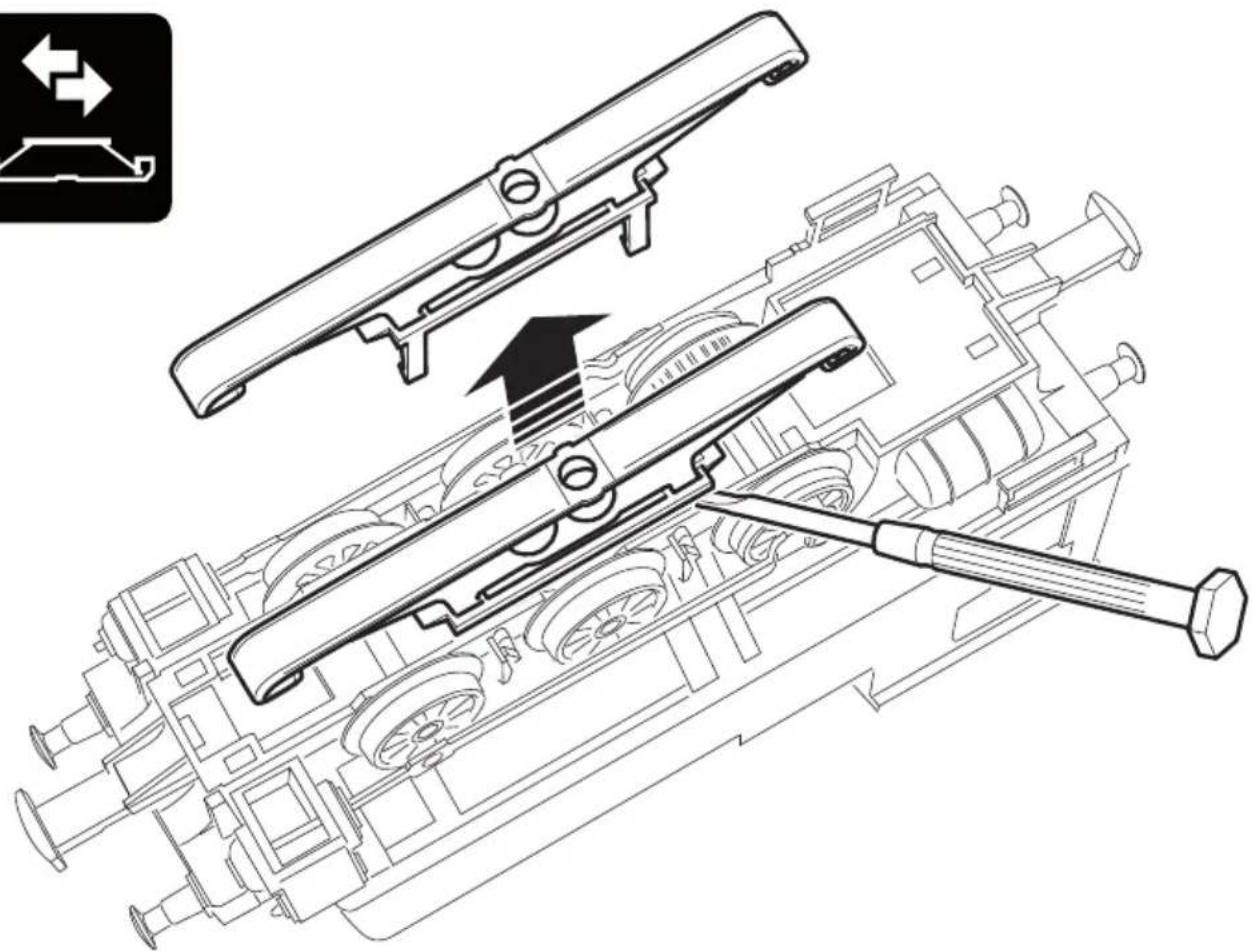
- Check to see if hair or dirt gets on the axles on the train and remove this hair or dirt from the axles with the help of a pair or tweezers so that the train runs correctly.
- The train can be wiped with a dry, lint-free cloth.
• Additional maintenance information can be found in Section 15.
12. Disposing

Notes on environmental protection:
Products marked with a trash container with a line through it may not be disposed of at the end of their useful life in the normal household trash. They must be taken to a collection point for the recycling of electrical and electronic devices. There is a symbol on the product, the operating instructions, or the packaging to this effect. The materials in these items can be used again according to this marking. Help us to protect the environment and conserve resources and bring this device to a corresponding disposal point/dealer free of charge. For disposal-related queries, contact the organisation responsible for waste disposal or your specialist retailer. www.maerklin.com/en/imprint.html

Batteries Do Not Belong in the
Household Trash! Every user in the EC area is legally obligated to turn in batteries at a collection point in his
community or at a dealer. The batteries are then disposed of appropriately in order to protect the environment.
Batteries containing dangerous materials are marked with this symbol and with chemical symbols (Cd = Cadmium, Hg = Mercury, Pb = Lead). www.maerklin.com/en/imprint.html
13. Symbols and Their Meaning

indicates adherence to all basic safety and health requirements.
(EU/UK)

Toy for use with a transformer
max. 18 V ...
digital Rated voltage
14. Warranty / Customer Service
- The warranty card included with this product specifies the warranty conditions.
- If you have questions about repairs, spare parts, or problems, please see your local Märklin specialty dealer or contact us at:
USA only: Find all contact details on www.marklin.com/company/contact
Résoudre

Mettre ensemble

6.4 Controller IR
Indications relatives aux piles et aux accus rechargeables
7. Mise en service
73033 Göppingen German
Tel: +49 7161 608 222
Los nemen

Railplan

6.2 Netadapter • IR-controller • Basistation
6.4 IR-controller
7. Ingebruikname
7.2 Adres kiezen:



Details der Darstellung können von dem Modell abweichen.
Details in the diagram may vary from the model.
Certains détails du dessin peuvent différer du modèle.
Details in de tekening kunnen afwijken van het model.
16.
D
Lokomotive
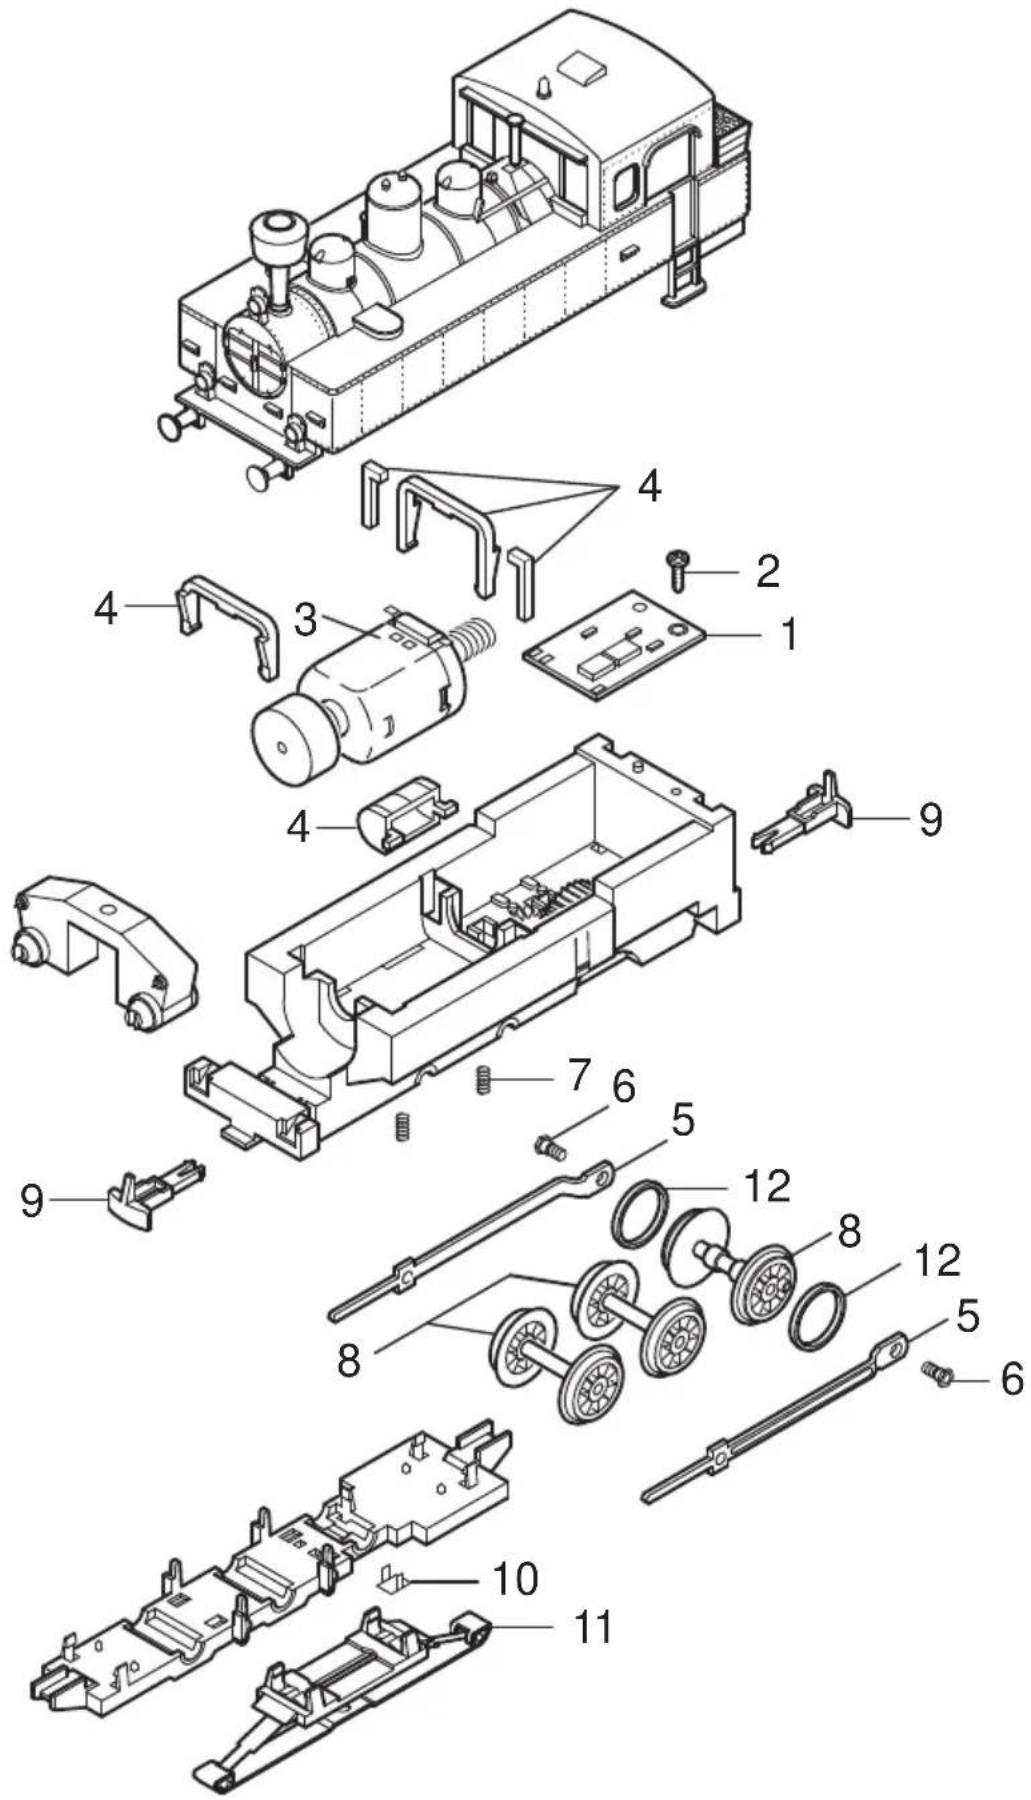
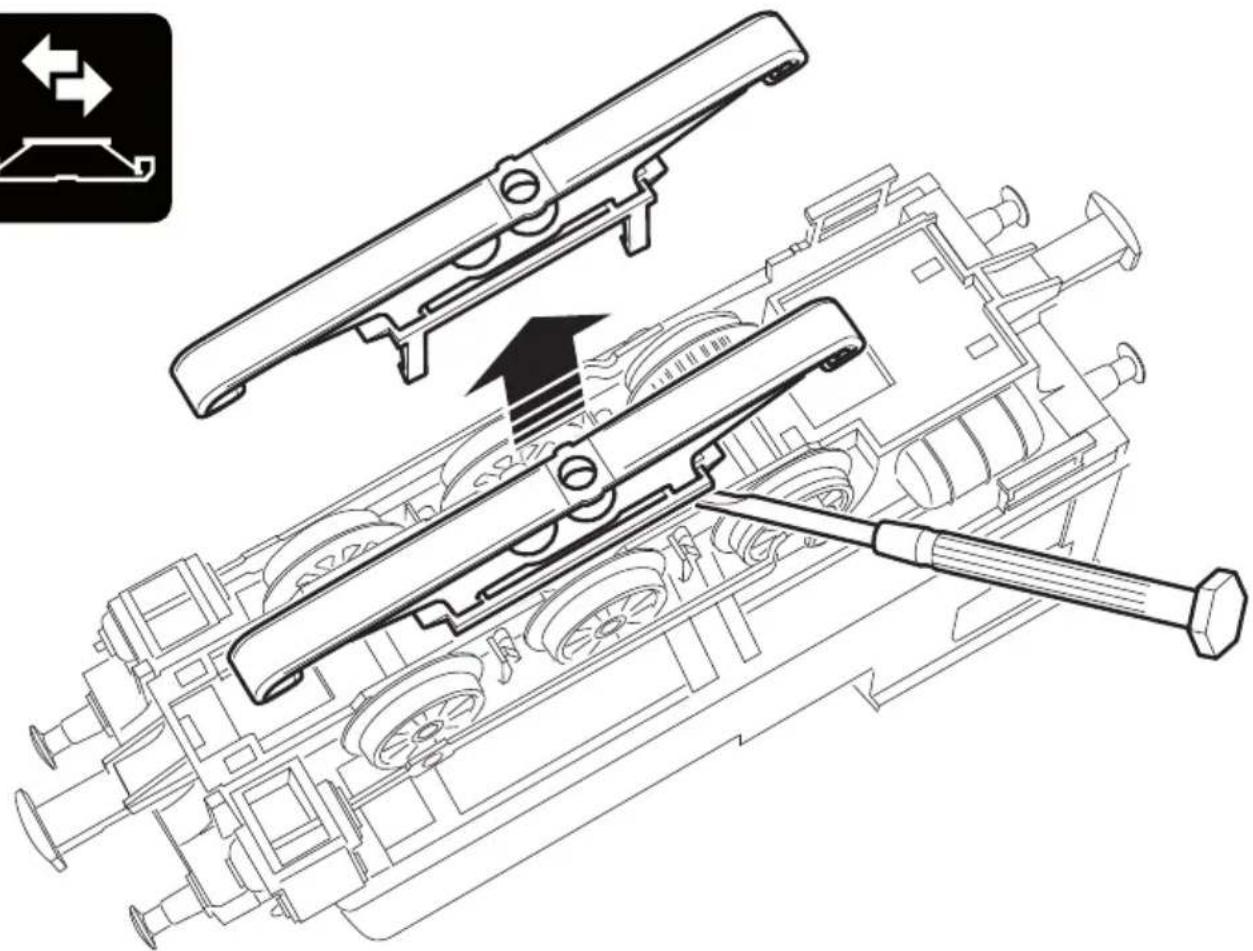
Note: Some parts are offered only unpainted or in another color. Parts not shown on the diagram can only be repaired as part of a repair done by the Märklin Repair Service.
General Note to Avoid Electromagnetic Interference:
A permanent, flawless wheel-rail contact is required in order to guarantee operation for which a model is designed. Do not make any changes to current-conducting parts.
16.
F
Locomotive
Desacoplar

Plan
6.4 Controlador IR
7. Puesta en marcha

Smontaggio

Tracciato

6.4 Controller IR
Inserire 2 x batterie tipo AAA (Micro) conformemente al disegno.


7. Azionamento
lsärtagning

Spåra image

6.2 Nätenhet • IR-kontroll • Basstation
6.4 IR-körkontroll

7. Handhavande av IR-körkontroll
7.1 Välj adress:


Spor layout

6.2 Kontaktstrømforsyning • IR-kontrol • basisstation
6.4 IR-kontrol
Sæt 2 x batterier type AAA (micro) i som vist på tegningen.

Valgt korrekt adresse? (se under punkt 8).






Los detalles del despiece pueden no coincidir con el modelo en miniatura I dettagli della raffigurazione possono differire dal modello.
Detaljer på ovanstående skiss kan avvika från modellen.
Detaljer i afbildningen kan afvige fra modellen.
16.
E
Locomotora
| 1 Decoder 386 379 |
| 2 Tornillo E786 750 |
| 3 Motor E106 144 |
| 4 Grapas de retención, ar tanque — |
| 5 Unidades de haste E215 965 |
| 6 Tornillo E210 925 |
| 7 Resorte de compresión E214 330 |
| 8 Rodados — |
| 9 Gancho de acoplamiento E399 740 |
| 10 Peças de contato E214 280 |
| 11 Patín E226 495 |
| 12 Aro de adherencia 7 154 |
Vagón volquete

- 6.4 IR-CONTROLLER
- INBETRIEBNAHME
- USING THE PRODUCT AS INTENDED
- SAFETY NOTES
- 2.1 IMPORTANT NOTES
- CONTENTS
- TECHNICAL INFORMATION
- 4.1 OVERLOAD PROTECTION
- NOTES ABOUT USING THIS MODEL FOR THE FIRST TIME
- PREPARATIONS
- 6.1 JOINING TRACK SECTIONS AND SETTING UP TRACK
- 6.2 SWITCHED MODE POWER PACK • IR CONTROLLER • BASE STATION
- 6.3 CONNECTIONS FOR THE BASE STATION
- IMPORTANT INFORMATION
- 6.4 IR CONTROLLER
- 6.5 OPERATING THE IR CONTROL FOR THE FIRST TIME
- UNSCREW THE BATTERY HOLDER AND LIFT UP THE COVER
- NOTES ABOUT BATTERIES AND RECHARGEABLE BATTERIES
- PUT THE COVER FOR THE BATTERY HOLDER BACK IN PLACE AND SCREW IT DOWN
- OPERATING
- 7.1 SELECTING AN ADDRESS
- 7.2 CHANGING AN ADDRESS
- LOCOMOTIVE FUNCTIONS
- 8.1 FUNCTION SWITCH
- 8.2 CONTROLLING THE LOCOMOTIVE
- INFORMATION ABOUT OPERATING THE TRAIN
- RUNNING 2 TRAINS
- TROUBLE RUNNING THE TRAIN
- CLEANING AND MAINTENANCE
- DISPOSING
- NOTES ON ENVIRONMENTAL PROTECTION
- BATTERIES DO NOT BELONG IN THE
- SYMBOLS AND THEIR MEANING
- WARRANTY / CUSTOMER SERVICE
- 6.4 CONTROLLER IR
- INDICATIONS RELATIVES AUX PILES ET AUX ACCUS RECHARGEABLES
- MISE EN SERVICE
- 6.2 NETADAPTER • IR-CONTROLLER • BASISTATION
- INGEBRUIKNAME
- 7.2 ADRES KIEZEN
- 16
- D
- GENERAL NOTE TO AVOID ELECTROMAGNETIC INTERFERENCE
- F
- 6.4 CONTROLADOR IR
- PUESTA EN MARCHA
- AZIONAMENTO
- 6.2 NÄTENHET • IR-KONTROLL • BASSTATION
- 6.4 IR-KÖRKONTROLL
- HANDHAVANDE AV IR-KÖRKONTROLL
- 7.1 VÄLJ ADRESS
- 6.2 KONTAKTSTRØMFORSYNING • IR-KONTROL • BASISSTATION
- 6.4 IR-KONTROL
- E
Brand : Märklin
Model : 29132
Category : Model making