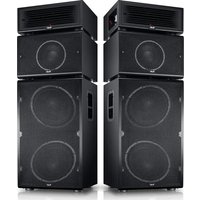
Power Hifi - Hi-Fi System Teufel - Free user manual and instructions
Find the device manual for free Power Hifi Teufel in PDF.


| Product Type | Hi-Fi System |
| Brand | Teufel |
| Model | Power Hifi |
| Dimensions (Main Unit) | Approx. 430 x 100 x 320 mm |
| Weight | Approx. 5.2 kg |
| Power Supply | AC 230 V, 50 Hz |
| Power Consumption | 150 W (max) |
| Amplifier Power | 2 x 50 W RMS |
| Frequency Response | 20 Hz - 20 kHz |
| Connectivity | Bluetooth 5.0, AUX, USB, Optical |
| Remote Control | Included (CR2025 battery) |
| Speaker Impedance | 4-8 ohms |
| Supported Audio Formats | MP3, AAC, FLAC, WAV |
| Display | LCD screen with backlight |
| Radio Tuner | FM with RDS |
| Cleaning Instructions | Use a soft, dry cloth. Avoid solvents. |
| Safety Features | Overheat protection, automatic standby |
| Spare Parts & Repairability | Contact Teufel support for spare parts |
| Warranty | 2 years |
Frequently Asked Questions - Power Hifi Teufel
User questions about Power Hifi Teufel
0 question about this device. Answer the ones you know or ask your own.
Ask a new question about this device
Download the instructions for your Hi-Fi System in PDF format for free! Find your manual Power Hifi - Teufel and take your electronic device back in hand. On this page are published all the documents necessary for the use of your device. Power Hifi by Teufel.
USER MANUAL Power Hifi Teufel
Technical Description And User Manual

POWER HIFI
Fully active, modular speaker system
General Notes And Information .... 3
Notice....3
Trademarks....3
Original packaging ....3
Complaints ....3
Contact 3
For Your Safety 4
Proper use ....4
Label description ....4
Safety notes 4
Explanation of symbols 5
Overview 6
Unpacking......6
Package contents 6
Checking the package contents......6
Introduction....7
Controls And Connections 8
Remote Control 9
Inserting/changing the batteries .....9
Setup.... 10
Setup location 10
Connecting....11
Connecting the speakers....11
Inputs for source devices 11
Analogue sources LINE IN, AUX IN .....11
Digital source....11
USB Sound Card 11
Output for companion mode 12
Mains connection 12
Operation....13
Activating and deactivating ....13
Automatic activation/deactivation .....13
Selecting a source 14
Adjusting the volume 14
Mute....14
Balance....15
Adjusting the sound 15
Setting the stereo channel 15
Locking the control panel 15
Mode....16
MASTER 16
COMPANION 16
Bluetooth® Mode 21
Bluetooth® options ......21
Bluetooth® pairing ....21
Restoring the connection with a paired external player ....21
Interruption of connection 22
Playback....22
Party mode ....22
Terminating the connection 22
USB Sound Card 23
Mac OS X 23
"Sound" system preference ....23
Windows 7, 8 and 10: ......23
"Sound" control panel 23
Playback....24
Software Update 25
Installing new software 25
Care And Cleaning 26
Troubleshooting....27
Technical Data 29
Declaration of Conformity 29
Disposal....30
Important information in accordance with the Electrical and Electronic Equipment Act (Germany: ElektroG) 30
Important information about the Batteries Act (Germany: BattG) 30
Notice
The information in this document may change without prior notice and in no way constitutes any liability on the part of Lautsprecher Teufel GmbH.
No part of this user manual may be reproduced in any form or be broadcasted in any way electronically, mechanically, by photocopy or recording without the written permission of Lautsprecher Teufel GmbH.
© All trademarks are the property of their respective owners.

Bluetooth
The Bluetooth ® word mark and Bluetooth ® symbol are registered trademarks of Bluetooth SIG, Inc.
and any use by Lautsprecher Teufel is licensed.
Qualcomm® aptX™

Qualcomm aptX is a product of Qualcomm Technologies International, Ltd.
Qualcomm is a trademark of Qualcomm Incorporated, registered in the USA and other countries, whose use has been approved. aptX is a trademark of Qualcomm Technologies International, Ltd., registered in the USA and other countries, whose use has been approved.
Original packaging
If you wish to exercise your right of return, we ask that you be absolutely sure to hold onto the packaging. We can only accept the return of the speakers WITH THE ORIGINAL PACKAGING.
Empty boxes are not available!
Complaints
In case of a complaint we will need the following information to process your enquiry:
1. Invoice number
Can be found on the sales slip (enclosed with the product) or on the order confirmation received as a PDF document, e.g. 4322543.
2. Serial number or batch number
Located on the back side of the device, e.g. serial no.: KB20240129A-123.
Thank you for your support!
Contact
Please contact our customer service department with any questions, suggestions, or complaints:
10787 Berlin (Germany)
Telephone: 00800 200 300 40 (tollfree)
Fax: +49 (0)30 / 300 930 930
Online support:
www.teufelaudio.com/service
Contact form:
www.teufelaudio.com/contact
Proper use
The POWER HIFI is designed for the playback of audio signals via Bluetooth ® or via direct connection to external players.
Only use the active speaker as described in this user manual. Any other use will be deemed as not in accordance with the instructions and may lead to damage to property or even persons.
The manufacturer accepts no liability for damage caused by improper use.
The active speaker is intended for private use.

Before operating the amplifier for the first time, please first read the safety notes and user manual carefully. This is the only way to
use all functions safely and reliably. Store the user manual in a safe place and also be sure to pass it on to any subsequent owner.
Label description
You can find the following signal terms in this user manual:
WARNING
Indicates a moderate risk, which, if not avoided, may result in severe injury.
CAUTION
Indicates a low risk, which, if not avoided, may result in minor or moderate injury.
NOTICE
Warns you of potential damage to equipment.
Safety notes
This chapter contains general safety notes which you should always observe to protect yourself and third parties. Also observe the warning notes in each chapter of this user manual.
WARNING
Improper electrical installation or excessive mains voltage may result in an electrical shock.
-The device is suitable for a mains voltage of 220-240 V, 50 Hz. When connecting the device, make sure that the correct voltage is present. You can find more information about this on the rating plate.
- Check the device regularly for damage. Immediately disconnect the mains plug and do not operate the device if its housing or mains cord is defective or exhibits other visible damages.
-This device is disconnected from the grid by pulling the mains plug. Thus, make sure that the mains plug is always easily accessible.
-If the device emits smoke, smells burnt or produces unusual sounds, immediately disconnect it from the mains and do not operate it further.
–Never touch the mains plug with wet hands.
-If the mains cord is damaged, replace it with an equivalent one.
–Never open the device housing.
Repairs may only be carried out by an authorised specialist workshop. Only parts that match the original specifications may be used.
–Never modify the device. Unauthorised modifications may affect the safety and functionality.
-Only use the accessory products specified by the manufacturer.
-Only use the device indoors.
- Do not operate the device in wet rooms and protect it from dripping and splashing water. Make sure that no vases or other liquid-filled objects are located on or near the device in order to prevent liquid from penetrating the housing. If water or any foreign objects have entered the housing, immediately disconnect the mains plug and send the device to our service address.
WARNING
An unsuitable setup location may result in injury and damage.
- If the active speaker is not securely mounted, do not use it in vehicles, in unstable locations, on wobbly tripods or furniture, on underdimensioned brackets etc. The components could tip or fall over and cause injury to persons or be damaged themselves.
- Set the components up so that they cannot be knocked over inadvertently and make sure that the cables do not pose a trip hazard.
- Carefully follow the user manual.
- Do not place the amplifier near heat sources (e.g. heaters, ovens, other heat generating equipment such as amplifiers etc.).
- Avoid prolonged exposure to direct sunlight. This may cause the housing to be discoloured.
WARNING
An unstable base may cause the unit to tip and injure or even kill persons, children are particularly at risk. You can prevent a large number of accidents by taking the following precautions:
- If possible, place the speakers on the ground.
- When storing the product, also ensure that it stands safely and that it cannot be knocked down or over.
WARNING
Children can become trapped in the plastic wrapping when playing and suffocate.
- Do not allow children to play with the device or the plastic wrapping. There is a danger of suffocation.
- Ensure that children do not remove small parts from the device or take them off of the device (e.g. control knobs or plug adapters). They could swallow the parts and choke.
CAUTION
The total system weighs 60 kg.
- Make sure that the floor has the required load-bearing capacity.
-Only carry/transport the individual components - never the entire system stacked on top of one another. - The additional weight limit of the toppart/amplifier is 5 kg. Do not go above this limit.
CAUTION
Leaking battery acid may lead to chemical burns.
- Do not allow battery acid to come into contact with skin, eyes or mucous membranes. In the event of contact with acid, immediately flush the applicable areas with plenty of clean water and consult a physician if necessary.
CAUTION
Batteries can explode if handled improperly.
–Never attempt to recharge batteries.
-Only use batteries of the same or equivalent type.
-You must not heat or short circuit batteries and rechargeable batteries or dispose of them in fire.
- Do not expose batteries and rechargeable batteries to direct sunlight.
CAUTION

Extended listening at high volumes may lead to hearing loss.
To avoid damage to health, avoid extended
listening at high volumes.
- When the volume is set high, always keep a certain distance from the device and never place your ear directly on the speakers.
- If an amplifier is set to full volume, this may produce very high sound pressure. This may have psychological consequences and also cause physical injury. Children and pets are particularly at risk. Set the volume control to a low setting when switching on the device.
CAUTION
This product contains magnetic material.
- If necessary, consult your physician and ask for effects on implants such as pacemakers or defibrillators.
- Keep magnetically sensitive objects (e.g. credit cards etc.) away from the speakers.
Explanation of symbols
| Protection class IIDual insulation | |
| Risk of electrical shockDo not open the housing. |
Unpacking
- Carefully open the box, take out the EPE foam half-shells and carefully lift the speakers out of the box.
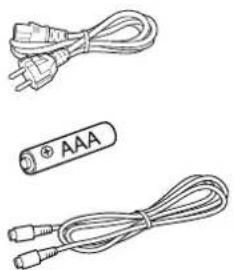
Package contents
(1) 1× control unit with high-range speaker (2)
(2) 1× mid-range speaker
(3) 1× low-range speaker
(4) 1× remote control POWER HIFI RC
(5) 1× mains cord for (1)
(6) 2× LR03/Micro/AAA batteries for (4)
Optional accessories (3)
(7) 1× XLR connector cord for master/companion mode (available in our online shop)
Checking the package contents
- Check that all items have been delivered and that nothing is damaged.
- If the delivery is incomplete or exhibits damage from transport, please contact our service team (see page 3).
NOTICE
Do not operate the device if you identify damages on it.
NOTICE (5)
If the device is subjected to warm temperatures after being cold (e.g. after transport), condensation may occur inside of it.
- In this case, wait at least 2 hours before you connect and activate it. (7)


Introduction
The POWER HIFI speaker sound system is for music enthusiasts with high standards, who prefer high-quality audio playback of various styles of music like jazz, big band and brass band, rock, gospel, soul, techno, house, but also film music. The extended dynamic range of the POWER HIFI speaker system is both impressive and delightful in every listening session since the musical content that is played back sounds like you're at a live concert.
POWER HIFI brings the crisp, high sound pressure, which the ROCKSTER is known for, as well as the extended dynamic range of audio playback to your living room and similar environments.
The amplifier has its own 3-band sound control (bass, approx. 100 Hz/middle bands approx 1 kHz/treble bands, approx. 10 kHz), that can be used to adjust the sound to perfectly suit the local acoustics.
The following inputs are available for your source devices:
- Bluetooth®
• USB sound card for PC and Mac - AUX IN (stereo via RCA)
• LINE IN (stereo via XLR) - OPT IN (stereo via Toslink e. g. the Teufel Streamer)
The respective stereo channel that is not played back is transmitted via the output LINE OUT (via XLR). Here, you can control an additional POWER HIFI as a companion.
In master/companion mode, a POWER HIFI provides all controls as the master and it controls the second POWER HIFI, the companion for which all controls are locked except for the volume adjustment and standby function.
To the side, you can find some examples for the configuration. Detailed connection examples can be found in the section „Mode“ on page 16.
Stereo setup
![graph LR A["POWER HIFI Stereo Companion"] -->|XLR cable| B["Power HIFI Stereo Master"] B -->|XLR cable| A](/content/2026/07/1433636/images/eb1edf695078ab3e8e033362119247aa12b0f8c9e27500aaa582fc0cc8fcd4df.jpg)
Stereo setup with mixing console and two companions
![graph TD A["POWER HIFI Stereo Companion"] --> B["Mixing console"] C["POWER HIFI Stereo Companion"] --> B B --> D["Connections via XLR cable"]](/content/2026/07/1433636/images/376263c771146b768db711bd0130ce3f7622677f109ef6f26633a3358d261923.jpg)
Mono setup with a master and multiple companions
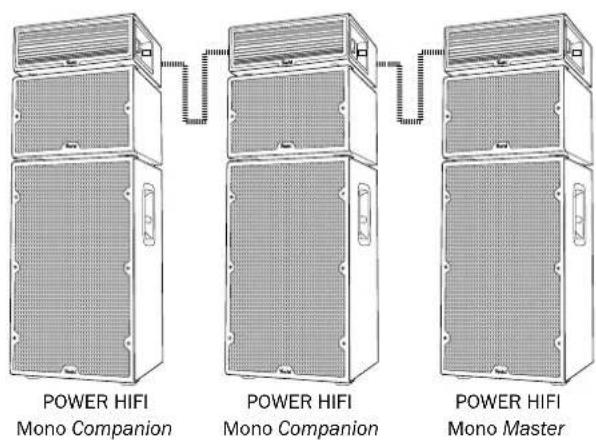
Each input on the master can be used, cascade connection via XLR cable

No. Name Function
(8) VOLUME Adjust the volume
(9) TREBLE Adjust the high range level
(10) MID Adjust the mid-range level
(11) POWER Switch the device on and to standby
(12) DISPLAY Display panel
(13) COMPANION Lights up during companion operation
(14) AUX, LINE, Opt, USB, 📍 Displays the active source
(15) PAIRING Start Bluetooth ® pairing
(16) SOURCE Select a source
(17) BASS Adjust the low-range level
(18) LED Power indicator (red LED)
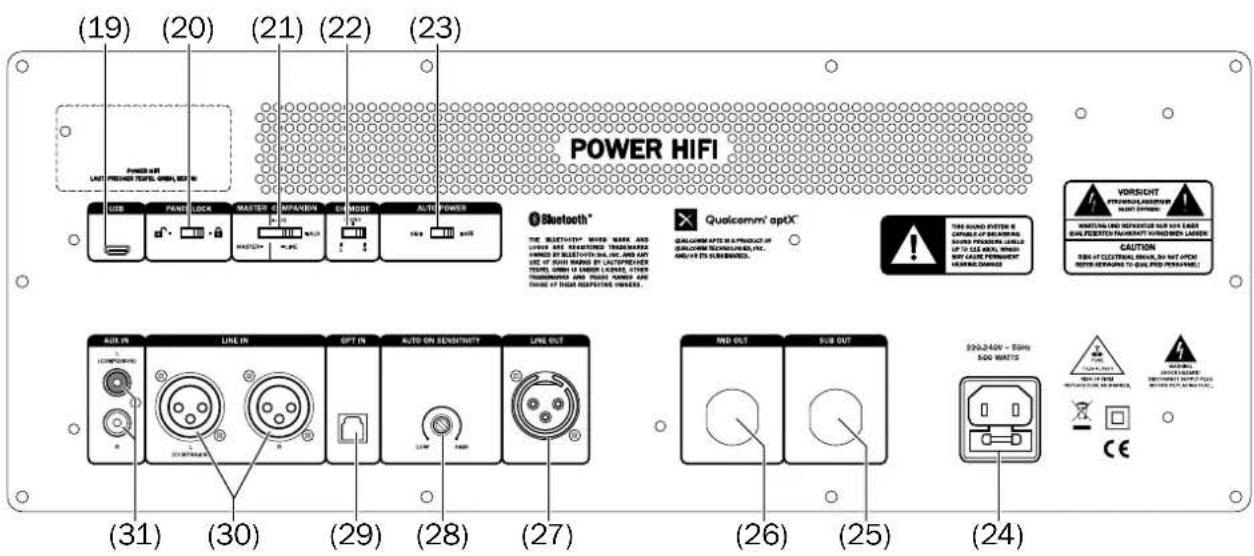
No. Name Function
| (19) USB SOUND | Micro-USB port to the PC for sound card operation and software updates |
| (20) PANEL LOCK | Lock/unlock the control panel |
| (21) MASTER/COMPANION | Switch between master/companion mode |
| (22) CH MODE | Choose audio channel |
| (23) AUTO POWER | Enable/disable automatic activation/deactivation |
| (24) MAINS CONNECTION | Mains connection with glass tube fuse (3.15 AL) |
No. Name Function
| (25) SUB OUT | Connector cord for bass speaker |
| (26) MID OUT | Connector cord for mid-range speaker |
| (27) LINE OUT | Analogue audio output (mono) for master/companion mode |
| (28) SENSITIVITY | Set the level for automatic activation |
| (29) OPT IN Optical digital audio input | |
| (30) LINE IN | Analogue audio input |
| (31) AUX IN | Analogue audio input |
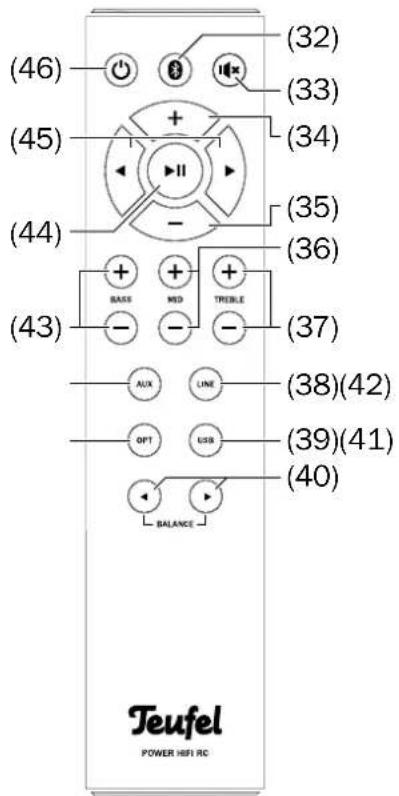
(32)
Select Bluetooth ® source, pushing and holding: Start pairing
(33)
Mute on/off
(34) + Increase the volume
(35) - Reduce the volume
(36) MID Adjust the mid-range level
(37) TREBLE Adjust the high range level
(38) LINE Select LINE IN as the analogue source
(39) USB Select PC as the source via the sound card
(40) BALANCE Set the sound level ratio on the left/right
(41) OPT Select OPT IN as the digital source
(42) AUX Select analogue source AUX IN
(43) BASS Adjust the low-range level
(44) ▶||
Start/pause playback
(45) ◀▶
Skip track forward/back
(46) ⏻
Switch the device on and to standby Pushing and holding forces the device to switch to standby (useful with multiple POWER HIFI).
Inserting/changing the batteries
The remote control is powered by 2 type AAA batteries.
-
To open the battery compartment, carefully unscrew the lid off - it is slightly under tension from the springs.
-
If applicable, remove the old batteries and dispose of them in an environmentally-friendly manner.
-
Slide the new batteries into the battery compartment according to the image on the back of the remote control.
-
Screw the lid back closed - it only fits the right way around and is slightly under tension from the springs.

NOTICE
When inserting the batteries in the compartment, make sure that the polarity is correct.

CAUTION
Batteries can explode if handled improperly.
- Never attempt to recharge batteries.
- Only use batteries of the same or equivalent type.
- You must not heat, short circuit batteries and rechargeable batteries, dispose of them in fire or expose them to direct sunlight.
- Leaking battery acid may lead to chemical burns.
- Do not allow battery acid to come into contact with skin, eyes or mucous membranes. In the event of contact with acid, immediately flush the applicable areas with plenty of clean water and consult a physician if necessary.

You can find comprehensive notes and tips for correct setup on our website.
Setup location

CAUTION
The total system weighs 60 kg.
- Make sure that the floor has the required load-bearing capacity.
- Only carry/transport the individual components - never the entire system stacked on top of one another.
NOTICE
Risk of damage! The isolation pads can produce discolouration on sensitive surfaces.
- On parquet, varnished wood and similar surfaces, you should stick felt gliders to the rubber feet of the speakers or put blankets or small carpets under them. This will prevent discolouration of the floor over the long term.
- Select a stable, level base.
• Make sure that the environment is clean and free from dust.
- Ensure sufficient ventilation.
- Select a location away from heat sources and prolonged exposure to direct sunlight.
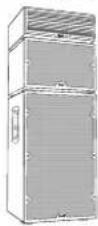
- Always place the components on top of one another in this order: Bass speaker on the bottom, then the mid-range speaker and the high-range speaker with the control unit on the top.
- Make sure that the feet of the top components are positioned directly in the recesses in the underlying housing.
- Lay the connector cords so that they do not pose a tripping hazard.
- Do not place any heavy objects on the cables or the speakers.
- Do not place open flames such as burning candles or similar on the speakers.
- Do not place any containers with liquids such as vases, beverages or similar on the speakers.
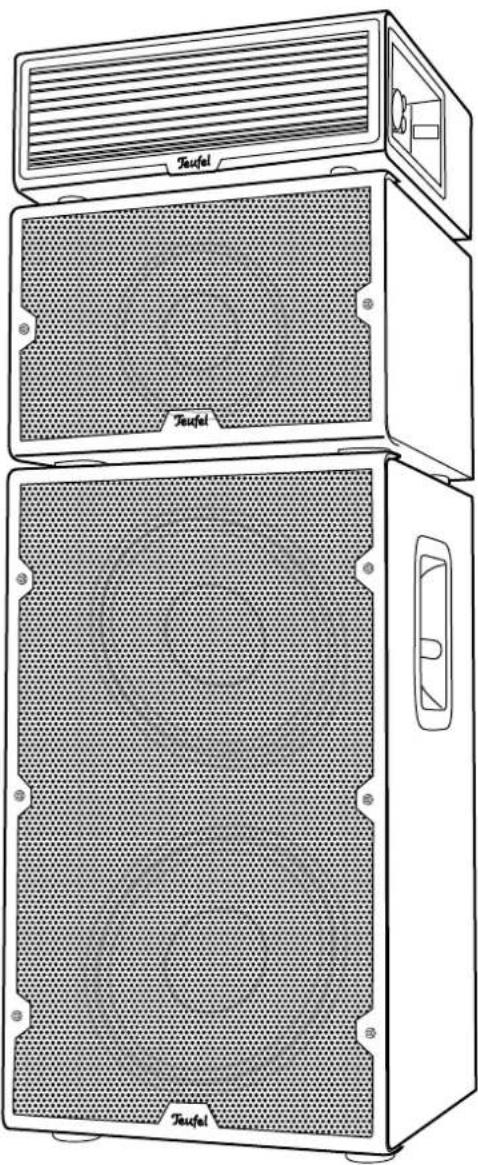
- Depending on the set-up location, it may make sense to angle the speakers towards the listening position. You should definitely try this to determine whether it noticeably improves the sound.
CAUTION
- Observe the volume of the master device and the external player: With the Power Hifi Companion, large input signals will result in very high output volumes!
- Before switching it on, make sure that the MASTER/COMPANION switch is set to the desired position (be absolutely sure to refer to „Mode“ on page 16).
CAUTION
Risk of injury/damage!
- Lay all cables so that they do not pose a tripping hazard.
Connecting the speakers
The speaker connections from the control unit to the two speakers (25) and (26) are designed as 4-pole SpeakON plug connectors. The different cable lengths ensure that the cables cannot be mixed up.

Insertion:
- Hold the plug with the cable up in front of the jack.
- Turn the plug approx. 45° to the left so its pivots fit into the jack.
- Slide the plug all the way into the jack.
- Turn the plug approx. 45° to the right until the locking mechanism clicks into place. The cable is now pointing up.
Disconnection:
- Pull the chromed latch back and turn the plug approx. 45° to the left.
- Pull the plug out of the jack.
Inputs for source devices
Analogue sources LINE IN, AUX IN
You can connect a source device with analogue sound (e.g. a CD player, a mixing console or a TV set) to each of the XLR jacks LINE IN (30) and the RCA jacks AUX IN (31).

Digital source
You can connect the optical digital audio output of a source device to the OPTICAL jack (29). You will need an optical cable with a TOSLINK plug for this. Your source device requires either an optical 3.5 mm plug or also a TOSLINK plug.
In companion mode, the optimal input is intended for applications in connection with professional sound projection technology (see „Mode“ on page 16).
USB Sound Card
The POWER HIFI features an integrated USB sound card for audio output from a PC. To do so, connect the PC to the USB jack (19) via a USB cable (USB A to Micro B). You can find information about playback from the PC in „USB Sound Card“ on page 23.

Via this USB jack, you can also load software updates to your POWER HIFI (see „Software Update“ on page 25).
Output for companion mode
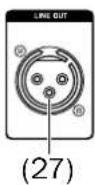
The analogue output LINE OUT (27) is especially designed for companion mode: The stereo channel, which this POWER HIFI does not play back is relayed here.
You can connect a second POWER HIFI here with the optional XLR connector cord (see „Mode“ on page 16).
Mains connection
-
Insert the IEC power plug of the mains cord (5) into the jack (24).
-
Insert the mains plug in a mains power socket (220-240V\~/50Hz).

The power indicator (18) lights up continuously in a dim red on the front side and thus indicates the standby mode.
Activating and deactivating
- By pressing the Power button (11) or ⭕ (46), you switch the POWER HIFI on.
After switching the device on in master mode, the last active audio source and volume will be set (max. 25).
The power indicator (18) goes out, the LED (14) for the active source will light up and the display panel (12) will show the volume within a range from 0–100. - By pressing the Power button (11) or Ⓧ (46) again, you switch the POWER HIFI to standby. The power indicator (18) is illuminated in a dim red now.
- By pushing and holding the button ⏻(46), you also securely switch multiple POWER HIFI to standby. This is particularly useful in master/companion mode: Hold the button down and target the POWER HIFI one after another. They will then switch off.
Automaticactivation/deactivation
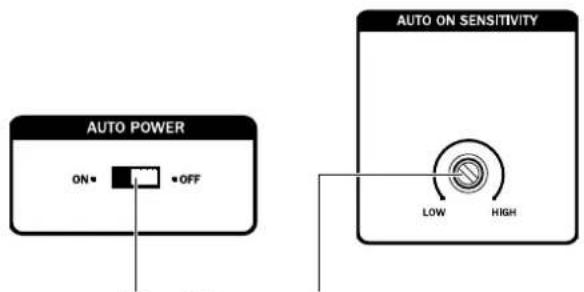
You can enable automatic activation and deactivation with the AUTO POWER switch (23):
OFF - automatic disabled
ON - automatic enabled
- If the POWER HIFI does not receive an audio signal and if there is no operation for more than 20 minutes, it will automatically switch to standby.
- As soon as a signal is detected on an audio source, the POWER HIFI will also wake up and switch to the detected audio source.
With the AUTO ON SENSITIVITY control (28), you can adjust the sensitivity from which the activation function is to recognise an audio signal:
- LOW: The sensitivity is set to low. Thus, an input signal is only considered at high input levels and the POWER HIFI will wake up.
- HIGH: The sensitivity is set to high. Thus, an input signal is already considered at low input levels and the POWER HIFI will wake up.

(23) (28)
Selectingasource
On the control panel, switch the sources by pushing the SOURCE button (16).
On the remote control, select the sources with the following buttons:
| Button Connection | |
| ※ (32) | Bluetooth |
| LINE (38) LINE IN (30) | |
| USB (39) USB (19) | |
| OPT (41) OPT IN (29) | |
| AUX (42) AUX IN (31) |
The selected source is indicated by one of the LED (14).

(31)

Adjusting the volume
- Increase the volume: Turn the VOLUME control (8) to the right or push the + button (34).
-Decrease the volume: Turn the VOLUME control (8) to the left or push the - button (35). - If you turn the VOLUME control (8) quickly by more than 45° , the volume will increase or decrease quickly.
- Pushing the – button (35) longer will quickly decrease the volume.
The current volume level is shown from 0–100 on the display panel (12).

The volume setting of an external player often affects the volume of the POWER HIFI.
Mute
- By pressing the button (33), (34) or (35), you can switch the sound off and back on.
A zero ("0") will appear on the display panel (12) during muting.
- You can also activate the sound by adjusting the volume.


Balance
The BALANCE buttons ◀/⟨40⟩ are used to set the volume level ratio between the left and right stereo channel.
The display panel (12) will indicate a shift to the left as a negative value and a shift to the right as a positive value.
This setting is not possible in mono mode (see below). If power is lost or the stereo channel changes (see below), this setting is deleted.
Adjusting the sound
You can adjust the sound in three frequency ranges:
- BASS - low tones, set with the BASS +/- buttons (43) or the BASS control (17).
- MID - mid-range tones, set with the MID +/- buttons (36) or the MID control (10).
- TREBLE - high-range tones, set with the TREBLE +/- buttons (37) or the TREBLE control (9).
- Possible settings: From “-6” (decrease) to “+6” (increase).
Setting the stereo channel
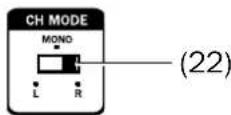
With the CH MODE switch (22), you determine the stereo channel, which is played back by this POWER HIFI.
- L - left channel
- MONO - both channels are mixed together
- R - right channel
The respective other channel is available via the output LINE OUT (27), with "MONO" the mixed signal.
Switching during operation will reset the balance setting (see above) to "0".
Locking the control panel
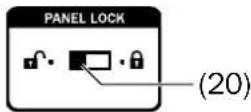
To avoid inadvertent or unauthorised operation, you can lock the display panel with the PANEL LOCK switch (20): The buttons and the controls are inoperable in the "🔒" position – operation is only possible with the remote control.
To unlock the control panel, slide the switch to the " 🔍" position.


Mode
Set the mode of the POWER HIFI with the MASTER/COMPANION switch (21):
MASTER
- All inputs, buttons and controls are active.
- The stereo channel set with CH MODE (see "Setting the stereo channel" on page 16) is played back; the respective other channel is available on the output LINE OUT (27).
CAUTION
- Observe the volume of the master device and the external player: With the Power Hifi Companion, large input signals will result in very high output volumes!
COMPANION
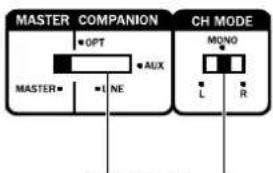
Companion operation is activated when the MASTER/COMPANION switch (21) is set to the following settings:
OPT digital input OPT IN (29) With this input, you can select the stereo channel (L/R) for playback with the CH MODE switch (22).
LINE analogue input LINE IN (30) Only the "L (COMPANION)" jack is active.
AUX analogue mono input AUX IN (31). Only the "L (COMPANION)" jack is active.
- The selected input is limited to a volume of 0 in the first configuration and must be manually set to 100. All other inputs are inoperable.
- The COMPANION LED (13) lights up as well as the LED (14) for the selected source.
(21) (22)


- The power buttons (11) and ⏻ (46) as well as the VOLUME control (8) work.
- All other buttons and controls are inactive; when operated, only the COMPANION LED (13) will blink briefly.
After the entire system is connected and switched on, each companion will display a pulsating plug sign in front of the “+0” volume display. In so doing, the companion indicates that its volume is set to the safety level.
- On the companion, carefully turn the volume to maximum (level of 100) with the VOLUME control (8).
This is the only way to correctly control the entire volume from the master. Otherwise, the balance between the left and right channel will not be correct. After initial setting of the volume, the companion will only display three dashes on the display panel.
CAUTION
Risk of injury/damage!
- Once the volume on the companion has been set, a very high playback level can be reached.
If a POWER HIFI is operated as a companion, you can decrease the volume with respect to the source with the VOLUME control (8). However, the maximum volume is controlled on the source.
- The recently set volume on the companion will be saved after approx. 30 seconds of operation and restored after standby.
- When disconnected from the power supply or when the MASTER/COMPANION switch (21) is operated, the volume will be set to 25 for the purpose of safety.


Example for a mono setup


POWER HIFI Mono Master

Example for a stereo setup


POWER HIFI Stereo Companion
All inputs can be used on the master. Operation occurs via the control panel or the remote control for the master.
The MASTER/COMPANION switch is set to MASTER on the master and to LINE on the companion.
The master is set to the right stereo channel with the CH MODE switch and it passes the left channel to the companion via the XLR cable. The position of this switch is ignored on the companion.
The master's output LINE OUT is connected to the companion's input LINE IN L via XLR cable.
Once the volume on the companion has been initially set, the volume and sound on the master will be controlled.

POWER HIFI Stereo Master
![graph TD A["Master/Companion CH MODE"] --> B["Mixing console with XLR outputs"] C["Master/Companion CH MODE"] --> B D["Power HIFI Companion"] --> B E["Power HIFI Companion"] --> B F["Power HIFI Companion"] --> B G["Power HIFI Companion"] --> B H["Power HIFI Companion"] --> B I["Power HIFI Companion"…](/content/2026/07/1433636/images/e052e905048c2dd09fce6e132ceb3c69f4b2a9c4eea321a863a2c0f980bb4127.jpg)
![graph TD A["POWER HIFI Companion"] --> B["Preamplifier with RCA outputs"] C["POWER HIFI Companion"] --> B D["POWER HIFI Companion"] --> B E["POWER HIFI Companion"] --> B F["POWER HIFI Companion"] --> B G["POWER HIFI Companion"] --> B H["POWER HIFI Companion"] --> B I["POWER HIFI Companion"] --> B J[…](/content/2026/07/1433636/images/a7ba0448d869e730287a4807feb4998d7ed925e7ed0a447c9b20d15183f2e304.jpg)




All inputs can be used on the master. Operation occurs via the control panel or the remote control for the master.
The MASTER/COMPANION switch is set to MASTER on the master and to LINE on all companions.
The master is set to MONO with the CH MODE switch and it passes the mixed stereo signal to the first companion via the XLR cable. The position of these switches will be ignored on all companions.
The master's LINE OUT output is connected to the first companion's LINE IN L input via XLR cable. The first companion's LINE OUT output is connected to the LINE IN L input of the next companion and so on. This way, up to four companions can be connected in a cascade.
Once the volume on the companions has been initially set, the volume and sound on the master will be controlled. However, the volume of the companions can be reduced via the master if, for example, the dance area is to be supplied with louder sound than the back part of the room.


Via Bluetooth®, you can connect a compatible external player wirelessly to the POWER HIFI. The audio output of your external player is then emitted via the POWER HIFI.

The Bluetooth ® wireless transmission system has a range of approximately 10 metres that is limited by walls and furnishings. If the connection is cut off, the POWER HIFI will attempt to re-establish a connection until you select another source.
You can also register two Bluetooth ® devices and have them played in alternation.
NOTICE
Only use the Bluetooth ® function in locations where wireless radio transmission is allowed.
Please keep in mind that the Bluetooth® behaviour may differ depending on the external player's operating system.
Bluetooth® options
Depending on the device type, your external player (e.g. smartphone) may also have a menu for Bluetooth® options such as media playback. You can find more information about the Bluetooth® options in the instruction manual for your external player/smartphone.
Bluetooth® pairing
To play the audio of your external player on your POWER HIFI via Bluetooth ® , you must first connect the devices with each other. The technical term for this is “pairing”.
-
Activate the Bluetooth® function on your external player (e.g. smartphone).
-
Select the "Bluetooth®" input on the POWER HIFI. For this, push the button Ⓧ(32) or, if applicable, push the SOURCE button (16) multiple times until the LED Ⓧ(14) illuminates in blue.
- If the POWER HIFI is not connected to an external player, pairing will start automatically and the LED Ⓧ(14) will quickly flash blue.
Otherwise, push the button Ⓧ(32) and hold it down for approx. 2 seconds or briefly push the PAIRING button (15) to start pairing.
Pairing will be active for approx. 60 seconds. Afterwards, the LED Ⓧ(14) will blink slowly. This indicates that there is no connection.
- Let your external player scan for Bluetooth ® devices. You will find more information about this in the user manual of your external player. After the search run, the “POWER HIFI” should also be present in the list of detected devices.
- Select "POWER HIFI" from the list of detected devices.
If your external player asks for a code, enter "0000" (four zeros).
Pairing is now complete and your POWER HIFI will now act as a Bluetooth® playback device. The POWER HIFI will now play back all sounds that would otherwise be played by your external player/ smartphone.
- If you would like to pair a second external player, repeat the above steps with the second device. Then select the POWER HIFI again from the list of paired devices on the first device. Now you can use both devices in party mode in alternation.
Restoring the connection with a paired external player
If your POWER HIFI was previously connected to the external player, it is no longer necessary to switch it to pairing mode to connect again. Simply selecting "POWER HIFI" on your external player from the list of paired devices is enough.
The POWER HIFI stores the pairing data of the last 7 external players (max.) which were connected to the system.
- To delete the list of external players, push the button (32) for 10 seconds.
External players can then only establish a connection after re-pairing.

(15)(14)(16)

Interruption of connection
If your external player moves out of the range of your POWER HIFI, the Bluetooth® connection will be interrupted. The connection will be re-established automatically when you are back within range.
Playback
The volume and sound settings of the external player also affect the volume and the sound of the POWER HIFI.
- Select the "Bluetooth®" input on the POWER HIFI. For this, tap the button (32), or, if applicable, the SOURCE button (16) multiple times until the LED (14) illuminates in blue.
- On your external player, switch the Bluetooth® function on and select "POWER HIFI" as the playback device.
- Start and control the playback on your source device.
Depending on the source device, you can also control playback with the remote control of the POWER HIFI:
-Play next track: Tap the navigation button (45).
-Play the track or chapter from the beginning: Briefly tap the navigation button ◄45).
-Play the previous track or previous chapter: Briefly tap the navigation buttons (45) twice.
- Pause/continue playback: Push the button ▶ I(44). If your source device is a smartphone, the Bluetooth® connection will be interrupted in the event of an incoming call and you can make phone calls as usual. After finishing your phone call, the sounds will once again be diverted and played back by your POWER HIFI.
Party mode
If you are using two external players at the same time, you can look for the next track on one device while the other is playing. Once the track is over, push the stop or pause button and start playback on the other device.
Terminating the connection
To terminate the Bluetooth® connection, switch the Bluetooth® function on your external player/smart-phone off.
The POWER HIFI features an integrated USB sound card for audio output from a PC.
No driver software is required for playback from the PC under Windows 7, 8 and 10 as well as Mac OS X 10.5 and higher. The operating systems detect the POWER HIFI as a USB Advanced Audio Device when it is connected to the USB port.
Connect the USB micro port (19) to a USB port on your PC. For this, you can use any type A USB 2.0 adapter cable to micro B.
Mac OS X
To quickly switch playback to the POWER HIFI, push the [alt] button on the Mac and click the speaker icon on the menu bar (you can enable this icon under
"Sound" in the system preferences, see below). Select the "PowerHIFI" from the list under "Output device". All Mac sounds will now be played back via the POWER HIFI.

"Sound" system preference
In the "Sound" system preference, you can select the POWER HIFI as the playback device on the "Output" tab: In the list, click "PowerHIFI". All Mac sounds will now be played back via the POWER HIFI.

If you check "Display volume on the menu bar" at the very bottom, you can also access the menu described above via the speaker icon.
Further sound settings depend on the programme in use, e.g. iTunes or Facetime.
Windows 7, 8 and 10:
When establishing the USB connection, Windows automatically detects the POWER HIFI and allocates playback accordingly.
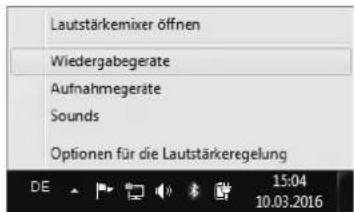
To quickly switch between the playback devices, right click the speaker icon on the task bar and select "Playback devices". The corresponding "Sound" tab of the control panel will open.
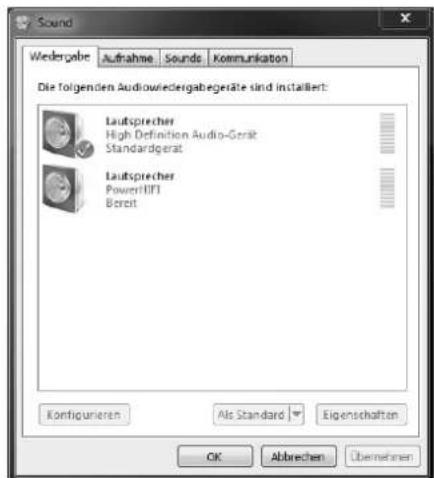
"Sound" control panel
In the "Sound" control panel, you can select the POWER HIFI as the playback device on the "Playback" tab: In the list, click "Speaker" under "PowerHIFI". All PC sounds will now be played back via the POWER HIFI.
If you want the audio output to permanently occur via the POWER HIFI (also after rebooting the PC), click the button "As Standard".
Other sound settings depend on the programme being used, e.g. Media Center or Skype.
Playback

The volume and sound settings of the PC also affect the volume and the sound of the POWER HIFI.
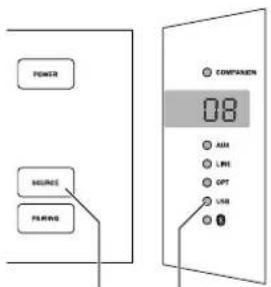
- Select the "USB" input on the POWER HIFI. For this, briefly push the USB button (39), or, if applicable, the SOURCE button (16) multiple times until the USB LED (14) illuminates in red.
- Select "PowerHIFI" as a playback device on your PC.
- Start and control the playback on your PC.
You can also control playback with the remote control of the POWER HIFI:
-Play next track: Tap the navigation button ▶(45).
-Play the track or chapter from the beginning: Briefly tap the navigation button ◀(45).
-Play the previous track or previous chapter: Briefly tap the navigation buttons (45) twice.
- Pause/continue playback: Push the button ▶ ||(44).
(14)(16)

The software of the POWER HIFI is being continually developed. You can download subsequent versions from our website.
Installing new software
- Load the new software from our website.
- Unpack the downloaded file.
- Pull the mains plug of the POWER HIFI and wait until the power indicator (18) is off.
- With a USB cable, connect your PC or Mac to the USB jack (19) of the POWER HIFI.
- Push and hold the buttons POWER (11) and SOURCE (16) at the same time and insert the mains plug of the POWER HIFI back into the socket. Continue to hold the buttons down until the power indicator (18) blinks rhythmically.
- A USB drive "POWER HIFI" will be displayed on your PC now. There, you will see a file "version.txt", from which you can determine the currently installed version.
- At this point, you can still cancel the update without risk by interrupting the USB connection to the PC.
NOTICE
Risk of damage!
- During the following steps, the POWER HIFI must not be switched off and the USB connection must not be interrupted!
- Copy the unpacked update file on your PC to the "POWER HIFI" drive.
The update will now run automatically. The power indicator (18) will continue to blink rhythmically. - Once the update is complete, the POWER HIFI will switch to standby.
At the same time, the USB connection to the PC will be interrupted, which may cause an error message on the PC. Ignore this message if applicable. - Pull the mains plug of the POWER HIFI again and wait until the power indicator (18) is off.
- Connect the POWER HIFI to the power supply again.
The new software was installed.
(19)


NOTICE
External influences could damage the speakers.
- If possible, only use plain water without any additives. In case of stubborn marks, a mild soap solution may be used.
-
Do not use caustic cleaning products, white spirit, thinners, petrol or similar under any circumstances. Such cleaning agents may damage the delicate surface of the housing.
-
Ideally, you should remove dust or small amounts of dirt with a dry, smooth leather cloth.
- Use a damp cloth to rub off stubborn dirt. Make sure that no liquid penetrates the housing.
- Then immediately wipe the damp surfaces off with a soft cloth without applying pressure.
The following advice should help you to solve problems. If this does not help, you will find useful information in the detailed FAQs on our website. Otherwise, please contact our hotline (see page 3). Take note of the warranty instructions.
| Problem Possible cause Solution | |||
| No function. No power supply. | Apply. Check the function of the socket | with another device. | |
| Control panel locked. To unlock the | control panel, slide the PANEL LOCK switch (20) to the | ||
| Mains fuse defective | 1. Disconnect themains cord.Carefully pull the fuse holder on themains connectionjack out. Disconnect themains cord.Carefully pull the fuse holder on themains connectionjack out. |  Push the old fuse down and out.Insert a new fuse (3.15 A delayed action) and push the holder back. Push the old fuse down and out.Insert a new fuse (3.15 A delayed action) and push the holder back. | |
| No sound. The wrong source | has been selected. | Select the correct source (see “Selecting a source” on page 14). | |
| The volume has been set too low. | Carefully increase the volume. | ||
| The volume of the external player has been set too low. | Carefully increase the volume of the external player. | ||
| Speaker cable not connected. Properly connect the speaker (page 11). | |||
| No sound with Bluetooth®. | No Bluetooth®connection. Establish a connection (see page „Bluetooth® pairing“ on page 21). | ||
| POWER HIFI has not been selected as the output device. | On the external player, select “POWER HIFI” as the Bluetooth® output device. | ||
| Bluetooth®connection impaired by another radio system (e.g. cord-less telephone, Wi-Fi). | Set up the POWER HIFI and/or external player in another location. Move to another room to test. | ||
| With some smartphones, switching to another app may result in no sound being emitted in the new app. | Before switching between apps, pause the previously used app to prevent this from happening. | ||
| No sound via cable (LINE, AUX). | Volume of the playback program has been set to zero. | Carefully increase the volume on the source device. | |
| The balance is incorrect in master-companion mode. | The volume on the companion has been set too low. | Carefully set the companion’s volume to 100 with the (8) control. | |
| A hum is emitted from the speaker. | The POWER HIFI is connected to a different power circuit than the rest of the system. | Connect the POWER HIFI and source device/ preamplifier to the same power circuit. | |
| The hum is due to line disturbance. | Buy a line filter and connect all devices to it. | ||
| The humming is caused by a multiple socket strip. | Use a different multiple socket strip or connect the POWER HIFI directly to the wall socket. | ||
| Bass speaker | |||
| Dimensions (W × H × D) 440 × 760 (thereof attributed to the feet: 15 mm) × 400 | |||
| Weight 38.2 kg | |||
| Mld-range speaker | |||
| Dimensions (W × H × D) 440 × 300 (thereof attributed to the feet: 15 mm) × 400 | |||
| Weight 13.2 kg | |||
| High-range speaker with control unit | |||
| Dimensions (W × H × D) 440 × 200 (thereof attributed to the feet: 15 mm) × 400 | |||
| Weight 9.1 kg | |||
| Operating voltage 220–240 V ~, 50 Hz | |||
| Max. power consumption 500 watts | |||
The following radio frequency bands and radio transmitting powers are used in this product:
| Radio network | Frequency bands in MHz Tr | Transmission power in mW/dBm |
| Bluetooth® | 2400-2483.5 2.5/4 |
You can find further technical data on our website.
Technical changes reserved!
Declaration of Conformity

Lautsprecher Teufel GmbH declares that this product complies with Directive 2014/53/EU. The full text of the EU Declaration of Conformity can be found at this web address:
www.teufelaudio.com/declaration-of-conformity
Important information in accordance with the Electrical and Electronic Equipment Act (Germany: ElektroG)
We advise owners of electrical and electronic appliances that old electrical and electronic devices must be handed in separately from municipal waste, in accordance with the applicable regulations. Batteries and rechargeable batteries that are not firmly enclosed in old electrical devices and lamps, and that can be removed from the old device without destroying them, must be separated from them in a non-destructive manner before they are handed to the collection point for their intended disposal. Please take note of our information on the Batteries Act [Germany: BattG] below for disposing of batteries.
You make an important contribution to returning, recycling and further processing of old devices if you separate your old devices into the correct collection groups for recycling.
The symbol below of a crossed-out dustbin, applied to electrical and electronic appliances, also advises of the duty to separate collections:

Consumer electronics stores and supermarkets are obliged, under certain conditions, to take back old electrical and electronic devices, in accordance with section 17 of the Electrical and Electronic Equipment Act. Stationary retailers must take back an old electrical device of the same type when a new electrical device is bought (1:1 return). This also applies to home deliveries. These retailers must also take back up to three small old electrical devices ( ≤ 25cm) without this being linked to a new purchase (0:1 return).
In accordance with the Electrical and Electronic Equipment Act, as online retailers of electrical devices and due to our product range, our obligation is limited to 1:1 return of large devices of >50 cm when selling a new electrical or electronic device of the same type. We comply with the obligation of return of devices other than large devices through our service provider. You can find the exact contact data and collection points on our website www.Teufel.de/entsorgung. It is also possible to return old electrical and electronic appliances free of charge at an official delivery point run by the public waste disposal authorities.
Important: For safety reasons we ask that you refrain from sending lighting fixtures (some lamps). For return of lighting fixtures please use the public waste disposal collection points or contact us directly at www.Teufel.de/entsorgung.
As an end-user, you are responsible for deleting any personal data on old electrical appliances before handing it in.
Important: Our appliances can contain batteries/rechargeable batteries. If this is the case, please refer to its attached product documentation for additional information on the type and chemical make-up of the battery. For products with battery compartments you can directly remove the batteries or rechargeable batteries and dispose of them properly. If the batteries are built in to the product, do not in any case attempt to remove the batteries yourself, instead contact one of our employees or appropriate specialist staff.
Important information about the Batteries Act (Germany: BattG)
Batteries and rechargeable batteries must not be disposed on in household waste.
Old batteries can contain toxic substances that could damage the environment or your health if not stored or disposed of properly. This applies especially to improper handling of batteries containing lithium.
However, batteries also contain important raw materials such as iron, zinc, manganese and nickel and these can be reused. Separate collection enables recycling of these raw materials and avoids any negative impact on the environment or human health due to toxic substances being released.
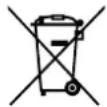
The crossed-out dustbin symbol means that you should not dispose of old batteries and rechargeable batteries in household waste. In addition, you, as the end-user, are legally obliged to return old batteries.
You can hand in batteries and rechargeable batteries free of charge at an official return point such as any public waste disposal collection point. You can also hand in old batteries, that we stock or have stocked as new batteries, at one of our Teufel stores or at one of our dispatch warehouses. However, if you send them to our dispatch warehouses we would like to point out the dangerous goods regulations of the
dispatch provider you opt for and ask you not send batteries to us by post. You can get the addresses of our dispatch warehouses from our customer service.
Due to existing legal regulations, the battery manufacturer must use the following symbols with the following meanings when marking the batteries.
Hg: the battery contains more than 0.0005 mass percent of mercury
Pb: the battery contains more than 0.004 mass percent of lead
Cd: the battery contains more than 0.002 mass percent of cadmium
Otherwise, to avoid waste and littering, batteries with a long service life or rechargeable batteries should be used. Exchangeable rechargeable batteries enable long service for electrical and electronic appliances and thus devices and rechargeable batteries can be prepared for recycling (e.g. regenerating/exchanging rechargeable batteries).
Further information on preventing waste for consumers can, however, be found in the Federal waste prevention programme with the participation of the Federal states.
Teufel
Please contact our customer service department with any questions, suggestions, or complaints:
10787 Berlin (Germany)
www.teufelaudio.com
Phone.: 00800 200 300 40 (toll-free)
Fax: +49 (0)30 - 300 930 930
Service: www.teufelaudio.com/service
Contact: www.teufelaudio.com/contact
No responsibility is assumed for the
correctness of this information.
Technical changes, typographical
errors and other errors reserved.




- TECHNICAL DESCRIPTION AND USER MANUAL
- POWER HIFI
- GENERAL NOTES AND INFORMATION .... 3
- FOR YOUR SAFETY 4
- OVERVIEW 6
- CONTROLS AND CONNECTIONS 8
- REMOTE CONTROL 9
- SETUP.... 10
- CONNECTING....11
- OPERATION....13
- BLUETOOTH® MODE 21
- USB SOUND CARD 23
- SOFTWARE UPDATE 25
- CARE AND CLEANING 26
- TROUBLESHOOTING....27
- TECHNICAL DATA 29
- DECLARATION OF CONFORMITY 29
- DISPOSAL....30
- NOTICE
- BLUETOOTH
- QUALCOMM® APTX™
- ORIGINAL PACKAGING
- COMPLAINTS
- INVOICE NUMBER
- SERIAL NUMBER OR BATCH NUMBER
- CONTACT
- PROPER USE
- LABEL DESCRIPTION
- WARNING
- CAUTION
- SAFETY NOTES
- IMPROPER ELECTRICAL INSTALLATION OR EXCESSIVE MAINS VOLTAGE MAY RESULT IN AN ELECTRICAL SHOCK
- AN UNSUITABLE SETUP LOCATION MAY RESULT IN INJURY AND DAMAGE
- AN UNSTABLE BASE MAY CAUSE THE UNIT TO TIP AND INJURE OR EVEN KILL PERSONS, CHILDREN ARE PARTICULARLY AT RISK. YOU CAN PREVENT A LARGE NUMBER OF ACCIDENTS BY TAKING THE FOLLOWING PRECAUTIONS
- CHILDREN CAN BECOME TRAPPED IN THE PLASTIC WRAPPING WHEN PLAYING AND SUFFOCATE
- THE TOTAL SYSTEM WEIGHS 60 KG
- LEAKING BATTERY ACID MAY LEAD TO CHEMICAL BURNS
- BATTERIES CAN EXPLODE IF HANDLED IMPROPERLY
- EXTENDED LISTENING AT HIGH VOLUMES MAY LEAD TO HEARING LOSS
- THIS PRODUCT CONTAINS MAGNETIC MATERIAL
- UNPACKING
- PACKAGE CONTENTS
- OPTIONAL ACCESSORIES (3)
- CHECKING THE PACKAGE CONTENTS
- NOTICE (5)
- INTRODUCTION
- NO. NAME FUNCTION
- INSERTING/CHANGING THE BATTERIES
- SETUP LOCATION
- CONNECTING THE SPEAKERS
- INPUTS FOR SOURCE DEVICES
- ANALOGUE SOURCES LINE IN, AUX IN
- DIGITAL SOURCE
- USB SOUND CARD
- OUTPUT FOR COMPANION MODE
- MAINS CONNECTION
- ACTIVATING AND DEACTIVATING
- AUTOMATICACTIVATION/DEACTIVATION
- SELECTINGASOURCE
- ADJUSTING THE VOLUME
- MUTE
- BALANCE
- ADJUSTING THE SOUND
- SETTING THE STEREO CHANNEL
- LOCKING THE CONTROL PANEL
- MODE
- MASTER
- COMPANION
- RISK OF INJURY/DAMAGE
- BLUETOOTH® OPTIONS
- BLUETOOTH® PAIRING
- RESTORING THE CONNECTION WITH A PAIRED EXTERNAL PLAYER
- INTERRUPTION OF CONNECTION
- PLAYBACK
- PARTY MODE
- TERMINATING THE CONNECTION
- MAC OS X
- SOUND" SYSTEM PREFERENCE
- WINDOWS 7, 8 AND 10
- SOUND" CONTROL PANEL
- INSTALLING NEW SOFTWARE
- RISK OF DAMAGE
- EXTERNAL INFLUENCES COULD DAMAGE THE SPEAKERS
- DECLARATION OF CONFORMITY
- IMPORTANT INFORMATION IN ACCORDANCE WITH THE ELECTRICAL AND ELECTRONIC EQUIPMENT ACT (GERMANY: ELEKTROG)
- IMPORTANT INFORMATION ABOUT THE BATTERIES ACT (GERMANY: BATTG)
Brand : Teufel
Model : Power Hifi
Category : Hi-Fi System