
CL2143S - Remote control HITACHI - Free user manual and instructions
Find the device manual for free CL2143S HITACHI in PDF.

| Product type | Universal remote control |
| Brand | HITACHI |
| Model | CL2143S |
| Power supply | 2 AAA batteries (1.5 V) |
| Operating voltage | 3 V DC |
| Infrared range | Approximately 8 meters |
| Number of preset channels | 100 |
| Display | On-screen display (OSD) |
| Compatible cable type | TV cable (S1-S20 / S21-S41) |
| Antenna impedance | 75 ohms (unbalanced) |
| Main functions | Power On/Off, Volume, Channel, Menu, OK, Back, Source, Mute, Numeric keys |
| Dimensions (L x W x H) | 200 x 50 x 25 mm |
| Weight (with batteries) | 110 g |
| Material | ABS plastic |
| Compatibility | HITACHI TVs and other brands (programming required) |
| Maintenance and cleaning | Clean with a soft, dry cloth. Do not use abrasive products. |
| Safety | Do not expose to humidity, extreme temperatures, or shocks. |
| Spare parts and repairability | Batteries and possibly back cover available. Repair by a professional recommended. |
| General information | Manual available for free download at notice-facile.com. Contact: france.consumateur@hitachi-eu.com |
Frequently Asked Questions - CL2143S HITACHI
User questions about CL2143S HITACHI
0 question about this device. Answer the ones you know or ask your own.
Ask a new question about this device
Download the instructions for your Remote control in PDF format for free! Find your manual CL2143S - HITACHI and take your electronic device back in hand. On this page are published all the documents necessary for the use of your device. CL2143S by HITACHI.
USER MANUAL CL2143S HITACHI
Instructions for use GB
Connect Peripheral Equipment 35
Connect Peripheral Equipment 36
Via the Euroconnector 36
Via Aerial Input 36
Decoder 36
TV and Video Recorder 36
Search for and store the test signal of the video
recorder 36
Camera and Camcorder 36
Connect the decoder to the video recorder 36
Preparation 37
Features 37
Safety Precautions 37
Before Switching on your TV 39
Power connection 39
Connections to the RF input socket 39
How to connect other devices 39
Inserting batteries in the remote control handset 39
Switching the TV ON/OFF 39
To switch the TV on 39
To switch the TV off 39
Operating the TV 39
Operating with the buttons on the TV set 39
Operating with Remote Control 39
Menu System 40
Sound Menu 40
Picture Menu 41
Feature Menu 42
Install Menu 43
Programme Menu 43
Other Features 44
TV Status 44
Programme Swap (P<P) 44
Double-digit (- -) 44
Personal Preferences (PP) 44
Sound Indicator 44
Sleep Timer Last Minute Indicator 45
Mute Indicator 45
No-Signal 45
Blue Background During No-Signal 45
Volume Bar 45
AV Modes 45
Teletext 45
To operate Teletext 45
To select a page of Teletext 45
To Select Index Page 45
To Select Teletext with a TV Programme 46
Searching for a page while watching TV 46
To Select Double Height Text 46
To Reveal "concealed" Information 46
To Stop Automatic Page Change 46
To Select a Subcode Page 46
To exit Teletext 46
To Display the Time 46
Tips 46
Care of the Screen 46
Poor Picture 46
No Picture 46
Sound 46
Remote Control 46
No solution 46
Specifications 47
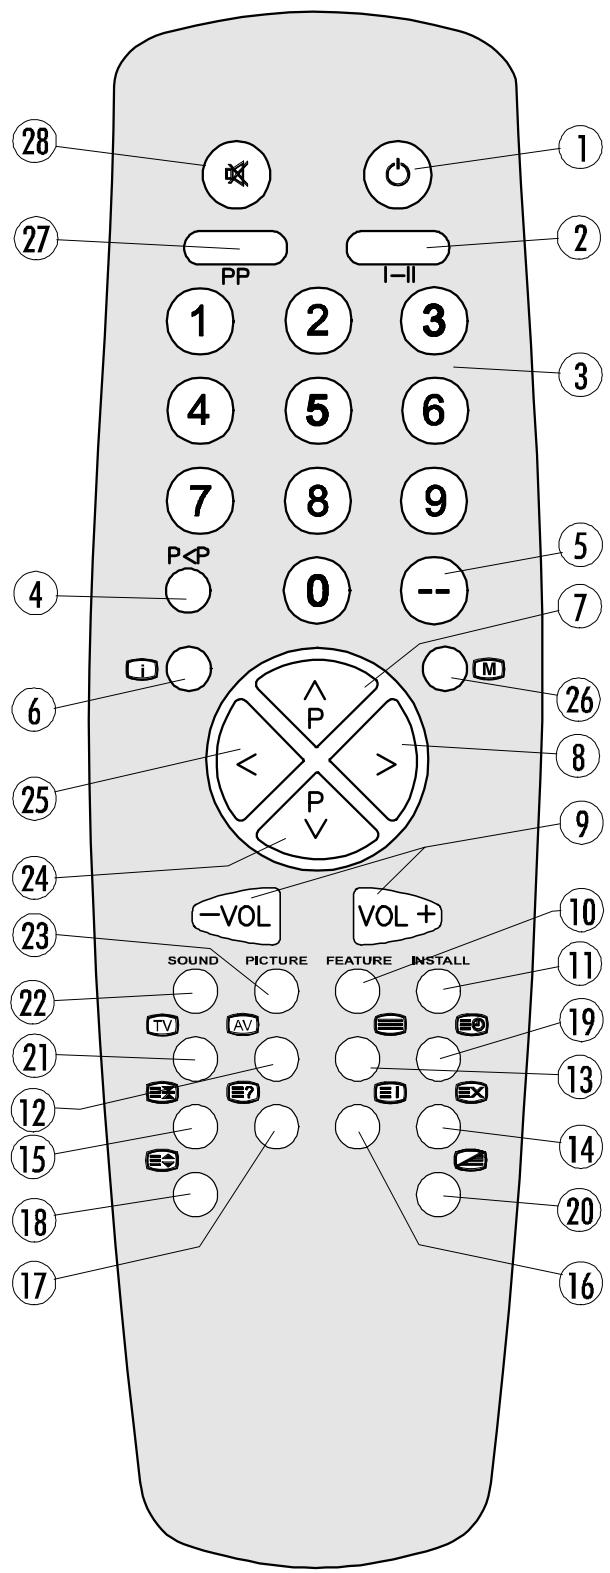
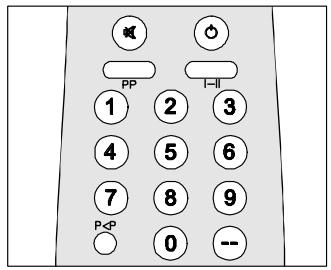
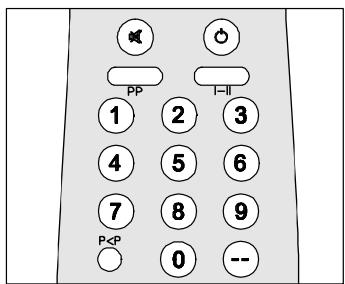
(1) O = Stand By
② I-II = Mono/Stereo - Dual I-II
③ 0 - 9 = Direct Program
4 P<P=PreviousProgramme
⑤ --= Double Digit
6 i = Info (Program Menu)
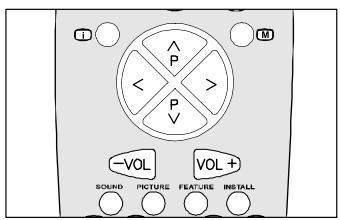
⑦ = Programme Up (Cursor Up)
8 = Cursor Right
9 -VOL/VOL + = Volume-/Volume+
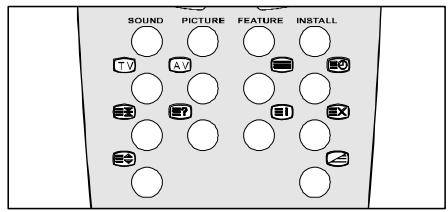
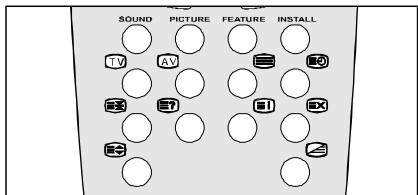
Yellow (FEATURE) = Feature Menu
⑪ Blue (INSTALL) = Installation Menu
12 AV = External Source (AV-1, F-AV, RGB)
Teletext Buttons
13 = Teletext
14 E = Update
15 三=Hold
16 E i = Index Page
17 3 = Revea
18 品 = Expand
19 Time
20 = Mix
② TV = TV / Quit Menu
22 Red (SOUND) = Sound Menu
② Green (PICTURE) = Picture Menu
24 P = Programme Down (Cursor Down)
25 = Cursor Left
26 M=Menu
27 PP = Change Picture Preset
28 品 = Mute
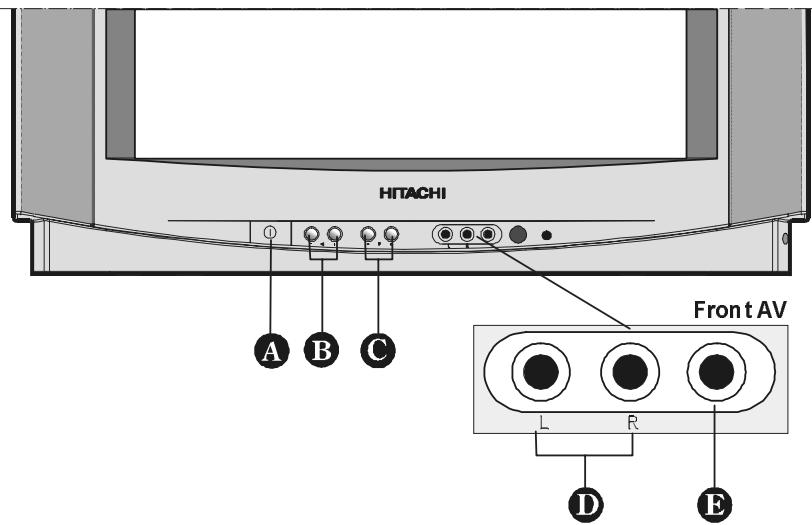
Control Panel Buttons
A POWER/ ① = Power On/Off
B - / + = Volume - / Volume +
C -P / P + = Program -/ Program +
Front AV input
AUDIO L/R = Audio left (white) / right (red)
VIDEO = VCR (yellow)
Connect Peripheral Equipment
There is a wide range of audio and video equipment that can be connected to your TV.
The connection diagrams show the back of the TV where the different equipment should be connected.

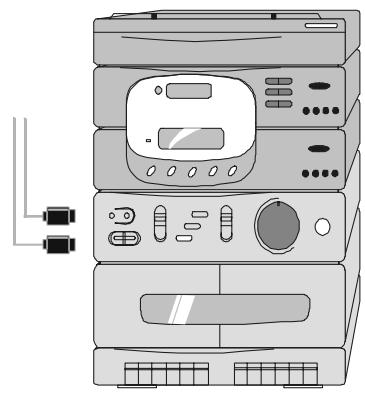
AUDIO
FOR SATELLITE RECEIVER
Connect Peripheral Equipment
There is a wide range of audio and video equipment that can be connected to your TV.
The following connection diagrams show you where the different equipment should be connected at the back side of the TV.
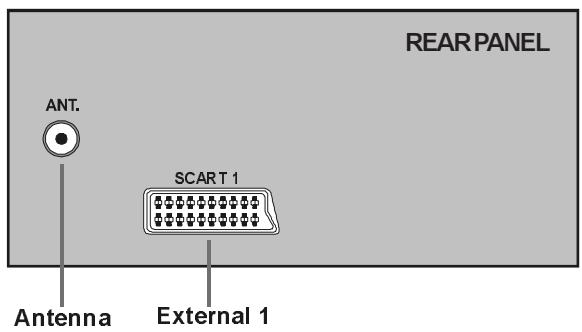
Via the Euroconnector
Your TV set has a Euroconnector socket. If you want to connect peripherals (e.g. video, decoder, etc.) which have Euroconnectors, to your TV, use SCART 1 input.
If an external device is connected via Euroconnector sockets TV is switched to AV mode automatically. If the signal is RGB then the RGB OSD indicator is displayed on the screen.
In AV mode if you press the “1” button the TV status OSD is displayed on the screen.
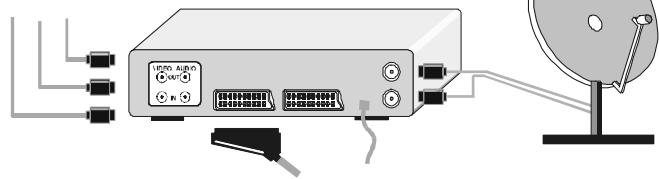
Via Aerial Input
If the equipment you want to connect to your TV e.g. video recorder or satellite receiver does not have a SCART socket, you should connect it to the aerial (ANT) socket on your TV.
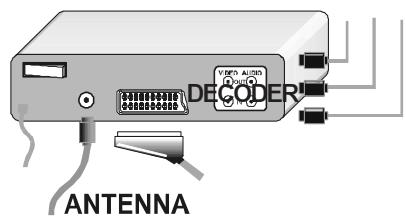
Decoder
Cable TV offers you a wide choice of programs. Most of them are free, others are to be paid for by the viewer. This means that you will need to subscribe to the broadcasting organization whose programmes you wish to receive. This organization will supply you with a corresponding decoder unit to allow the programmes to be unscrambled.
For further information ask your dealer. See also the booklet supplied with your decoder.
Connecting a decoder with an aerial socket to the TV
- Connect the aerial cable.
Connecting a decoder without an aerial socket to the TV
- Connect the decoder to your TV with a SCART lead to SCART 1. When your decoder has a SCART connector you can obtain better picture quality if you connect a SCART lead to EXTERNAL.
- Then select the appropriate AV mode by pressing the “AV” button.
TV and Video Recorder
- If your video recorder has a SCART socket please connect it to the TV using a SCART lead. Your TV should also be connected to your video recorder using the aerial RF output socket.
Please note using a SCART lead will produce better quality pictures.
Search for and store the test signal of the video recorder
- Unplug the aerial cable from the aerial socket "ANT" of your video recorder.
- Switch on your TV and put the video recorder on the test signal. (See the handbook for your video recorder.)
- Enter the Tuning menu via the Install menu.
- Search for the test signal of your video recorder in the same way as you searched for and stored the TV signals. See Tuning, Search and Store TV channels. Store the test signal under programme number 0.
- Replace the aerial cable in the aerial socket "ANT" of your video recorder once you have stored the test signal.
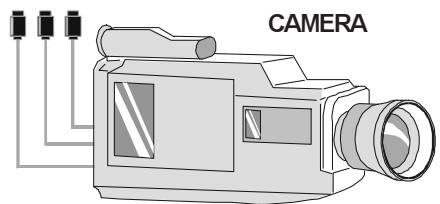
Camera and Camcorder
To connect to Front-AV input
Connect your camcorder to the front of your TV.
- Connect your equipment to the TV viaVIDEO (yellow), AUDIO R (red) and AUDIO L (white) inputs. You should connect the jacks to the input of the same colour.
Connect the decoder to the video recorder
Some video recorders have a special SCART connector for decoder.
- Connect a SCART lead to the SCART connector of your decoder and to the special SCART connector of your video recorder. See also the handbook of your video recorder.
- To connect your video recorder to the TV, see TV and Video Recorder section.
If you want to connect more equipment to your TV, consult your dealer.
Preparation
Place the TV on a solid surface.
If placing the TV into a cabinet or alcove, ensure there is at least a 100mm (10cm) gap to the sides and rear and top of the TV. This is to allow for adequate ventilation during operation. Please read below for more safety information before installation.
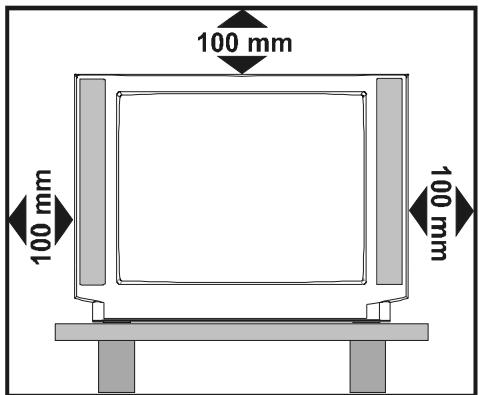
"Use this apparatus in tropical and/or moderate climates"
Features
It is a remote controlled colour television.
- 100 programmes from VHF, UHF bands or cable channels can be preset.
- It can tune cable channels.
- Controlling the TV is very easy by its menu driven system.
- It has SCART connector for external devices (video recorder, audio equipment, video games, etc.).
- Stereo sound system.
- Front AV in is available.
- Teletext
- All programmes can be named.
- Programme swapping between last watched two programmes.
- Forward or backward automatic tuning.
- Sleep timer.
- Child Lock.
Automatic sound mute when no transmission.
- When no valid signal is detected, after 5 minutes the TV switches itself automatically to stand-by mode.
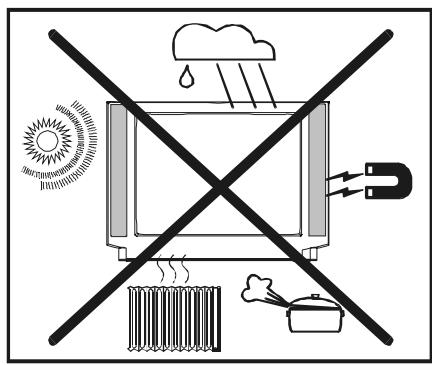
Safety Precautions
IMPORTANT SAFETY INFORMATION ON OPERATING YOUR TV
Do's and Don'ts
DO's
This Television has been designed and manufactured to meet international safety standards, but like any electrical equipment, care must be taken if you are to obtain the best results and safety is to be assured.
DO read the operating instructions before you attempt to use the equipment.
DO consult your dealer if you are in any doubt about installation, operation or safety of your equipment.
DO be careful with glass panels or doors on equipment.
This TV is supplied with a fitted mains plug. This plug must not be cut off as it may contain a special radio interference filter, the removal of which could lead to impaired performance. If you wish to extend the lead, obtain an appropriate safety approved extension lead or consult your dealer.
Observe the manufacturers instructions when connecting extension leads to the TV. Check the fuse rating on the new plug, this should be fitted with a 5 Amp fuse which conforms to either ASTA or BSI (BS1 362) approvals, these are easily identifiable by either the A\$A or S symbols. If you are in any doubt about the installation of an extension lead, please consult a competent electrician.
DON'Ts
DON'T continue to operate the equipment if you are in any doubt about it working normally, or if it is damaged in any way switch off, withdraw the mains plug and consult your dealer.
DON'T place water filled vessels on top of T.V. cabinets.
DON'T remove any fixed cover as this may expose dangerous voltages.
DON'T leave equipment switched on when it is unattended unless it is specifically stated that it is designed for unattended operation or has a stand-by mode. Switch off using the switch on the equipment and make sure your family know how to do this. Special arrangements may need to be made for infirm or handicapped people.
DON'T use equipment such as personal stereos or radios so that you are distracted from the requirements of traffic safety. It is illegal to watch television whilst driving.
DON'T obstruct the ventilation of the equipment, for example with curtains or soft furnishings. Overheating will cause damage and shorten the life of the equipment.
DON'T use makeshift stands and NEVER fix legs or stands to the TV with any screws other than those provided - to ensure complete safety always use the manufacturers approved stand with the fixings provided.
DONT allow electrical equipment to be exposed to rain or moisture.
ABOVE ALL
- NEVER let anyone, especially children push anything into holes, slots or any other opening in the case - this could result in a fatal electric shock.
- NEVER guess or take chances with electrical equipment of any kind - it is better to be safe than sorry!
1. Power Cord
The power supply cable should be placed so that it is not likely to be walked on or pinched by items placed on or against it. Pay particular attention to the cable
Where it enters the plug, power outlet, and the point where it emerges from the receiver.
2. Moisture and Water
Do not use this equipment in a humid and damp place (avoid the bathroom, the sink in the kitchen, and near the washing machine). Do not expose this equipment to rain or water, as this may be dangerous and do not place objects filled with liquids on top. Avoid from dripping or splashing.
3. Cleaning
Before cleaning, unplug the receiver from the main supply outlet. Do not use liquid or aerosol cleaners. Clean with a soft dry cloth.
4. Lightning
To prevent damage during a storm, lightning or when going on holiday, disconnect the power lead and aerial from the wall outlet and disconnect the aerial plug from the back of the television.
5. Ventilation
The slots and openings on the receiver are intended for ventilation and to ensure reliable operation. To prevent overheating, these openings must not be blocked or covered in anyway.
6. Replacement Part
When replacement parts are required, be sure the service technician has used replacement parts which are specified by the manufacturer or have the same specifications as the original one. Unauthorized substitutions may result in fire, electrical shock, or other hazards.
7. Servicing
Please refer all servicing to qualified personnel. Do not remove the back cover as this may result in an electric shock.
8. X-rays
This television has sheilding for protection against the emission of X-rays.
9. Flame sources
Do not place naked flame sources on the apparatus.
Warning!
Any intervention contrary to regulations, in particular, any modification of high voltage or a replacement of the picture tube may lead to an increased concentration of x -rays. Any television modified in this way no longer complies with license and must not be operated.
Instructions for waste disposal:
- Packaging and packaging aids are recyclable and should principally be recycled. Packaging materials, such as foil bag, must be kept away from children.
- Batteries, including those which are heavy metal-free, should not be disposed of with household waste. Please dispose of used batteries in an environmentally sound manner. Find out about the legal regulations which apply in your area"
"DO NOT LEAVE YOUR TVIN STAND-BY OR OPERATING WHEN LEFT UNATTENDED FOR ALONG TIME"
CAUTION
RISK OF ELECTRIC SHOCK

The lightning flash with the arrowhead symbol, within an equilateral triangle, is intended to alert the user to the presence of uninsulated "dangerous voltage"
within the product' enclosure that may be of sufficient magnitude to constitute a risk of an electric shock.

The exclamation point within an equilateral triangle is intended to alert the user to the presence of important operating and maintenance (servicing) instructions in the literature accompanying the appliance.
Before Switching on your TV
Power connection
IMPORTANT: The TV set is designed to operate on 230V AC, 50 Hz.
- After unpacking, allow the TV set to reach the ambient room temperature before you connect the set to the mains.
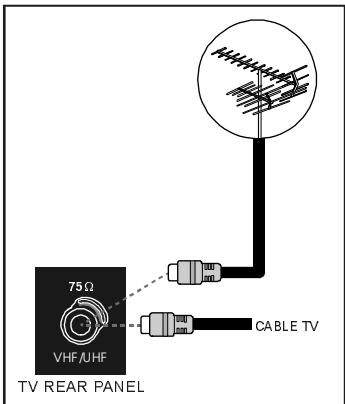
Connections to the RF input socket
- Connect the aerial or cable TV plug into the RF input socket on the back of the TV. If you are also connecting a video recorder /satellite receiver, plug the aerial into this equipment first and then connect the RF output socket from this device to the RF input on the back of the TV.
How to connect other devices
IMPORTANT: Switch off the TV before connecting any external device.
Sockets for external connections are at the back of the TV. For connection of other devices via Euroconnector refer to the manuals of the related devices.
Inserting batteries in the remote control handset
- Place the batteries in the right directions as seen below.
- Remove the battery cover located on the back of the handset by gently pulling upwards from the indicated part.
- Insert two AAA (R03) or equivalent type batteries inside.
- Replace the battery cover.
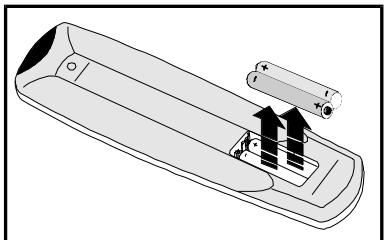
NOTE: Remove batteries from remote control handset when it is not to be used for a long period. Otherwise it can be damaged due to any leakage of batteries.
Switching the TV ON/OFF
To switch the TV on
Your TV will switch on in two steps:
1- Press the power button located on the front of the TV. Then the TV switches itself to standby mode and the RED LED
located below the TV turns on.
2- To switch on the TV from stand-by mode either:
Press a digit button on the remote control so that a programme number is selected,
or,
Press Programme Up or Down buttons on the front of the TV or on the remote control, so that last switched off programme is selected.
In either case the TV will switch on and the RED LED will turn to GREEN.
To switch the TV off
- Press the stand-by button on the remote control, so the TV will switch to stand-by mode and the GREEN LED will become RED,
or,
Press the power button located on the front of the TV, so the TV will switch off and the GREEN LED will turn off.
Operating the TV
You can operate your TV both using the remote control handset and onset buttons.
Operating with the buttons on the TV set
Volume setting and programme selection can be made using the buttons on the front panel.
Volume Setting
- Press “ ” button to decrease volume or “ ” button to increase volume, so a volume level scale (slider) will be displayed at the middle of the bottom on the screen.
- By pressing both the “+” and “-” buttons at the same time you can enter Main menu.
Programme Selecting
- Press "P +" button to select the next programme or "P -" button to select the previous programme.
Operating with Remote Control
The remote control handset of your TV is designed to control all the functions of the model you selected. The functions will be described in accordance with the menu system of your TV.
Functions of the menu system are described in Menu System section.
Volume Setting
Press "VOL+," button to increase volume. Press "VOL-" button to decrease volume. A volume level scale (slider) will be displayed at the middle of the bottom on the screen.

Programme Selecting (Previous or next programme)
- Press "P" button to select the previous programme.
Press button to select the next programme.
Programme Selecting (direct access):
Press digit buttons on the remote control handset to select programmes between 0 and 9. TV will switch to the selected programme. To select programmes between 10 - 99, you must use the double digit button "- -".
P -- this OSD is displayed at the left hand upper on the screen.
After this, press the digit buttons consecutively for the programme you want to select (eg. for programme 27, first press 2 and then 7). If the second digit is not entered within 3 seconds, this function will disappear.
Press directly the programme number to reselect single digit programmes.
Programme Swapping
- Press "P<P" (programme swap) button to select the last selected programme. This button provides swapping between last two selected programmes. For example, select programme 8, then select programme 2. Now, if you press "P<P" button, programme 8 will be selected. If you press the same button again, programme 2 will be selected and so on.
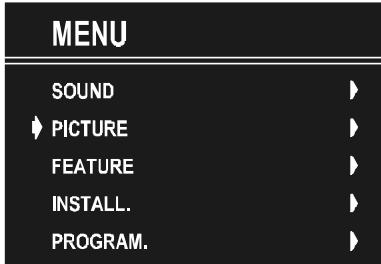
Menu System
Your TV has been designed with a menu system, to provide an easy manipulation of a multi-function system. The TV is controlled by choosing the commands, which are displayed on the screen.
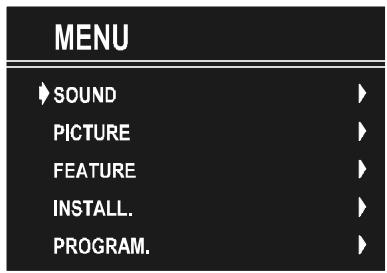
Press the "M" button. The Main menu will be displayed at the middle on the screen.
All the selected items in this menu system is indicated with CYAN characters and with an arrow on the leftside of items.
To select a sub-menu use "△" or "P" button, and press "▲" or "▷" button. Each option can also be selected with the coloured button and "i" button on the remote control.
MAIN MENU
The menu system is described below.
The short way in order to enter the menus, press :
"M" Button, Main Menu.
Red Button, Sound Menu.
Green Button, Picture Menu.
Yellow Button, Feature Menu.
Blue Button, Install Menu.
" i" Button, Programme Menu.
Menu button has two functions; first is opening or closing the "MAIN MENU", and the second is closing the sub-menu and then opening its parent menu.
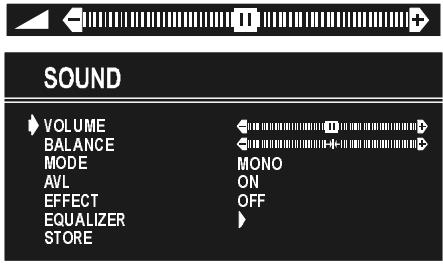
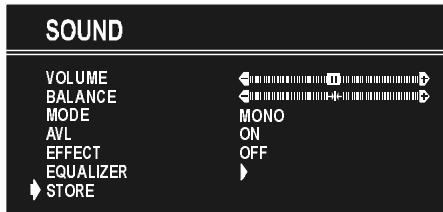
Sound Menu
To change sound settings
- Enter the Sound Menu directly, pressing the Red button or,
- As you enter the main menu, sound will be the first selected option. In the main menu, select SOUND using “ ” or “P” button, then enter the sound menu pressing “<” or “>” button.
Setting Volume:
As you enter the sound menu, Volume will be the first selected option.
- Press “ ” button to increase volume.
- Press “ ” button to decrease volume.
Or you can directly change the volume settings using "VOL+" (to increase) or "-VOL" (to decrease) button.
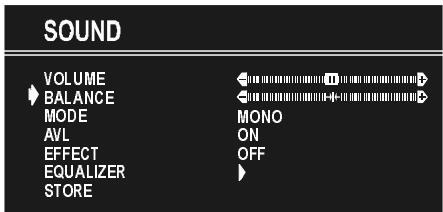
Setting Balance
It allows adjusting the distribution between the left and right speakers.
- Using or button select Balance.
- Press “D” button to change balance rightward.
- Press “ ” button to change balance leftward.
When balance control is in mid position, the cursor is displayed with the two reciprocal arrows.
Selecting Mode
- Using “ ” or “ ” button select Mode.
- Press “ ” or “ ” button to change Mode.
You can choose MONO, STEREO or DUAL (I-II) mode, only if the selected channel supports that mode.
You can also change sound mode directly pressing "I-II" button on your remote control.
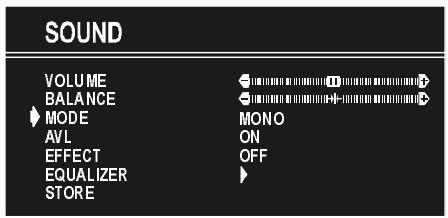
In case of bilingual broadcast (Dual Sound), you can select original or dubbed language using mode option.
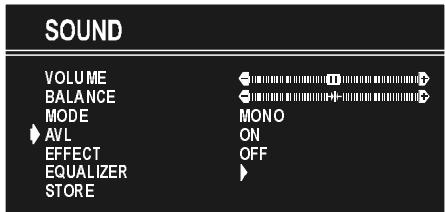
Setting AVL
Automatic Volume Limiting (AVL) function normalises sound to obtain fixed output level between programs, having different sound levels. Pressing “ ” or “ ” button will turn on and off this feature.
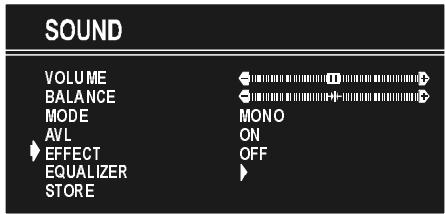
Setting Effect
You can use this feature to switch the sound effect on and off. Pressing “<” or “>” button will turn on and off this feature. If the current sound system is MONO and the sound effect is set ON, then the sound will be heard as if it is STEREO. If the current sound system is STEREO, switching this effect on will make the sound deeper. Switching it off will make no change in MONO and STEREO.
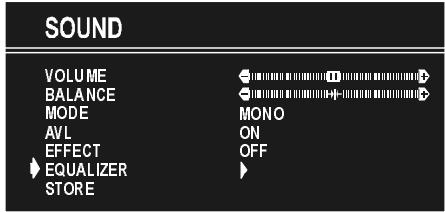
Equalizer
To enter Equalizer sub-menu, select Equalizer using “ ” or “P” button, then enter Equalizer menu pressing “<” or “>” button.
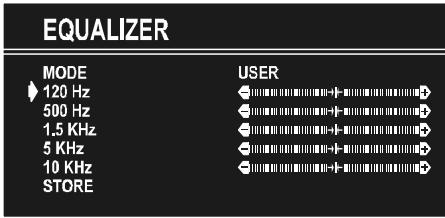
In MODE item there are five predefined and one user defined options. These are USER, CLASSIC, JAZZ, ROCK, POP and FLAT. The predefined options can not be changed by the user. If you change one of the frequency values of the predefined
options, the MODE is switched automatically to USER option. The USER option may be adjusted by the user.
The 5 items below the MODE are available to adjust the sound settings in 5 frequency values: 120Hz , 500Hz , 1.5kHz , 5kHz and 10kHz . To change the values of 5 frequency options, select one of the options by “ ” or “ ” button, and then press “ ” to increase the value, or “ ” to decrease the value. In mid position, cursor is displayed with the two reciprocal arrows.
To store the Equalizer settings, press " " or " " button on "STORE" option.
During the store process all the items are stored, moreover, the USER mode information would not be lost. In other words, when the user mode is selected again, after storing the MODE with one of the predefined options, the user define frequency values would be set.
To Store the Settings
- Press " " or " " button on "STORE" option to store Sound menu settings.
Picture Menu
- To enter the Picture menu directly, press the "GREEN" button, or
- Press "M" button, now you are in Main menu. In the Main menu, select "PICTURE" using or button, then enter the Picture menu pressing or button.
Setting Brightness
- As you enter the picture menu, Brightness will be the first selected option.
- Press “D” button to increase brightness.
- Press " " button to decrease brightness.
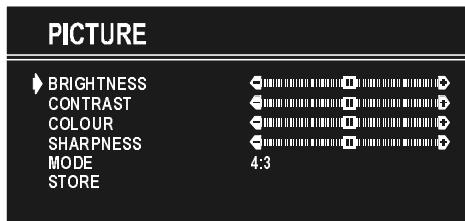
Setting Contrast
Using u or button select Contrast.
- Press “ ” button to increase contrast level.
- Press "←" button to decrease contrast level.
PICTURE
BRIGHTNESS
CONTRAST
COLOUR
SHARPNESS
MODE
STORE
←
←
←
←
4:3
Setting Colour
- Using " or " " button select Colour.
- Press “D” button to increase colour level.
- Press “ ” button to decrease colour level.
PICTURE
BRIGHTNESS
CONTRAST
COLOUR
SHARPNESS
MODE
STORE
←
←
←
4:3
Setting Sharpness
- Using “ ” or “ ” button select Sharpness.
- Press “ ” button to increase peaking level.
- Press " " button to decrease peaking level.
PICTURE
BRIGHTNESS
CONTRAST
COLOUR
SHARPNESS
MODE
STORE
←
←
←
←
4:3
Mode
This item is used to change the picture size.
By pressing “ ” or “ ” button you may choose one off two options. These are, “4:3” and “16:9”.
- 4:3 This option forces the picture ratio to 4:3 mode.
- 16:9 This option forces the picture ratio to 16:9 mode.
PICTURE
BRIGHTNESS
CONTRAST
COLOUR
SHARPNESS
MODE
STORE
←
←
←
←
4:3
To Store the Settings
- Press “ ” or “ ” button on STORE option to store Picture menu settings except Picture Mode.
PICTURE
BRIGHTNESS
CONTRAST
COLOUR
SHARPNESS
MODE
STORI
←
←
4:3
OK
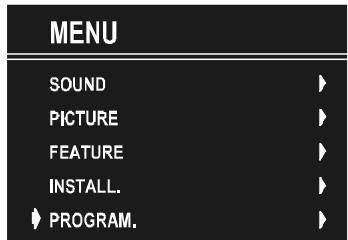
Feature Menu
- To enter the Feature menu directly, press the "YELLOW" button, or
- Press "M" button, now you are in Main menu. In the Main menu, select FEATURE using P or P button. Then enter the Feature menu pressing or button.
MENU
SOUND
PICTURE
FEATURE
INSTALL.
PROGRAM.
V
Sleep Timer
As you enter the Feature menu, SLEEP TIMER will be the first selected option. Use “<” or “>” button to change the Sleep Timer values between OFF, 0:15:00, 0:30:00, 0:45:00, 1:00:00, 1:15:00, 1:30:00, 1:45:00 and 2:00:00.
It is displayed on the upper right of the screen. If sleep timer is activated it is displayed with the TV status and erased with it after 3 seconds.
0:15:00
FEATURE
SLEEP TIMER
CHILD LOCK
LANGUAGE
OFF
OFF
ENGLISH
If there is only one minute left of the countdown of the timer, it is displayed automatically on the upper right of the screen, and stayed there until finishing. Then TV goes automatically to stand-by.
Child Lock
You can use this feature to prevent children turning on TV or changing programs or adjustments etc. without remote control.
The CHILD LOCK feature can be set by “<” or “>” button to either ON or OFF. When OFF is selected, there will be no difference in the operation of your TV. When ON is selected, the TV can only be controlled by the remote control handset. In this case, the front panel buttons (except the Switch On/Off button) will not work.
FEATURE
SLEEP TIMER
CHILD LOCK
LANGUAGE
OFF
OFF
ENGLISH
Selecting Menu Language
Menu language can be chosen by pressing “<” or “>” button on LANGUAGE item.
FEATURE
SLEEP TIMER
CHILD LOCK
LANGUAGE
OFF
OFF
ENGLISH
To Store Settings
In Feature menu all settings are stored automatically.
Install Menu
- To enter the Install menu directly, press the BLUE button, or
- Press "M" button, now you are in Main menu. In the Main menu, select "INSTALL." using or button. Then enter the Install menu pressing "Δ" or "▷" button.
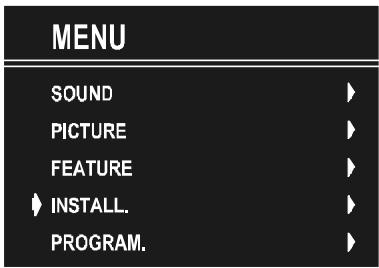
SelectingProgramme
To select programme number, you can use “ ” or “ ” button, Digit Buttons or The Double Digit button with digit buttons.
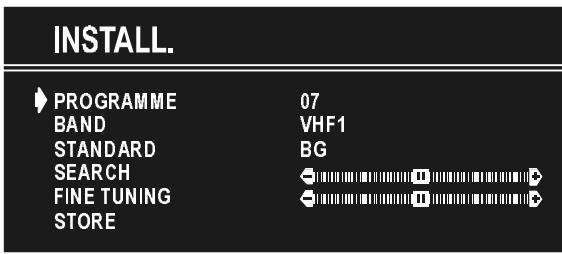
Selecting Band
BAND, can be chosen either,
- VHF1, VHF3 or UHF by “ ” or “ ” button.
Selecting Standard
Using “ ” or “ ” button on STANDARD, you can change the standard to B/G, D/K, L/L'.
Selecting Search
To start the search process, press "▶" button for forward search or "◁" button for backward search. SEARCH item blinks during search process, since the process is stopped or signal is found. During search process the semi-transparent menu background becomes "BLUE". To stop the search process "◁" or "▷" button must be pressed again.
Selecting Fine Tuning
You can use the Fine Tuning process for fine adjustment (after coarse adjustment), if you are not happy about the image on the screen.
Use “ ” or “ ” button on FINE TUNING item, until getting the best image on the screen.
To Store Settings
Press “<” or “>” button on STORE option to store Install menu settings.
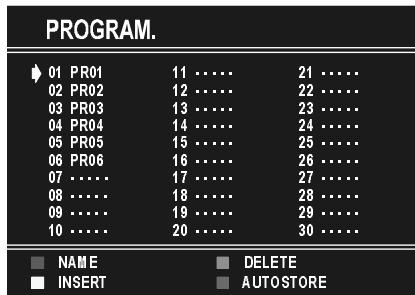
Programme Menu
To enter Programme menu directly, press the "i" button, or
- Press "M" button, now you are in Main menu. In the Main menu, select "PROGRAM." using or button. Then enter the Programme menu pressing or button.
By moving the cursor in four directions you can reach 30 programmes in the same page. By scrolling the pages up or down by pressing the navigation buttons you can select all the programmes in TV mode (except the AV mode).
In menus, "△" and "P" buttons are working like "Direction Up" and "Direction Down".
By cursor action, programme selection is done automatically. Selected programme is displayed with "CYAN" characters. In order to select programme is also possible by using digit or double-digit button. In this way programme selection is automatic and after selection the selected programme is displayed with cyan characters. The TV Status is changed by the programme selection too. When using double-digit button in order to select a programme, the Programme Number in TV Status OSD is displayed in "P --" form, and by pressing digit buttons they are displayed in it.
Programme Number is between 00 and 99. Programme Name has a name string with 5 characters. After autostore process the Programme Names are set to "PR01" (programme number),
At the bottom of the menu there is a programme sort functions section. Each function is activated by color button (seen below). NAME allows changing the programme name. By DELETE you can delete programmes that you decided. INSERT section is for inserting programmes into another programme spaces. By selecting AUTOSTORE section, Autostore menu will be available.
To change the name of a decided programme, Select the programme and push the RED (NAME) button. The first letter begins to blank on the selected name. To change that letter “ ” or “ ” button can be used, and to select the other letters, “ ” or “ ” button can be used. If the cursor is at the last letter of the Programme Name, pressing “ ” button moves the cursor at the beginning. On the contrary, if the cursor is at the beginning of the Programme Name, pressing “ ” button moves the cursor at the end.
After changing the name by pressing the RED button (STORE) it is stored. After activating the name process the "INSERT", "DELETE" and "AUTOSTORE" processes will be inactive and
"CANCEL" option will be valid. This option cancels the name process, if the new name do not want to be stored.

When the GREEN button is pressed, "NAME", "AUTOSTORE" and "DELETE" functions are erased, the selected programme (A) is displayed with green characters. From now on, the automatic selection is canceled. Cursor moves are indicated with "CYAN" characters. With navigation buttons, the decided program space (B) can be selected and by pressing the green button again the programme will be inserted into that space. All programmes below the inserted programme will move down by one number.
"CANCEL" function cancels the activated "INSERT" process.
For "DELETE" process press the yellow button, ("NAME", "INSERT" and "AUTOSTORE" functions are inactive). Pressing yellow button again erases the selected programme from the programme list, and the programmes below shift one up. Pressing blue button cancels the activated "DELETE" process.
To enter Autostore menu, press to the blue button. To learn the features of this function see "AUTOSTORE" below.
Autostore
Autostore, searches and stores all channels automatically on your TV, according to the transmission of programme systems in your area.
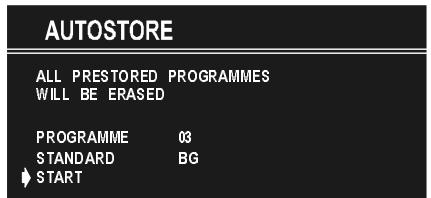
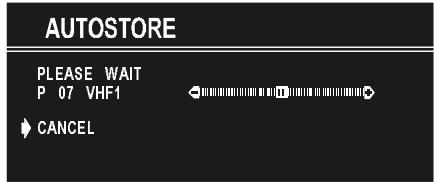
PROGRAMME item is used in order to store the channels after Autostore, as from a required programme. In default the programme number is set to the following programme after the last set programme. By using “<” or “>” button the number can be changed, in addition to change number digit button or double digit button can be used too.
Using “ ” or “ ” button on STANDARD, you can change the standard to B/G, D/K, L/L'.
To cancel AUTOSTORE before starting, press "TV" button. To select "START" use P or P button and press or button. To cancel AUTOSTORE during running press or button.
After Autostore is finalized, a programme list will appear on the screen. In the programme list you will see the programme numbers and names assigned to the programmes.
If you do not accept the locations and/or the programme names of programmes, you can change them in Programme menu.
Other Features
TV Status
Programme Number, Programme Name (or AV), (they are displayed on the upper left of the screen) and Sleep Timer (shows the time left on the upper right screen if enabled). In stereo options the sound indicator is displayed with them too. They are displayed after programme change for 3 seconds.
P01 Programme Number
PR-01 Programme Name (5 characters)
These OSD's are displayed when a new programme is entered by digit button, by pressing "P<P" button, or by "△" or "P" button, or by "TV" button.
Programme Swap (P<P)
This button is used to reenter to the preceding entered programme again. Pressing "P<P" consecutively allows to swap into two last entered programmes.
Double-digit (- -)
This OSD is displayed when the "Double-Digit" button pressed in place of the programme number indicator.

After that, in order to enter a programme press two digits consecutively. Both digits must be entered within 3 seconds or the function will disappear.
Personal Preferences (PP)
All the preset values will be restored, when pressing "PP".

Sound Indicator
This is a stereo option. The alternatives of the indicator are Mono, Stereo, Dual I and Dual II. This indicator is displayed under the programme number indicator on the screen. "I-II" button is used to select Mono or Stereo, or Dual I or Dual II.

In Mono broadcast or in forced-mono (for stereo broadcast).

In Stereo broadcast.

If dual broadcast detected. Dual I is selected in default and also can be selected after Dual II by Remote Control.

If Dual II selected by Remote Control.
Sleep Timer Last Minute Indicator
It is displayed on the upper right of the screen. If sleep timer is activated it is displayed with the TV status and erased with it after 3 seconds.
If there is only one minute of the countdown left of the timer, it is displayed automatically on the upper left of the screen, and stayed there until finishing. Then TV goes automatically to stand-by.
0:15 : 00
Mute Indicator
It is placed in the upper middle of the screen when enabled, and it stays there until it is disabled.
To cancel mute, there are two alternative; the first one is pressing to "X" button, thus volume is set to the preceding value, and the second one is increasing the volume level, thus it starts at the minimum level to increase. By decreasing the volume level in mute state, mute will not be ignored, only the volume level will decrease. If mute is cancelled after decreasing the volume level, the volume will return at the decreased level.
No-Signal
No-Signal Timer Indicator
It is displayed in the middle of the screen when no valid signal detected. It shows the time remaining before the switching to the Stand-By mode (it takes 5 minutes when no signal detected or no any Remote Control command is accessed). The indicator is displayed for 3 seconds when there is no valid signal.
After an Remote Control command (if No-Signal Timer is active) the timer stops and if no signal detected again the timer is initialized to 5 minutes and starts 3 seconds later again to count down.
It is not valid in AV mode.
05:00
Blue Background During No-Signal
In case, no valid signal is detected (in TV or AV mode) Blue Background is activated. During search process Blue Background is not active. But instead there is another feature given; the semi-transparent menu background is made blue.
Volume Bar
It is displayed in the lower middle of the screen. When a volume command is received (pressing "Vol+ or "Vol-" by Remote Control or Front panel) and no menu is active, it stays on the screen for 3 seconds, after the last volume command or until another command is received in between.
AV Modes
By pressing the "AV" button you can switch your TV to AV modes (except being in Teletext). Pressing this button consecutively will switch the TV in one off the AV modes: AV-1, F-AV, RGB.
AV1 supports the RGB mode. But if there is some colour problem in AV1 mode, please force the AV mode to RGB mode. In order to quit the AV mode press the "TV" button.
Teletext
Teletext is an information system that displays text on your TV screen. Using the Teletext information system you can view a page of information on a subject that is available in the list of contents (index).
On screen display is not available in text mode.
Contrast, brightness or colour control is not available, but volume control is available in text mode.
To operate Teletext
- Select a TV station on which Teletext is being transmitted.
- Press (TELETEXT) " " button. Usually the list of contents (index) is displayed on the screen.
To select a page of Teletext
- Press the appropriate digit buttons for the required Teletext page number.
The selected page number is displayed at the top left corner of the screen. The Teletext page counter searches until the selected page number is located, so that the desired page is displayed on the screen.
- Press "P" button to move the Teletext screen forward one page at a time.
- Press "P" button to move the Teletext screen backward one page at a time.
To Select Index Page
- To select the page number of the index (generally page 100), press "三i" button.
To Select Teletext with a TV Programme
- Press " l button. The text is now superimposed over the programme on the screen.
- Press " 2 " button again to return to the Teletext page.
Searching for a page while watching TV
- While Teletext Mode is on, pressing “ × ” will change the mode to TV, one more press to “ × ” will change the mode from TV to the latest Teletext page we left. In the TV mode enter a page number using digit keys. As you enter digits first line of teletext page will appear on top screen and will remain there until the requested page is found. Then teletext line will be replaced by page number to indicate that page has been found. Now you can display this teletext page pressing “ × ” button.
To Select Double Height Text
- Press "三等" button for the top half of the information page to be displayed in double height text.
- Press "三令" button again for the bottom half of the information page to be displayed in double height text.
- Press "三" button once more for the full page of normal height text.
To Reveal "concealed" Information
- Pressing “ ” button once will reveal answers on a quiz or games page.
- Pressing “ = ” button again will conceal the revealed answers.
To Stop Automatic Page Change
The teletext page you have selected may contain more information than what is on the screen; the rest of the information will be displayed after a period of time.
- Press "回" button to stop the automatic page change.
- Press "三" button again to allow the next page to be displayed.
To Select a Subcode Page
Subcode pages are subsections of long Teletext pages that can only be displayed on the screen one section at a time.
- Select the required Teletext page.
- Press " l " button.
- Select the required subcode page number by pressing four digit buttons (e.g. 0001).
- If the selected subcode page is not displayed in a short time, press "三×" button. TV programme will be displayed on the screen.
- Teletext page number will be displayed on the upper left corner of the screen when the selected page is found.
- Press “ × ” button to display the selected Teletext page.
To exit Teletext
- Press "TV" button. The screen will switch to TV mode.
To Display the Time
- While watching a TV programme with Teletext transmission press "三" button. The current time information, captured from Teletext will be displayed at the upper middle of the screen for 5 seconds.
- If the programme being watched does not have Teletext transmission, no information will be displayed.
Tips
Care of the Screen
Clean the screen with a slightly damp, soft cloth. Do not use abrasive solvents as they may damage the TV screen coating layer
Poor Picture
Have you selected the correct TV system? Is your TV set or house aerial located too close to the loudspeakers, nonearthed audio equipment or neon lights, etc. ?
Mountains or high buildings can cause double pictures or ghost images. Sometimes you can improve the picture quality by changing the direction of the aerial.
Is the picture or Teletext unrecognisable? Check if you have entered the correct frequency.
The picture quality may degrade when two peripherals are connected to the TV at the same time. In such a case, disconnect one of the peripherals.
No Picture
Is the aerial connected properly? Are the plugs connected tightly to the aerial socket? Is the aerial cable damaged? Are suitable plugs used to connect the aerial? If you are in doubt, consult your dealer.
No Picture means that your TV is not receiving any transmission. Have you pressed the correct keys on the remote control? Try once more.
Sound
You can not hear any sound. Did you perhaps interrupt the sound, pressing "OK" key?
Sound is coming from only one of the speakers. Is the balance set to one direction extreme? See SOUND menu.
Remote Control
Your TV no longer responds to the remote control. Press the "TV" button on the remote control once more. Perhaps the batteries are exhausted. If so you can still use the local keys at the front of your TV.
Have you selected the wrong menu? Press "TV" key to return to TV mode or press "M" to return to the previous menu.
No solution
Switch your TV set off and on. If this does not work, call the service personnel; never attempt to repair it yourself.
Specifications
TV BROADCASTING
PAL SECAM B/G D/K L/L'
RECEIVING CHANNELS
VHF (BAND I/III)
UHF (BAND U)
HYPERBAND
German + Nicam Stereo
AUDIO OUTPUT POWER (W_RMS) (%10 THD)
2 × 8
POWER CONSUMPTION (W) (max.)
95
PICTURE TUBE
21^ (55cm.)
DIMENSIONS (mm)
| D | L | H | WEIGHT (kg) |
| 473 | 563 | 442 | 18.5 |
HITACHI
Hitachi, Ltd. Tokyo, Japan
International Sales Division
THE HITACHI ATAGO BUILDING,
No. 15-12 Nishi Shinbashi, 2-Chome,
Minato - Ku, Tokyo 105-8430, Japan.
Tel: 03 35022111
HITACHI EUROPE LTD,
Whitebrook Park
Lower Cookham Road
Maidenhead
Berkshire
SL6 8YA
UNITED KINGDOM
Tel: 01628 643000
Fax: 01628 643400
Email: consumer-service@hitachi-eu.com
HITACHI EUROPE S.A.
364 Kifissias Ave. & 1, Delfon Str.
152 33 Chalandri
Athens
GREECE
Tel: 1-6837200
Fax: 1-6835964
Email: service.hellas@hitachi-eu.com
HITACHI EUROPE GmbH
Munich Office
Dornacher Strasse 3
Email: HSE-DUS.service@hitachi-eu.com
HITACHI EUROPE S.A.
Gran Via Carlos III, 86, planta 5
Email: customerservice.italy@hitachi-eu.com
HITACHI Europe AB
Box 77 S-164 94 Kista
SWEDEN
Tel: +46 (0) 856271100
Fax: +46 (0) 8562711 13
Email: csgswe@hitachi-eu.com
HITACHI EUROPE S.A.S
Lyon Office
B.P. 45, 69671 BRON CEDEX
FRANCE
Tel: 04 72 14 29 70
Fax: 04 72 14 29 99
HITACHI EUROPE LTD (Norway) AB
STRANDVEIEN 18
1366 Lysaker
NORWAY
Tel: 67 5190 30
Fax:67519032
Email: csgnor@hitachi-eu.com
HITACHI EUROPE AB
Egebaekgård
Egebækvej 98
DK-2850 Nærum
DENMARK
Tel: +45 43 43 6050
Fax: +45 43 60 51
Email: csgnor@hitachi-eu.com
HITACHI EUROPE AB
Neopoli / Niemenkatu 73
FIN-15140 Lahti
FINLAND
Tel: +358 3 8858 271
Fax: +358 3 8858 272
Email: csgnor@hitachi-eu.com
Hitachi Europe Ltd
Bergensesteenweg 421
1600 Sint-Pieters-Leeuw
BELGIUM
Tel: +32 2 363 99 01
Fax: +32 2 363 99 00
Email: sofie.van.bom@hitachi-eu.com
HITACHI EUROPE LTD
Na Sychrove 975/8
101 27 Praha 10 - Bohdalec
CZECH REPUBLIC
Tel: +420 267 212 383
Fax: +420 267 212 385
Email: csgnor@hitachi-eu.com
- Teletext Buttons
- Control Panel Buttons
- Front AV input
- Connect Peripheral Equipment
- Via the Euroconnector
- Via Aerial Input
- Decoder
- Connecting a decoder with an aerial socket to the TV
- Connecting a decoder without an aerial socket to the TV
- TV and Video Recorder
- Search for and store the test signal of the video recorder
- Camera and Camcorder
- To connect to Front-AV input
- Connect the decoder to the video recorder
- Preparation
- Features
- Safety Precautions
- IMPORTANT SAFETY INFORMATION ON OPERATING YOUR TV
- DO's
- DON'Ts
- ABOVE ALL
- Power Cord
- Moisture and Water
- Cleaning
- Lightning
- Ventilation
- Replacement Part
- Servicing
- X-rays
- Flame sources
- Warning!
- Instructions for waste disposal:
- CAUTION
- RISK OF ELECTRIC SHOCK
- Before Switching on your TV
- Power connection
- Connections to the RF input socket
- How to connect other devices
- Inserting batteries in the remote control handset
- Switching the TV ON/OFF
- To switch the TV on
- To switch the TV off
- Operating the TV
- Operating with the buttons on the TV set
- Volume Setting
- Programme Selecting
- Operating with Remote Control
- Programme Selecting (Previous or next programme)
- Programme Selecting (direct access):
- Programme Swapping
- Menu System
- MAIN MENU
- Sound Menu
- To change sound settings
- Setting Volume:
- Setting Balance
- Selecting Mode
- Setting AVL
- Setting Effect
- Equalizer
- To Store the Settings
- Picture Menu
- Setting Brightness
- Setting Contrast
- PICTURE
- Setting Colour
- Setting Sharpness
- Mode
- Feature Menu
- MENU
- Sleep Timer
- FEATURE
- Child Lock
- Selecting Menu Language
- To Store Settings
- Install Menu
- SelectingProgramme
- Selecting Band
- Selecting Standard
- Selecting Search
- Selecting Fine Tuning
- Programme Menu
- Autostore
- Other Features
- TV Status
- Programme Swap (P<P)
- Double-digit (- -)
- Personal Preferences (PP)
- Sound Indicator
- Sleep Timer Last Minute Indicator
- Mute Indicator
- No-Signal
- No-Signal Timer Indicator
- Blue Background During No-Signal
- Volume Bar
- AV Modes
- Teletext
- To operate Teletext
- To select a page of Teletext
- To Select Index Page
- To Select Teletext with a TV Programme
- Searching for a page while watching TV
- To Select Double Height Text
- To Reveal "concealed" Information
- To Stop Automatic Page Change
- To Select a Subcode Page
- To exit Teletext
- To Display the Time
- Tips
- Care of the Screen
- Poor Picture
- No Picture
- Sound
- Remote Control
- No solution
- Specifications
- TV BROADCASTING
- RECEIVING CHANNELS
- AUDIO OUTPUT POWER (W_RMS) (%10 THD)
- POWER CONSUMPTION (W) (max.)
- PICTURE TUBE
- HITACHI
Brand : HITACHI
Model : CL2143S
Category : Remote control