
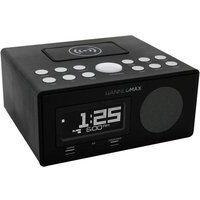
HX-123CR - Alarm Clock HANNLOMAX - Free user manual and instructions
Find the device manual for free HX-123CR HANNLOMAX in PDF.


| Product Type | Alarm Clock Radio |
| Brand | HANNLOMAX |
| Model | HX-123CR |
| Dimensions (approx.) | 6 x 4 x 3 inches (15 x 10 x 8 cm) |
| Weight (approx.) | 0.9 lb (0.4 kg) |
| Power Supply | AC 120V 60Hz or 2 x AAA batteries (backup) |
| Radio Bands | AM / FM |
| Alarm Modes | Radio, Buzzer, or Combination |
| Dual Alarm | Yes, independent settings |
| Snooze Function | Yes, 9-minute interval |
| Sleep Timer | Yes, up to 90 minutes |
| Display | LED, dimmer control |
| Time Format | 12-hour or 24-hour selectable |
| Backup Battery Type | 2 x AAA (not included) |
| Cleaning Instructions | Wipe with a dry, soft cloth. Do not use liquid cleaners. |
| Safety Warnings | Keep away from water and moisture. Unplug during storms. |
| Repairability | Not user-serviceable. Contact support for issues. |
| Included Accessories | AC adapter, user manual |
Frequently Asked Questions - HX-123CR HANNLOMAX
User questions about HX-123CR HANNLOMAX
0 question about this device. Answer the ones you know or ask your own.
Ask a new question about this device
Download the instructions for your Alarm Clock in PDF format for free! Find your manual HX-123CR - HANNLOMAX and take your electronic device back in hand. On this page are published all the documents necessary for the use of your device. HX-123CR by HANNLOMAX.
USER MANUAL HX-123CR HANNLOMAX
The lightning flash with arrowhead symbol, within an equilateral triangle, is intended to alert the user to the presence of uninsulated “dangerous voltage” within the products enclosure that may be of sufficient magnitude to constitute a risk of electric shock to persons.
CAUTION
RISK OF ELECTRIC SHOCK DO NOT OPEN
Warning: To reduce the rise of electric shock, do not remove cover (or back) no user-serviceable parts inside. Refer servicing to qualified service personnel.

The exclamation point within an equilateral triangle is intended to alert the user to the presence of important operating and maintenance (servicing) instructions in the literature accompanying the appliance.
IMPORTANT SAFETY INSTRUCTIONS
- Read these instructions.
- Keep these instructions.
- Heed all warnings.
- Follow all instructions.
- Do not use this apparatus near water.
- Clean only with dry cloth.
- Do not block any ventilation openings. Install in accordance with the manufacturer's instructions.
- Do not install near any heat sources such as radiators, heat registers, stoves, or other apparatus (including amplifiers) that produce heat.
- Protect the power cord from being walked on or pinched particularly at plugs, convenience receptacles, and the point where they exit from the apparatus.
- Only use attachments/accessories specified by the manufacturer.
- Use only with the cart, stand, tripod, bracket, or table specified by the manufacturer, or sold with the apparatus. When a cart is used, use caution when moving the cart/apparatus combination to avoid injury from tip-over.
2) Unplug the apparatus during lightning storms or when unused for long periods of time.
3) Refer all servicing to qualified service personnel. Servicing is required when the apparatus has been damaged in any way, such as power-supply cord or plug is damaged, liquid has been spilled or objects have fallen into the apparatus, the apparatus has been exposed to rain or moisture, does not operate normally, or has been dropped.

FCC NOTICE
This device compiles with Part 15 of the FCC Rules. Operation is subject to the following two conditions :
(1) this device may not cause harmful interference, and (2) this device must accept any interference received, including interference that may cause undesired operation.

QUICK REFERENCE
1. CLK / MEM
• Use this button to set the clock
- Use this button to store radio stations in the memory.
- Use this button to select the stored radio stations in the memory.
2. MIN /
- Use this button to adjust the minute in CLOCK or ALARM time
- Use this button to search the radio station in backward direction.
3. HOUR / ▶
- Use this button to adjust the hour in CLOCK or ALARM time.
- Use this button to search the radio station in forward direction.
4. DIMMER ( Use this button to adjust the brightness of the display.)
5. AL2 / - (VOLUME)
• Use this button to set the alarm time in ALARM 2
- Use this button to decrease the volume.
6. AL1 / + (VOLUME)
- Use this button to set the alarm time in ALARM 1
- Use this button to increase the volume.
7. SOURCE / AL. OFF / ⏻
- Use this button to turn on the unit.
- Use this button to select AM, FM or AUX mode
- Use this button to turn the ALARM off after Alarm activates.
8. SNOOZE (SLEEP)
- Use this button to temporarily suspend the ALARM for a short period.
- Use this button to set the sleep time.
9. PM INDICATOR
- ALARM 1 BUZZER INDICATOR (This indicator shows that the unit is in ALARM 1 buzzer mode.)
- ALARM 1 RADIO INDICATOR(This indicator shows that the unit is in ALARM 1 radio mode.)
- ALARM 2 BUZZER INDICATOR (This indicator shows that the unit is in ALARM 2 buzzer mode.)
- ALARM 2 RADIO INDICATOR (This indicator shows that the unit is in ALARM 2 radio mode.)
- DC JACK (Connect the unit to the AC/DC adaptor.)
- FM WIRE ANTENNA (Extent this wire antenna to obtain better FM broadcasting.)
- BATTERY COMPARTMENT (Compartment for the back-up battery.)
14. LED DISPLAY
SETTING THE CLOCK
- With the unit in CLOCK mode, press and hold the CLK / MEM button for about 1 second, the time will begin to flash on the display.
- Press the HOUR / ▶ button to adjust the hour.
- Press the MIN / ◀ button to adjust the minute.
- When the correct time is selected, press the CLK / MEM button again to confirm.
SETTING THE ALARMS
- With the unit in CLOCK mode, press the AL1/+ or AL2/- button. The ALARM time will begin to flash on the display.
- Press the HOUR / ▶ button to adjust the alarm hour.
- Press the MIN / ◀ button to adjust the alarm minute.
- When the desired alarm time is selected, press the AL1/+ or AL2/- button to confirm.
- Press the AL1/+ or AL2/- button to select the ALARM sound mode - buzzer or currently set radio station. The alarm buzzer or radio indicator will light up.
SNOOZE FUNCTION
- Whenever the alarm (radio or buzzer) activates, it can be temporarily suspended for a short period of 9 minutes by pressing the SNOOZE button once.
- The buzzer or radio will then automatically activate again after the 9 minutes SNOOZE period has ended.
- This procedure can be repeated for up to approximately one hour.
TURN OFF THE ALARM
When the Alarm activate, press the SOURCE / AL. OFF / ⏻ button to turn off the Alarm.
LISTENING TO THE AM/FM RADIO
- Press the SOURCE / AL. OFF / ⏻ to select AM or FM band.
- Press the HOUR / ▶ or MIN / ◀ button step by step to tune to the desired radio stations.
- Press and hold the HOUR / ▶ or MIN / ◀ button for approx.1 second, it will start to search the next radio station in the direction of the search. The search operation simply finds stations with strong signals. Stations with weak reception can only be tuned in manually.
- To turn off the radio, press and hold the SOURCE / AL. OFF / ⏻ button for approx.. 1 second.
SETTING THE CLOCK
- With the unit in CLOCK mode, press and hold the CLK / MEM button for about 1 second, the time will begin to flash on the display.
- Press the HOUR / ▶ button to adjust the hour.
- Press the MIN / ◀ button to adjust the minute.
- When the correct time is selected, press the CLK / MEM button again to confirm.
SETTING THE ALARMS
- With the unit in CLOCK mode, press the AL1/+ or AL2/- button. The ALARM time will begin to flash on the display.
- Press the HOUR / ▶ button to adjust the alarm hour.
- Press the MIN / ◀ button to adjust the alarm minute.
- When the desired alarm time is selected, press the AL1/+ or AL2/- button to confirm.
- Press the AL1/+ or AL2/- button to select the ALARM sound mode - buzzer or currently set radio station. The alarm buzzer or radio indicator will light up.
SNOOZE FUNCTION
- Whenever the alarm (radio or buzzer) activates, it can be temporarily suspended for a short period of 9 minutes by pressing the SNOOZE button once.
- The buzzer or radio will then automatically activate again after the 9 minutes SNOOZE period has ended.
- This procedure can be repeated for up to approximately one hour.
TURN OFF THE ALARM
When the Alarm activate, press the SOURCE / AL. OFF / ⏻ button to turn off the Alarm.
LISTENING TO THE AM/FM RADIO
- Press the SOURCE / AL. OFF / ⏻ to select AM or FM band.
- Press the HOUR / ➤ or MIN / ◀ button step by step to tune to the desired radio stations.
- Press and hold the HOUR / ▶ or MIN / ◀ button for approx.1 second, it will start to search the next radio station in the direction of the search. The search operation simply finds stations with strong signals. Stations with weak reception can only be tuned in manually.
- To turn off the radio, press and hold the SOURCE / AL. OFF / ⏻ button for approx.. 1 second.
SAVING A RADIO STATION TO THE MEMORY
- Tune the radio to the desired station.
- Press and hold the CLK / MEM button to store this radio station in the next memory station number. The display will show PXX (XX is the memory station number from 01 to 10)
- Up to 10 AM and 10 FM radio stations can be stored in the memory.
TO LISTEN TO A SAVED RADIO STATION
- Press the SOURCE / AL. OFF / ⏻ button to select AM or FM band.
- Press the CLK / MEM button to skip to the next stored radio station.
- This function allows you to listen to the radio while you fall asleep.
- Press the SNOOZE button, the display will show the default sleep time of 90 minutes.
- Press the SNOOZE button repeatedly to set the desired sleep time. (90-80-70-60-50-40-30-20-10 min. or OFF)
- After the pre-set time has elapsed, the radio will turn off automatically.
DIMMER CONTROL
Press the DIMMER button to select the brightness of the display
SPECIFICATIONS
Frequency Range: AM: 520-1710 KHz FM: 87.5 - 108 MHz
Power Supply: AC 120V \~ 60 Hz
Rated Output DC6V 100mA
Back-Up Battery: 2 pcs. UM4 AAA size (Battery not included)
Specifications are subject to change without prior notice.

- CAUTION
- RISK OF ELECTRIC SHOCK DO NOT OPEN
- IMPORTANT SAFETY INSTRUCTIONS
- FCC NOTICE
- QUICK REFERENCE
- CLK / MEM
- MIN
- HOUR
- DIMMER ( USE THIS BUTTON TO ADJUST THE BRIGHTNESS OF THE DISPLAY.)
- AL2 / - (VOLUME)
- AL1 / + (VOLUME)
- SOURCE / AL. OFF / ⏻
- SNOOZE (SLEEP)
- PM INDICATOR
- LED DISPLAY
- SETTING THE CLOCK
- SETTING THE ALARMS
- SNOOZE FUNCTION
- TURN OFF THE ALARM
- LISTENING TO THE AM/FM RADIO
- SAVING A RADIO STATION TO THE MEMORY
- TO LISTEN TO A SAVED RADIO STATION
- DIMMER CONTROL
- SPECIFICATIONS
Brand : HANNLOMAX
Model : HX-123CR
Category : Alarm Clock