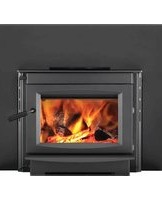
S20i - Fireplace Napoleon - Free user manual and instructions
Find the device manual for free S20i Napoleon in PDF.


| Brand | Napoleon |
| Model | S20i |
| Product type | Built-in gas fireplace |
| Dimensions (W x H x D) | 762 mm x 572 mm x 406 mm |
| Weight | 45 kg |
| Fuel | Natural gas or propane (convertible) |
| Heat output | 10.5 kW (max) |
| Efficiency | Up to 80% |
| Glass type | Tempered heat-resistant glass |
| Main features | Electronic ignition, adjustable flame, remote control included |
| Safety system | Flame detection, automatic shutdown in case of malfunction |
| Venting | Direct vent (coaxial duct) |
| Firebox material | Stainless steel and cast iron |
| Trim options | Black or brushed frame |
| Maintenance and cleaning | Clean glass with non-abrasive product; annual inspection by a professional |
| Spare parts and repairability | Parts available via customer service; repairability score: 8/10 |
| Warranty | 2 years parts and labor |
| Standards | CE, EN 13240 |
Frequently Asked Questions - S20i Napoleon
User questions about S20i Napoleon
0 question about this device. Answer the ones you know or ask your own.
Ask a new question about this device
Download the instructions for your Fireplace in PDF format for free! Find your manual S20i - Napoleon and take your electronic device back in hand. On this page are published all the documents necessary for the use of your device. S20i by Napoleon.
USER MANUAL S20i Napoleon
This wood appliance needs periodic inspection and repair. It is against United States federal regulations to operate this wood appliance in a manner inconsistent with the operating instructions in this manual.
FRENCH PG. 39

INSTALLATION AND OPERATION MANUAL
Product Name \$20i
INSTALLER:
Leave this manual with the appliance.
CONSUMER:
Retain this manual for future reference.
SAFETY INFORMATION
! WARNING
If the information in these instructions are not followed exactly, a fi re or explosion may result causing property damage, personal injury or death. Please read the entire manual before you install and use your appliance. This heater has not been tested with an unvented gas log set. To reduce risk of fi re or injury, do not install an unvented gas log set into the heater.
- This heater can be very hot when burning.
- Combustible materials such as firewood, wet clothing, etc. placed too close can catch fire.
- Children and pets must be kept from touching the heater when it is hot.
- The chimney must be sound and free of cracks. Before installing this appliance, contact the local building or fire authority and follow their guidelines.
- Always operate this appliance with the door(s) or screen (where applicable) tightly closed.
- Burn wood behind the log retainer directly on the firebricks.
- Do not use an elevated grate or otherwise raise the fire.
- This appliance is designed to burn natural wood only. Higher effi ciencies and lower emissions generally result when burning air dried seasoned hardwoods, as compared to softwoods or to green or freshly cut hardwoods.
- Do not start a fire with chemicals or fluids such as gasoline, engine oil, etc.
- Do not burn trash or garbage, lawn clippings/waste, rubber, waste petroleum products, paints or paint thinners/solvents, plastic, materials containing asbestos, construction debris, railroad ties or treated wood, manure or animal remains, salt water driftwood or salted materials, unseasoned wood, coal, charcoal, coloured paper, cardboard, plywood or particleboard. Burning these materials may result in release of toxic fumes or render the appliance ineffective and cause smoke.
- Do not let the appliance become hot enough for any part to glow red.
Wood Stoves ONLY
- At least 14 squares inches (90.3 square centimeters) of outside air must be admitted to the room or directly to the appliance through a 4" (101.6mm) diameter pipe.
- KEEP THE STOVE TOP TEMPERATURE BELOW 700°F (371°C).
Attempts to achieve heat output rates that exceed design specifications can result in steel distortion and damage.




FOR INDOOR USE ONLY
U.S. ENVIRONMENTAL PROTECTION AGENCY (E.P.A.) CERTIFIED TO COMPLY WITH 2020
PARTICULATE EMISSIONS STANDARDS USING CORD WOOD. THIS APPLIANCE HAS BEEN
TESTED BY POLYTESTS AND LISTED BY CSA GROUP TO STANDARDS:
ULC-S628, UL1482. ASTM E3053-17; ASTM E2515-11 METHODS ALT-125
AS REFERENCED INTO 40 CFR PART 60 SUBPART AAA.
REFERENCE #: 161746

Wolf Steel Ltd., 24 Napoleon Rd., Barrie, ON, L4M 0G8 Canada / 103 Miller Drive, Crittenden, Kentucky, USA, 41030
Phone 1 (866) 820-8686 • www.napoleon.com • hearth@napoleon.com

WARNING
- This appliance is hot when operated and can cause severe burns if contacted.
- Any changes or alterations to this appliance or its controls can be dangerous and is prohibited.
- Do not operate appliance before reading and understanding operating instructions. Failure to operate appliance according to operating instructions could cause fire or injury.
- Before installing this appliance, contact the local building or fi re authority and follow their guidelines.
- This appliance must be installed by a qualified installer. Never try to repair or replace any part of the appliance unless instructions are given in this manual. All other work should be done by a trained technician.
- Risk of burns. The appliance should be turned off and cooled before servicing.
- Do not operate without fully assembling all components. Do not install damaged, incomplete or substitute components.
- Do not let the appliance become hot enough for any part to glow red.
- Risk of cuts and abrasions. Wear protective gloves, footwear and safety glasses during installation. Sheet metal edges may be sharp.
- All wiring should be done by a qualified electrician and shall be in compliance with local codes. in the absence of local codes, use the current CSA22.1 Canadian Electric Code in Canada or the current National Electric Code ANSI/NFPA No. 70 in the United States.
- If equipped, burning your appliance with the ash dump door ajar creates a fi re hazard that may result in discolouration to the door, internal damage to the appliance or a house and/or chimney fi re.
- Do not connect this appliance to a chimney fl ue serving another appliance.
- Clothing or other fl ammable material should not be placed on or near the appliance. Objects placed in front of the appliance must be kept a minimum of 48" (121.9cm) away from the front face of the appliance.
- Due to high temperatures, the appliance should be located out of traffic and away from furniture and draperies.
• Even after the appliance is off, it will remain hot for an extended period of time. - Any safety screen or guard removed for servicing must be replaced prior to operating the appliance.
• Under no circumstances should this appliance be modified. - This appliance must not be connected to a chimney flue pipe servicing a separate solid fuel burning appliance.
- Do not operate the appliance with the glass door removed, cracked or broken. Replacement of the glass should be done by a licensed or qualified service person.
- Do not strike or slam shut the appliance glass door.
- Only doors / optional fronts certified with the appliance are to be installed on the appliance.
- If the appliance is not properly installed, a house fire may result. Do not expose the appliance to the elements (ex. rain, etc.) and keep the appliance dry at all times. Wet insulation will produce an odour when the appliance is used.
- The chimney must be sound and free of cracks. Clean your chimney a minimum of twice a year and as required.
- Children and adults should be alerted to the hazards of high surface temperature and should stay away to avoid burns or clothing ignition.
- Young children should be carefully supervised when they are in the same room as the appliance.
Toddlers, young children and others may be susceptible to accidental contact burns. A physical barrier is recommended if there are at risk individuals in the house. To restrict access to an appliance or stove, install an adjustable safety gate to keep toddlers, young children and other at risk individuals out of the room and away from hot surfaces. - Ensure you have incorporated adequate safety measures to protect infants/toddlers from touching hot surfaces.
- Check with your local hearth specialty dealer for safety screens and hearth guards to protect children from hot surfaces. These screens and guards must be fastened to the floor.
- Keep the packaging material out of reach of children and dispose of the material in a safe manner. As with all plastic bags, these are not toys and should be kept away from children and infants.
- Do not start a fire with chemicals or fluids such as gasoline, engine oil, etc.
HOT GLASS WILL CAUSE BURNS.
DO NOT TOUCH GLASS UNTIL COOLED.
NEVER ALLOW CHILDREN TO TOUCH GLASS.
! WARNING


WARNING
- Your appliance requires periodic maintenance and cleaning. Failure to maintain your appliance may lead to smoke spillage in your home.
- Ashes must be disposed in a metal container with a tight lid and placed on a non-combustible surface well away from the home or structure until completely cool.
- Ensure clearances to combustibles are maintained when building a mantel or shelves above the appliance. Elevated temperatures on the wall or in the air above the appliance can cause melting, discolouration or damage to decorations, a TV or other electronic components.

WARNING: This product can expose you to chemicals including lead and lead compounds, which are known to the State of California to cause cancer, and chemicals including carbon dioxide, which are known to the State of California to cause birth defects or other reproduc- harm. For more information, go to www.P65Warnings.ca.gov.
For wood appliances:
- Lower emissions generally result when burning air dried seasoned hardwoods, as compared to softwoods or too green or freshly cut hardwoods. Burning wet unseasoned wood can cause excessive creosote accumulation. When this is ignited it can cause a chimney fi re that may result in a serious house fi re.
- This appliance is designed to burn natural wood only. Do not burn trash or garbage, lawn clippings / waste, rubber, waste petroleum products, paints or paint thinners / solvents, plastic, materials containing asbestos, construction debris, railroad ties or treated wood, manure or animal remains, salt water driftwood or salted materials, unseasoned wood, coal, charcoal, coloured paper, gift wrapping, cardboard, plywood or particleboard. Burning these materials may result in release of toxic fumes or render the appliance ineffective and cause smoke.
- Burn wood directly on the fi rebricks. Do not elevate grate or otherwise raise the fi re.
- Do not store wood within appliance installation clearances or within the space required for re-fueling and ash removal.
- If equipped, the catalyst must be installed and in good working order. It is recommended that the catalyst is inspected at least three times per heating season.
table of contents
1.0 general information 5
1.1 dimensions 5
1.2 specifications 6
1.3 general instructions 7
1.4 general information 8
1.5 rating plate information 9
2.0 installation planning 10
2.1 minimum clearance to combustibles 10
3.0 installation 11
3.1 typical existing masonry 12
3.2 factory built fireplace 13
4.0 finishing 14
4.1 door removal 14
4.2 door adjustment 15
4.3 door handle installation 15
4.4 secondary air tubes 16
4.5 bricks and baffles installation 17
4.6 backerplate installation 18
4.7 logo placement 18
4.8 blower installation 19
5.0 operation
5.1 optimum burn method 22
5.2 optional blower operation 22
5.3 air control 23
5.4 fire extinguishers / smoke & carbon monoxide detectors 23
5.5 fuel loading 24
5.5.1 extended fire 25
5.6 smoking 25
6.0 maintenance 26
6.1 ash removal procedures 26
6.2 creosote formation and removal 26
6.3 runaway or chimney fire 27
6.4 chimney cleaning 27
6.5 door glass replacement 28
6.6 care of glass 29
6.7 door gasket replacement 29
6.8 blower service or replacement 30
6.9 wood 31
7.0 replacement parts 32
7.1 overview part 1 33
7.2 overview part 2 34
8.0 accessories 35
9.0 troubleshooting 36
10.0 warranty 37
note:
The information throughout this manual is believed to be correct at the time of printing. Wolf Steel Ltd. reserves the right to change or modify any information within this manual at any time without notice. Changes, other than editorial, are denoted by a vertical line in the margin.
1.1 dimensions
TOP VIEW FRONT VIEW RIGHT SIDE VIEW


note:
Due to an adjustable air channel, A, B and C are adjustable in 3/8" (9.5mm) increments (see "specifications" section for min max).
1.2 specifications
| Specifications | |||
| Emissions 2.25 grams / hour | |||
| Efficiency | Total LHV H | HV | |
| 72.10% 77.54 | % 72.06% | ||
| Chamber (D.W.H) | 14 5/8" x 20 7/8" x 11 5/8"(372mm x 530mm x 295mm) | ||
| Viewing Area 153 in2 | (987cm2) | ||
| Capacity 1.9 cubic feet (0.05 cubic meters) | |||
| Approx. area heated** 800-1800 square feet (74-167m2) | |||
| Maximum heat output*** 65,000 BTU /Hr | |||
| Heat output* 12,944 - 54,127 BTU /Hr | |||
| Duration low fire** 8 hours | |||
| Weight w/o bricks 225 lbs (102kg) | |||
| Weight of bricks 60 lbs (27kg) | |||
| Ideal wood length 16" (406mm) | |||
| Minimum Stack Height **** 15 feet (4.5m) | |||
| Efficiency Standard | B415.1-10 | ||
| A | B | C | |
| Minimum Depth | 5 1/4" (134mm) | 11 1/2" (292mm) | 6 13/16" (173mm) |
| Maximum Depth | 10 3/4" (273mm) | 17" (432mm) | 12 5/16" (313mm) |
* As tested using test method ALT-125.
** Figures will vary considerably with individual conditions.
*** Wolf Steel Ltd. estimated realistic BTU/hr with hardwood logs and regular refueling.
**** Required in order to achieve proper draft.
1.3 general instructions

WARNING
- All wiring should be done by a qualified electrician and shall be in compliance with local codes. In the absence of local codes, use the current CSA 22.1 Canadian Electric Code in Canada or the current National Electric Code ANSI/NFPA No.70 in the United States.
- This appliance has not been tested with any vented or unvented gas log set. To reduce risk of fire or prevent injury, do not install a vented or unvented gas log set into the appliance.
- Burning your appliance with the ash dump door open or ajar creates a fire hazard that may result in discolouration to the gold plated door, internal damage to the appliance or a house chimney fire.
- Do not connect this appliance to a chimney flue serving another appliance.
-
This appliance and its components are designed to be installed and operated as a system. Any alteration to or substitution for items in this system, unless allowed by these installation instructions will void the listing and may void the product warranty. It may also create a hazardous installation. Read through these instructions thoroughly before starting your installation and follow them carefully through your project.
-
Before beginning your installation, consult with your local building code agency or fire officials and insurance representative to ensure compliance.
- Non-toxic smoke will be emitted during the paint curing process to help dissipate the smoke open a window near the appliance.
- Remove any dust or debris off the top of the appliance before fi ring the appliance as the paint will become soft as the appliance heats up and will harden as the appliance cures. To cure the paint on your appliance, burn your appliance moderately hot during the fi rst few fi res.
- To keep the gasket from sticking to the appliance as the paint is curing, periodically open the door every 5-10 minutes.
- For the first two weeks, use generous amounts of fuel and burn the appliance with the damper wide open for an hour as the appliance goes through a process of eliminating moisture in the steel and fi rebricks. The initial heat output will be reduced while the moisture is bring drawn from the appliance and it will be necessary to build several hot fi res to remove this moisture.
- DURING THIS PROCESS DO NOT OVERFIRE THE APPLIANCE. REDUCE THE AMOUNT OF AIR COMING INTO THE APPLIANCE IF THE APPLIANCE OR CHIMNEY BECOMES RED.
general information
1.4 general information
Your appliance was specifically designed to meet the 2020 U.S.A. EPA particulate emission standards for cord wood and has been extensively tested in Canadian laboratories. This system is the most efficient, simple and trouble free we know and works as follows:
Your appliance is the exact duplication of the clean-burning technology found in all Napoleon EPA-certified freestanding stoves. External modifications have been made to allow its installation as a “functional insert” with a heat circulating blower system and a means of enclosing the solid fuel burning fireplace cavity for greater heating efficiency.
Your appliance must be installed only into a solid fuel burning fireplace that is at least 14" (356mm) deep 25 7/8" (657mm) wide and 22" (559mm) high with an approved lined chimney at least 15 feet high (4.6m) and a hearth of 18" (457mm). This minimum recess can only be achieved if the opening height is sufficient enough to allow the connector to fit under the noncombustible facing. The appliance and chimney must be constructed in accordance with all national and local building code standards.
The chimney vent system used on your wood burning appliance should be designed with the least amount of restriction possible to enable the exhaust products to easily flow through it. Chimney vent systems that are too short or too long can also have an adverse effect on the flow of exhaust through it. The wood burning appliance and chimney vent system also require a sufficient supply of combustion air not only to support the combustion in the combustion chamber but to replace the exhaust leaving it so it can flow freely up through the vent system and out into the atmosphere. It is the correct balance of combustion air and the chimney vent system that will ensure the appliance provides you with its optimum performance.
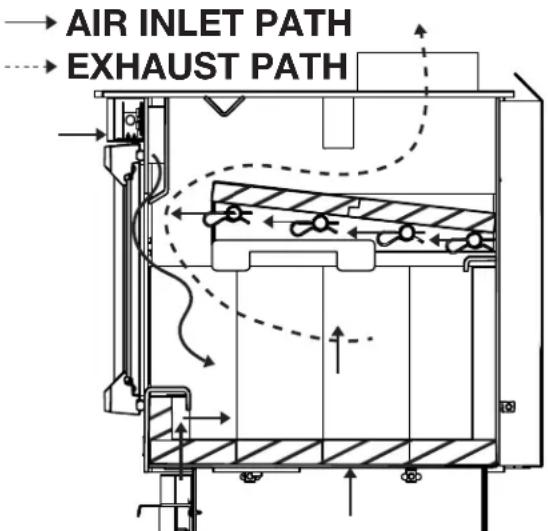
Secondary air from the rear intake opening travels up the back in the secondary air housing to the manifold located across the top and flows out laterally to oxidize the gases below the smoke exit.
The lower combustion chamber is lined with high temperature firebricks on 2 sides, the back and across the bottom, with a layer of fibre baffles at the top to maintain a high temperature in the combustion chamber so that gases mixing with the preheated air from the secondary air manifold tube are easily ignited and burned. The appliance sides and back are shielded to direct the heat upwards and forwards into the room.
Be sure to provide sufficient combustion air. There are many
other appliances in your home competing for air such as: a kitchen range hood, forced air heating devices or a bathroom exhaust blower.
Expansion / contraction noises during heating up and cooling down cycles are normal and to be expected.
After extended periods of non-operation such as following a vacation or a warm weather season, the appliance
may emit a slight odour for a few hours. This is caused by dust particles on the firebox burning off. Open a window to sufficiently ventilate the room.
If you experience smoking problems, you may need to open a door, a window or otherwise provide some method of supplying combustion air to the appliance.

We suggest that our woodburning hearth products be installed and serviced by professionals who are certified in the U.S. by the National Fireplace Institute® (NFI) as NFI Woodburning Specialists or who are certified in Canada by Wood Energy Technical Training (WETT).

Wood Energy Technical Training
1.5 rating plate information
This illustration is for reference only. Refer to the rating plate on the appliance for accurate information
note:
The rating plate must remain with the appliance at all times. It must not be removed.


REFERENCE #: 161746
INSTALL AND USE ONLY IN ACCORDANCE WITH THE MANUFACTURER'S INSTRUCTIONS AND LOCAL BUILDING CODES. MINIMUM CEILING HEIGHT: 7ET (2.13m)
HEARTH EXTENSION / FLOOR PROTECTION: MUST BE NON-COMBUSTIBLE AND EXTEND 22" IN FRONT OF THE INSERT AND 5" ON BOTH SIDES WITH A MINIMUM THICKNESS OF 1" (K=0.04)
CHIMNEY TYPE: MINIMUM 6" (152mm) DAMETER APPROVED RESIDENTIAL TYPE. FOR MOBILE HOME, USE A CHIMNEY LISTED TO ULC S629 IN CANADA OR UL 103HT IN THE USA.
DO NOT OBSTRUCT SPACE UNDER THEATER. SPECIAL METHODS ARE REQUIRED WHEN PASSING A CHIMNEY THROUGH A WALL OR CEILING, SEE INSTRUCTIONS AND BUILDING CODES. DO NOT CONNECT THIS APPLIANCE TO A CHIMNEY FLUE SERVING ANOTHER APPLIANCE.
WARNING: FOR USE WITH SOLID WOOD FUEL ONLY, DO NOT BURN ANY OTHER TYPE OF FUEL. DO NOT USE GRATE OR ELEVATE FIRE. BUILD WOOD FIRE DIRECTLY ON HEARTH.
WARNING: RISK OF SMOKE SPILLAGE. OPERATE ONLY WITH DOOR FULLY CLOSED.
REPLACE GLASS ONLY WITH CERAMIC GLASS. DO NOT OVERFIRE. IF HEATER OR CHIMNEY CONNECTORS GLOW, YOU ARE OVERFIRING. INSPECT AND CLEAN CHIMNEY. FREQUENTLY, UNDER CERTAIN CONDITIONS OF USE CRESCOTE BUILD UP MAY OCCUR RAPIDLY.
DANGER: RISK OF ELECTRICAL SHOCK. DISCONNECT POWER BEFORE SERVICING APPLIANCE.
INSERT: INSTALL AND USE ONLY IN SOLID FUEL BURNING FIREPLACES. DO NOT REMOVE BRICKS OR MORTAR FROM SOLID FUEL BURNING FIREPLACE. INSTALL WITH A POSITIVE FLUE CONNECTOR AND FACEPLATE.
CONTACT LOCAL BUILDING FIRE OFFICIALS ABOUT RESTRICTIONS AND INSTALLATION INSPECTION IN YOUR AREA.
A MINIMUM CLEARANCE OF 18" (457mm) TO THE CHIMNEY CONNECTOR MAY BE REQUIRED BY THE AUTHORITY HAVING JURISDICTION.
LISTED SOLID FUEL BURNING FIREPLACE INSERT ENCASTRÉ À COMBUSTIBLE SOLIDE HOMOLOGUÉ TESTED TO: / TESTÉ SELON : UL1482 - 2011 / ULC S628 - 1993 MODEL / MODELE: S20i / T20i
POUR INSTALLATION ET UTILISATION CONFORMÉMENT AUX INSTRUCTIONS DU FABRICANT ET AUX CODES LOCAUX DU BÂTIMENT.
HAUTEUR DE PLAFOND MINIMAL: 7PI (2,13m).
BASE DE PROTECTION/PROTECTION DE PLANCHER : DOIT ETRE DE NATURE INCOMBUSTIR LE ET SE PROLONGER DE 22" À L'AVANT DE L'ENCASTRE ET 8" SUR LES OÛTÉS, ET AVOUR UNÉ ÉPAISSEUR MINIMALE DE 1" (K = 0,84).
TYPE DE CHEMINÉE: DIAMETRE MINIMAL DE 6" (152mm) APPROVÉE POUR USAGE RÉSIDENTEL, POUR MAISON MOBILE, EMPLOYEZ UNE CHEMINÉE HOMOLOGUÉE ULG 8629 AU CANADA OU UL 100HT AUX ÉTATS-UNIS.
NE RIEN ENTREPOSER SOUS L'APPAREIL. DES MÉTHODES SÉCIALES SONT REQUISES L'ORSQU'UNE CHEMINÉE TRAVERSE UN MUR OU UN PLAFOND. VOIR LES INSTRUCTIONS ET LES CODES DU BÂTIMENT, NE PAS RACCORDER À LA CHEMINÉE D'UN AUTRE APPAREIL
AVERTISSEMENT: POUR USAGE AVEC LE BOIS SEUILLEMENT NE BRÔLEZ PAS AUCUNE AUTRE TYPE DE COMBUSTIBLE N'UTILSÉZ PAS DE CHILNET OU NE SURELLEVÉZ PAS LE BOIS PRÉPAREZ LE FEU DIRECTEMENT SUR L'ÂTRE.
AVERTISSEMENT: RISQUE D'ÉOHAPPEMENT DE FUMEE. TENIR LA PORTE FERMÉE LORSQUE LE POÈLE FONCTIONNE. REMPLACEZ LA VITRE PAR UNE VITRE EN CÉRAMIQUE SEULEMENT.
NE SURC-AUITEZ PAS L'APPAREL, SIL APPAREL OU LES RACCORDS ROUGOENT, L'APPAREL SURCHAUFFEE. INSPECTEZ ET NETTOYLE LA CHEMINÉE FRÉQUEMENT. DANS CERTAINES CONDITIONS, DES DÉPÔTS DE CREOSOT PEUVENT SE FORMER RAPIDEMENT.
DANGER: RISQUE DE SECOUSSE ELECTRIQUE, CHEZ AVANT DE PROCÉDER À L'ENTRET EN ENCASTRÉ: INSTALLEZ ET UTIUSEZ SEULITATION DANS UN FOYER A COMBUSTIBLE SOLIDE, NE RETIRÉAN DE MONTIER, NI BRIOULS DU FOYER A COMBUSION PARTE INSTALLEZ AVEC UNE GAIN CONFORME ET UNE THÈQUE DE RLCOURMEMLNT.
RENSEIGNA DE LA D'ATURITÉS L'AUTORITÉS LOUEN ET BÉLA UNTAGE DES VINCLE DES ALCNDILS AU SUIE DES RÉVITÉCONS ET RÉVITÉNS PRÉTENS D'INGATAPTIONS VOCINE REGION. UN D'ATURITÉS L'ATUAL DE LA AUTOMÉRIQUE AU PACOUXÉS DES CHEMINEE PECUE D'INE EXIGÉ PAR AUTOTURE DE MANT JURIDICTION.
THIS WOOD HEATER NEEDS PERIODIC INSPECTION AND A REPAIR FOR CREOPER OPERATION. CONSULT THE OWNER'S GENERAL FOR FURTHER INFORMATION. IT IS AGAINST FIRECAL REGULATIONS TO OPERATE THIS WOOD HEATER
IN LA CHAVIER INCONSISTENT WITH THE OPERATING INSTRUCTIONS IN THE OWNER'S MANUAL, / CE POLLE À BOIS COIT ÉTILE INSPECTÉ PÉRIDIQUÈMENT ET RÉPARÉ POUR UN FONCTIONNEMENT CORRECT, CONSULTÉ LE MANUEL DU PROPRIÉTAIRE POUR PLUS D'INFORMATION. II EST CONTRE LE REGLEMENTS FÉDÉRAUX POUR FAIRÉ FONCTIONNER CE POIL E À BOIS D'UNE MANIERE INCOMPATIBLE AVEC LES INSTRUCTIONS DE FONCTIONNEMENT DANS LE MANUEL DU PROPRIÉTAIRE.

| APPLIANCE/ APPSH1 | ADJAC-NI SIDE WALL (TO BID) / MUL LATE/AL ADJACENT (AI COTE) A | MANTLE (TO BID) / MANTEAU (UBOVA) DESSUS B | TOP RACING (TO TOTY) / MAUTIX LA PAÇADE (UBOVA) DESSUS C | SIDE RACING, TO SUIT VCOII DE LA PAÇADE AU COST D | MINIMUM HEART EXENSION / EASE IN ALE PROTECTION MINIVALE E | MINIMUM H-ARCH THEONIBES/ MAXIM LE MINIVALE DE LA BASF DE PROTECTION F | MINIMUM H-ARCH SID-EXTENDION/ MAX IM PROTECTION LETRAFA MINIVALE G |
| 820V 730 | 16" | 30" | 22" | 12" | 22" | 1" | 8" |
MANUFACTURE DATE: / DATE DE FABRICATION:
YEAR/ANNÉE: □2019 □2020 □2021 □2022 □2023 □2024
MONTH/MOIS: 1 2 3 4 5 6 7 8 9 10 11 12
CAUTION HOT WHILE IN OPERATION. DO NOT TOUCH. KEEP CHILDREN, CLOTHING AND FURNITURE AWAY. CONTACT MAY CAUSE SKIN BURNS.
ATTENTION: QUAND L'APPAREIL FONCTIONNE, LA SURFACE DEVIENT CHAUBE, NE PAS
TOUCHER. TENIR LES ENFANTS, LES VÊTEMENTS ET LES MEUBLES À L'ÉCART. LE CONTACT PEUT CAUSER DES BRÛLURES À LA PEAU.
WOLF STEEL LTD.
24 NAPOLEON ROAD, BARRIE, ON, L4M 0GB CANADA
WOLF STEEL USA
CRITTenden, KY, 401030 USA
NAC GUANGZHOU P.R.C.
GUANGZHOU,CHINA

with 2020 particulate emission standards using cordwood, Certifié conforme à la norme d'émanation de particles de 2020 en utilisant bols de corde, 40 CIFP Part BCL, Subpart AVA 2,25 Grams Per Hour / 2020 Cordwood / 2,25 Grammes par heure / Bols de Corde 2020, Overall Efficiency/Efficacité Total: 72.1% | UK: 77,54% | HM: 72,06%
S20i / T20i
W385-4534/B
2.0 installation planning
Clean all ashes out of the inside of the existing fireplace opening. Make sure that the chimney and fireplace are free of cracks, loose mortar, creosote deposits, blockage or other signs of deterioration. If necessary, have any repair work done by a qualified professional before installing the insert.
Do NOT remove bricks or mortar from the fireplace. In case of an outside air inlet or ash dump, fill with fiberglass insulation. Adhere to minimum clearances as illustrated.
Combustible material must not protrude more than 1" (25mm) to the side of the insert or between the mantel and the top of the insert.
2.1 minimum clearance to combustibles
| MINIMUM CLEARANCES | ||
| A | Sidewall | 16" (406mm) |
| B | Mantel | 30" (762mm) |
| C | Top facing | 22" (559mm) |
| D | Side facing | 10" (254mm) |
| E | Hearth (front) | 22" (559mm) |
| F | Minimum hearth thickness | 1" (25mm) |
| G | Hearth (side) 8" (203mm) | |
| H | In front of insert | 48" (1219mm) |
| MINIMUM EXISTING FIREPLACE DIMENSIONS | ||
| I | Width (rear) | 25 7/8" (657mm) |
| J | Width (front) | |
| K | Height (front) | 22" (559mm) |
| L | Height (rear) | |
| M | Depth | 14" (356mm) |
| N | Hearth width | 41 3/8" (1051mm) |
| O | Facing width | 45 3/8" (1153mm) |
| P | Facing height | 42 5/8" (1083mm) |
| Q | Mantel | 50 5/8" (1286mm) |
HEARTH EXTENSION / FLOOR PROTECTION:
Must be non-combustible and extend 22" (559mm) in front of the insert and 8" (203mm) on both sides with a minimum thickness of 1" (25mm) and a thermal conductivity factor (K) 0.84.
Clearances can be reduced with shielding acceptable to local authorities. Reduced installation must comply with NFPA 211 or CAN/CSA-B365.


WARNING
- Wear gloves, protective footwear and safety glasses for protection.
- Carefully follow the instructions for assembly of the pipe and other parts needed to install the appliance. Failure to do so may result in a fire, especially if combustibles are too close to the appliance or chimney and air spacers are blocked, preventing the free movement of cooling air.
- Do not draw outside air from garage spaces. Exhaust products of gasoline engines are hazardous. Do not install outside air ducts such that the air may be drawn from attic spaces, basements or above the roofing where other heating appliances or fans and chimneys exhaust or utilize air. These precautions will reduce the possibility of appliance smoking or air flow reversal. The outside air inlet must remain clear of leaves, debris, ice and/or snow. It must be unrestricted while appliance is in use to prevent room air starvation which can cause smoke spillage and an inability to maintain a fire. Smoke spillage can also set off smoke alarms.
- Negative pressure within your home may inadvertently affect your appliance.
- To prevent contact with sagging or loose insulation, the appliance must not be installed against vapour barriers or exposed insulation. Localized overheating could occur and a fire could result.
- Do not use makeshift compromises during installation. Do not block or restrict air, grille or louvre openings. Do not add a hood.
- To prevent personal injury, keep hand tools in good condition, sharpen cutting edges and make sure tool handles are secure.
• Always maintain the minimum air space required in the enclosure to prevent fires. - Check with local building offi cials for any permits required for installation of this appliance and notify your insurance company prior to proceeding.
It is extremely important that your appliance be installed according to the manufacturer's specifications. The manufacturer's installation instructions and specified clearances should always be followed in accordance with local and national codes. In Canada the CSA B365 and the CSA C22.1 installation codes are to be followed. In the USA the ANSI NFPA 70 and ANSI NFPA 211 installation codes are to be followed.
Chimney and liner must be in good condition and kept clean.
3.1 typical existing masonry
You can install your appliance using your existing masonry chimney. To do so, use the following guidelines. If you are using a masonry chimney, it is important that it be built in compliance with the specifications of the Building Code in your region. It must normally be lined with fire clay bricks, metal or clay tiles sealed together with fire cement. (Round flues are the most efficient).
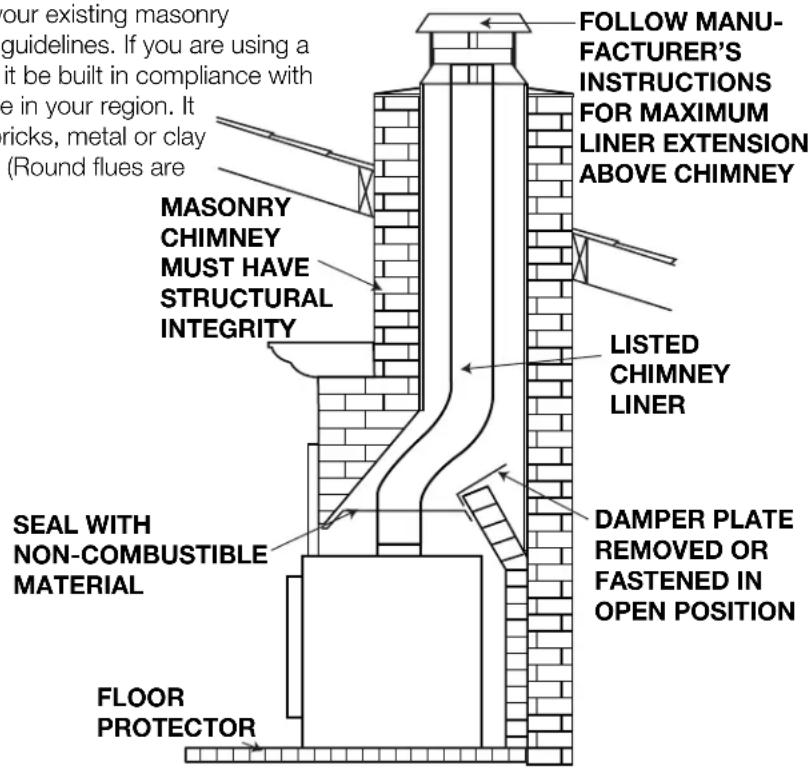
A. Remove the fireplace damper or fasten it permanently open.
* We recommend the following method of sealing off the damper area around the liner.
B. * Measure the throat of the fireplace and mark this shape on a piece of 24 gauge sheet metal (flue cover); cut a six-inch (6.75" / 171mm) hole to lie directly below the fireplace flue opening. Allow two inches of material for a flange on all sides and cut to these measurements. Bend down the flanges. If you have never done this before, it might be a good idea to make a cardboard pattern and test it first. Fasten this flue cover in position as high as possible with two masonry screws per side through the flanges into the fireplace.
In Canada: Install a listed 6" (152mm) diameter flexible stainless steel liner from the top of the chimney to the insert flue collar. Attach a stainless steel liner connector or elbow to the liner and insert onto the flue collar. Fasten with three screws. Secure the top of the liner to the chimney cap using a liner support and chimney flashing. Cap the top of the chimney liner assembly using an approved rain cap.
note:
This fireplace insert must be installed with a continuous chimney liner of 6" (152mm) diameter extending from the fireplace insert to the top of the chimney. The chimney liner must conform to the Class 3 requirements of CAN/ULC-S635, Standard for Lining Systems for Existing Masonry or Factory-Built Chimneys and Vents, or CAN/ULC-S640, Standard for Lining Systems for New Masonry Chimneys.
In the United States: While it is not required, it is recommended that a chimney liner be installed that is continuous from the insert to the top of the chimney, particularly when the insert is installed in a basement. For this type of connection, use the "In Canada" installation instructions above.
If a continuous liner is not installed, a “direct flue connection” must be made. The direct flue connection requires a non-combustible connector that extends from the insert into the chimney flue liner and also that the installed flue cover be sealed below the entry point of the connector to prevent dilution of combustion products in the chimney flue with air from inside the house. Cap the top of the chimney using an approved rain cap.
The following installation requirements must be observed when installing solid fuel burning inserts into factory built fireplaces.
3.2 factory built fireplace
The following installation requirements must be observed when installing solid fuel burning inserts into factory built fireplaces.
A. The factory built fireplace must be listed per UL 127 or ULC S610.
B. Clearances to any combustible material surrounding this insert as identified must be followed. These clearance requirements supersede any pre-existing facing material clearances listed for the factory built fireplace.
C. Installation must include a full height listed chimney liner meeting HT requirements (2100°F/1149°C) as required in UL 1777 (U.S.) or ULC S635 (Canada). The liner must be securely attached to the insert flue collar and the chimney top.
D. Means must be provided to prevent room air passage to the chimney cavity of the fireplace. This may be accomplished by sealing the damper area around the chimney liner, or sealing the appliance front.
E. The air flow within and around the appliance shall not be altered by the installation of the insert (i.e. no louvres or cooling air inlet or outlet ports are blocked), unless specifically tested as such for each factory built fireplace manufacturer and model line.
note:
Using a louvered face plate (surround) complies with this requirement.
F. Alteration of the appliance in any manner is not permitted with the following exceptions;
A. External trim pieces which do not affect the operation of the appliance may be removed providing they can be stored on or within the fireplace for reassembly if the insert is removed.
B. The chimney damper may be removed to install the chimney liner.
G. Circulating air chambers (i.e. in a steel fireplace liner or metal heat circulator) shall not be blocked.
H. Means must be provided for removal of the insert to clean the chimney flue.
I. Inserts that project in front of the fireplace must be supplied with appropriate support means.
J. A permanent metal warning label must be attached to the back of the fireplace stating that the fireplace must be restored to its original condition for safe use without the insert.
4.0 finishing
4.1 door removal

WARNING
- Burning your appliance in with the doors open or ajar creates a fire hazard that may result in a house and/or chimney fire.
- Do not strike or slam door.
- Never remove the door when the appliance is hot.
note:
We strongly recommend using two people to remove and/or install the appliance door as it is very heavy.
- With one hand on the door to prevent it from falling, open the door and remove the 6 large screws located on the hinges (Fig. 4-1).
- Remove the door, placing it face down on a soft, non-abrasive surface (Fig. 4-2). Be careful not to scratch the paint.
- Reverse these steps to install the door.

Fig. 4-1
note:
Hinge MUST stay secured to appliance during door removal / installation.

Fig. 4-2
4.2 door adjustment
note:
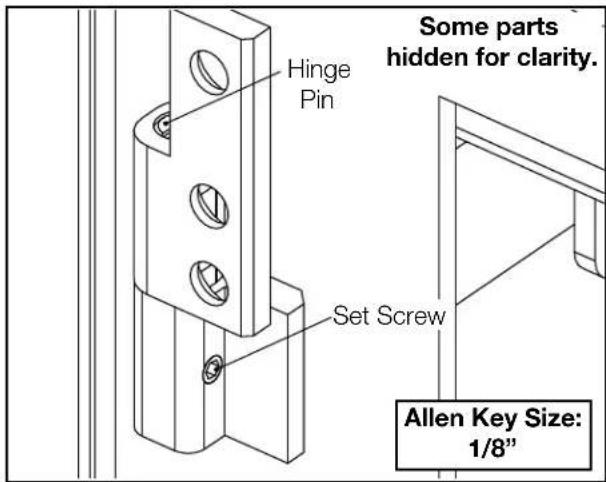
This hinge pin is an offset cam, which means it can move the door away from or closer to the firebox face, either creating a gap between it and the door gasket or making the door fit too tight. Adjust accordingly.
- After removing and reinstalling the door (see "door removal" section), the door may not be level. In this case, door adjustment may be necessary.
- To align the door, loosen the set screws. Rotate the hinge pins clockwise or counter-clockwise to raise or lower the opposite end of the door. Tighten the set screw.
note:
Door adjustment is strictly trial and error; you may need to perform this adjustment a few times until the desired door angle is attained.
- Ensure the door latch closes and engages properly.
4.3 door handle installation

WARNING
- Burning your appliance in with the doors open or ajar creates a fire hazard that may result in a house and/or chimney fire.
- Do not strike or slam door.
- Never remove the door when the appliance is hot.

Front View
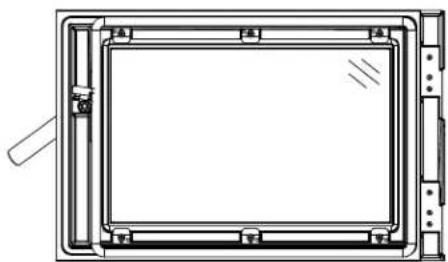
Back View

4.4 secondary air tubes
note:
The back 3 secondary air tubes are factory-installed; therefore only the front secondary air tube (supplied inside the firebox) will need to be installed.
Before beginning installation, note the correct orientation of the secondary air tube. The side with the notch should face to the right, while the side with 2 holes on the end should face to the left.

- With the appliance door open or removed, insert the left side of the secondary air tube into the hole in the left side of the appliance.
- Insert the right side of the secondary air tube into the hole in the right side of the appliance. Ensure the notch makes contact with the pin (Fig. 4-3).
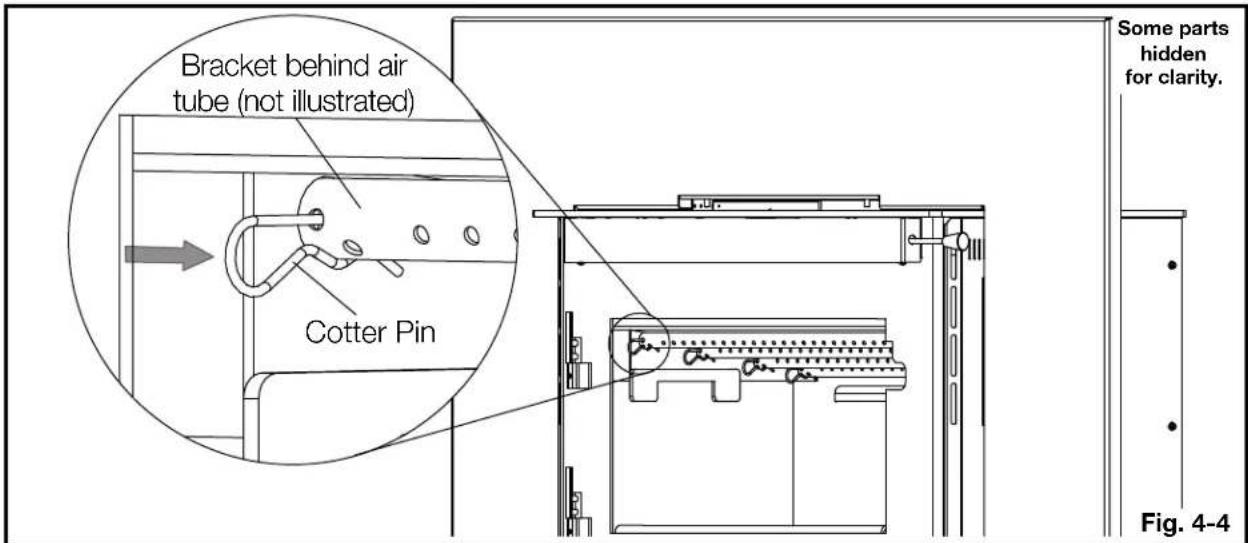
- Align the hole in the secondary air tube with the hole in the bracket inside the left side of the firebox, and then insert a cotter pin (supplied) (Fig. 4-4).
- Spread the cotter pin to retain the secondary air tube in place.

4.5 bricks and baffles installation

WARNING
- Operation of the appliance without the bricks and baffles can result in excessive temperatures that could damage the appliance., chimney and the surrounding enclosure.
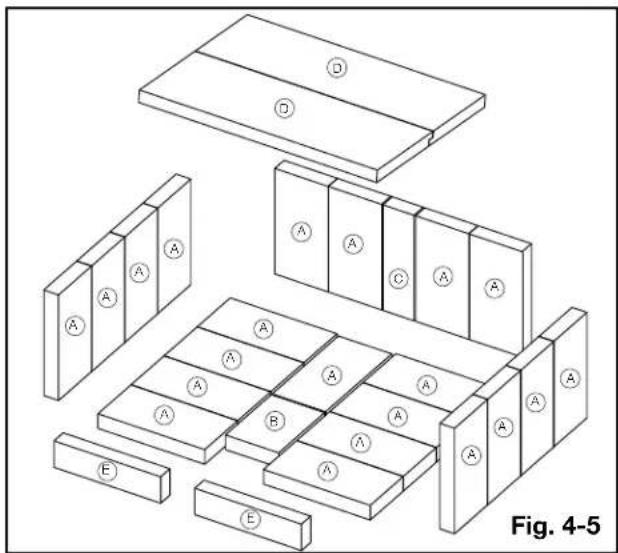
With the appliance and chimney installation completed, move the bricks into place as illustrated below (Fig. 4-5).
A. Install nine (A) bricks and one (B) brick along the bottom of the firebox, working from the back of the appliance forward.
B. Install eight (A) bricks along the left and right sides of the appliance.
C. Install four (A) bricks and one (C) brick along the back wall by pivoting the bricks up under the brick retainer.
note:
Place brick (C) in the centre, with two (A) bricks on either side as illustrated (Fig. 4-5).
D. Carefully pivot fibre baffles (D) up onto the secondary air tubes as illustrated (Fig. 4-6). Ensure that the top baffles are pushed all the way to the rear of the firebox, leaving a minimum of a 1 inch gap along the front. This will allow the flue gases to escape the firebox. Ensure overlap joint is tight.
E. Install the two (E) bricks along the front.

note:
The fibre baffles are shipped inside the firebox. They must be removed from all special packaging prior to installation.
For further details about brick descriptions and part numbers, see "replacement parts" section.
4.6 backerplate installation
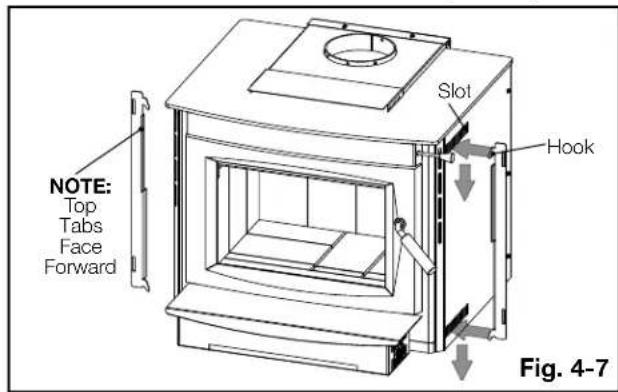
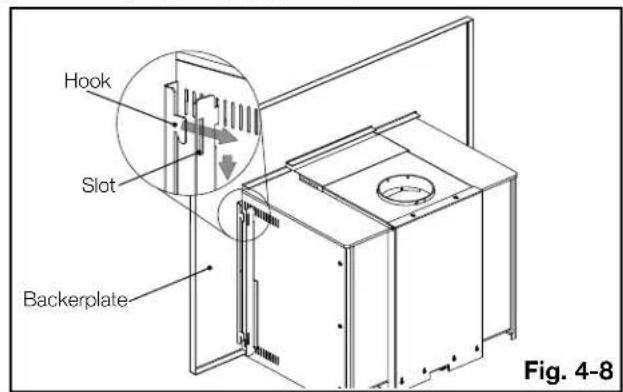
A. Install brackets (supplied) onto both sides of the appliance by inserting the hooks into the desired appliance slots.
note:
Brackets are asymmetrical. During installation, ensure the top tabs face forward (Fig. 4-7).
B. Place the hooks on the backerplate into the slots in the brackets previously installed in step A (Fig. 4-8).
C. Adjust the blower air channel by sliding it forwards or backwards (Fig. 4-9).
D. Fasten the blower air channel in place by installing 2 screws (supplied) (Fig. 4-10).


4.7 logo placement
Remove the backing of the logo supplied and place, as illustrated.

4.8 blower installation

WARNING
- Risk of fire and electrical shock.
- Turn off the electrical power before servicing this appliance.
- Use only Wolf Steel approved optional accessories and replacement parts with this appliance. Using non-listed accessories (blowers, doors, louvres, trims, etc.) could result in a safety hazard and will void the warranty and certification.
- Ensure that the blower's power cord is not in contact with any surface of the appliance to prevent electrical shock or fire damage. Do not run the power cord beneath the appliance.
Drywall dust will penetrate into the blower bearings, causing irreparable damage. Care must be taken to prevent drywall dust from coming into contact with the blower or its compartment. Any damage resulting from this condition is not covered by the warranty policy. Use of the blower increases the output of heat.
This blower is thermally activated. Depending on the intensity of the fire, the blower will start 15-30 minutes after lighting. The thermal switch for the appliance is affixed to an adjustable bracket, which should be positioned so it is in contact with the blower housing as illustrated.
note:
For shipping purposes the blower housing has been stored within the firebox. We recommend removing the door prior to installing the blower.
A. Remove the door (see "door removal" section).
B. Remove the two screws securing the cover to the blower assembly (Fig. 4-11). Set the screws and cover aside.
C. Remove the shipping bracket by removing the two screws (Fig. 4-12). Discard the bracket and set the screws aside.


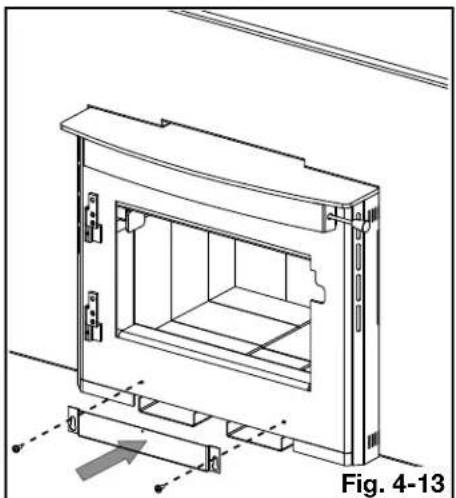
D. Install the blower mounting bracket using the two screws from step C (Fig. 4-13).
E. Secure the hooks in the blower assembly over the blower mounting bracket (Fig. 4-14), and then slide the blower assembly down until it is secure. Ensure the blower assembly is centred to the firebox.

finishing
F. Loosen the adjustment screws, then slide the thermal disc bracket until the thermal disc is touching the face of the firebox (Fig. 4-15).
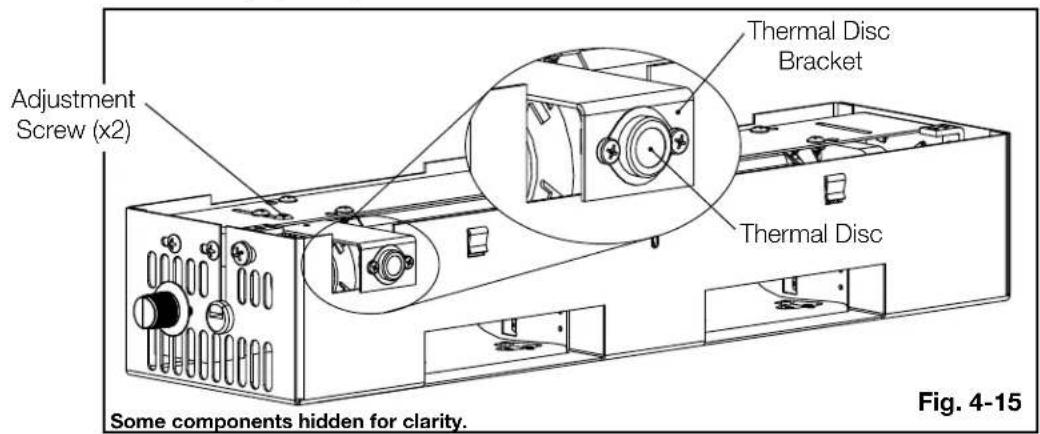
G. Re-secure the adjustment screws to hold the thermal disc bracket in place.
H. Re-attach the cover using the two screws previously removed in step B.
I. Reinstall the door previously removed in step A.

WARNING
- Always operate this appliance with the door closed and latched except during start up and re-fueling. Always wear gloves to prevent injury. Do not leave the fire unattended when the door is unlatched as unstable wood could fall out of the fire chamber creating a fire hazard to your home.
- Never leave children unattended when there is a fire burning in the appliance.
- Never use gasoline, gasoline-type lantern fuel, kerosene, charcoal lighter fluid, or similar liquids to start or "freshen up" a fire in this appliance. Keep all such liquids well away from the appliance while it is in use.
- Objects placed in front of the appliance should be kept a minimum of 48" from the front face.
- Any modification of the appliance that has not been approved in writing by the testing authority is considered breaching CSA B365 (Canada) and ANSI/NFPA 211 (USA).
- Open air control (and damper when fitted) before opening firing door.
- Hot while in operation. Keep children, clothing and furniture away. Contact may cause skin burns. Wear gloves to operate your appliance.
- Burning your appliance with the doors open or ajar creates a fire hazard that may result in a house and or chimney fire.
- This wood appliance has a manufacturer-set minimum low burn rate that must not be altered. It is against federal regulations in the United States to alter this setting or otherwise operate this wood appliance in a manner inconsistent with operating instructions in this manual.
Your Napoleon EPA listed product is designed with the most advanced technology. The appliance is extremely airtight. The first fire(s) in your appliance will be difficult to get going and keep going with little amount of heat being generated. This is a result of the moisture being driven out of the fire brick. During the break-in period (the first 2 or 3 fires) create only small, fires using kindling; this will allow the firebrick to cure. Do not be alarmed if small hairline cracks develop in the firebrick. This is a normal occurrence and does not pose a safety hazard. The paint may also smell a little for the first few fires as it cures and you may wish to open a door or window to alleviate the smell.
To start, a brisk fire is required. Place loosely crumpled paper on the floor of the appliance and cover with dry kindling. Open the air control fully by sliding control all the way to the right. Light the paper and leave the door slightly ajar (one inch) until all kindling is burning. To maintain a brisk fire, a hot coal bed must be established and sustained.
Slowly add larger wood (2x4 size pieces). Lay the pieces lengthwise from side to side in the hot coal bed with a shallow trench between, so that the primary air can flow directly into this trench and ignite the fuel above. When the fire seems to be at its peak, medium sized logs may be added. Once these logs have caught fire, carefully close the door. (Closing the door too quickly after refueling will reduce the firebox temperature and result in an unsatisfactory burn.) Remember it is more efficient to bum medium sized wood, briskly, and refuel frequently than to load the appliance with large logs that result in a smouldering, inefficient fire and dirty glass.
As soon as the door is closed, you will observe a change in the flame pattern. The flames will get smaller and lazier because less oxygen is getting into the combustion chamber. The flames, however, are more efficient. The flames will remain lazy but become larger again as soon as the firebricks have been heated thoroughly and the chimney becomes heated and provides a good draft. At this point, the roaring fire that you see when the door is opened is wastefully drawing heated room air up the chimney, certainly not desirable. Always operate with the door fully closed once the medium sized logs have caught fire.
You can now add larger pieces of wood and operate the appliance normally. Once the appliance is entirely hot, it will burn very efficiently with little smoke from the chimney. There will be a bed of orange coals in the firebox and secondary flames flickering just below the top baffles. You can safely fill the firebox with wood to the top of the door and will get best burns if you keep the appliance pipe temperatures between 250°F (120°C) and 450°F (270°C). A surface thermometer will help regulate this.
Without an appliance thermometer, you are working blindly and have no idea of how the appliance is operating! An appliance thermometer offers a guide to performance.
Can't get the fire going? Use more kindling and paper. Assuming the chimney and vent are sized correctly and there is sufficient combustion air, the lack of sufficiently dry quantities of small kindling is the problem. Thumb size is a good gauge for small kindling diameter.
Can't get heat out of the appliance? One of two things may have happened. The appliance door may have been closed prematurely and the appliance itself has not reached optimum temperature. Reopen the door and/or draft control to re-establish a brisk fire. The other problem may have been wet wood. The typical symptom is sizzling wood and moisture being driven from the wood.
5.1 optimum burn method
For optimal emissions performance and efficiency, follow these simple guidelines when using your appliance:
A. Maintain a 2" (51mm) deep, hot, glowing red coal bed.
B. Burn dry seasoned wood with less than 20% moisture content and burn so that the glass door remains clean.
C. A stove thermometer should indicate 350° F ( 176° C) as an average temperature.
D. Maintain a minimal trace of smoke coming from the chimney when the appliance is burning as intended.
E. Inspect and replace all necessary components such as gaskets, manifolds, glass and other components which may affect the overall appliance performance.
F. Ensure an adequate draft to control burn rate and temperature.
See “operation” and “maintenance” sections.
5.2 optional blower operation
The following operating procedure is recommended to achieve optimal performance:
When operating on high burn rate:
- We recommend setting the blower to the "HIGH" setting and operating with a thermodisc (located in the blower assembly, mounted to the front of the appliance).
When operating on medium burn rate:
- We do not recommend using the blower.
When operating on low burn rate:
- We recommend turning on the blower after approximately 60 minutes at the minimum setting and operating with a thermodisc (located in the blower assembly, mounted to the front of the appliance).
5.3 air control

WARNING
- This wood appliance has a manufacturer-set minimum low burn rate that must not be altered. It is against federal regulations in the United States to alter the setting or otherwise operate this wood appliance in a manner inconsistent with operating instructions in this manual.
Draft is the force which moves air from the firebox up through the chimney. The amount of draft in your chimney depends on the length and diameter of chimney, local geography, nearby obstructions and other factors including the amount of heat generated by the fire which can be measured by an appliance thermometer.
Before adjusting the air control, install the knob (supplied) by screwing it onto the end of the air control rod (Fig. 5-1).
Adjusting the air control all the way to the left reduces the temperature. The draft can be adjusted from low to high by moving the handle in and out (Fig. 5-2).
Inadequate draft may cause back-puffing into the room through the appliance and chimney connector points and may cause plugging of the chimney. Too much draft may cause an excessive temperature in the appliance, glowing red appliance parts or chimney connectors or an uncontrollable burn which can lead to a chimney fire or permanent damage to the appliance.
Do not operate your appliance for longer than 30 minutes with the draft control on "HIGH" (fully open).


5.4 fire extinguishers / smoke & carbon monoxide detectors
note:
Always check your smoke and CO detectors are working properly.
All homes with a solid fuel burning appliance should have at least one fire extinguisher in a central location, known to all, at least one smoke detector and carbon monoxide (CO) detector in the room containing the appliance. If the smoke detector sounds an alarm, correct the cause but do not deactive or relocate the smoke detector. If the carbon monoxide detector sounds an alarm, immediately vent the area, evacuate and call your local fire department.
operation
5.5 fuel loading
When loading the appliance, ensure that the two upper fibre baffles are not lifted up and off their ledge. Maximum heat for minimum fuel (optimum burn) occurs when the appliance top temperature is between 500°F (260°C) and 600°F (315°C).
note:
When loading the appliance, ensure to keep fuel back from the glass. If coals were to accumulate on the front lip, there is a chance they will fall out when the door is opened.
Burn only dry seasoned wood with 20% moisture content. It produces more heat and less soot or creosote. Do not burn ocean beach wood. Its salt content can produce a metal eating acid. Because these appliances burn at the front, they are clean and efficient, but they are also very hot and gloves are useful.

WARNING
- Burn wood behind the log retainer directly on the fire bricks. Do not use elevated grate or otherwise raise the fire.
- Do not store wood within appliance installation clearances or within the space required for re-fueling and ash removal.
- Burning wet, unseasoned wood can cause excessive creosote accumulation, which, when ignited, can cause a chimney fire that may result in a serious house fire.
When operating the appliance effi ciently, the bricks will be nearly all white and the glass mostly clear. The white-ness of the bricks and the cleanness of the glass are good indicators of your operating effi ciency.
Not enough heat is produced when only one or two pieces of wood are burned.
A minimum of three pieces are needed to encase a bed of coals that sustains the fire. Loosely stacked wood burns quicker than a tightly packed load.
A flash fi re is a small fi re burned quickly when you don't need much heat. After your kindling has "caught", load at least 3 pieces of wood, stacked loosely. Burn with the draft control fully open or closed only slightly.
Wood burns in cycles rather than giving a steady output of heat. It is best to plan these cycles around your household routine so that only enough coals are left to start the next load.

INSUFFICIENT FIREWOOD

SUFFICIENT FIREWOOD
When refuelling, open the door slowly to prevent smoke spillage. Use a pair of long appliance gloves when feeding the fire. Keep a small steel shovel nearby to use as a poker and to remove ashes. Do not store wood within 4 feet (1.2m) of the appliance.
Follow the directions below to minimize smoke spillage while re-loading the appliance.
- Move the air control to high.
- Open the bypass door, if equipped.
- Open the glass door slightly. Allow the airflow inside the firebox to stabilize before opening the doors fully.
- Load wood and burn at a medium low setting.
- After 5-10 minutes, close the glass doors.
- Ensure catalyst temperature is stable then shut bypass door, if equipped.
In the evening, load your appliance at least a half-hour before bed to ensure the fi re is hot enough to close the draft control for an overnight burn, refer to the "overnight burn" section for detailed information.
5.5.1 extended fire
Load your larger pieces of wood so they are tightly packed, close enough to prevent the flames from penetrating it completely. After approximately 30 minutes, depending on the size of the load, close the draft control completely making sure that the fi re is not extinguished.
DO NOT OVERFIRE THE APPLIANCE!
Overfi ring can occur by:
A. Burning large amounts of smaller wood pieces such as furniture scraps, skids or treated wood;
B. Vigorously burning large loads of wood with the draft control on "HIGH" (fully open) for long periods of time (one or two hours).
C. Operating the appliance with the ash dump door blocked open or a poor gasket seal on the main door.
5.6 smoking
A properly installed appliance should not smoke. If yours does, check the following:
• Has the chimney had time to get hot?
• Is the smoke passage blocked anywhere in the appliance, chimney connector or chimney?
• Is the room too airtight and the air intake not connected to the outside? Try with a window partly open.
• Is the smoke flow impeded by too long a horizontal pipe or too many bends?
- Is it a weak draft perhaps caused by a leaky chimney, a cold outside chimney, too large a diameter of a chimney, too short a chimney, or a chimney too close to trees or a higher roof?
• Is the moisture content of the wood greater than 20%?
• If equipped, has the catalyst bypass been closed or closed prematurely?
6.0 maintenance

WARNING
- Turn off the power before servicing the appliance.
- Appliance may be hot. Do not service until appliance has cooled.
- Do not use abrasive cleaners.
Check your chimney and chimney connector for creosote and soot buildup weekly until a safe frequency for cleaning is established.
If accumulation is excessive, disconnect the appliance and clean both the chimney and the appliance. You may want to call a professional chimney sweep to clean them. Both have to be cleaned at least once a year or as often as necessary.
Remove fibre baffles and clean above them once a year. Replace any broken bricks or baffles.
6.1 ash removal procedures

WARNING
- Improper disposal of ashes result in fires. Do not discard ashes in cardboard boxes, dump in backyards, or store in garages.
- If using a vacuum to clean up ashes, be sure the ashes are entirely cooled. Using a vacuum to clean up warm ashes could cause a fire inside the vacuum.
- Never operate your appliance with the grate cover removed.
- Failure to achieve a good seal between the ash opening, ash plug or ash well door will result in an over-fire condition that could cause damage to the appliance.
Allow the ashes in your firebox to accumulate to a depth of two or three inches; they tend to burn themselves up. When the fire has burned down and cooled, remove any excess ashes but leave an ash bed approximately 1" (25mm) deep on the firebox bottom to help maintain a hot charcoal bed.
DISPOSAL OF ASHES: Ashes should be placed in a metal container with a tight fitting lid. The closed container of ashes should be placed on a non-combustible floor or ground, well away from all combustible materials, pending final disposal. If the ashes are disposed of by burial in soil or otherwise locally dispersed, they should be retained in the closed container until all cinders have thoroughly cooled.
6.2 creosote formation and removal
When wood is burned slowly, it produces tar and other organic vapors, which combine with expelled moisture to form creosote. The creosote vapors condense in the relatively cooler chimney fl ue or a slow-burning fi re. As a result, creosote residue accumulates on the fl ue lining. When ignited, this creosote makes an extremely hot fi re.
The chimney connector and chimney should be inspected at least once every two months during the heating season to determine if a creosote buildup has occurred.
If creosote has accumulated, it should be removed to reduce the risk of a chimney fire.
6.3 runaway or chimney fire

WARNING
- A chimney fi re can permanently damage your chimney system. This damage can only be repaired by replacing the damaged component parts. Chimney fi res are not covered by the lifetime limited warranty.
CAUSES:
• Using incorrect fuel, or small fuel pieces which would normally be used as kindling.
- Creosote build up in chimney.
• Leaving the door ajar too long and creating extreme temperatures as the air rushes in the open door.
- If equipped, burning your appliance with the ash plug not securely seated.
SOLUTIONS:
- Do not burn treated, painted, artificial, paper or processed wood logs, coal, charcoal, coloured paper or cardboard.
• Have chimney regularly cleaned. - Be careful not to over-fi re the appliance by leaving the door open too long after initial start-up. A thermometer on the chimney connector and/or appliance top helps to indicate the appliance operating temperature.
- If equipped, always operate the appliance with the ash plug properly installed.
IN CASE OF A CHIMNEY FIRE:
- Close glass door and air control (and damper, when equipped).
- Have a well understood plan for evacuation and a place outside for everyone to meet. Prepare to evacuate to ensure everyone's safety.
- Call local fi re department. Have a fi re extinguisher handy. Contact local authorities for further information on how to handle a chimney fi re.
- After the chimney fi re is out, clean and inspect the chimney or chimney liner for stress and cracks prior to lighting another fi re. Also check combustibles around the chimney and the roof.
6.4 chimney cleaning
Both the chimney and the appliance must be inspected and cleaned if necessary at least once a year. For serious wood burners, chimney cleaning must be done as needed to avoid chimney fi res; the venting systems for controlled combustion appliances may need cleaning as often as once a month. These rates, however, depend on the burning habits of the individual operating the appliance. For example, it is possible to clog a solid fuel appliance chimney in a few days if slow, smoldering fi res are burned and the chimney is cold.
note:
Appliances burned consistently without hot fires may result in significant creosote accumulations in the chimney.
Certain items and considerations are important in chimney cleaning:
- Proper tools should be used, including a brush specifically designed for chimney cleaning.
- The chimney connector and dampers as well as the chimney should be cleaned.
- The appliance's fi rebox and baffl e system should be cleaned if needed.
- The chimney should be inspected and repairs made if needed, preferably by a qualified chimney sweep or mason.
6.5 door glass replacement

WARNING
- Do not use substitute materials.
• Glass may be hot. Do not touch glass until cooled. - Care must be taken when removing and disposing of any broken door glass or damaged components. Be sure to vacuum up any broken glass from inside appliance before operation.
-
Do not strike, slam, or scratch. Do not operate appliance with glass removed, cracked, broken, or scratched.
-
When the appliance is cool, have two people remove the door and place it face down on a soft, non-abrasive surface (see "door removal" section). Be careful not to scratch the paint.
- Remove the 6 screws securing the glass retainers (Fig. 6-1). Set the screws and glass retainers aside.
- Remove all broken glass and the old gasket.
- Apply high temperature silicone (not supplied) in the gasket groove as illustrated (Fig. 6-2).
- Cut the 1/4" gasket (supplied) to size and place on top of the silicone. Press the gasket down firmly to ensure it stays in place. Ensure the gasket joint is at the bottom as illustrated (Fig. 6-2).
- Place new glass on top of the gasket.
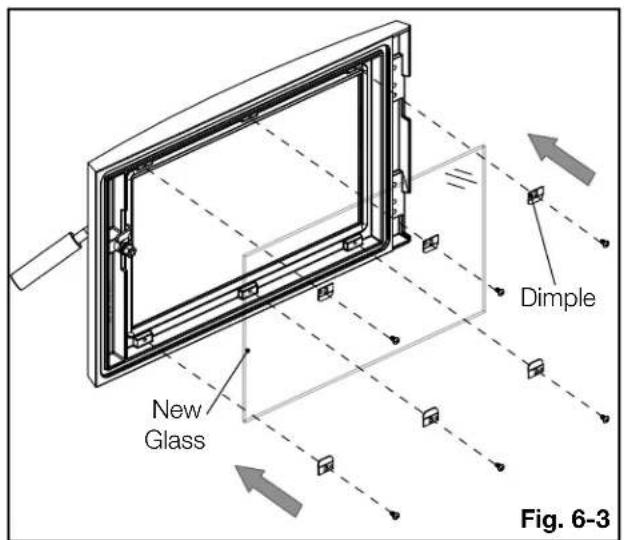
- Re-secure the 6 glass retainers by installing the 6 screws previously removed in step 2 (Fig. 6-3). Ensure the retainer dimples face away from the glass.
- Re-install the door.


6.6 care of glass

WARNING
- Do not clean glass when hot! Do not use abrasive cleaners to clean glass.
If the glass is not kept clean, permanent discolouration and/or blemishes may result. Normally a hot fire will clean the glass. The most common reasons for dirty glass include:
- Not using sufficient fuel to get the appliance thoroughly hot.
• Using green or wet wood. - Closing the draft so far that there is insufficient air for complete combustion.

If it is necessary to clean the glass, buff lightly with a clean dry cloth and non-abrasive cleaner. Clean the glass after the first 10 hours of operation with a recommended appliance glass cleaner. Thereafter, clean as required.
The glass is very strong, but do not let burning fuel rest or fall against it and always close the door gently.
NEVER FORCE OR SLAM IT SHUT!
Do not operate the appliance with broken glass, as leakage of flue gases may result.
Contact your local authorized dealer/distributor for complete cleaning instructions.
If the glass should ever crack or break while the fire is burning, do not open the door until the fire is out. Do not operate the appliance until the glass has been replaced. Contact your local authorized dealer/distributor for replacement parts. DO NOT SUBSTITUTE MATERIALS.
6.7 door gasket replacement
- When the appliance is cool, remove the door and place it face down on a soft, non-abrasive surface (see "door removal" section). Be careful not to scratch the paint.
- Apply high temperature silicone (not supplied) in the gasket groove as illustrated (Fig. 6-4).
- Cut the 1/2" gasket (supplied) to size and place on top of the silicone. Press the gasket down firmly to ensure it stays in place. Ensure the gasket joint is at the bottom as illustrated (Fig. 6-4).
- Re-install the door.

6.8 blower service or replacement
A. Turn off all electrical power to the appliance.
B. Remove the 2 screws securing the cover to the blower housing (Fig. 6-5). Set the cover and screws aside.
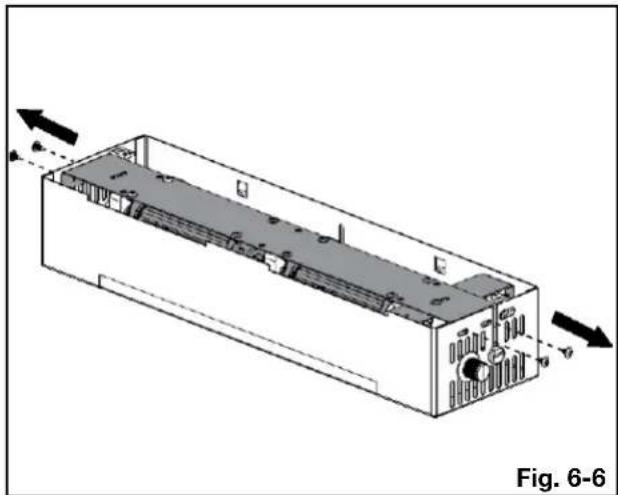
C. Remove the 4 screws securing the retainer to the blower housing (Fig. 6-6). Slide blowers (attached to retainer) out of the housing deflectors and lift them up. Set screws and blowers (attached to retainer) aside.
D. If dust and debris have accumulated, vacuum the blowers and blower housing prior to re-installation.
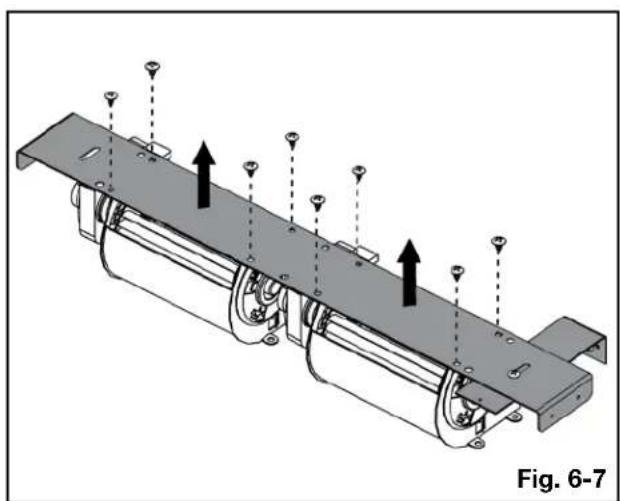
E. If blower replacement or service is required, remove the 8 screws securing the blowers to the retainer (Fig. 6-7).
F. Reverse these steps to reinstall the blower.


6.9 wood
WARNING
- This appliance is designed to burn natural wood only. Do not burn treated wood, coal, charcoal, coloured paper, cardboard, solvents or garbage. This appliance has not been tested with an unvented gas log set. To reduce risk of fire or injury, do not install an unvented gas log set into the appliance.
- Higher effi ciencies and lower emissions generally result when burning air dried seasoned hardwoods, as compared to softwoods or too green or freshly cut hardwoods.
- Burning wet unseasoned wood can cause excessive creosote accumulation. When ignited, it can cause a chimney fire that may result in a serious house fire.
- Do not store fuel within the clearance to combustibles, or in the space required for re-fueling and ash removal.
Before loading the appliance, ensure all required insulation and baffles (if equipped) are installed and situated properly. For maximum efficiency, when the appliance is thoroughly hot, load it fully to the specified maximum amount and burn at a medium low setting (if equipped). The whiteness of the bricks and the cleanliness of the glass are good indicators of your operating efficiency. Not enough heat is produced when only a few pieces of wood are burned or the wood may not burn completely.
note:
Appliances surrounded by solid rock or brick will experience a longer heat up period as those materials absorb the heat being generated.
TYPES OF WOOD
Both hardwood and softwood burn equally well in this appliance but hardwood is denser, will weigh more per cord and burn a little slower and longer.
Manufactured fi relogs made by compressing 100% natural wood fi bre can be safely used as fuel. Do not use manufactured fi relogs if they contain additives such as paraffi n, wax, binders etc. Never burn more than two manufactured fi relogs at a time.

MOISTURE CONTENT
Burn only dry, clean unpainted wood that has been seasoned. It produces more heat and less soot or creosote. Freshly cut wood contains about 50% moisture while after proper seasoning only about 20% of the water remains. As wood is burned, this water boils off consuming energy that should be used in heating. The wetter the wood, the less heat is given off and the more creosote is produced. Dry fi rewood has cracks in the end of the grain.
STORING WOOD
Firewood should be split and stacked in a manner that allows for full air circulation and covered in early spring to be ready for burning that fall. Dry fi rewood has cracks in the end grain.
Cut the wood so that it will fit horizontally, front to back, making for easier loading and less of a likelihood that the wood will roll onto the glass.
Fuel for the appliance must not be stored closer than the required clearances to combustibles (heat sensitive material). NEVER STORE WOOD IN THE ASH PAN COMPARTMENT (if applicable).
7.0 replacement parts

WARNING
- Failure to position the parts in accordance with this manual or failure to use only parts specifically approved with this appliance may result in property damage or personal injury.
Contact your dealer for questions concerning prices and policies on replacement parts. Normally, all parts can be ordered through your Authorized dealer / distributor.
For warranty replacement parts, a photocopy of the original invoice will be required to honour the claim.
When ordering replacement parts always give the following information:
• Model & Serial Number of appliance
• Installation date of appliance
- Part number
• Description of part
- Finish
Parts, part numbers, and availability are subject to change without notice.
Parts identified as stocked will be delivered within 2 to 5 business days for most delivery destinations.
Parts not identified as stocked will be delivered within a 2 to 4 week period, for most cases.
Parts identified as 'SO' are special order and can take up to 90 days for delivery.
7.1 overview part 1

Items may not appear exactly as illustrated.
| Ref. No. | Part Number | Description | Stocked |
| 8 | W150-0128 | Channel, blower air adjustable | |
| 9 | W485-0047 | Pin, hairpin cotter | Yes |
| 10 | W720-0189 | Tube, front secondary air | |
| 11 | W720-0190 | Tube, secondary air (x3) | |
| 12 | W010-4597 | Assembly, blower | |
| 13 | W585-0949 | Shield, rear heat | |
| 14 | W500-1033 | Blower mounting bracket |
| Ref. No. | Part Number | Description | Stocked |
| 1 | W010-4550 | Assembly, door and glass | |
| 2 | W325-0103 | Handle, front door | |
| 3 | W200-0785 | Cover, primary air, lower | |
| 4 | W200-0784 | Cover, primary air | |
| 5 | W380-0034 | Knob, primary air control | |
| 6 | W010-4589 | Assembly, air control | |
| 7 | W485-0053 | Spring, adjustable cam hinge | Yes |
7.2 overview part 2

Items may not appear exactly as illustrated.
| Ref. | Part Number | Description | Stocked |
| 1 | W090-0338 | Brick, 1.250 x 4.500 x 9.000 (A) | |
| 2 | W090-0340 | Brick, 1.250 x 6.250 x 4.500 (B) | |
| 3 | W090-0341 | Brick, 1.250 x 2.625 x 9.000 (C) | |
| 4 | W010-3564 | Baffle, ceramic fibre (D) | Yes |
| 5 | W090-0339 | Brick, 2.250 x 9.000 x 1.250 (E) | |
| 6 | W562-0002-SER | Assembly, door gasket | Yes |
| 7 | W300-0168-SER | Assembly, glass and gasket | Yes |
| 8 | W062-0077-SER | Blower, replacement (6.5” crossflow) | Yes |
| 9 | KB-35 | Variable speed swtch | Yes |
| 10 | W690-0002 | Thermodisc (heat detector) | Yes |
Items may not appear exactly as illustrated.
| Ref. No. | Part Number | Description | Stocked |
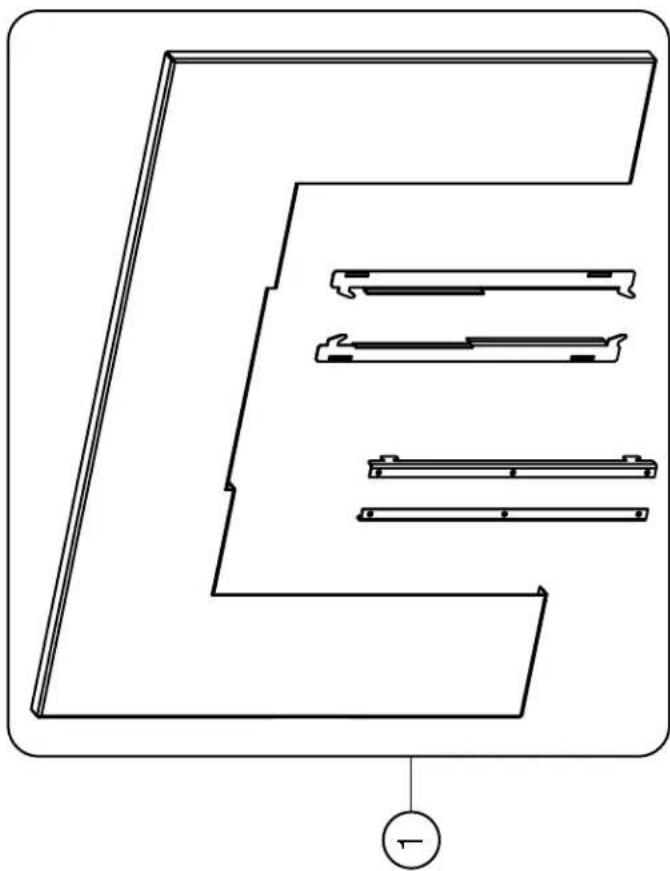
| 1 | SCH1B3041 | One piece charcoal backerplate |

WARNING
- Turn off the appliance completely and let cool before servicing. Only a qualified service person should service and repair this electric appliance.
- Appliance may be hot, do not service until appliance has cooled.
- Do not use abrasive cleaners.
- When checking connections, installing jumper wires (for test purposes only) or replacing components, unplug appliance from the receptacle to prevent electrical shock or damage to the component.
| symptom test solution | |
| Can't get the fi re started. Not enough kindling / paper? Add more. | |
| Not enough air? Ensure air control is fully open. Also ensure that the air opening is not obstructed. | |
| Cold air blockage? Burn a piece of paper to establish a draft. | |
| Use dry seasoned wood with 20% moisture content. | |
| Flue blockage? Inspect chimney. | |
| Smokes when door is open. Cold air blockage? Burn a piece of paper to establish a draft. | |
| Insuffi cient draft? Add more pipe. | |
| Let air stabilize before opening door. | |
| Ensure baffl es are positioned correctly. | |
| Negative pressure? Open a window near the appliance. | |
| Appliance emits odour. Paint curing, see “general instructions” section. | |
| Stove doesn't burn hot enough. Wood has more than 20% moisture. | |
| Insuffi cient draft? Add more pipe. | |
| Not enough air? Ensure air control is fully open. Also ensure that the air opening is not obstructed. | |
| Wood burns too fast. Air control may need to be adjusted down. | |
| Check to see ash plug is properly seated (if equipped). | |
| Check door gasket for adequate seal. | |
| Wood may be extremely dry. | |
| Dirty glass. Air control may be closed too far. | |
| Burn hotter, smaller fi res. | |
| Use well seasoned wood with 20% moisture content. | |
| Blower does not run. Appliance may not be up to temperature. | |
| Ensure blower has power. | |
Napoleon Wood Appliances are manufactured under the strict Standard of the world recognized ISO 9001 : 2015 Quality Management System.
Napoleon products are designed with superior components and materials assembled by trained craftsmen who take great pride in their work. The complete appliance is again thoroughly inspected by a qualified technician before packaging to ensure that you, the customer, receives the quality product that you expect from Napoleon.
Napoleon Wood Appliances President's Lifetime Limited Warranty
The following materials and workmanship in your new Napoleon Wood Appliance are warranted against defects for as long as you own the appliance. For pellet appliances this covers: the pellet hopper, outer shell, ceramic glass (thermal breakage only) and ash drawer.* For wood appliances this covers: combustion chamber, heat exchanger, stainless steel baffle retainer, ceramic glass (thermal breakage only), gold plated parts against tarnishing, porcelainized enameled components, aluminum extrusion trims, vortex baffle, ash drawer and iron castings.*
For pellet appliances, the combustion chamber and heat exchanger are warranted against defects for a period of 5 years. For wood appliances equipped with a guillotine door/screen system, they are warranted against defects for a period of 5 years. Electrical (110V) components and wearable parts are covered and Napoleon will provide replacement parts free of charge during the first year of the limited warranty. For pellet appliances this covers: blowers, thermal switches and burn pot.* For wood appliances this covers: blowers, thermal switch, switches, wiring, fi rebrick, secondary air tubes and gasketing.*
Labour related to warranty repair is covered free of charge during the first year, with the exception of the guillotine door/screen system which will be warranted for a period of 3 years. Repair work, however, requires the prior approval of an authorized company official. Labour costs to the account of Napoleon are based on a predetermined rate schedule and any repair work must be done through an authorized Napoleon dealer.
For appliances that include firebricks and baffles, they should routinely be removed by the operator as part of the regular service and therefore, any warranty replacement of these parts does not qualify for any labour allowances.
* Construction of models vary. Warranty applies only to components included with your specific appliance.
Conditions and Limitations
Napoleon warrants its products against manufacturing defects to the original purchaser only. Registering your warranty is not necessary. Simply provide your proof of purchase along with the model and serial number to make a warranty claim. Provided that the purchase was made through an authorized Napoleon dealer, your appliance is subject to the following conditions and limitations:
Warranty coverage begins on the date of original installation. This factory warranty is non-transferable and may not be extended whatsoever by any of our representatives. The wood appliance must be installed by a qualified and authorized installer, service agency or supplier. Installation must be done in accordance with the installation instructions included with the product and all local and national building and fire codes. This limited warranty does not cover damages caused by misuse, lack of maintenance, accident, alterations, abuse or neglect. Operating the appliance on high for extended periods of time, is neglect. Parts installed from other manufacturers will nullify this warranty.
This limited warranty further does not cover any scratches, dents, corrosion or discoloring caused by excessive heat, abrasive and chemical cleaners nor chipping on porcelain enamel parts, nor any venting components used in the installation of the appliance. In the first year only, this warranty extends to the repair or replacement of warranted parts which are defective in material or workmanship provided that the product has been operated in accordance with the operation instructions and under normal conditions. After the first year, with respect to the President's Limited Lifetime Warranty,
Napoleon may, at its discretion, fully discharge all obligations with respect to this warranty by refunding to the original warranted purchaser the wholesale price of any warranted but defective parts. After the first year, Napoleon will not be responsible for installation, labour or any other costs or expenses related to the reinstallation of a warranted part, and such expenses are not covered by this warranty. Notwithstanding any provisions contained in the President's Limited Lifetime Warranty,
Napoleon's responsibility under this warranty is defined as above and it shall not, in any event, extend to any incidental, consequential or indirect damages. This warranty defines the obligations and liability of Napoleon with respect to the
Napoleon wood appliance and any other warranties expressed or implied with respect to this product, its components or accessories are excluded. Napoleon neither assumes, nor authorizes any third party to assume, on its behalf, any other liabilities with respect to the sale of this product. Napoleon will not be responsible for: over-fi ring, downdrafts, spillage caused by environmental conditions such as rooftops, buildings, nearby trees, hills, mountains, inadequate vents or ventilation, excessive venting confi gurations, insufficient makeup air, or negative air pressures which may or may not be caused by mechanical systems such as exhaust blowers, furnaces, clothes dryers, etc.
Any damages to appliance, combustion chamber, heat exchanger, brass trim or other component due to water, weather damage, long periods of dampness, condensation, damaging chemicals or cleaners will not be the responsibility of
Napoleon. Regular cleaning of the fi ne ash generated during the operation of this appliance is a necessary part of maintaining your wood appliance. Failure of any components, which is attributed to poor maintenance, is not warrantable and will not be covered by this policy. Napoleon reserves the right to have its representative inspect any product or part thereof prior to honouring any warranty claim. All parts replaced under the President's Limited Lifetime Warranty Policy are subject to a single claim. During the fi rst 10 years Napoleon will replace or repair the defective parts covered by the lifetime warranty at our discretion free of charge. From 10 years to life, Napoleon will provide replacement parts at 50% of the current retail price. All parts replaced under the warranty will be covered for a period of 90 days from the date of their installation.
The manufacturer may require that defective parts or products be returned or that digital pictures be provided to support the claim. Returned products are to be shipped prepaid to the manufacturer for investigation. If a product is found to be defective, the manufacturer will repair or replace such defect. Before shipping your appliance or defective components, your dealer must obtain an authorization number. Any merchandise shipped without authorization will be refused and returned to sender. Shipping costs are not covered under this warranty. Additional service fees may apply if you are seeking warranty service from a dealer. Warranty labour allowance is only for the replacement of the warranted part. Travel, diagnostic tests, shipping and other related charges are not covered by this warranty and other related charges are not covered by this warranty.
NAPOLEON CELEBRATING OVER 40 YEARS OF HOME COMFORT PRODUCTS



7200, Route Transcanadienne, Montréal, Québec H4T 1A3
24 Napoleon Road, Barrie, Ontario, Canada L4M 0G8
214 Bayview Drive, Barrie, Ontario, Canada L4N 4Y8
103 Miller Drive, Crittenden, Kentucky, USA 41030
De Riemsdijk 22, 4004 LC Tiel, The Netherlands
Phone: 1-866-820-8686
napoleon.com
POUR L'UTILISATION INTÉRIEUR SEULEMENT
CERTIFIÉ SELON LES NORMES D'ÉMISSION DE PARTICULE DE 2020 DE L'AGENCE DE PROTECTION DE L'ENVIRONMENT AMÉRICAINE (E.P.A) EN UTILISANT DU BOIS DE CORDE. CET APPAREIL A ÉTÉ TESTÉ PAR POLYTESTS ET HOMOLGUÉ PAR CSA GROUP À NORMES: ULC-S628, UL1482. ASTM E3053-17; ASTM E2515-11 MÉTHODES ALT-125 COMME RÉFÉRENCE DANS 40 CFR PARTIE 60 SOUS-PARTIE AAA. N° DE RÉFÉRENCE: 161746



C US
Wolf Steel Ltd., 24 Napoleon Rd., Barrie, ON, L4M 0G8 Canada / 103 Miller Drive, Crittenden, Kentucky, USA, 41030
Téléphone 1 (866) 820-8686 • www.napoleon.com • hearth@napoleon.com

AVERTISSEMENT

AVERTISSEMENT
FR


CERTIFIED
www.nficertified.org

Wood Energy Technical Training
HEARTH EXTENSION / FLOOR PROTECTION: MUST BE NON-COMBUSTIBLE AND EXTEND 22" IN FRONT OF THE INSERT AND 2" ON BOTH SIDES WITH A MINIMUM THICKNESS OF 1" (K=0.84)
CHIMNEY TYPE: MINIMUM 6' (152mm) DIAMETER APPROVED RESIDENTIAL TYPE. FOR MOBILE HOME, USE A CHIMNEY LISTED TO ULC 8629 IN CANADA OR UL 103HT IN THE USA
DO NOT OBSTRUCT SPACE UNDER HEATER. SPECIAL METHODS ARE REQUIRED WHEN PASSING A CHIMNEY THROUGH A WALL OF CEILING. SEE INSTRUCTIONS AND BUILDING CODES. DO NOT CONNECT THIS APPLIANCE TO A CHIMNEY FLUE SERVING ANOTHER APPLIANCE.
WARNING: FOR USE WITH SOLID WOOD FUEL ONLY, DO NOT UARN ANY OTHER TYPE OF FULL, DO NOT USE CHATE OR ELEVATE FIRE, BUILD WOOD FIRE DIRECTLY ON HEARTH.
WARNING: RISK OF SMOKE SPILLAGE. OPERATE ONLY WITH DOOR FULLY CLOSED.
REPLACE GLASS ONLY WITH CERAMIC GLASS. DO NOT OVERFIRE. IF HEATER OR CHIMNEY CONNECTORS GLOW, YOU ARE OVERRIRING. INSPECT AND CLEAN CHIMNEY TREGENTLY. UNDER CERTAIN CONDITIONS OF USE CREOSOTE BUILD-UP MAY OCCUR RAPOLY
DANGER: RISK OF ELECTRICAL SHOCK, DISCONNECT POWER BEFORE SERVICING APPLIANCE
INSERT: INSTALL AND USE ONLY IN SOLID FUEL BURNING FIREPLACES. DO NOT REMOVE BRICKS OR MORTAR FROM SOLID FUEL BURNING FIREPLACE. INSTALL WITH A POSITIVE FLUE CONNECTOR AND FACEPLATE.
CONTACT LOCAL BUILDING FIRE OFFICIALS ABOUT RESTRICTIONS AND INSTALLATION INSPECTION IN YOUR AREA.
A MINIMUM CLEARANCE OF 18" (457mm) TO THE CHIMNEY CONNECTOR MAY BE REQUIRED BY THE AUTHORITY HAVIN JURISDICTION.

LISTED SOLID FUEL BURNING FIREPLACE INSERT ENCASTRE A COMBUSTIBLE SOLIDE HOMOLOGUE TESTED TO: / TESTÉ SELON : UL1482 - 2011 / ULC S628 - 1993 MODEL / MODELE: S20i / T20i
POUR INSTALLATION ET UTILISATION CONFORMÉMENT AUX INSTRUCTIONS DU L'ABRICANT ET AUX CODES LOCAUX DU RÂTIMENT.
HAUTEUR DE PLAFOND MINIMAL: 7PI (2,13m). BASE DE PROTECTION/PROTECTION DE PLANCHER: DOIT ÉTRE DE NATURE INCOMBUSTIBLE ET SE PROLONGER DE 22" A L'AVANT DE L'ENCASTRE ET 8" SUR LES CÔTÉS, ET AVOIR UNE ÉPAISSEUR MINIMALE DE 1" K - 0,54.
TYPE DE CHEMINÉE: DIAMÈTRE MINIMAL DE 6" (162mm) APPROUILL POUR USAGE RÉSICONTI ELL POUR MAISON MOBIL F. EMPLOYEZ UNÉ CHEMINÉE HOMOLOGUIE U.C. 5829 AU CANADA OU UL 108HT AUX ÉTAITS-UNIS.
NE RIEN ENTREPOSER SOUS L'APPAREIL. DES METHODES SPÉCIALES SONT REQUISES LORSOÙ N'UNE CHEMINEE TRAVERSE UN MUR OU UN PLAFOND. VOIR LES INSTRUCTIONS ET LES CODES DU BÂTIMENT. NE PAS FACCORDER À LA CHEMINÉE D'UN AUTRE APPAREIL.
AVERTISSEMENT: POUR USAGE AVEO LE BOIS SEULEMENT NE BRUI EZ PAS AUCUNE AUTRE TYPE DE COMBUSTIBLE N'UTILISEZ PAS DE CHENET OU NE SURÉLEVEZ PAS LE BOIS PRÉPAREZ LE FEU DIRECTEMENT SUR L'ÂTRE
AVERTISSEMENT: RISQUE D'ÉCHAPPEMENT DE FUMEE. TENIN LA PORTE FORMÉ L'HOSQUE LE SOLE FONCTIONNE. REMPLAGEZ LA VITRE PAR L'INE VITRE EN CÔRAMIQUE SULLEMENT. NE SURCHAFFEZ PAS L'APPAREL, GIL APPAREL OU L'EG RACORDS HOUGLOIENT, L'APPAREL SURCHAURÉE, INSPECTEZ ET NETTOYZ LA CHEMINÈE FRIQUÉMENT DANS CERTAINES CONDUINS, DES DEPÔTÉ DE CREOSOTE PEUVENT SE FORMER PARADULT.
DANGER: HISQUE DE SLOQUESSE, ELECTRICUL DÉBRAN- OZ AWANT DE PROCEDURE L'ENTERTAIN. ENCASTRE: INSTALLEZ ET ULIOSE SEQUILEMENT DANS UN FOYER À COMBUSTIBLE SOUIDE. NE RETIREZ PAS DE MORTIER, NE THICKES DU FOYER À COMBUSTIBLE SOUIDE. INSTALLEZ AVEG UNI GAINE CONFORME ET UNI PLAQUE DE RESOUVEMENT
BENSEGNEZ-AVOUS AUXRES DES AUTORITÉS LOCALES DU RÂTIMENT ET DU SERVICE DES INCENDIES AU SUJET DES THISTRICTIONS ET DES INSPECTIONS D'INSTALLATION DANS VOTTE RÉCION.
UN DÉGAGEMENT MINIMAL DE 18" (457mm) JUSQU'AU RADCORD DE LA CHEMNÉE PEUT ÉTRE EXGÉ PAR L'AUTORTE AYANT JURIDICTION.
THIS WOOD HEATER NELDS PERIODIC INSPECTION AND REPAIR FOR PROPER. OPERATION CONSULT THE OWNER'S MANUAL OF LUTTELIN CHIMATION, IT IS AGAINST FEDERAL REGULATIONS TO OPERATE THIS WOOD HEATER IN A MANNER INCONSIENT WITH THE OPERATING INSTRUCTIONS IN THE OWNER'S MANUAL / OF POR LE BOIS DOIT ETRE INSPECTÉ PÉRIOCIUMÉMENT ET RÉPARÉ POUR UN FONCTIONNEMENT CORRECT, CONSULTÉ LE MANUEL DU PROPRIÉTAIRE FOUR PLUS D'INFORMATIONS. IL EST CONTIVE LE RÉCLEMENTS FÉDÉRAUX POUR FAIRÉ FONCTIONNEL CE POILLE À BOIS D'UNE MANUEL INCOMPATR I EAVES LES INSTRUCTIONS DE FONCTIONNEMENT DANS LE MANUEL DU PROPRIÉTAIRE.
CLEARANCE TO COMBUSTIBLE CONSTRUCTION / DÉGAGEMENTS AUX MATÉRIAUX COMBUSTIBLES: (MEASURED TO APPLIANCE / À PARTIR DE L'APPAREIL)
| APPLIANCE/APPEAR | AMOUNTS & WALL (TO TO) / MAXIAL/ AIR CEMENT (AU COTE A | MANTLE (TO TO) / MAXIAL (USQUAL) DESSUS D | TOP RACING (TO TOY / HAU 31 A LAGUE (USQUAL) DESSUS C | SIDE RACING (TO SO / DOG) / DE LA CAPAUX (AU OCTE D) | MINIMUM HEARTH EX. NIKON / BASIL DE PROTECTION MINIMALE E | MINIMUM HEARTH THICKNESS / HENSION MINIVALE DL. LA BASE DE PROTECTION F | MINIMUM HEARTH SIDE EXTENSION / BHAUL DE PROTECTION LATERFALIE MINIMALE G |
| 500 TRO | 16" | 87" | 22" | 17" | 22" | 1" | 8" |
MANUFACTURE DATE: / DATE DE FABRICATION:
| YEAR/ANNÉE: | 2019 | 2020 | 2021 | 2022 | 2023 | 2024 |
| MONTH/MOIS: | 1 | 2 | 3 | 4 | 5 | 6 |

CAUTION:
HOT WHILE IN OPERATION. DO NOT TOUCH. KEEP CHILDREN, CLOTHING AND FURNITURE AWAY. CONTACT MAY CAUSE SKIN BURNS.
ATTENTION:
QUAND L'APPAREIL FONCTIONNE, LA SURFACE DEVIENT CHAUDE. NE PAS TOUCHER. TENIR LES ENFANTS, LES VÊTEMENTS ET LES MEUBLES À L'ÉCART. LE CONTACT PEUT CAUSER DES BRÛLURES À LA PEAU.
WOLF STEEL LTD.
24 NAPOLEON ROAD, BARRIE. ON. L4M 0GB CANADA
WOLF STEEL USA
103 MILLER DRIVE CRITTenden, KY, 401030 USA
NAC GUANGZHOU P.R.C.
NO.69 HEFENG ROAD, GUANGZHOU,CHINA

Fig. 4-1
note:
Fondé/Fence

VBackAfière


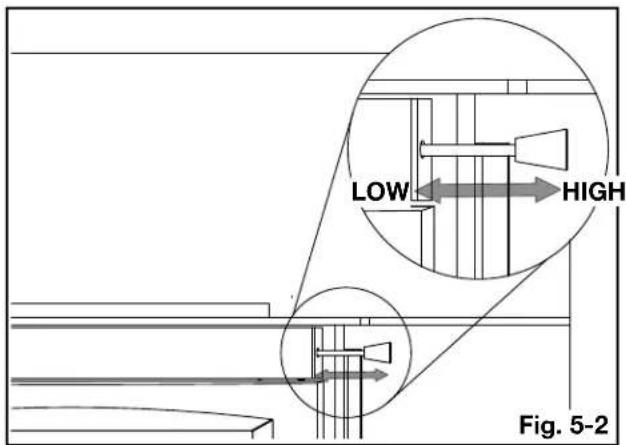
QUANTITÉ DE BOIS INSUFFISANTE

QUANTITÉ DE BOIS SUFFISANTE
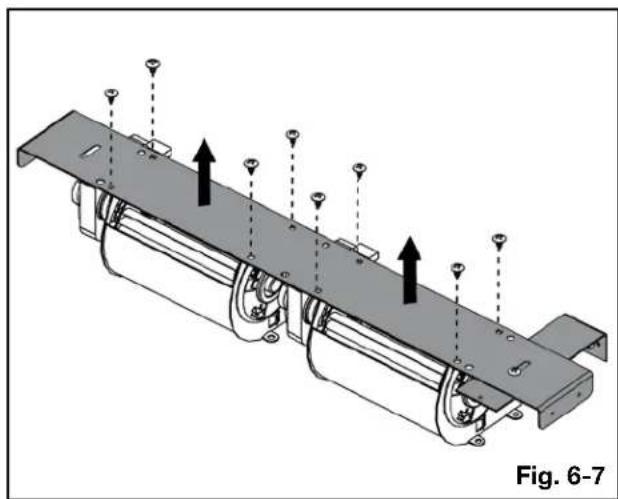
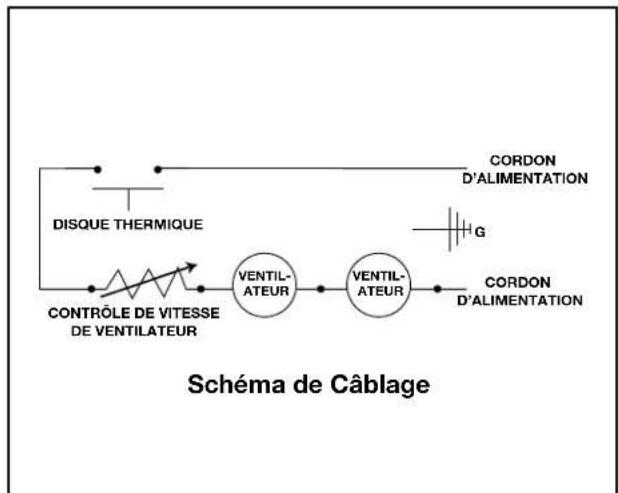
! AVERTISSEMENT



24 Napoleon Road, Barrie, Ontario, Canada L4M 0G8
214 Bayview Drive, Barrie, Ontario, Canada L4N 4Y8
103 Miller Drive, Crittenden, Kentucky, USA 41030

- INSTALLATION AND OPERATION MANUAL
- INSTALLER
- CONSUMER
- SAFETY INFORMATION
- WARNING
- WOOD STOVES ONLY
- FOR INDOOR USE ONLY
- FOR WOOD APPLIANCES
- TABLE OF CONTENTS
- 1.0 GENERAL INFORMATION 5
- 2.0 INSTALLATION PLANNING 10
- 3.0 INSTALLATION 11
- 4.0 FINISHING 14
- 5.0 OPERATION
- 6.0 MAINTENANCE 26
- 7.0 REPLACEMENT PARTS 32
- 8.0 ACCESSORIES 35
- 9.0 TROUBLESHOOTING 36
- 10.0 WARRANTY 37
- NOTE
- 1.1 DIMENSIONS
- 1.2 SPECIFICATIONS
- 1.3 GENERAL INSTRUCTIONS
- GENERAL INFORMATION
- 1.4 GENERAL INFORMATION
- 1.5 RATING PLATE INFORMATION
- LISTED SOLID FUEL BURNING FIREPLACE INSERT ENCASTRÉ À COMBUSTIBLE SOLIDE HOMOLOGUÉ TESTED TO: / TESTÉ SELON : UL1482 - 2011 / ULC S628 - 1993 MODEL / MODELE: S20I / T20I
- CAUTION HOT WHILE IN OPERATION. DO NOT TOUCH. KEEP CHILDREN, CLOTHING AND FURNITURE AWAY. CONTACT MAY CAUSE SKIN BURNS
- 2.0 INSTALLATION PLANNING
- 2.1 MINIMUM CLEARANCE TO COMBUSTIBLES
- HEARTH EXTENSION / FLOOR PROTECTION
- 3.1 TYPICAL EXISTING MASONRY
- 3.2 FACTORY BUILT FIREPLACE
- 4.0 FINISHING
- 4.1 DOOR REMOVAL
- 4.2 DOOR ADJUSTMENT
- 4.3 DOOR HANDLE INSTALLATION
- 4.4 SECONDARY AIR TUBES
- 4.5 BRICKS AND BAFFLES INSTALLATION
- 4.6 BACKERPLATE INSTALLATION
- 4.7 LOGO PLACEMENT
- 4.8 BLOWER INSTALLATION
- FINISHING
- 5.1 OPTIMUM BURN METHOD
- 5.2 OPTIONAL BLOWER OPERATION
- WHEN OPERATING ON HIGH BURN RATE
- WHEN OPERATING ON MEDIUM BURN RATE
- WHEN OPERATING ON LOW BURN RATE
- 5.3 AIR CONTROL
- 5.4 FIRE EXTINGUISHERS / SMOKE & CARBON MONOXIDE DETECTORS
- OPERATION
- 5.5 FUEL LOADING
- 5.5.1 EXTENDED FIRE
- DO NOT OVERFIRE THE APPLIANCE
- OVERFI RING CAN OCCUR BY
- 5.6 SMOKING
- 6.0 MAINTENANCE
- 6.1 ASH REMOVAL PROCEDURES
- 6.2 CREOSOTE FORMATION AND REMOVAL
- 6.3 RUNAWAY OR CHIMNEY FIRE
- CAUSES
- SOLUTIONS
- IN CASE OF A CHIMNEY FIRE
- 6.4 CHIMNEY CLEANING
- 6.5 DOOR GLASS REPLACEMENT
- 6.6 CARE OF GLASS
- NEVER FORCE OR SLAM IT SHUT
- 6.7 DOOR GASKET REPLACEMENT
- 6.8 BLOWER SERVICE OR REPLACEMENT
- 6.9 WOOD
- TYPES OF WOOD
- MOISTURE CONTENT
- STORING WOOD
- 7.0 REPLACEMENT PARTS
- NAPOLEON WOOD APPLIANCES PRESIDENT'S LIFETIME LIMITED WARRANTY
- CONDITIONS AND LIMITATIONS
- NAPOLEON CELEBRATING OVER 40 YEARS OF HOME COMFORT PRODUCTS
- POUR L'UTILISATION INTÉRIEUR SEULEMENT
- AVERTISSEMENT
- LISTED SOLID FUEL BURNING FIREPLACE INSERT ENCASTRE A COMBUSTIBLE SOLIDE HOMOLOGUE TESTED TO: / TESTÉ SELON : UL1482 - 2011 / ULC S628 - 1993 MODEL / MODELE: S20I / T20I
- CAUTION
- ATTENTION
- WOLF STEEL LTD
- WOLF STEEL USA
- NAC GUANGZHOU P.R.C
Brand : Napoleon
Model : S20i
Category : Fireplace