
NSW8S826GT - Refrigerator AEG - Free user manual and instructions
Find the device manual for free NSW8S826GT AEG in PDF.


| Product type | Fridge-freezer |
| Brand | AEG |
| Model | NSW8S826GT |
| Installation type | Freestanding |
| Dimensions (HxWxD) (cm) | 185 x 60 x 65 (estimated) |
| Net weight (kg) | 70 (estimated) |
| Power supply | 220-240 V / 50 Hz |
| Energy class | E (EU regulation 2017/1369) |
| Annual consumption (kWh) | 250 (estimated) |
| Total capacity (L) | 300 (estimated) |
| Fridge capacity (L) | 220 (estimated) |
| Freezer capacity (L) | 80 (estimated) |
| Noise level (dB) | 42 |
| Refrigerant | R600a (isobutane) |
| Defrost | Automatic (No Frost) |
| Lighting | LED |
| Main functions | No Frost, SuperCool, SuperFreeze, Holiday mode |
| Safety | Child lock, open door alarm |
| Maintenance and cleaning | Clean with warm water and non-abrasive cleaner; automatic defrost |
| Warranty | 2 years |
| Repairability score | 7.5 / 10 (estimated) |
Frequently Asked Questions - NSW8S826GT AEG
User questions about NSW8S826GT AEG
0 question about this device. Answer the ones you know or ask your own.
Ask a new question about this device
Download the instructions for your Refrigerator in PDF format for free! Find your manual NSW8S826GT - AEG and take your electronic device back in hand. On this page are published all the documents necessary for the use of your device. NSW8S826GT by AEG.
USER MANUAL NSW8S826GT AEG
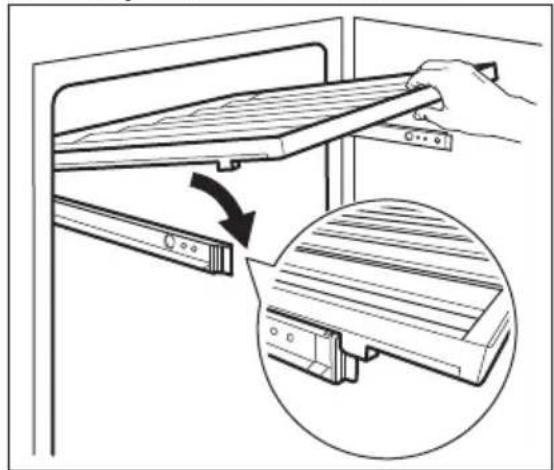
6.2 Removing and installing shelves. Removing shelves
To remove a shelf:
Installing shelves

CAUTION!


For instructions on removing and installing shelves, refer to the chapter "Removing and installing shelves".
Installing shelves

CAUTION!


1 Control panel 2 Shelf 3 Foot 4 Decorative frame 5 Glass door with three layers
6 Handle 7 Gasket 8 Air filter
5. OPERATION

WARNING!
Installing shelves
- Align the guides with the front.

CAUTION!


Thank you for choosing this AEG product. We have created it to give you impeccable performance for many years, with innovative technologies that help make life simpler – features you might not find on ordinary appliances. Please spend a few minutes reading to get the very best from it.
Visit our website to:

Get usage advice, brochures, trouble shooter, service and repair information: www.aeg.com/support

Register your product for better service: www.registeraeg.com

Buy Accessories, Consumables and Original spare parts for your appliance: www.aeg.com/shop
CUSTOMER CARE AND SERVICE
Always use original spare parts.
When contacting our Authorised Service Centre, ensure that you have the following data available: Model, PNC, Serial Number.
The information can be found on the rating plate.
⚠ Warning / Caution-Safety information
i General information and tips
Environmental information
Subject to change without notice.
1. ⚠ SAFETY INFORMATION
Before the installation and use of the appliance, carefully read the supplied instructions. The manufacturer is not responsible for any injuries or damage that are the result
of incorrect installation or usage. Always keep the instructions in a safe and accessible location for future reference.
1.1 Children and vulnerable people safety
- This appliance can be used by children aged from 8 years and above and persons with reduced physical, sensory or mental capabilities or lack of experience and knowledge if they have been given supervision or instruction concerning the use of the appliance in a safe way and understand the hazards involved.
- Children aged from 3 to 8 years are allowed to load and unload the appliance provided that they have been properly instructed.
- This appliance may be used by persons with very extensive and complex disabilities provided that they have been properly instructed.
- Children of less than 3 years of age should be kept away from the appliance unless continuously supervised.
- Children should be supervised to ensure that they do not play with the appliance.
- Children shall not carry out cleaning and user maintenance of the appliance without supervision.
- Keep all packaging away from children and dispose of it appropriately.
1.2 General Safety
• This appliance is for storing wine only. - This appliance is designed for single household domestic use in an indoor environment. - This appliance may be used in offices, hotel guest rooms, bed & breakfast guest rooms, farm guest houses and other similar accommodation where such use does not exceed (average) domestic usage levels. - WARNING: Keep ventilation openings, in the appliance enclosure or in the built-in structure, clear of obstruction.
- WARNING: Do not use mechanical devices or other means to accelerate the defrosting process, other than those recommended by the manufacturer.
- WARNING: Do not damage the refrigerant circuit.
- WARNING: Do not use electrical appliances inside the food storage compartments of the appliance, unless they are of the type recommended by the manufacturer.
- Do not use water spray and steam to clean the appliance.
- Clean the appliance with a moist soft cloth. Only use neutral detergents. Do not use abrasive products, abrasive cleaning pads, solvents or metal objects.
- When the appliance is empty for a long period, switch it off, defrost, clean, dry, and leave the door open to prevent mould from developing within the appliance.
- Do not store explosive substances such as aerosol cans with a flammable propellant in this appliance.
- If the supply cord is damaged, it must be replaced by the manufacturer, its Authorised Service Centre, or similarly qualified persons in order to avoid a hazard.
2. SAFETY INSTRUCTIONS
2.1 Installation

WARNING!
Only a qualified person must install this appliance.
- Remove all the packaging.
- Do not install or use a damaged appliance.
- Do not use the appliance before installing it in the built-in structure due to safety manner.
- Follow the installation instructions supplied with the appliance. Always take care when moving the appliance as it is heavy. Always use safety gloves and enclosed footwear.
- Make sure the air can circulate around the appliance.
- At first installation or after reversing the door, wait at least 4 hours before connecting the appliance to the power supply.
This is to allow the oil to flow back in the compressor.
- Before carrying out any operations on the appliance (e.g. reversing the door), remove the plug from the power socket.
- Do not install the appliance close to radiators or cookers, ovens, or hobs, unless otherwise specified in the installation instructions.
- Do not expose the appliance to the rain.
- Do not install the appliance where there is direct sunlight.
- Do not install this appliance in areas that are too humid or too cold.
- When you move the appliance, lift it by the front edge to avoid scratching the floor.
2.2 Electrical connection

WARNING!
Risk of fire and electric shock.

WARNING!
When positioning the appliance, ensure the supply cord is not trapped or damaged.

WARNING!
Do not use multi-plug adapters and extension cables.
• The appliance must be earthed. - Make sure that the parameters on the rating plate are compatible with the electrical ratings of the mains power supply. • Always use a correctly installed shockproof socket. - Make sure not to cause damage to the electrical components (e.g. mains plug, mains cable, compressor). Contact the Authorised Service Centre or an electrician to change the electrical components. - The mains cable must stay below the level of the mains plug. - Connect the mains plug to the mains socket only at the end of the installation. Make sure that there is access to the mains plug after the installation. - Do not pull the mains cable to disconnect the appliance. Always pull the mains plug.
2.3 Use

WARNING!
Risk of injury, burns, electric shock or fire.

The appliance contains flammable gas, isobutane (R600a), a natural gas with a high level of environmental compatibility. Be careful not to cause damage to the refrigerant circuit containing isobutane.
- Do not change the specification of this appliance.
- Any use of the built-in product as freestanding is strictly prohibited.
- Do not put electrical appliances (e.g. ice cream makers) in the appliance unless they are stated applicable by the manufacturer.
- If damage occurs to the refrigerant circuit, make sure that there are no flames and sources of ignition in the room. Ventilate the room.
- Do not let hot items to touch the plastic parts of the appliance.
- Do not store flammable gas and liquid in the appliance.
- Do not put flammable products or items that are wet with flammable products in, near or on the appliance.
- Do not touch the compressor or the condenser. They are hot.
2.4 Internal lighting

WARNING!
Risk of electric shock.
- This product contains one or more light sources of energy efficiency class E.
- Concerning the lamp(s) inside this product and spare part lamps sold separately: These lamps are intended to withstand extreme physical conditions in household appliances, such as temperature, vibration, humidity, or are intended to signal information about the operational status of the appliance. They are not intended to be used in other applications and are not suitable for household room illumination.
2.5 Care and cleaning

WARNING!
Risk of injury or damage to the appliance.
- Before maintenance, deactivate the appliance and disconnect the mains plug from the mains socket.
- This appliance contains hydrocarbons in the cooling unit. Only a qualified person must do the maintenance and the recharging of the unit.
- Regularly examine the drain of the appliance and if necessary, clean it. If the drain is blocked, defrosted water collects in the bottom of the appliance.
2.6 Service
• To repair the appliance contact the Authorised Service Centre. Use original spare parts only. - Please note that self-repair or non-professional repair can have safety consequences and might void the guarantee. - The following spare parts will be available for 7 years after the model has been discontinued: thermostats, temperature sensors, printed circuit boards, light sources, door handles, door hinges, trays and baskets. Please note that some of these spare parts are only available to professional repairers, and that not all spare parts are relevant for all models.
- Door gaskets will be available for 10 years after the model has been discontinued.
2.7 Disposal

WARNING!
Risk of injury or suffocation.
- Disconnect the appliance from the mains supply.
- Cut off the mains cable and discard it.
- Remove the door to prevent children and pets to be closed inside of the appliance.
- The refrigerant circuit and the insulation materials of this appliance are ozone-friendly.
- The insulation foam contains flammable gas. Contact your municipal authority for information on how to discard the appliance correctly.
- Do not cause damage to the part of the cooling unit that is near the heat exchanger.
3. INSTALLATION

WARNING!
Refer to Safety chapters.
3.1 Dimensions
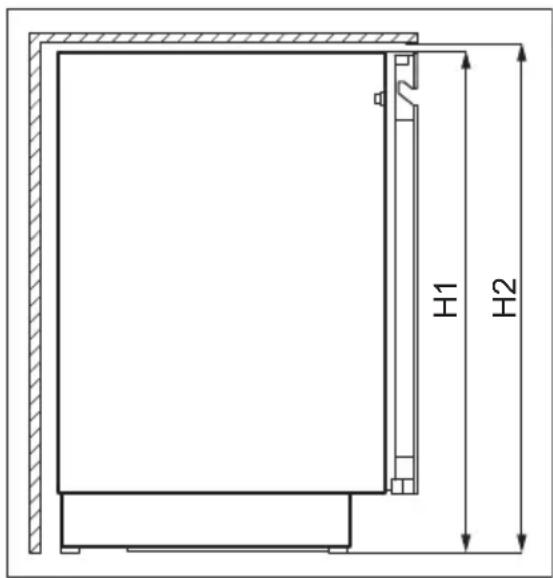
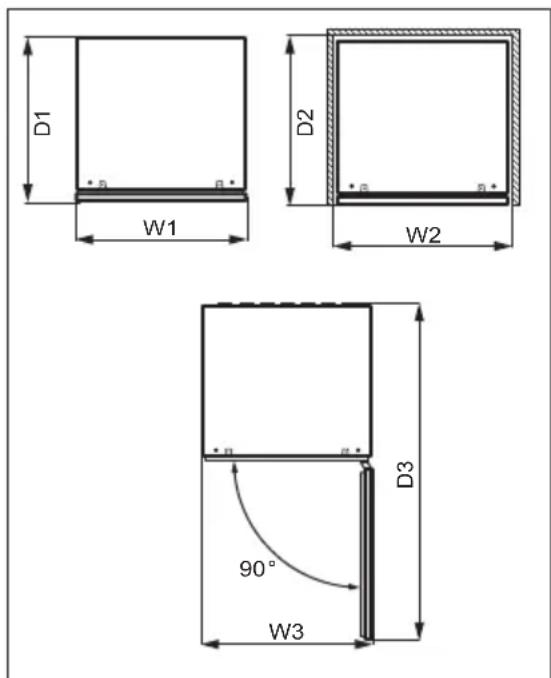
Overall dimensions 1
H1 mm 818
W1 mm 595
D1 mm 577
1 the height, width and depth of the appliance without the handle
Space required in use 2
H2 mm 820
W2 mm 600
D2 mm 580
the height, width and depth of the appliance including the handle, plus the space necessary for free circulation of the cooling air
Overall space required in use
H2 mm 820
W3 mm 600
D3 mm 1162
the height, width and depth of the appliance including the handle, plus the space necessary for free circulation of the cooling air, plus the space necessary to allow door opening to the minimum angle permitting removal of all internal equipment
3.2 Location
To ensure appliance's best functionality, you should not install the appliance in the nearby of the heat source (oven, stoves, radiators, cookers, hoods, hobs or extractor hobs) or in a place with direct sunlight. Make sure that air can circulate freely around the back of the cabinet.
This appliance should be installed in a dry, well ventilated indoor position.
This appliance is intended to be used at ambient temperature ranging from 10°C to 38°C.
The correct operation of the appliance can only be guaranteed within the specified temperature range.
If you have any doubts regarding where to install the appliance, please turn to the vendor, to our customer service or to the nearest Authorised Service Centre.
It must be possible to disconnect the appliance from the mains power supply. The plug must therefore be easily accessible after installation.
3.3 Electrical connection
- Before plugging in, ensure that the voltage and frequency shown on the rating plate correspond to your domestic power supply.
- The appliance must be earthed. The power supply cable plug is provided with a contact for this purpose. If the domestic power supply socket is not earthed, connect the appliance to a separate earth in compliance with current regulations, consulting a qualified electrician.
- The manufacturer declines all responsibility if the above safety precautions are not observed. • This appliance complies with the E.E.C. Directives.
3.4 Levelling
When placing the appliance make sure that it stands level. This can be achieved by two adjustable feet at the bottom in front.
3.5 Door reversibility
Please refer to the separate document with instructions on installation and door reversal.

CAUTION!
At every stage of reversing the door protect the floor from scratching with a durable material.
4. PRODUCT DESCRIPTION
4.1 Product overview
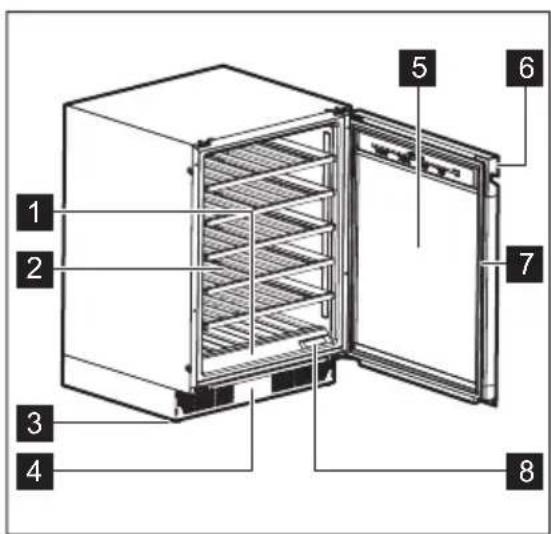
1 Control panel 2 Shelf 3 Foot 4 Decorative frame 5 Triple-glazed glass door
6 Handle 7 Gasket 8 Air filter
5. OPERATION

WARNING!
Do not spill any liquids on the control panel. This may damage the equipment and increase the risk of electric shock.
5.1 Control panel
![graph LR A["1"] --> B["Color Mode"] B --> C["Block"] C --> D["+"] D --> E["Filter Reset"] E --> F["On/Off"] F --> G["5"]](/content/2026/07/1423744/images/54b5b032171224d04184311b26231dd8a814bc4bf016943e9ae3402c8b9cb04c.jpg)
1 Cellar Mode key 2 Display 3 Temperature decrease key
4 Temperature increase key 5 Light key
5.2 Display
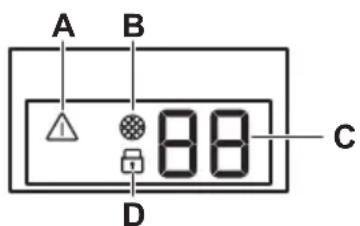
A. Alarm indicator B. Filter reset indicator C. Temperature indicator
D. Child lock indicator
5.3 Switching on and off
To switch on the appliance:
- Insert the plug into the wall socket.
- If the display is off, tap and hold the Temperature decrease key and Light key for 3 seconds.
The display shows the default set temperature 12°C.
To switch off the appliance, repeat step 2 and pull out the plug from the wall socket.
To select a different temperature, refer to the "Temperature regulation" section.
5.4 Temperature regulation

The default set temperature for the wine cabinet is 12°C.

The temperature can be adjusted between +5 and +20°C.
To set the temperature, tap the Temperature increase or decrease key for the compartment:
- Single tap shows the current set temperature. • Second tap increases or decreases the temperature by one degree.
- To speed up the selection, tap and hold the Temperature increase or decrease key until you reach the desired temperature.

By default, the temperature digits show the current temperature. When you tap once or start selecting a new setting, the displayed digits blink. After 3 seconds without tapping the keys, the digits stop blinking and the current temperature is displayed.
To set the right temperature for each type of wine, refer to the "Daily use" chapter.
5.5 Light setup
Tap the Light key once to turn the light on or off. The default light setting is 1A for the light behaviour and 9L for the light brightness.

The light has no negative effect on the quality of wine.
You may adjust behaviour and brightness of the light.
To set the light behaviour or brightness:
- Tap and hold the Light key for 3 seconds to enter the light setting menu.
- Light behaviour A appears. Tap the Light key again to go to the light brightness L.
- Tap the temperature regulators repeatedly to set the desired light behaviour or brightness.
Light behaviour (A):
- 1A door open - lights on at the highest dimming level, door closed - lights turn off.
- 2A door open - lights on at the highest dimming level, door closed - lights on at the selected dimming level.
- 3A door open and closed - lights on at the selected dimming level.
- 4A door open - lights on at the selected dimming level, door closed - lights on at the highest dimming level.
Light brightness (L):
- 9L is the brightest setting while 1L is the dimmest one.
5.6 Cellaring
In this mode, the appliance switches to the preset default temperature of 12°C.
To activate the Cellaring mode, tap the Cellar Mode key. CE on the display starts blinking. Wait 5 seconds. The mode is active when CE stops blinking and is lit at half brightness.
To deactivate the Cellaring mode, tap Cellar Mode once again. When the Cellaring mode is deactivated, the temperature returns to its previous setting.
5.7 Child Lock mode
Activate the Child Lock mode to lock the keys from an unintentional operation.
To activate the Child Lock, tap and hold the Cellar Mode key for 3 seconds. When the mode is on, the lock indicator lights up at full brightness. After 3 seconds, the lock indicator dims to half brightness.

If you press any key other than Cellar Mode, the lock indicator blinks three times.
To deactivate the Child Lock mode, tap the corresponding key again.

The Child Lock mode deactivates after electricity interruption or unplugging the appliance.
5.8 Reset air filter
To reset the air filter alarm:
- Change the carbon air filter. Refer to the "Replacing air filter" section.
- Tap and hold the Temperature increase and Light keys simultaneously for 5 seconds.
- The filter indicator turns off for the next 6 months.

After 6 months, the display shows the filter indicator to remind you to replace filter.
5.9 Mute or unmute sounds
The sounds are enabled by default.
To mute or unmute the sounds:
- Tap and hold the Cellar Mode and Temperature increase keys simultaneously for 5 seconds.
- The display shows Of for 2 seconds when the sounds are muted, or On for 2 seconds when the sounds are unmuted.
5.10 Changing temperature units
To switch the temperature units between °C and °F:
- Tap simultaneously the Cellar Mode and Temperature decrease keys.
- Once you set your preferred unit, °C or °F blinks on the display for 5 seconds.
5.11 Demo mode
Activate the Demo mode to demonstrate the appliance's features.
To activate the Demo mode, tap and hold the Light and Cellar Mode keys simultaneously for 10 seconds.
Once the mode is on, the display shows dE and On blinking alternately for 5 seconds.
The above message is displayed every 5 minutes to remind you that the appliance is in the Demo mode.
To deactivate the Demo mode, repeat the above procedure.
Once you deactivate the mode, the display shows dE and Of blinking alternately for 5 seconds.
5.12 High and low temperature alarm
High temperature alarm
The alarm activates when the compartment's temperature is 5°C higher than the set temperature for more than 60 minutes.
During the alarm:
6. DAILY USE
6.1 Wine storage

This appliance is intended to be used exclusively for the storage of wine.
The storage time for wine depends on age, alcoholic content, type of grapes and level of fructose and tannin in it. At the time of purchase, check if the wine is
- the display shows H° • the alarm indicator flashes
Low temperature alarm
The alarm activates when the compartment's temperature is 2° C lower than the set temperature for more than 60 minutes.
During the alarm:
- the display shows L° • the alarm indicator flashes
Press any key on the control panel to turn off the alarm.
- When the appliance returns to the set temperature, the normal display restores. Check if the wine inside is not spoiled.
- If the temperature is still too high or too low, the alarm activates again after 60 minutes.

The alarm does not activate within the first 90 minutes after switching on the appliance.
5.13 Door open alarm
If the door is left open for approximately 5 minutes, the lights start to flash and display shows alternately dr and OP. After 2 more minutes the sound is on.
The alarm stops after closing the door or after pressing any key on the control panel.

The alarm goes off again after 5 minutes if the door is still open.
already aged or if it will improve over time.
Recommended storage temperatures:
- For champagne and sparkling wines, between +6°C and +8°C.
- For white wines, between +10°C and +12°C.
- For rosé and light red wines, between +12°C and +16°C.
For aged red wines, between +14°C and +18°C.
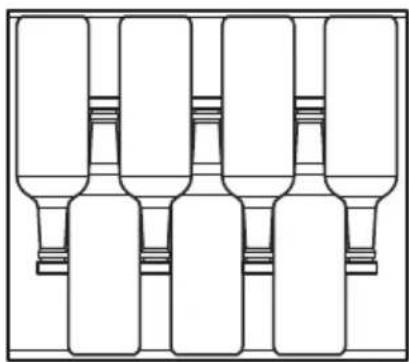
The appliance is designed to store up to 40 Bordeaux bottles (0.75 l) by placing:
- 5 bottles on level 1, 7 bottles on levels 2 - 6.
- Storage levels

Full shelf on levels 2 - 6
6.2 Removing and installing shelves
Removing shelves
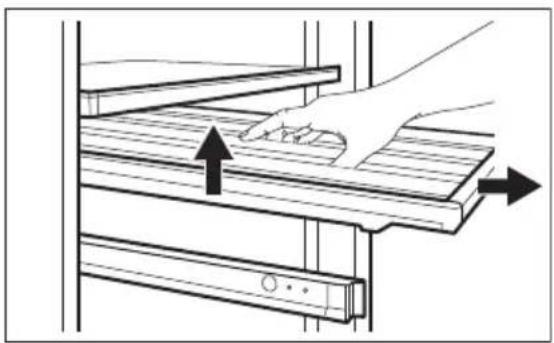
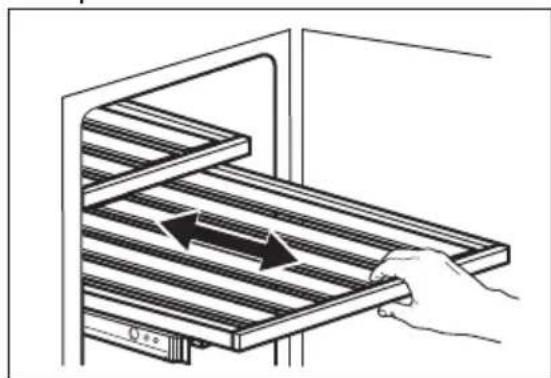
To remove the shelf:
- Open the wine cabinet door completely.
- Pull the shelf out.
- Grab the shelf in the middle, lift it up slightly, and take it out of the wine cabinet.
Installing shelves
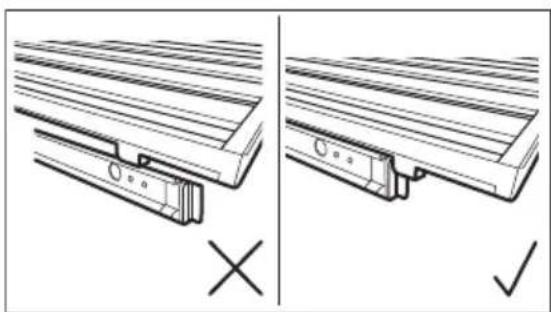
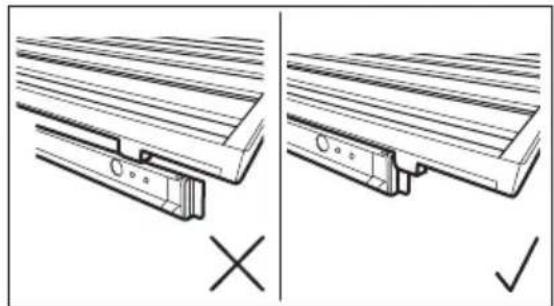
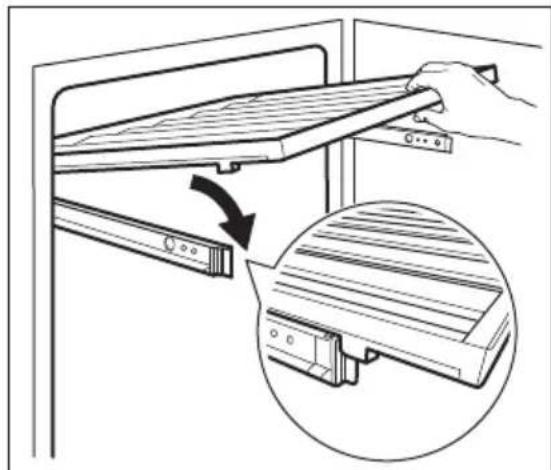
To put the shelf back into its initial position:
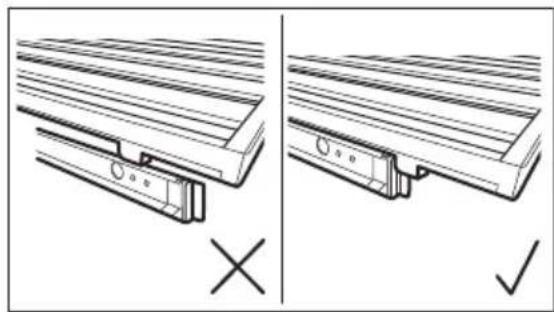
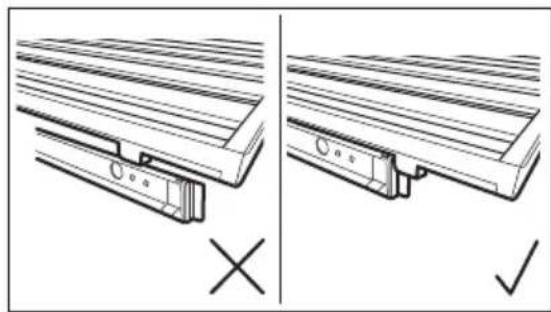
- Pull out the shelf's rails completely.
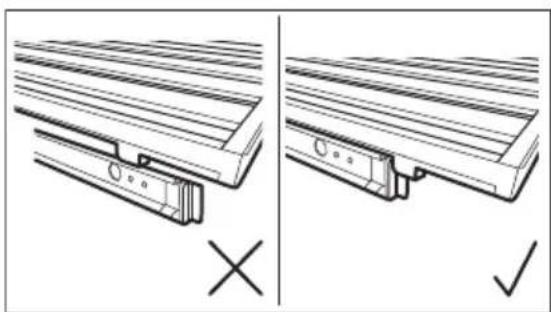
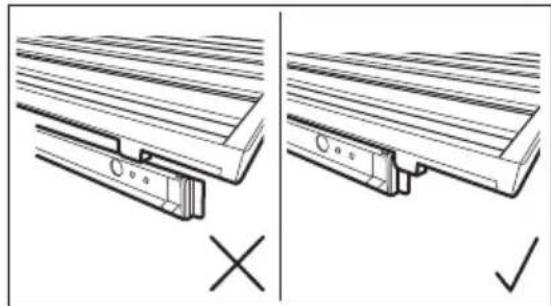
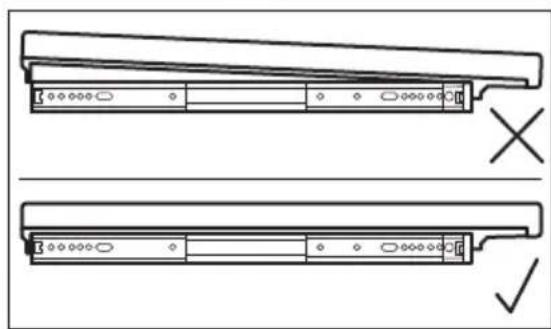
- Position the shelf's rear mounts on the rails, so they are engaged on both sides.
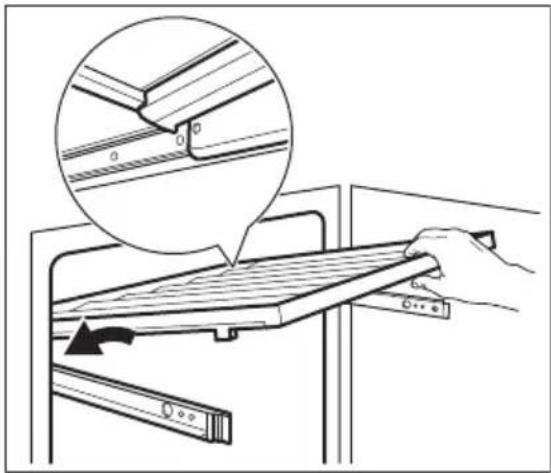
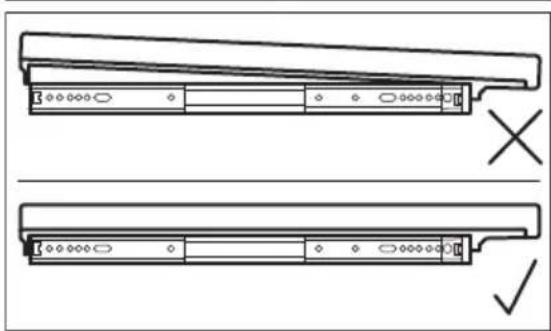
- Align the guides in the front.
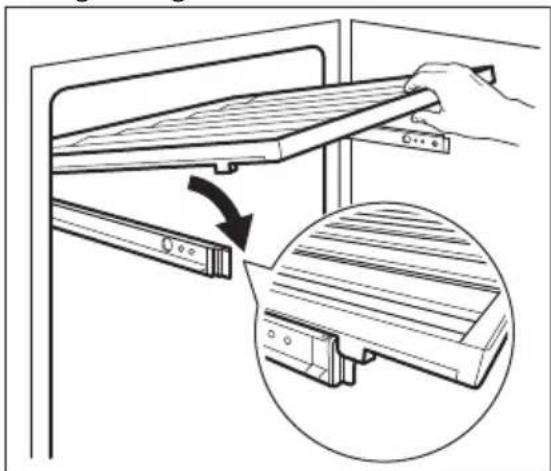
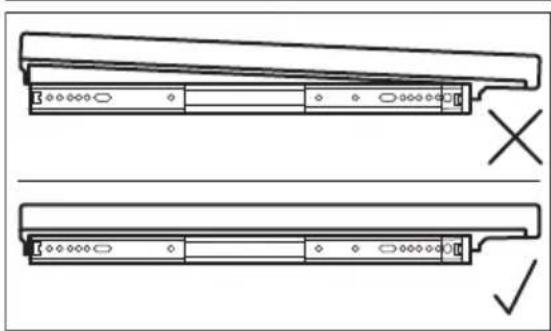
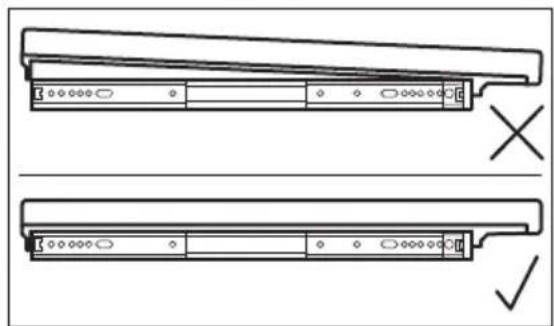
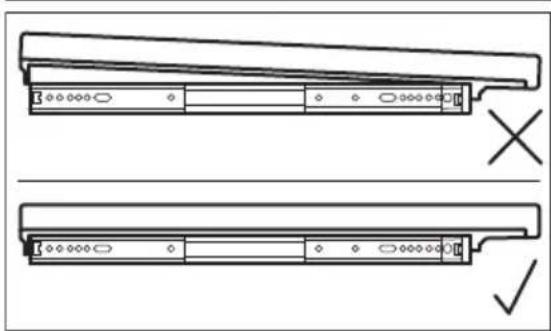
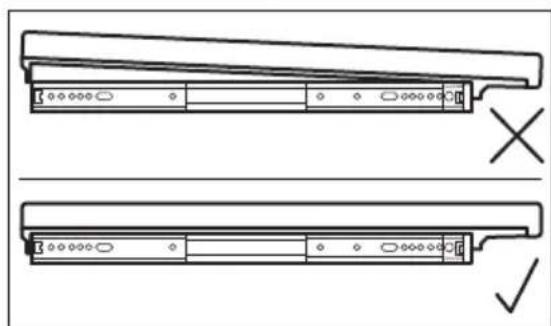
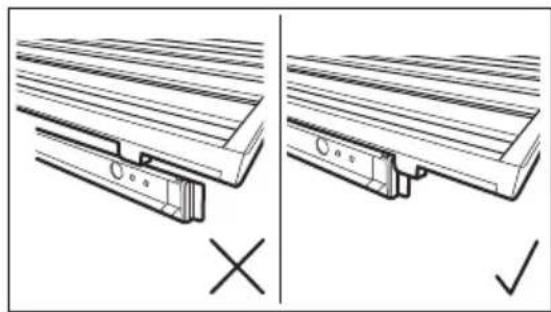
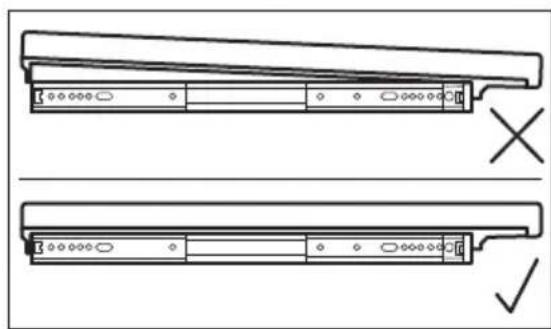
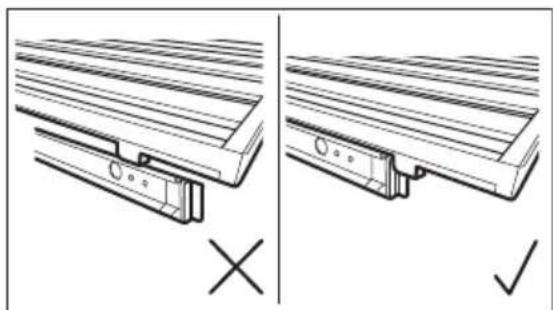
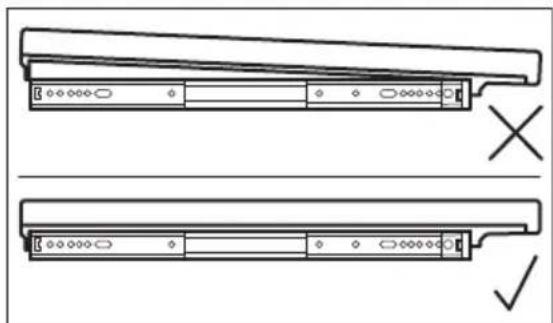
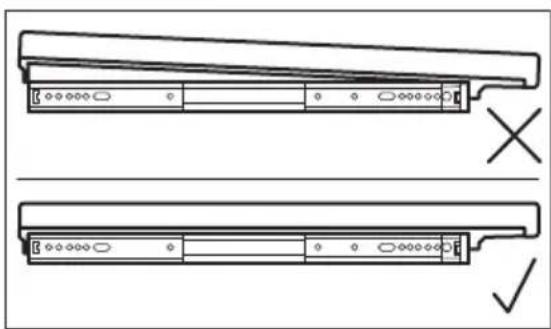
- Press the back of the shelf down firmly to check if it is placed and engaged correctly on the rails, and push it back into the appliance.
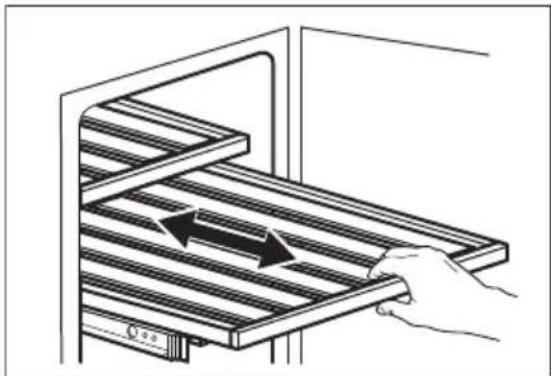

CAUTION!
Before placing any wine bottles on the shelves, make sure they are properly engaged on the rails.
Check for the possible wrong shelf positioning:
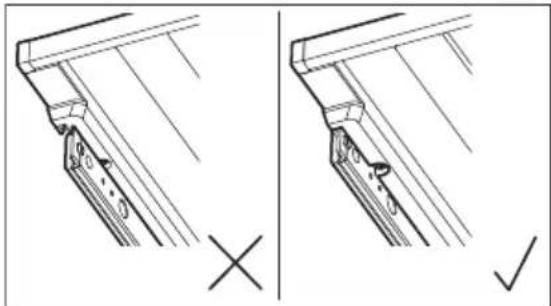
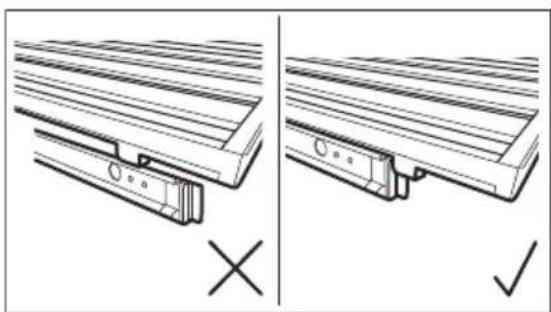
7. HINTS AND TIPS
7.1 Hints for energy saving
- The internal configuration of the appliance is the one that ensures the most efficient use of energy.
Use the wooden shelves only to store bottles.
6.3 Replacing air filter
Your appliance is equipped with the air carbon filter located next to the control panel. Refer to the "Product description" chapter.
The filter purifies air from unwanted odours in the wine cabinet, improving the storage quality.
To replace the air filter:
- Locate the filter and detach it from the appliance. Remove its cover.
- Remove the old filter.
- Take out the new filter from the plastic bag.
- Insert the new filter ensuring the side with the text is facing upward.
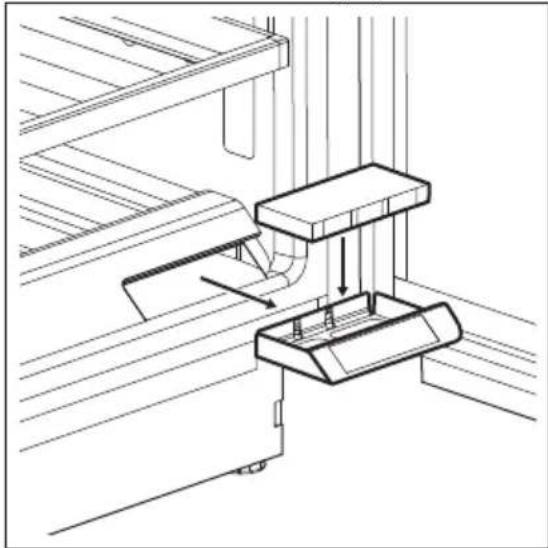
- Put the filter cover back and install it back into the appliance.
- Go to the control panel and reset the filter to deactivate the alarm. Refer to the "Reset air filter" section.
To get the best performance, the filter should be changed every 6 months. New active filter can be purchased from your local dealer or through the website. The part number is printed on the plastic bag.
- Do not open the door frequently or leave it open longer than necessary.
- Ensure a good ventilation. Do not cover the ventilation grilles or holes.
8. CARE AND CLEANING

WARNING!
Refer to Safety chapters.
8.1 General warnings

CAUTION!
Unplug the appliance before carrying out any maintenance operation.

This appliance contains hydrocarbons in its cooling unit; maintenance and recharging must therefore only be carried out by authorized technicians.

The accessories and parts of the appliance are not suitable for washing in a dishwasher.
8.2 Cleaning the interior
Before using the appliance for the first time, the interior and all internal accessories should be washed with lukewarm water and some neutral soap to remove the typical smell of a brand-new product, then dried thoroughly.

CAUTION!
Do not use detergents, abrasive powders, chlorine or oil-based cleaners as they will damage the finish.
8.3 Periodic cleaning
The equipment has to be cleaned regularly:
- Clean the inside with lukewarm water and baking soda solution. The solution should be about 2 tablespoons of baking soda to a litre of water.
- Wring excess water out of sponge or cloth when cleaning the area of the controls, or any electrical parts.
- Clean the outside of the appliance with warm water and some neutral soap.
- Regularly check the door seals and wipe them clean to ensure they are clean and free from debris.
- Rinse and dry thoroughly.
8.4 Cleaning the drain
Periodically clean the drain hole to prevent water from overflowing and dripping onto the stored bottles. The drain hole is located on the rear wall in the lower left part of the appliance.
Before cleaning, remove the two bottom shelves. To reach the drain more easily, slightly press the covering grid. For cleaning purpose, use a soft tube cleaner.
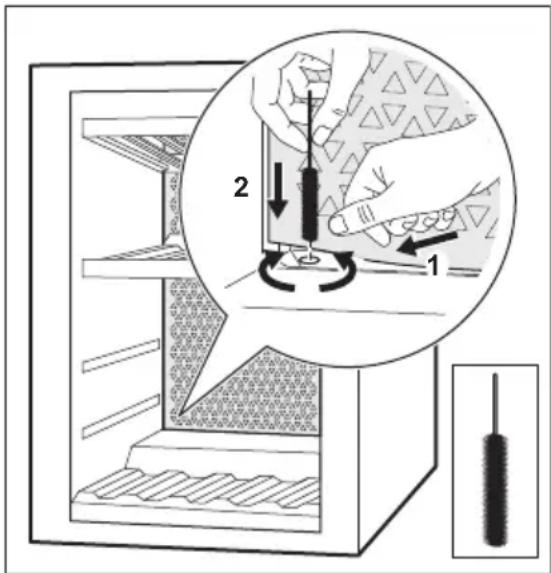

Refer to the "Removing and installing shelves" chapter for instructions on how to remove and install the shelves.
8.5 Periods of non-operation
When the appliance is not in use for long periods, take the following precautions:
- Disconnect the appliance from electricity supply.
- Remove all items.
- Clean the appliance and all accessories.
- Leave the door open to prevent unpleasant smells.
When the appliance is not in use due to power failure:
- Most power failures are corrected within a few hours and don't affect the temperature of your appliance if you minimize the door opening.
- If the power is going to be off for a longer time, you need to take the proper steps described above.
9. TROUBLESHOOTING

WARNING!
Refer to Safety chapters.
9.1 What to do if...
| Problem Possible cause Solution | ||
| The appliance does not operate. | The appliance is switched off. | Switch on the appliance. |
| The mains plug is not connected to the mains socket correctly. | Connect the mains plug to the mains socket correctly. | |
| There is no voltage in the mains socket. | Connect a different electrical appliance to the mains socket, to check if electricity is flowing. If not, contact a qualified electrician. | |
| The circuit breaker tripped or a blown fuse. | Turn on the circuit breaker or change the fuse. | |
| The compressor operates continually. | Temperature is set incorrectly. | Refer to the "Operation" chapter. |
| The room temperature is too high. | Refer to the "Installation" chapter. | |
| The door is opened too often. | Do not keep the door open longer than necessary. | |
| The door is not closed correctly. | Refer to the "Closing the door" section. | |
| The light does not work. The light is turned off. Turn on the light. Refer to the "Light setup" section. | ||
| The appliance is not plugged in. | Connect the appliance. | |
| The circuit breaker tripped or a blown fuse. | Turn on the circuit breaker or change the fuse. | |
| The lamp is defective. Contact the Authorised Service Centre. | ||
| The light button is not operating. | Contact the Authorised Service Centre. | |
| Too much vibration. The appliance is not supported properly. | Check if the appliance stands stable. | |
| The appliance is noisy. The appliance is not supported properly. | Check if the appliance stands stable. | |
| Water flows on the rear plate of the appliance. | During the automatic defrosting process, frost melts on the rear plate. | This is correct. |
| Water flows inside the wine cabinet. | The appliance drain is clogged. | Clean the appliance drain hole. Refer to the "Cleaning the drain" section. |
| Water flows inside the wine cabinet. | Products prevent that water flows into the water collector. | Make sure that products do not touch the rear plate. |
| The temperature in the wine cabinet is too low or too high. | The temperature regulator is not set correctly. | Set a higher or lower temperature. |
| The door is not closed correctly. | Refer to the "Closing the door" section. | |

If the advice does not lead to the desired result, call the nearest Authorised Service Centre.
9.2 Replacing the lamp
The appliance is equipped with a longlife LED interior light.
Only service is allowed to replace the lighting device. Contact your Authorised Service Centre.
9.3 Closing the door
- Clean the door gaskets.
- If necessary, adjust the door. Refer to the "Installation" chapter.
- If necessary, replace the defective door gaskets. Contact the Authorised Service Centre.
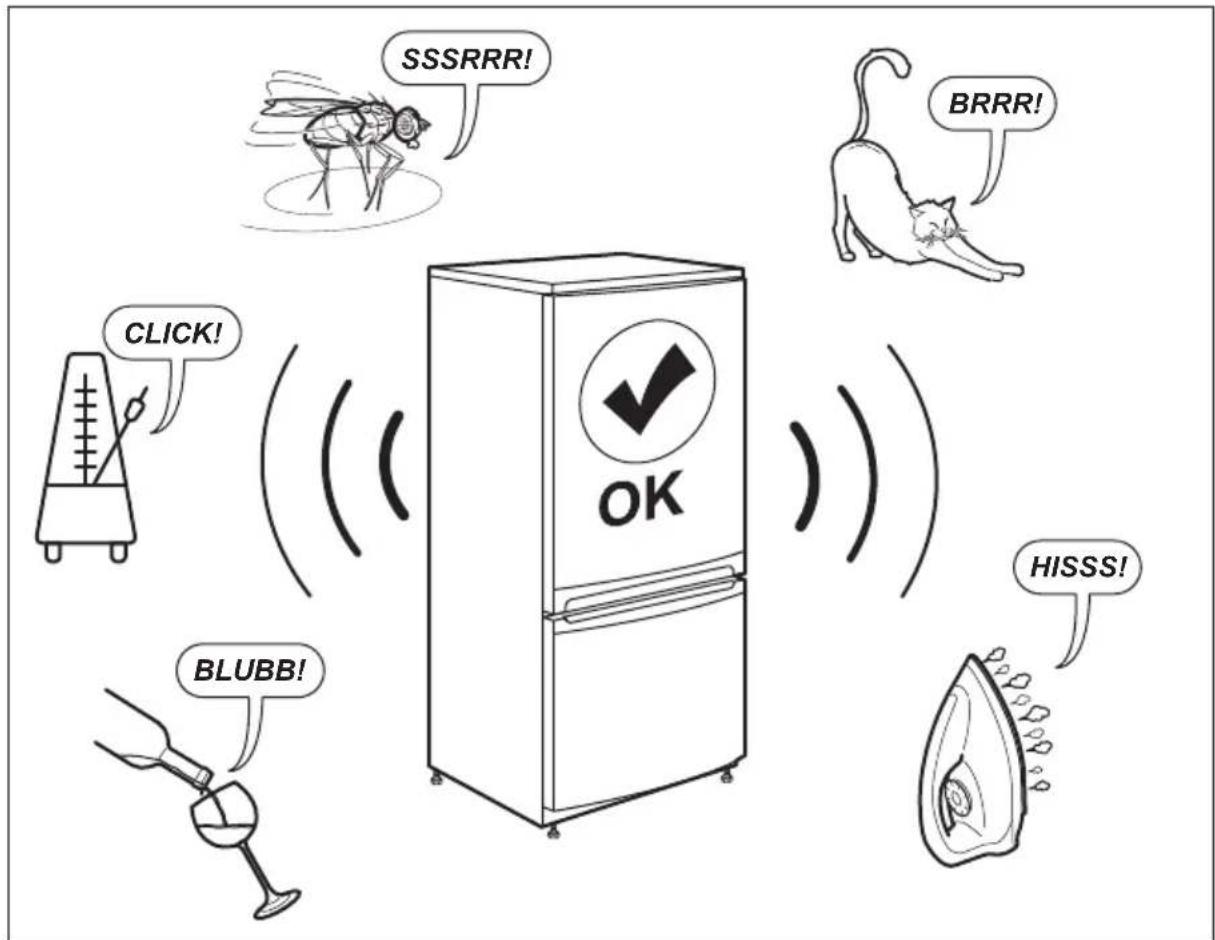
10. NOISES
11. TECHNICAL DATA
The technical information is situated on the rating plate on the internal side of the appliance and on the energy label.
The QR code on the energy label supplied with the appliance provides a web link to the information related to the performance of the appliance in the EU EPREL database. Keep the energy label for reference together with the user manual and all other documents provided with this appliance.
It is also possible to find the same information in EPREL using the link https://eprel.ec.europa.eu and the model name and product number that you find on the rating plate of the appliance.
See the link www.theenergylabel.eu for detailed information about the energy label.
12. INFORMATION FOR TEST INSTITUTES
Installation and preparation of the appliance for any EcoDesign verification shall be compliant with EN 62552. Ventilation requirements, recess dimensions and minimum rear
clearances shall be as stated in this User Manual at Chapter 3. Please contact the manufacturer for any other further information, including loading plans.
13. ENVIRONMENTAL CONCERNS
Recycle materials with the symbol. Put the packaging in relevant containers to recycle it. Help protect the environment and human health by recycling waste of electrical and electronic appliances. Do not dispose of
appliances marked with the symbol with the household waste. Return the product to your local recycling facility or contact your municipal office.
CONTENTS
1 Control panel 2 Shelf 3 Foot 4 Decorative frame 5 Triple-glazed glass door

CAUTION!


1. ⚠ SAFETY INFORMATION
Installing the shelves

NOTE!

7. TIPS AND ADVICE
9. TROUBLESHOOTING

WARNING!
Installing the shelves

ATTENTION!

7. TIPS
9. TROUBLESHOOTING

WARNING!

ATTENTION!


4. PRODUCT DESCRIPTION
Installing shelves

CAUTION!

7. TIPS AND ADVICE
9. TROUBLESHOOTING

WARNING!
9. TROUBLESHOOTING
1 Control panel 2 Shelf 3 Foot 4 Decorative frame 5 Triple glass door
6 Handle 7 Gasket 8 Air filter
5. USE

WARNING!
Installing shelves

CAUTION!
Before placing wine bottles on the shelves, make sure they are properly attached to the rails.
7.1 Tips for saving energy


ATTENTION!


6.2 Removing and installing shelves Removing shelves
Removing a shelf:
Installing shelves
- Align the guides at the front.
- Press the rear of the shelf firmly downwards to ensure it is correctly seated on the rails, and push it back into the appliance.

WARNING!

Repair information:
www.aeg.com/support
1 Control panel 2 Shelf 3 Foot 4 Decorative frame 5 Triple-glazed glass door
Installing shelves

CAUTION!

7. TIPS AND ADVICE


CE


- REMOVING AND INSTALLING SHELVES. REMOVING SHELVES
- INSTALLING SHELVES
- CAUTION
- OPERATION
- WARNING
- CUSTOMER CARE AND SERVICE
- ⚠ SAFETY INFORMATION
- CHILDREN AND VULNERABLE PEOPLE SAFETY
- GENERAL SAFETY
- SAFETY INSTRUCTIONS
- INSTALLATION
- ELECTRICAL CONNECTION
- USE
- INTERNAL LIGHTING
- CARE AND CLEANING
- SERVICE
- DISPOSAL
- DIMENSIONS
- OVERALL DIMENSIONS
- SPACE REQUIRED IN USE
- OVERALL SPACE REQUIRED IN USE
- LOCATION
- LEVELLING
- DOOR REVERSIBILITY
- PRODUCT DESCRIPTION
- PRODUCT OVERVIEW
- CONTROL PANEL
- DISPLAY
- SWITCHING ON AND OFF
- TEMPERATURE REGULATION
- LIGHT SETUP
- CELLARING
- CHILD LOCK MODE
- RESET AIR FILTER
- MUTE OR UNMUTE SOUNDS
- CHANGING TEMPERATURE UNITS
- DEMO MODE
- HIGH AND LOW TEMPERATURE ALARM
- HIGH TEMPERATURE ALARM
- DAILY USE
- WINE STORAGE
- LOW TEMPERATURE ALARM
- DOOR OPEN ALARM
- RECOMMENDED STORAGE TEMPERATURES
- REMOVING AND INSTALLING SHELVES
- REMOVING SHELVES
- HINTS AND TIPS
- HINTS FOR ENERGY SAVING
- REPLACING AIR FILTER
- GENERAL WARNINGS
- CLEANING THE INTERIOR
- PERIODIC CLEANING
- CLEANING THE DRAIN
- PERIODS OF NON-OPERATION
- TROUBLESHOOTING
- WHAT TO DO IF
- REPLACING THE LAMP
- CLOSING THE DOOR
- NOISES
- TECHNICAL DATA
- INFORMATION FOR TEST INSTITUTES
- ENVIRONMENTAL CONCERNS
- CONTENTS
- INSTALLING THE SHELVES
- NOTE
- TIPS AND ADVICE
- ATTENTION
- TIPS
- TIPS FOR SAVING ENERGY
- REMOVING AND INSTALLING SHELVES REMOVING SHELVES
Brand : AEG
Model : NSW8S826GT
Category : Refrigerator