
SCOOBA 390 - Floor cleaning robot IROBOT - Free user manual and instructions
Find the device manual for free SCOOBA 390 IROBOT in PDF.

| Product type | Floor washing robot |
| Brand | iRobot |
| Model | Scooba 390 |
| Approximate dimensions | 34 cm diameter, 9 cm height |
| Approximate weight | 3.5 kg |
| Power source | Rechargeable battery, AC charger (models L13143 or 5961) |
| Runtime | Approximately 45 minutes per cleaning cycle |
| Charging time | ~3 hours for a full charge, 16 hours for a refresh charge (first time) |
| Main functions | 4-step cleaning (preparation, washing, scrubbing, vacuuming), iAdapt technology, internal drying mode, obstacle detection, cliff sensors, virtual wall (included on some models) |
| Compatible surfaces | Sealed hard floors (tile, linoleum, etc.). Do not use on carpet, unsealed wood, wax, laminate. |
| Maintenance and cleaning | Rinse the tank after each use, clean the filter and vacuum port, clean the brush and cleaning head. Use warm water or white vinegar (60 ml) or Scooba solution (7 ml). |
| Safety | Do not immerse, do not use bleach, do not use on unsuitable surfaces. Automatic shutdown in case of problem. |
| Spare parts and repairability | Removable battery, removable brush and cleaning head, removable filter. No information on repairability. |
| General information | Manufacturer: iRobot Corporation, 8 Crosby Drive, Bedford, MA 01730, USA |
Frequently Asked Questions - SCOOBA 390 IROBOT
User questions about SCOOBA 390 IROBOT
0 question about this device. Answer the ones you know or ask your own.
Ask a new question about this device
Download the instructions for your Floor cleaning robot in PDF format for free! Find your manual SCOOBA 390 - IROBOT and take your electronic device back in hand. On this page are published all the documents necessary for the use of your device. SCOOBA 390 by IROBOT.
USER MANUAL SCOOBA 390 IROBOT
With the Clean tank filled and properly installed, place Scooba in the center of the Charge Scooba's Battery
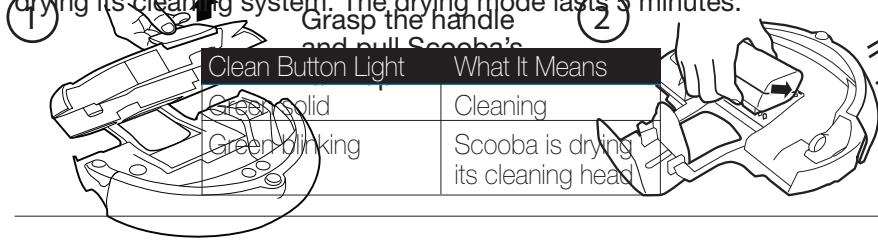
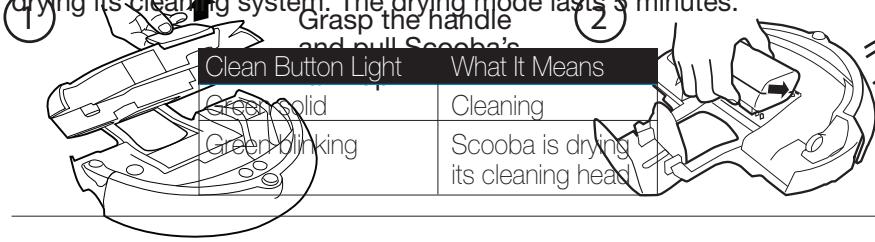
Let Scooba clean until the tank is empty (approximately 45 minutes). Scooba's Clean light will blink to indicate that it is almost finished cleaning and that Scooba is drying its cleaning system. The drying mode lasts 5 minutes.
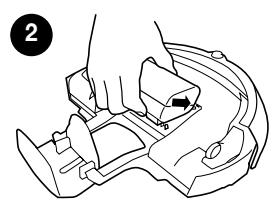
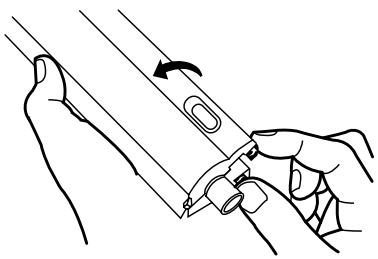
Place battery in Scooba by rotating the battery into its slot, making sure the tabs fit inside the guide holes.
Empty Scooba
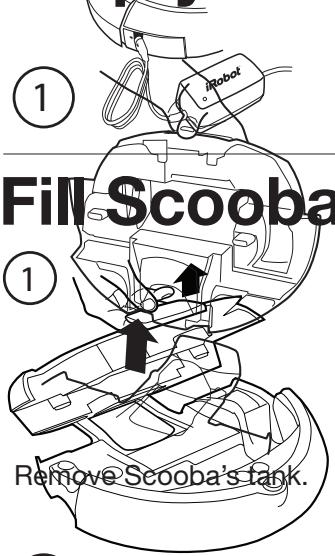
4 Scooba's tank.
When Scooba has completed every step and dirinse Scooba's tan
Scooba to charge the battery. For best performance, iRobot recommends clng Scooba's battery overnight 2 first time only

| Power Button Light | Battery Status |
| Red | Battery empty |
| Green pulse | Charging |
| Green fast pulse | 16-hour refresh charge |
| Green solid | Fully charged |
| Recharging | Battery not installed |
6 e Clean tank with water and 7ml (4 capful or 1 packet) of Scooba cleaning solution natural enzyme formula or 60 ml of white vinegar.
Slowly fill the remainder of the Secure the tank cap and place Close the tank by pressing Clean tank with warm or cold tap the tank back in the tank down when the tank you will water. Tilt the tank and ensure it is holder. be a click when the tank completely filled to the top. is properly installed.
TIP: Scooba is designed to work with 7ml of Scooba cleaning solution natural enzyme formula or 60ml of white vinegar and water. Robo
With the Clean tank filled and properly installed, place Scooba in the center of the Charge Scooba's Battery
Let Scooba clean until the tank is empty (approximately 45 minutes). Scooba's Clean light will blink to indicate that it is almost finished cleaning and that Scooba is drying its cleaning system. The drying mode lasts 5 minutes.
Place battery in Scooba by rotating the battery into its slot, making sure the tabs fit inside the guide holes.
Empty Scooba
4 Scooba's tank.
When Scooba has completed every step and dirinse Scooba's tan
Scooba to charge the battery. For best performance, iRobot recommends clng Scooba's battery overnight 2 first time only
| Power Button Light | Battery Status |
| Red | Battery empty |
| Green pulse | Charging |
| Green fast pulse | 16-hour refresh charge |
| Green solid | Fully charged |
| Red 3ng | Battery not installed |

F 6 e Clean tank with water and 7ml (capful or 1 packet) of Scooba cleaning solution natural enzyme formula or 60 ml of white vinegar.

Slowly fill the remainder of the Secure the tank cap and place Close the tank by pressing Clean tank with warm or cold tap the tank back in the tank down when the tank you will water. Tilt the tank and ensure it is holder. be a click when the tank completely filled to the top. is properly installed.
TIP: Scooba is designed to work with 7ml of Scooba cleaning solution natural enzyme formula or 60ml of white vinegar and water. Robo
iRobot Scooba®
FLOOR WASHING ROBOT
300 Series
OWNER'S MANUAL
Dear Scooba Owner
Congratulations and welcome to the world of iRobot! You have joined the growing number of people who have discovered a smarter way to clean.
iRobot Scooba is an innovative and easy-to-use product that will change the way you clean hard floors. Scooba frees you to manage other household tasks while it cleans, so you can wash your hard floors more frequently and get more done.
Thank you for joining the iRobot revolution. We look forward to bringing you more groundbreaking products that will change and improve your world.
On behalf of the entire iRobot team,
Colin Angle
Chairman, CEO and Co-founder, iRobot Corporation

Looking after your iRobot Scooba
For best results, use it often! Scooba is designed to work with only Scooba Hard Floor Cleaning Solution or plain tap water. Never use bleach in Scooba! After every use, rinse the tank, filter, and vacuum port. The brushes do a lot of the hard work, so it's best to take them out and remove the hair and fluff that collect around these.
Your Scooba is pretty smart in getting around, but it does need a little help. Before cleaning, sweep up large debris and clear away any clutter, furniture and lightweight rugs. General dust, dirt and grime are what it's there for, but avoid large liquid spills.
Extend the battery life by recharging it as soon as possible and storing your Scooba plugged in. For long-term storage, charge battery, then remove and store the battery in a cool, dry place.
Safety first As your Scooba contains electrical parts, don't submerge or spray it with water - clean with a damp cloth only.

CAUTION: DO NOT USE SCOOBA ON THESE SURFACES:
Carpet or rugs, unsealed hardwood, waxed floors, or laminate flooring
How to get started
Charge Scooba
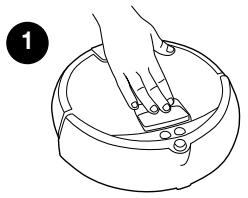
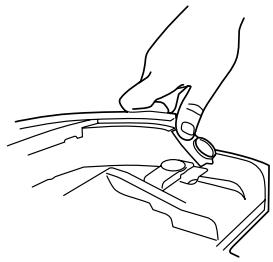
Pick Scooba up by the handle and set it down on a flat surface.
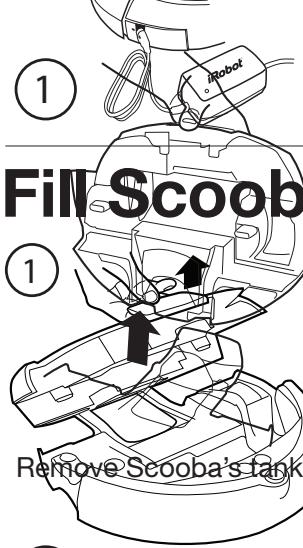
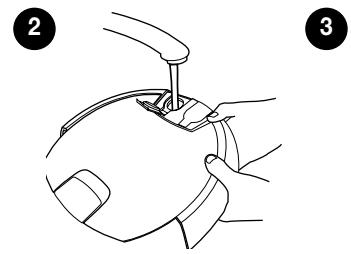
- Press the handle down to release the tank. Remove the tank.
- Insert the battery by aligning guide tabs and click it into place.
- Plug in the battery charger and let the battery charge overnight (first time only).
Setup Scooba
- Once Scooba is fully charged, remove the charging plug and remove the tank.
- Fill the clean tank with water and optional Scooba Hard Floor Cleaner. For a shorter cleaning cycle, put less water in the tank. Close tank caps.
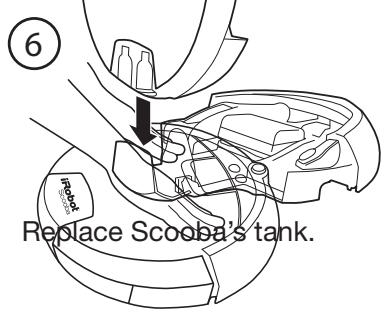
- Place the tank back in Scooba and push the tank down until it clicks into place.

Ready to go!
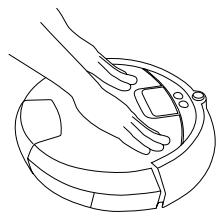
First, sweep up large debris and then place Scooba in the middle of the room.
- Press POWER to turn Scooba on.
- Press CLEAN to start a cleaning cycle.
Then just walk away and let your Scooba get to work (approximately 45 minutes for a full tank.)
TIP: If you wish to end a cleaning cycle early, activate the internal drying mode first by pressing CLEAN while Scooba is cleaning. If Scooba is off, press POWER and then press CLEAN twice.
Scooba's Anatomy

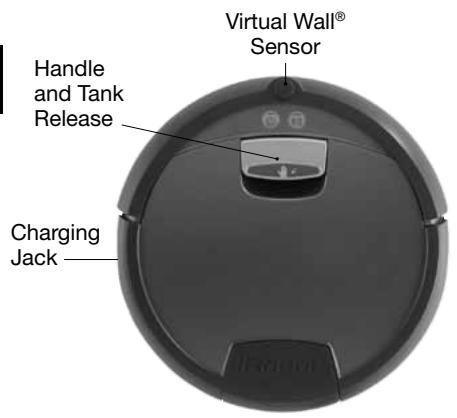
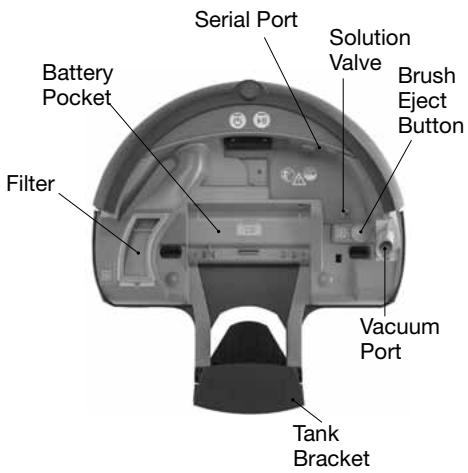
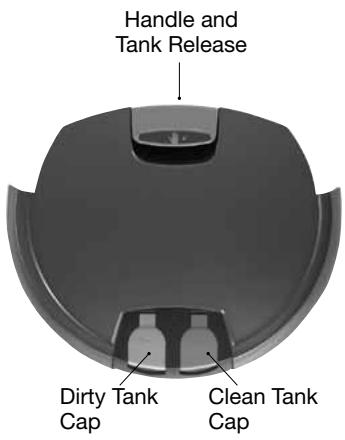
Scooba has two main parts: the robot base, and the tank.
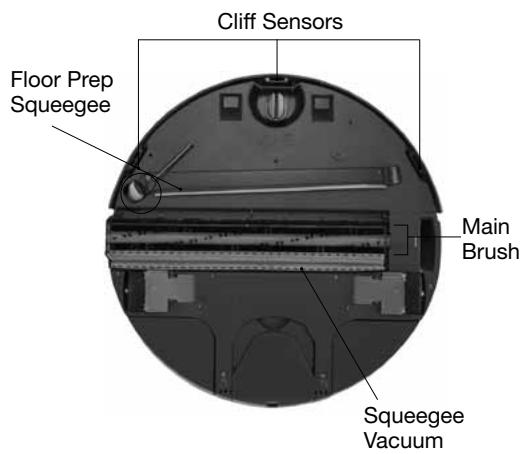
Robot Base
Scooba's Tank
Scooba's Lights
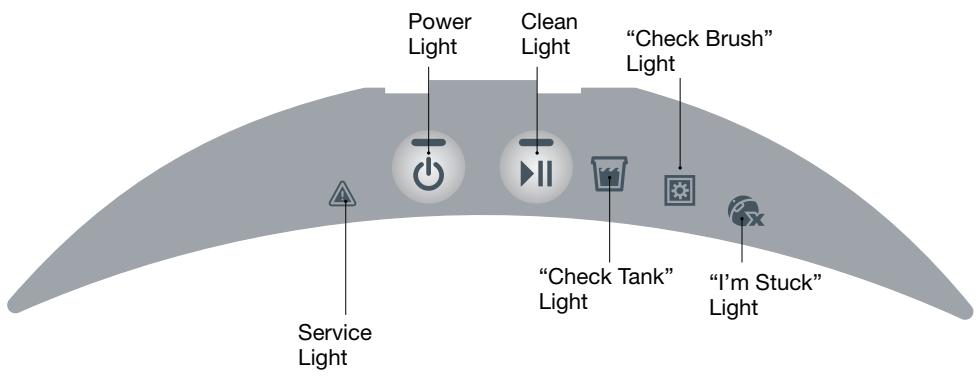
| Light Behavior | What it Means | |
| Power | Red solid | Battery discharged |
| Green pulsing | Battery charging | |
| Green solid | Battery fully charged | |
| Red blinking | Battery not installed | |
| Clean | Green solid | Cleaning |
| Green blinking | Internal drying mode | |
| Check Tank | Green solid | The cleaning cycle is complete. Empty tank. |
| Check Brush | Yellow solid | Remove and clean brush and filter (see pages 5 - 6). |
| I'm Stuck | Yellow solid | Move and restart Scooba. |
| Service | Red blinking | Scooba needs help. Refer to troubleshooting section (see pages 11 - 12). |
Scooba Essential Maintenance
To keep Scooba running at peak performance, perform the following maintenance tasks after every cleaning cycle.
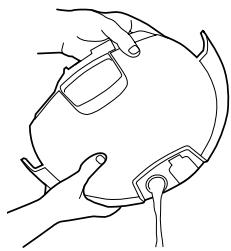
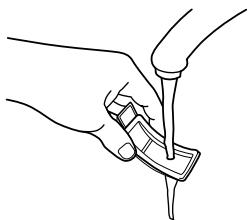
Rinse and Empty Scooba's Tank
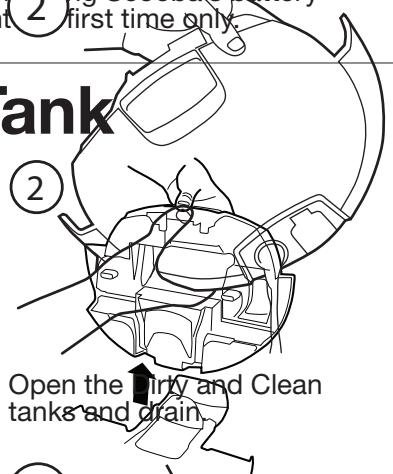
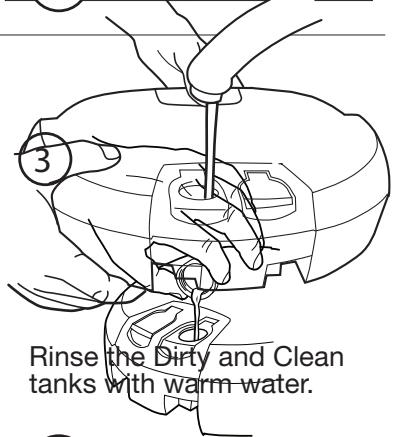
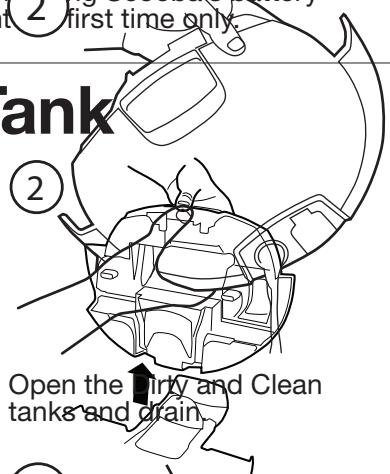
Scooba puts down fluid from the CLEAN tank and collects dirty solution into the DIRTY tank. Empty and rinse both tanks after every cleaning cycle.
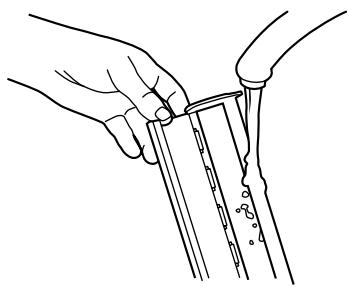
1 Run water into the back openings.
2 Empty tanks and partially refill tanks with warm water.
3 Vigorously shake the tank and empty through all openings.
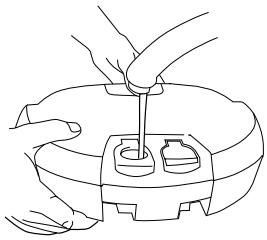
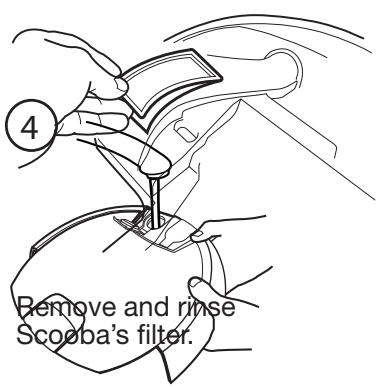
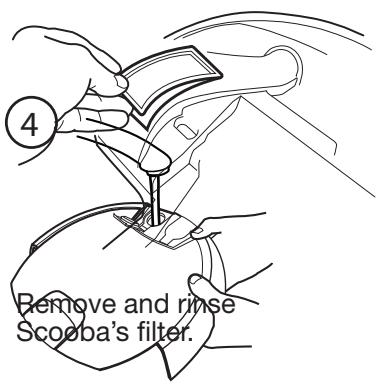
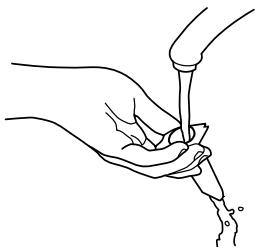
Rinse Scooba's Filter and Vacuum Port
(Parts to be cleaned or maintained are colored grey and orange.)
1 Remove filter.
2 Rinse under water.
3 Replace item. Do not force.

1 Remove vacuum port.
2 Rinse under water.
3 Replace item. Do not force.
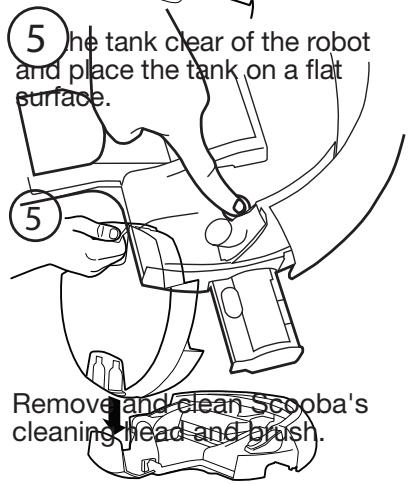
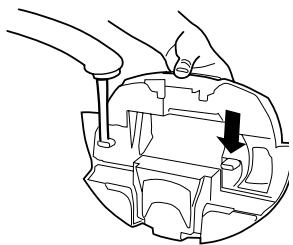
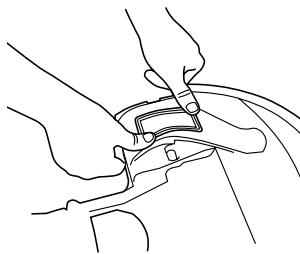
Clean Scooba's Cleaning Head and Brush
(Parts to be cleaned or maintained are colored grey and orange.)
Scooba's brush is located inside a cartridge called the 'cleaning head'. Access to the cleaning head is inside Scooba, so the tank needs to be removed when removing and replacing the cleaning head.
With the tank removed, push eject button to remove the cleaning head.
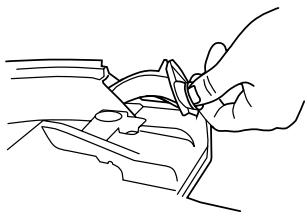
Open the cleaning head by pushing the tabs in opposite directions, then remove the brush.
3 Rinse the cleaning head and brush under water.
Ensure the tank is removed before replacing the cleaning head. The cleaning head will click into place.
CAUTION: Scooba contains electronic components that can be damaged by spills of water or other liquids. Clean the bottom and top of Scooba with a damp cloth only. Do not pour or spray water onto Scooba, other than into the Clean or Dirty tanks.
Scooba Cleaning Solution
iRobot approves using Scooba with plain tap water or Scooba Hard Floor Cleaning Solution which is specially formulated to be tough on cleaning but safe around children and pets.
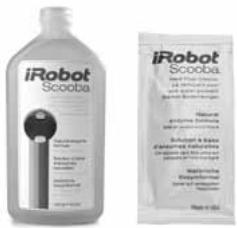
CAUTION: Use of other solutions may damage Scooba and voids the warranty. Never use bleach!
Scooba's Cleaning System
Scooba uses four cleaning stages in every pass. Scooba has a unique two chamber tank design that ensures fresh cleaning solution never mixes with the dirty water that Scooba picks up as it cleans.
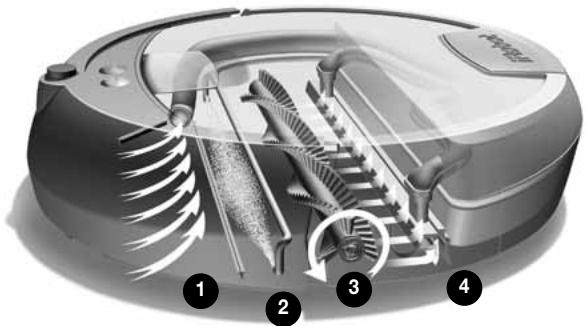
Preps - Scooba picks up loose dirt and light debris from the floor.
Washes - Scooba continuously lays down a small amount of fresh cleaning solution.
3 Scrubs - Scooba gently scrubs to clean spills and grime.
Vacuums - Scooba's squeezegee vacuum picks up dirty water and debris, leaving your floor clean.
Scooba will clean until it has used all of the solution in the Clean tank, approximately 45 minutes. At the end of a cleaning cycle, Scooba will enter a brief internal drying mode to remove water within its systems. During this time Scooba's Clean light will blink.
Scooba's Cleaning Pattern
Scooba is a robot that cleans differently than the way most people clean their floors. iAdapt™ Responsive Technology, iRobot's advanced, proprietary system of software and sensors, allows Scooba to get around, under and past everyday obstacles.
Note: Scooba's cleaning cycle takes approximately 45 minutes and will pass over the same area on the floor multiple times to ensure total coverage.
While Scooba is cleaning it calculates the best path to clean your floor and determines the best times to use its various cleaning behaviors:
1 Spiraling: Enables Scooba to efficiently clean a large area.
Wall Following: Enables Scooba to clean the room perimeter and navigate around furniture and obstacles.
3 Room Crossing: Enables Scooba to clean new areas while crisscrossing the room.

TIP: For best performance and floor coverage, clear your floor of chairs, clutter, and light rugs. Use a Virtual Wall to contain Scooba to one room. For smaller rooms, partially filling the tank will shorten Scooba's cleaning time.
Battery and Charging
Scooba is powered by a rechargeable battery and should be fully charged before each cleaning cycle. When fully charged (takes up to three hours), Scooba's battery will last for at least one full cleaning.
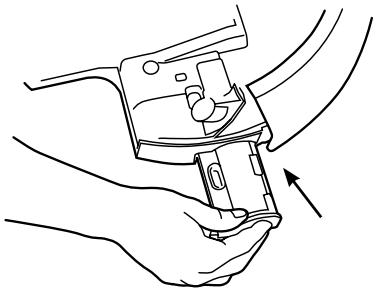
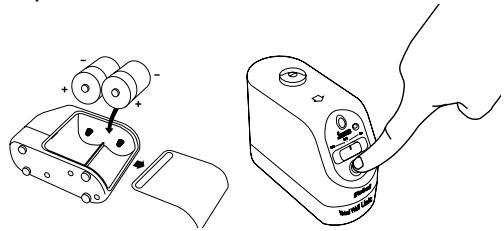
Install the battery
To install the battery, first align the two battery tabs with Scooba's guide holes. With the tabs inserted, push down on the battery and listen for a click as the battery clicks into place.
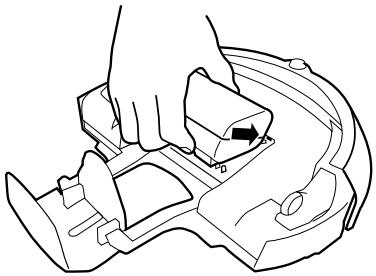

If the battery's tabs are not inside the guide holes in the battery pocket, the tank and robot base may not be properly connected.
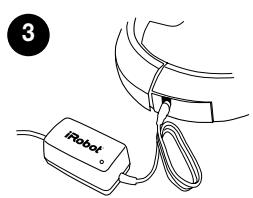
Charge the battery
Charge Scooba's battery by plugging the charger into wall and connecting the charger to Scooba (lift charging jack cover). Always make sure that the green power light of the charger is ON while plugged into the wall.

TIP: For best battery performance, recharge the battery as soon as possible and store your Scooba plugged in. For long-term storage, remove and store the battery in a cool, dry place.
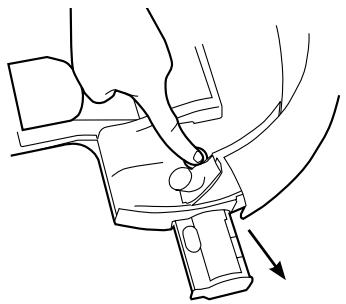
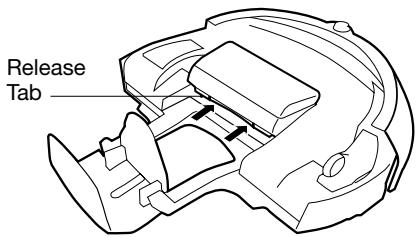
Remove the battery
To remove the battery, first grip the battery, making sure to push in the release tabs. Then lift the battery up and out of Scooba.
Scooba's Virtual Wall®
(included with select models)
The Scooba Virtual Wall creates an invisible barrier that Scooba will not cross. Virtual Walls can be set to block areas from 1 to 2.5 meters (1 to 8 feet).
TIP: Use the Virtual Wall to block doorways or to keep Scooba away from cords.
The Virtual Wall beam is keyhole shaped. A small halo prevents Scooba from bumping the Virtual Wall and a larger beam blocks off areas of your home where you don't want Scooba to go.
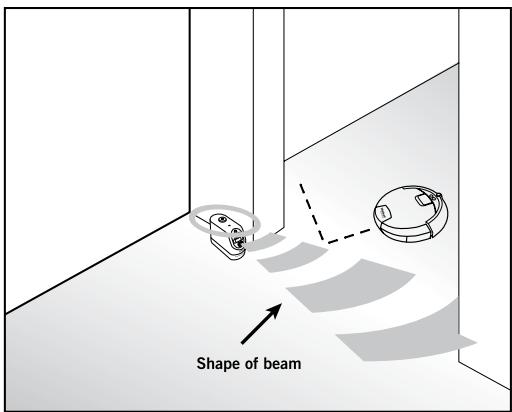
TIP: For best performance, place the Virtual Wall on the outside of the doorway you wish to block, and always set the Virtual Wall to the shortest setting possible.
Virtual Walls require 2 "D" batteries. Virtual Walls will automatically shut themselves off at the end of a cleaning cycle, or they can be manually shut off by pressing their power button.
Troubleshooting
Warning Lights
Scooba has several warning lights that tell you if the robot needs assistance.
| Warning Light | Possible Cause | What To Do |
| Power Light (Red) | Battery is discharged | Recharge Scooba's battery (see page 9). |
| “Check Tank” Light | The clean tank is empty (normal at end of cycle) | Empty the tank and fill partially with warm water. Shake the tank vigorously and empty it out. |
| The tank is not properly secured | Confirm battery, filter and vacuum port are properly installed. Ensure the tank is completely closed. | |
| “Check Brush” Light | The brush is jammed | Remove and clean Scooba's brush and cleaning head. With cleaning head and tanks removed, turn Scooba over, inspect and clean the cleaning head area. |
| The cleaning head is improperly installed | Remove and replace Scooba's cleaning head (see page 6). | |
| The filter is missing | Remove, rinse and replace Scooba's filter. Ensure filter is installed properly (see page 5). | |
| “I'm Stuck” Light (followed by “uh-oh” and a number of beeps) | (1 beep) One of Scooba's wheels is off the floor | Inspect Scooba's wheels. Push each wheel up and down, place the robot back on the floor and press Clean. |
| (2 beeps) The front wheel is stuck | Ensure that the front wheel can spin freely. Lightly push the wheel up and down. The front wheel can easily be removed, cleaned, and replaced. | |
| (3 beeps) Bumper problem | Tap the bumper to ensure that it moves in and out. Visually inspect the bumper edges for debris. | |
| (4 beeps) Scooba's cliff sensors are dirty or malfunctioning | Clean cliff sensors with a cotton swab (see page 3 for sensor location). The cliff sensors are located in the bumper and are accessed by turning Scooba over. | |
| (5 beeps) Left or right wheel malfunction | Inspect Scooba's drive wheels. Spin the wheels by hand and confirm that they offer some resistance. If tires are damaged, replace tires. | |
| Service Light (followed by 4-tone alarm and a number of beeps) | (1 beep) Pump error | Contact iRobot customer care. |
| (2 beeps) Vacuum error | Contact iRobot customer care. | |
| (3 beeps) Battery error | Contact iRobot customer care. | |
| (4 beeps) Charger error | Contact iRobot customer care. | |
| (5 beeps) Battery is too hot | Make sure Scooba was not recently filled with water or charged in a hot place. Wait for Scooba and the battery to cool down and try again. |
General Troubleshooting
Refer to the table below to resolve Scooba's problem.
| Problem | Possible Cause | What To Do |
| Scooba will not power on | Power is off | Press Power, then press Clean to start Scooba. |
| Battery is not charged | Charge Scooba's battery (see page 9). | |
| Battery is not correctly seated | Remove battery and ensure that battery tabs are placed inside Scooba's guide holes before closing Scooba's tank. | |
| Warning Light is on | Refer to Warning Light troubleshooting (see page 11). | |
| Excessive foam coming out of Scooba | There is too much cleaning solution concentrate in Clean tank | Empty and rinse the Clean tank thoroughly. When re-filling, make sure to use only 7 ml of Scooba cleaning solution and to fill the Clean tank completely to the rim with water. |
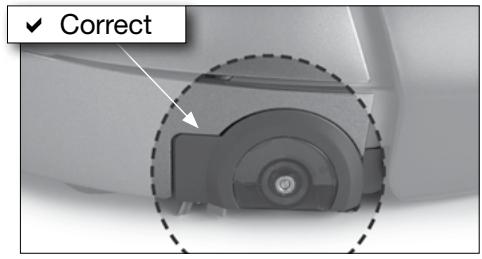
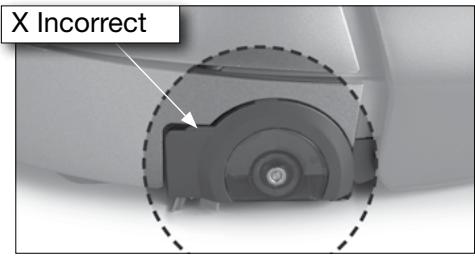
| Cleaning head sticks out of Scooba, will not engage | Cleaning head is not closed tightly over the brush | With the tank open, slide the cleaning head out of Scooba. Squeeze the cleaning head completely closed over the brush before re-inserting it into its proper location (see page 6). |
Important Safety Instructions
CAUTION: DO NOT EXPOSE THE ELECTRONICS OF SCOOBA, ITS BATTERY, OR THE BATTERY CHARGER. THERE ARE NO USER SERVICEABLE PARTS INSIDE. REFER SERVICING TO QUALIFIED SERVICE PERSONNEL. PLEASE ENSURE VOLTAGE RATING FOR ENCLOSED BATTERY CHARGER MATCHES STANDARD OUTLET VOLTAGE. Always exercise caution when operating your Scooba. To reduce the risk of injury or damage, keep these safety precautions in mind when setting up, using and maintaining Scooba:
GENERAL SAFETY INSTRUCTIONS
- Read all safety and operating instructions before operating Scooba.
- Retain the safety and operating instructions for future reference.
- Observe all warnings on Scooba, battery, charger and in owner's manual.
- Follow all operating and use instructions.
Refer all non-routine servicing to iRobot. - This appliance is not intended for use by persons (including children) with reduced physical, sensory or mental capabilities, or lack of experience and knowledge, unless they have been given supervision or instruction concerning use of the appliance by a person responsible for their safety.
Children should be supervised to ensure they do not play with the appliance.
SCOOBA SAFETY
- Scooba is for indoor use only.
- Scooba is not a toy. Do not sit or stand on the robot. Small children and pets should be supervised when Scooba is cleaning.
- Clean with a damp cloth only. Do not submerge this robot in water.
- Do not use this robot to pick up anything that is burning or smoking.
- Do not use this robot to pick up spills of bleach, paint, or other chemicals.
- Before using this robot, pick up objects such as clothing, loose papers, pull cords for blinds and curtains, power cords and any fragile objects. If the robot passes over a power cord and drags it, there is a chance an object could tumble off a table or shelf.
- If the room to be cleaned contains a balcony, a physical barrier should be used to prevent access to the balcony and ensure safe operation.
- Always remove the battery before long-term storage or transportation of the robot.
SCOOBA BATTERY AND CHARGING SAFETY
- Operate your Scooba only from the type of power source indicated on the marking label. If you are not sure of the type of power supplied in your home, consult your local power company.
- Charge using a standard outlet only. Product may not be used with any type of power converter. Use of other power converters will immediately void the warranty.
- Use only the charger supplied by the manufacturer to charge this device.
- Do not use a charger with a damaged cord or plug.
- Charge indoors only.
- Never handle chargers with wet hands.
Always disconnect Scooba from the charger before cleaning.
SCOOBA USE RESTRICTIONS
- Do not use Scooba on carpets, rugs, unsealed hardwood, stone or laminate flooring.
- Do not use bleach, ammonia, or hot water as it may damage the robot and void the warranty.
- Store and operate Scooba in room temperature environments only.
- Do not use Scooba to clean up pooled spills (e.g., spilled gallon of milk).
DECLARATION OF CONFORMITY
iRobot Scooba® Vacuum Cleaning Robot and Accessories
Manufacturer: iRobot Corporation, 8 Crosby Drive, Bedford, MA 01730, USA
Declarsthat Scooba along with Model L13143 and 5961 Battery Chargers conform to the
requirements of Low Voltage Directive 2006/95/EC as amended by 93/68/EC and EMC
Directive 2004/108/EC as amended by 93/68/EC and 2004/108/EC.
Standards below have been applied:
EN 60335-2-2:2003 + A1:2004 + A2:2006
Household and similar electrical appliances - Safety - Part 2-2: Particular requirements for vacuum cleaners and water-suction cleaning appliances.
EN 60335-1:2002 + A1:2004 + A11:2004 + A12:2006 + A2:2006 + A13:2008
Household and similar electrical appliances. Safety . General requirements.
EN 60335-2-29:2004
Household and similar electrical appliances - Safety Part 2-29: Particular requirements for battery chargers.
EN 55014-1:2000 + A1:2001 + A2:2002
Electromagnetic compatibility - Requirements for household appliances, electric tools and similar apparatus - Part 1: Emission
EN 55014-1:1997 + A2:2002
Electromagnetic compatibility - Requirements for household appliances, electric tools
and similar apparatus - Part 2: Immunity - Product family standard
iRobot Customer Care USA
If you have questions or comments about Scooba, please contact iRobot before contacting a retailer.
Please visit our web site at www.irobot.com for support tips, frequently asked questions, or information about accessories and other iRobot products.
Should you still need assistance:
- Visit the iRobot support web site at www.irobot.com/support
- Call our customer care representatives at 877.855.8593
iRobot Customer Care International
To contact an international partner near you for sales and technical support, visit global.irobot.com.
- Empty Scooba
- iRobot Scooba®
- Dear Scooba Owner
- Looking after your iRobot Scooba
- How to get started
- Charge Scooba
- Setup Scooba
- Ready to go!
- Scooba's Anatomy
- Robot Base
- Scooba's Tank
- Scooba's Lights
- Scooba Essential Maintenance
- Clean Scooba's Cleaning Head and Brush
- Scooba Cleaning Solution
- Scooba's Cleaning System
- Scooba's Cleaning Pattern
- Battery and Charging
- Install the battery
- Charge the battery
- Remove the battery
- Scooba's Virtual Wall®
- Troubleshooting
- Warning Lights
- General Troubleshooting
- Important Safety Instructions
- GENERAL SAFETY INSTRUCTIONS
- SCOOBA SAFETY
- SCOOBA BATTERY AND CHARGING SAFETY
- SCOOBA USE RESTRICTIONS
- DECLARATION OF CONFORMITY
- iRobot Customer Care USA
- iRobot Customer Care International
Brand : IROBOT
Model : SCOOBA 390
Category : Floor cleaning robot