
TB-55W63AE6 - Television PANASONIC - Free user manual and instructions
Find the device manual for free TB-55W63AE6 PANASONIC in PDF.


| Brand | Panasonic |
| Model | TB-55W63AE6 |
| Product type | LED TV |
| Screen size | 55 inches (139 cm) |
| Resolution | 4K Ultra HD (3840 x 2160 pixels) |
| Dimensions with stand (W x H x D) | 1233 x 770 x 244 mm |
| Dimensions without stand (W x H x D) | 1233 x 714 x 73 mm |
| Weight with stand | Approx. 15.5 kg |
| Weight without stand | Approx. 15.0 kg |
| Power supply | 220-240 V, 50/60 Hz |
| Power consumption (typical) | 100 W |
| Standby consumption | Less than 0.5 W |
| Operating system | My Home Screen 5.0 |
| HDMI inputs | 3 (including 1 with ARC) |
| USB ports | 2 |
| Network connectivity | Built-in Wi-Fi, Ethernet |
| Bluetooth | Yes |
| Audio | Dolby Audio, 20 W speakers |
| Maintenance | Clean with a soft, dry cloth. Do not use abrasive products or solvents. |
| Safety | Do not expose to moisture, do not block ventilation openings, use a grounded wall outlet. |
| Spare parts and repairability | Contact an authorized Panasonic after-sales service. |
| General information | Manufactured by Panasonic, category TV. Manual available online. |
Frequently Asked Questions - TB-55W63AE6 PANASONIC
User questions about TB-55W63AE6 PANASONIC
0 question about this device. Answer the ones you know or ask your own.
Ask a new question about this device
Download the instructions for your Television in PDF format for free! Find your manual TB-55W63AE6 - PANASONIC and take your electronic device back in hand. On this page are published all the documents necessary for the use of your device. TB-55W63AE6 by PANASONIC.
USER MANUAL TB-55W63AE6 PANASONIC
You can find instructions for your TV's features in the E-Manual. To access the E-Manual, enter Settings>System>More menu, select Manuals and press OK. For quick access press Settings button and then Info button.
Markings on the Product.... 2
Assembling / Removing the pedestal 4
When using the wall-hanging bracket.... 4
Environmental Information.... 5
Features 5
Accessories Included.... 5
TV Control & Operation 6
Watching TV 6
Inserting the Batteries into the Remote 6
Power Connection 6
Antenna Connection....6
Switching On/Off....7
First Time Installation....7
Media Playback via USB Input 7
E-Manual 7
Software Upgrade....7
Specification 8
Remote Control 10
Troubleshooting & Tips.... 11
Connectivity 11
Wired Connectivity.... 11
Wireless Connectivity 12
Handling of the customer information....13
Licence Notification 14
Disposal of Old Equipment and Batteries....14
Declaration of Conformity (DoC) 14
More Information 14
Safety Information

CAUTION
RISK OF ELECTRIC SHOCK DO NOT OPEN

CAUTION: TO REDUCE THE RISK OF ELECTRIC SHOCK DO NOT REMOVE COVER (OR BACK).

NO USER-SERVICEABLE PARTS INSIDE. REFER SERVICING TO QUALIFIED SERVICE PERSONNEL
In extreme weather (storms, lightning) and long inactivity periods (going on holiday) disconnect the TV set from the mains.
The mains plug is used to disconnect TV set from the mains and therefore it must remain readily operable. If the TV set is not disconnected electrically from the mains, the device will still draw power for all situations even if the TV is in standby mode or switched off.
Note: Follow the on screen instructions for operating the related features.
IMPORTANT - Please read these instructions fully before installing or operating
WARNING: This device is intended to be used by persons (including children) who are capable / experienced of operating such a device unsupervised, unless they have been given supervision or instruction concerning the use of the device by a person responsible for their safety.
- Use this TV set at an altitude of less than 5000 metres above the sea level, in dry locations and in regions with moderate or tropical climates.
- The TV set is intended for household and similar indoor use but may also be used in public places.
- For ventilation purposes, leave at least 5cm of free space around the TV.
- The ventilation should not be impeded by covering or blocking the ventilation openings with items, such as newspapers, table-cloths, curtains, etc.
- The power cord/plug should be easily accessible. Do not place the TV, furniture, etc. on the power cord. A damaged power cord/plug can cause fire or give you an electric shock. Handle the power cord by the plug, do not unplug the TV by pulling the power cord. Never touch the power cord/plug with wet hands as this could cause a short circuit or electric shock. Never make a knot in the power cord or tie it with other cords. When damaged it must be replaced, this should only be done by qualified personnel.
- Do not expose the TV to dripping or splashing of liquids and do not place objects filled with liquids, such as vases, cups, etc. on or over the TV (e.g. on shelves above the unit).
- Do not expose the TV to direct sunlight or place open flames such as lit candles on top of or near the TV.
- Do not place heat sources such as electric heaters, radiators, etc. near the TV set.
- Do not place the TV on the floor or on inclined surfaces.
- To avoid the danger of suffocation, keep plastic bags out of the reach of babies, children, and domestic animals.
- Carefully attach the stand to the TV. If the stand is provided with screws, tighten them firmly to prevent the TV from tilting. Do not over-tighten the screws and mount the stand rubbers properly.
- Do not dispose of batteries in fire or with hazardous or flammable materials.
WARNING
- Batteries must not be exposed to excessive heat such as sunshine, fire, or the like.
- Excessive sound pressure from earphones or headphones can cause hearing loss.
ABOVE ALL - NEVER let anyone, especially children, push or hit the screen, push anything into holes, slots, or any other openings in the TV.
| Caution | Serious injury or death risk |
| Risk of electric shock | Dangerous voltage risk |
| Maintenance | Important maintenance component |
Markings on the Product
The following symbols are used on the product as markers for restrictions, precautions, and safety instructions. Each explanation should be considered where the product bears the related marking only. Note such information for security reasons.

Class II Equipment: This appliance is designed in such a way that it does not require a safety connection to electrical earth.

Hazardous Live Terminal: The marked terminal(s) is/are hazardous live under normal operating conditions.

Caution, See Operating Instructions: The marked area(s) contain(s) user replaceable coin or button cell batteries.

Class 1 Laser Product: This product contains Class 1 laser source that is safe under reasonably foreseeable conditions of operation.
WARNING
• Do not ingest the battery, Chemical Burn Hazard. - This product or the accessories supplied with the product may contain a coin/button cell battery. If the coin/button cell battery is swallowed, it can cause severe internal burns in just 2 hours and can lead to death. - Keep new and used batteries away from children. - If the battery compartment does not close securely stop using the product and keep it away from children. - If you think batteries might have been swallowed or placed inside any part of the body, seek immediate medical attention.
A television may fall, causing serious personal injury or death. Many injuries, particularly to children, can be avoided by taking simple precautions such as:
- ALWAYS use cabinets or stands or mounting methods recommended by the manufacturer of the television set.
- ALWAYS use furniture that can safely support the television set.
- ALWAYS ensure the television set is not overhanging the edge of the supporting furniture.
- ALWAYS educate children about the dangers of climbing on furniture to reach the television set or its controls.
- ALWAYS route cords and cables connected to your television so they cannot be tripped over, pulled or grabbed. • NEVER place a television set in an unstable location.
- NEVER place the television set on tall furniture (for example, cupboards or bookcases) without anchoring both the furniture and the television set to a suitable support.
- NEVER place the television set on cloth or other materials that may be located between the television set and supporting furniture.
- NEVER place items that might tempt children to climb, such as toys and remote controls, on the top of the television or furniture on which the television is placed.
- The equipment is only suitable for mounting at heights ≤2 m.
If the existing television set is going to be retained and relocated, the same considerations as above should be applied.
Apparatus connected to the protective earthing of the building installation through the MAINS connection or through other apparatus with a connection to protective earthing – and to a television distribution system using coaxial cable, may in some circumstances create a fire hazard. Connection to a television distribution system has therefore to be provided through a device providing electrical isolation below a certain frequency range (galvanic isolator).
WALL MOUNTING WARNINGS
- Read the instructions before mounting your TV on the wall.
- The wall mount kit is optional. You can obtain it from your local dealer, if not supplied with your TV.
- Do not install the TV on a ceiling or on an inclined wall.
- Use the specified wall mounting screws and other accessories.
- Tighten the wall mounting screws firmly to prevent the TV from falling. Do not over-tighten the screws.
- Using other wall-hanging brackets, or installing a wall-hanging bracket by yourself, has the risk of personal injury and product damage. In order to maintain the unit's performance and safety, be absolutely sure to ask your dealer or a licensed contractor to secure the wall-hanging brackets. Any damage caused by installing without a qualified installer will void your warranty.
- Carefully read the instructions accompanying optional accessories, and be absolutely sure to take steps to prevent the TV from falling off.
- Handle the TV carefully during installation since subjecting it to impact or other forces may cause product damage.
- Take care when fixing wall brackets to the wall. Always ensure that there are no electrical cables or pipes in the wall before hanging the bracket.
- To prevent fall and injury, remove the TV from its fixed wall position when it is no longer in use.
DAMAGES
- Excepting cases where responsibility is recognised by local regulations, Panasonic accepts no responsibility for malfunctions caused by misuse or use of the product, and other problems or damages caused by use of this product.
- Panasonic accepts no responsibility for loss, etc., of data caused by disasters.
- External devices separately prepared by the customer are not covered by the warranty. Care for the data stored in such devices is the responsibility of the customer. Panasonic accepts no responsibility for abuse of this data.
Figures and illustrations in these operating instructions are provided for reference only and may differ from the actual product appearance. Product design and specifications may be changed without notice.
Assembling / Removing the pedestal
Preparations
Take out the pedestal(s) and the TV from the packing case and put the TV onto a work table with the screen panel down on the clean and soft cloth (blanket, etc.)
• Use a flat and firm table bigger than the TV. • Do not hold the screen panel part. • Make sure not to scratch or break the TV.
CAUTION: Please refrain from inserting pictured screws to the TV body when not using the TV stand e.g. wall hanging. Inserting screws without pedestal may cause a damage of the TV.
Assembling the pedestal
- The stand of the TV consists of 4 pieces. Install these pieces together.
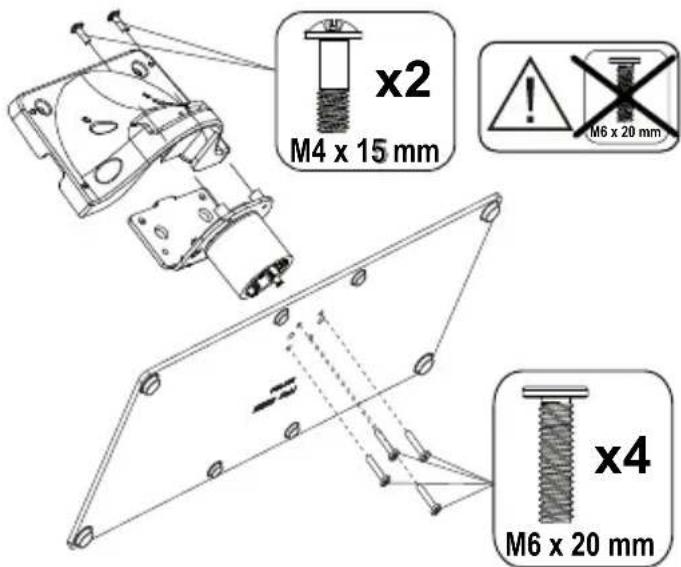
- Place the stand(s) on the stand mounting pattern(s) on the rear side of the TV.

- Insert the screws (M4 x 15 mm + M6 x 20 mm) provided and tighten them gently until the stand is properly fitted.

Removing the pedestal from the TV
Be sure to remove the pedestal in the following way when using the wall-hanging bracket or repacking the TV.
- Put the TV onto a work table with the screen panel down on the clean and soft cloth. Leave the stand(s) protruding over the edge of the surface. • Unscrew the screws that fixing the stand(s).
- Remove the stand(s).
When using the wall-hanging bracket
Please contact your local Panasonic dealer to purchase the recommended wall-hanging bracket.
Holes for wall-hanging bracket installation;
Rear of the TV

| 43” 50” 55” 65” | ||||
| a (mm) 1 | 00 200 200 400 | |||
| b (mm) 1 | 00 200 200 200 | |||
View from the side
VESA
Bracket
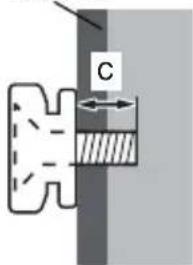

| (d) | 43” 50”, 55”, 65” | ||
| Depth of screw (c) | min. | 9 mm 12 mm | |
| max. | 10 mm 15 mm | ||
| Diameter M4 M6 | |||
Note: The screws for fixing the TV onto the wall-hanging bracket are not supplied with the TV.
Environmental Information
This television is designed to be environmentally friendly. To reduce energy consumption, you can follow these steps:
If you set the Energy Saving to Minimum, Medium, Maximum or Auto, the TV will adjust the energy consumption accordingly. Set to Off to turn this setting off. If you like to set the backlight to a fixed value, set to Custom, highlight Backlight (located under the Energy Saving setting), and then adjust manually using the Left or Right directional buttons on the remote.
Note: Available Energy Saving options may differ depending on the selected Mode in the Settings > Picture menu.
The Energy Saving settings can be found in the Settings > Picture menu. Go to Home screen and highlight Settings in the Navigation Carousel and press OK to access the Settings menu. Note that some picture settings will be unavailable to be changed.
You can also turn the screen off using the Screen Off option, if you want to hear the sound only and don't need to watch. If you press the Right button or Left button consecutively, the Screen Off option will be selected and "Screen will be off in 15 seconds." message will be displayed on the screen. Select Proceed and press OK to turn the screen off immediately. If you don't press any button, the screen will be off in 15 seconds. Press any button on the remote or on the TV to turn the screen on again.
Note: Screen Off option is not available if the Mode is set to Game.
When the TV is not in use, please switch off or disconnect the TV from the mains plug. This will also reduce or stop the energy consumption.
Features
• Remote controlled colour TV • Fully integrated digital terrestrial/cable/satellite TV (DVB-T-T2/C/S-S2) • HDMI inputs to connect other devices with HDMI sockets • USB input • OSD menu system • Stereo sound system • Teletext • Headphone connection • Automatic programming system • Manual tuning • Automatic power down after up to eight hours • Sleep timer • Child lock • Automatic sound mute when no transmission • NTSC playback • AVL (Automatic Volume Limiting) • PLL (Frequency Search) • Game Mode (Optional) • Picture off function • Ethernet (LAN) for Internet connectivity and service • 802.11 a/b/g/n built in WLAN Support • Audio Video Sharing • HbbTV
Accessories Included
- Remote Control
- Batteries: 2 x AAA
- Quick Start Guide
- Power Cord
- Detachable stand
- Stand mounting screws (M4 x 15 mm) + (M6 x 20 mm)
TV Control & Operation

This TV has a joystick as shown in the above drawing. It allows you to control the Volume / Programme / Source and Turn Off - On functions of the TV.
Note: The position of the joystick may differ depending on the model.
Watching TV
The Home screen is your starting point for browsing. It gathers all the TV shows and movies that matter to you - trending titles on all your streaming apps, recently watched shows, live TV channels, and recommended shows based on your ratings and viewing habits.
Content in each carousel changes dynamically based on your usage. Even carousel categories update as TiVo OS gets to know you better. For example, based on what you've been watching, you might see a Comedy Movies or Health & Fitness carousel one day and an Oscar Winners carousel a few days later.
Need Help?
Get answers to common questions and learn to experience the most from TiVo OS at: https://www.tivo.com/support
Inserting the Batteries into the Remote
The remote may have a screw that secures the battery compartment cover onto the remote control (or this may be in a separate bag). Remove the screw, if the cover is screwed on previously. Then remove the battery compartment cover to reveal the battery compartment. Insert two 1.5V - size AAA batteries. Make sure the (+) and (-) signs match (observing correct polarity). Do not mix old and new batteries. Replace only with same or equivalent type. Place the cover back on. Secure the cover again with the screw, if any.
A message will be displayed on the screen when the batteries are low and must be replaced. Note that when the batteries are low, the performance of the remote control may be impaired.
Batteries should not be exposed to excessive heat such as sunshine, fire or the like.
Power Connection
IMPORTANT: The TV set is designed to operate on a 220-240V AC, 50 Hz supply. After unpacking, allow the TV set to reach the ambient room temperature before you connect the set to the mains.

Plug one end (the two-hole plug) of the supplied detachable power cord into the power cord inlet on the rear side of the TV as shown above. Then plug the other end of the power cord into the mains socket outlet.
Note: The position of the power cord inlet may differ depending on the model.
Antenna Connection
Connect the aerial or cable TV plug to the aerial input (ANT) socket located on the left side of the TV or satellite plug to the satellite input (LNB) socket located on the rear side of the TV.
Rear side of the TV

1. Satellite
Left side of the TV

2. Aerial or cable

If you want to connect a device to the TV, make sure that both the TV and the device are turned off before making any connection. After the connection is done, you can turn on the units and use them.
Switching On/Off
To Switch the TV On
Connect the power cord to a power source such as a wall socket (220-240V AC, 50 Hz).
To switch on the TV from standby
- Press the Standby button, Programme +/- or a numeric button on the remote control.
- Press the centre of the joystick on the TV in or push it up/down.
To switch on the TV from hard standby
- Press the centre of the joystick on the TV in.
To switch the TV into standby
Press the Standby button on the remote control, the TV will switch into standby mode.
To switch the TV into hard standby
Press the centre of the joystick on the TV in and hold it down for more than 3 seconds, the TV will switch into hard standby mode.
To switch off the TV
To power down the TV completely, unplug the power cord from the mains socket.
Note: When the TV is switched into standby mode, the standby LED can blink to indicate that features such as Standby Mode Search, Over Air Download or Timer is active. The LED can also blink when you switch on the TV from standby mode.
First Time Installation
When turned on for the first time, the language selection screen is displayed. Select the desired language and press OK. In the following steps of the installation, set your preferences using the directional buttons and OK button. The installation wizard will guide you through the setup process. You can perform first time installation anytime using the Factory Reset option in the Settings>Installation menu.
Media Playback via USB Input
You can connect 2.5" and 3.5" inch (HDD with external power supply) external hard disk drives or USB memory stick to your TV by using the USB input(s) of the TV.
IMPORTANT! Back up the files on your storage devices before connecting them to the TV. Manufacturer will not be responsible for any file damage or data loss. Certain types of USB devices (e.g. MP3 Players) or USB hard disk drives/memory sticks may not be compatible with this TV. The TV supports FAT32 and NTFS disk formatting.
Wait a little while before each plugging and unplugging as the player may still be reading files. Failure to do so may cause physical damage to the USB player and the USB device itself. Do not pull out your drive while playing a file.
You can use USB hubs with your TV's USB input(s). External power supplied USB hubs are recommended in such a case.
It is recommended to use the TV's USB input(s) directly, if you are going to connect a USB hard disk.
Note: When viewing media files the Media Browser menu can only display a maximum of 1000 media files per folder.
E-Manual
You can find instructions for your TV's features in the E-Manual.
To access the E-Manual, enter the Settings>System>More menu, select Manuals and press OK. For quick access press the Settings button and then the Info button.
By using the directional buttons select a desired topic and press OK to read instructions. To close the E-Manual screen press the Back/Return, Exit or TiVo button.
Note: Depending on model, your TV may not support this function. The content of the E-Manual may vary according to the model.
Software Upgrade
Your TV is capable of finding and updating the software automatically via the broadcast signal or via Internet.
Software upgrade search via user interface
Press the Settings button on the remote or select Settings on the Home screen. Highlight the Software Upgrade option in the System>More menu and press OK. Then highlight the Scan for upgrade option and press OK to check for a new software upgrade. You can select the satellite which is used for updating process and configure its parameters by using the Edit Upgrade for Satellite menu options.
If a new upgrade is found, it starts to download the upgrade. After the download is completed, a warning will be displayed, press OK to complete software upgrade process and restart TV.
3 AM search and upgrade mode
Your TV will search for new upgrades at 3:00 o'clock if the Automatic scanning option is set to Enabled and the TV is connected to an aerial signal or to the Internet. If a new software is found and downloaded successfully, it will be installed at the next power on.
Note: Do not unplug the power cord while led is blinking during the reboot process. If the TV fails to come on after the upgrade, unplug, wait for two minutes then plug it back in.
All updates are automatically controlled. If a manual search is carried out and no software is found then this is the current version.
Specification
| TV Broadcasting | PAL BG/I/DKSECAM BG/DK | |||
| Receiving Channels | VHF (BAND I/III) - UHF (BAND U) - HYPERBAND | |||
| Digital Reception | Fully integrated digital terrestrial-cable-satellite TV(DVB-T-C-S) (DVB-T2, DVB-S2 compliant) | |||
| Number of Preset Channels | 11000 | |||
| Channel Indicator On Screen Display | ||||
| RF Aerial Input 75 Ohm (unbalanced) | ||||
| Operating Voltage 220-240V AC, 50Hz. | ||||
| Audio | Dolby Atmos | |||
| Headphone 3.5 mm mini stereo jack | ||||
| Networked Standby Power Consumption (W) | < 2 | |||
| TB-43W63AE6TB-43W63AE7TB-43W63AE8TB-43W63AE9 | TB-50W63AE6TB-50W63AE7TB-50W63AE8TB-50W63AE9 | TB-55W63AE6TB-55W63AE7TB-55W63AE8TB-55W63AE9 | TB-65W63AE6TB-65W63AE7TB-65W63AE8TB-65W63AE9 | |
| Audio Output Power (WRMS.) (10% THD) | 2 x 10 W 2 x 10 W 2 x 10 W 2 x 12 W | |||
| Power Consumption (W) | 120 W 135 W 140 W 200 W | |||
| Weight (kg) 11 Kg 14 | Kg 17 Kg 23,5 Kg | |||
| TV Dimensions DxLxH (with stand) (mm) | 221 x 964 x 614 221 x 1119 x 704 221 x 1233 x 769 251 x 1452 x 890 | |||
| TV Dimensions DxLxH (without stand) (mm) | 68 x 964 x 560 68 x 119 x 647 66 x 1233 x 711 72 x 1452 x 836 | |||
| Display | 16/9 43" | 16/9 50" | 16/9 55" | 16/9 65" |
| Operation temperature and operation humidity | 0°C up to 40°C, 85% humidity max | |||
For more product information, please visit EPREL: https://eprel.ec.europa.eu.
EPREL registration number is available on https://eprel.panasonic.eu/product.
Wireless LAN Transmitter Specifications
| Frequency Ranges | Max Output Power |
| 2400 - 2483,5 MHz (CH1 - CH13) < 100 | mW |
| 5150 - 5250 MHz (CH36 - CH48) < 200 | mW |
| 5250 - 5350 MHz (CH52 - CH64) < 200 | mW |
| 5470 - 5725 MHz (CH100 - CH140) < 200 | mW |
Country Restrictions
The Wireless LAN equipment is intended for home and office use in all EU countries, the UK and Northern Ireland (and other countries following the relevant EU and/or UK directive). The 5.15 - 5.35 GHz band is restricted to indoor operations only in the EU countries, in the UK and Northern Ireland (and other countries following the relevant EU and/or UK directive). Public use is subject to general authorisation by the respective service provider.
| Country Restriction | |
| Russian Federation Indoor use only | |
The requirements for any country may change at any time. It's recommended that user checks with local authorities for the current status of their national regulations for both 2.4 GHz and 5 GHz wireless LAN's.
Standard
IEEE 802.11.a/b/g/n
Host Interface
USB 2.0
Security
WEP 64/128, WPA, WPA2, TKIP, AES, WAPI

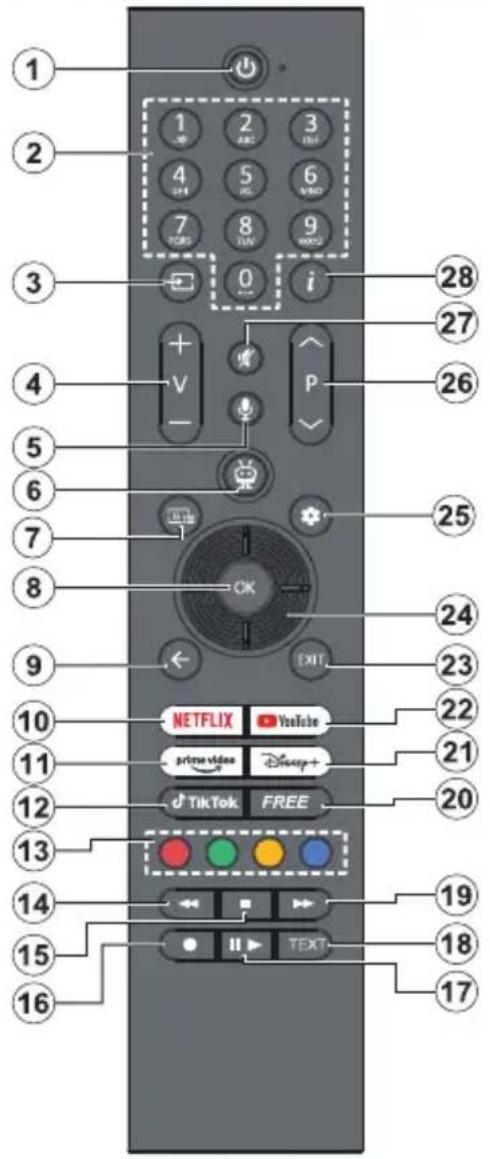
- Standby (*): Standby / On (press briefly) Restart / Power Off (press and hold)
- Numeric buttons: Switches the channel in Live TV mode, enters a number in the text box on the screen
- Source: Shows available broadcast and content sources, is also used in pairing process of the remote
- Volume +/-: Increases/decreases the volume level
- Voice: Activates the microphone on the remote Note: Voice search and voice control may not be available in some countries
- TiVo: Returns you to Home screen within TiVo OS from places like a movie you're watching or the Settings screen
- Guide: Displays the electronic programme guide for digital TV channels. The current channel (if on the TV source) or the last channel watched (if on the Home screen) should be a digital channel.
- OK: Confirms user selections, enters sub-menus, holds the page (in Live TV-Teletext mode), views channel list (in Live TV mode).
- Back/Return: Returns to previous menu screen, goes one step back, closes open windows, opens index page (in Live TV-Teletext mode). Quickly
cycles between previous and current channels or sources.
- Netflix: Launches the Netflix application.
- Prime Video: Launches the Amazon Prime Video application.
- TikTok: Launches the TikTok application.
- Coloured Buttons: Follow the on-screen instructions for coloured button functions.
- Rewind: Moves frames backwards in media such as movies.
- Stop: Stops the media being played.
- No function.
- Pause: Pauses the media being played. Play: Starts to play selected media.
- Text: Displays teletext (where available). Press the button a second time to superimpose the teletext over a normal broadcast picture (mix). Press again to close.
- Fast Forward: Moves frames forward in media such as movies.
- Free: Displays free content from various applications on the Home screen.
- Disney+: Launches the Disney+ application.
- YouTube: Launches the YouTube application.
- Exit: Closes and exits from displayed menus, returns to the previous screen, exits from any running application or OSD banner, closes the Home screen and switches to the last source used.
- Directional buttons: Help navigate menus, setting options, move the focus or cursor, etc., and display the subpages in Live TV-Teletext mode when pressed Right or Left. Follow the on-screen instructions.
- Settings: Opens the Settings menu.
- Programme +/-: Increases/decreases channel number in Live TV mode.
- Mute: Completely turns off the volume of the TV.
- Info: Displays information about on-screen content, shows hidden information (reveal - in Live TV-Teletext mode).
(*) Standby Button
Press and hold the Standby button to see additional actions for this button. Highlight one of the Restart, Standby (Normal Standby), and Power off (Forced Standby) options and press OK to perform the selected action. If your TV stops responding to commands and the actions menu cannot be displayed, the TV will be forced to restart when the button is kept pressed for about five seconds.
Press briefly and release the button to switch the TV into standby mode or to switch it on when it's in standby mode.
To pair remote with the TV
In order to pair your remote, you can go to Settings > Devices > Pair Remote Control or Other Device (Bluetooth) menu, set the Pair Remote Control or Other Device (Bluetooth) option to Enabled, then
highlight Discover and press OK to start the device discovery.
Press and hold the Source button on the remote until the LED on the remote starts to blink, then release the Source button. That means the remote is in pairing mode.
Now you will wait for the TV to find your remote. Select the name of your remote and press OK when it appears on the TV screen.
When the pairing process is successful, the LED on the remote will go off. If the pairing process fails, the remote will enter sleep mode after 30 seconds.
Troubleshooting & Tips
TV will not turn on
Make sure the power cord is plugged in securely to a wall outlet. Press the Standby button on the remote.
Poor picture
- Check if you have correctly tuned the TV.
- Low signal level can cause picture distortion. Please check antenna connections.
- Check if you have entered the correct channel frequency if you have performed manual tuning.
No picture
• TV is not receiving any signal. Make sure the correct source has been selected. • Is the antenna connected properly? • Is the antenna cable damaged? • Are suitable plugs used to connect the antenna? - If the content is received through an HDMI input, try changing the related HDMI source input setting to Enhanced or Regular from the Sources option in the Settings>System menu. • If you are in doubt, consult your dealer.
No sound
- Check if the TV sound is muted. Press the Mute button or increase the volume to check.
- Sound is coming from only one speaker. Check the balance setting from the Sound menu.
- Check if the Sound Output option is set correctly from the Sound menu.
- If the content is received through an HDMI input, try changing the related HDMI source input setting to Enhanced or Regular from the Sources option in the Settings>System menu.
Remote control - no operation
- The batteries may be exhausted. Replace the batteries.
- The batteries may be inserted incorrectly. Refer to the Inserting the Batteries into the Remote section.
No signal on an input source
• It is possible that no device is connected. - Check the AV cables and connections from your device. - Check the device is switched on.
Connectivity
Wired Connectivity
To Connect to a Wired Network
- You must have a modem/router connected to an active broadband connection.
- Connect your TV to your modem/router via an Ethernet cable. There is a LAN port at the rear (back) of your TV.

1 Broadband ISP connection 2 LAN (Ethernet) cable 3 LAN input on the rear side of the TV - You might be able to connect your TV to your LAN depending on your network's configuration. In such a case, use an Ethernet cable to connect your TV directly to the network wall outlet.

1 Network wall socket 2 LAN input on the rear side of the TV
Configuring Wired Device Settings
To configure wired connection settings go to the Settings>Network menu.
Network Type
Set Network Type as Wired Device if you are connecting via an Ethernet cable.
Internet Speed Test
Highlight Internet Speed Test and press the OK button. TV will check the internet connection bandwidth and display the result when complete.
Advanced Settings
Highlight Advanced Settings and press the OK button. On the next screen you can change the IP and DNS settings of the TV. Highlight the desired one and press Left or Right button to change the setting from Automatic to Manual. Now you can enter the IP and / or DNS values manually. Select the related item in the drop down menu and enter the new values using the numeric buttons of the remote. Highlight Save and press the OK button to save settings when complete.
Networked Standby Mode
You can enable or disable the Networked Standby Mode feature by setting this option accordingly. Refer to the Networked Standby Mode section for further information.
Other Information
The status of the connection will be displayed as Connected or Not Connected and the current IP address, if a connection is established. The IP address of your TV will also be displayed on the screen.
Wireless Connectivity
To Connect to a Wireless Network
- You must have a wireless modem/router connected to an active broadband connection.

1 Broadband ISP connection
A Wireless-N router (IEEE 802.11a/b/g/n) with simultaneous 2.4 and 5 GHz bands is designed to increase bandwidth. These are optimised for smoother
and faster HD video streaming, file transfers and wireless gaming.
The frequency and channel differ depending on the area.
The transmission speed differs depending on the distance and number of obstructions between the transmission products, the configuration of these products, the radio wave conditions, the line and the products that you use. The transmission may also be cut off or may get disconnected depending on the radio wave conditions, DECT phones or any other WLAN 11b appliances. The standard values of the transmission speed are the theoretical maximum values for the wireless standards. They are not the actual speeds of data transmission.
The location where the transmission is most effective differs depending on the usage environment.
The TV supports 802.11 a, b, g & n type modems. It is highly recommended that you should use the IEEE 802.11n communication protocol in order to avoid any possible problems while watching videos.
You must change your modem's SSID when there are any other modems around with the same SSID. You can encounter connection problems otherwise. Use a wired connection if you experience problems with a wireless connection.
Configuring Wireless Device Settings
To configure wireless connection settings go to Settings>Network menu.
Network Type
Set Network Type as Wireless Device to start connection process.
Scan Wireless Networks
Highlight the Scan Wireless Networks option and press OK to start a search for available networks. All found networks will be listed. Highlight your desired network from the list and press OK to connect. A network with hidden SSID can not be detected by other devices. If you want to connect to a network with hidden SSID, scroll down the list of detected wireless networks, highlight the Add New Network option and press OK. Enter the name of the network and select the security type using the related options to connect.
Note: If the modem supports N mode, you should set N mode settings.
If the selected network is password-protected, enter the correct key by using the virtual keyboard. You can use this keyboard via the directional buttons and the OK button on the remote control.
Wait until the IP address is shown on the screen. This means that the connection is now established.
Disconnect
If you have connected to a wireless network, the Disconnect option will appear in the Network menu and your wireless network profile will also be saved. Thus, your TV will connect to the same network automatically whenever you switch to wireless connection. To disconnect from a wireless network and delete the saved wireless network profile, highlight Disconnect and press OK.
Press WPS on your wifi router
If your router has WPS, you can directly connect to the modem/router without entering a password or adding the network first. Highlight the Press WPS on your wifi router option and press OK. Go to your modem/router device and press the WPS button on it to make the connection. You will see a connection confirmation on your TV once the devices have paired. Select OK to proceed. No further configuration is required.
Internet Speed Test
Highlight Internet Speed Test and press the OK button to check your internet connection speed.
Advanced Settings
Highlight Advanced Settings and press the OK button to open the advanced setting menu. Use directional and numeric buttons to set. The procedure is the same as explained for wired connectivity. Highlight Save and press the OK button to save settings when complete.
Networked Standby Mode
You can enable or disable the Networked Standby Mode feature by setting this option accordingly. Refer to the Networked Standby Mode section for further information.
Other Information
The status of the connection will be displayed as Connected or Not Connected, and the current IP address, if a connection is established. The address of your TV will also be displayed on the screen.
Connecting to your mobile device via WLAN
If your mobile device has WLAN feature, you can connect it to your TV via a router, in order to access the content in your device. For this, your mobile device must have an appropriate sharing software.
Connect your TV to your router by following the steps mentioned in the sections above.
Afterwards, connect your mobile device to the same network as your TV and then activate the sharing software on your mobile device. Then, select files that you want to share with your TV.
If the connection is established correctly, you will be able to access the shared files installed on your mobile device via the Audio Video Sharing feature of your TV.
Go to the Navigation carousel on the Home screen and select Sources. Then highlight the Audio Video Sharing option in the Sources menu and press OK. Available media server devices in the network will be displayed. Select your mobile device and press the OK button to continue.
- If available, you can download a virtual remote controller application from the server of your mobile device application provider.
Note: This feature may not be supported on all mobile devices.
Handling of the customer information
When using the Internet connecting function of this TV, after agreeing to Panasonic's terms of service / privacy policy (hereinafter referred to as terms and conditions etc.), Customer Information on the use of this unit may be collected and used according to terms and conditions etc.
For details of terms of service / privacy policy, refer to [TiVo] Settings > Legal.
Customer's personal information may be recorded on this TV by broadcasting organisation or application provider. Before repairing, transferring or discarding this TV, erase all the information recorded on this TV according to the following procedure.
[TiVo] Settings > Installation > Factory Reset
Customer information may be collected by provider via application provided by third parties on this TV or website. Please confirm the terms and conditions etc. of provider in advance.
- Panasonic will not be held responsible for collecting or using customer Information via application provided by third party on this TV or website.
- When entering your credit card number, name, etc., pay special attention to the trustworthiness of the provider.
- Registered information may be registered in the server etc. of provider. Before repairing, transferring or discarding this TV, be sure to erase the information according to the terms and conditions etc. of provider.
Licence Notification
The terms HDMI, HDMI High-Definition Multimedia Interface, HDMI trade dress and the HDMI Logos are trademarks or registered trademarks of HDMI Licensing Administrator, Inc.

Dolby, Dolby Vision, Dolby Atmos, and the double-D symbol are registered trademarks of Dolby Laboratories Licensing Corporation. Manufactured under licence from Dolby Laboratories. Confidential unpublished works. Copyright © 2012-2022 Dolby Laboratories. All rights reserved.
Dolby Vision·Atmos
YouTube and the YouTube logo are trademarks of Google Inc.
The Bluetooth® word mark and logos are registered trademarks owned by the Bluetooth SIG, Inc. and any use of such marks by Vestel Elektronik Sanayi ve Ticaret A.S. is under licence. Other trademarks and trade names are those of their respective owners.
This product contains technology subject to certain intellectual property rights of Microsoft. Use or distribution of this technology outside of this product is prohibited without the appropriate licence(s) from Microsoft.
Content owners use Microsoft PlayReady™ content access technology to protect their intellectual property, including copyrighted content. This device uses PlayReady technology to access PlayReady-protected content and/or WMDRM-protected content. If the device fails to properly enforce restrictions on content usage, content owners may require Microsoft to revoke the device's ability to consume PlayReady-protected content. Revocation should not affect unprotected content or content protected by other content access technologies. Content owners may require you to upgrade PlayReady to access their content. If you decline an upgrade, you will not be able to access content that requires the upgrade.
The "CI Plus" Logo is a trademark of CI Plus LLP.
This product is protected by certain intellectual property rights of Microsoft Corporation. Use or distribution of such technology outside of this product is prohibited without a licence from Microsoft or an authorised Microsoft subsidiary.

Disposal of Old Equipment and Batteries
Only for European Union and countries with recycling systems
These symbols on the products, packaging, and/or accompanying documents mean that used electrical and electronic products and batteries must not be mixed with general household waste.
For proper treatment, recovery and recycling of old products and batteries, please take them to applicable collection points in accordance with your national legislation.
By disposing of them correctly, you will help to save valuable resources and prevent any potential negative effects on human health and the environment.
For more information about collection and recycling, please contact your local municipality.
Penalties may be applicable for incorrect disposal of this waste, in accordance with national legislation.

Note for the battery symbol (bottom symbol):
This symbol might be used in combination with a chemical symbol. In this case it complies with the requirement set by the Directive for the chemical involved.
Declaration of Conformity (DoC)
Hereby, Panasonic Marketing Europe GmbH, declares that this TV is in compliance with the essential requirements and other relevant provisions of the Directive 2014/53/EU.
If you want to get a copy of the original DoC of this TV, please visit the following website:
http://www.ptc.panasonic.eu/compliance-documents
Authorized Representative:
Panasonic Testing Centre
Panasonic Marketing Europe GmbH
Winsbergring 15, 22525 Hamburg, Germany
Web Site: http://www.panasonic.com
More Information
For more information, please visit the Support page on Panasonic website, where you can find the full manual instruction.
WEP 64/128, WPA, WPA2, TKIP, AES, WAPI.
Remote control
Panasonic Testing Centre
Panasonic Marketing Europe GmbH
Winsbergring 15, 22525 Hamburg, Germany
Website: http://www.panasonic.com
More information
WEP 64/128, WPA, WPA2, TKIP, AES, WAPI
Remote control

Panasonic Testing Centre
Panasonic Marketing Europe GmbH
Winsbergring 15, 22525 Hamburg, Germany
Website: http://www.panasonic.com
More information
WEP 64/128, WPA, WPA2, TKIP, AES, WAPI

Panasonic Testing Centre
Panasonic Marketing Europe GmbH
Winsbergring 15, 22525 Hamburg, Germany
Website: http://www.panasonic.com
Further information
| (d) | 43" 50", 55", 65" | ||
| Profondità della vite (c) | min. | 9 mm 12 mm | |
| max. | 10 mm 15 mm | ||
| Diametro M4 M6 | |||
WEP 64/128, WPA, WPA2, TKIP, AES, WAPI
Remote control

Panasonic Testing Centre
Panasonic Marketing Europe GmbH
Winsbergring 15, 22525 Hamburg, Germany
Website: http://www.panasonic.com
To turn off the TV.
To turn off the TV completely, unplug the power cord from the outlet.
WEP 64/128, WPA, WPA2, TKIP, AES, WAPI
Remote control

1 ISP broadband connection
Covered by patents at patentlist.accessadvance.com
Panasonic Testing Centre
Panasonic Marketing Europe GmbH
Winsbergring 15, 22525 Hamburg, Germany
Website: http://www.panasonic.com
More information
Removing the stand from the television
| (d) | 43” 50”, 55”, 65” | ||
| Ruuvin syvyys (c) | min. | 9 mm 12 mm | |
| max. | 10 mm 15 mm | ||
| Halkaisija M4~ M6~ | |||
WEP 64/128, WPA, WPA2, TKIP, AES, WAPI
Remote control

(*) Standby button
Panasonic Testing Centre
Panasonic Marketing Europe GmbH
Winsbergring 15, 22525 Hamburg, Germany
WEP 64/128, WPA, WPA2, TKIP, AES, WAPI
Remote control

1 Broadband ISP connection
Covered by patents at patentlist.accessadvance.com
Panasonic Testing Centre
Panasonic Marketing Europe GmbH
Winsbergring 15, 22525 Hamburg, Germany
Website: http://www.panasonic.com
More information
| (d) | 43" 50", 55", 65" | ||
| Skruens dybde (c) | min. | 9 mm 12 mm | |
| max. | 10 mm 15 mm | ||
| Diameter M4 M6 | |||
WEP 64/128, WPA, WPA2, TKIP, AES, WAPI
Remote control

Panasonic Testing Centre
Panasonic Marketing Europe GmbH
Winsbergring 15, 22525 Hamburg, Germany
Website: http://www.panasonic.com
More information
- SAFETY INFORMATION
- CAUTION
- IMPORTANT - PLEASE READ THESE INSTRUCTIONS FULLY BEFORE INSTALLING OR OPERATING
- WARNING
- MARKINGS ON THE PRODUCT
- WALL MOUNTING WARNINGS
- DAMAGES
- ASSEMBLING / REMOVING THE PEDESTAL
- PREPARATIONS
- ASSEMBLING THE PEDESTAL
- REMOVING THE PEDESTAL FROM THE TV
- WHEN USING THE WALL-HANGING BRACKET
- VIEW FROM THE SIDE
- ENVIRONMENTAL INFORMATION
- FEATURES
- ACCESSORIES INCLUDED
- TV CONTROL & OPERATION
- WATCHING TV
- NEED HELP
- INSERTING THE BATTERIES INTO THE REMOTE
- POWER CONNECTION
- ANTENNA CONNECTION
- REAR SIDE OF THE TV
- SATELLITE
- LEFT SIDE OF THE TV
- AERIAL OR CABLE
- SWITCHING ON/OFF
- TO SWITCH THE TV ON
- TO SWITCH ON THE TV FROM STANDBY
- TO SWITCH ON THE TV FROM HARD STANDBY
- TO SWITCH THE TV INTO STANDBY
- TO SWITCH THE TV INTO HARD STANDBY
- TO SWITCH OFF THE TV
- FIRST TIME INSTALLATION
- MEDIA PLAYBACK VIA USB INPUT
- E-MANUAL
- SOFTWARE UPGRADE
- SOFTWARE UPGRADE SEARCH VIA USER INTERFACE
- AM SEARCH AND UPGRADE MODE
- COUNTRY RESTRICTIONS
- STANDARD
- HOST INTERFACE
- SECURITY
- (*) STANDBY BUTTON
- TO PAIR REMOTE WITH THE TV
- TROUBLESHOOTING & TIPS
- TV WILL NOT TURN ON
- POOR PICTURE
- NO PICTURE
- NO SOUND
- REMOTE CONTROL - NO OPERATION
- NO SIGNAL ON AN INPUT SOURCE
- CONNECTIVITY
- WIRED CONNECTIVITY
- TO CONNECT TO A WIRED NETWORK
- CONFIGURING WIRED DEVICE SETTINGS
- NETWORK TYPE
- INTERNET SPEED TEST
- ADVANCED SETTINGS
- NETWORKED STANDBY MODE
- OTHER INFORMATION
- WIRELESS CONNECTIVITY
- TO CONNECT TO A WIRELESS NETWORK
- BROADBAND ISP CONNECTION
- CONFIGURING WIRELESS DEVICE SETTINGS
- SCAN WIRELESS NETWORKS
- DISCONNECT
- PRESS WPS ON YOUR WIFI ROUTER
- CONNECTING TO YOUR MOBILE DEVICE VIA WLAN
- HANDLING OF THE CUSTOMER INFORMATION
- FOR DETAILS OF TERMS OF SERVICE / PRIVACY POLICY, REFER TO [TIVO] SETTINGS > LEGAL
- [TIVO] SETTINGS > INSTALLATION > FACTORY RESET
- LICENCE NOTIFICATION
- DOLBY VISION·ATMOS
- DISPOSAL OF OLD EQUIPMENT AND BATTERIES
- ONLY FOR EUROPEAN UNION AND COUNTRIES WITH RECYCLING SYSTEMS
- NOTE FOR THE BATTERY SYMBOL (BOTTOM SYMBOL)
- DECLARATION OF CONFORMITY (DOC)
- MORE INFORMATION
- REMOTE CONTROL
- FURTHER INFORMATION
- TO TURN OFF THE TV
- REMOVING THE STAND FROM THE TELEVISION
Brand : PANASONIC
Model : TB-55W63AE6
Category : Television