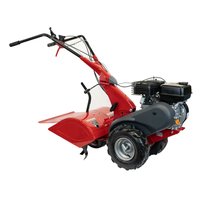
MM250 - Tiller Rato - Free user manual and instructions
Find the device manual for free MM250 Rato in PDF.


| Product type | Lawn mower |
| Brand | Rato |
| Model | MM250 |
| Dimensions (L x W x H) | 800 x 600 x 400 mm |
| Weight | 25 kg |
| Fuel | Unleaded gasoline |
| Displacement | 125 cm³ |
| Cutting width | 46 cm |
| Cutting height | Adjustable from 25 to 75 mm |
| Grass bag capacity | 50 L |
| Starting type | Recoil starter |
| Forward speed | Variable |
| Main functions | Mowing, mulching, grass collection |
| Maintenance | Clean the deck after each use, change oil after 50 hours |
| Safety | Engine stops when releasing handle, protective deck |
| Spare parts | Blades, belts, filters available |
| Repairability | Estimated repairability score 7/10 |
Frequently Asked Questions - MM250 Rato
User questions about MM250 Rato
0 question about this device. Answer the ones you know or ask your own.
Ask a new question about this device
Download the instructions for your Tiller in PDF format for free! Find your manual MM250 - Rato and take your electronic device back in hand. On this page are published all the documents necessary for the use of your device. MM250 by Rato.
USER MANUAL MM250 Rato

MANUALE D'USO
Lingua originale

Translation of the original

Read and understand this manual in its entirety before carrying out any work on the packaging, the machine or the interchangeable equipment.
BEDIENUNGSANLEITUNG


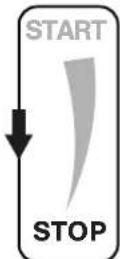
Accelerator command. In the START/1 position, the air is open; while, in the STOP/0 position, the motor is off.


Label scheme for wheels block/unblock.
① Manufacturer
② Model: xxxx-xxxxxxxxxxxx
③ Type: xxxxx xxxx | xxxxxxxxxxxxxxx
④ Nr.: xxxxxxxxxxx-xxxxxx
⑤ Weight: xxx kg
⑥ Date: aaaa / m
⑦ Power: x.xx kW
CE

Etichetta innesto Retromarcia. Label: reverse drive. Aufkleber für RG-Bowdenzug. Marche arrière. Etiqueta conexión Marcha atrás. Jazda wstecz. Μοχλός εμπλοκής οπίσθιας ταχύτητας. Etiquesta engate marcha atrás. Label koppeling, Achteruitversnelling.


Label: forward gear clutch
Read the instructions manual before operating on the machine - Danger tiller rotation.
Label: gears change.


![graph TD A["Tool icon: 3D terrain"] --> B["Tool icon: 2D gear movement"] B --> C["Worker: 100% moving on tire wheel"] C --> D["Tool icon: 3D cycle indicator with arrow indicating cycle"]](/content/2026/07/1414336/images/7a018d69bc98b6a070d62ad4231c306f4696d9d90fa4983f0961156603ed8c1c.jpg)
![graph TD A["Engine"] --> B["Oil"] A --> C["FUEL"] D["Tractor"] --> E["Oil"] style A fill:#f9f,stroke:#333 style D fill:#f9f,stroke:#333](/content/2026/07/1414336/images/8f319d03bdf161dfe6364f3124db9723a468ce0c85233073610e261ac1bdc376.jpg)





B



ACCESSORI (NON INCLUSI):
We thank you for your confidence in our products and wish you an enjoyable use of the machine and/or the interchangeable equipment.
We have created these operating instructions to ensure trouble-free operation. Carefully follow these recommendations for the satisfaction of owning a long-term properly functioning machine or interchangeable equipment.
Our machines and interchangeable equipment are tested very rigorously before being mass-produced and are subjected to strict controls during actual manufacturing. This is the best guarantee of quality for us and for the user.
This machine and/or interchangeable equipment has been subjected to strict neutral tests in the country of origin and meets the safety standards in force.
1.2 THE MANUAL
The manual is divided into chapters and paragraphs in order to present the information as clearly as possible.
The instructions, drawings and documentation contained in this manual are of a confidential technical nature, strictly the property of the manufacturer (see EC declaration on last page) and may not be wholly or partially reproduced in any way.
The user's manual must be stored with care and must accompany the machine and/or the interchangeable equipment in all the changes of ownership that it may have through its life.
To facilitate this, the manual must be handled with care, with clean hands and must not be deposited on dirty surfaces.
It must be stored in an environment protected from moisture and heat and in such a way that it is always on hand to clarify any doubts. No parts should be removed, modified or torn.
1.3 MANUAL SYMBOLS
! DANGER!
This symbol highlights situations that can affect safety, cause death and/or serious injury to the operator.
CAUTION!
This symbol highlights situations that can cause minor injury to the operator and/or damage to the machine.
i INFORMATION!
This symbol highlights special indications for better clarity and ease of use.
The images are indicated by the specific figures (e.g.
1.4 MANUFACTURER DATA
See cover or CE label.
For information and to order spare parts, please contact your local dealer, quoting the item number and production number, which can be found on the CE label shown in .
- Manufacturer identification
- Model
- Product identification code
- Item serial number
- Mass
- Year / Month
- Motor power
- Type of product
2. SAFETY INSTRUCTIONS
DANGER!
All the dangers described in this paragraph can generate serious injury or death of the operator.
DANGER!
Read and understand this use and maintenance manual in its entirety before assembling and operating the machine or the interchangeable equipment.
DANGER!
It is the responsibility of the employer to transmit all the information contained in this manual to the operator who will use the machine or the interchangeable equipment.
This machine and/or interchangeable equipment complies with all European standards in force during the period of production. Improper use or maintenance may nevertheless increase the risk of injury.
In order to reduce this risk, read the following safety instructions carefully and pay attention to the hazard symbols on the following pages.
General indications:
-
Use of the machine by persons under 16 years of age or by persons who have consumed alcohol, medicine or drugs is prohibited.
-
The electromagnetic field generated by the motor or electrical circuit could interfere with pacemaker devices. Carriers of these devices MUST consult with their doctor before using the machine.
-
Do not start the machine while standing in front of the tool or approach it when it is running. When pulling on the motor starter cord (if any), the tool and the machine itself must remain stationary.
-
The motor MUST remain off during machine transport and all adjustment, maintenance, cleaning operations and interchangeable equipment changes.
-
Do not leave the machine until the motor has been switched off and the machine has been parked in a stable, safe position.
-
Take care with the exhaust pipe. Near-by parts can reach as high as 80°. Replace worn or defective silencers.
-
Before starting work with the machine, perform a visual and physical check to ensure that all the safety and accident prevention systems it is equipped with are fully functional. Excluding or tampering with them is strictly prohibited. Replace damaged or worn parts before use.
-
Any improper use, repairs carried out by non-specialised personnel or the use of non-original spare parts will invalidate the warranty and shall forfeit any manufacturer liability.
-
Do not modify the motor rotation speed regulator calibration or reach excessive speeds.
-
Only original spare parts must be used to ensure the machine level of safety.
Instructions for use:
-
Before using the machine and/or this interchangeable equipment, familiarise yourself with the controls and learn how to stop it quickly.
-
Check the motor oil level before starting the machine.
-
Before starting the machine, check that all fasteners (bolts, screws, nuts, etc.) are tightened and that the bonnets and protection systems are intact and correctly fitted.
-
Walk, do not run, while working.
-
Do not start the machine in closed rooms where carbon fumes can accu-

mulate.
- Work only during daylight hours with good lighting and visibility (minimum visibility required equal to the work area defined in the "WORK AREA" paragraph).
- Do not work during thunderstorms and/or on wet or slippery ground.
- Do not work on slopes of more than 10° unless using specific equipment for work on slopes (not available on all machines or versions). Use the utmost caution when reversing the direction of travel and when pulling the machine towards you.
- Always make sure that there are support points on slopes. Keep feet at a suitable distance from the tools and do not put hands or feet near moving parts.
- Always drive the machine with both hands on the handlebar.
- Do not work near ditches or embankments. If a wheel crosses the roadside, the car may suddenly overturn.
- Do not reverse the machine with your back to a wall or similar objects to avoid being trapped.
- Always work cross-wise on slopes, never uphill or downhill.
Indications for the interchangeable equipment:
- Before installing, inspecting, repairing, removing or replacing the interchangeable equipment or some parts of it, stop the engine, letting the machine cool down (15-20 minutes), and make sure that there are no moving parts, disconnect the spark plug cap.
- When handling the equipment for the assembly, replacement or maintenance, wear sturdy protective gloves. In general, avoid contact with the equipment tools and do not put your hands and feet near the moving tools to avoid amputations and injuries.
- Do not use the machine associated with this equipment if the latter is not correctly installed or if it does not operate properly.
- Disengage the equipment by releasing the lever when work is not performed or if dangerous conditions such as the approach of strangers to the danger area, any malfunctions, reduced visibility or sudden impact against an obstacle are felt.
- Disengage the equipment if you cross gravel drives or roads.
- Disengage the equipment and turn off the machine if you notice abnormal vibrations.
Instructions for adjustment and maintenance:
DANGER!
All ADJUSTMENT and MAINTENANCE operations must be carried out with the motor switched off. Remove the spark plug cap or ignition key (if present) to avoid unexpected start-up.
Keep all nuts, bolts and screws tightened to ensure safe machine operation.
Only use original Eurosystems spare parts. The owner loses all warranty rights when using non-original spare parts.
Do not make any structural changes or adaptations. Such changes will invalidate the warranty and the manufacturer's liability.
We reserve the right to make design improvements to the machine and/or the interchangeable equipment without making changes to these instructions.
Instructions for lifting:
DANGER!
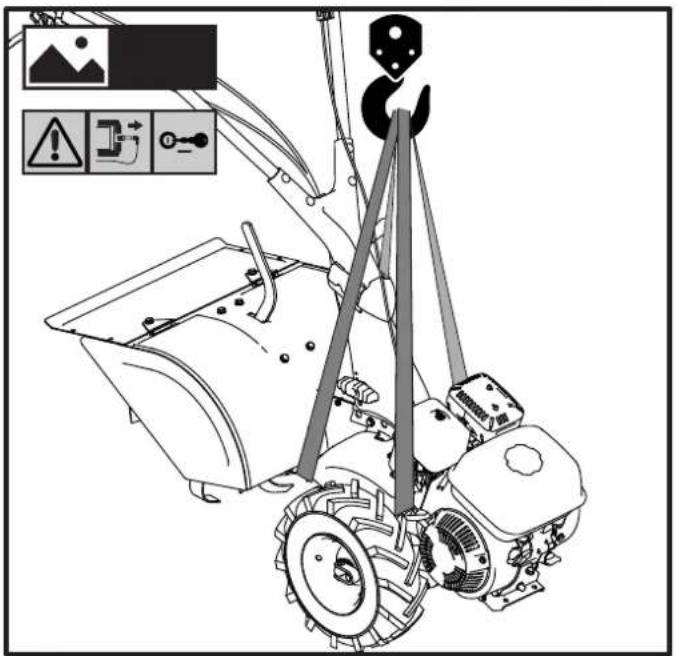
Use lifting systems that are undamaged and suitable for the masses to be lifted (see the HANDLING AND TRANSPORT paragraph).
DANGER!
Do not stand under suspended loads.
2.1 DESCRIPTION AND FIELD OF USE
The motor-cultivator is designed and built to hoe the land. The motor-cultivator must only be used with original equipment and spares.
ACCESSORIES (NOT INCLUDED):
- 32 cm rotary cultivator equipped with pair iron wheels ∅350x50
- Fixed-wing ridger 905030000 with coupling.
2.2 IMPROPER USE
DANGER!
All the dangers described in this paragraph can generate serious injury or death of the operator.
- Use the machine only for the use intended by the type of equipment mounted.
-
Do not use the machine to transport objects, people or animals.
-
Do not use the machine to tow and/or push carts or other devices.
- Do not mount equipment not authorized by the manufacturer.
- Do not modify machine parts.
- Do not exclude or tamper with protection systems.
2.3 WORK AREA

The user is responsible for the safety of persons, property and animals within the machine danger zone.
This zone is defined as the internal area of a circumference of a minimum radius of 10 m with the tool mounted on the machine in the centre.
DANGER!
The danger area extends for 10 meters around the machine and must be closed with suitable warning signs.
DANGER!
Some very clear/evident warnings about the thrown objects danger should be settled in the area stating that it is prohibited to enter into such area. If the operator becomes aware of the presence of any people or animal in the danger area he shall immediately switch off the machine and not restart the machine until the area is clear.
Do not stand in the danger zone for any reason while the machine is in operation. Only the operator, who has read and understood the manual in all its parts, is authorised to stand within this area and to occupy the only operating position, located behind the handlebar, holding it firmly.
The operator must check the surrounding area before starting the machine and must pay particular attention to children and animals.
Before starting work on a certain area, clean it of foreign objects.
Always pay attention to the ground and the surrounding area when working. If undesired and/or dangerous objects are detected, switch off the machine and secure it before leaving the operating position to remove them, being sure to prevent the machine from starting, moving or tipping over.
2.4 CLOTHING

INFORMATION!
The procurement of such personal protective equipment is the sole responsibility of the customer or employer.
During machine use and maintenance operations:
The operator MUST always wear suitable safety shoes, gloves, and hearing protection devices and wear long, resistant trousers and safety goggles.



Do not wear loose-fitting clothing, jewelry, ties, scarves, dangling drawstrings that could get caught by the equipment. Tie up your hair.
During unpacking and assembly:
The operator MUST always wear resistant safety shoes, gloves, and clothing.



3. DEFINITION OF PICTOGRAMS


2.1

DANGER!
Keep all labels clean and in good condition, replace them if damaged.
4. TECHNICAL FEATURES
| Model | MM250 YM355 | |
| GROSS and NET weight | CE declaration label on the last page | |
| Rated power | ||
| Sound power | ||
| Acoustic pressure | ||
| Vibrations | ||
| Tyres 13x5.00-6 | ||
| Rotary cutters diameter | 320 mm | |
| Rotary cutters rotation | 275/min | |
| Forward speed 1^ | 1,1 km/h | |
| Forward speed 2^ | -2,1 km/h | |
| Reverse speed in 1^ | 0,96 km/h | |
| Reverse speed in 2^ | -1,8 km/h | |
| Concerning the engine technical data, please see the enclosed instructions manual | ||
5. HANDLING AND PACKAGING
2 or more people are required to handle packaging, using the handles on the cardboard box. The GROSS weight is indicated in the "TECHNICAL FEATURES" chapter.

CAUTION!
Do not overturn or roll the machine. Possible damage to bonnets and mechanical parts.

INFORMATION!
If more than one machine or interchangeable equipment is supplied on pallets, unload without dropping them on the ground. Use a forklift if necessary.
6. UNPACKING/ASSEMBLY

Unpacking

Kandlebar support assembly:
secure the handlebar support (B) to the frame (A), using screws (g) with washers (h) in the two holes. Secure the knobs (m) with washers (y), screws (i) and nuts (l) in the slot.


Rotavator assembly: Insert
the widening tines (C) at the ends of the other rotavators and secure them with the screws (n) and nuts (o).


Rotavator cowling assem-
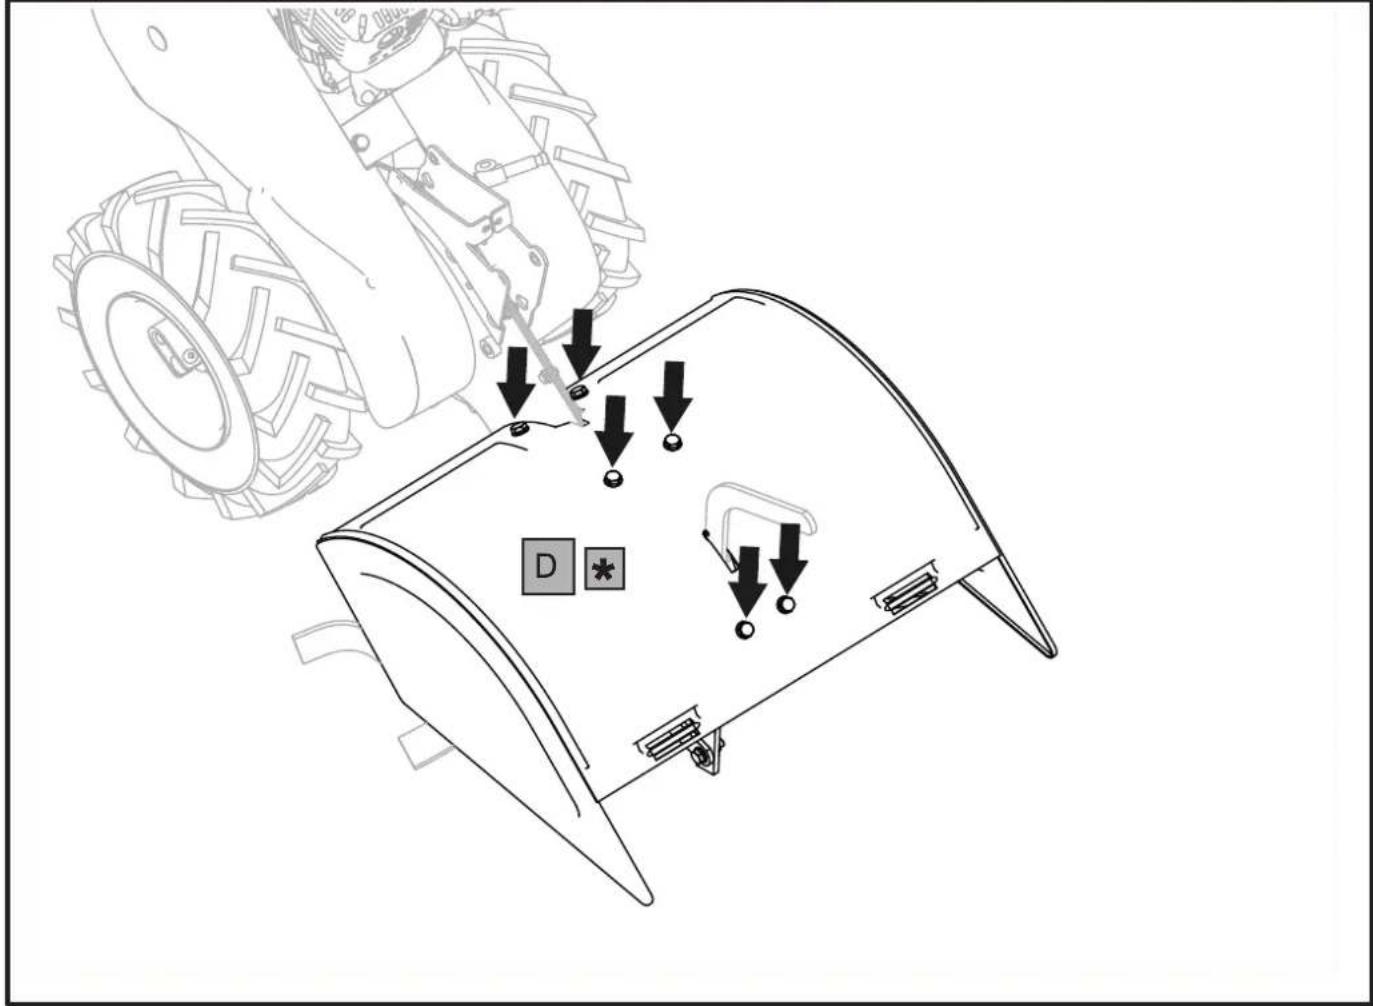
bly: Unscrew the 6 screws from the seats on the frame, then position the cowling (D), taking care to match its slots with the screw seats, and tighten the 6 screws.

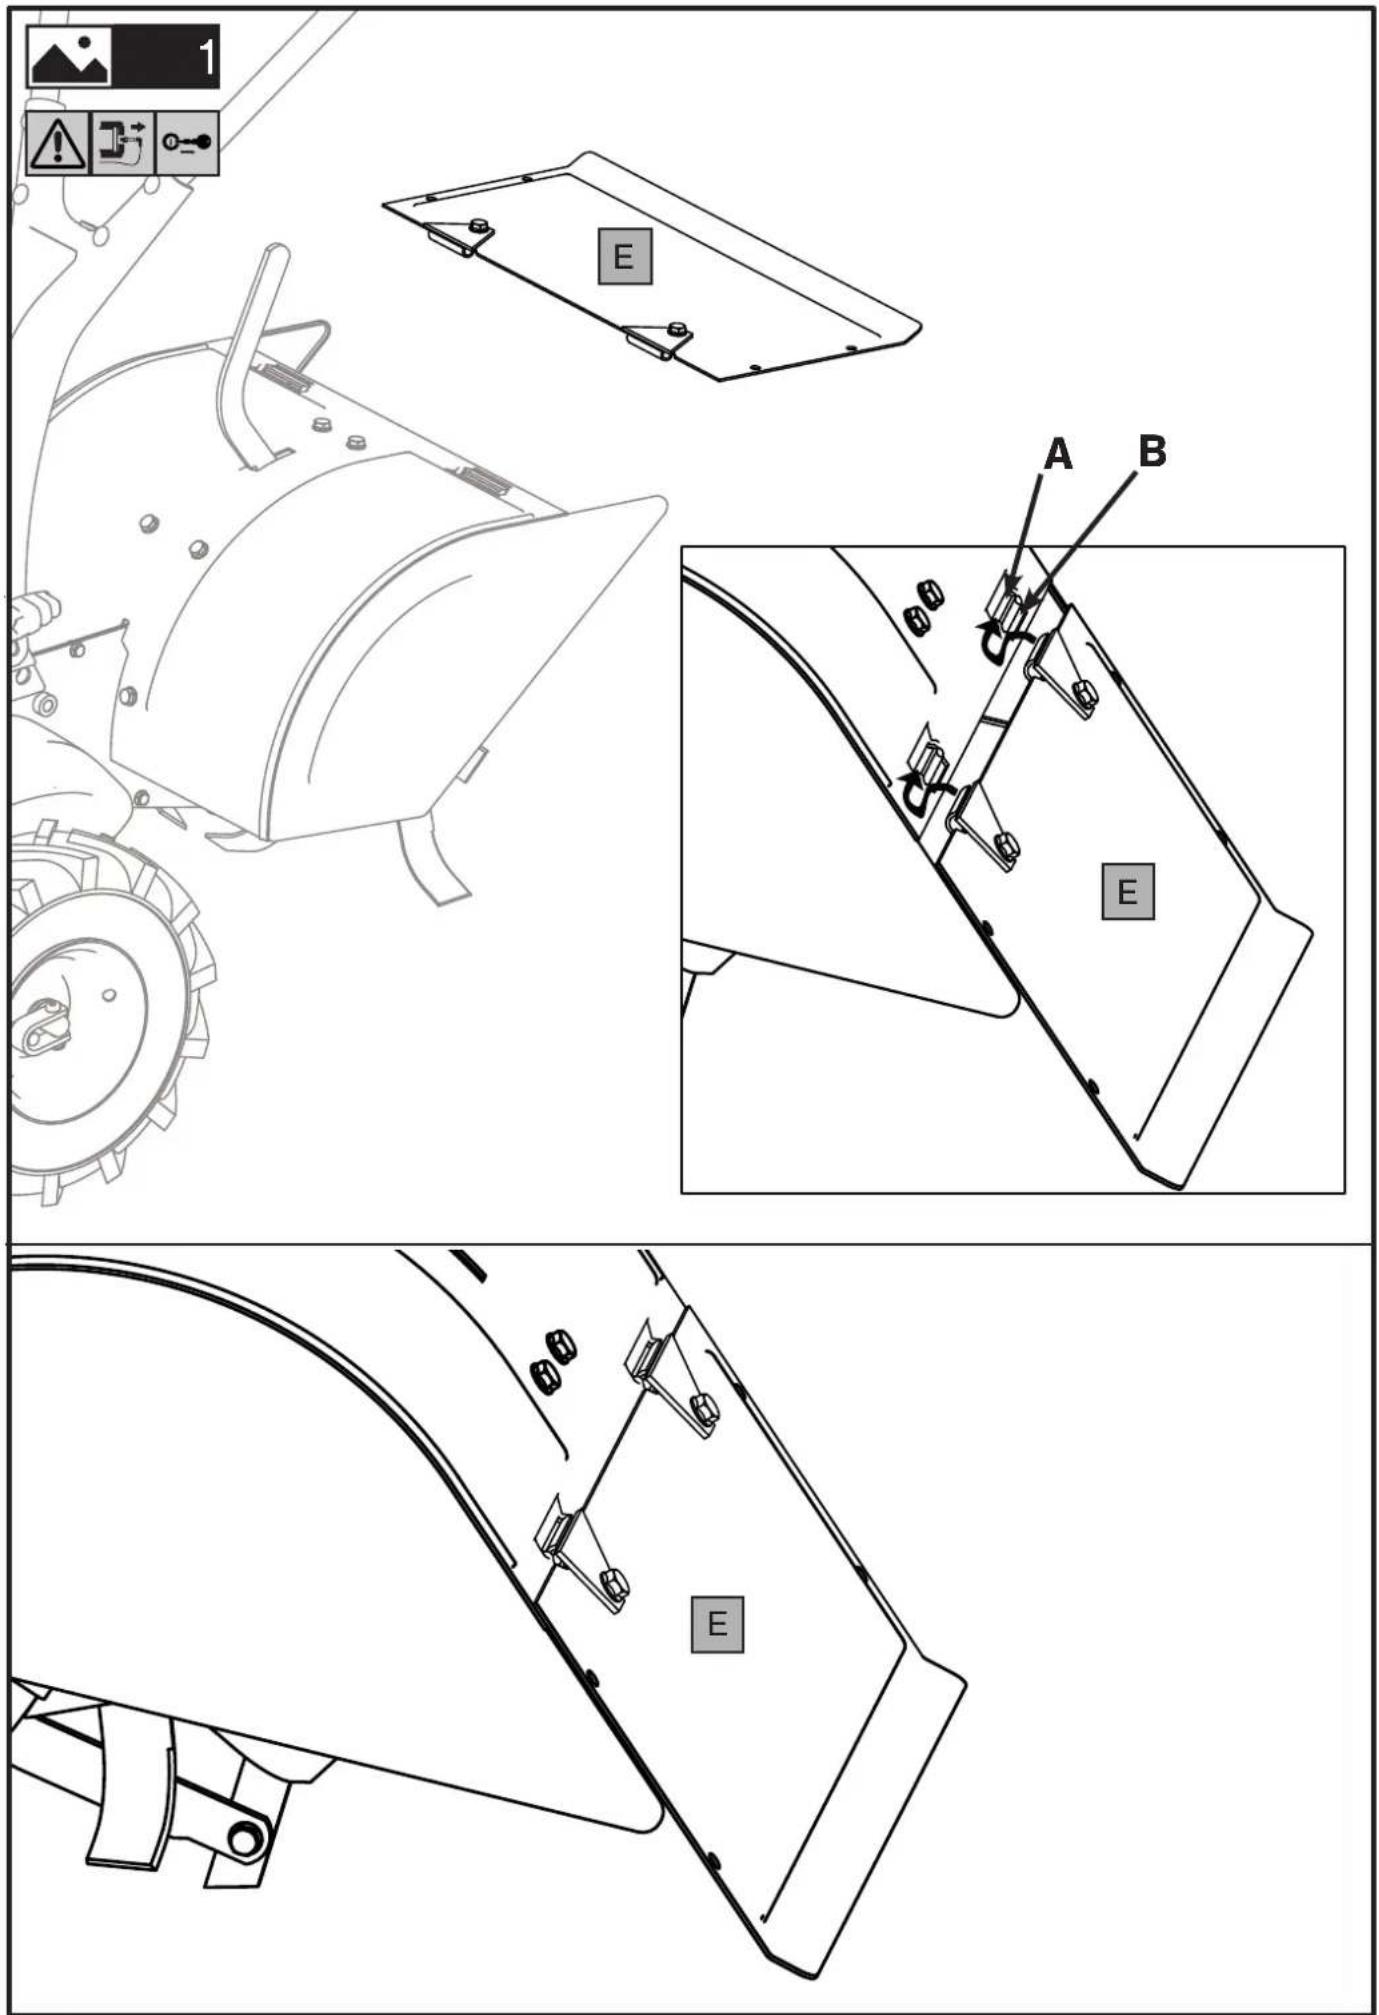
Rotavator cowling bracket
assembly: Insert the hooks of the bracket (E), holding this rotated upwards, into the relevant slots on the Rotavator cowling. CAUTION: The bracket must be positioned with the hooks facing the same way as in the enlargement shown, or rather the hooks must enter from above into slit "B" and exit from "A".

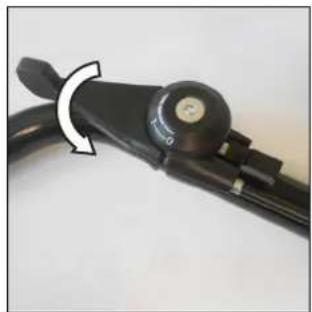
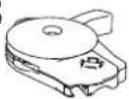
Throttle assembly: Depending
on the throttle supplied (A, B shown):
-Throttle A: hook terminals "x" and "y" of the throttle cables.
-Throttle B: unscrew the screw and nut from the throttle, then screw back on the handlebar.

CAUTION!
The motor is supplied without lubricating oil. For information on the type of oil and quantities to be used, refer to the motor manual contained in the accessory bag

7. USE

CAUTION!
Do not start the engine until all assembly stages have been completed.

CAUTION!
Add lubricating oil to the motor before first start-up. For information on the type of oil and quantities to be used, refer to the motor manual contained in the accessory bag [F].

CAUTION!
Before starting the machine, check the oil level inside the motor, as indicated in

DANGER!
Before proceeding, read and understand the chapter "SAFETY INSTRUCTIONS" in its entirety.
7.1 DESCRIPTION OF ELEMENTS
SAFETY DEVICE
All the motorcultivators are equipped with an accident prevention device. Such device causes the clutch release and the machine stopping on the single or reverse speed position, to the release of the control lever, furthermore such device avoids the reverse speed insertion if the single speed is on.

CAUTION!
If the machine is on reverse speed the rotavators are automatically stopping.

CONTROLS DESCRIPTION
1) Accelerator lever control Start-Stop
2) Forward speed lever control.
3) Forward speed lever control
4) Control speed SLOW-FAST (2+2 speed version only)
5) "Fork on 3 positions"
6) Starter handle
7) Root face control lever.
8) Cable/belt adjustment control
9) Handlebar side adjustment lever

THREE-POSITION WHEEL
CLUTCHING DEVICE: The cultivator is equipped with a special device called a "THREE-POSITION FORK".
- In position 1 (free), the wheel turns freely on the shaft so that the machine can move when the engine is stopped.
- In position 2 (locked), the wheel is integral with the shaft, setting into drive, meaning ready to start working. This is the most commonly used position.
- In position 3 (semi-differential), the wheel can perform about a half-turn turning on the shaft, in order to allow turns.

CAUTION!
All operations on the three-position fork must be performed when the engine is at a standstill.
7.2 TANK FILLING

DANGER!
Use caution when handling flammable fluids. Fuel is highly flammable and explosive.

DANGER!
Do not fill the tank in closed or poorly ventilated environments.

DANGER!
Before refilling the tank, switch off the machine and wait until the motor has cooled down (15-20 min).

DANGER!
Do not smoke or use electronic devices near combustible fluids.

DANGER!
Use suitable, undamaged filling devices such as fuel cans, funnels, etc.

DANGER!
In case of fuel leakage, move the machine before starting it up.

DANGER!
When filling operations have been completed, replace the cap and tighten it firmly.


7.3 START-UP AND SHUT-DOWN

DANGER!
Check correct functioning of the maintained action levers and double safety command before using the machine. See the "CABLE ADJUSTMENT" paragraph to make adjustments. It is forbidden to use the machine in case of malfunction of the controls.

CAUTION!
At the first use of the machine it is absolutely necessary to verify that inside the chassis is present the lubrication oil. Do no start the unit/machine on before having done such control. For additional information please look at the chapter GEARBOX 10.5.

CAUTION!
When you have finished the assembly, switch the machine and check, bringing the accelerator to the stop position, the engine shuts completely down.

CAUTION!
Before switching the engine on, carefully check if the motorcultivator is in perfect good conditions.
1.

Engine instructions:
Carefully read the instructions booklet enclosed to the relevant engine.
Check if the air filter is clean.
Fill the tank in as per the fuel described in the engine specifications and using a filter filling funnel.
Do not change the calibration of the speeds control rotation device of the engine in order not to over-speed it.
2.

Put the fork into position
1 (free) so that the wheel could freely turn on the shaft to allow the movements.
3.
ove the machine to the borders to be milled.
4.

Put the fork into position (ed) working position.
Check if the gearbox control lever (Fig. 1.7 part 4 only 2+2 speed version) is on loose position. Adjust the handlebar to the requested position/height.
5.

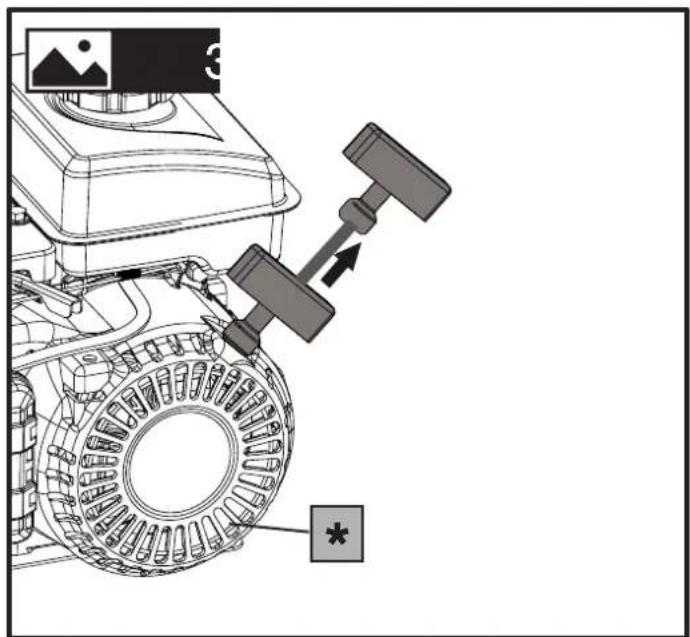
How to switch the engine
on: Open the fuel cap (for the engine equipped like this), push to halway the accelerator lever on the handlebar. If the engine is cold, operate the starter device on the carburetor.
6.

Bring the starter handle energetically. When the on, after some bursts/ut the starter again at rest
G
Grasp the handlebar, insert the speed (for 2+2 speed version) pos. A slow speed, pos. B fast speed (Fig. 1.7). At the beginning we recommend you to work on position 1, slow speed.
8.

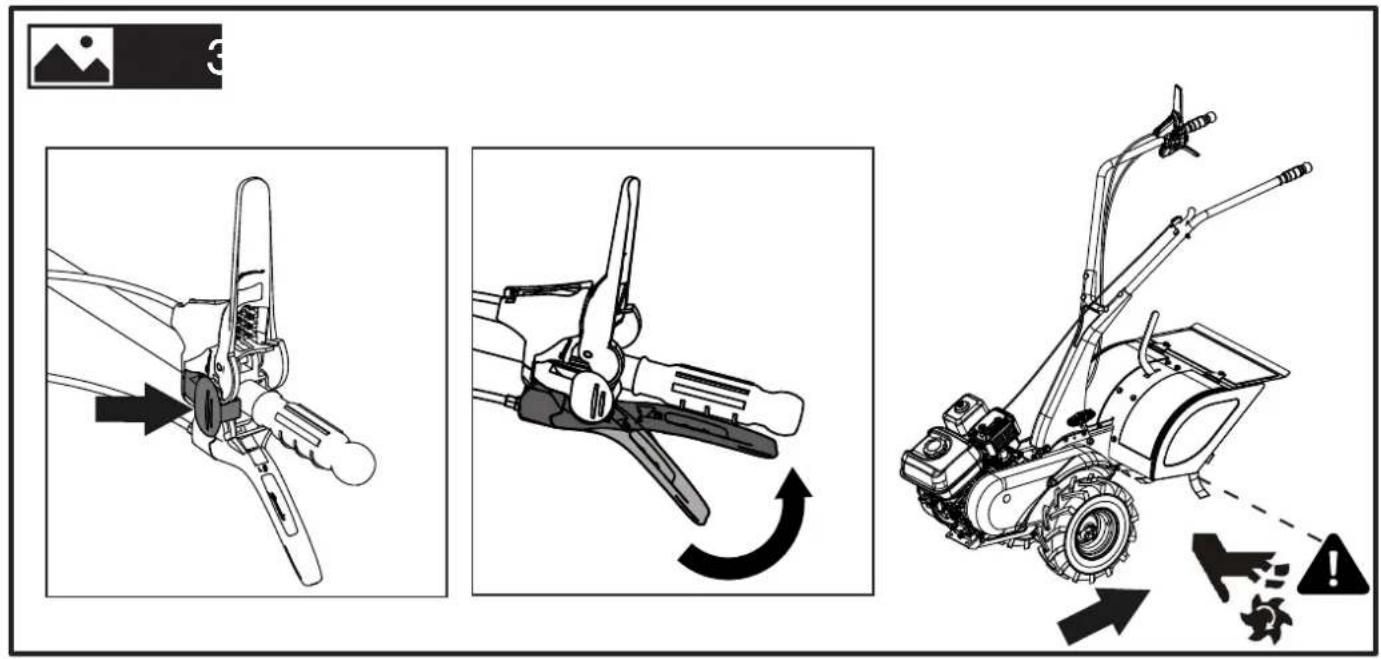
Forward speed: hold the r, press the safety catch the figure inwards and then ever forward with its grip to tum stroke, meaning to its lever must be held down in blade rotation. If you our hand, the lever will rise automatically disengage blade
4

Reverse speed: let go of
the clutch lever (Fig. 3.6) and, after having pressed the relative safety
catch, pull the lever shown in Fig. 3.7 located on the handlebar, raising the back of the machine so that the Rotavator comes out of the ground until the machine starts to back up.
10.

At the end of the work:
when you finish the work, to stop the engine, bring the accelerator lever to the bottom gear.

DANGER!
In case you have to face an unforeseen and accidental obstacle, you should immediately leave the two driving levers (Fig. 3.6, 3.7).

DANGER!
In case of severe impact in case you find deformations or obvious damages, please go on changing all the knives and the corresponding pins with screws and tightening nuts. Ask to an authorized service centre.
8. HANDLING AND TRANSPORT

DANGER!
Before proceeding, read and understand the chapter "SAFETY INSTRUCTIONS" in its entirety.
With the motor off, the machine can be moved by hand by pushing or pulling it from the handlebar.
LIFTING:

9. STORAGE
When the machine is not going to be used for long periods of time, it is essential to protect the tool with anti-corrosion and antioxidant substances.
Clean the machine of leaves and/or dirt before storage.

DANGER!
Remove the fuel from the tank and close the tap (if present).
Park the machine on flat ground, removing the ignition key (if present) and/or spark plug cap.

DANGER!
Protect the sharp parts and cover the machine with protective sheets if necessary.
10. PERIODIC MAINTENANCE

DANGER!
Before proceeding, read and understand the chapter "SAFETY INSTRUCTIONS" in its entirety.
Keep all nuts, bolts and screws tightened to ensure safe operation of the machine and/or interchangeable equipment in safe conditions.
10.1 DEPHT ADJUSTMENT


To ensure good milling and smooth movement of the cultivator, the Rotavator is equipped with a depth control device (7 Fig. 1.7) that adjusts the working depth of the hoes. Pull the control lever back and move it up or down to control ground penetration: the correct adjustment has been achieved when the machine moves at a constant speed and without jerking.
- Hard soils cultivation: bring the depth control device to position (B). Such position corresponds to a small soil penetration.
- Soft soils penetration: Bring the depth control device to position (A). Such position corresponds to a deep soil penetration depth.

CAUTION!
When moving with the machine in motion on surfaces other than the working ground, keep the depth control device in position (B); in this way, the hoe will not scrape the surface.
10.2 HANDLEBAR ADJUSTMENT

HEIGHT ADJUSTMENT:
The height of the cultivator handlebar can be adjusted. Before starting any work it is a good standard operating procedure to adjust the handlebar to the operator's requirements so that the machine could be easily handled. Loosen the handlebar support fixing screws. Adjust to optimal height, tighten the screws.

LATERAL ADJUSTMENT:
Lateral handlebar adjustment keeps the operator from stepping on ground that has already been hoed and from damaging vegetation. Lower the lever to unlock the handlebar. Rotate the handlebar from the desired side (positions possible: -35°, 0°, 35°) and raise the lever to lock it.
10.3 GREASING

CAUTION!
Every 50 working hours, grease the reverse speed shaft with the suitable greaser, upon disassembling of rubber cap.

CAUTION!
Once such operation has finished you must close the hole again with the rubber cap because inside the casing there are some gears/parts on motion.
10.4 CABLE ADJUSTMENT

FORWARD/REVERSE LEVER:
Attention: the wheels should start to turn when the driving lever has crossed half its way. When the mentioned lever is completely pulled, on working position, the belt control device (8, Fig.1.7) must be arranged as in figure 4.6B, with the "cylinder" in contact with the two washers on the sides. To obtain the am conditions you have to act on the M10 nut set close near the belt control device (Fig. 4.6A).
10.5 MACHINE OIL CHANGES


OIL LEVEL CONTROL:
Verify the oil level every 60 hours: put the machine on flat surface, remove the cap 1 and check if the oil reaches the hole bottom edge. In case you need to fill it on you have to perform it from the hole of the cap 2. Go on with such operation until you see the oil coming out from control cap 1. Screw both caps again.
OIL CHANGE:
Change the oil every 150 hours. The oil drain has to be performed when the machine is hot: remove caps 1 and 2 and tilt the machine to a complete emptying, then put the machine on flat land, fill it in with oil through the hole of cap 2 until the oil starts coming out from control cap 1. Screw both caps again.

INFORMATION!
Use a syringe (not included) for easier and safer extraction.

CAUTION!
Use SAE 80 or equivalent oil.

CAUTION!
Waste fuel oil is a polluting material: don't waste it in the surroundings, please apply to suitable waste material centres.
10.6 TYRE INFLATION
If the wheels are not full, we recommend checking tyre inflation before each machine use. The recommended value is 21 PSI (1.5 bar).

CAUTION!
Before inflating the tyre, always check the maximum PSI value on the tyre.

CAUTION!
Do not use pressurised water to wash the machine and/or interchangeable equipment. Doing so can damage the motor and any electrical systems or batteries.

CAUTION!
Avoid excessive use of water near labels. In the event of damage, labels must be replaced before using the machine and/or the interchangeable equipment again.
11. CLEANING AND WASHING

DANGER!
Before proceeding, read and understand the chapter "SAFETY INSTRUCTIONS" in its entirety.
Wait for all the hot parts to cool down (at least 20 minutes) before washing and/or cleaning the machine or the interchangeable equipment. Use compressed air or a sponge with neutral detergent and water.
- MAINTENANCE PLAN
| How often See chapt. | ||
| Checking the tightness of fasteners and guards | Always before starting the machine - check that there are no untightened screws, bolts and/or nuts and that the bonnets and protection systems are intact and correctly fitted. | - |
| Cleaning After each | use 11. | |
| Inflation As needed | 10.6 | |
| Cable adjustment | If operation is not as according to the manual | 10.4 |
| Base oil change | 60 hours | 10.5 |
| Motor | See specific manual | |
- TROUBLESHOOTING
| Possible cause See chapt. | ||
| The motor does not start | No fuel; top up. 7.2 | |
| Check that the throttle is set to START/1. 7.3 | ||
| Check that the spark plug cap is properly inserted. | Specific motor manual | |
| Check the conditions of the spark plug and clean or replace if necessary. | Specific motor manual | |
| Check that the fuel cock is open (only for motor models for which the cock is provided). | Specific motor manual | |
| Motor power decreases | Air filter dirty, clean it. | Specific motor manual |
| Check if any stone or soil/vegetation residue is stopping the tool rotation, in case remove them. | ||
| The rotavators will not turn | Adjust the transmission cable registers. 10.4 | |
| Check that the rotavators are fixed to the shaft. - | ||
| Check the positioning and conditions of the transmission belts; reposition and/or replace them. | - | |
| Wheels are not turning | Check the transmission cables. 10.4 | |
| Contact the nearest authorised service centre if the problem cannot be solved. | ||
14. ADDITIONAL INSTRUCTIONS
14.1 DISPOSAL
At the end of its life cycle, the product must be disposed of in accordance with the regulations in force for Differentiated waste disposal and cannot be treated as simple urban waste.
The product must be disposed of at dedicated collection points or must be returned to the dealer if you wish to replace the product with another new equivalent product.
The product is composed of non-biodegradable parts and substances that can pollute the surrounding environment if not properly disposed of. In addition, some of these materials can be recycled to avoid environmental pollution. It is everyone's duty to contribute to the health of the
environment.
When present, the symbol

the electrical and electronic equipment that must be disposed of separately as prescribed by standards 2002/95/EC, 2002/96/EC and 2003/108/EC.
Do not dispose of this equipment in un- sorted municipal waste, but take it to ap- propriate separate collection areas.
Ask your local authorities for information about waste disposal areas.
Anyone who does not dispose of the product in accordance with this paragraph is responsible for it in accordance with the regulations in force.
14.2 DECOMMISSIONING AND DISMANTLING
The decommissioning and dismantling of the Machine and/or the interchangeable equipment covered by this user's manual consists in the disassembly of the product by authorised personnel in compliance with the provisions of Legislative Decree 81/08 (use of PPE, etc.) and the subsequent sorting and disposal as reported in the "DISPOSAL" paragraph of this Use and maintenance manual.
1. ALLGEMEINE INFORMATIONEN
1.1 EINLEITUNG
1.3 SYMBOLIQUE DU MANUEL
DANGER!
1.4 DONNÉES DU CONSTRUCTEUR
∴ m = 3/11
OPIS ELEMENTÓW STEROWANIA
∴ m = 3/11
TRÓJPOZYCYJNE URZĄDZENIE
3. DEFINITIE VAN DE PICTOGRAMMEN


GEVAAR!
Un marchio di: - A brand of:
Multipower srl
Via Don Minzoni, 6D/6E - 42044 Gualtieri (Reggio Emilia) Italy Tel.
039-0522.221128 Fax 039-0522.221136
E-mail: info@multi-power.it
POLITYKA GWARANCYJNA MULTIPOWER QUALITY AND SERVICES S.R.L.
Multipower Quality & Services
Tel. +39-0522-221128 - Fax. +39-0522-221136 - Website: www.multi-power.it
Multipower Quality & Services
Tel. +39-0522-221128 - Fax. +39-0522-221136 - Website: www.multi-power.it
- MANUALE D'USO
- BEDIENUNGSANLEITUNG
- ① MANUFACTURER
- ACCESSORI (NON INCLUSI)
- 1.2 THE MANUAL
- 1.3 MANUAL SYMBOLS
- DANGER
- CAUTION
- I INFORMATION
- 1.4 MANUFACTURER DATA
- SAFETY INSTRUCTIONS
- GENERAL INDICATIONS
- INSTRUCTIONS FOR USE
- INDICATIONS FOR THE INTERCHANGEABLE EQUIPMENT
- INSTRUCTIONS FOR LIFTING
- 2.1 DESCRIPTION AND FIELD OF USE
- ACCESSORIES (NOT INCLUDED)
- 2.2 IMPROPER USE
- 2.3 WORK AREA
- 2.4 CLOTHING
- INFORMATION
- DURING MACHINE USE AND MAINTENANCE OPERATIONS
- DURING UNPACKING AND ASSEMBLY
- DEFINITION OF PICTOGRAMS
- TECHNICAL FEATURES
- HANDLING AND PACKAGING
- UNPACKING/ASSEMBLY
- UNPACKING
- KANDLEBAR SUPPORT ASSEMBLY
- ROTAVATOR ASSEMBLY: INSERT
- ROTAVATOR COWLING ASSEM
- ROTAVATOR COWLING BRACKET
- THROTTLE ASSEMBLY: DEPENDING
- USE
- 7.1 DESCRIPTION OF ELEMENTS
- SAFETY DEVICE
- CONTROLS DESCRIPTION
- THREE-POSITION WHEEL
- 7.2 TANK FILLING
- 7.3 START-UP AND SHUT-DOWN
- 1
- ENGINE INSTRUCTIONS
- 2
- PUT THE FORK INTO POSITION
- 3
- 4
- PUT THE FORK INTO POSITION (ED) WORKING POSITION
- 5
- HOW TO SWITCH THE ENGINE
- 6
- G
- 8
- REVERSE SPEED: LET GO OF
- 10
- AT THE END OF THE WORK
- HANDLING AND TRANSPORT
- LIFTING
- STORAGE
- PERIODIC MAINTENANCE
- 10.1 DEPHT ADJUSTMENT
- 10.2 HANDLEBAR ADJUSTMENT
- HEIGHT ADJUSTMENT
- LATERAL ADJUSTMENT
- 10.3 GREASING
- 10.4 CABLE ADJUSTMENT
- FORWARD/REVERSE LEVER
- 10.5 MACHINE OIL CHANGES
- OIL LEVEL CONTROL
- OIL CHANGE
- 10.6 TYRE INFLATION
- CLEANING AND WASHING
- ADDITIONAL INSTRUCTIONS
- 14.1 DISPOSAL
- 14.2 DECOMMISSIONING AND DISMANTLING
- ALLGEMEINE INFORMATIONEN
- 1.1 EINLEITUNG
- 1.3 SYMBOLIQUE DU MANUEL
- 1.4 DONNÉES DU CONSTRUCTEUR
- ∴ M = 3/11
- OPIS ELEMENTÓW STEROWANIA
- TRÓJPOZYCYJNE URZĄDZENIE
- DEFINITIE VAN DE PICTOGRAMMEN
- GEVAAR
- MULTIPOWER SRL
- POLITYKA GWARANCYJNA MULTIPOWER QUALITY AND SERVICES S.R.L
- MULTIPOWER QUALITY & SERVICES
Brand : Rato
Model : MM250
Category : Tiller