
CIH614CF - Cooker CANDY - Free user manual and instructions
Find the device manual for free CIH614CF CANDY in PDF.
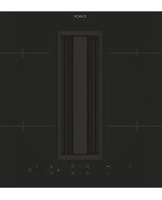


| Product type | Induction electric cooker |
| Brand | Candy |
| Model | CIH614CF |
| Dimensions (W x D x H) | 60 cm x 60 cm x 85 cm |
| Net weight | 35 kg |
| Electrical supply | 230 V / 50 Hz |
| Total power | 7.2 kW |
| Hob type | 4 induction cooking zones |
| Oven functions | Fan-assisted, natural convection, grill, defrost, interior light |
| Oven cleaning | Pyrolytic (self-cleaning) |
| Cooktop | Black ceramic glass |
| Oven capacity | 65 liters |
| Child safety | Control lock |
| Automatic shut-off | Yes |
| Timer | Yes, with programmer |
| Repairability index | 8/10 |
| Availability of spare parts | On the official Candy website and authorized dealers |
| Care of the ceramic glass hob | Clean with a specific ceramic glass cleaner and a soft cloth |
| Oven care | Use the pyrolytic cycle or a mild cleaner |
| Included accessories | Grill, drip tray, rotisserie spit (depending on model) |
| Energy class | A+ |
| Noise | Sound level < 50 dB |
Frequently Asked Questions - CIH614CF CANDY
User questions about CIH614CF CANDY
0 question about this device. Answer the ones you know or ask your own.
Ask a new question about this device
Download the instructions for your Cooker in PDF format for free! Find your manual CIH614CF - CANDY and take your electronic device back in hand. On this page are published all the documents necessary for the use of your device. CIH614CF by CANDY.
USER MANUAL CIH614CF CANDY
Instruction Manual For Induction Hob
Thank you for purchasing the CANDY induction hob. Please read this instruction manual carefully before using the hob and keep it in a safe place for future reference.
CONTENTS
INSTRUCTION MANUAL - 2
OPERATION 19
POWER MANAGEMENT 25
CLEANING AND CARE 27
LIST OF ACCESSORIES 31
PRODUCT INSTALLATION 32
FAILURE DISPLAY AND INSPECTION 33
WHAT TO DO IF TROUBLE OCCURS 33
ELECTRICAL CONNECTION 35
INSTRUCTION MANUAL
Strictly observe the instructions in this manual. All liability is declined for any problems, damage, or fires caused by failure to comply with the instructions in this manual. The device is intended for domestic use only, to cook food and extract the fumes generated by cooking. No other use is allowed (e.g., heating rooms). The manufacturer declines any liability for inappropriate use or incorrect control settings.
Read the instructions carefully: they include important information about installation, use, and safety.
Do not make electrical changes to the device. Before installing the device, make sure that none of the components are damaged.
Otherwise, contact the dealer and do not continue with the installation.
Check that the device is intact before continuing with installation. Otherwise, contact the dealer and do not continue with the installation.
1. Warnings
Please note! Pay strict attention to the following instructions:
• The device must be disconnected from the electric power supply before carrying out any installation work. - Installation or maintenance must be performed by a qualified technician, in compliance with the manufacturer's instructions and local safety regulations. Do not repair or replace any part of the device unless specifically stated in the operating manual.
• By law, the appliance must be earthed. • The power cable must be long enough to allow the device built into the unit to be connected to the power supply. - In order for the installation to comply with current safety regulations, an approved omnipolar circuit breaker is required that guarantees complete disconnection of the mains in over voltage category III, in accordance with the installation rules. - Do not use power strips or extension cords. • Once installation is complete, the
electrical components must no longer be accessible by the user.
• The device and its accessible parts get hot during use. Be careful not to touch the heating elements.
- Ensure that children do not play with the device; keep children away and supervise them because the accessible parts may become very hot during use.
- For people with pacemakers and active implants, it is important to check, prior to using the induction hob, that their pacemaker is compatible with the device.
- Do not touch the heating elements of the device during and after use.
- Avoid contact with cloths or any other flammable material until all the hob components have cooled down sufficiently, risk of fire.
- Do not place flammable material on or near the device.
• Overheated fats and oils easily catch fire. Supervise the cooking of fatty or oily food.
•If the surface is cracked, switch the device off immediately to prevent the risk of an
electric shock.
•The device is not intended to be operated with an external timer or a separate remote control system.
•Unattended cooking on a device with oil or fat can be dangerous and may cause a fire.
•The cooking process must be supervised. A short cooking process must be constantly monitored.
- NEVER attempt to put fires out using water. Instead, turn off the device and smother the flames, for example with a lid or a fire blanket.
Fire hazard: do not place objects on the cooking surfaces.
- Do not use steam cleaners, risk of electric shock.
- Do not place metal objects, such as knives, forks, spoons or lids on the device because they could become hot.
- Before connecting the device to the electrical network: check the data plate (on the bottom of the device) to ensure that the voltage and power correspond to the mains supply and that the power socket is suitable. If in doubt, consult a qualified electrician.
Important
•After use, turn off the hob at the switch and do not rely on the pan detector.
- Prevent liquids from boiling over, so turn the heat down when boiling or heating liquids.
•Do not leave the heating elements turned on with empty pots and pans or with no pans.
- Switch off the relevant hot plate when you have finished cooking.
- Never use aluminium foil for cooking and never place products packaged in aluminium on the hob. The aluminium would melt and irreparably damage your device.
- Never heat a tin or can containing foods without opening it first: it might explode!
•This warning also applies to all other types of hobs.
• High power levels such as the Booster function should not be used to heat certain liquids, such as oil for frying. Excessive heat may be dangerous. In these cases, we recommend the use of a lower power level.
- Containers must be placed directly on the hob and in the centre. Under no circumstances may any other objects be placed between the pan and the hob.
•If the temperature becomes high, the device automatically decreases the power level of the cooking zones.
•Before doing any cleaning or maintenance work, disconnect the device from the mains power supply by removing the plug or turning off the mains switch. Wear protective gloves for all installation and maintenance operations. The device can be used by children over the age of eight and by people with impaired physical, sensory or mental abilities or lacking in experience or the necessary knowledge provided that they are supervised or after they have received instruction about how to safely use the device and understand the inherent dangers. Children must be supervised to ensure they do not play with the device. Cleaning and maintenance must never be performed by children unless they are properly supervised.
The room must be properly ventilated when the device is used at the same time as other gas-powered devices, or powered by other fuel. The device must be regularly cleaned both internally and externally (AT LEAST ONCE A MONTH), in strict accordance with the maintenance instructions. Failure to follow the rules for device cleaning and filter replacement and cleaning may result in a fire hazard. Food must never be cooked flambe. Using a naked flame may damage the filters and cause a fire hazard; it must, therefore, be avoided under all circumstances. Extra care must be taken when frying to prevent the oil from overheating and catching fire.
PLEASE NOTE
•The accessible parts of the device may become hot when the hob is switched on.
.Please note! Do not connect the device to the electric power supply until installation has been fully completed. The regulations laid down by local authorities must be strictly followed with regard to the technical and safety measures to adopt for fume
extraction.
•The extracted air must not be conveyed through the same ducts used to extract the fumes generated by gas combustion or other types of combustion devices. Never use the device without the grille properly installed!
Only use the fastening screws supplied with the device for installation, or if not supplied, purchase the correct type of screws.
- When the device is used together with other devices powered with non-electrical energy, the negative pressure of the room must not exceed 4 Pa (4 x 10⁻⁵ bar). This manual must be stored for future consultation at any time. If sold, transferred or moved, it must remain with the device.
This device is marked in compliance with the
European Directive 2012/19/EC - UK SI 2013
No3113, Waste Electrical and Electronic
Equipment (WEEE). By ensuring that this
device is disposed of correctly, the user will
help prevent potential negative impacts on the environment and human health.
The symbol on the device or documentation provided indicates that this device must not be treated as domestic waste, but must be taken to a suitable waste collection site for the recycling of electrical and electronic appliances. Dispose of it in accordance with local regulations for waste disposal. For further information about the treatment, recovery and recycling of this device, please contact your local authority, the collection service for household waste or the shop from where the device was purchased. Device designed, tested and developed in compliance with regulations on:
• Safety: EN/IEC 60335-1; EN/IEC 60335-2-6, EN/IEC 60335-2-31, EN/IEC 62233. • Performance: EN/IEC 61591; ISO 5167-1; ISO 5167-3; ISO 5168; EN/IEC 60704-1; EN/IEC 60704-2-13; EN/IEC 60704-3; ISO 3741; EN 50564; IEC 62301. EN 60350-2;
• EMC: EN 55014-1; CISPR 14-1; EN 55014-2; CISPR 14-2; EN/IEC 61000-3-3; EN/IEC 61000-3-12. Recommendations for correct use in order to reduce the impact on the environment: When you start cooking, turn the device on at minimum speed, leaving it on for a few minutes when you have finished cooking. Increase the speed only if there is a large quantity of fumes and steam, using the Booster function only in extreme cases. To keep the odour reduction system running efficiently, replace the carbon filter/s when necessary. To ensure the high performance of the grease filter, clean it when necessary. To improve efficiency and minimize noise, use the maximum duct diameter indicated in this manual.
2. Use
Using the hob
The induction cooking system uses the physical principle of magnetic induction to directly transfer energy from the generator to the pot.
Advantages:
When compared to electric hobs, your induction hob is:
- Safer: lower temperature on the glass surface.
- Faster: shorter food heating times.
- More accurate: the hob immediately reacts to your commands.
- More efficient: 90% of the absorbed energy is converted into heat. Moreover, once the pot is removed from the hob, heat transmission is immediately interrupted, avoiding unnecessary heat losses.
2.1 Cooking containers

Only use pots marked with the symbol :
to prevent scratching, do not use:
- containers with less than perfectly flat bottoms.
- metal containers with enamelled bottoms.
- containers with a rough base, to avoid scratching the hob surface.
- do not place hot pots and pans on the control panel surface.
2.1.1 Preexisting containers
Induction cooking generates heat through the use of magnetism.
Therefore, containers must be made of a magnetic material, such as iron. To determine if a pot is suitable, test its material with a magnet. If a pot does not respond to a magnet, it is not suitable for induction cooking.
2.1.2 Recommended pan bottom diameters
IMPORTANT: If the pot size is incorrect, the cooking zones will not activate.
For details of the minimum pot diameter that needs to be used on each zone, see the illustrated part of this manual.
2.2 Energy saving
Recommendations for best results:
- Use pots and pans with a bottom diameter equal to that of the cooking zone.
- Use only pots and pans with flat bottoms.
- Keep the lid on the pot whenever possible during cooking.
- Cook vegetables, potatoes, etc. with a minimal amount of water to reduce cooking time.
- Use a pressure cooker, as it further reduces the energy consumption and cooking
time.
- Center the pot within the cooking zone indicated on the hob.
CHOOSING THE RIGHT COOKWARE
Cookware for induction hobs
Cookware for induction cooking zones must be made of metal and have magnetic properties. The base must be sufficiently large.
Only use pots with a base suitable for induction.
This is how to establish the suitability of a pot:
| Suitable cookware | Unsuitable cookware |
| Enamelled steel pots with a thick base | Pots made of copper,stainless steel, aluminium, ovenproof glass, wood, ceramic and terracotta |
| Cast iron pots with an enamelled base | |
| Pots made of multi-layer stainless steel, rustproof fermite steel or aluminium with a special base |
Conduct the magnet test described below or make sure that the pot bears the symbol for suitability for cooking with induction current.
Never use pans with a misshapen base. A hollow or rounded base can interfere with the operation of the overheating protection, so that the appliance becomes damaged. This may lead to the glass top cracking and the pan base melting. Damage from the use of unsuitable pans or from boiling dry is excluded from the guarantee.

If the base of the cookware is only partially ferromagnetic, only the area that is ferromagnetic will heat up. This may mean that heat will not be distributed evenly. The non-ferromagnetic area may not heat up to a sufficient temperature for cooking.

The ferromagnetic area will also be reduced if the material from which the cookware is made contains aluminum, for example. This may mean that cookware will not become sufficiently hot or even that it will not be detected.

The material(s) from which the base of the cookware is made can affect the result. Using pots and pans made from materials that distribute heat evenly, such as stainless-steel pans with a three-layer base, saves time and energy. Use cookware with a flat base; if the base of the cookware is uneven, this may affect the heat supply.

Magnet test:
Move a magnet towards the base of your cookware. If it is attracted, you can use the cookware on the induction hob.

Note:
When using pans suitable for induction from certain manufacturers, noises may occur which are attributable to the design of these pans. Take care when using simmering pans as simmering water may dry up unnoticed, resulting in damage to the pot and to the hob for which no liability will be assumed.
Dimension of Cookware
To achieve a good cooking result, the ferromagnetic area on the base of the pan should match the size of the hotplate. If a hotplate does not detect an item of cookware, try placing it on another hotplate with a smaller diameter.
| Cooking zone | Minimum pan diameter |
| 160mm | 120mm |
| 180mm | 140mm |
Using the extractor fan
The extractor fan system can be used in two ways: as an external exhausting version or as a filtration version with internal re-circulation. The external exhausting version removes smoke, steam, and cooking odors to the outside, while the internal filtration re-circulation version filters these elements and circulates cleaned air back into the room.

Exhausting version
The fumes are expelled to the outside using a series of pipes (sold separately) attached to the included connecting pipe. The diameter of the exhaust pipes or adaptor must match the dimension of the included connecting pipe, which is 222 x 89 mm.
For more information on using the exhausting version, refer to the relevant page in the illustrated section of the manual. When connecting the product to wall-mounted exhaust pipes and holes, make sure the diameter matches the air outlet (connecting flange). Using pipes and holes with a smaller diameter may decrease the extractor's efficiency and increase noise levels. For best results, keep the duct as short as possible with a minimum number of curves (maximum angle: 90°) and avoid sudden
changes in duct diameter.
- Keep the duct as short as possible.
- Use ducting with the least possible number of curves (maximum angle: 90°).
- Avoid drastic changes in the ducting diameter.

Filtrating version
The internal filtration re-circulation version filters cooking fumes and releases clean air back into the kitchen. Instead of venting outside, this system recirculates air indoors after passing it through filters. It's handy when outdoor venting isn't possible. Specialized filters, like activated carbon filters (included in the accessory), trap grease and odors effectively. Regular maintenance, including filter replacement, is necessary for optimal performance. This method helps maintain clean indoor air and is energy-efficient, but it doesn't entirely remove pollutants from the home. Installation way and dimension requirements can refer to the user manual.
3. Installation
- Both the electrical and mechanical installation must be performed by qualified professionals. This electrical appliance is designed to be installed into a worktop with a thickness between 2 to 6 cm for a top installation, or 2.5 to 6 cm for a flush installation. When installing the hob, keep a minimum distance of 5 cm in front, 4 cm on the sides, and 50 cm from overhead wall units. Note: The recommended distances are provided as examples only. When planning your kitchen, follow the guidelines provided by the kitchen manufacturer.
3.1 Connecting to the electrical supply
To connect the hob to the electrical supply, proceed as follows:
- Remove the hob from its packaging and place it on a flat surface.
- Connect the power cable to the hob.
- Connect the other end of the power cable to the electrical supply.
- Make sure the electrical connection is secure and meets the local electrical regulations.
Disconnect the device from the electric power supply.
Installation must be carried out by professionally qualified personnel with knowledge of the regulations in force for installation and safety.
The manufacturer denies all liability to persons, animals or property if the guidelines provided in this chapter are not followed.
The power cable must be long enough to allow the hob to be removed from the worktop.
Make sure the electrical connection is secure and meets the local electrical regulations.
Do not use extension leads.
The earth power cable must be 2cm longer than the other cables.
- If the electrical appliance is not supplied with a power cable, use one with a minimum conductor diameter of 2.5 mm2 for power up to 7200 Watt; for higher power levels, the diameter must be 4 mm2.
- The temperature must not reach 50°C above room temperature anywhere along the cable.
- The appliance is intended for permanent connection to the power supply.
- Please note! Before reconnecting the circuit to the mains power supply, make sure that it is working correctly, always check that the power cable is correctly installed.
- Please note! The interconnection cable must be replaced by the authorized technical support service or by a person with similar qualifications.
Note: the product is equipped with a Power Limitator function, which allows a maximum power limit to be set. The limit must be set at the time of the product's connection to the electrical network or when the electrical network itself is reconnected (within the following 2 minutes).
3.3 Mounting
Before starting the installation:
- After unpacking the product, check that it has not been damaged during transport and in the event of problem, please contact the reseller or the Customer support service before installing it.
- Check that the product is the right size for the installation area.
- Check for accessories (e.g. bags containing screws, warranty certificates, etc.) inside the packaging (placed there for transport reasons). Remove and keep them safe, if present.
- Also check that there is a power socket near the installation area.
Preparing the cabinet for installation:
- The product cannot be installed above cooling appliances, dishwashers, heaters, ovens, washing machines and dryers.
- Create the cut-outs in the cabinet before inserting the hob and carefully remove any shavings or sawdust.
- To optimize the filter installation, it is advisable to cut a slot in the plinth to insert a grille (available on the market). IMPORTANT: use a single-component adhesive sealant (S), which withstands temperatures up to 250°; before installation, thoroughly clean the surfaces to stick and eliminate any substance that may compromise adhesion, (e.g. release agents, preservatives, fats, oil, dust, traces of old adhesives, etc.); the adhesive should be uniformly spread all around the outside of the frame; after sticking, leave the adhesive to dry for about 24 hours.
Caution! Failure to install screws and fasteners in accordance with these instructions may result in electrical hazards.
Note: to ensure the correct installation of the product, it is recommended to tape the pipes using an adhesive with the following characteristics:
- soft elastic PVC film, with an acrylic-based adhesive.
- compliant with DIN EN 60454 regulations.
- flame retardant.
- excellent resistance to wear.
- resistant to temperature fluctuations.
- can be used at low temperatures.
OPERATING THE HOB WITH THE SENSOR BUTTONS
1 ON/OFF 3 Timer display 5 Childlock 7 Power level display for HOB 9 Power level selection for HOB 11 Boost 13 Power level selection for HOOD
2 Timer setting 4 Timer selection 6 Keep warm function 8 Cooking zone selection 10 Pause 12 Power level display for HOC
PRODUCT SPECIFICATION![graph LR A["1200W(1500W)"] --> C["Processing Unit"] B["1800W(2200W)"] --> C C --> D["Output Line 1: 1200W(1500W)"] C --> E["Output Line 2: 1800W(2200W)"]](/content/2026/07/1413809/images/26ebadec121f6b3c6ee05115d7e6e384cb5ae818711a6adee6f711d451fedc86.jpg)
Using the Hood
1. STANDBY MODE:
After power on, the buzzer beeps once, all displays show "0" and the hood enters the state of standby mode.
If there is no operation within 30s, all display will turn off completely and the hood will automatically switch off. You can re-activate the hood at any time by touching any control panel.
2. POWER LEVEL SETTING:
The hood offers four power levels (level 1 to level 4), allowing users to adjust suction intensity according to their needs.
Press and hold the power selection key for 1 second to activate the hood. By default, it will start on level 1. You can select the power level by pressing the key and .
3. BOOST MODE:
Boost mode, activated by selecting the highest power level ("P"), provides intensified suction for rapid clearing of cooking fumes. It lasts for only 10 minutes to prevent excessive energy consumption and is designed to efficiently remove cooking odors and grease during intense cooking sessions.
Press and hold the key for one second after power level setting, the hood will get into the BOOST MODE (P) directly. Please note that the BOOST MODE can only last for 10min, after that it will go to level 4 automatically.
a) DELAYED SHUT-DOWN MODE:
After the hob stops operating, the hood continues to extract residual oil fumes.
Operates for up to 5 minutes to ensure thorough ventilation even after cooking has ceased. After 5 minutes, it will turn off automatically.
Helps maintain a clean and odor-free kitchen environment by removing lingering cooking smells and grease particles.
Press the key to turn off the hood (P→4→3→2→1→d→turn off). You can also press and hold the key for one second to get into delayed shutdown mode (d) directly.
During delayed shutdown mode, you can press to turn off the hood directly, or press to turn on the hood to level 1. And you can select the power level by pressing the key + and -.
4. AUTOMATIC MODE:
The hood adjusts its operation based on the induction hob's activity. When the hob is on, the hood activates to level 1. After the hob turns off, the hood switches to delayed shutdown mode automatically. This ensures continuous ventilation even after cooking is complete, effectively eliminating residual odors and grease from the kitchen environment.
Using the Hob
To start cooking
- After power on, the buzzer beeps once, all the indicators for HOB light up for 1 second then go out, indicating that the hob has entered the state of standby mode.
- Touch the ON/OFF switch. all the indicators show “-”

- Place a suitable pan on the cooking zone that you wish to use. Make sure the bottom of the pan and the surface of the cooking zone are clean and dry.

- Touch the heating zone selection control and an indicator next to the key will flash.

- Select a heat setting by touching the power level control.

- If you don't choose a heat setting within 1 minute, the Induction hob will automatically switch off.
- You will need to start again at step 1.
- You can modify the heat setting at any time during cooking.
When you have finished cooking
- Touch the heating zone selection that you wish to switch off.

- Turn the cooking zone off by touching the power level control. Make sure the display shows "0".

- Turn the whole hob off by touching the ON/OFF control.

- Beware of hot surfaces
"H" will show which means the cooking zone is too hot to touch. It will disappear when the surface has cooled down to a safe temperature. It can also be used as an energy saving function if you want to heat further pans, use the hotplate that is still hot.
H
Using Boost function
Activate the boost function
- Select the zone with boost function.
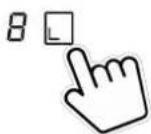
- Touching the booster key "BOOST", power level indication shows "P".

Cancel Boost function
- Select the zone with boost function.

- Touching the booster key "BOOST" or press the power level to cancel the Boost function, and select the level you want to set.

- Boost function can only last for 5 minutes, after that the zone will go to level 9 automatically.
Locking the Controls
- You can lock the controls to prevent unintended use (for example children accidentally turning the cooking zones on).
- When the controls are locked, all the controls except the ON/OFF control are disabled.
To lock the controls
Touch the childlock control. The timer indicator will show "Lo".
To unlock the controls
● Make sure the hob is turned on. - Touch and hold the childlock control for 3 seconds. - You can now start using your hob.
When the hob is in lock mode, all the controls are disabled except the ON/OFF, you can always turn the hob off with the ON/OFF control in an emergency, but you shall unlock the hob first in the next operation.
Residual Heat Warning
When the hob has been operating for some time, there will be some residual heat. The letter "H" appears to warn you to keep away from it.
Auto Shutdown
A safety feature of the hob is auto shutdown. This occurs whenever you forget to switch off a cooking zone. The default shutdown times are shown in the table below:
| Power level | 1 | 2 | 3 | 4 | 5 | 6 | 7 | 8 | 9 |
| Default working timer (hour) | 8 | 8 | 8 | 4 | 4 | 4 | 2 | 2 | 2 |
Using the Timer
You can use the timer in two different ways:
- You can use it as a minute minder. In this case, the timer will not turn any cooking zone off when the set time is up.
- You can use it as a cut-off timer to turn one or more cooking zones off after time is up.
- You can set the timer up to 99 minutes.
Using the Timer as a Minute Minder
- Make sure the cooktop is turned on. And zone selection key is not activated (zone indication '-' is not blinking).
Note: You can set minute minder before or after cooking zone power setting finished.

- Touch timer key, "30" will show in the timer display and blink. The default setting is 30 min.
- Set the time by touching the "+" or "-" control. (e.g., 5)
Short touch for adjusting 1 min and long touch for adjusting 10 min.

- When the time is set, it will begin to count down immediately. The display will show the remaining time.
- The buzzer will beep for 20 seconds and the timer indicator shows "- -" when the set time has finished.
Using the timer to switch off one or more cooking zones
Touch the heating zone selection control for the zone you want to set the timer for.

Touch the timer key; "30" will show in the timer display and blink. The default setting is 30 minutes.
Set the time by touching the "+" or "-" control (e.g., 5). A short touch adjusts by 1 minute, and a long touch adjusts by 10 minutes.

When the time is set, it will begin counting down immediately. The display will show the remaining time.
Note: There will be a red dot in the bottom right corner of the power level indication, indicating that the zone is selected.
When the cooking timer expires, the corresponding cooking zone will switch off automatically.
Note: Other cooking zones will keep operating if they were turned on previously.
If the timer is set on more than one zone:
When you set the timer for several cooking zones, red dots of the relevant cooking zones are indicated. The timer display shows the minimum timer. The dot of the corresponding zone blinks.

Once the countdown timer expires, the corresponding zone will switch off. Then it will show the new minimum timer, and the dot of the corresponding zone will flash.

Note: Touch the heating zone selection control, and the corresponding timer will be shown in the timer indicator.
Cancel the timer
Touch the heating zone selection control for the zone you want to cancel the timer for.

- Touching the timer control, the indicator will flash.
- Touching the “-” control to set the timer to “00”, the timer is cancelled.

Power settings
The heating power of the cooking zones can be set at various power levels. In the chart you will find examples of how to use each setting.
| Cooking level: | Suitable for: |
| 1 | Keeping food warm. Simmering small quantity (lowest power setting). |
| 2 | Simmering. |
| 3-4 | Simmering larger quantities or roasting larger pieces of meat ur they are cooked through. |
| 5-6 | getting juices. |
| 7-8 | Roasting, getting juices. |
| 9 | Roasting. |
| P | Roasting (highest power output). |
Power management
This hob can be connected to a 13, 20, 25, 32 Amp supply and configured to work on any of these power settings.
The hob is preset to be connected to a 32Amp supply; When four zones are selected at the same time the hob will limit the maximum power consumed so that the 7.0kW power supply cannot be exceeded. In a similar way, when the hob is connected and configured to a 13/20/25Amp supply mode, the hob will limit the maximum power at 2.5/3.5/4.5/7.0kW.
If, however, the hob is connected and configured to a 32Amp power supply, all four zones can be used on the maximum setting with boost at the same time.
To change the Power management setting
- Cut off the power supply to the hob.
- Leave the power supply cut off for one minutes.
- Switch on the power supply again.
- Follow the instructions under "To configure the hob into ECO Mode" from step "1" onward.
NOTE: The ECO Mode Configuration can be entered only once if the power supply of the method cut off.
(Note: The ECO mode should be set within one minute after the power is turned on, otherwise the ECO mode setting cannot be entered after more than one minute)
To configure the hob into Power management
- Touch ON/OFF key to switch on the power supply. The buzzer beeps once, all displays show “-” and “-”

- Touch front left zone key and rear left zone key simultaneously for 3 seconds. The buzzer beeps indicating that the induction hob enters selection of ECO Mode. (Display shows the preset power 7.0kW)

- Touch timer key, then timer display will flash. You can select the power setting now.

- To change the total power setting, press the front left area key to select a new total power setting. Pressing the front left area key again will cycle through the options. The timer display will show four options: 25, 35, 45, and 70. For example, when the timer display shows the number "25," it indicates that the total power is set to 2500W. Keep pressing the front left area key until you find the desired power setting.

* By default, the power setting is factory set to 7.0kW.
- Touch timer key again, the timer display stop flashing and the previously selected zone key will show "o" indicating that the setting is confirmed.

- Touch the ON/OFF to switch off. Then switch on and the hob is configured ready to use at the ECO Mode you set for.

- Touch the ON/OFF to switch on, now you can use the new power
CLEANING AND CARE
Before cleaning, switch off the hob and let it cool down.
Do not use steam cleaners or high-pressure cleaners to clean the cooking this may result in an electric shock.
When cleaning make sure that you only wipe lightly over the on/off sense, hob may otherwise be accidentally switched on!
Glass ceramic hob
Important! Never use aggressive cleaning agents such as rough scouring a abrasive saucepan cleaners, rust and stain removers etc.
Cleaning after use
Always clean the entire hob when it has become soiled. It is recommended that you do so every time the hob is used. Use a damp cloth and a little washing-up liquid. Then dry the hob with a clean dry cloth to ensure that no residue is left on the surface of the hob.
Weekly cleaning
Clean the entire hob thoroughly once a week with commercial glass ceramic cleaning agents. Please follow the manufacturer's instructions carefully. When applied, the cleaning agent will coat the hob in a protective film which is resistant to water and dirt. All dirt remains on the film and can be removed easily. Then rub the hob with a clean cloth. Make sure that no cleaning agent remains on the surface, since this will react aggressively when the hob is heated up and will change the surface.
Specific soiling: Heavy soiling and stains (limescale and shiny, mother-of-pearl stains) can best be removed when the hob is still slightly warm. Use commercial cleaning agents to clean the hob. Proceed as outlined under Item 2. First remove soil which has boiled over with a wet cloth, and then remove remaining soiling with a special glass scraper for glass ceramic hobs. Then clean the hob again as described under Item 2.

Burnt sugar and melted plastic must be removed immediately, while they are still hot, with a glass scraper. Then clean the hob again as described under Item 2.
Grains of sand which may get onto the hob when you peel potatoes or clean lettuce may scratch the surface of the hob when you move pots around. Make sure that no grains of sand are left on the hob.
Changes in the colour of the hob will not affect the function and the stability of the glass ceramic material. These colour changes are not changes in the material but food residues which were not removed and which have burnt into the surface.
Shiny spots result when the base of the cookware rubs on the surface of the hob, particularly when cookware with an aluminium base or unsuitable cleaning agents are used. They are difficult to remove with standard cleaning agents. You may need to repeat the cleaning process several times. In time, the decoration will wear off and dark stains will appear as a result of using aggressive cleaning agents and faulty pan bottoms.
In case a large amount of liquid is accidentally poured into the machine, take off the silicone plug on the bottom case to release the liquid.

WHAT TO DO IF TROUBLE OCCURS
In case of any errors during operation, please check the following table before calling for service. Below are some common errors and the checks to perform.
| Problem | Possible causes | What to do |
| Thecooktopcannot be turned on. | No power. | Make sure the cooktop is connected to the power supply and that it is switched on.Check whether there is a power outage in your home or area. If you've checked everything and problem persists, call a qualified technician. |
| Thetouch controls are unresponsive. | The controls are locked. | Unlock the controls. See section‘OPERATING THE HOB WITH THE SENSOR BUTTON for instructions. |
| Thetouch controls are difficult to operate. | There may be a slight film of water over the controls or you may be using the tip of your finger when touching the controls. | Make sure the touch control area is dry and use ball of your finger when touching the controls. |
| Theglass is being scratched. | Rough-edged cookware.Unsuitable, abrasive scourer or cleaning products being used. | Use cookware with flat and smooth bases. See ‘Choosing the right cookware’.See ‘Care and cleaning’. |
| Somepans make crackling or clicking noises. | This may be caused by the construction of your cookware (layers of different metals vibrating differently). | This is normal forcookware and does not indicate a fault. |
| Theinduction hob makes a low humming noise when used on a high heat settin | This is caused by the technolo of induction cooking. | This is normal, but the noise should quieten dow or disappear completely when you decrease the heat setting. |
| Fannoise comingfromthe induction hob. | A cooling fan built into your induction hob has come on to prevent the electronics from overheating. It may continue to run even after you've turned the induction hob off. | This is normal and needs no action. Do not swit the power to the induction hob off at the wall the fan is running. |
| Pans do not become hot andappears in the display. | The induction hob cannot detect the pan because it is n suitable for induction cooking.The induction hob cannot detect the pan because it is to small for the cooking zone or not properly centered on it. | Use cookware suitable for induction cooking. See section ‘Choosing the right cookware’.Centre the pan and make sure that its base mat the size of the cooking zone. |
| The induction hob or a cooking zone has turned itself off unexpectedly, a tone sounds and an error code is displayed (typically alternating with one or two digits in the cooking timer display). | Technicalfault. | Please note down the error letters and numbers, switch the power to the induction hob off at the wall, and contact a qualified technician. |
| After connectingthe power and pressing the “power” key, there is no response from the appliance. | Is there a power supply failure | Wait for the power supply to be resumed |
| Is the fuse blown or circuit breaker tripped? | Check the root causes carefully. If the problem cannot be fixed, please contact our Service Centr for inspection and repair. | |
| Is the plug connected firmly? | ||
| Heating is interrupted duringnormal use anda “Beep” is heard. | Incompatible cookware or no cookware used? | Replace cookware; use cookware suitable for the induction cooker. |
| The cookware is not placed or the center of the heating zone | Place the cookware on the center of the indicate heating zone. | |
| Is the cookware being heated but it is continually being removed? | Place the cookware inside the heating zone. | |
| Nooperation duringthe heating being in use | Is the cookware empty or the temperature too high? | Please check whether the appliance is being misused |
| Is the air intake/exhaust vent cloggedorhas dirt accumulated on it? | Unclog the air intake/exhaust vent. Wait for the appliance to cool down, then switch it on again. | |
| Is the cooker working over 2 hours without any interaction? | Reset cooking modes or use the timer function |
If the above remedies/controls cannot fix the problem, unplug the appliance immediately, and contact the Service Centre for inspection and repair. Note the error code and report it to the Service Centre Ltd. To avoid any danger and damage to the appliance, do not disassemble or repair it by yourself.
FAILURE DISPLAY AND INSPECTION
| Error code | Possible cause | What to do |
| U | No pan | Please put suitable pot on the heating zone. If it is st unworkable, please contact the service center. |
| E1 | Abnormal supply voltage( lower than 160V). | Please inspect whether power supply is normal. Power after the power supply is normal. |
| E2 | Abnormal supply voltage( higher than 280V). | Please inspect whether power supply is normal. Power after the power supply is normal. |
| E3/E5/E7 | Induction coil temperature sensor failure | Please contact the service center. |
| E4/E6 | IGBT temperature sensor failure | Please contact the service center. |
| Er | Communication between main boardand display board failure | Please contact the service center. |
| Et | Overflow protection | Please clean the water on the control panel and turn the hob again. |
LIST OF ACCESSORIES
| No. | Name | Diagram | Qty |
| 1 | ST 4x5 Screw |  | 4 pcs |
| 2 | ST 4x14 Screw |  | 2 pcs |
| 3 | Installation bracket |  | 4 pcs |
| 4 | Sponge bar |  | 1 pcs |
| 5 | Air intake grid |  | 1 pcs |
| 6 | 9cm Square pipe |  | 2 pcs |
| 7 | 6cm Square pipe | [SASA] | 1 pcs(only for filtratingversion) |
| 8 | Connection pipe |  | 1 pcs |
| 9 | Bent pipe |  | 2 pcs for filtrating version1 pcs for exhausting version |
| 10 | Air outlet ASSY |  | 1 pcs(only for filtrating version) |
| 11 | Aluminium sticker |  | 5 pcs |
| 12 | Carbon filter(for filtration version only) |  | 1 pcs |
PRODUCT INSTALLATION
| Step 1:Screw the installation brackets on the bottom case. | Step 2:Stick the sponge bar around the ceramic glass. |
 | 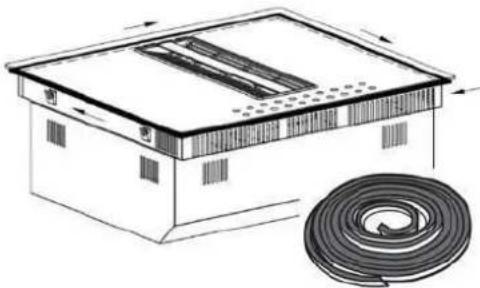 |
Step 3:Fix the bent pipe. | Step 4:Install the product into the cabinet.(from step a to step b) |
| Step 5:If the cabinet height is less than 80cm, we cut the pipe to desired length. | Step 6:If the cabinet height is more than 80cm, can use two pipes with a connection. |
 |  |
| Step 7:Install the pipe and stick with sealing stri | Step 8:Install the air outlet ASSY at the bottom cabinet, fix the screwing. |
 |  |
| Step 9:Install the carton filter in the air outlet A:(*carbon filter for filtration version only) | Step 10:Install the grid. |
 |  |
DIMENSION OF INSTALLATION

| Model | L(mm) | W(mm) | H(mm) | A(mm) | B(mm) | C(mm) | D(mm) | F(mm) | G(mm) |
| CIH6I4CF | 590 | 520 | 245 | 560 | 490 | ≥ 40 | ≥ 70 | ≥ 40 | 20-40 |
| CIH6I4CE |
Cabinet and Flue Pipe Size
Filtration Version Exhausting Version
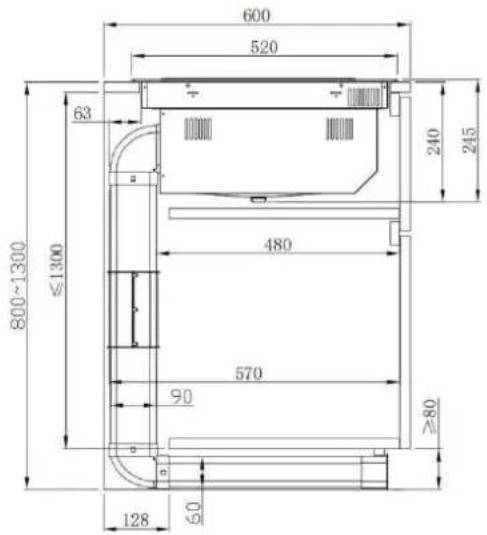

ELECTRICAL CONNECTION

This hob must be connected to the mains power supply only by a suitably qualified person.
Before connecting the hob to the mains power supply, check that:
- the domestic wiring system is suitable for the power drawn by the hob.
- the voltage corresponds to the value given in the rating plate
- the power supply cable sections can withstand the load specified on the rating plate.
To connect the hob to the mains power supply, do not use adapters, reducers, or branching devices, as they can cause overheating and fire.
The power supply cable must not touch any hot parts and must be positioned so that its temperature will not exceed 75°C at any point.

Check with an electrician whether the domestic wiring system is suitable without alterations. Any alterations must only be made by a qualified electrician.
The power supply should be connected in compliance with the relevant standard. The method of connection is shown below.

- If the cable is damaged or to be replaced, the operation must be carried out by the after-sales agent with dedicated tools to avoid any accidents.
- If the appliance is being connected directly to the main supply, an Omani polar circuit-breaker must be installed with a minimum opening of 3mm between contacts.
- The installer must ensure that the correct electrical connection has been made and that it is compliant with safety regulations.
- The cable must not be bent or compressed.
- The cable must be checked regularly and replaced by authorized technicians only.
Special Declaration
The contents of this manual have been carefully checked. However, the company cannot be held responsible for any misprints or omissions. Also, any technical modifications may be included in a revised version of the manual without notice. The appearance and colour of the appliance in this manual may differ from the actual one.
This appliance is labelled in accordance with European Directive 2012/19/EU regarding electric and electronic appliances (WEEE).
The WEEE contain both polluting substances (that can have a negative effect on the environment) and base elements (that can be reused). It is important that the WEEE undergo specific treatments to correctly remove and dispose of the pollutants and recover all the materials. Individuals can play an important role in ensuring that the WEEE do not become an environmental problem; it is essential to follow a few basic rules:
- The WEEE should not be treated as domestic waste;
- The WEEE should be taken to dedicated collection areas managed by the town council or a registered company.
In many countries, domestic collections may be available for large WEEEs. When you buy a new appliance, the old one can be returned to the vendor who must accept it free of charge as one-off, as long as the appliance is of an equivalent type and has the same functions as the purchased appliance.

Valid only for Cyprus
CONTENTS
USER MANUAL....2
OPERATING THE HOB WITH THE SENSOR BUTTONS.... 19
Power management 26
CLEANING AND MAINTENANCE 28
WHAT TO DO IF PROBLEMS ARISE.... 30
ERROR DISPLAY AND INSPECTION 31
LIST OF ACCESSORIES 32
PRODUCT INSTALLATION.... 33
ELECTRICAL CONNECTION 36
USER MANUAL
Magnet test:
WHAT TO DO IF PROBLEMS ARISE
| Model | L (mm) | B (mm) | H (mm) | A (mm) | B (mm) | C (mm) | D (mm) | F (mm) | G (mm) |
| CIH614CF | 590 | 520 | 245 | 560 | 490 | ≥ 40 | ≥ 70 | ≥ 40 | 20-40 |
| CIH614CE |
Magnet test:
Using the hood
1. STANDBY MODE:
WHAT TO DO IN CASE OF PROBLEMS
| Modelo | L (mm) | A(mm) | H (mm) | A (mm) | B (mm) | C (mm) | D (mm) | F (mm) | G (mm) |
| CIH614CF | 590 | 520 | 245 | 560 | 490 | ≥40 | ≥70 | ≥40 | 20-40 |
| CIH614CE |
Magnet test:
WHAT TO DO IF PROBLEMS OCCUR
| Malli | L (mm) | W (mm) | H (mm) | A (mm) | B (mm) | C (mm) | D (mm) | F (mm) | G (mm) |
| CIH614CF | 590 | 520 | 245 | 560 | 490 | ≥40 | ≥70 | ≥40 | 20–40 |
| CIH614CE |
INSTRUCTION MANUAL 2
USING THE COOKTOP WITH TOUCH CONTROLS ..... 19
PRODUCT INSTALLATION 33
ELECTRICAL CONNECTION.... 36
INSTRUCTION MANUAL
Magnet test:
PRODUCT FEATURES
![graph LR A["1200 W (1500 W)"] --> C["Central Chamber"] B["1800 W (2200 W)"] --> C C --> D["1200 W (1500 W)"] C --> E["1800 W (2200 W)"]](/content/2026/07/1413809/images/d9d329ee0cad36f4992311b25732a61840972d15a7251fb4457063a41f899c13.jpg)
IN CASE OF PROBLEMS
PRODUCT INSTALLATION
| Modèle | L (mm) | W (mm) | H (mm) | A (mm) | B (mm) | C (mm) | D (mm) | F (mm) | G (mm) |
| CIH614CF | 590 | 520 | 245 | 560 | 490 | ≥ 40 | ≥ 70 | ≥ 40 | 20-40 |
| CIH614CE |
HOW TO PROCEED IN CASE OF PROBLEMS
| Modello | L (mm) | W (mm) | H (mm) | A (mm) | B (mm) | C (mm) | D (mm) | F (mm) | G (mm) |
| CIH614CF | 590 | 520 | 245 | 560 | 490 | ≥ 40 | ≥ 70 | ≥ 40 | 20 - 40 |
| CIH614CE |
Magnet test:
WHAT TO DO IF PROBLEMS OCCUR
| Modell | L (mm) | B (mm) | H (mm) | A (mm) | B (mm) | C (mm) | D (mm) | F (mm) | G (mm) |
| CIH614CF | 590 | 520 | 245 | 560 | 490 | ≥ 40 | ≥ 70 | ≥ 40 | 20-40 |
| CIH614CE |
INSTRUCTION MANUAL...... 2
OPERATE THE BOARD WITH THE SENSOR BUTTONS 19
INSTRUCTION MANUAL
Magnet test:
WHAT TO DO IF PROBLEMS OCCUR
| Modelo | L (mm) | W (mm) | H (mm) | A (mm) | B (mm) | C (mm) | D (mm) | F (mm) | G (mm) |
| CIH614CF | 590 | 520 | 245 | 560 | 490 | ≥40 | ≥70 | ≥40 | 20-40 |
| CIH614CE |
Magnet test:
INSTALLATION DIMENSIONS

| Modell | L (mm) | B (mm) | H (mm) | A (mm) | B (mm) | C (mm) | D (mm) | F (mm) | G (mm) |
| CIH614CF | 590 | 520 | 245 | 560 | 490 | ≥40 | ≥70 | ≥40 | 20-40 |
| CIH614CE |
- CONTENTS
- INSTRUCTION MANUAL
- WARNINGS
- IMPORTANT
- PLEASE NOTE
- HELP PREVENT POTENTIAL NEGATIVE IMPACTS ON THE ENVIRONMENT AND HUMAN HEALTH
- USE
- USING THE HOB
- ADVANTAGES
- COOKING CONTAINERS
- ONLY USE POTS MARKED WITH THE SYMBOL
- PREEXISTING CONTAINERS
- RECOMMENDED PAN BOTTOM DIAMETERS
- ENERGY SAVING
- CHOOSING THE RIGHT COOKWARE
- COOKWARE FOR INDUCTION HOBS
- MAGNET TEST
- NOTE
- DIMENSION OF COOKWARE
- USING THE EXTRACTOR FAN
- EXHAUSTING VERSION
- FILTRATING VERSION
- INSTALLATION
- CONNECTING TO THE ELECTRICAL SUPPLY
- MOUNTING
- USING THE HOOD
- STANDBY MODE
- POWER LEVEL SETTING
- BOOST MODE
- DELAYED SHUT-DOWN MODE
- AUTOMATIC MODE
- TO START COOKING
- WHEN YOU HAVE FINISHED COOKING
- USING BOOST FUNCTION
- ACTIVATE THE BOOST FUNCTION
- CANCEL BOOST FUNCTION
- LOCKING THE CONTROLS
- TO LOCK THE CONTROLS
- TO UNLOCK THE CONTROLS
- RESIDUAL HEAT WARNING
- AUTO SHUTDOWN
- USING THE TIMER
- USING THE TIMER AS A MINUTE MINDER
- USING THE TIMER TO SWITCH OFF ONE OR MORE COOKING ZONES
- IF THE TIMER IS SET ON MORE THAN ONE ZONE
- CANCEL THE TIMER
- POWER SETTINGS
- POWER MANAGEMENT
- TO CHANGE THE POWER MANAGEMENT SETTING
- TO CONFIGURE THE HOB INTO POWER MANAGEMENT
- CLEANING AND CARE
- GLASS CERAMIC HOB
- CLEANING AFTER USE
- WEEKLY CLEANING
- WHAT TO DO IF TROUBLE OCCURS
- PRODUCT INSTALLATION
- DIMENSION OF INSTALLATION
- CABINET AND FLUE PIPE SIZE
- ELECTRICAL CONNECTION
- SPECIAL DECLARATION
- USER MANUAL
- WHAT TO DO IF PROBLEMS ARISE
- WHAT TO DO IN CASE OF PROBLEMS
- WHAT TO DO IF PROBLEMS OCCUR
- PRODUCT FEATURES
- IN CASE OF PROBLEMS
- HOW TO PROCEED IN CASE OF PROBLEMS
- INSTALLATION DIMENSIONS
Brand : CANDY
Model : CIH614CF
Category : Cooker