
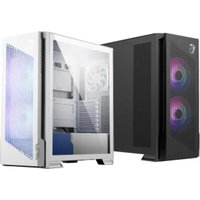
MAG FORGE 321R AIRFLOW - Desktop Computer MSI - Free user manual and instructions
Find the device manual for free MAG FORGE 321R AIRFLOW MSI in PDF.


| Product Type | Desktop Computer Case |
| Brand | MSI |
| Model | MAG FORGE 321R AIRFLOW |
| Form Factor | Mid Tower |
| Motherboard Support | ATX, Micro-ATX, Mini-ITX |
| Dimensions (H x W x D) | 485 mm x 220 mm x 460 mm |
| Weight | 7.5 kg |
| Material | Steel, Tempered Glass, ABS |
| Side Panel | Tempered Glass |
| Cooling System (Included Fans) | 2 x 120mm Front, 1 x 120mm Rear |
| Front I/O Ports | USB 3.2 Gen 1 Type-C, USB 3.2 Gen 1 Type-A, Audio Jacks |
| Expansion Slots | 7 |
| Drive Bays | 2 x 3.5", 2 x 2.5" |
| Max GPU Length | 340 mm |
| Max CPU Cooler Height | 165 mm |
| PSU Support | Bottom mount, ATX |
| Dust Filters | Front, Top, Bottom |
| Color | Black |
| Warranty | 2 years |
Frequently Asked Questions - MAG FORGE 321R AIRFLOW MSI
User questions about MAG FORGE 321R AIRFLOW MSI
0 question about this device. Answer the ones you know or ask your own.
Ask a new question about this device
Download the instructions for your Desktop Computer in PDF format for free! Find your manual MAG FORGE 321R AIRFLOW - MSI and take your electronic device back in hand. On this page are published all the documents necessary for the use of your device. MAG FORGE 321R AIRFLOW by MSI.
USER MANUAL MAG FORGE 321R AIRFLOW MSI
MAG Series
PC Case
MAG FORGE 320R AIRFLOW
MAG FORGE 321R AIRFLOW
MAG FORGE 120A AIRFLOW
MAG FORGE 121A AIRFLOW
User Guide
Contents
Specifications....3
Accessories 5
Case Features (320R/ 321R) ....6
Case Features (120A) 7
Case Features (121A) 8
Side and Front View....9
I/O and Buttons (320R)....10
I/O and Buttons (321R)....11
I/O and Buttons (120A / 121A)....12
Side Panel Removal....13
Front Bezel Removal....14
Motherboard Installation ....15
Graphics Card Installation....16
SSD & HDD Installation (320R/ 321R) ....17
SSD & HDD Installation (120A / 121A) ....18
PSU Installation....19
Top Panel I/O Connection ....20
Control Board Connection (320R) 21
Control Board Connection (321R) 23
Control Board Connection (120A / 121A) 25
General Information 26
Specifications
Comparison of Key Differences
| Product Name | MAG FORGE320R/ 321RAIRFLOW | MAG FORGE 120AAIRFLOW | MAG FORGE 121AAIRFLOW |
| Dimensions (DxWxH) | 472.5 x 210 x 498mm | 411.6 x 210 x 498mm | 411.6 x 210 x 498mm |
| Top Radiator Support | 120 / 140 / 240 /280 / 360 mm | 120 / 240 mm 120 / | 240 mm |
| Pre-installed Fan | Top: NoFront: 3 x 120mmARGB fansRear: 1 x 120mmARGB fan | Top: 2 x 120mmAuto-RGB fansFront: 3 x 120mmAuto-RGB fansRear: 1 x 120mmAuto-RGB fan | Front: 3 x 120mmAuto-RGB fansRear: 1 x 120mmAuto-RGB fan |
| Side Fans Support 2 x 120mm No No | |||
| Maximum GPU Length | 390mm(Pre-installedfront fan) | 330mm(Pre-installedfront fan) | 330mm(Pre-installedfront fan) |
| Drive Bays | 1 x 2.5” SSD2 x Combo3.5” /2.5” | 3 x 2.5” SSD2 x 3.5” HDD | 3 x 2.5” SSD2 x 3.5” HDD |
| LED Controller | LED controllerwith Mystic LightSync | LED controller(Standalone) | LED controller(Standalone) |
Basic Information
| Case Type Mid Tower | |
| Supported Motherboard Sizes ATX, Micro-ATX, Mini-ITX | |
Cooling Fan Support
| Top 3 x 120mm or 2 x 140mm | |
| Front 3 x 120mm or 2 x 140mm | |
| Rear 1 x 120mm | |
| PSU Shroud 2 x 120mm |
Expansion Slots
PCIe Slots 7 slots
I/O Ports and Buttons
| USB Ports | 2 x USB 3.2 Gen1 Type-A1 x USB 3.2 Gen2 Type-C (321R) |
| Audio Ports | 1 x Audio jack (120A / 121A / 320R)1 x Micphone jack (120A / 121A / 320R)1 x Audio/Micphone Combo Jack (321R) |
| Buttons | 1 x Reset button (120A / 121A)1 x Power button1 x LED switch button (120A / 121A / 320R) |
Chassis Clearances
| Maximum CPU Cooler Height 160mm | |
| Front Radiator Support 120 / 140 / 240 mm | |
| PSU Support | 160mm (with 3.5” HDD tray)200mm (without 3.5” HDD tray) |
Materials
| Metal Specification SPCC 0.5 | |
| Front Bezel Material Mesh + Plastic | |
| Left Side Panel 4mm tempered glass | |
| Dust Filter | Top: Magnetic filterSide: Magnetic filterBottom: Plastic filter |
Accessories
Item Name / Q'ty Used for
 | Cable ties x5 | Cable management |
 | Screw #6-32 10mm x2 | Securing drive tray |
 | Stand-off #6-32 6.5mm x4 | Motherboard Stud |
 | Screw M3 5mm x20 | Motherboard / SSD |
 | Screw #6-32 6mm x6 | Securing PSU / PCIe Card |
 | Screw #6-32 5mm x4 | 3.5” HDD |
 | PCIe slot cover x2 | PCIe slot protection |
 | 1 to 4 fan splitter cable x1 (For 320R only) | Connecting 4 fans |
Case Features (320R/ 321R)
Case Features (120A)
Case Features (121A)
Side and Front View
320R/ 321R
120A / 121A

I/O and Buttons (320R)

| Item Description | |
| 1 USB 3.2 Gen 1 5Gbps Type-A port | |
| 2 Microphone jack | |
| 3 Audio jack | |
| 4 LED switch button | |
| 5 Power button |
I/O and Buttons (321R)

| Item Description | |
| 1 USB 3.2 Gen 2 10Gbps Type-C port | |
| 2 USB 3.2 Gen 1 5Gbps Type-A port | |
| 3 Audio/Micphone Combo Jack | |
| 4 LED switch button | |
| 5 Power button |
I/O and Buttons (120A / 121A)

| Item Description | |
| 1 LED switch button | |
| 2 USB 3.2 Gen 1 5Gbps Type-A port | |
| 3 Microphone jack | |
| 4 Audio jack | |
| 5 Reset button | |
| 6 Power button |
Side Panel Removal

Front Bezel Removal

Motherboard Installation

Graphics Card Installation

SSD & HDD Installation (320R/ 321R)

SSD & HDD Installation (120A / 121A)

PSU Installation

Top Panel I/O Connection

Control Board Connection (320R)

Addressable RGB LED Strip Connection

Addressable RGB LED Fan Connection


- Please always turn off the power supply and unplug the power cord from the power outlet before installing or removing the ARGB LED Strip.
- Please ensure all cables are securely connected before powering on.
- This LED Hub can support up to 10 MSI devices or 6 non-MSI devices. • Each port can support a maximum of 64 ARGB LEDs, with a total of no more than 128 LEDs.
- Exceeding these limits may cause ARGB LEDs to display abnormal colors, flicker, or be unable to change colors.
LED Switch Button Function (320R)
- Single press to toggle between LED effects.
- Long press for three seconds to sync with the motherboard.
LED Effect Sequence (320R)
After pressing the LED Switch button, the LED effect sequence is as follows:
| 1 Solid red |
| 2 Solid green |
| 3 Solid blue |
| 4 Solid purple |
| 5 Solid cyan |
| 6 Solid yellow |
| 7 Solid white |
| 8 Rainbow color cycling |
| 9 Color running effect |
| 10 Gradient color transition effect |
| 11 Rainbow color breathing |
| 12 Color breathing |
| 13 Rainbow flashing |
| 14 Color flashing |
Control Board Connection (321R)

Addressable RGB LED Strip Connection
Addressable RGB LED Fan Connection

- Please always turn off the power supply and unplug the power cord from the power outlet before installing or removing the ARGB LED Strip.
- Please ensure all cables are securely connected before powering on.
- This LED Hub can support up to 10 MSI devices or 6 non-MSI devices. • Each port can support a maximum of 64 ARGB LEDs, with a total of no more than 128 LEDs.
- Exceeding these limits may cause ARGB LEDs to display abnormal colors, flicker, or be unable to change colors.
LED Switch Button Function (321R)
- Single press to toggle between LED effects.
- Long press for three seconds to sync with the motherboard.
LED Effect Sequence (321R)
After pressing the LED Switch button, the LED effect sequence is as follows:
| 1 Solid red |
| 2 Solid green |
| 3 Solid blue |
| 4 Solid purple |
| 5 Solid cyan |
| 6 Solid yellow |
| 7 Solid white |
| 8 Rainbow running |
| 9 Single-Color running |
| 10 Gradient running |
| 11 Rainbow color breathing |
| 12 Single-Color breathing |
| 13 Rainbow flashing |
| 14 Single-Color flashing |
Control Board Connection (120A / 121A)

IMPORTANT
- The control board’s fan header is a special specification and is not compatible with standard ARGB and RGB fans.
- Please always turn off the power supply and unplug the power cord from the power outlet before installing or removing the Auto-RGB fan.
- Please ensure all cables are securely connected before powering on.
LED Switch Button Function (120A / 121A)
- Single press for RGB rainbow effect.
- Press again to turn off LED lighting.
General Information
Copyright and Trademarks Notice
Copyright © Micro-Star Int'l Co., Ltd. All rights reserved.
The MSI logo used is a registered trademark of Micro-Star Int’l Co., Ltd. All other marks and names mentioned may be trademarks of their respective owners. No warranty as to accuracy or completeness is expressed or implied. MSI reserves the right to make changes to this document without prior notice.
All text, images, illustrations, and other content in this manual are the property of MSI. No part of this manual may be reproduced, distributed, or used in any form without the written permission of MSI.
Revision History
• Version 1.0, 2023/08, First release. • Version 1.1, 2024/05, Modifying the note for the ARGB LED Hub. • Version 1.2, 2024/10, Add 121A. • Version 1.3, 2024/12, Add 321R.

- MAG SERIES
- PC CASE
- CONTENTS
- SPECIFICATIONS
- EXPANSION SLOTS
- I/O PORTS AND BUTTONS
- CHASSIS CLEARANCES
- MATERIALS
- ACCESSORIES
- SIDE AND FRONT VIEW
- I/O AND BUTTONS (320R)
- I/O AND BUTTONS (321R)
- I/O AND BUTTONS (120A / 121A)
- SIDE PANEL REMOVAL
- FRONT BEZEL REMOVAL
- MOTHERBOARD INSTALLATION
- GRAPHICS CARD INSTALLATION
- SSD & HDD INSTALLATION (320R/ 321R)
- SSD & HDD INSTALLATION (120A / 121A)
- PSU INSTALLATION
- CONTROL BOARD CONNECTION (320R)
- ADDRESSABLE RGB LED STRIP CONNECTION
- ADDRESSABLE RGB LED FAN CONNECTION
- LED SWITCH BUTTON FUNCTION (320R)
- LED EFFECT SEQUENCE (320R)
- CONTROL BOARD CONNECTION (321R)
- LED SWITCH BUTTON FUNCTION (321R)
- LED EFFECT SEQUENCE (321R)
- CONTROL BOARD CONNECTION (120A / 121A)
- IMPORTANT
- LED SWITCH BUTTON FUNCTION (120A / 121A)
- GENERAL INFORMATION
- COPYRIGHT AND TRADEMARKS NOTICE
- REVISION HISTORY
Brand : MSI
Model : MAG FORGE 321R AIRFLOW
Category : Desktop Computer