
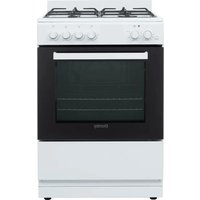
DER24V1B - Cooker DANBY - Free user manual and instructions
Find the device manual for free DER24V1B DANBY in PDF.
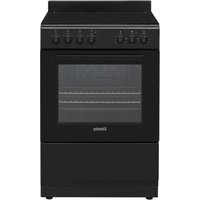


| Product Type | Electric Cooker / Range |
| Brand | Danby |
| Model | DER24V1B |
| Width | 24 inches (61 cm) |
| Depth | 25.5 inches (65 cm) |
| Height (to cooktop) | 36 inches (91 cm) |
| Weight | Approximately 120 lbs (54 kg) |
| Power Supply | 240 V / 60 Hz / 40 A |
| Cooktop Type | Electric coil burners |
| Number of Burners | 4 |
| Oven Type | Electric conventional oven |
| Oven Capacity | 4.2 cu. ft. (119 L) |
| Oven Features | Bake, broil, and keep warm |
| Cleaning | Manual clean with removable oven door |
| Safety Features | Auto shut-off, child lock, anti-tip bracket |
| Energy Source | Electric |
| Spare Parts Availability | Contact Danby customer service or authorized dealers |
| Warranty | 1 year limited parts and labor |
Frequently Asked Questions - DER24V1B DANBY
User questions about DER24V1B DANBY
0 question about this device. Answer the ones you know or ask your own.
Ask a new question about this device
Download the instructions for your Cooker in PDF format for free! Find your manual DER24V1B - DANBY and take your electronic device back in hand. On this page are published all the documents necessary for the use of your device. DER24V1B by DANBY.
USER MANUAL DER24V1B DANBY
OWNER'S MANUAL
24" ELECTRIC RANGE
Owner's Manual....1 - 22
24" ELECTRIC RANGE
Danby Products Limited, Guelph, Ontario, Canada N1H 6Z9
Danby Products Inc. Findlay, Ohio, U.S.A. 45840
www.danby.com
Welcome to the Danby family.
We are proud of our quality products and we believe in dependable service. We suggest that you read this owner's manual before plugging in your new appliance as it contains important operation information, safety information, troubleshooting, and maintenance tips to ensure the reliability and longevity of your appliance.
You are entitled to the warranty coverage as described in the owner's manual provided with your new appliance.
- Please write down your appliance information below. You must keep the original proof of purchase receipt to validate and receive warranty services.
- Register your product online and receive a FREE 2 MONTH WARRANTY EXTENSION after filling out a product survey, at www.danby.com/support/product-registration/
Model Number:
Serial Number:
Date of Purchase:
Need Help?
- Read your Owner's Manual for installation help, troubleshooting, and maintenance assistance.
- Visit www.Danby.com to access self-service tools, FAQs and much more by searching your model number in the search bar.
- For the Quickest Customer Service, please fill out the web form at www.danby.com/support. Your submission will go directly to an expert on your particular appliance. Our average response times are between 20 minutes and 2 hours, during EST business hours.
- Call 1-800-263-2629 - please note that during peak hours, hold times can exceed one hour.

Important Safety Information READ AND FOLLOW ALL SAFETY INSTRUCTIONS
WARNING - TIP OVER HAZARD
- A child or adult can tip the appliance and be killed
- Verify the anti-tip bracket has been properly installed to the floor
- Ensure the anti-tip bracket is re-engaged when the range is moved
- Do not operate the range without the anti-tip bracket in place and engaged
- Failure to follow these instructions can result in death or serious burns to children or adults
ANTI-TIP DEVICES
To reduce the risk of the appliance tipping by abnormal usage or improper door loading, the appliance must be secured by installing anti-tip devices. There are two anti-tip devices that must be installed to ensure the appliance is safe.
Note: If the range is ever relocated, both anti-tip devices must be removed and installed at the new location.
ANTI-TIP BRACKET
Installed on either the left or the right rear leg. To install the anti-tip bracket:
- Place the anti-tip bracket (1) on the floor where the range will be installed.
- Mark the location of the hole in the anti-tip bracket.
- Use a 5/16" (8mm) drill bit to drill a hole in the floor and insert the provided screw (2) to secure the anti-tip brackets to the floor.
- Then install the anti-tip chain.
ANTI-TIP CHAIN
- Use a wall plug to fasten the hook (3) to the kitchen wall.
- With the help of the locking mechanism (4), connect the safety chain (5) to the hook.
INSTALL BOTH ANTI-TIP DEVICES
- Slide the range back and into position, ensuring that the anti-tip bracket is positioned over the rear foot of the appliance.
- Using the screw attachment (6), tightly fix the chain to the back of the range (7).
- Remember the safety chain should be as short as practically possible to avoid the appliance from tilting forward, so the range should be very close to the back wall (8).


Important Safety Information READ AND FOLLOW ALL SAFETY INSTRUCTIONS
NOTICE - BEFORE FIRST TIME USE
The heating elements have a protective coating on them which must be burned off before use. To do this:
- Open the oven door and set the temperature control knob to 450°F.
- Turn the function selector to the bake element and the broil element separately for approximately 15 minutes.
- It is important to ensure adequate ventilation during this period.
WARNING - HEATING ELEMENTS
- Heating elements on the surface or in the interior of the appliance may be hot even though they appear cool.
- Areas near the heating elements may become hot enough to cause burns.
- Do not touch or let clothing or other flammable materials touch/contact heating elements or areas near them during or after use (they must have sufficient time to cool).
- Surfaces of the appliance may become hot enough to cause burns: these areas include oven vent openings, surfaces near these openings, oven doors and oven windows.
DANGER - GREASE FIRES
- When heating fat or grease, do not leave it unattended as it could catch fire.
- Never pick up a flaming pot or pan.
- Do not use water or flour on grease fires.
- In the event of a grease fire, turn off burner - if it is safe to do so - and extinguish the fire with a dry chemical or foam-type extinguisher.
- You may also smother the fire with a tight fitting pot lid, cookie sheet, flat tray, or baking soda.
- If there is a fire in the oven during baking, smother the fire by closing the oven door and turn the oven off.
DANGER - FIRE RISK
- It is recommended that this appliance be connected to a separate circuit that is not shared with any other appliance.
- Never clean the appliance or appliance parts with flammable fluids, as these fumes can create a fire hazard and/or explosion.
- Before cleaning or servicing this appliance, unplug the appliance completely from the electrical outlet or disconnect the range power supply at the household distribution panel by removing the fuse or switching off the circuit breaker. Failure to do so can result in electrical shock or death. Always disconnect the electrical supply to the appliance before servicing.
- Do not attempt to repair or replace any part of your appliance unless it is specifically recommended in this manual. All other servicing should be referred to a qualified service technician.
- This appliance should never be used as a source of heat to warm or heat a room. Using this appliance as a space heater can lead to overheating of the appliance and/or carbon monoxide poisoning.
- The stove top elements should not be operated without proper cookware.
- All openings in the wall behind the appliance and the floor under the appliance shall be sealed.
- Do not obstruct the flow of air around the appliance.
- Keep the area around the appliance clear and free of combustible materials, gasoline and other flammable vapors. Always keep combustible wall coverings, curtains or drapes a safe distance from the range.
- Never use or store gasoline or other flammable vapors or liquids inside or in the proximity of this appliance. Failing to do so may result in a fire hazard or explosion.

Important Safety Information READ AND FOLLOW ALL SAFETY INSTRUCTIONS
IMPORTANT
COLDER TEMPERATURES CAN DAMAGE THE ELECTRONIC CONTROL OF THE APPLIANCE
If the appliance has not been used for an extended period of time
- Be sure the appliance has been in temperatures above 32°F (0°C) for at least three (3) hours before turning on the power to the appliance
MODIFICATIONS
- Never modify or alter the construction of the appliance by removing the leveling legs, panels, wire covers, anti-tip brackets/screws, or any other part of the appliance
WARNINGS
STORAGE IN OR ON THE APPLIANCE
- Flammable materials should not be stored in an oven or microwave, near surface burners or elements, or in the storage or warmer drawer (this includes paper, plastic, and cloth items like cookbooks, plastic ware, and towels)
- Do not store explosives, such as aerosol cans, on or near the appliance
MOVING THE APPLIANCE
If you need to move the appliance:
- Do not move the appliance when it is in use, or still hot (to reduce the risk of burns)
- To reduce the risk of injury due to tipping of the appliance, verify the re-installation of this appliance into the anti-tipping device provided after returning the appliance to the original installed position
DISPOSING OF THE APPLIANCE
To avoid the possibility of child entrapment please take the following precautions before throwing out the appliance:
- Remove the oven door completely
- Never allow children to operate, play with, or crawl inside the electric range
CAUTION - POWER FAILURES
Do not attempt to operate the appliance during a power failure. If the power fails:
- Turn the appliance off right away
- If power is restored and the surface element has not been turned off, the element will turn back on as soon as the power is restored
- This may result in ignition of items on or near the cook-top, leading to serious injury or death
WARNING
The manufacturer declines all liability for injury to persons or damage to property caused by incorrect or improper use of the range

Important Safety Information READ AND FOLLOW ALL SAFETY INSTRUCTIONS
GENERAL SAFETY REQUIREMENTS
- Ensure the appliance is properly installed and grounded by a qualified technician
- To eliminate the risk of burns or fire by reaching over heated surface units, cabinet storage space located above the surface units should be avoided. If cabinet storage is to be provided, the risk can be reduced by installing a range hood that projects horizontally a minimum of 5 inches (12.7 cm) beyond the bottom of the cabinets
- Loose fitting or hanging garments should never be worn while using the appliance
- Only use dry pot holders (do not use a towel or other bulky cloths) - moist or damp pot holders on hot surfaces may result in burns from steam
- Do not let the pot holder touch hot heating elements.
- Do not heat unopened food containers - build-up of pressure may cause container to burst and result in injury.
- Children should not be left alone or unattended in the area where the appliance is in use.
- Children should never be allowed to sit or stand on any part of the appliance (this includes the storage drawer, lower broiler drawer, warner drawer, or lower double oven).
- Do not store items of interest to children in the cabinets above the appliance or on the back-guards of ranges. Children climbing on or near the appliance to reach items could be seriously injured.
- Do not allow children to climb or play around the appliance, as the weight of a child on an open oven door may cause the appliance to tip, resulting in serious burns or other injury.
- An open drawer, when hot, may cause burns.
- Stepping, leaning, or sitting on the door or drawers of this appliance can result in serious injuries and also cause damage to the appliance.
- Never cover any slots, holes or passages in the oven bottom or cover an entire rack with materials such as aluminum foil. Doing so blocks air flow through the oven and may cause carbon monoxide poisoning. Aluminum foil linings may also trap heat, causing a fire hazard.
- To avoid the possibility of a burn or an electric shock, always be certain that the controls for all surface elements are at the OFF position, and that all coils are cool before attempting to lift or remove a coil cooking element.
- This range is designed and manufactured solely for the cooking of domestic (household) food and is not suitable for any non domestic application and therefore should not be used in a commercial environment. The range warranty will be void if the range is used within a non domestic environment.

Important Safety Information: Read and follow all safety instructions.
Grounding Instructions
This appliance must be properly grounded. Grounding reduces the risk of electrical shock by providing an escape wire for the electrical current.
Installation
- Be sure your appliance is properly installed and grounded by a qualified technician.
Do not connect this appliance to the same wall outlet as another appliance. Do not connect it to an extension cord or an adapter plug. Failure to follow this warning may cause serious injury, fire, or death.
Note: Turning the appliance off does not disconnect the appliance from the power supply.
It is recommended that the power cord and the plug be placed parallel with the floor so that the cord runs parallel with the floor.
CAUTION - RISK OF ELECTRICAL SHOCK
If the cord or plug becomes damaged, disconnect the appliance from the power supply and replace with a cord or plug of the same type.

Important Safety Information READ AND FOLLOW ALL SAFETY INSTRUCTIONS
RADIANT COOK-TOP SAFETY
Know which knob or key controls each surface heating area.
- Place cookware with food on the cooking area before turning it on.
- Turn the cooking area off before removing the cookware.
Cookware handles should be turned inward and not extend over adjacent surface elements.
- This will reduce the risk of burns, ignition of flammable materials, and spillage due to unintentional contact with the utensil.
Use the proper pan size: The appliance is equipped with four burners of different sizes.
- Select cookware with flat bottoms that match the surface unit size.
- The use of undersized cookware can expose a portion of the heating element to direct contact and may result in ignition of clothing.
- Proper sizing of the cookware to the cook-top will improve cooking efficiency.
- If using a griddle or long pan, do not use it on more than one burner at once.
Ensure reflector pans or drip bowls are in place:
Absence of these pans or bowls during cooking may subject wiring components to damage.
Use the appropriate type of cooking utensils:
- Only certain types of glass, ceramic, earthenware or other glazed utensils are suitable for range top service without breaking due to sudden change in temperature.
- Check the manufacturer's recommendations for cook-top use.
Never leave appliance unattended while in use:
- Boil over can cause smoking and greasy spills can ignite.
- A pan that has boiled dry could also be damaged and may end up damaging the cook-top.
Never leave oil unattended while frying:
- If oil is heated beyond its smoking point it may ignite, resulting in fire that may spread to surrounding cabinets.
- Use a deep fat thermometer whenever possible to monitor oil temperature.
To avoid oil spillover and fire:
- Use a minimum amount of oil when shallow pan-frying.
- Avoid cooking frozen foods with excessive amounts of ice.
The searing grill is not designed for use on the cook-top:
- Doing so may result in a fire.
Remember to turn on the fan when you are flaming foods under a ventilating hood.
GLASS AND CERAMIC COOK-TOP SAFETY
Do not clean or operate a broken cook-top: If the cook-top should break, cleaning solutions and spillovers may penetrate the broken cook-top and create a risk of electric shock.
- Contact a qualified technician immediately.
Clean a glass cook-top with caution:
- If a wet sponge or cloth is used to wipe spills on a hot cooking area, be careful to avoid a potential steam burn.
- Some cleaners may produce harmful fumes if applied to a hot surface.
- Avoid scratching the cook-top glass with sharp objects.

Important Safety Information READ AND FOLLOW ALL SAFETY INSTRUCTIONS
OVEN SAFETY
Protective liners: Do not use aluminum foil, aftermarket liners, or any other materials or devices to line oven bottom, oven racks, or any other part of the appliance.
- Only use aluminum as recommended for baking, such as lining cookware or as a cover placed on food.
- Any other use of protective liners or aluminum foil may result in a risk of electric shock, fire, or a short circuit.
Use care when opening the door:
- Stand to the side of the appliance when opening the door of a hot oven.
- This will allow hot air or steam to escape before removing or replacing food.
Never cover or place anything on or near the top of the oven vent, especially plastic or heat-sensitive items: These items can melt or ignite.
Always place oven racks in desired location while the oven is cool: If the rack must be moved while the oven is hot:
- Remove all cookware and utensils before moving the rack.
- Use potholders and grasp the rack with both hands to reposition.
- Do not let potholder come into contact with a hot burner or element in the oven.
Do not use a broiler pan without an insert:
- Broiler pans and inserts allow dripping fat to drain away from the high heat of the broiler.
- Do not cover the broiler insert with aluminum foil - exposed fat and grease could ignite.
Do not place shelves, pans, baking trays, broil trays, or other cooking utensils in the bottom of the oven chamber.
Always place on an oven shelf.
Do not cook food on the bottom of the oven:
• Always cook in the proper cookware and always use an oven rack
Do not use the oven if a heating element develops a glowing spot during use or shows other signs of damage: A glowing spot indicates the heating element may fail and present a potential burn, fire, or shock hazard
- Turn the oven off immediately
- Contact a qualified service technician to have the heating element replaced
Never clean the oven with any high pressure steam cleaning devices
Keep oven vents unobstructed
INSTALLATION INSTRUCTIONS
BEFORE INSTALLATION
- Make sure there are no flammable or combustible materials in the vicinity (curtains, oil, cloth, etc) which may catch fire
- The worktop and furniture surrounding the appliance must be made of materials resistant to temperatures above 215°F (100 °C)
- The appliance should not be installed directly above a dishwasher, fridge, freezer, washing machine or clothes dryer
- The appliance can be placed close to other furniture on the condition that, in the area where the appliance is set up, the furniture's height does not exceed the height of the cooktop
- To eliminate the risk of burns or fire when reaching over a hot surface element, cabinet storage space above the cooktop should be avoided. If cabinet storage space is to be provided above the cooktop, the risk can be reduced by installing a range hood that protrudes at least 5" (127 mm) beyond the front of the cabinets. Cabinets installed above a cooktop may be no deeper than 13" (330 mm)
WARNING FOR INSTALLATION AND PREPARATION FOR USE
The appliance must be installed by an authorized service person or qualified technician.
- Incorrect installation may cause harm and damage for which the manufacturer accepts no responsibility and the warranty will not be valid.
- Prior to installation, ensure that the local distribution conditions (electricity voltage and frequency and/or nature of the gas and gas pressure) and the adjustments of the appliance are compatible. The adjustment conditions for this appliance are stated on the label.
- Ensure the laws, ordinances, directives and standards in force in the country of use are followed (safety regulations, proper recycling in accordance with the regulations, etc.).
INSTALLATION INSTRUCTIONS
IMPORTANT - UNPACKING YOUR APPLIANCE
Please read and follow the following instructions and precautions for unpacking, installing and servicing your appliance:
- Remove all tape and packaging before using the appliance.
- Dispose of the carton and plastic bags after unpacking the appliance.
- Never allow children to play with packaging material.
- Do not remove the wiring label and other literature attached to the appliance.
- Do not remove model/serial number plate.
INSTALLATION OF THE COOKER
- The worktop and furniture surrounding the appliance must be made of materials resistant to temperatures above 215°F (100 °C).
- If the kitchen furniture is higher than the cooktop, the kitchen furniture must be at least 13/32" (10 cm) away from the sides of the appliance for air circulation.
- If a cooker hood or cupboard is to be installed above the appliance, the safe distance between the cooktop and any cupboard/cooker hood should be as shown:
| A (Cupboard) 16.5" (420 mm) |
| B (Cooker hood) 25.5"/27.5" (650mm/700mm) |
| C Product width |
| D 2" (50 mm) |

LEVELING INSTRUCTIONS
The appliance must be level to operate safely and properly. There are four leveling legs located at the corners of the bottom of the appliance. Adjust the leveling legs until the appliance is level. Use a carpenter's level to confirm.

INSTALLATION INSTRUCTIONS
POWER CORD STRAIN RELIEF INSTALL
Only a 4-conductor power-supply cord kit rated 240 volts, 40 amperes and marked for use with ranges must be used. Assemble the strain relief in the hole. Insert the power cord through the strain relief and tighten. Allow enough slack to easily attach the cord terminals to the connector block. If tabs are present at the end of the winged strain relief, they can be removed for better fit.
Note: Do not install the power cord without a strain relief. The strain relief bracket should be installed before reinstalling the rear range wiring cover.

3-WIRE POWER CORD INSTALLATION
WARNING
The neutral or ground wire of the power cord must be connected to the neutral terminal located in the center of the connector block. The power leads must be connected to the outside (brass colored) terminals.
Remove the 3 wire terminal screws from the connector block.
Insert screws through each power cord terminal ring and into the connector block until the screws engage the nuts. Be certain that the center wire is connected to the center screw of the connector block.
Tighten screws securely.
Do NOT remove ground strap connection.

INSTALLATION INSTRUCTIONS
4-WIRE POWER CORD INSTALLATION
WARNING
The neutral wire of the supply circuit is connected to the neutral terminal located in the center of the connector block. The power leads must be connected to the outside (brass coloured) terminals. The 4th grounding lead must be connected to the frame of the range with the grounding plate and grounding screw.
- Remove the 3 screws from the connector block.
- Remove the grounding screw and strap from the connector block middle location and the screw connection to the frame of the range.
- Insert screws through each power cord terminal ring and into the connector block until the screw engages the nut. Be certain that the center wire is connected to the center screw of the connector block. Tighten the screws securely.
- Attach the ground wire to the frame of the range.
- Replace the terminal block access plate.

INSTALLATION INSTRUCTIONS
PRODUCT FEATURES
- Cooktop
- Control panel
- Oven door handle
- Oven door
- Adjustable feet

CONTROL PANEL
- Oven Timer Control Knob
- Oven Function Control Knob
- Oven Thermostat Knob
- Oven Indicator Light
- Surface Cooking Knob
- Surface Cooking Light

OPERATING INSTRUCTIONS
CERAMIC HEATER CONTROLS
• Ceramic heat is controlled by a 6-position knob. • To turn on, turn the control knob to the required setting. - By the control knobs will be a symbol that indicates the heater that is controlled by that knob. - The ON/OFF light on the control panel will show if any of the ceramic heaters are in use.

| Knob Position Function | |
| 0 Off | |
| MIN Keep warm | |
| 3-5 Heating at low heat | |
| 7-9 MAX Cooking, roasting and boiling | |
RESIDUAL HEAT INDICATOR (if available)
• After using the ceramic heater, heat will be stored in the vitro ceramic glass, called residual heat. If the residual heat level is greater than +140 °F (60 °C), the residual heat indicator will be active for the cooking zone that is above this temperature. If the power supply to the hob is disconnected while the residual heat indicator is on, the warning light will flash when the power is reconnected. The display will flash until the residual heat has decreased or until one of the cooking zones is activated.
COOKWARE
WARNING: Never operate the hob without pans on the cooking zone.
• If possible, always place lids on the pans. Do not use cookware with jagged edges or a curved base.

Ensure the base of your cookware is smooth, sits flat against the glass, and is the same size as the cooking zone. Always center your cookware on the element.

When removing cookware from the ceramic surface, always lift it, do not slide it, as it may scratch the glass.

IMPORTANT
- The temperature of accessible parts may become high while the appliance is operating. Keep children and animals away from the ceramic heater during operation until it has fully cooled after operation.
- If you notice a crack on the cooktop, switch it off immediately and contact an authorized service provider to get it replaced.
OPERATING INSTRUCTIONS
OVEN FUNCTION CONTROL KNOB
Turn the knob to the corresponding symbol of the desired cooking function.

OVEN THERMOSTAT KNOB
After a cooking function has been selected, turn this knob to set the desired temperature. The oven thermostat light will illuminate whenever the oven is heating up or still hot.

OVEN FUNCTIONS
NOTE: It is recommended to preheat the oven for 10 minutes for best results.
Bake

The oven's thermostat and warning lights will switch on, and the lower and upper heating elements will begin operating. The Bake function emits heat, ensuring even cooking of food.
Ideal for making:
- Pastries • Cakes
- Baked pasta • Lasagna
- Pizza
Broil Low

The oven's thermostat and warning lights will switch on, and the broil heating element will begin operating. This function is used for broiling or toasting foods on the upper shelves of the oven.
• Always place a tray beneath the food to catch any drips of oil or fat.
Broil High

The oven's thermostat and warning lights will switch on, and the broil and upper heating elements will begin operating. This function is used for faster broiling and for broiling food with a larger surface area, like meat.
• Always place a tray beneath the food to catch any drips of oil or fat.
OPERATING INSTRUCTIONS
OVEN TIMER CONTROL KNOB
For your enhanced safety, our oven has been designed to operate with a timer.

To set the timer, turn the knob clockwise to your desired amount of time. Once the timer reaches 0, the oven will turn off.

If you prefer to use the oven without the timer, simply turn the timer knob counterclockwise to the M (manual), and the oven will stay on continuously.

ACCESSORIES
The EasyFix Wire Rack
- To remove the wire rack, pull the wire rack as shown below to release it from the clips (a). After releasing it from the clips, lift it up.

The Four Wheel Guided Drawer
- Your appliance includes a drawer for storage of accessories - trays, shelves, grids, and small pots and pans

WARNING: The inner surface of the drawer may become hot during use. Do not store any food, plastic or flammable materials in the drawer.
The Splashback
- The splashback is attached to the cooktop with two screws

The Wire Grid

WARNING: When placing the grid, ensure the rear is correctly positioned before pushing it into the oven.
CARE & MAINTENANCE
GENERAL CLEANING INSTRUCTIONS
WARNING: Switch off the appliance and allow it to cool before cleaning.
- Ensure cleaning materials are appropriate and recommended by the manufacturer before using on the appliance.
- Use smooth cream or liquid cleaners - make sure they do not have any particles in them.
- Do not use corrosive creams, abrasive cleaning powders, rough wire wool, or hard tools as they may damage the cooker surfaces.
For everyday cleaning of marks, fingerprints, and non-sugary spillovers, apply a ceramic cooktop cleaning product. Rinse and wipe dry with a clean cloth or paper towel.
Cleaning the Inside of the Oven
• Best cleaned while oven is warm - Recommended to do after each use of the oven - Wipe the oven with a soft cloth soaked in soapy water - Then wipe oven again with a wet cloth and dry it.

Cleaning the Ceramic Glass
WARNING: If the surface is cracked, switch off appliance immediately to avoid the possibility of an electric shock. Call right away to have it replaced.
- Use a cream or liquid cleaner to clean the vitroceramic glass.
- Rinse and dry glass thoroughly with a dry cloth.
- Remember: do not use cleaning materials meant for steel, as they may damage the glass.
If substances with a low melting point are used in the cookware's base or coatings, they can damage the glass-ceramic cooktop.
For boil overs, melts, and hot sugary spills on the cooktop, remove the spill or food item immediately with a ceramic cooktop razor but beware hot cooking surfaces. Hold the razor at a 45-degree angle and scrape the spilled food to a cool area of the cooktop, then clean it up with a dish cloth or paper towel. Large spills should be removed immediately to ensure they do not bake onto the surface of the cooktop.
Any changes in colour to the ceramic glass will not affect the structure or durability of the ceramic and is not due to a change in the material. The colour may change for a number of reasons:
- Spilt food has not been cleaned off the surface
- Incorrect dishes are being used, which can erode the surface
- The wrong cleaning materials are being used
CARE & MAINTENANCE
Cleaning Glass Parts
- Clean glass parts of your appliance on a regular basis
- Use a glass cleaner to clean the inside and outside of the glass parts
- Rinse and dry them thoroughly with a dry cloth
Cleaning the Enameled Parts
- Clean enameled parts of your appliance on a regular basis
- Wipe the enameled parts with a soft cloth soaked in soapy water
- Then wipe them over again with a wet cloth and dry them
IMPORTANT
Do not clean the enameled parts while they are still hot from cooking
Do not leave vinegar, coffee, milk, salt, water, lemon, or tomato juice on the enamel for long periods of time.
Cleaning Stainless Steel Parts (if available)
- Clean stainless steel parts of your appliance on a regular basis.
- Wipe the stainless steel parts with a soft cloth soaked in water only.
- Then dry them thoroughly with a dry cloth.
IMPORTANT
Do not clean the stainless steel parts while they are still hot from cooking.
Do not leave vinegar, coffee, milk, salt, water, lemon, or tomato juice on the enamel for long periods of time.
Cleaning Painted Surfaces (if available)
- Spots of tomato, tomato paste, ketchup, lemon, oil derivatives, milk, sugary foods, sugary drinks, and coffee should be cleaned immediately with a cloth dipped in warm water.
- If these are not cleaned and dry on the surfaces, do not rub them with hard objects (pointed objects, steel and plastic scouring pads, surface-damaging dish sponges) or cleaning agents containing high levels of alcohol, stain removers, degreasers, or abrasive chemicals. Otherwise, corrosion may occur on the powder painted surfaces, and stains can appear.
NOTE: The manufacturer will not be held responsible for any damage caused by the use of inappropriate cleaning products or methods.
CARE & MAINTENANCE
Removal of the Inner Glass
You must remove the oven door glass before cleaning, as shown below:
- Push the glass in the direction of B and release it from the location bracket (x). Pull the glass out in the direction of A.

To replace the inner glass:
- Push the glass towards and under the location bracket (y) in the direction of B.
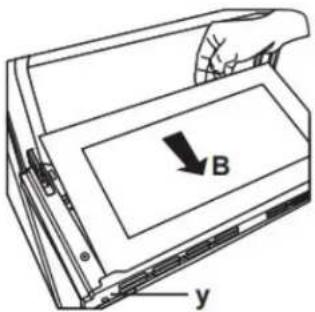
- Place the glass under the location bracket (x) in the direction of C.

NOTE: If the oven door is a triple glass oven door, the third glass layer can be removed the same way as the second glass layer.
Removal of the Oven Door
NOTE: The oven door is removable but it is heavy. It is recommended that at least two people work together to remove it.
Remove the oven door before cleaning the oven door glass, as shown below:
- Open the oven door.

- Open the locking catch (a) (with the aid of a screwdriver) up to the end position.

- Close the door until it almost reaches the fully closed position and remove the door by pulling it towards you.

CARE & MAINTENANCE
Removal of the Wire Shelf
To remove the wire rack, pull the wire rack as shown in the figure. After releasing it from the clips (a), lift it up.

Oven Light Replacement
Warning: The maintenance of this appliance should be carried out by an authorized service person or qualified technician only.
Important
- Before replacing the oven light bulb, make sure the electrical power is disconnected from the appliance. Failure to do so may result in electric shock or burn.
- Be sure to let the light cover and bulb cool completely before replacing.
- Removing the oven door can make this process easier.
To replace the light bulb:
- Remove the glass lens, then remove the bulb.
- Insert the new bulb (resistant to 600°F or 315°C) to replace the bulb that you removed (240 V, 15-25 Watt, Type E14).
- Replace the glass lens, then your oven is ready to be used.
Notes:
The product contains a light source of energy efficiency class G.
The included light source is not intended for use in other applications - it is designed specifically for use in household cooking appliances. It is not suitable for household room illumination.
TROUBLESHOOTING
| Areas of Concern Possible Cause Solutions | ||
| The cooking zones cannot be switched on | There is no power supply | Check household fuse for the applianceDouble check the circuit breaker to see if it was trippedEnsure the plug is fully inserted into the wall outletCheck if there is a power failure by testing other electronic appliances |
| Oven does not turn onPower is switched offCheck w | whether there is power being supplied to the applianceCheck if other kitchen appliances are functioning | |
| There is no heat, or the oven is not warming up | Oven temperature control is set incorrectlyOven door has been left openThere is no power | Check the oven temperature to ensure it has been set correctlyEnsure there is sufficient power to the appliance |
| Cooking is uneven within the oven | Oven shelves are not positioned correctlyTemperature is not set properlyShelf position is incorrectOven was not preheatedCookware is not suitable for baking or roasting | Check that the recommended temperatures and shelf positions are being used - adjust accordinglyConfirm the cookware is suitable for baking or roastingDo not frequently open the door unless you are cooking items that need to be turned. If you open the door often, the interior temperature will be lower, which could affect the results of your cooking |
| Oven light (if available) is not on | The bulb is looseThe oven light has burnt outThe electrical supply is switched off or has disconnectedThe light switch is malfunctioning | Double check the bulb is not looseReplace the lamp as per the instructionsEnsure the electrical supply is switched on at the wall socket outlet |
| Oven fan (if available) is noisy | Oven shelves are vibrating | Check that the oven is levelCheck to see if the shelves and any bake ware are vibrating or in contact with the oven back panel |
Danby.
Limited "In-Home" Warranty
This quality product is warranted to be free from manufacturer's defects in material and workmanship, provided that the unit is used under the normal operating conditions intended by the manufacturer. This warranty is available only to the person to whom the unit was originally sold by Danby Products Limited (Canada) or Danby Products Inc. (U.S.A.) (hereafter "Danby") or by an authorized distributor of Danby, and is non-transferable.
Terms of Warranty
Plastic parts are warranted for thirty (30) days from the date of purchase, with no extensions provided.
First 24 months
During the first twenty four (24) months, any functional parts of this product found to be defective, will be repaired or replaced, at warrantor's option, at no charge to the original purchaser.
To obtain service
Contact the dealer where the unit was purchased, or contact the nearest authorized Danby service depot, where service must be performed by a qualified service technician. If service is performed on the unit by anyone other than an authorized service depot, all obligations of Danby under this warranty shall be void.
Boundaries of in-home service
Danby reserves the right to limit the boundaries of “In Home Service” to the proximity of an authorized service depot. Any appliance requiring service outside the limited boundaries of “In Home Service”, will be the consumer’s responsibility to transport at their own expense to the original point of purchase or a service depot for repair. If the appliance is installed in a location that is 100 kilometers (62 miles) or more from the nearest service center, it must be delivered to the nearest authorized Danby Service Depot by the purchaser.
Transportation charges to and from the service location are not protected by this warranty and are the responsibility of the purchaser.
Exclusions
Save as herein provided, by Danby, there are no other warranties, conditions, representations or guarantees, express or implied, made or intended by Danby or its authorized distributors and all other warranties, conditions, representations or guarantees, including any warranties, conditions, representations or guarantees under any Sale of Goods Act or like legislation or statute is hereby expressly excluded. Save as herein provided, Danby shall not be responsible for any damages to persons or property, including the unit itself, howsoever caused or any consequential damages arising from the malfunction of the unit and by the purchase of the unit, the purchaser does hereby agree to indemnify and hold harmless Danby from any claim for damages to persons or property caused by the unit.
General Provisions
No warranty or insurance herein contained or set out shall apply when damage or repair is caused by any of the following:
- Power failure.
- Damage in transit or when moving the appliance.
- Improper power supply such as low voltage, defective house wiring or inadequate fuses.
- Accident, alteration, abuse or misuse of the appliance such as inadequate air circulation in the room or abnormal operating conditions (ie. extremely high or low room temperature).
- Use for commercial or industrial purposes (ie. If the appliance is not installed in a domestic residence).
- Fire, water damage, theft, war, riot, hostility, acts of God such as hurricanes, floods etc.
- Service calls resulting in customer education.
- Improper Installation (ie. Building-in of a free standing appliance or using an appliance outdoors that is not approved for outdoor application, including but not limited to: garages, patios, porches or anywhere that is not properly insulated or climate controlled).
Proof of purchase date will be required for warranty claims; retain bills of sale. In the event that warranty service is required, present the proof of purchase to our authorized service depot.


CONTROL PANEL
OVEN THERMOSTAT KNOB
ACCESSORIES
The EasyFix rack
The wire rack

Danby Products Limited, Guelph, Ontario, Canada N1H 6Z9 Danby Products Inc. Findlay, Ohio, U.S.A. 45840
www.danby.com


- OWNER'S MANUAL
- WELCOME TO THE DANBY FAMILY
- NEED HELP
- IMPORTANT SAFETY INFORMATION READ AND FOLLOW ALL SAFETY INSTRUCTIONS
- WARNING - TIP OVER HAZARD
- ANTI-TIP DEVICES
- ANTI-TIP BRACKET
- ANTI-TIP CHAIN
- INSTALL BOTH ANTI-TIP DEVICES
- NOTICE - BEFORE FIRST TIME USE
- WARNING - HEATING ELEMENTS
- DANGER - GREASE FIRES
- DANGER - FIRE RISK
- IMPORTANT
- COLDER TEMPERATURES CAN DAMAGE THE ELECTRONIC CONTROL OF THE APPLIANCE
- MODIFICATIONS
- WARNINGS
- STORAGE IN OR ON THE APPLIANCE
- MOVING THE APPLIANCE
- DISPOSING OF THE APPLIANCE
- CAUTION - POWER FAILURES
- WARNING
- GENERAL SAFETY REQUIREMENTS
- IMPORTANT SAFETY INFORMATION: READ AND FOLLOW ALL SAFETY INSTRUCTIONS
- GROUNDING INSTRUCTIONS
- INSTALLATION
- CAUTION - RISK OF ELECTRICAL SHOCK
- RADIANT COOK-TOP SAFETY
- KNOW WHICH KNOB OR KEY CONTROLS EACH SURFACE HEATING AREA
- COOKWARE HANDLES SHOULD BE TURNED INWARD AND NOT EXTEND OVER ADJACENT SURFACE ELEMENTS
- ENSURE REFLECTOR PANS OR DRIP BOWLS ARE IN PLACE
- USE THE APPROPRIATE TYPE OF COOKING UTENSILS
- NEVER LEAVE APPLIANCE UNATTENDED WHILE IN USE
- NEVER LEAVE OIL UNATTENDED WHILE FRYING
- TO AVOID OIL SPILLOVER AND FIRE
- THE SEARING GRILL IS NOT DESIGNED FOR USE ON THE COOK-TOP
- GLASS AND CERAMIC COOK-TOP SAFETY
- CLEAN A GLASS COOK-TOP WITH CAUTION
- OVEN SAFETY
- USE CARE WHEN OPENING THE DOOR
- DO NOT USE A BROILER PAN WITHOUT AN INSERT
- DO NOT COOK FOOD ON THE BOTTOM OF THE OVEN
- INSTALLATION INSTRUCTIONS
- BEFORE INSTALLATION
- WARNING FOR INSTALLATION AND PREPARATION FOR USE
- IMPORTANT - UNPACKING YOUR APPLIANCE
- INSTALLATION OF THE COOKER
- LEVELING INSTRUCTIONS
- POWER CORD STRAIN RELIEF INSTALL
- WIRE POWER CORD INSTALLATION
- PRODUCT FEATURES
- CONTROL PANEL
- OPERATING INSTRUCTIONS
- CERAMIC HEATER CONTROLS
- RESIDUAL HEAT INDICATOR (IF AVAILABLE)
- COOKWARE
- OVEN FUNCTION CONTROL KNOB
- OVEN THERMOSTAT KNOB
- OVEN FUNCTIONS
- BAKE
- BROIL LOW
- BROIL HIGH
- OVEN TIMER CONTROL KNOB
- ACCESSORIES
- THE EASYFIX WIRE RACK
- THE FOUR WHEEL GUIDED DRAWER
- THE SPLASHBACK
- THE WIRE GRID
- CARE & MAINTENANCE
- GENERAL CLEANING INSTRUCTIONS
- CLEANING THE INSIDE OF THE OVEN
- CLEANING THE CERAMIC GLASS
- CLEANING GLASS PARTS
- CLEANING THE ENAMELED PARTS
- CLEANING STAINLESS STEEL PARTS (IF AVAILABLE)
- CLEANING PAINTED SURFACES (IF AVAILABLE)
- REMOVAL OF THE INNER GLASS
- REMOVAL OF THE OVEN DOOR
- REMOVAL OF THE WIRE SHELF
- OVEN LIGHT REPLACEMENT
- TO REPLACE THE LIGHT BULB
- NOTES
- TROUBLESHOOTING
- DANBY
- LIMITED "IN-HOME" WARRANTY
- TERMS OF WARRANTY
- FIRST 24 MONTHS
- TO OBTAIN SERVICE
- BOUNDARIES OF IN-HOME SERVICE
- EXCLUSIONS
- GENERAL PROVISIONS
- THE EASYFIX RACK
- THE WIRE RACK
Brand : DANBY
Model : DER24V1B
Category : Cooker