
Typhon - Synthesizer Dreadbox - Free user manual and instructions
Find the device manual for free Typhon Dreadbox in PDF.


| Type | Desktop Synthesizer |
| Sound Engine | Monophonic analog synthesizer with digital effects |
| Oscillators | 2 analog VCOs with pulse/saw/triangle waves |
| Filter | Analog 24dB/oct low-pass filter (resonant) |
| Envelopes | 2 ADSR envelopes (VCA and VCF) |
| LFO | 1 LFO with waveshape, sync, and routing |
| Effects | Chorus, delay, reverb (digital, stereo) |
| Polyphony | Monophonic (paraphonic mode with 2-note via separate oscillators) |
| Sequencer | 64-step sequencer with motion recording |
| Connectivity | MIDI In/Out (5-pin DIN), USB (MIDI), CV/Gate (Eurorack compatible) |
| Audio I/O | 1/4" headphone out, 1/4" line out (unbalanced) |
| Power | 9V DC center positive (500mA or more), or USB-C (5V 500mA) |
| Dimensions | 200 x 140 x 65 mm (7.9 x 5.5 x 2.6 in) |
| Weight | ~450 g (1 lb) |
| Construction | Metal chassis with wooden side panels |
| Display | OLED screen for parameter visualization |
| Controls | Knobs and buttons; no touchscreen |
| Presets | 100 factory presets, 100 user slots |
| Firmware | USB firmware update via Dreadbox updater |
| Included Accessories | USB cable, quick start guide (no printed manual) |
| Maintenance | Wipe with dry cloth; avoid solvents |
| Safety | Use only provided power supply; do not expose to moisture |
| Repairability | No user-serviceable parts; contact Dreadbox for repairs |
| Environmental | RoHS compliant |
Frequently Asked Questions - Typhon Dreadbox
User questions about Typhon Dreadbox
0 question about this device. Answer the ones you know or ask your own.
Ask a new question about this device
Download the instructions for your Synthesizer in PDF format for free! Find your manual Typhon - Dreadbox and take your electronic device back in hand. On this page are published all the documents necessary for the use of your device. Typhon by Dreadbox.
USER MANUAL Typhon Dreadbox
1.1 Key Features....3
1.2 In the Box....3
1.3 Block diagram 4
1.4 Quick start guide....5
2. Connections
2.1 Powering considerations....6
2.1.1 Bad power supply (or cable) side effects 7
2.2 External Audio input - using the device as an effects box ....7
-
Direct Analog Engine controls (left side)......8
-
Screen general manual ...... 9
5. Presets
5.1 Save a preset....9
5.2 Load a preset 9
6. Modulators (M1,M2,M3)
6.1 General 10
6.2 Modulator destinations and custom targets 10
6.3 LFO....12
6.4 Envelope Generator 12
6.5 Random Voltage 12
6.6 Step Sequencer....13
7. The Sinevibes Effects (FX1, FX2, FX3)
7.1 FX1: Distortion and Bit crush 14
7.2 FX2: Enhancers (Chorus, Ensemble, Flanger)....15
7.3 FX3: Reflections (Delay, Ping pong, Reverb) 15
- Other settings (SET page) ...... 16
9. Note Sequencer
9.1 Controls....17
9.2 Edit a sequence....17
9.3 Advanced note sequencer tactics ....18
9.4 Note sequencer transpose....18
9.5 Note sequencer record....18
10. Menu
10.1 Custom targets 20
10.2 Sync options 20
10.3 Mod Wheel 20
10.4 Velocity....20
10.5 Aftertouch 20
10.6 Key Track....20
10.7 Pitch Wheel 20
10.8 Midi CC 21
10.9 Global settings....21
-
Midi Implementation 22
-
Shortcuts and hidden functions ...... 23
-
Specifications 23
Introduction
I never read manuals.
So, first of all, let me just say that if you get bored reading manuals, feel free to skip to page 5 on the quick start guide.
Now if you do keep reading,
- you're probably just waiting for the synth to arrive, or
- you like to read (though this should really not be your first choice), or
- you just need to find out more about a certain feature
(but I guess you just went to the "Table of Contents" and already skipped all this mumbo jumbo), or
- you thought that the author of this manual (who is Yiannis) is a super cool guy and you want to check out what this Typhon stuff is all about (very unlikely).
In any case, thank you for reading this manual.
And in the case that you purchased Typhon, double thanks.
1.1 Key features
- 2 analog VCO's
- An analog 24db/octave resonating Low pass filter
- Analog VCA's
- 2 x Envelope generators dedicated to the filter and the amp respectively
- 3 x Modulators that can be either a LFO, envelope, random or step sequencer
-
32 bit @ 96kHz (depending on the effect type) Stereo DSP effects coded by Sinevibes including:
-
5 Different distortions
- A bit crusher
- 5 x Enhancer effects (chorus, ensemble, flanger, phaser, pitch shifter)
- 2 different delay types
-
3 different reverb types
-
32 note sequencer
- 256 presets (Bank A and half the Bank B only contain factory presets)
- Extended Midi implementation (via DIN5)
- External audio input can turn this box into the ultimate effects unit
- Manage and exchange presets with the freely provided software (download from our website)
- Powered via USB, you can get 60 hours of continuous play with a 20.000 mAh power bank
- All aluminium enclosure - product made in Greece / EU
1.2 In the Box
You will find a Typhon synthesizer and a USB cable. Please note that a USB mains adapter or power supply is not included, as nowadays we all usually have few lying around the house. Almost any USB adapter will work with the Typhon, but there are some power considerations, so please check the "Connections" section of the manual before plugging in your Typhon.
1.3 Block Diagram
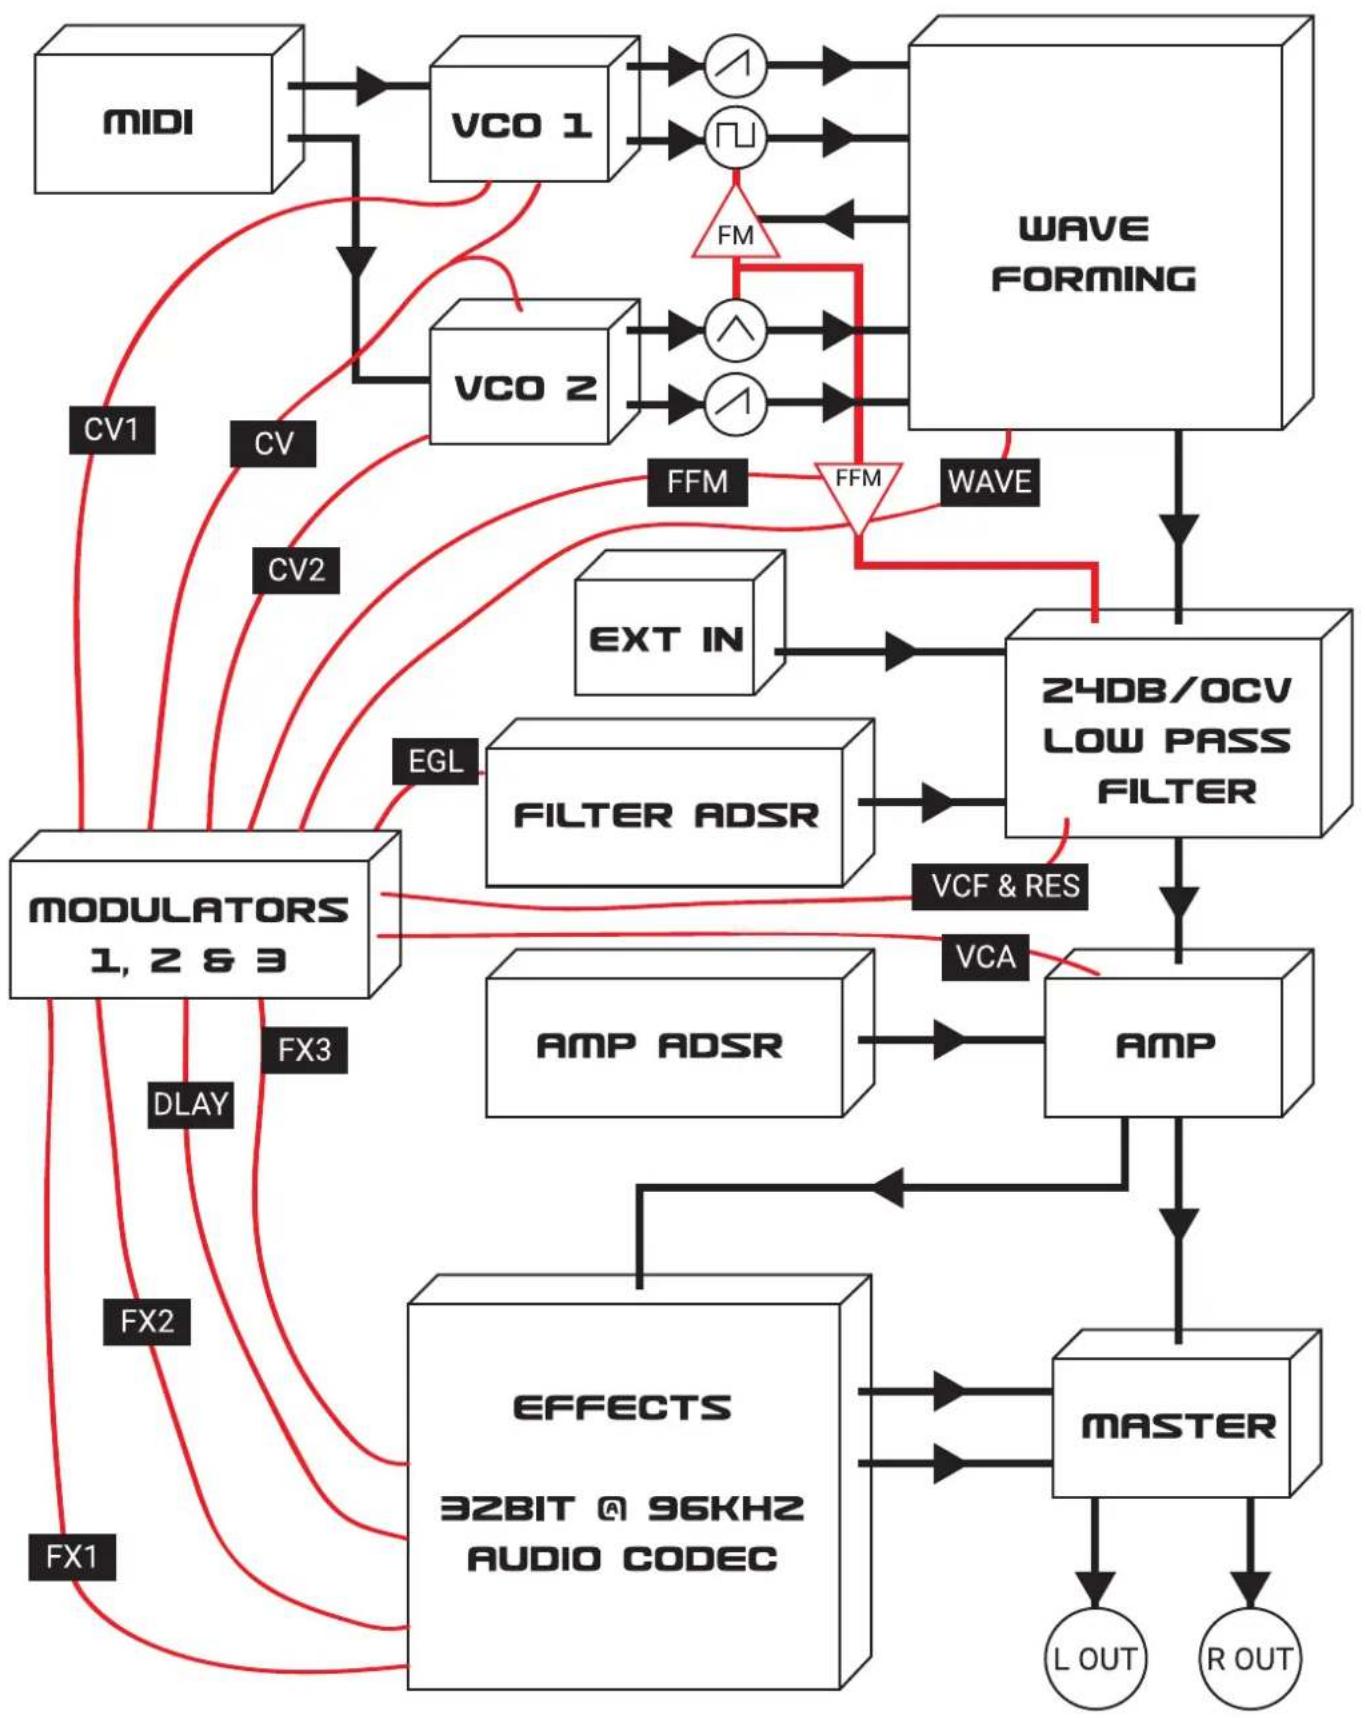
flowchart
graph TD
    A["MIDI"] --> B["VCO 1"]
    B --> C["1"]
    C --> D["WAVE FORMING"]
    D --> E["24DB/OCV LOW PASS FILTER"]
    E --> F["AMP"]
    F --> G["MASTER"]
    G --> H["L OUT"]
    G --> I["R OUT"]
    J["VCO 2"] --> K["1"]
    K --> L["FFM"]
    L --> M["EXT IN"]
    M --> N["FILTER ADSR"]
    N --> O["VCF & RES"]
    O --> P["VCA"]
    P --> Q["AMP ADSR"]
    Q --> R["EFFECTS 32BIT @ 96KHZ AUDIO CODEC"]
    S["MODULATORS 1, 2 & 3"] --> T["FX3"]
    T --> U["DLAY"]
    U --> V["FX2"]
    V --> W["FX1"]
    X["CV1"] --> Y["CV"]
    Y --> Z["CV2"]
    Z --> AA["CV"]
    AA --> AB["EXT IN"]
    AB --> AC["24DB/OCV LOW PASS FILTER"]
    AC --> AD["WAVE FORMING"]
    AD --> AE["24DB/OCV LOW PASS FILTER"]
    AE --> AF["VCF & RES"]
    AF --> AG["VCA"]
    AG --> AH["AMP ADSR"]
    AH --> AI["EFFECTS 32BIT @ 96KHZ AUDIO CODEC"]
    AI --> AJ["FX3"]
    AJ --> AK["FX2"]
    AK --> AL["FX1"]
TYPHON
QUICK START GUIDE
Analog Synthesizer


- Connections

flowchart
graph TD
    A["Headphones output"] --> B["External Audio In"]
    C["INSTRUMENT"] --> B
    D["Computer (midi IN/OUT, power supply and resources management)"] --> E["USB"]
    F["Out to speakers"] --> G["MIDI CONTROLLER"]
    H["Control Typhon via midi device"] --> I["MIDI IN"]
    I --> J["USB"]
    K["Send Typhon's MIDI to other devices"] --> L["MIDI INSTRUMENT"]
    M["Power supply via USB"] --> N["MIDI IN"]
    O["TYPHON Analog Synthesizer"] --> P["Out to speakers"]
    Q["In"] --> R["MIDI IN"]
    S["L mono OUT"] --> T["MIDI IN"]
2.1 Powering considerations
Even though the Typhon is an analog synthesizer, it can be powered with a simple USB cable. Giving the unit some extra mobility, you can just use a power bank and play anywhere (with a 20.000 mAh power bank you could power and play the unit for up to 60 hours).
Most homes nowadays have at least a dozen or so USB cables and power adapters lying around (from smartphones, computers, printers, and other devices), so we didn't think there was a point including one with the Typhon and adding to the environmental waste.
So, you're thinking, "Can I use any USB power supply?"
Yes, but there are some things you need to consider. Not having a dedicated power adapter means that depending on the USB power supply quality or your connection, could result in a dirty synth or noise floor. You can easily avoid those situations though, by following these simple rules:
- When you turn the Typhon on, there is a burst of noise occurring. This is normal and to encounter it, make sure you have the level of your monitor/amp turned off.
- Power the Typhon and all the devices connected to it, from the same mains power line. You should especially avoid using different mains (for example a mains line for Typhon and a different one for your amp/monitor) that have internal protection circuit. This can produce a constant noise generation from the output of the synthesizer, which can only be eliminated by resetting the unit.
- When powering the Typhon from a computer, if you use a DAW to process the unit's audio, a ground loop can be created, causing a noticeable hum. In that case, you should power the Typhon from a different power
supply, and not from the same computer that you're running the DAW on.
- Using a very long USB cable can also cause line noise. For cleaner sounding performance it's also better to use a USB cable that has a ferrite bead installed.
- Make sure your USB power adapter is rated for at least 500mA
- Poor quality USB power adapters should be avoided.
- And as mentioned above, when using a power bank, make sure it's a good quality one. You can also power a keyboard controller with the same power bank.
2.1.1 Bad power supply (or cable) side effects:
- May only boot the logo's screens and never enter the main page
- Lots of noise, abnormal sound elements
- Firmware updater may not work
- Preset handler may not be able to connect properly
- Screen may flicker or freeze
If you have any of the above effects, replace your adapter and/or cable asap.
You should also avoid leaving the synth on power when you are not going to use it for a long period of time (and that should be a rule for every electrical/electronic device) for various reasons. Most important is:
- Expanded life circle
- Protection of the environment
2.2 External Audio Input - Using the device as an effects box
Typhon's extended effects make it ideal for a use as an effects box.
There are some things to consider, though before doing this:
On page 4, note that EXT IN (external input) runs through the analog filter and the Amp, so:
- The internal oscillator must be muted
- The VCA must be kept constantly open
- The filter can affect the sound, so if the Cut off is fully closed, no sound will pass through
- Fretted instruments (or lower level output devices) may require extra pre-amplification
"So how do i get my input working?"
Two ways:
- Use the factory preset Bank C-1 or
-
Make your own setting:
-
Make sure on Global Settings you have the MASTER CLOCK on internal
- On SET page, adjust every parameter to 0 except of VCA LVL at 100
- Set Cut off from the left side at max, and reson to min
- Now we need to keep the VCA constantly open. Go to any modulator (I prefer the use of M3) and set it at "STEP" mode. Then setup:
# - 1
| Step | - | 1 |
| LVL | - | 100 |
| DEST | - | VCA |
| LVL | - | 100 |
This last adjustment will set a step modulator at 1 step (so constantly active) to the VCA and always at max, meaning the VCA is constantly on.
3.Direct analog engine controls (left side)
Typhon's left side is dedicated to a set of 8 controls for quick and easy sound sculpting.

flowchart
graph TD
    A["Waveform"] --> B["VCO1 is in a square wave and VCO2 in a triangle wave"]
    A --> C["VCO1 is in a square wave and VCO2 in a saw wave"]
    A --> D["VCO1 is off, and VCO2 is in a triangle wave"]
    A --> E["VCO1 is in a square wave and VCO2 triangle wave is modulating it"]
    A --> F["VCO1 is in a saw wave and VCO2 is also in a saw wave"]
    A --> G["VCO1 is in a square wave and VCO2 is off. To the left and right of this wave you have a variable pulse width"]
Wave: This controls the waveform, amplitude, and routing of the two oscillators. With just a single knob, you can get the most interesting and useful combinations that these oscillators can offer. While rotating the knob, the selected waves fade into the adjacent wave and oscillator settings, instead of just switching abruptly.
Tune 2: Controls the tuning of the second oscillator
Cut off: Controls the filter's initial cut off frequency
Reson: Controls the amount of filter feedback (Q or resonance)
EG level: Sets how much the filter ADSR envelope modulates the filter's Cutoff
Filter Time: Scales the initial filter ADSR envelope settings from 10 times as slow, up to 6 times as fast.
Amp Time: Scales the initial amp ADSR envelope settings from 10 times as slow, up to 6 times as fast.
Volume: Sets the master level. Important to note, that this is a global setting and the only control that cannot be stored in a preset.
Filter EG and Amp EG button: Lets you enter the ADSR edit mode. Select the filter or the amp ADSR by pressing the "shift" button. Use the sliders to edit the envelope. By pressing it again, will exit the ADSR edit mode.
4. Screen general manual
Typhon, is built to be portable, compact sized and affordable, but offering substantial features and build quality. What we came up with, was a small, 128x64 OLED screen, controlled with a few buttons, a rotary encoder, and 5 sliders.
The general idea, is that each digital feature has a dedicated page. For example, there are 3 modulators, so there is a page for each of them (M1, M2, M3). Each of the 5 sliders is represented with a vertical line on the screen, where the top of this vertical line shows the function of the slider and the bottom of the line shows the current value for the slider.
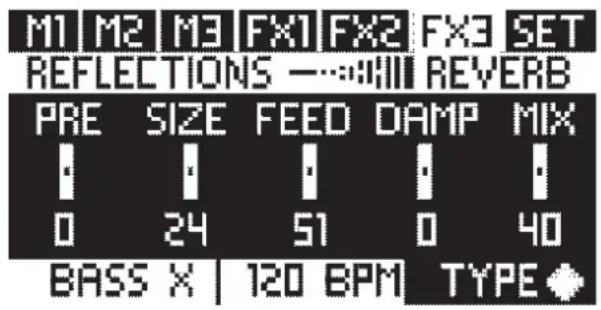
While on the main page, rotating the encoder, will make a swap between the pages, but while in a menu, where you have lists, it will scroll the list. For a better view over that, you can also check the image located on the quick start guide.
To press enter, just push the encoder down. On the main page, this will access the menu. The back button, in the sound editing pages (modulators, effects, sequencer and envelopes) is used as the sequencer play/stop action. But when in a list or in a menu, where back is needed, this will
not control the sequencer's play/stop but it will act as a "go back" action.
5. Presets
The Typhon has a 256 patch storage locations, divided into 4 banks for easy access. On start-up, Typhon will load Bank A, preset 1.
Upon loading a preset, you can start editing and sculpting its sound. Note that your changes will not be stored unless you "SAVE" the patch.
You can also backup, rename, rearrange, exchange and download presets online with the DREADBOX SOFTWARE, provided for free on our web-page at www.dreadbox-fx.com/downloads
5.1 Loading presets:
- Press "LOAD".
- Turn the encoder to choose a Bank from A to D and select it by pressing "LOAD" or pushing down the encoder
- Turn the encoder to choose a preset from 1 to 64 and select it by pressing "LOAD" or pushing down the encoder
5.2 Saving presets:
- Press "SAVE".
- Choose a Bank from A to D and select it by pressing "SAVE" or pushing down the encoder
- Choose a preset to replace from 1 to 64 and select it by pressing "SAVE" or pushing down the encoder
- A name editing field will appear. You can have up to 7 letters as a name for your preset. Available characters are: "A B C D E F G H I J K L M N O P Q R S T U V W X Y Z 1 2 3 4 5 6 7 8 9 / - + % * . ? _ and the SPACE.
- To change a character, rotate the encoder; to move to the next character, push the encoder; to go back, just press "BACK".
- When you are done press "SAVE"
- SHORTCUTS: You can hold down "shift" button (the button next to the sliders) to delete all characters. You can click once the "shift" button to delete the selected character
6. Modulators
6.1 General
There are 3 available modulators, M1, M2, M3, that can be used on the Typhon. These 3 modulators can work at the same time and have multiple destinations for each modulator with different modulation amounts. Each modulator can be set to one of the following 4 modulation sources:
LFO | Envelope | Random generator | Step sequencer
Even though each modulator (M1, M2, or M3) can have multiple destinations, each modulator can only have one modulation source. So for example, M1 can have an LFO that modulates CV, Filter Cutoff, and Amp, but M1 can only have ONE of the 4 modulation sources operating at a time.
Each of the modulation sources has 3 dedicated controls to shape its motion. These are always the first 3 sliders. The last 2 sliders always control the destination (target of the modulator) and the level (amount of modulation). Those settings are preserved no matter which of the 4 modulation sources is selected for the modulator.
For example: You set a LFO, with DEST being CV, set at LVL being +10. If you switch the modulation source to an envelope, DEST CV will still have a value of +10.
Note that for CV-related destinations (DEST values of CV, CV1, or CV2), LVL values run from 0 to 0.9 and then 1 to 24, with the values representing semitones, but with all the other possible destination values (DEST), LVL values are scaled + / 100 .
6.2 Modulator destinations (DEST) and Custom targets :
CV Pitch of both VCO
CV1 Pitch of VCO 1
CV2 Pitch of VCO 2
WAVE Waveform of oscillators (as shown on the WAVE knob)
CUT Filter cut off
VCA AMP level
FX1 FX1 MIX amount
FFM Filter FM amount
FX2 FX2 MIX amount
FX3 FX3 MIX amount
1.____ Custom target 1
2._ _ Custom target 2
3._ _ Custom target 3
The last three targets are called Custom targets, as they are chosen from a list.
There are two ways to access this list:
-
while you are on the custom target that you want to change you press and hold the shift button (that is the button next to the sliders). That will pop up a menu, where you have to choose the parameter you want to affect.
-
Go to MENU (encoder down) -- 1. CUSTOM TARGETS -- then choose the modulator you want to alter -- and the custom target number.
List of Modulation Targets
| PARAMETER SORT NOTES | |||
| 1 VCO | PITCH CV | ||
| 2 VCO | 1 PITCH CV1 | ||
| 3 VCO | 2 PITCH CV2 | ||
| 4 VCO | WAVE WAV WAVE AS SHOWN ON THE LEFT SIDE | ||
| 5 VCO | LEVEL VCO FOR BOTH OSCILLATORS | ||
| 6 VCF | LOW PASS CUT OFF CUT | ||
| 7 VCF | HIGH PASS CUT OFF HPF As found on the FX1 page | ||
| 8 VCF | LOW PASS RESON RES | ||
| 9 VCF | EG LEVEL EGL | ||
| 10 VCF | EG TIME VFT | ||
| 11 VCF | FFM LEVEL FFM | ||
| 12 | VCA LEVEL VCA | CONTROLS THE INITIAL LEVEL | |
| 13 AMP EG TIME AET | |||
| 14 M1 | CUSTOM 1 LEVEL M11 NOT AVAILABLE ON M1 AND M2 | ||
| 15 M1 | CUSTOM 2 LEVEL M12 NOT AVAILABLE ON M1 AND M2 | ||
| 16 M1 | CUSTOM 3 LEVEL M13 NOT AVAILABLE ON M1 AND M2 | ||
| 17 M2 | CUSTOM 1 LEVEL M21 NOT AVAILABLE ON M2 AND M3 | ||
| 18 M2 | CUSTOM 2 LEVEL M22 NOT AVAILABLE ON M2 AND M3 | ||
| 19 M2 | CUSTOM 3 LEVEL M23 NOT AVAILABLE ON M2 AND M3 | ||
| 20 M3 | CUSTOM 1 LEVEL M31 NOT AVAILABLE ON M1 AND M3 | ||
| 21 M3 | CUSTOM 2 LEVEL M32 NOT AVAILABLE ON M1 AND M3 | ||
| 22 M3 | CUSTOM 3 LEVEL M33 NOT AVAILABLE ON M1 AND M3 | ||
| 23 M1 | RATE M1R NOT AVAILABLE ON M1 AND M2 | ||
| 24 M2 | RATE M2R NOT AVAILABLE ON M2 AND M3 | ||
| 25 M3 | RATE M3R NOT AVAILABLE ON M1 AND M3 | ||
| 26 FX1 | PARAMETER 1 F11 | ||
| 27 FX1 | PARAMETER 2 F12 | ||
| 28 FX1 | MIX FX1 | ||
| 29 FX2 | PARAMER 1 F21 | ||
| 30 FX2 | PARAMER 2 F22 | ||
| 31 FX2 | PARAMER 3 F23 | ||
| 32 FX2 | PARAMER 4 F24 | ||
| 33 FX2 | MIX FX2 | ||
| 34 FX3 | PARAMER 1 F31 | ||
| 35 FX3 | PARAMER 2 F32 | ||
| 36 FX3 | PARAMER 3 F33 | ||
| 37 FX3 | PARAMER 4 F34 | ||
| 38 FX3 | MIX FX3 | ||
| 39 | SEQUENCER DIVISIONS SDV THIS WILL MODULATE THE DIVISION SLIDER, SO IT DEPENDS ON WERE THE SLIDER WAS LAST LEFT TO. Range is 32 to 1 | ||
| 40 SEQUENCER TEMPO TEM +/- 500 BPM RANGE. CAPS AT 0 BPM AND 1000BPM | |||
6.3 LFO
The LFO or low frequency oscillator modulation source, is the simplest and the most common form of modulation that can be found in analog synthesis. A set of values are produced based on the selected waveform, and when that waveform ends, it just starts again. Your controls are:
RATE: The rate at which the cycle of the selected waveform is completed, or simply, the speed of the modulation.
WAVE: The LFO waveform. You can choose between Triangle, Square, 25% Pulse, Trapezoid, and Chaos Saw. In each cycle, the Chaos Saw randomly generates Saw waves at a different amplitude or level.
FADE: Dynamic control over the LVL of the LFO. When set to positive values, a fade in will occur. With negative values, the LFO fades out, until it reaches 0 LVL. A value of -100 means a one shot LFO. For no fade, just set this value to 0.
DEST: Modulation destination or target
LVL: Modulation level for the selected destination. You can have negative values. This lets you change the waveform by 180 degrees. For example the Saw is falling with positive (+) values, but rising with negative () values.
6.4 Envelope
With the envelope modulation source, a set of values are produced based on a user-defined envelope. Unlike the LFO (which repeats), the envelope only executes once (single shot) when triggered. It's also a common feature found in analog synthesis, mostly used for amplitude and filter expression.
Your controls are:
A: Attack, sets the rate the values rise for the first step of the envelope.
D/R: Decay / release, determines the rate the values fall for both the decay and release steps of the envelope.
S: Sustain, sets the level at which the values hold or stay when a key is pressed.
DEST: Modulation destination or target
LVL: Modulation level for the selected destination. You can have negative values. This allows you to shape the envelope in the opposite direction.
6.5 Random
The random modulation source, is exactly what the title describes: A random value generator, or as frequently (but not correctly) described a sample and hold.
Your controls are:
RATE: Speed at which the different values are randomly produced. When the LFO is synced to the unit BPM, this will also be governed by BPM divisions
LAG: Time at which different values slide
PROB: Chances that a new value will be produced
DEST: Modulation destination or target
LVL: Modulation level for the selected destination. You can have negative values. This allows you to have the random moving into inverted values.
6.6 Step sequencer
Like the note sequencer, the step sequencer is synchronized to the Typhon's BPM setting, but the two should not be confused as both provide different functions. While the note sequencer acts like a controller playing notes, the step sequencer is just another way to modulate parameters like the Filter Cutoff or the waveforms of the Oscillators.
The step sequencer always runs at the BPM rate, and it will also take advance of the note sequencer parameter "DIVISIONS" (for more info about this go to the "Note sequencer" section). The step sequencer continuously runs in the background, but restarts with every new note trigger, or every time you press the play button (when play is already engaged, it must first be stopped before it can take action again).
Your controls are:
: Number of active steps
Step: Chosen step to edit
->LVL: Selected step value
DEST: Modulation destination or target
LVL: Modulation level for the selected destination. You can also have negative values. This lets the step sequencer modulation subtract from the destination's values.
Create a step sequencer pattern:
Let's make a simple pattern that modulates the filter cut off.
- Push down the encoder and from the menu choose option 1. INITIAL PRESET
- Set the CUTOFF knob at about 50%, and the RESON knob at about 70% so that the sound gets dark.
- Select M1 and then hit the MODE (or shift) button until "STEP" is armed
- Set the first slider (#) at 4
- Select "CUT" as destination (slider 4) and set its level at +50 (slider 5)
- Select STEP 1 (slider 2) and set its LVL at 0 (slider 3)
- Select STEP 2 (slider 2) and set its LVL at 15 (slider 3)
- Select STEP 3 (slider 2) and set its LVL at 35 (slider 3)
- Select STEP 4 (slider 2) and set its LVL at 55 (slider 3)
Now hit a note with your keyboard and you will notice that the filter is being modulated at the same BPM rate as the recorded pattern you just made. To change the pattern rate, hit SQNCR and rotate the encoder. For more info about BPM check "9. NOTE SEQUENCER"
7. The Sinevibes Effects
Typhon is equipped with a set of powerful DSP effects developed by Sinevibes.
For more info about Sinevibes, please visit www.sinevibes.com
A high-quality, 32bit codec, running at 96kHz, is used to produce these effects, providing unparalleled sound quality. The chain of effects are ordered exactly the way they are named. FX1, then FX2, and finally FX3. Only one FX type can be active for each of the 3 categories. For example, you cannot have both the delay and re-verb algorithms running at the same time, because they are both located on FX3.
When modulating an FX parameter (using any of the modulators), the algorithm that is modulated will be the one that is currently selected or armed for either FX1, FX2, or FX3.
All of the effects are stereo, but only some of them will produce a stereo element. The rest of the effects are still able to process a stereo signal.
7.1 FX1: High pass filter Distortion and Bit crush
High pass filter
This is a digital 2 pole high pass filter, which is placed in series after the VCA and before the effects chain. Although it's a resonant one, it cannot produce self oscillations. To fully by-pass the filter, set CUT to 0. Its cut off
range goes from 20HZ up to 20.000HZ
The rest of FX1 is dedicated to distortion algorithms. The Bit Crusher is also located here, as we consider it to be a distortion effect.
You can choose between 6 different algorithms:
Hard Clipping | Foldback | S-curve | Triangle Clipping | Shred | Bit Crusher
Your control values are global for all algorithms and they are:
GAIN: Distortion pre-gain
LVL: Distortion level (0 = no sound)
MIX: Effect mix
When using the Bit Crusher algorithm, GAIN becomes the sampling rate, and LVL the Bit depth.
7.2 FX2: Enhancers (Chorus, Ensemble, Flanger)
FX2 is dedicated to three different time-based delay effects and these are:
Chorus | Ensemble (a polyphonic chorus) | Flanger | Phaser | Pitch shifter
Chorus, Ensemble and Flanger:
DEPTH: Modulation amount
SPD: Modulation speed
WIDTH: When at 0, the effect is MONO. As you advance to 100 the left and right channels are split and a stereo effect is produced. At 100, both left and right channels have a 180 degree inverted modulation.
FEED: Feedback of the effect
MIX: Dry/wet balance. This parameter is global for all 3 algorithms
Barber pole phase shifter:
Based on the Bode frequency shifter algorithm configured with a positive feedback loop, which allows it to produce an audible illusion of endlessly morphing resonant spectrum sweeps. These sweeps are going "upwards" with negative phaser frequencies, or "downwards" with positive frequencies, and it's possible to seamlessly transition between these states.
SPD : moving speed
WIDTH: stereo spread
FEED : phaser feedback
MIX: dry/wet mix
Granular pitch shifter:
Granular pitch shifter uses real-time buffer recording and dual variable playback heads to speed the incoming audio up, or slow it down, changing its pitch. This algorithm features high-quality spline interpolation for ultrasmooth pitch adjustment within the range of two octaves. Its built-in feedback line also applies the pitch shift recursively – enabling creation of truly ethereal, spacey sounds.
SEMI L: sets how many semitones (up or down) the pitch changes for the left channel
SEMI R : sets how many semitones (up or down) the pitch changes for the right channel
DAMP: this is a filter (high pass at 1 to 100, and low pass at -1 to -100) on the total effect
FEED : feedback control
MIX : dry/wet mix
7.3 FX3: Reflections (Delay, Ping pong, Large Reverb, Soft Reverb, Cloud Reverb)
FX3 is dedicated to delay and reverb effects and include:
- Delay (a stereo delay that can have different delay times on each channel)
- Ping pong delay
- Large Reverb (a huge, lush reverb)
- Soft Reverb (a lite verion of teh large reverb)
- Cloud reverb (granular type reverb)
The first four effects share two common controls, that are governed from slider 4 to 5:
DAMP: A filter is added to the feedback loop of the effect. Minus values set a low pass filter and positive a High Pass one
MIX: Dry/wet balance. This parameter is global for all 3 algorithms
The 3 first controls for the Delay are:
L: Left channel delay time
R: Right channel delay time
FEED: Amount of repeats
For the Ping Pong:
TIME: Delay time
EMPTY: This control does nothing
FEED: Amount of repeats
For the Large and Soft Reverb:
PRE: Pre Delay time. A faint buzzing noise may be heard when changing values while the reverb is active
SIZE: Room size
FEED: Decay time
Cloud Reverb
This effect, continuously records audio into a buffer, and at the same time plays up to 12 separate grains from it – with each grain having its own randomised size and position within the buffer. Together with feedback and additional psychoacoustic stereo widening, this creates a lush “cloud of sound” reverb effect. Controls are:
TUNE : Detuning of each grain
SIZE: grain length
FEED : feedback
GRAIN : amount of active grains. From -12 to 12. Negative values set the playback in reverse
MIX: dry/wet mix
8. Other settings (SET page)
The right-most page "SET" allows access to the following settings:
VCO GLIDE: Portamento rate
VCO LVL: Vco1 and Vco2 level
VCF TRACK: Filter cutoff key track
VCF FFM: Filter frequency modulation (VCO2 triangle into filter cut off)
VCA LVL: Preset level
LEGATO button: Legato On or Off (will affect portamento and envelope re-trigger)
9. Note Sequencer
9.1 Controls
The note sequencer is a module that tells the Typhon what notes to play, when to play them, and how to play them. You can have from 1 to 32 steps in a sequence, covering a 6-octave range of notes.
To access the sequencer, press the SQNCR button. When in sequencer edit mode, the button will be lit. To exit the sequencer edit mode, just hit the SQNCR button again.
When in sequencer edit mode, the ENCODER now changes functions:
Rotate the encoder to change the BPM rate, or Press it Down to copy/paste a step's settings to another step.
Your sequencer controls are:
STEP: Choose the step you want to edit
OCV: Set the step's octave
NOTE: Set the step's note
GATE: Gate length. Use a value of 0 to get a note REST (no trigger) and a value of 100 to get a note TIE (which ties the current step to the next step in the sequence)
VEL: Step's velocity value. You must setup a Velocity target from the menu in order for this to work. For more info check 10.4 "Velocity"
And with shift ON (the button to the right of the sliders), you get access to these controls:
LENG: Sequence length. This also defines the max STEP value you can edit
DVS: BPM divisions
PROB: Chances that a step will be played. If a step isn't played, a rest will be produced instead.
SWI: Swing amount. For more info about swing, check this awesome article https://www.attackmagazine.com/technique/passing-notes/daw-drum-machine-swing/
9.2 Edit a sequence
Let's try to create a simple sequence of 4 steps playing C, E, G, B.
- Push down the encoder and from the menu, choose option 1. INITIAL PRESET
- Hit SQNCR, then press SHIFT (button 1) and set:
LENG = 4 (this will have 4 active steps)
DVS = 8 ( produces 8 triggers/ BPM)
PROB = 75 (this allows a 75% chances that a note will be played)
SWI = 50 (this is no swing)
- Exit SHIFT mode and select the first step to edit: With slider 1 (STEP) choose 1.
- Set :
OCV = +2
NOTE = C
GATE = 50
VEL = 0
- Then push down the encoder. A message "COPIED" will appear at the bottom right of the screen. Select STEP = 2. Then push the encoder down again. This process should paste the STEP 1 settings into STEP 2.
- At this step (2) change NOTE to E and VEL to 25
- Push the encoder again and select STEP 3. Push again to paste step's 2 settings.
- At this step (3) change the NOTE to G and VEL to 60
- Push the encoder one more time and select STEP 4. Push again to paste step's 3 settings
- Now on this step (4) change the NOTE to B and VEL to 100
Press Play. A very simple sequence will be played.
9.3 Advanced note sequencer tactics
To follow up with this tutorial, please first complete chapter 9.2 "Edit a sequence".
So, we have a sequence playing. Now let's put the VELOCITY in use:
1. Exit the sequencer edit mode by pressing the SQNCR button.
2. Press the encoder and from the menu, choose option 4. VELOCITY
3. Choose option 5. CUT
4. Set to 50
5. Press "BACK" to exit the menu.
- Adjust the CUTOFF at about 10 o'clock. You can also set the RESON to max for the result to be more dramatic.
And finally let's add a step sequencer to this:
- On the MAIN page, select M1
-
Push MODE (button 1) until you have the step sequencer armed.
-
Set: #: 5
Step: Chosen step to edit - see below
->LVL: Selected step value - see below
DEST: FX1
LVL: +100
- Choose: STEP 1 and set -> LVL 0
STEP 2 and set -> LVL 40
STEP 3 and set -> LVL 10
STEP 4 and set -> LVL 100
STEP 5 and set -> LVL 20
9.4 Note sequencer transpose
This is a constantly active feature, that allows you to transpose the notes of a note sequencer with an external midi controller.
To use it, a sequencer must be active (Play button on). By default, the base of the transpose is the middle C note found on a keyboard controller (C3). Hitting C3 will have no effect on the played notes. Anything below C3 will transpose the sequence down, and above C3 will transpose it up.
For example, if you hit D3 while a sequence is playing, the whole sequence will be transposed 2 semitones up.
Useful notes:
- The transposed note will be taken in consideration on the next available step, not on the one currently running
- Hitting many keys while on the same step will have no effect. It will only transpose to the last one played.
- Transposing a note below or above on the note range that the synth can reproduce (A0 to C8) will play the lowest or highest note available.
- Transpose will be reset to its default value (C3) each time the sequencer is stopped.
9.5 Note sequencer Record
This feature allows you to record sequences with the use of an external keyboard controller.
You can record note value and velocity amount. Gate will always be set at 50%.
Recording a new sequence:
- Press the SQNCR button to enter the sequencer edit page.
- To start recording a new sequence, press SHIFT and set STEPS # at 1
- Press SHIFT again. Now press and hold the encoder for 2 seconds. The word RECORD will appear on the lower right of the screen.
-
Hit a key. Now the RECORD is changed to APPEND and the played note values are recorded to the selected step.
-
Continue hitting keys. After 32 keys are pressed, the sequencer reaches its step limit and record mode automatically ends.
- If you want to stop recording at any other time, just hit down the encoder once, or exit the sequencer page
TIP:
RECORD = on key press, overwrite current step
APPEND = on key press record a new step after the one you have currently selected
Editing while recording, set REST and TIE:
To edit the last recorded step, you can normally use the sliders, so as to change note, octave, gate and velocity manually. This is also the way to set a step at REST or TIE.
To edit a previously recorded step (let's say you have just recorded step #8 and you want to edit step #2), just use the step slider to select step #2.
By doing this, the indication on the bottom right should be RECORD, meaning that your next key press will record step #2. Then, with the step slider, you can go back to step#8 APPEND and continue recording your sequence from the point you left it, or you can continue to record from step #3.
TIP:
You can have the sequencer playing while recording, so that you can listen to what you have edited so far.
10. Menu
To access the MENU, from the main page, push the encoder.
This will let you edit and manage some of the most useful parameters for controlling Typhon.
- Custom Targets --> M1--> Custom1 to 3 --> Target selection
M2--> Custom1 to 3 --> Target selection
M3--> Custom1 to 3 --> Target selection
- Sync options --> M1 (free, key, bpm, bpm key)
M2 (free, key, bpm, bpm key)
M3 (free, key, bpm, bpm key)
FX3 (free, bpm)
-
Mod wheel --> (targets.. 0-100)
-
Velocity --> (targets.. 0-100)
-
Aftertouch --> (targets.. 0-100)
-
Key track --> (targets.. 0-100)
-
Pitch wheel --> (1-12)
-
MIDI CC--> CC (enable or disable)
CC2 target (targets.. 0-100)
CC handling (overriding or additive)
CC list (shows the full CC documentation)
- Global settings--> Midi channels--> Input (1-16 or All)
| Output | (through | or | 1-16) | ||
| Master clock sync mode (internal or external) | |||||
| Control Handling--> Knobs (catch or jump) | |||||
| Sliders (catch or jump) NOTE: Some slider controls will always be on Jump mode! | |||||
Firmware version
Hardware check (performs a hardware check)
From this menu, you can change the destination of the custom targets located at M1,2,3. For more info check on paragraph 6.2
10.2 Sync options
You can choose how your modulators sync, with respect to the internal BPM clock or with each keyboard/sequencer trigger. This option only works for the LFO and RANDOM modulator sources.
You can also setup the delay times to be set according to the BPM. Note that max delay time is 1 sec, so trying to set anything above this, will just cap the time to 1 sec.
Entering this option will get you to the following list:
- M1
- M2
- M3
- FX3 (only FREE and BPM available - and only for the DELAY and PING PONG algorithms)
Choosing any of these will ask you to choose one of the following options:
- FREE (the modulators will run freely according to the set RATE)
- KEY (each time a new note is pressed, the modulator circles will start over)
- BPM ( all rates are now a div/mult of the BPM rate)
- BPM KEY (as above combined with KEY)
10.3 Mod Wheel
This will set one or more destinations for your controller's modulation wheel.
Upon entering this option, you will be asked to choose a destination, and then the amount for that destination. You can hit the "shift" button (the one next to the sliders) to set the selected parameter, or all the parameters to 0(if you are in the list page)
10.4 Velocity
This will set one or more destinations for the Velocity parameter.
Upon entering this option, you will be asked to choose a destination, and then the amount for that destination. Velocity orders can be sent either by an external midi controller, or by velocity values in the note sequencer. You can hit the "shift" button (the one next to the sliders) to set the selected parameter, or all the parameters to 0(if you are in the list page)
10.5 Aftertouch
This will assign aftertouch to one or more destinations.
Aftertouch is controlled by the amount of pressure applied to a key, and can be found on many synths.
After entering this option, you will be asked to choose a destination, and then the amount for that destination. You can hit the "shift" button (the one next to the sliders) to set the selected parameter, or all the parameters to 0(if you are in the list page)
10.6 Key Track
This will set one or more destinations for the key track parameter. Key tracking will add an offset, according to what note the synth plays.
Entering this option, you will be asked to choose a destination, and then the amount for that destination.
Key track can be input either by an external midi controller, or by note values in the note sequencer.
You can hit the "shift" button (the one next to the sliders) to set the selected parameter, or all the parameters to 0(if you are in the list page)
10.7 Pitch Wheel
The pitch wheel is an essential tool used while playing a keyboard, letting the player bend the pitch up or down a set number of semi-tones. Here you can choose the maximum number of semitones the pitch will bend up or down.
10.8 MIDI CC
Here you can setup MIDI CC behaviour of Typhon.
Entering this setting you have the following sub menu:
1. CC - ENABLED / DISABLED.
This will also include the program change messages. Better to turn these off when not used, as some controllers send CC orders by default
2. CC2 TARGET
This will set one or more targets for the CC2 parameter.
CC2 is a midi order originally associated with breath controllers, that can be used by an external controller or by a DAW. Upon entering this option, you will be asked to choose a destination, and then the amount for that destination. You can hit the "shift" button (the one next to the sliders) to set the selected parameter, or all the parameters to 0(if you are in the list page)
3. CC HANDLING- OVERRIDING / ADDITIVE
This indicated what will the incoming CC value will do: Override and completely ignore previous value, or add its value to the current one.
4. CC LIST
This is just a list of midi CCs for reference, which can't be edited.
10.9 Global settings
1. MIDI CHANNELS -> INPUT (1-16 or ALL)
OUTPUT (1-16 or THROUGH)
Here you can select at what channel your synth responds to.
2. MASTER CLOCK - INTERNAL / EXTERNAL
This is a choice of whether the synth will have its internal BPM setting, or respond to an external MIDI clock, send by other MIDI devices
3. CONTROL HANDLING
Here you can choose if your sliders / knobs respond directly to changes (JUMP), or if the user must pass over the current stored value before changes start to apply(GRAB).
4. FIRMWARE VESRION
Just a number indicating your current firmware version
5. HARDWARE CHECK
This is mostly used on our workshop to check the synth. Feel free to try it out.
6. SCREEN SAVER
This is used to set the screen in an OFF state, when it's not in use so as to extend its life. We strongly suggest to have it engaged, even on the 10 minute circle. Time starts counting from the moment the screen (NOT the synth) is left inactive. When the set time passes with no changes, the screen will turn black and you can exit this mode with one of the following ways:
- Turn or push the encoder
- Hit the SHIFT button
- Apply any change to the screen. Note that if you have the sliders on grab mode, the screen will not go ON until a change to the values is applied.
11. MIDI implementation
Typhon can accept the following MIDI messages:
- Note ON/OFF
- Note Number
- Aftertouch
- Velocity
- Modulation Wheel
- Pitch Bend
- MIDI CC
- Programm changes
- Clock
- Transport messeges
Here is a list of the currently open CC orders
| 1. MOD WHEEL ... 63. M2 CUT LEVEL | ||
| 2. CC2 33. VCF EG LEVEL ... | ||
| 3. RESONANCE 34. VCA EG ATTACK | 65. M2 VCA LEVEL | |
| 4. CUTOFF 35. VCA EG DECAY 66. | M2 FX1 LEVEL | |
| 5. WAVE 36. VCA EG SUSTAIN 67. | M2 FFM LEVEL | |
| 6. OSC 2 TUNE 37. VCA EG RELEASE | 68. M2 FX2 LEVEL | |
| 7. GLIDE AMOUNT 38. VCA EG TIME | 69. M2 FX3 LEVEL | |
| 8. VCO'S LEVEL | ... 70. M2 CUSTOM 1 LEVEL | |
| 9. FILTER TRACKING | 40. M1 PARAMETER 1 | 71. M2 CUSTOM 2 LEVEL |
| ... 41. M1 PARAMETER 2 | 72. M2 CUSTOM 3 LEVEL | |
| 11. FILTER FM AMOUNT | 42. M1 PARAMETER 3 | 73. M3 PARAMETER 1 |
| 12. HP CUT OFF | 43. M1 CV LEVEL | 74. M3 PARAMETER 2 |
| 13. HP RESONANCE 44. M1 CV1 LEVEL | 75. M3 PARAMETER 3 | |
| 14. FX1 PARAMETER 1 | 45. M1 CV2 LEVEL | 76. M3 CV LEVEL |
| 15. FX1 PARAMETER 2 | 46. M1 WAVE LEVEL | 77. M3 CV1 LEVEL |
| 16. FX1 MIX | 47. M1 CUT LEVEL | 78. M3 CV2 LEVEL |
| 17. FX2 PARAMETER 1 | 48. M1 VCA LEVEL | 79. M3 WAVE LEVEL |
| 18. FX2 PARAMETER 2 | 49. M1 FX1 LEVEL | 80. M3 CUT LEVEL |
| 19. FX2 PARAMETER 3 | 50. M1 FFM LEVEL 81. M3 VCA LEVEL | |
| 20. FX2 PARAMETER 4 | 51. M1 FX2 LEVEL | 82. M3 FX1 LEVEL |
| 21. FX2 MIX | 52. M1 FX3 LEVEL | 83. M3 FFM LEVEL |
| 22. FX3 PARAMETER 1 | 53. M1 CUSTOM 1 LEVEL | 84. M3 FX2 LEVEL |
| 23. FX3 PARAMETER 2 | 54. M1 CUSTOM 2 LEVEL | 85. M3 FX3 LEVEL |
| 24. FX3 PARAMETER 3 | 55. M1 CUSTOM 3 LEVEL | 86. M3 CUSTOM 1 LEVEL |
| 25. FX3 PARAMETER 4 | 56. M2 PARAMETER 1 | 87. M3 CUSTOM 2 LEVEL |
| 26. FX3 MIX | 57. M2 PARAMETER 2 | 88. M3 CUSTOM 3 LEVEL |
| 27. VCF EG ATTACK | 58. M2 PARAMETER 3 | 89. SEQ LENGTH |
| 28. VCF EG DECAY | 59. M2 CV LEVEL | 90. SEQ DIVISION |
| 29. VCF EG SUSTAIN | 60. M2 CV1 LEVEL | 91. SEQ PROBABILITY |
| 30. VCF EG RELEASE | 61. M2 CV2 LEVEL | 92. SEQ SWING |
| 31. VCF EG TIME | 62. M2 WAVE LEVEL |
12. Shortcuts and hidden functions
- On preset save : You can hold down "shift" button (the button next to the sliders) to delete all characters. You can click once the "shift" button to delete the selected character
- Modulators custom target selection : while you are on the custom target that you want to change you press and hold the shift button. That will pop up a menu, where you have to choose the parameter you want to affect.
- Menu modulations (Mod wheel, Velocity, Aftertouch, Key track, CC2) You can hit the SHIFT button to set the selected parameter, or all the parameters to 0 (if you are in the list page)
- Note Sequencer record: Press the SQNCR button to enter the sequencer edit page. Now press and hold the encoder for 2 seconds. The word RECORD will appear on the lower right of the screen.
- Note Sequencer step copy: Press the SQNCR button to enter the sequencer edit page. Hit down the encoder. A message "COPIED" will appear at the bottom right of the screen. Select another step. Then push the encoder down again. The original step is now copied to the selected one.
13. Specifications
USB powered (at least 1000mA)
60 Playing hours with 20,000mA portable power bank
MIDI Din5 IN and OUT
14 inch unbalanced Stereo Out
18 inch balanced Headphone Out
18 inch unbalanced Mono Audio In (for routing via Typhon FX)
Dimensions: 23 x 13 x 6 cm
Weight: 1kg

- Connections
- Presets
- Modulators (M1,M2,M3)
- The Sinevibes Effects (FX1, FX2, FX3)
- Note Sequencer
- Menu
- Introduction
- Key features
- In the Box
- Block Diagram
- TYPHON
- QUICK START GUIDE
- Powering considerations
- So, you're thinking, "Can I use any USB power supply?"
- Bad power supply (or cable) side effects:
- External Audio Input - Using the device as an effects box
- Two ways:
- 3.Direct analog engine controls (left side)
- Screen general manual
- Loading presets:
- Saving presets:
- Modulators
- General
- Modulator destinations (DEST) and Custom targets :
- LFO
- Envelope
- Your controls are:
- Random
- Step sequencer
- : Number of active steps
- Create a step sequencer pattern:
- The Sinevibes Effects
- FX1: High pass filter Distortion and Bit crush
- High pass filter
- FX2: Enhancers (Chorus, Ensemble, Flanger)
- Chorus, Ensemble and Flanger:
- Barber pole phase shifter:
- Granular pitch shifter:
- FX3: Reflections (Delay, Ping pong, Large Reverb, Soft Reverb, Cloud Reverb)
- The 3 first controls for the Delay are:
- For the Large and Soft Reverb:
- Cloud Reverb
- Other settings (SET page)
- Controls
- Your sequencer controls are:
- Edit a sequence
- Advanced note sequencer tactics
- Note sequencer transpose
- Useful notes:
- Note sequencer Record
- Recording a new sequence:
- TIP:
- Editing while recording, set REST and TIE:
- Sync options
- Mod Wheel
- Velocity
- Aftertouch
- Key Track
- Pitch Wheel
- MIDI CC
- CC - ENABLED / DISABLED.
- CC2 TARGET
- CC HANDLING- OVERRIDING / ADDITIVE
- CC LIST
- Global settings
- MIDI CHANNELS -> INPUT (1-16 or ALL)
- MASTER CLOCK - INTERNAL / EXTERNAL
- CONTROL HANDLING
- FIRMWARE VESRION
- HARDWARE CHECK
- SCREEN SAVER
- MIDI implementation
- Shortcuts and hidden functions
- Specifications
Brand : Dreadbox
Model : Typhon
Category : Synthesizer