
MDRC345FEE01 - Freezer MIDEA - Free user manual and instructions
Find the device manual for free MDRC345FEE01 MIDEA in PDF.


| Product type | Freezer |
| Brand | Midea |
| Model | MDRC345FEE01 |
| Net capacity | 345 liters |
| Energy class | A+ |
| Annual energy consumption | 250 kWh |
| Dimensions (W x D x H) | 1050 x 650 x 850 mm |
| Net weight | 45 kg |
| Power supply | 220-240 V, 50 Hz |
| Freezing temperature | -18 °C |
| Quick freeze function | Yes |
| Defrost type | Manual |
| Lining material | Steel |
| Insulation | Polyurethane foam |
| Noise level | 42 dB(A) |
| Climate class | SN-N-ST |
| Safety | Secure closure with handle |
| Maintenance and cleaning | Manual defrost, clean with soft cloth |
| Spare parts | Available through Midea after-sales service |
| Repairability | Repairability index: 8.0/10 |
| Warranty | 2 years |
Frequently Asked Questions - MDRC345FEE01 MIDEA
User questions about MDRC345FEE01 MIDEA
0 question about this device. Answer the ones you know or ask your own.
Ask a new question about this device
Download the instructions for your Freezer in PDF format for free! Find your manual MDRC345FEE01 - MIDEA and take your electronic device back in hand. On this page are published all the documents necessary for the use of your device. MDRC345FEE01 by MIDEA.
USER MANUAL MDRC345FEE01 MIDEA
Chest Freezer
ELECTRONIC CONTROL SERIES
USER MANUAL
MDRC152FEE MDRC207FEE
MDRC280FEE MDRC345FEE
MDRC405FEE MDRC564FEE
LANGUAGES
EN English
DE Deutsch
IT Italian
FR French
ES Spanish
PT Portuguese
GR Greek
PL Polish
SR Serbian
HR Republic of Croatia
HU Hungary
SL Slovenia
RO Romania
BG Bulgaria
AL Albanian
CZ Czech
SK Slovak
LT Lithuania
LV Latvian
THANK YOU LETTER
Thank you for choosing Midea! Before using your new Midea product, please read this manual thoroughly to ensure that you know how to operate the features and functions that your new appliance offers in a safe way.
CONTENTS
THANK YOU LETTER 01
SPECIFICATIONS 02
PRODUCT OVERVIEW....03
PRODUCT INSTALLATION....04
OPERATION INSTRUCTIONS 06
CLEANING AND MAINTENANCE....11
TROUBLESHOOTING....12
APPENDIX....14
SPECIFICATIONS
| Product model | MDRC152FEE | MDRC207FEE | MDRC280FEE |
| Rated Voltage / Frequency 220-240V~/50Hz | |||
| Freezer compartment Volume(L) 99 142 198 | |||
| Freezing Capacity(kg/24h) 4.5 6.5 9 | |||
| Temperature Rise Time(h) 17 15 21 | |||
| Refrigerant,Amount(g) R600a,42 R600a,46 R600a,56 | |||
| Overall Dimension (WxDxH)mm 545*495*850 | 632*550*850 | 816*550*850 | |
| Product model | MDRC345FEE | MDRC405FEE | MDRC564FEE |
| Rated Voltage / Frequency | 220-240V~/50Hz | ||
| Freezer compartment Volume(L) | 249 | 290 | 418 |
| Freezing Capacity(kg/24h) | 11.5 | 14 19 | |
| Temperature Rise Time(h) | 28 | 45 | 50 |
| Refrigerant,Amount(g) | R600a,66 | R600a,62 | R600a,100 |
| Overall Dimension (WxDxH)mm | 985*600*850 | 1115*670*850 | 1416*750*825 |
PRODUCT OVERVIEW
Names of components

1 Door handle (optional) 2 Lamp (optional) 3 Shelving basket (optional) 4 Power cord 5 Shutter 6 Temperature control panel
7 Drainage hole 8 Cabinet

ATTENTION
Images shown here are intended as examples only.
PRODUCT INSTALLATION
Installation Instructions
For refrigerating appliances with climate class
- Depending on the climate class, this refrigerating appliance is intended to be used at ambient temperatures within the range specified in the following table.
- The climate class can be found on the rating plate. The product may not operate properly at temperatures outside the specific range. You can find the climate class on the product label.
Effective temperature range
The product is designed to operate normally within the temperature range specified by its class rating.
| Class Symbol | Ambient temperature range °C | ||
| IEC 62552 (ISO 15502) ISO 8561 | |||
| Extended temperate SN | + 10 to + 32 | + 10 to + 32 | |
| Temperate N + 16 to + 32 | + 16 to + 32 | ||
| Subtropical ST + 16 to + 38 | + 18 to + 38 | ||
| Tropical T + 16 to + 43 | + 18 to + 43 | ||
Dimensions and Clearances
Too small a distance from adjacent items may result in degradation of freezing capability and increased electricity costs. Allow over 100 mm of clearance from each adjacent wall when installing the appliance.


ATTENTION
The picture above is only for reference. The actual configuration will depend on the physical product or statement by the distributor.
Connecting the appliance
After installing the appliance, connect the power plug into a socket outlet.

- Open the cover plate from the side with the tool.
- Open the cover plate, take out the power cord, and then cover the cover plate.

ATTENTION
After connecting the power supply cord (or plug) to the outlet, wait 2 or 3 hours before you put food into the appliance. If you add food before the appliance has cooled completely, your food may spoil.
Changing the light (optional)
Any replacement or maintenance of the LED lamps is intended to be made by the manufacturer, its service agent or similar qualified person.
OPERATION INSTRUCTIONS
Control panel
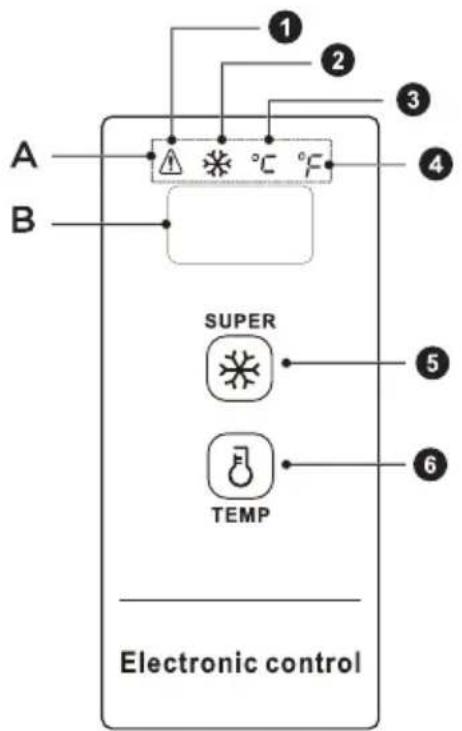
EN
| Operation key and lamp | |
| 1. High temperature warming indicator lamp A. Indicator lamp display area | |
| 2. Super-freeze indicator lamp B. Temperature display area | |
| 3. Centigrade temperature indicator lamp | |
| 4. Fahrenheit temperature indicator lamp | |
| 5. Super-freeze key | |
| 6. Tempering key | |
Display control
- When power on the freezer, the display window will be on for 3s, and then it will enter normal operation display, the original electrified display shall be under 18°C • Display of normal operation:
- If there is no failure, the set temperature or function mode will be displayed;
- If there is any failure, the failure code will be displayed;
Show sleep function:
- The sleep function will open by default after electrifying, after the temperature is confirmed, the display will extinguish after another 30s. The sleep mode could be switched via combined key:
- By pressing tempering key “ 8 ” and super-freeze key “ * ” for 5s simultaneously, when “ON” is displayed in the temperature display area once, it indicates the sleep function is opened.
- By pressing the tempering key “8” and the super-freeze key “5” simultaneously for 5 seconds, when “OF” is displayed in the temperature display area once, it indicates that the sleep function is closed.
Operation control:
- Open the sleep function. After each temperature confirmation for tempering, the display area will extinguish for another 30 seconds.
- Close the sleep function. After each temperature confirmation for tempering, the display area will not extinguish and will remain on.
Lock/Unlock
After initial electrification, the key is in lock state by default; it is required to operate after unlocking.
- Lock: after pressing the super-freeze key “📋” continuously for 3 seconds, the display area will blink once, and the set temperature will take effect immediately. Once entering lock state, the display area will not blink; after no-key operation for 30 seconds, it could also enter automatic lock state, and the display area will blink once.
- Unlock: after pressing the super-freeze key “*” continuously for 3 seconds, the display area will blink once to unlock. Under the lock state, it is required to conduct key operation after unlock.
IMPORTANT:
The various following key operations shall be implemented under unlock state.
Fahrenheit and centigrade temperature conversion
- By long pressing the tempering key “TEMP” for 3 seconds, Fahrenheit and centigrade temperature conversion could be implemented. When the centigrade temperature is displayed, the centigrade temperature indicator lamp is on; and when the Fahrenheit temperature is displayed, the Fahrenheit temperature indicator lamp in the display area will be on.
Temperature Setting
- By pressing the tempering key “the display window will display the refrigerator temperature, by pressing the tempering key” once every time, the refrigerator temperature will change 1 degree Celsius/Fahrenheit.

ATTENTION
For settings of -30°C/-22°F, an ambient temperature of 25°C/77°F or less is recommended.
The specific temperature change is cycled according to the figure below:

By pressing the super-freeze key “*”, the super-freeze indicator lamp “*” will turn on.
When setting the centigrade temperature, “-30” will be displayed in the temperature display area. If the compressor operates continuously, the centigrade temperature indicator lamp “°C” will turn on.
When setting the Fahrenheit temperature, “-22” will be displayed in the temperature display area. If the compressor operates continuously, the Fahrenheit temperature indicator lamp “°F” will turn on.
Quit super-freeze:
- Power on after power failure.
- Continuous operation of compressor for 24 hours.
- If sensor failure occurs under super-freeze mode, you can quit super-freeze.
- Under super-freeze mode, you can quit the super-freeze mode by repressing the super-freeze key "SUPER".
High temperature alarm
- The indicator lamp “⚠️” will turn on for high temperature alarm.
Power failure memory
- During power failure, the sudden operating state of power failure will be locked. After power is recovered, the operation shall be continued according to the setting before the power failure. The super-freeze function will be quitted after power failure.
Failure code
If a failure occurs, the display area will show corresponding error codes as listed in the table below. The user should contact a specialist for maintenance to ensure the normal operation of the freezer.
Fault Code Fault Description
E2 Temperature sensor failure
Tips on storing food
- The low temperature of the freezer can keep food fresh for a long time and is mainly used for storing frozen foods and making ice.
- The freezer is suitable for storing meat, fish, shrimp, pastries, and other foods that are not to be consumed in the short term. Do not store fluids in bottled or closed containers, such as bottled beer, beverages, etc.
- It is not suitable to store bottled or closed containers of fluid items for a long time. If you want to store such items, they should not be placed close to the wall of the freezer.
- There may be a slight deviation between the temperature inside the box and the actual set temperature, which does not affect normal use.
- Please note that food should be consumed within its shelf life.
- The fast-freezing function is designed to preserve the nutritional value of food. It can quickly freeze food in a short time. If a large amount of food needs to be frozen at once, it is recommended that users turn on the fast-freezing function 5 hours in advance. This increases the freezing speed, allowing food to be frozen quickly and effectively retaining its nutrients.
ATTENTION
• After long-term use, there may be some wear on the hinge, which can cause noise when opening or closing the door and reduce the hinge's service life. It is recommended to apply grease to the hinge regularly for maintenance, which can effectively eliminate noise and extend the hinge's lifespan. • The weight of objects in the basket should not exceed 5 kg. - If the product is packaged in thin film, condensation may form on the surface of the box and the film when the temperature and humidity of the transportation environment change rapidly. This is a normal physical phenomenon and does not affect the use of the product.
CLEANING AND MAINTENANCE
Your freezer is designed for year-round use and requires minimal cleaning and maintenance. To keep your freezer running efficiently and odor-free, we recommend cleaning it regularly.
Defrost
Freezer shall be manually defrosted.
- Unplug the freezer and open the freezer door, remove foods and shelving basket before defrosting; Open the outflow hole and drainage hole (and place water container at the outflow hole); indoor frost will naturally melt, wipe the defrost water with a dry, soft cloth. When the frost softens, an ice scraper might be used to the accelerate de-icing process.
- Please remove the food and put in a cool place when defrosting before removing accessories.
Stop using
- Power failure: Foods can be preserved for a couple of hours even in summer in case of power failure; it is recommended to reduce the frequency of opening door and do not put fresh foods into the freezer.
- Long-time nonuse: Please unplug the freezer left unused for a long time for cleaning. Keep the door open to avoid the bad odor.
- Moving: Do not turn upside or vibrate the freezer, the carrying angle can not be greater than 45° . Do not hold the door and hinge when moving this unit.
ATTENTION
- Other mechanical devices or other means shall not be used to accelerate except those recommended by the manufacturer. Do not damage the refrigerant circuit.
- Continuous operation is recommended when the freezer is started. Please do not stop the freezer under normal circumstances so as not to affect the freezer's service life.
TROUBLESHOOTING
The following simple issues can be handled by the user. Please call the after-sale service department if the issues are not solved.
| Problem Possible reason | |
| Not work | ·Whether the freezer is plugged and connected to power; |
| ·Low voltage | |
| ·Whether temperature control knob is in the work area | |
| ·Failure power or tripping circuit. | |
| Odor | ·Odorous foods should closely wrapped; |
| ·Check whether there is any rotten food | |
| ·Whether the interior shall be cleaned. | |
| Long-term operation of compressor | ·It is normal that freezer operates for longer time in summer when the ambient temperature is higher; |
| ·Do not put too much food in the freezer at one time; | |
| ·Do not put foods until they are cooled; | |
| ·Frequent opening of freezer door; | |
| ·Thick frost layer (defrost is needed). | |
| Light not work | ·Whether the freezer is connected to power, whether the light is damaged. |
| Door can not be properly closed | ·The freezer door is stuck by food packages; |
| ·Too much food; | |
| ·Unbalanced freezer. | |
| Loud noises | ·Whether the floor is flat, whether the placement of freezer is stable; |
| ·Whether the freezer accessories are properly placed. | |
| Transient difficulty in door opening | ·After refrigeration, there will be pressure difference between the inside and outside of the freezer to result in transient difficulty in door opening. This is a normal physical phenomenon. |
| Over heat on sidewall | ·The freezer enclosure may emit heat during operation specially in summer, this is caused by the radiation of the condenser, and it is a normal phenomenon. |
| Surface Condensation | ·Condensation: condensation phenomenon will be detected on the exterior surface and door seals of the freezer when the ambient humidity is high, this is a normal phenomenon,and the condensation can be wiped away with a dry towel. |
| Airflow sound Buzz Clatter | ·Refrigerants circulating in the refrigerant lines will produce eruption of sound and grunts which is normal does not affectthe cooling effect. |
| ·Buzz will be generated by running compressor specially when starting up or shutting down. | |
| ·The solenoid valve or electric switch valve will clatter which is a normal phenomenon and does not affect the operation. | |
EN
APPENDIX
Special for new European standard
The ordered parts in the following table can be acquired from the Service provider channel.
| Ordered part Provided by | Minimum time required for Provision | |
| Thermostats Professional maintenance personnel | At least 7 years after the last model is launched on the market | |
| Temperature sensors | Professional maintenance personnel | At least 7 years after the last model is launched on the market |
| Printed circuit boards | Professional maintenance personnel | At least 7 years after the last model is launched on the market |
| Light sources Professional maintenance personnel | At least 7 years after the last model is launched on the market | |
| Door handles Professional repairers and final users | At least 7 years after the last model is launched on the market | |
| Door hinges Professional repairers and final users | At least 7 years after the last model is launched on the market | |
| Trays Professional repairers and final users | At least 7 years after the last model is launched on the market | |
| Baskets Professional repairers and final users | At least 7 years after the last model is launched on the market | |
| Door gaskets Professional repairers and final users | At least 10 years after the last model is launched on the market | |
Dear customer,
- If you want to return or replace the product, please contact the store where you bought it.
(Remember to bring the purchase invoice.)
- If your product breaks down and needs repair, please contact the after-sales service provider.

ATTENTION
The model information in the product database, as well as the model identifier, can be obtained through a weblink scanned by a QR code, if any, on the energy efficiency label of the product.
For more information about the energy efficiency of the appliance, visit https://ec.europa.eu and search using the model name.
The model name can be found on the rating label of the appliance.
1 Door handle (optional) 2 Lamp (optional) 3 Shelf basket (optional) 4 Power cord 5 Ventilation grille 6 Temperature controller
TROUBLESHOOTING 12
APPENDIX 14
TECHNICAL SPECIFICATIONS
PRODUCT INSTALLATION
PRODUCT OVERVIEW....03
PROBLEMS AND SOLUTIONS....12
APPENDIX....14
SPECIFICATIONS
PRODUCT INSTALLATION....04
OPERATING INSTRUCTIONS....06
CLEANING AND MAINTENANCE 11
TROUBLESHOOTING 12
APPENDIX....14
SPECIFICATIONS
1 Door handle (optional) 7 Drain outlet 2 Lamp (optional) 8 Housing 3 Basket (optional) 4 Power cord 5 Lock 6 Temperature control display

CAUTION
- Open the cover plate on the side using a tool.
- Open the cover plate, remove the power cord, and then close the cover plate.

CAUTION
After connecting the power cord (or plug) to the outlet, wait 2 or 3 hours before placing food in the appliance. If you add food before the appliance is completely cooled, food may spoil.
Replacing the light bulbs (optional)
- Any replacement or maintenance of LED bulbs is intended for the manufacturer, its service agent, or a similarly qualified person.
INSTRUCTIONS FOR USE
Control panel

| Kontrolni tasteri i sijalica | |
| 1. Lampica indikatora za visoku temperaturu | A. Oblast prikaza lampice indikatora |
| 2. Lampica indikatora za brzo zamrzavanje B. Oblast za prikaz temperature | |
| 3. Lampica indikatora za temperaturu u stepenima Celzijusa | |
| 4. Lampica indikatora za temperaturu u stepenima Farenhajtima | |
| 5. Taster brzog zamrzavanja | |
| 6. Taster za podešavanje temperature | |
Display screen
- When the freezer is turned on, the screen window lights up for 3 seconds, and then enters the standard operating mode. After being plugged in, the screen displays a temperature below 18 °C.
- Standard operating mode display:
- If there is no fault, the set temperature or operating mode is displayed;
- If there is any malfunction, a fault code is displayed;
Display of sleep function:
- The sleep function will be activated by default after powering on. When the temperature is confirmed, the screen will turn off after the next 30 seconds. The sleep mode can be toggled using the button combination:
- Press and hold the temperature setting button “TEMP” and the quick freeze button “SUPER” simultaneously for 5 seconds. When “ON” is displayed once in the temperature display area, it means the sleep function is active.
- Press and hold the temperature setting button “TEMP” and the quick freeze button “SUPER” simultaneously for 5 seconds. When “OFF” is displayed once in the temperature display area, it means the sleep function is closed.
Operation control:
- Open the sleep function. Each time you confirm the temperature during temperature setting, the display area turns off for an additional 30 seconds;
- Close the sleep function. Each time you confirm the temperature during temperature setting, the display area does not turn off, but continues to operate.
Temperature setting range in degrees Fahrenheit:

Quick freeze function
Entering quick freeze mode:
When you press the quick freeze button “SUPER”, the quick freeze indicator light “*” turns on.
When setting the temperature in degrees Celsius, the temperature display area shows “-30”. If the compressor continues to run, the Celsius temperature indicator light “°C” will be on.
When setting the temperature in degrees Fahrenheit, the temperature display area shows “-22”. If the compressor continues to run, the Fahrenheit temperature indicator light “°F” will be on.
Exiting quick freeze mode:
1 Door handle (optional) 2 Light (optional) 3 Shelf basket (optional) 4 Power cord 5 Latch 6 Temperature control panel
7 Drain outlet 8 Cabinet
CAUTION
- Using a tool, open the cover plate on the side.
- Open the cover plate, take out the power cord, and then close the cover plate.

CAUTION
After connecting the power cord (or plug) to the outlet, wait 2 or 3 hours and then put food in the appliance. If you put food in before the appliance is completely cooled, the food may spoil.
Temperature setting range in degrees Fahrenheit:

Super-freeze function
To activate super-freeze:
1 Door handle (optional) 2 Light (optional) 3 Shelf basket (optional) 4 Power cord 5 Flap 6 Temperature control panel
ANNEX 14
EN
SPECIFICATIONS
PRODUCT INSTALLATION
MDRC152FEE MDRC207FEE MDRC280FEE
Rated voltage/frequency 220–240 V~/50 Hz
- Using a tool, open the side cover.
- Open the cover, pull out the power cord, then close the cover.

WARNING
PRODUCT OVERVIEW 03
PRODUCT INSTALLATION 04
INSTRUCTIONS FOR USE 06
CLEANING AND MAINTENANCE 11
TROUBLESHOOTING 12
APPENDIX 14
SPECIFICATIONS
make yourself at home

- USER MANUAL
- LANGUAGES
- THANK YOU LETTER
- CONTENTS
- SPECIFICATIONS
- PRODUCT OVERVIEW
- NAMES OF COMPONENTS
- ATTENTION
- PRODUCT INSTALLATION
- INSTALLATION INSTRUCTIONS
- FOR REFRIGERATING APPLIANCES WITH CLIMATE CLASS
- EFFECTIVE TEMPERATURE RANGE
- DIMENSIONS AND CLEARANCES
- CONNECTING THE APPLIANCE
- CHANGING THE LIGHT (OPTIONAL)
- OPERATION INSTRUCTIONS
- CONTROL PANEL
- DISPLAY CONTROL
- LOCK/UNLOCK
- IMPORTANT
- FAHRENHEIT AND CENTIGRADE TEMPERATURE CONVERSION
- TEMPERATURE SETTING
- HIGH TEMPERATURE ALARM
- POWER FAILURE MEMORY
- FAILURE CODE
- FAULT CODE FAULT DESCRIPTION
- TIPS ON STORING FOOD
- CLEANING AND MAINTENANCE
- DEFROST
- STOP USING
- TROUBLESHOOTING
- APPENDIX
- SPECIAL FOR NEW EUROPEAN STANDARD
- DEAR CUSTOMER
- TECHNICAL SPECIFICATIONS
- CAUTION
- REPLACING THE LIGHT BULBS (OPTIONAL)
- INSTRUCTIONS FOR USE
- DISPLAY SCREEN
- QUICK FREEZE FUNCTION
- SUPER-FREEZE FUNCTION
- MDRC152FEE MDRC207FEE MDRC280FEE
- WARNING
Brand : MIDEA
Model : MDRC345FEE01
Category : Freezer