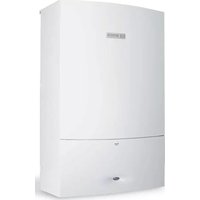
Condens 5000W - Heating BOSCH - Free user manual and instructions
Find the device manual for free Condens 5000W BOSCH in PDF.


| Product Type | Wall-hung gas condensing boiler |
| Brand | Bosch |
| Model | Condens 5000W |
| Dimensions (H x W x D) | 700 x 400 x 300 mm |
| Weight | 30 kg |
| Power Supply | 230 V / 50 Hz |
| Rated Heating Output | 24 kW |
| Rated Heating Input (max) | 26.5 kW |
| Energy Efficiency Class | A (ErP directive) |
| Flue Type | Room-sealed (C13, C33, C53) |
| Gas Type | Natural gas (G20) / LPG (G31) convertible |
| Main Functions | Central heating and domestic hot water (combi version) |
| Control Interface | Digital display with rotary knobs and buttons |
| Maintenance | Annual service by qualified engineer; cleaning of heat exchanger and burner |
| Safety Features | Frost protection, overheat protection, flame supervision, pressure relief valve |
| Spare Parts Availability | Standard Bosch spare parts widely available through distributors |
| Reparability Index | 8.5 / 10 (estimated) |
Frequently Asked Questions - Condens 5000W BOSCH
User questions about Condens 5000W BOSCH
0 question about this device. Answer the ones you know or ask your own.
Ask a new question about this device
Download the instructions for your Heating in PDF format for free! Find your manual Condens 5000W - BOSCH and take your electronic device back in hand. On this page are published all the documents necessary for the use of your device. Condens 5000W by BOSCH.
USER MANUAL Condens 5000W BOSCH
Installation and Maintenance Instructions
Hydronic gas system boiler 18kW
Bosch Condens 5000W
ZSB18 - 2A
natural_image
Line drawing of a white rectangular device with a circular base and top panel, no text or symbols present.Table of contents
1 Explanation of symbols and safety instructions ..... 3
1.1 Explanation of symbols .... 3
1.2 General safety instructions .... 3
2 Product Information .... 5
2.1 Boiler carton contents....6
2.2 Technical data....7
2.3 Layout....8
3 Pre-Installation....11
3.1 Cleaning primary systems .... 11
3.2 Mains supply....11
3.2.1 Electrical supply....11
3.2.2 Equipotential (earth) bonding....11
3.2.3 Gas supply 11
3.3 Water system and pipe work .... 11
3.4 Condensate pipe work....13
3.4.1 Internal connections .... 13
3.5 Pressure relief drain line .....14
3.6 Boiler location and clearances .... 15
3.6.1 Installation location....15
3.6.2 Servicing clearances - ventilated compartment. . . . . 15
3.6.3 Compartments....15
3.7 Plumbing manifold .... 16
3.7.1 Connections....16
3.8 Flue options .... 17
3.9 Flue options .... 19
4 Installation ....20
4.1 Unpacking the wall frame and ancillary items .... 20
4.2 Wall mounting template and flue opening.....21
4.3 Unpacking the boiler .... 22
4.4 Boiler connections....23
4.5 Flue installation .... 25
4.5.1 Measuring the flue (standard flue) ..... 25
4.5.2 Flue terminal plume re-direction....27
4.6 Condensate connection....28
4.7 Electrical....29
5 Commissioning....31
5.1 Pre-commissioning checks .... 31
5.2 Filling the system .... 32
5.3 Water treatment .... 32
5.4 Starting the boiler .... 33
5.5 Commissioning....34
5.5.1 Checking the gas inlet pressure....34
5.5.2 Checking the gas rate....34
5.5.3 Domestic Hot Water: Controlling the hot water temperature....35
5.6 Starting the boiler .... 35
5.6.1 Replace outer casing:....35
5.6.2 Fitting fascia flap ....35
5.6.3 Installing bottom panel .... 35
5.6.4 Handover ....35
6 Servicing and spares .... 36
6.1 Inspection and service:....36
6.2 Check the gas inlet pressure .... 37
6.3 Checking flue integrity....37
6.4 Fan pressure test .... 37
6.5 Flue gas analysis....38
6.6 Setting the air/gas ratio .... 39
6.6.1 Setting the CO/CO2....39
6.7 Checking the heat exchanger .... 40
6.8 Replacement of parts .... 42
6.8.1 Removing the outer case .... 43
6.8.2 Primary sensor .... 43
6.8.3 Overheat thermostat....43
6.8.4 Flue overheat thermostat (with grommet) ..... 43
6.8.5 Moving the control panel to the service position . . . . 44
6.8.6 Gas valve....44
6.8.7 Air/gas manifold and fan assembly....45
6.8.8 Fan .... 45
6.8.9 Electrode assembly and burner .... 46
6.8.10 Heat exchanger .... 47
6.8.11 Access to boiler control components ..... 48
6.8.12 PCB fuse....48
6.8.13 Transformer/PCB 49
6.8.14 Replacing the control panel....49
6.8.15 Syphon removal....50
6.8.16 Diverter valve motor (if option integral diverter valve fitted) .... 50
6.8.17 Diverter valve (if option integral diverter valve fitted) .... 50
6.8.18 Auto air vent .... 51
6.8.19 Pump head .... 51
6.8.20 Drain tap....51
6.8.21 Pressure gauge....52
6.8.22 Hydraulic block removal .... 52
6.8.23 CH pressure relief valve .... 53
6.8.24 Bypass valve....53
6.8.25 Expansion vessel .... 53
6.9 Short parts list .... 55
7 Fault finding and diagnosis....56
7.1 Fault finding....56
7.1.1 Circuit diagram....58
7.2 Boiler operation function....59
7.3 Boiler protection function .... 60
8 Technical Specifications/Logs....61
8.1 Commissioning report for the appliance ..... 61
8.2 Inspection and maintenance checklist ..... 63
8.2 Inspection and maintenance checklist ..... 63
1 Explanation of symbols and safety instructions
1.1 Explanation of symbols
Warnings
In warnings, signal words at the beginning of a warning are used to indicate the type and seriousness of the ensuing risk if measures for minimising danger are not taken.
The following signal words are defined and can be used in this document:

DANGER:
DANGER indicates that severe or life-threatening personal injury will occur.

WARNING:
WARNING indicates that severe to life-threatening personal injury may occur.

CAUTION:
CAUTION indicates that minor to medium personal injury may occur.
NOTICE:
NOTICE indicates that material damage may occur.
Important information

The info symbol indicates important information where there is no risk to people or property.
Additional symbols
Symbol Meaning
▶ a step in an action sequence
→ a reference to a related part in the document
- a list entry
-a list entry (second level)
Table 1
1.2 General safety instructions
PLEASE READ THESE INSTRUCTIONS CAREFULLY BEFORE STARTING INSTALLATION.
This installation manual is only applicable to the model of boiler stated on the front cover of this manual.
This boiler must be installed by an authorised person only. Failure to install this boiler correctly could lead to prosecution.
If you are in any doubt contact the Robert Bosch technical hotline on:
1300 30 70 37 AU or 0800 54 33 52 NZ
Please leave these instructions, completed installation checklist and user manual with the customer after installing the boiler.
Abbreviations used in this manual:
| ∅ | Diameter |
| NG Natural gas | |
| LPG | Liquefied Petroleum Gas |
| CH | Central Heating |
| DHW | Domestic Hot Water |
| PCB | Printed Circuit Board |
| PRV | Pressure Relief Valve |
| NTC | Negative Temperature Coefficient (sensor) |
| IP | Ingress Protection |
| RCD | Residual Current Device |
| TRV | Thermostatic Radiator Valve |
| approx. | approximate |
| BSP | British Standard Pipe |
| pH | potential Hydrogen |
| PVC | Poly Vinyl Chloride |
| RSF | Room Sealed Flue |
| kPa | kilo Pascals |
Table 2 Abbreviations
⚠️ If you smell gas:
▶ Call the Federal Governments safety hotline on 13 17 92
LPG boilers call the supplier's number on the side of the LPG tank/cylinder.
▶ Turn OFF the ECV (Emergency Control Valve) at the meter.
▶ Do not turn electrical switches ON or OFF.
▶ Do not strike makes or smoke.
▶ Put out naked flames.
▶ Open doors and windows.
▶ Keep people away from the affected area.
⚠ Boiler operation
This boiler must only be operated by a responsible adult who has been instructed in, understands, and is aware of the boiler's operating conditions and effects.
⚠️ Service checklist
The Service Checklist places responsibilities on both manufacturers and installers. The purpose is to ensure that customers are provided with the correct equipment for their needs, that it is installed, commissioned and serviced in accordance with the manufacturer's instructions by authorised persons and meets the requirements of the appropriate building regulations. The service checklist can be used to demonstrate compliance with building regulations and should be provided to the customer for future reference.
⚠ Combustion and corrosive materials
- Do not store or use any flammable materials (thinners, paints etc.) inside or within the vicinity of the appliance.
Chemically aggressive substances can corrode the appliance and invalidate any warranty.
- Do not spray aerosols in the vicinity of this appliance while it is in operation.
Clearance space around the appliance.
- Do not restrict this space with the additions of cupboards, shelves etc. next to or around the appliance.
- Do not store any combustible materials on or next to the appliance, such as clothes, towels, paper or plastic bags.
- DO NOT PLACE ARTICLES ON OR AGAINST THIS APPLIANCE.
⚠️ fittings and modifications
Fitting the boiler and any controls may only be carried out by an authorised person.
- Do not modify this appliance.
- Flue systems must not be modified in any way other than as described in the fitting instructions. Any misuse or unauthorised modifications to the boiler, flue or associated components and systems could invalidate the warranty. The manufacturer accepts no liability arising from any such actions, excluding statutory rights.
⚠ Servicing
Advise the user to have the system serviced annually by an authorised person. Approved spares must be used to help maintain the economy, safety and reliability of the boiler.
⚠ Installation regulations
All gas boilers must be installed by an authorised person in accordance with AS 3000, AS 5601 and building regulations of relevant states and territories.
Failure to install boilers correctly could lead to prosecution.
Standards
▶ Observe all regulations and standards applicable to the system in your country prior to installation and commissioning.
▶ Make sure the entire system satisfies the following standards, regulations and directives.
Where no specific instruction is given, reference should be made to the following standards:
• AS 1596 LPG storage and handling,
- AS 1697 Installation and maintenance of steel pipe systems for gas,
- AS 1910 Water supply - float control valves for use in hot and cold water,
- AS 3498 Authorization requirements for plumbing products - water heaters and hot-water storage tanks.
• AS 3500 National plumbing and drainage code,
- AS 4032 Water supply - valves for the control of hot water supply temperatures,
- AS/NZS 5263.1.2 Gas fired water heaters for hot water supply and/or central heating,
• AS/NZS 5601 Gas Installations,
• AS/NZS 3000 Electrical Installations.
⚠ Liquefied Petroleum Gas (LPG)
A boiler using LPG gas must not be installed in a room or internal space below ground level unless one side of the building is open to the ground.
Intended use
The appliance may only be installed in a sealed unvented central heating system.
This appliance is intended for indoor use only.
It is not to be used for pool or spa pool applications. Not suitable for commercial boosting of warm water recirculation systems.
Using the appliance for any other purpose will be considered incorrect use. Bosch accepts no liability for any damage resulting from such use.
The commercial and industrial use of the appliance to generate process heat is not permitted.
⚠ Symbols used in this manual
| Domestic Hot Water | |
| Central Heating | |
| Hot water storage cylinder | |
| Domestic Cold Water supply | |
| Electrical supply | |
| Gas supply |
Table 3 Commonly used symbols
2 Product Information
Boiler features and checklist
• Pre-wired and pre-plumbed
• Galvanised steel inner frame
• Digital control system
- Intelligent controls
• Automatic ignition
- Direct burner ignition electrodes
• Built-in frost protection
• Built-in fault finding diagnostics
- Modulating automatic gas valve
- Combustion air fan with speed regulator
• CH temperature sensor & control
- Pump anti-seizure protection
- Flue gas temperature sensor
• Condensate syphonic trap
- Temperature control
Checklist - Hardware literature pack
| Contents Qty. | |
| Installation instructions 1 | |
| User instructions 1 | |
| Warranty card 1 | |
| Sealing pack: 1 | |
| - Compression nut 22mm 3 | |
| - Compression ring 22mm 3 | |
| - Compression nut 15mm 3 | |
| - Compression ring 15mm 3 | |
| - Fibre washer 18.6 x 13.5 x 1.5 2 | |
| - Fibre washer 23.9 x 17.2 x 1.5 2 | |
| - Bonded washer 34 inch for gas 1 | |
| Adapter, 22mm to R 34 3 | |
| Adapter, 15mm to R 12 1 | |
| Syphon assembly | 1 |
| Warranty return envelope | 1 |
Table 4
2.1 Boiler carton contents

6720646195-01.2Wo
Fig. 1 Boiler carton contents
Standard package:
| 1 Hydronic system boiler 5 Fascia panel | ||
| 2 Wall mounting frame 6 Syphon assembly | ||
| 3 Hardware literature pack (see checklist) 7 Metric to Imperial adapter pack | ||
| 4 Bottom panel | ||
2.2 Technical data
| Description Unit Natural Gas 18kW LPG 18kW | |||
| Gas flow maximum rate - 10 minutes from lighting | |||
| Natural Gas G20 Mj/h 73.84 - | |||
| Liquefied Petroleum Gas (LPG) kg/h - 1.46 | |||
| Central Heating (CH) | |||
| Maximum rated heat input (net) kW 18.48 14.48 | |||
| Minimum heat input kW 5.54 9.64 | |||
| Maximum rated heat output 40/30 °C | kW 19.28 19.28 | ||
| Maximum rated heat output 40/30 °C | kW 19.11 19.11 | ||
| Maximum rated heat output 40/30 °C | kW | 18 | 18 |
| Maximum flow temperature | °C | 82 | 82 |
| Maximum flow temperature to cylinder (with integral optional diverter valve) | °C | 75 | 75 |
| Maximum permissible operating pressure | kPa | 250 | 250 |
| Available pump head at 20 K (°C) system temperature rise | m | 2.0 | 2.0 |
| Flue | |||
| Flue gas temperature 80/60 °C, rated/minimum load | °C | 70/60 | 71/61 |
| Flue gas temperature 40/30 °C, rated/minimum load | °C | 48/34 | 49/37 |
| CO2 level at maximum rated heat output (after 10 minutes) | % | 9.8 | 10.81) |
| CO2 level at minimum rated heat output (after 10 minutes) | % | 9.2 | 10.21) |
| NOx class | 44 | ||
| Condensate | |||
| Maximum condensate rate | l/h 1.5 | 1.2 | |
| pH value, approximate | 4.8 | 4.8 | |
| Electrical | |||
| Electrical power supply voltage | a.c. V | 240 | 240 |
| Frequency | Hz | 50 | 50 |
| Maximum power consumption | W 140 | 140 | |
| General data | |||
| Star Rating | |||
| Permissible ambient temperatures | °C | 0 - 50 | 0 - 50 |
| Nominal capacity of boiler | litre | 3.9 | 3.9 |
| Noise output level (Max Central Heating) | dBA | 42 | 42 |
| Packaged boiler weight | kg | 41 | 41 |
| Total boiler weight | kg | 37.5 | 37.5 |
| Lift weight | kg | 27.1 | 27.1 |
| Efficiency | |||
1) Propane
Table 5 Technical data Bosch Condens 5000W
2.3 Layout

Fig. 2 Main boiler components
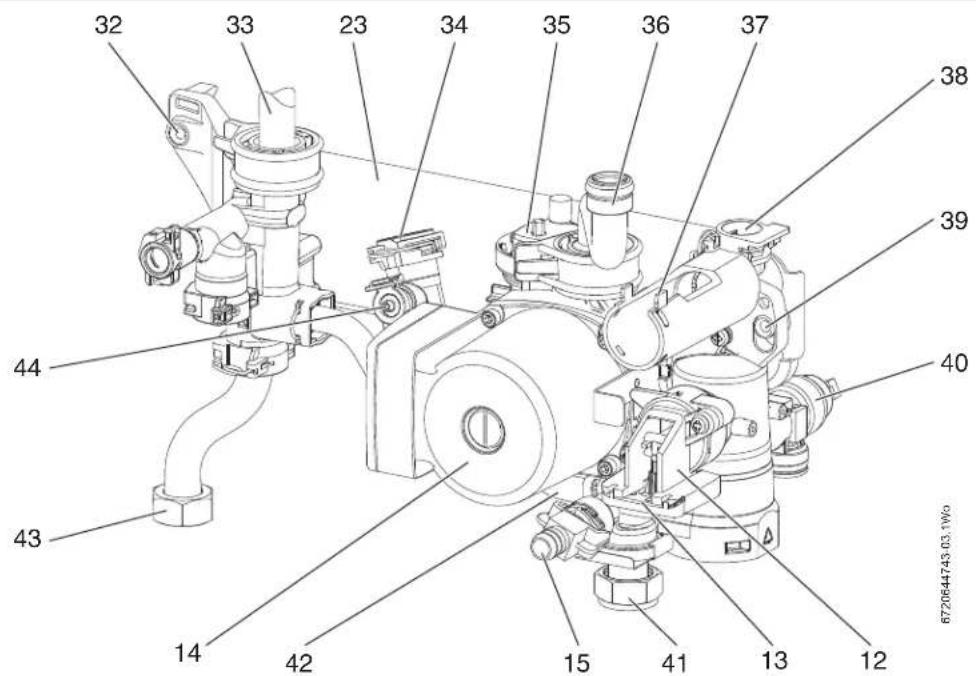
Fig. 3 Hydraulic block components
Key to figures 2 and 3
| 1 Expansion vessel 23 Hydraulic block mounting plate | ||
| 2 Sensor - boiler flow 24 Left side hand-hold for lifting boiler | ||
| 3 Removable panel - for servicing 25 Gas valve | ||
| 4 Electrode assembly 26 Flue air pressure switch connection (not used) | ||
| 5 Overheat thermostat 27 Fan | ||
| 6 Securing nut - air/gas manifold clamp 28 Fan guard | ||
| 7 Silicon tube - heat exchanger air vent 29 Manual vent point | ||
| 8 Heat exchanger 30 Fan pressure test point | ||
| 9 Flue over heat thermostat 31 Air/gas manifold | ||
| 10 Access panel - heat exchanger/sump cleaning 32 Compact hydraulic - left mounting point | ||
| 11 Right side hand-hold for lifting boiler | 33 Flow connector from heat exchanger | |
| 12 Diverter valve assembly (body) | 34 Expansion vessel hose connection point | |
| 13 Diverter valve actuator (stepper motor) | 35 Auto air vent | |
| 14 Pump | 36 Return connection to heat exchanger | |
| 15 Drain point | 37 Flow turbine housing (not used) | |
| 16 CH return isolator | 38 Unused port | |
| 17 System pressure gauge | 39 Compact hydraulic - right mounting point | |
| 18 Control panel (in service position) | 40 Pressure relief valve | |
| 19 Cover - external wiring connections | 41 CH return connection to service valve | |
| 20 Cover - transformer and PCB | 42 Internal by-pass | |
| 21 Gas inlet connection BSP 3⁄4 inch thread | 43 CH flow connection to service valve | |
| 22 CH flow isolator | 44 Pressure gauge connection point | |
Table 6 Boiler components

Fig. 4 Additional boiler components
Key to figure 4
| 1 Burner ON indicator light (green) 9 PRV pipe connection point | ||
| 2 Power ON/OFF indicator/Fault diagnostic light (blue) 10 CH return isolator | ||
| 3 Position for optional programmer 11 Gas inlet connection - BSP 34 inch thread | ||
| 4 Reset button 12 CH flow isolator | ||
| 5 System pressure gauge 13 Condensate connection | ||
| 6 ECO button (not used) 14 CH temperature control | ||
| 7 DHW temperature control ^1) | 15 Service mode button | |
| 8 Boiler identification label | ||
1) The DHW temperature control is only operational when the "optional internal diverter valve" is fitted.
Table 7 Additional boiler components
3 Pre-Installation
3.1 Cleaning primary systems

NOTE:
▶ All the following pre-installation sections must be read and requirements met before starting boiler or flue installations.

CAUTION:
▶ Isolate the mains supplies before starting any work and observe all relevant safety precautions.

System contamination and debris:
▶ Debris from the system can damage the boiler and reduce efficiency. Failure to comply with the guidelines for the use of water treatment with the boiler will invalidate the warranty.
Before cleaning the system:
▶ Ensure the system and pipe work are in good working order.
▶ Where possible keep the existing boiler/circulating pump in place when flushing the system.
NOTICE:
▶ Artificially softened water must not be used to fill the CH system.
Flushing the system:
▶ Fill the system with cold water and check for leaks.
▶ Open all drain points and drain the system.
▶ Close drain points and add a suitable flushing agent compatible with aluminium at the correct strength for the system conditions in accordance with the manufacturer's instructions.
The pH value of the system water must be less than 8 or the boiler guarantee will be invalidated.
▶ Circulate the flushing agent before the boiler is fired up.
▶ Run the boiler/system at normal operating temperature as directed by the manufacturer of the flushing agent.
- Drain and thoroughly flush the system to remove the flushing agent and debris.
▶ It may be necessary to use a power flushing machine to aid the cleansing procedure in some circumstances.
▶ Close the drain points and refill with fresh water and a suitable inhibitor.
▶ Vent any air from the boiler and system.
Inhibitor
▶ Add a suitable inhibitor or combined inhibitor/antifreeze, if the system is exposed to freezing conditions, to the heating system in accordance with the manufacturer's guidelines.

WARNING:
Sealing agents:
▶ The addition of sealing agents to the system water is not permitted as this may block the heat exchanger.
3.2 Mains supply
3.2.1 Electrical supply
• Supply: 240V - 50 Hz, 140 Watts.
- Cable: PVC insulated 0.75 mm2 (24 x 0.2 mm) temperature rated to 90°C.
- External 3A fuse.
• The boiler must be earthed.
- This boiler must not be connected to a three phase supply.
• IPX4D.
- Wiring must comply with AS/NZS 3000 Electrical Installations.
3.2.2 Equipotential (earth) bonding
- Main equipotential bonding is carried at the origin of the electrical installation.
- Supplementary bonding is carried out in an area of increased shock risk e.g. bathrooms.
- Metal pipes can be used as bonding conductors if joints are metal to metal and electrically continuous.
- Wiring regulations require that extraneous conductive parts must be connected to the main electrical earth.
- The main bonding of incoming metallic services must be as close as practical to their entry point, before any branch pipe work and a maximum of 600mm from an internal meter.
- Earth bond conductors must be copper and the same size as other earth bonding conductors and not be less than 10mm^2 .
- The earth bond conductors must be permanently fixed to the metal pipes with clamps and labels in a visible position to allow for inspection.
3.2.3 Gas supply
- Boilers using natural gas (NG) must be connected to a governed meter.
- Liquefied petroleum gas (LPG) must be connected to a regulator or governed meter.
- Installation and connection of the gas supply to the boiler must be in accordance with AS/NZS 5601.
- Under no circumstance should the size of the gas supply pipe be less than the inlet on the boiler.
- The meter or regulator and pipe work to the meter must be checked, preferably by the gas supplier. This is to ensure that the equipment is in good working order and can meet the gas flow and pressure requirements and demand from any other appliance being served.
3.3 Water system and pipe work
Plastic pipe work
- Any plastic pipe work must have a polymeric barrier with 600mm (minimum) length of copper pipe connected to the boiler.
- Plastic pipe work used for underfloor heating must be correctly controlled with a thermostatic blending valve limiting the temperature of the circuits to approximately 50 °C.
Primary system connections/valves
- All system connections, taps and mixing valves must be capable of sustaining a pressure up to 3 bar.
- Bosch recommends that thermostatic radiator valves (TRV's) be used on all radiators within the sleeping accommodation but not the radiator where the room thermostat is sited. This must be fitted with lockshield valves and left open.
- A drain point is required at the lowest part of the system.
- An air vent is required at all the high points in the system.

The boiler is equipped with an automatic internal by-pass.
Sealed primary system:
NOTICE:
▶ Artificially softened water must not be used to fill the CH system.
- The CH sealed system must be filled using an approved filling loop or comply with figure 5 for system fill.
- Where the system volume is more than 100 litres or exceeds 265kPa at maximum heating temperature, an extra expansion vessel item [2] figure 6 must be fitted as close as possible to the boiler in the central heating return.
- Pressurise the extra expansion vessel item [2] figure 6 to the same value as the expansion vessel built into the boiler.
- Do not use galvanised pipes or radiators.
System fill

flowchart
graph TD
    A["HEATING return"] --> B["SV SV"]
    B --> C["Hose union"]
    C --> D["CV"]
    D --> E["CV"]
    E --> F["Test point"]
    F --> G["Mains supply"]
    H["Temporary hose"] --> C
    I["CV = Check Valve"] --> J["SV = Stop Valve"]
    K["AA = Auto Air vent"] --> L["CV = Check Valve"]
    M["Heating return"] --> N["AA"]
    N --> O["SV"]
    O --> P["CV"]
    P --> Q["Make up vessel"]
    Q --> R["1000 mm (39 in) above the highest point of the system."]
Fig. 5 Example of system fill
Additional expansion vessel

flowchart
graph TD
    A["1"] --> B["2"]
    B --> C["3"]
    style A fill:#f9f,stroke:#333
    style B fill:#bbf,stroke:#333
    style C fill:#fff,stroke:#333
    note right of B: 672064743-08 - Wo
Fig. 6 Additional expansion vessel example
Key to figure 6:
[1] Boiler expansion vessel - CH
[2] Extra expansion vessel - CH return
[3] Pressure relief discharge
System layouts
i
The boiler is equipped with an internal by-pass. The internal bypass is not intended to be a substitute for an external system bypass. An external automatic bypass should be used if the system flow can be significantly adjusted or stopped by zone valves and thermostatic radiator valves (TRV).
i
Drain valve
▶ A drain valve should be fitted at the lowest point(s) of the heating circuit and beneath the appliance.
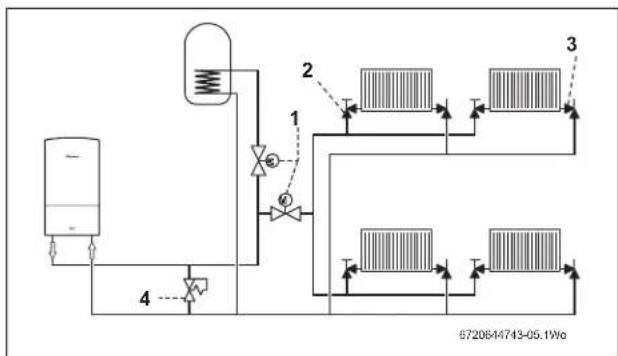
S Plan layout example
flowchart
graph TD
    A["Feed Inlet"] --> B["Reactor Unit"]
    B --> C["Valve"]
    C --> D["Column 1"]
    D --> E["Column 2"]
    E --> F["Column 3"]
    F --> G["Column 4"]
    G --> H["Column 5"]
    H --> I["Column 6"]
    I --> J["Column 7"]
    J --> K["Column 8"]
    K --> L["Column 9"]
    L --> M["Column 10"]
    M --> N["Column 11"]
    N --> O["Column 12"]
    O --> P["Column 13"]
    P --> Q["Column 14"]
    Q --> R["Column 15"]
    R --> S["Column 16"]
    S --> T["Column 17"]
    T --> U["Column 18"]
    U --> V["Column 19"]
    V --> W["Column 20"]
    W --> X["Column 21"]
    X --> Y["Column 22"]
    Y --> Z["Column 23"]
    Z --> AA["Column 24"]
    AA --> AB["Column 25"]
    AB --> AC["Column 26"]
    AC --> AD["Column 27"]
    AD --> AE["Column 28"]
    AE --> AF["Column 29"]
    AF --> AG["Column 30"]
Fig. 7 S Plan
Key to figure 7:
[1] Diverter valve (2 port valve)
[2] Radiator valve (flow)
[3] Lock shield valve (return)
[4] By-pass
Y Plan layout example

flowchart
graph TD
    A["~"] --> B["1"]
    B --> C["2"]
    C --> D["3"]
    D --> E["4"]
    E --> F["5"]
    F --> G["6720644743-06.1Wo"]
Fig. 8 Y Plan
Key to figure 8:
[1] Diverter valve (3 port valve)
[2] Radiator valve (flow)
[3] Lock shield valve (return)
Optional internal diverter valve (not supplied with boiler)
This boiler is designed to operate on a sealed system only. The boiler will require a second return pipe from the water cylinder to the wall mounting frame.

flowchart
graph TD
    A["Boiler flow"] --> B["Cylinder return"]
    B --> C["Heating return"]
    C --> D["Component 2"]
    D --> E["Component 3"]
    E --> F["Component 4"]
    style A fill:#f9f,stroke:#333
    style B fill:#ccf,stroke:#333
    style C fill:#cfc,stroke:#333
    style D fill:#fcc,stroke:#333
    style E fill:#cff,stroke:#333
    style F fill:#ffc,stroke:#333
Fig. 9 Optional internal diverter valve
Key to figure 9:
[2] Radiator valve (flow)
[3] Lock shield valve (return)
3.4 Condensate pipe work
i
NOTE:
▶ Where a new or replacement boiler is being installed and freezing conditions are possible, access to an internal “gravity discharge” point should be one of the factors considered in determining boiler location.
The condensate pipe must be a minimum of 40 mm ∅ plastic pipe.
The condensate pipe work must fall at least 50 mm per metre towards the outlet and should take the shortest practicable route.
▶ Ensure that there are no blockages in the pipe run.
3.4.1 Internal connections
Where there is the possibility of freezing conditions and In order to minimise the freezing risk during prolonged cold spells, the following methods of installing condensate drainage pipe should be adopted, in order of priority.
Wherever possible, the condensate drainage pipe should be routed and terminated so that the condensate drains away from the boiler under gravity to a suitable internal soil and vent stack. A suitable permanent connection to the foul waste pipe should be used.
A self sealing device should be incorporated in the drainage path, if possible, in an upright position. A tundish should be used as a suitable air gap just before the self sealing device. The self sealing device can be used on a gradient as long as it preceded by a vertically mounted tundish.
Soil vent stack disposal
Disposal - vertical position

Fig. 10 Disposal to soil vent stack - vertical position
Key to figure 10:
[1] Condensate discharge
[2] Air gap (20mm)
[3] Tundish
[4] Self sealing device
[6] Vent stack
Disposal - gradient position
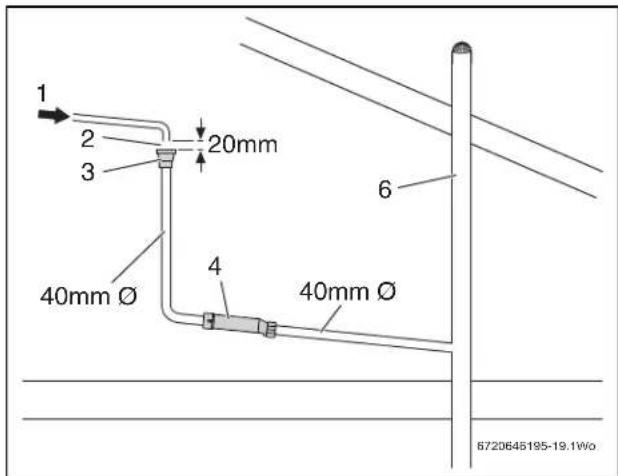
Fig. 11 Disposal to soil vent stack - on gradient
Key to figure 11:
[1] Condensate discharge
[2] Air gap (20mm)
[3] Tundish
[4] Self sealing device
[6] Vent stack
Internal waste pipe disposal
Disposal - kitchen or bathroom waste pipe
Alternatively if the first option is not possible an internal kitchen or bathroom waste pipe can be used.

Fig. 12 Disposal to a waste pipe
Key to figure 12:
[1] Condensate discharge
[2] Air gap (20mm)
[3] Tundish
[4] Self sealing device
Disposal - bifurcated pipe
A washing machine waste pipe or bifurcated pipe etc. can also be used.

Fig. 13 Bifurcated pipe disposal
Key to figure 12:
[1] Condensate discharge
[2] Air gap (20mm)
[3] Tundish
[4] Self sealing device
[5] Dishwasher connection
3.5 Pressure relief drain line
i
NOTE:
▶ The PRV is a safety device for the boiler and if activated may discharge boiling water steam through the relief valve drain line.
▶ Care should be taken when siting the drain line so that it does not cause an obstruction or discharge above a window, entrance or other public access where it could cause a hazard.
- The pressure relief valve and control valve shall be fitted with a drain line that shall be of copper or other suitable pipping and be of a diameter not smaller than the nominal size of the valve outlet as per AS/NZS 3500.
- Drain line should be finished with a partial bend, near the outlet to face the external wall to help prevent freezing.
- Pressure relief discharge pipe can be between 200 and 300mm above a paved area [1].
- Pressure relief discharge pipe can be between 75 and 300mm when discharging into a gravel pit [2] of not less than 100mm diameter.

Fig. 14
[1] Paved area
[2] Gravel pit not less than 100mm∅
3.6 Boiler location and clearances
3.6.1 Installation location
This boiler is only suitable for installing internally within a property at a suitable location onto a fixed, rigid surface at least the same size as the boiler and capable of supporting the boiler weight.

No surface protection is required against heat transfer from the boiler.
3.6.2 Servicing clearances - ventilated compartment
Figure 15 shows the minimum space required to install and service the boiler in a ventilated compartment.
- If a boiler is installed in a compartment with clearances less than shown in the tables 9, 10, or 11 ventilation is required. Refer to table 8 for ventilation requirements.
| Vent position To room or internal space Direct to outside | ||
| High level Minimum free area122 cm ^2 | Minimum free area61 cm ^2 | |
| Low level Minimum free area122 cm ^2 | Minimum free area61 cm ^2 | |
Table 8 Compartment ventilation

Fig. 15 Vented compartment minimum clearances
* Minimum clearance to removable door
** Minimum clearance required for servicing
3.6.3 Compartments
- Minimum clearances must be maintained.
- An access door is required to install, service and maintain the boiler and any ancillary equipment.
- If fitting the boiler into an airing cupboard use a noncombustible material to separate the boiler from the airing space.
The material can be perforated up to a maximum hole size of 13mm.
Boiler clearances - Unventilated compartments

Tables 9, 10, or 11 show the options for the minimum space required to install and service the boiler inside an unventilated compartment.
Installation clearances - Unventilated compartments

CAUTION:
Clearances
▶ Above and below clearances must not be reduced below the values shown in table 9 as they are the minimum clearances required for servicing.
Unventilated compartment installation clearances
| The suggested total unventilated compartment minimum clearances are: | |
| Clearance dimension (millimetres) | |
| Side | 4001) |
| Above | 170 approx. (30 above the elbow) |
| Below | 200 |
| Front | 1002) |
1) If side clearances are reduced from 400 mm see table 10 for updated clearances.
2) If front clearance is reduced from 100 mm see table 11 for updated clearances.
Table 9 Minimum unventilated compartment clearances
If side clearances are reduced, either the clearances above & below (height) are increased or the front clearance is increased.
| If total side clearance is reduced to: (Combined left & right clearances excluding boiler) | Increase height clearances to (approx): (Combined above & below clearances excluding boiler) | Front clearance (to removable door) must be increased to: | |
| 350 | 441 | OR | 129 |
| 300 | 523 | 161 | |
| 250 | 617 | 200 | |
| 200 | 717 | 243 | |
| 150 | 856 | 295 | |
| 100 | 1,012 | 358 | |
| 50 | 1,202 | 343 |
Table 10 Reduced side clearances
If front clearance is reduced, either the clearances above & below (height) are increased or the total side (left & right) clearance is increased.
| If front clearance (to removable door) is reduced to: | Increase height clearances to (approx): (Combined above & below clearances excluding boiler) | Increase total side clearance is reduced to: (Combined left & right clearances excluding boiler) | |
| 50 | 511 | OR | 505 |
| 25 | 596 | 569 |
Table 11 Reduced front clearances
3.7 Plumbing manifold
3.7.1 Connections

WARNING:
If fitting an optional integral diverter valve.
▶ Refer to the "optional integral diverter valve" installation instructions.
Heating System connection 34 inch BSP thread compression fittings Gas connection 34 inch BSP thread
Table 12 System connections
Use the fittings supplied in the hardware literature pack.
- If the boiler pipes are to be run behind the boiler ensure that the pipes pass through the slot in the white cardboard guide. This is fitted to the frame.

Further guidance on pipe routing can be found printed on the boiler template (supplied).

Fig. 16 Pipe dimension
| # Function From left case | edge | ∅ of pipe connections | |
| 1 CH flow 70 mm 3⁄4 BSP | |||
| 2 | Gas | 200 mm | 3⁄4 BSP |
| 3 | CH return | 330 mm | 3⁄4 BSP |
| 4 | Condensate | 35 mm | 22 mm |
| 5 | Pressure relief valve | 367 mm | 1⁄2 BSP |
Table 13

Fig. 17
[1] CH flow
[2] Gas
[3] CH return
3.8 Flue options
The Condens 5000W series has the option of three horizontal RSF (60/100 telescopic, 60/100 extended telescopic and 80/125) flue systems and two vertical RSF (60/100 or 80/125) flue systems:
The flue systems have different maximum flue lengths.
The following details shows some possible flue configurations.
Table 14 shows the maximum total length of a flue available to the installer after the effective lengths of the bends have been taken into account from each flue option shown in figure 18.
| Bosch Condens 5000W Maximum total flue | length (mm) | |
| Flue type 60/100 80/125 | ||
| 1 - Telescopic horizontal flue assembly 570 1,070 | ||
| 2 - Extended horizontal flue 4,600 13,000 | ||
| 3 - Horizontal flue with 1 x 90° bend 2,600 11,000 | ||
| 4 - Horizontal flue with 2 x 90° bends N/A 9,000 | ||
| 5 - High level horizontal flue with 1 x 90° bend 2,600 11,000 | ||
| 6 - High level horizontal flue with 2 x 90° bends | N/A | 9,000 |
| 7 - High level horizontal flue with 3 x 90° bends | N/A | 7,000 |
| 8 - Vertical balanced flue assembly | 6,400 | 15,000 |
| 9 - Vertical balanced flue with 2 x 90° bends 2,400 | 11,000 | |
| 10 - Vertical balanced flue with 2 x 45° bends | 4,400 | 13,000 |
Table 14 Maximum flue lengths
i
Effective flue lengths of bends
▶ Each 90° bend used is equivalent to 2 metres of straight flue
▶ Each 45° bend used is equivalent to 1 metre of straight flue

Fig. 18 Flue options examples
3.9 Flue options

Use as a guide only. Refer to AS5601 or local gas fitting rules for specific locations
T = Flue terminal M = Gas meter W = Window
I = Mechanical air inlet P = Electricity meter or fuse box

Shaded area indicates prohibited area
6720846195-02.1Wo
Fig. 19 Flue terminal positions
i
NOTE:
The location of the flue terminal must comply with the clearances shown on this page. If you are unsure about clearances not indicated here, in general refer to AS/NZS 5601 or your local authority. In Western Australia refer to the SECWA rules and regulations.
▶ All measurements are the minimum clearances required.
▶ Terminals must be positioned so to avoid combustion products entering the building.
▶ Install a fire proof back board if installing on combustible surfaces.
i
The fixing method must be sufficient to hold the weight of the boiler.
| Ref. | Item Minimum | clearance (mm) |
| a | Below eaves, balconies and other projections (Appliances over 50Mj/h) | 300 |
| b | From the ground, above a balcony or other surface 300 | |
| c | From a return wall or external corner 300 | |
| d | From a gas meter 1,000 | |
| e | from an electricity meter or fusebox/breaker panel 500 | |
| f | From a drain pipe or soil pipe | 75 |
| g | Horizontally from any building structure or obstruction facing a flue terminal | 500 |
| h | From any other flue terminal, cowl or combustion air intake | 300 |
| j | Horizontally from any opening window, door, non-mechanical air inlet or other opening into a building with the exception of sub-floor ventilation | 300 |
| k | From a mechanical air inlet including a spa blower 1,000 | |
| n | Vertically below an opening window, door, non-mechanical air inlet or other opening into a building with the exception of sub-floor ventilation | 500 |
Table 15
4 Installation

WARNING:
Before continuing ensure:
▶ All the previous “pre-installation” sections must be read and the requirements met before starting boiler or flue installation.
4.1 Unpacking the wall frame and ancillary items

CAUTION:
Lifting and carrying.
▶ Only lift a manageable weight, or ask for help.
▶ Bend the knees and keep the back straight with feet apart, when lifting or putting down heavy objects.
▶ Do not lift and twist at the same time.
▶ Lift and carry object close to the body.
Handling instructions
- It is advised that two people are used to carry the carton from the van to the point of delivery.
- Once the carton has been delivered, the outer carton is removed first. Care should be taken when releasing the straps. If a sharp implement is used make sure the outer carton is not pierced and that the implement is used in such a way so that it may not cause personal injury.
- All sharp objects must be covered or the blade retracted after use and put away in a safe place. Care should be taken when lifting the boiler from the base and the proper technique for safe lifting of any heavy object should be strictly observed.

Fig. 20 Unpacking
[1] Wall mounting frame
[2] Wall mounting template
[3] Inner packing
[4] Installer pack
[5] Bottom panel
[6] Front fascia
[7] Syphon assembly
[8] Adaptor pack
▶ Remove straps and open the top of the boiler packaging.
▶ Remove the wall mounting frame [1] and wall mounting template [2] and from the packaging.
▶ Remove the boiler bottom panel [5], front fascia [6], hardware literature pack [4] and syphon assembly [7] from the carton.
NOTICE:
Before installing the boiler!
▶ Ensure that the system has been cleaned as explained in section Cleaning primary systems on page 11
4.2 Wall mounting template and flue opening

WARNING:
Damage to property!
Damage caused by drilling into pipes, electrical cables, damp proof course or other hazards.
▶ Before drilling ensure that there are no obstructions or other hazards.

WARNING:
Safety!
Risk of injury
▶ All relevant safety precautions must be undertaken. Protective clothing, footwear, gloves and safety goggles must be worn as appropriate.

Flue turret adapter
The flue turret adaptor has an in-built 3° angle giving the flue assembly the rise from the appliance to ensure the condensate flows back to the appliance.
Fixing the wall mounting frame
The boiler template shows the relative positions of the flue and the top and bottom fixing of the mounting frame.
-
Fix the template to the wall in the desired position.
-
Drill 4 holes for the wall mounting frame through the template.

The wall mounting template has been sized to allow for minimum clearances of 5mm sides, 200mm base and 30mm above a 100mm ∅ flue elbow.
Rear flue outlet
Figure 21 shows the boiler template with the flue centre lines of both the 100 mm and 125 mm flue systems.
- Mark centre line of flue to be used; the external diameter of the hole can also be marked if required.
▶ If extensions are to be added then the complete flue must rise at an angle of 3^ from the appliance.
Side flue outlet
Figure 21 shows the boiler template with the flue centre lines of both the 100 mm and 125 mm flue systems.
- Mark from the centre line of the wall mounting template to the wall which the flue will pass through.
▶ Allow for a rise of 52mm per metre length of flue, to give a 3° angle.
Example hole size
- If a 100mm diameter flue is to be used, a 125mm diameter hole is required.
- If using the weather sealing collar by pushing it through from inside the property, then a 150mm diameter hole is required to accommodate this.
Flue outlet position marked and ready to drill hole
▶ Drill hole using a core drill or similar.
▶ Clear any debris from the site.

Fig. 21 Marking the flue position
4.3 Unpacking the boiler
Key to figures 22, 23, 24 & 25:
1 Outer carton
2 Inner sleeve (unwrap from front)
3 Packaging base
4 Protective wrapping
5 Boiler outer case
Table 16
▶ Remove outer carton [1] and place safely away from the working area.

Fig. 22 Outer carton removal
▶ With the outer packaging removed and the inner sleeve [2] still in place gently lay the boiler on its back.
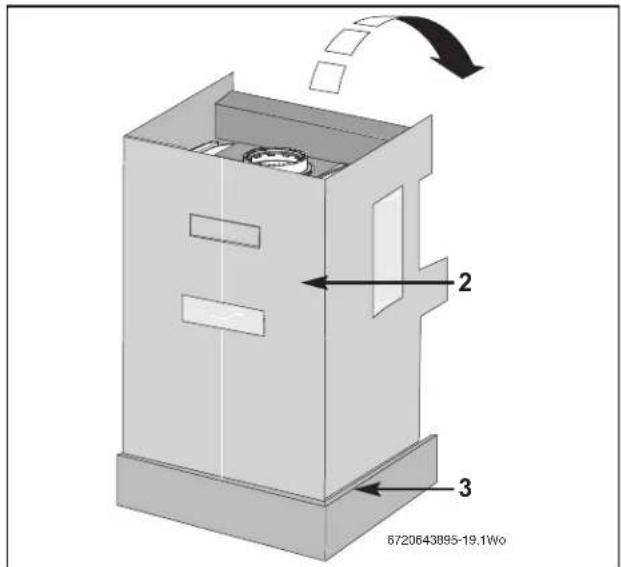
Fig. 23 Laying boiler down
The boiler will lie at an angle to the floor to allow the boiler outer casing [5] to be removed.
▶ The inner sleeve [2] opens as shown in figure 24.
▶ Remove the protective wrapping [4].

Fig. 24 Packaging removal
- Undo but do not remove the two screws at the bottom of the boiler.
- Undo the two screws at the top (see figure 25).
- Remove the outer case [5].

Fig. 25 Outer case removal
NOTICE:
Transport protection covers
▶ Remove the internal transport packaging and protection covers from the appliance.

CAUTION:
Before hanging the boiler!
▶ Remove the plastic strip fitted to pipes before hanging the boiler.
4.4 Boiler connections

CAUTION:
▶ Isolate the mains gas supply before starting any work and observe all relevant safety precautions.

Optional internal diverter valve
▶ If the optional integral diverter valve kit is required, fit the kit now before hanging the boiler on the wall frame.
Metric to imperial adapters
Before mounting the wall frame:
▶ Before mounting the wall frame, fit the metric to Imperial adapters to the central heating and gas isolators.
▶ Remove the nut and olive from the back of the isolator.
▶ Refer to figure 26 and fit the nut and olive onto the adapter and mount onto the back of the isolators.
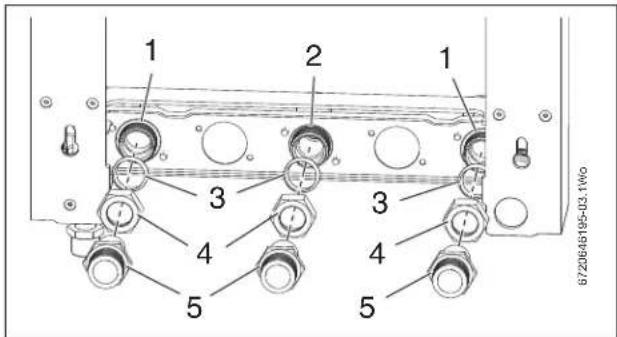
Fig. 26 CH and gas adapters fitting
[1] Central heating isolation valve
[2] Gas isolation valve
[3] Compression ring
[4] Compression nuts
[5] Metric to imperial adapter (22mm to R ^3/4 )
Wall mounting frame
Remove wall mounting template and secure the wall mounting frame to the wall with the appropriate fixings for the boiler weight and wall type.
▶ System pipes may be run vertically upwards behind the boiler or below it. See Plumbing manifold section on page 16.
Fit sealing washers to service valves before hanging boiler.
- CH flow BSP 20
- Gas inlet BSP 20
- CH return BSP 20
▶ Fit the metric to imperial (15mm to R½) adapter [4] to the pressure relief valve connection [1].
▶ Assemble the compression nut [3] and ring [2] onto the adapter [4] and fit to the PRV connection [1].
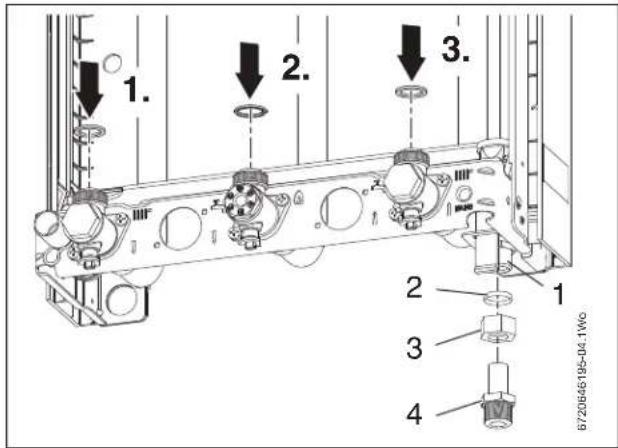
Fig. 27 Sealing washers and PRV adapter fitting
[1] PRV connection
[2] Compression ring
[3] Compression nut
[4] 15mm to R½ adapter
NOTICE:
Before hanging the boiler onto the wall mounting frame
▶ Ensure that the pressure relief valve connection is in the down position.
This is located on the right hand side of the wall frame at the rear. Apply a smear of silicone lubricant to the seal to ease connection later.
- Pull the extended tab/lever forward and down until there is no further travel.

Fig. 28 PRV connection in the down position
Hanging the boiler

CAUTION:
Check before hanging the boiler
▶ Ensure caps or plastic strip fitted to pipes must be removed before hanging the boiler.
- Hang the boiler on to the wall mounting frame by the two brackets positioned left and right at the top rear of the boiler.
- Do not lift the boiler by the air gas manifold. There are two handling holes incorporated into the inner casing left and right in the lower section of the boiler.

natural_image
Technical line drawing of a mechanical device with internal components and directional arrows (no text or symbols)Fig. 29 Hanging the boiler
NOTICE:
▶ The pressure relief connector must be repositioned after the boiler has been correctly mounted to the wall mounting frame.

To ease assembly of components, apply silicone lubricant to sealing surfaces.
PRV connection
- Push the lever on the pressure relief connector UP until the stop on the inside of the handle is over the shoulder of the metal bracket to secure in place.

Fig. 30 PRV to the up position
▶ Connect the pressure relief drain pipe to 12 inch BSP joint using the compression nut and olive supplied in the literature/hardware pack.
▶ Remove the screw from the control panel retaining bracket and lower the control panel into the service position.
▶ Make connections to the heating system. Connect the gas supply to the boiler gas isolation valve 34 inch BSP compression fitting.
Expansion vessel connection
To connect the expansion vessel flexible pipe to the hydraulic manifold situated to the left of the pump:
▶ Remove and discard the plastic cap from the expansion vessel flexible pipe.
Refer to figure 31.
- Release the retaining clip.
- Remove and discard the orange plastic blanking plug from the pressure vessel connection at the hydraulic manifold.
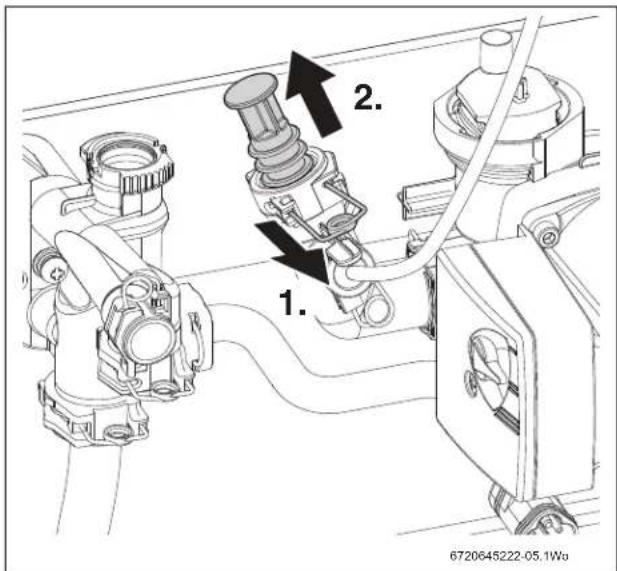
Fig. 31 Blanking plug removal
Refer to figure 32.
▶ Insert the expansion vessel flexible pipe it to the fitting on the pump.
▶ Secure in place with the wire retaining clip.

Fig. 32 Expansion vessel hose connection
4.5 Flue installation
Horizontal flue (60/100mm ∅)
For vertical flues and 80/125mm horizontal flues, please refer to separate instructions supplied with the flue kit.
i
To ease assembly of flue components, apply silicone lubricant to sealing surfaces.
The following details are the basic instructions for the 60/100mm ∅ flue.
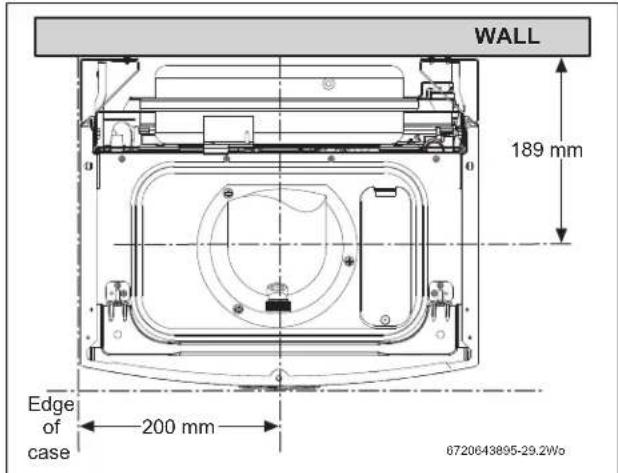
Fig. 33 Flue turret centre
4.5.1 Measuring the flue (standard flue)
▶ Measure from the outside of the wall to the centre line of the flue turret to determine length L.
▶ Subtract 50mm from the length L to give the correct dimension to the flue elbow connection.
▶ If the length L falls within the telescopic range of 350 to 570mm, then no cutting will be required.
▶ If the required length is less than 350mm the standard telescopic flue can be modified, refer to following section.
▶ If the required length is greater than 570mm, then flue extensions will have to be used. Refer to the 60/100 Horizontal Flue Instruction manual provided in the telescopic flue kit.
Adjusting the telescopic flue length
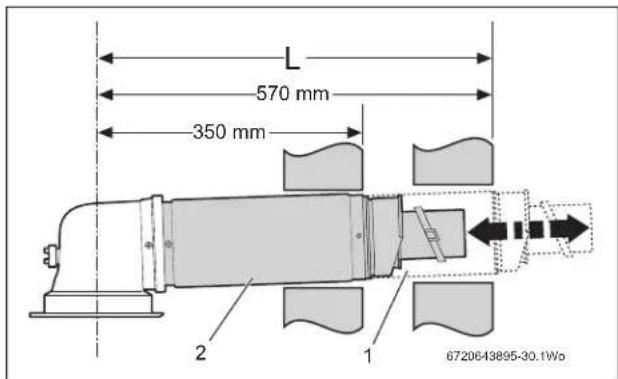
Fig. 34 Standard telescopic flue
▶ Extend tube [1] by withdrawing from tube [2] to achieve the flue length required, between 350 - 570mm.
- Secure with screw provided and seal joint with the aluminium tape supplied.
Reducing the telescopic flue length
i
Correct orientation of flue terminal
▶ Ensure that the "top" label is facing up before securing the flue section to the turret.
The flue terminal must be fitted with the 'top' label uppermost to allow the correct fit and use of the plume management system.
▶ Remove securing screws [3] to detach the terminal assembly from the turret.
▶ Slide terminal section [2] from the terminal assembly [1] and discard the terminal section [2].

Fig. 35 Reducing the standard terminal
▶ To use terminal assembly [1] without cutting remove the location lug [4] on the inner flue tube [5] and remove any burrs.
Further flue length reduction of the terminal assembly:
▶ Mark the length required for the terminal as shown (min. 130mm) and cut square, taking care not to damage the tubes.
▶ Remove any burrs and chamfer the outer edge of the tubes to assist ease of connection and prevent seal damage.
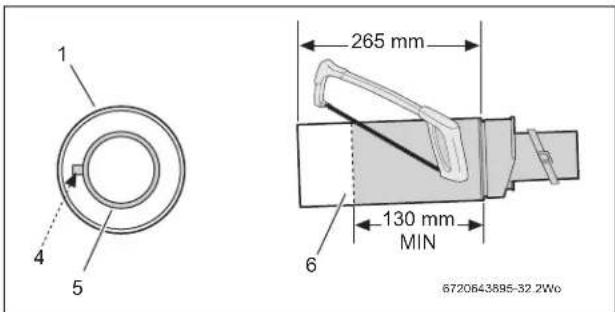
Fig. 36 Further terminal assembly reduction
i
The aluminium tape is not required when reducing the terminal.
Installing the telescopic flue
Refer to figure 37.
- Set the flue length to the distance required, secure with screws provided.
- Seal the joint with the aluminium tape provided.
- Slide the inner wall seal onto the terminal.
- If fitting from inside the building; slide the outer wall seal onto the terminal.
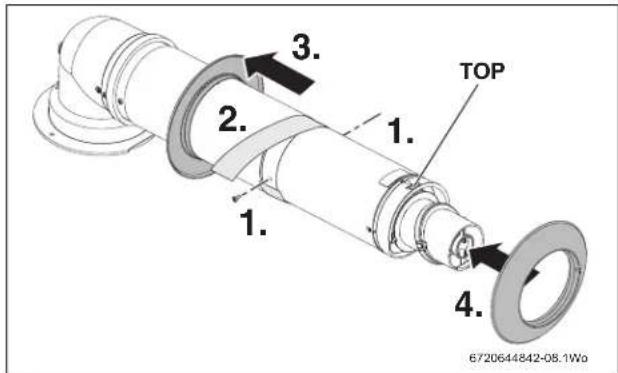
Fig. 37 Telescopic flue preparation
i
The turret securing screws are from the boiler and are not in flue kit.
Refer to figures 38 & 39.
- Remove the three inner flue tube retaining screws [2]. The inner tube will be held in place in the boiler.
- Check the boiler flue seal is correctly seated and apply silicone grease.
- Position terminal through the flue opening in the wall to the outside of the building by the distance shown.
- Align the flue turret to the boiler flue outlet with flat facing [1] to the rear of the boiler.
The flue turret should be pushed straight down, on to the boiler.

Fig. 38 Aligning the flue turret
▶ Fit the screws removed in step 1 to secure flue turret.
▶ If fitting the outer seal from outside the building, slide the outer wall seal onto the terminal as shown.

Fig. 39 Telescopic flue installation
i
For more information refer to the 60/100 horizontal flue kit instruction manual.
Additional notes and reminders
- Ensure that all cut lengths are square and free from burrs.
- The flue is sealed when assembled correctly and the components are pushed fully home.
- The flue is set at an angle of 3^ or 52mm per metre length.

Fig. 40 Slope for condensate disposal within the flue system
4.5.2 Flue terminal plume re-direction
The flue discharge can be re-directed allowing some plume redirection control, alternatively, a complete plume management system can be fitted to the flue terminal.
Re-directing the flue discharge
Refer to figure 41.
- Refit the terminal end [2] and secure with screws [1].
- Loosen screws [3] and rotate the entire outlet assembly to redirect the plume. Tighten screws [3] to secure in the required position.
i
The flue terminal outlet has built-in stops to limit rotation for horizontal fluing to allow condensate to run back into the boiler for safe disposal. Do not attempt to force beyond the limit stops.

Fig. 41 Plume re-direction
NOTICE:
Outlet position
The flue terminal outlet position must follow those stated in the relevant boiler instruction manual. When redirecting the flue discharge the outlet terminal must be at least 1,500mm from any opening in the direction of the discharge to prevent combustion products from entering the building.

Fig. 42 Plume redirect distance to an opening
[1] Opening in building
[2] Flue discharge
[3] Plume deflector
[4] Minimum 1,500mm from an opening in the building
4.6 Condensate connection

Condensate termination point
▶ Never terminate or discharge into any open source, including; sink, bath, shower, bidet, toilet etc.
- Ensure that the condensate drain is a 20mm ∅ plastic pipe. The pipe must fall at least 50mm per metre towards the outlet.

Do not use lubricants or sealing compounds.
Refer to figure 43.
- Remove the transit blanking cap from the sump.
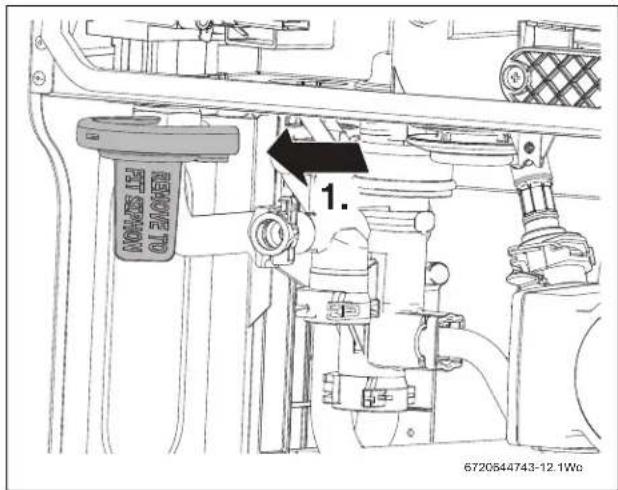
Fig. 43 Transit blanking cap removal
Refer to figure 44
▶ Fill syphon with 200 to 250 millilitres of water.
▶ Remove orange seal retainer and discard.

natural_image
Technical line drawing of a mechanical component with a circular inset showing a ring and a black arrow pointing to a feature (no text or symbols present)Fig. 44 Syphon seal protective cap removal
NOTICE:
Before fitting the syphon
▶ Move the fan lead, DHW NTC sensor lead and ignition cable out of the way when fitting the syphon to ensure that they do not become trapped.
NOTICE:
Syphon discharge hose connection
▶ Do not use solvents, adhesive or lubricant when pushing the pipe onto the rubber connector.
Refer to figure 45.
- Fit the syphon assembly:
- Push the syphon onto the sump assembly, until the lug on the sump is fully engaged with the slot on the back of the syphon assembly and the clip is engaged in the top of the syphon.
- Push the discharge hose, onto the wall frame connector, until fully engaged.

Fig. 45 Syphon fitting
Syphon maintenance
There is no need to remove the syphon assembly for cleaning.
To drain debris from the syphon, during the annual service:
▶ Place a suitable container below the syphon to collect any remaining condensate or debris from the syphon.
▶ Release the clips and remove the drainage cap[1] from the bottom of the syphon.
▶ Empty the debris and condensate from the syphon into a suitable container.
▶ Re-fit the drainage cap [1] to bottom of the syphon.

Fig. 46 Syphon drainage cap location
4.7 Electrical

CAUTION:
Risk of electric shock!
▶ Isolate electrical components from the power supply (230 V AC) (fuse, circuit breaker) and secure against unintentional reconnection before carrying out any work and observe all relevant safety precautions.

The boiler is pre-wired with a 1½ metre mains supply cable.
A spare strain relief block is supplied in case the pre-wired cable is not used.
- The mains electrical supply to the boiler and system wiring centre must be common and through a three pin plug and socket.
Access to the electrical connections
▶ Remove boiler casing to access control panel.
Refer to figure 47.
- Remove the screw securing the control panel.
- Lower the control panel into the horizontal service position.

Fig. 47 Moving the control panel into the service position

CAUTION:
Damage to control unit!
Small pieces of wire can cause shorts and damage to electronics.
▶ When stripping wires always ensure copper strands do not fall into the control box.
Refer to figure 48.
- Unscrew the three screws in the control panel.
- Remove the connections cover.

Fig. 48 Removing the connection cover
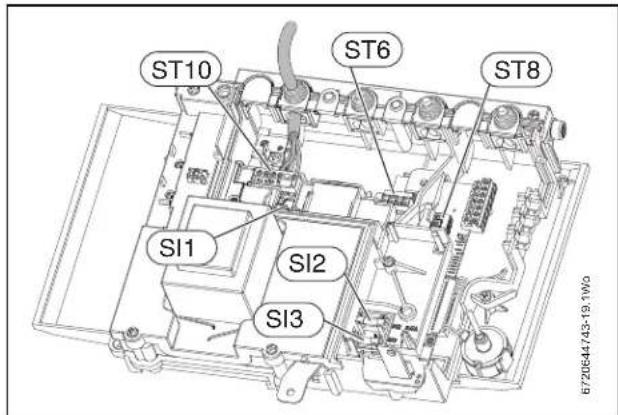
Fig. 49 Electrical connector information
[SI1] Fuse F1 - 2.5A
[SI2] Fuse F2 - 0.5A
[SI3] Fuse F3 - 1.5A
[ST6] Frost thermostat connection
[ST10] Mains In (230V) and external controls connections
[ST19] EMS BUS connection
System wiring centre connection (ST10)

Pre-wired link
▶ Remove the pre-wired link between L_R and L_S on ST10
- Connect the LIVE feed wire from terminal (L S ) to the LIVE on the system wiring centre.
▶ Connect NEUTRAL wire from terminal (N S ) to the neutral on the system wiring centre.
▶ Connect SWITCHED LIVE wire from terminal ( L_R ) to the boiler demand on the system wiring centre.

Fig. 50 Wiring centre connections to the boiler

A pump is already fitted to the boiler! No other pump should be fitted.
▶ Refit the control panels removed earlier.

NOTE:
▶ External diverter valve(s) and all other 240V parts are not supplied with the boiler.
▶ A fascia mounted programmer/timer cannot be fitted unless optional integral diverter valve is used.
▶ Refer to manufacturers' instructions when connecting external parts to the wiring centre.
▶ Robert Bosch cannot be held responsible for wiring errors.
There is an option to fit an internal diverter valve. This also requires fitting an extra harness and a code plug change. See "optional diverter valve" instructions supplied with the integral diverter valve kit.
▶ Option integral diverter valve kit: 18kW - 7 716 192 568
This option is covered in the fault finding guide on page 56 of these instructions.
Optional external frost thermostat connection (ST6)
- Connect frost thermostat cables to terminals F_S and F_R . - The frost thermostat connections are not polarity sensitive.
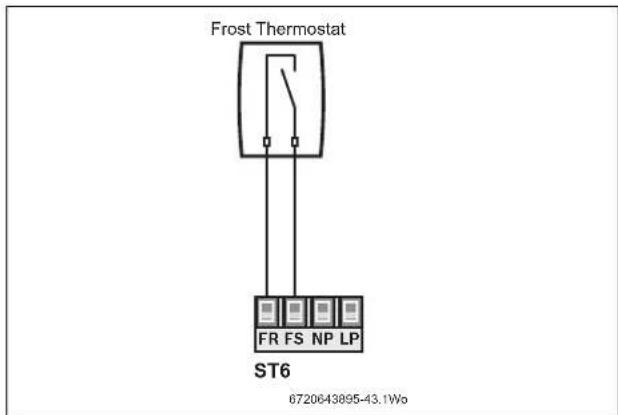
Fig. 51 Frost thermostat connections
5 Commissioning
5.1 Pre-commissioning checks

CAUTION:
Risk of electric shock!
▶ Isolate electrical components from the power supply (230 V AC) (fuse, circuit breaker) and secure against unintentional reconnection before carrying out any work and observe all relevant safety precautions.
▶ Check that the service and water pipes are connected to the correct position on the manifold.
Refer to figure 52.
Ensure that the washers have been fitted to the water connections and the bonded washer to the gas connection on the manifold.
- CH flow 34 inch BSP thread
- Gas inlet 34 inch BSP thread
- CH return 34 inch BSP thread
▶ Check that the PRV adapter is fitted [1]

Fig. 52 Pipe fittings check
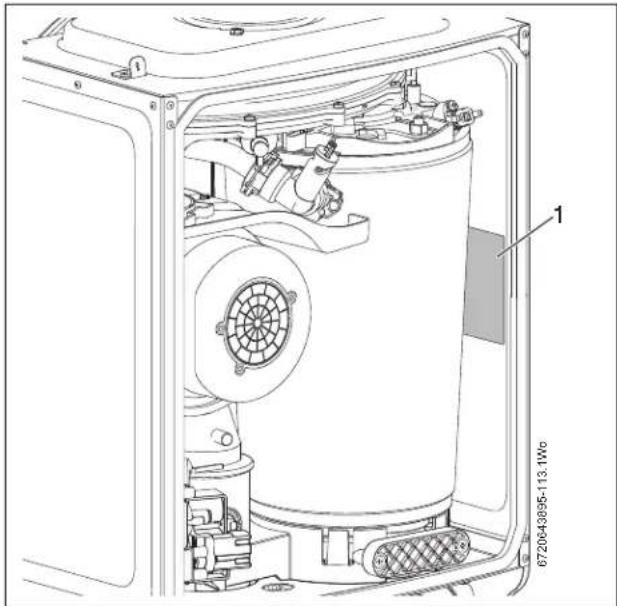
Refer to figure 53.
▶ Check the gas type specified on the identification plate [1], on the inside of the combustion chamber, matches that of the gas supply.
natural_image
Technical line drawing of a mechanical device interior showing internal components and housing (no text or symbols)Fig. 53 Identification plate
Gas supply pipe work tightness check
▶ Turn on the main gas supply, check the gas pipe work connections and rectify any leaks.
Refer to figure 54.
▶ Check that the condensate discharge pipe [1] has been connected to the syphon.
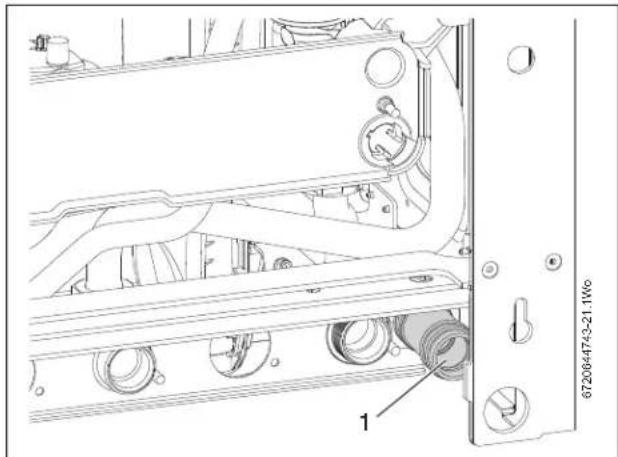
Fig. 54 Condensate discharge pipe check
Refer to figure 55.
▶ Check pressure relief drain pipe [1] is correctly fitted and securely tightened.
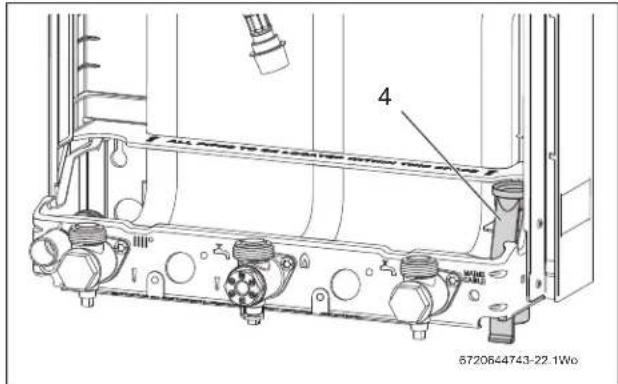
Fig. 55 Pressure relief drain pipe connection check
NOTICE:
If the appliance is not to be commissioned immediately then, after successfully completing all of the checks and any rectification work:
▶ Isolate the electricity supply.
▶ Isolate the gas supply.
▶ Close the shut-off valve for the cold water inlet.
▶ Close the water shut-off valves to the appliance.
▶ Label appropriately.
5.2 Filling the system
i
Before pressurising the system.
Additional expansion vessel fitted to the system.
The appliance integral expansion vessel is pre-charged to 75kPa (equal to a static head of 7.5m (22ft)). A Schrader type valve is fitted to the expansion vessel to allow for pressure adjustment if required.
▶ If an extra expansion vessel is fitted to the central heating system, ensure that it is set to the same pressure as the appliance internal expansion vessel, refer to separate instructions supplied with the extra expansion vessel.
▶ Check drain cocks are closed and all radiator valves are open. Add a suitable inhibitor or combined inhibitor/anti-freeze, if the system is exposed to freezing conditions, to the heating system water in accordance with the manufacturers instructions.
▶ Turn on the water main and open the system valves.
▶ Open all radiator valves.
▶ Fill the system via an approved filling loop to between 150 and 200 kPa then turn the valve anti-clockwise to close.
Refer to figure 56.
▶ Vent [1] any air from the boiler heat exchanger using a suitable container to collect any water. Ensure tube outlet [2] is directed away from the fan or any other electrical component to prevent any water damage. Also place a suitable cover over the fan to prevent any spillage of water on to electrical connections. Ensure the cover is removed after venting.
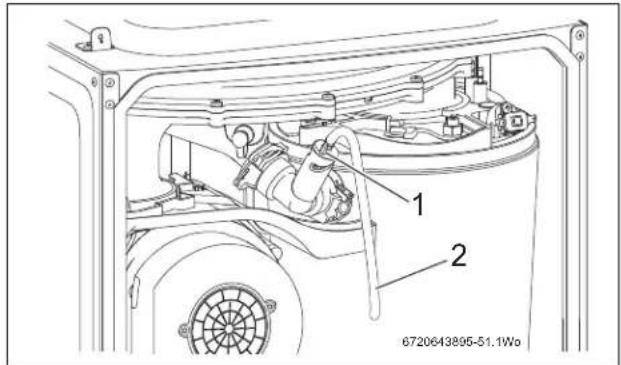
Fig. 56 Venting the boiler heat exchanger
▶ Vent all radiators, tighten when completed and check the system and correct any leaks and correct if required.
▶ Briefly open the pressure relief valve to test its operation.
▶ If required increase system pressure back to between 150 to 200 kPa.
▶ Rotate the adjustable pointer on the pressure gauge to record the set system pressure.
▶ Isolate and remove filling loop connection to system.
5.3 Water treatment
NOTICE:
▶ Artificially softened water must not be used to fill the CH system.
Flushing (CH):
▶ Switch off the boiler.
▶ Open all drain points and drain the system while the boiler is hot.
▶ Close drain points and add a suitable flushing agent at the correct strength for the system condition in accordance with the manufacturer's instructions.
▶ Run the boiler/system at normal operating temperature for the time stated by the manufacturer of the flushing agent.
- Drain and thoroughly flush the system to remove the flushing agent and debris.
Inhibitor (CH):
▶ Check drain points are closed and all radiator valves are open before adding a suitable inhibitor compatible with aluminium (or combined inhibitor/anti-freeze if the system is exposed to freezing conditions) to the heating system water in accordance with the manufacturers instructions.
i
The pH value of the system water must be less than 8 or the boiler warrantee will be invalidated.
▶ Fill system via an approved filling loop to between 150 and 200 kPa.
▶ Vent all radiators; tighten vents when complete.
▶ Vent any air from the boiler heat exchanger using a suitable container to collect any water.
▶ Ensure tube outlet is directed away from the fan or any other electrical component to prevent damage.
▶ Also place a suitable cover over the fan to prevent any spillage of water onto electrical connections. Ensure the cover is removed after venting.
▶ Vent all radiators.
▶ Re-pressurise if necessary.
▶ Set all controls to maximum.
▶ Record the date when the inhibitor was added to the system on the warrantee card.
NOTICE:
The concentration of inhibitor in the system should be checked every 12 months or sooner if content is lost.
The addition of sealing agents to the system water is not recommended as this can cause problems with deposits left in the heat exchanger.
5.4 Starting the boiler

WARNING:
Running the boiler
▶ Never run the boiler when the system is empty or partially filled.

6720643895-52.1Wo
Fig. 57 Control panel overview
[1] Central heating temperature control
[2] Burner indicator (green)
[3] Service button
[4] Cover or optional Programmer
[5] Power ON and fault indicator (blue)
[6] ECO button - not used
[7] Reset button
[8] DHW temperature control (only operational when "optional integral diverter valve" is fitted)
[9] System pressure gauge
Switching the boiler ON/OFF:
▶ Turn on mains power supply, the power on indicator [5] illuminates blue.
▶ Turn on any external controls.
▶ Set the thermostatic radiator controls to maximum temperature.
▶ Set the clock/programmer to continuously ON and the room thermostat to maximum temperature.
▶ Turn the boiler CH temperature control [1] to maximum.
The burner on indicator [2] illuminates green when the burner has lit.
If the boiler fails to light, the blue power indicator [5] and reset button [7] will flash.

Resetting the boiler if a fault occurs
▶ Do not press the blue power indicator [5] to reset the boiler.
▶ Press and hold the reset button [7] for more than two seconds to reset the boiler if it fails to light.
5.5 Commissioning
i
The combustion settings on this gas-fired boiler have been checked, adjusted and preset at the factory for operation on the gas type defined on the data plate.
No measurement of the combustion values is necessary provided there is a meter installed allowing the gas rate to be checked.
▶ Do not adjust the air/gas ratio valve!
Having checked:
▶ That the boiler has been installed in accordance with the installation instructions.
▶ The integrity of the flue system and flue seals, as described in section 6.3 of this manual.
▶ The integrity of the boiler combustion circuit and relevant seals.
5.5.1 Checking the gas inlet pressure
The inlet pressure to the boiler must be checked using the following procedure:
Measuring the inlet pressure
▶ Close gas isolation valve.
▶ Slacken the screw in the inlet pressure test point [1] and connect a manometer.
▶ Open gas isolation valve.
▶ Measure the pressure with the boiler running at maximum.
- Press service button for more than ten seconds and set CH temperature to maximum.
- The service button will illuminate continually and the blue power indicator will pulse five times.
▶ Check the gas supply working pressure at the gas valve conforms to values for the appropriate gas type shown in Figures 59 and 60.
i
Ensure inlet pressure is satisfactory with all other gas appliances working.

natural_image
Technical line drawing of a mechanical assembly with labeled component (no readable text or symbols)Fig. 58 Inlet pressure test point
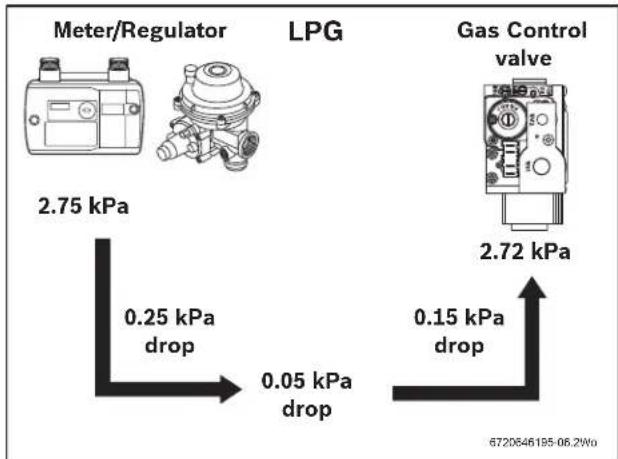
Gas pressure within the system
Refer to the figures below for Natural Gas or LPG pressures.
If the pressure drops are greater than shown below, then this would indicate a problem with the pipe work or connections within the system.

Fig. 59 Natural Gas pressures
other
| Component | Pressure Drop (kPa) | | :--- | :--- | | Meter/Regulator | 2.75 | | Gas Control valve | 2.72 | | Flow Direction | 0.25 (kPa drop) to 0.05 (kPa drop) | | Current Direction | 0.15 (kPa drop) to 0.05 (kPa drop) | The diagram shows a single directional flow with arrows indicating direction of pressure change.Fig. 60 LPG pressures
NOTICE:
Do not continue commissioning until the correct gas pressure is achieved.
5.5.2 Checking the gas rate
▶ The gas rate should be measured at the gas meter after 10 minutes operation at maximum.
See technical data section at the front of this manual.
▶ Where a gas meter is not available (e.g. LP gas) the CO/CO _2 must be checked to the units shown in the setting of the air/gas ratio, refer to section 6.6 "Setting the air/gas ratio".
▶ If pressure and gas rate are satisfactory press the service button again and the boiler will return to normal operation.
- If left in the service mode the control will return to normal operation after 15 minutes.
▶ Close the gas isolation valve.
▶ Remove the manometer.
▶ Re-seal the screw in the gas inlet pressure test point.
▶ Open the gas isolation valve.
▶ Ensure that there are no gas leaks.
▶ Replace the outer case.
5.5.3 Domestic Hot Water: Controlling the hot water temperature.
i
The hot water temperature can only be controlled when the "optional integral diverter valve" kit is fitted.
The hot water temperature can be set to between approximately 40 °C and 60 °C using the DHW temperature control.
5.6 Starting the boiler
5.6.1 Replace outer casing:
▶ Replace outer casing making sure that the securing points are properly located.
Refer to figure 61.
-
Replace top two screws.
-
Tighten bottom two screws.

Fig. 61 Fitting outer casing
5.6.2 Fitting fascia flap
▶ Present the flap up to the boiler with the hinge pins facing the boiler.
▶ Engage the left hand pin into the grey pivot. The hinge pin and pivot hole are both square, rotate the flap to ensure that the pin is located in the pivot.
▶ Support the flap in your left hand and with your right hand, bend the right side down. This should enable you to engage the right hand pin in the pivot. Rotate the flap to ensure that the pins and pivots are located securely.
▶ Close the flap.
5.6.3 Installing bottom panel
▶ The bottom panel slides onto two ledges (C) either side of the boiler frame.
▶ Hold the panel up against the underside of the boiler and slide towards the rear, until there is no more movement.
▶ Slide the panel forward until it is fully engaged.

natural_image
Diagram of a laptop chassis showing internal components and wiring (no text or symbols)Fig. 62 Bottom panel installation
i
Every time the power to the boiler is turned off and on, the boiler enters a learning mode and may take some time to optimise the boiler performance. This time is variable and is dependant on hot water and central heating demand.
5.6.4 Handover
▶ Complete the gas boiler commissioning checklist.
▶ Open the fascia cover by gently pressing the centre top of the cover.
▶ Set up the controls and show the user how to operate all the controls shown in the user guide.
▶ Ensure that the user guide is left with the customer.
6 Servicing and spares
6.1 Inspection and service:

CAUTION:
▶ Turn off the gas supply and isolate the mains supplies before starting any work and observe all relevant safety precautions.
NOTICE:
Component replacement:
▶ After replacement of a gas related component, where a gasket or seal has been disturbed or replaced, check for gas tightness using a gas sniffer/analyser.
▶ Also after re-assembly, carry out the following checks:
- Fan pressure.
- Flue gas analysis.
NOTICE:
Personnel and equipment:
▶ Service work must only be carried out by an authorised person.
▶ Service work must not be attempted if a calibrated CO/CO _2 analyser and manometer are not available.
- To ensure the continued efficient operation of the boiler it must be checked at regular intervals.
- The frequency of servicing will depend upon the particular installation conditions and usage however, an annual service is recommended.
- The extent of the service required is determined by the operating condition of the boiler.
- The service interval record sheet at the rear of these instructions must be completed after each service.
Inspection
▶ Check that the terminal and the terminal guard, if fitted, are clear and undamaged.
▶ If the boiler is in a compartment or cupboard check that the specified service space around the boiler is clear.
▶ Check all the joints and connections in the system and remake any that show signs of leakage. Refill and repressurise if applicable as described in Commissioning.
▶ Operate the boiler and take note of any irregularities. Refer to fault finding for rectification procedures.
Component access
Removing the outer case
▶ Remove bottom panel by pushing it fully back and then pulling it forward and down to remove.
Refer to figure 63.
-
Undo and remove two screws securing boiler casing at the top of the boiler.
-
Undo but do not remove the two screws.
▶ Pull case forward and remove.

Fig. 63 Outer casing removal
Lowing the boiler control panel to the service position Refer to figure 64.
- Remove screw securing the control panel.
- Pull the panel forward into the service position.
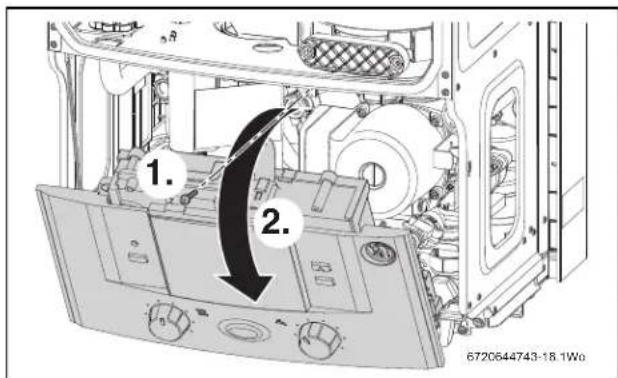
Fig. 64 Moving the control panel into service position
6.2 Check the gas inlet pressure
NOTICE:
▶ Ensure that the gas inlet pressure is satisfactory with all other gas appliances working.
▶ Do not continue with the other checks if the correct gas inlet pressure can not be achieved.
Check the gas supply working pressures in the system conform to the readings shown in the following table:
Natural Gas Pressure
| at the meter/regulator at the gas control valve | |
| 1.13kPa 1.1kPa minimum | |
| LPG Pressure | |
| at the meter/regulator at the gas control valve | |
| 2.75kPa 2.75kPa | |
Table 17 Gas supply working pressures
6.3 Checking flue integrity
The integrity of the flue system and performance of the boiler can be checked via the flue.
▶ With the boiler case on and the boiler running at maximum.
▶ Insert the analyser probe into the air intake.
▶ Allow the readings to stabilise and check that:
- O_2 is equal to, or greater than 20.6%
- CO_2 is less than 0.2%
▶ If the readings are outside these limits then this indicates that there is a problem with the flue system or combustion circuit.

Fig. 65 Flue integrity test
[1] Air intake sample point
[2] Flue gas sample point
6.4 Fan pressure test
i
This test is to determine if the heat cell requires cleaning/attention.
Setting the boiler to maximum
- Press and hold service button for more than 10 seconds.
- Set the CH temperature to maximum.
- The service button will illuminate continually and the blue power indicator will pulse 5 times.
- The boiler will stay in this mode for 15 minutes unless the service button is pressed again.
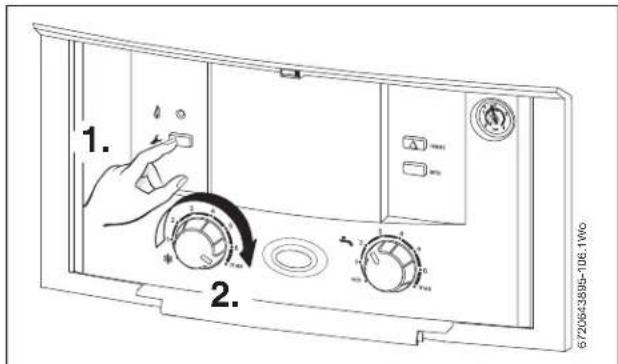
Fig. 66 Set the boiler to maximum
Fan pressure measurement
▶ Remove the cover and connect a digital manometer to the fan pressure test point.

natural_image
Technical line drawing of an internal mechanical device with visible components and wiring (no text or symbols)Fig. 67 Fan pressure test point
▶ After measurement replace test point cover.
▶ The pressure will read negative, refer to the chart in figure 68.

bar
FAN PRESSURE TEST | Boiler Type | Test Pressure Range (kPa) | | :--- | :--- | | Clean Heat Ex. | -0.2 to 0.0 | | Heat Ex. ok | -0.4 to -0.8 | | NG Boiler ZSB18-2A-23: | -0.8 | | LPG Boiler ZSB18-2A-31: | -0.74 | 6720646195-13.1WoFig. 68 Fan pressure readings
If the boiler fails the fan pressure test then before adjusting the air/gas ratio, try the following:
▶ Check the syphon is not blocked.
- Remove the screws securing the sump cover.
- Remove the sump cover.
- Clean the sump and heat exchanger with a suitable brush
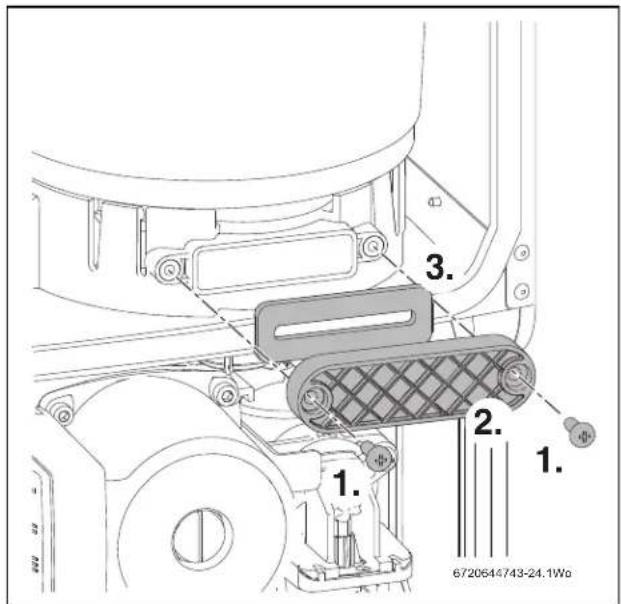
Fig. 69 Sump access
▶ Check the exhaust path and flue for restriction.
▶ Clean the heat exchanger with a suitable cleaning tool. refer to section 6.7 "Checking the heat exchanger".
▶ Re-check the fan pressure readings
6.5 Flue gas analysis
Combustion test:
▶ Connect the flue gas analyser to the flue gas sampling point as shown in the figure 70.
▶ Run the boiler at maximum output for at least 10 minutes.
▶ Check the CO/CO 2 readings against the information in table 18 CO/CO 2 settings.

Fig. 70 Combustion test
[1] Air inlet sample point
[2] Flue gas sample point
If the boiler fails the combustion test, check:
▶ Air intake for restriction.
▶ Diaphragm in the fan, for correct operation.
▶ Cleanliness of the heat cell, plus blockages in the condensate disposal.
6.6 Setting the air/gas ratio
NOTICE:
Combustion testing
Setting of the gas ratio must be carried out by an authorised person. Setting of the gas ratio must not be attempted unless the person carrying out the test is equipped with a calibrated combustion analyser and is competent in it's use.
6.6.1 Setting the CO/CO 2
i
When running in the service mode, the boiler will operate the central heating. This is to allow sufficient time for the setting procedure.
▶ Refer to section 6.2 "Check the gas inlet pressure" and ensure that the gas inlet pressure is correct before continuing.
▶ To adjust the CO/CO _2 it will be necessary to first operate the boiler at maximum output.
- Press and hold down the service button for more than 10 seconds until illuminated (refer to figure 71).
- The blue power indicator will pulse 5 times.
- Turn central heating control to maximum (refer to figure 71).
- The boiler will then go to maximum output.
▶ Refer to table 18 and check the CO/CO _2 at maximum and if required adjust for maximum via adjuster [1] figure 72 using a 2.5mm Allen key.
▶ Check CO is less than 200ppm for Natural Gas and less than 250ppm for LPG.
- Set the central heating control to minimum (refer to figure 71).
- The boiler will go to minimum output.
▶ Measure the CO/CO 2 and check against table 18. If required set the minimum CO/CO 2 via adjuster [2] figure 72 on the gas valve until the correct measurement is set:
- Remove dust cap with flat bladed screw driver.
- Using a 4mm Allen key adjust CO _2 .
- Replace the dust cap.
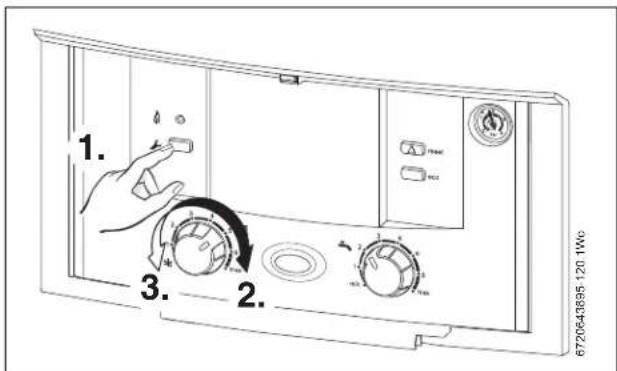
Fig. 71 Setting the boiler to minimum or maximum
▶ Check that the CO is less than 200ppm for Natural Gas and less than 250ppm for LPG.
▶ Return to maximum and re-check the CO/CO _2 . If correct, press the service button; the button will cease to be illuminated and the blue power indicator will be permanently illuminated.
▶ Re-assemble and refit boiler case.

Fig. 72 Gas valve adjustment
CO/CO2 settings for Condens 5000W
CO/CO₂ should be measured after 10 minutes
| Gas type CO | 2 maximum CO | 2 minimum |
| Natural Gas 9.8% ± 0.5 | 9.2% ± 0.5 | |
| LPG (Propane) | 10.8% ± 0.2 | 10.2% ± 0.2 |
| Set by manufacturer |
NOTES:
▶ Appliances intended for use with LP gas (Propane or Universal) must initially be set on propane at 10.8% (max.) and 10.2% (min.) and at these CO _2 settings the appliance will operate satisfactorily on Universal LP gas.
The exhaust of an appliance operating on Universal LP gas will however indicate a CO_2 concentration of up to 12.8% but will need no adjustment.
▶ When checking an existing boiler the tolerance is ± 0.5.
▶ If checking after cleaning or component replacement or for adjustment when the reading obtained is outside the tolerances given above, then the tolerance is ± 0.2.
CO - less than 200 ppm (0.002 ratio) Natural Gas.
CO - less than 250 ppm (0.0025 ratio) LPG.
Table 18 CO/CO _2 settings
6.7 Checking the heat exchanger
NOTICE:
Combustion testing
Setting of the gas ratio must be carried out by an authorised person. Setting of the gas ratio must not be attempted unless the person carrying out the test is equipped with a calibrated combustion analyser and is competent in it's use.
NOTICE:
CO/CO _2 checks
▶ If the joint between the air/gas manifold and heat exchanger is disturbed the sealing gasket must be replaced. After completing the service of the boiler, the CO/CO2 must be checked and set to the limits shown in section Setting the air/gas ratio on page 39.
i
There is an accessory kit available designed for cleaning the heat exchanger, part number: 7 716 192 312.
▶ Isolate the power to the boiler and remove outer case and base panel. 1. Refer to figure 73 and remove the clip from gas valve outlet.
i
If the plastic elbow can not be easily removed, undo the nut to push the plastic elbow out of the fitting.
- Pull the gas outlet elbow free from the gas valve.

Fig. 73 Upper gas valve connection removal
▶ Remove electrical connector and earth wire from fan.
i
To prevent damage to the electrodes when removing the air/gas manifold, disconnect the leads to the electrodes.
▶ Disconnect spark electrode and flame sensor connections.
- Refer to figure 74 and undo the securing nut on the top of the heat exchanger and remove the retaining plate assembly.
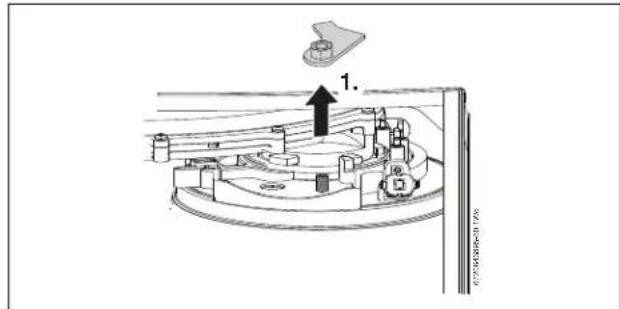
Fig. 74 Air/gas manifold securing nut
- Refer to figure 75 and rotate fan and air/gas manifold assembly around the top of the heat exchanger until it stops at the lug.
▶ Lift up assembly and remove from boiler. - Remove the cover panel by removing retaining screw.
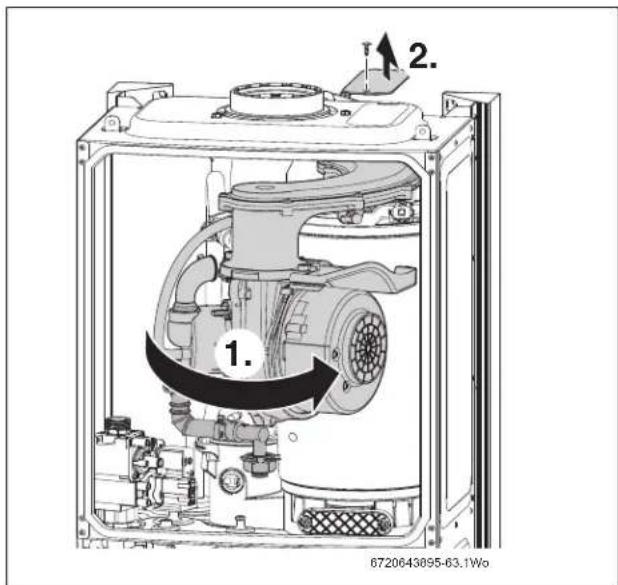
Fig. 75 Rotate air/gas manifold
Burner removal
Refer to figure 76.
- Remove clamping plate.
- Remove spark/flame electrode assembly and seal from the top of the heat exchanger.
- Remove burner.

Fig. 76 Burner and electrode assembly removal
Checking and cleaning the electrode assembly:
NOTICE:
Cleaning
▶ Do not use wire wool to clean the electrodes.
▶ Inspect the condition of the electrodes and ceramics, replace if necessary.
▶ Use a plastic scouring pad to clean the electrodes.
Baffle removal
Refer to figure 77.
- Remove the top baffle.
- Remove the lower baffle.
i
If the lower baffle is stuck, it may be necessary to use the "baffle removal tool" from the heat exchanger cleaning kit part number: 7 716 192 312, as shown in figure 77.

Fig. 77 Baffle removal
Access cover removal
Refer to figure 78.
- Remove the two pozi-drive screws.
- Remove the access cover.
- Remove the gasket.

Fig. 78 Access cover removal
Cleaning the primary heat exchanger
▶ Access the heat exchanger flue ways by inserting the cleaning brush (7 716 192 312) through the top access hole in the casing, removal of panel shown in figure.
▶ Clean heat exchanger flue ways using the cleaning brush removing any debris from the access point in the sump.
▶ Clean around the sealing surface on the sump.
▶ Replace the access cover.
▶ Using a suitable container to collect water from syphon connection at the base of the boiler flush heat exchanger with water.
▶ Re-assemble ensuring that the lower baffle [2] and the top baffle [1] are refitted correctly (refer to figure 77).
▶ Refer to figure when re-fitting the burner to ensure that it fits centrally within the heat exchanger and location tabs are situated in location holes.
▶ Ensure that the seal is replaced with a new seal and ensure that the seal is correctly fitted.
▶ Check the syphon unit is clean before refitting to boiler.
▶ Reassemble and check combustion as stated in Setting the air/gas ratio section on page 39.
i
The heat exchanger does not have to be removed for cleaning. The heat exchanger is shown removed from the boiler to illustrate cleaning more clearly.
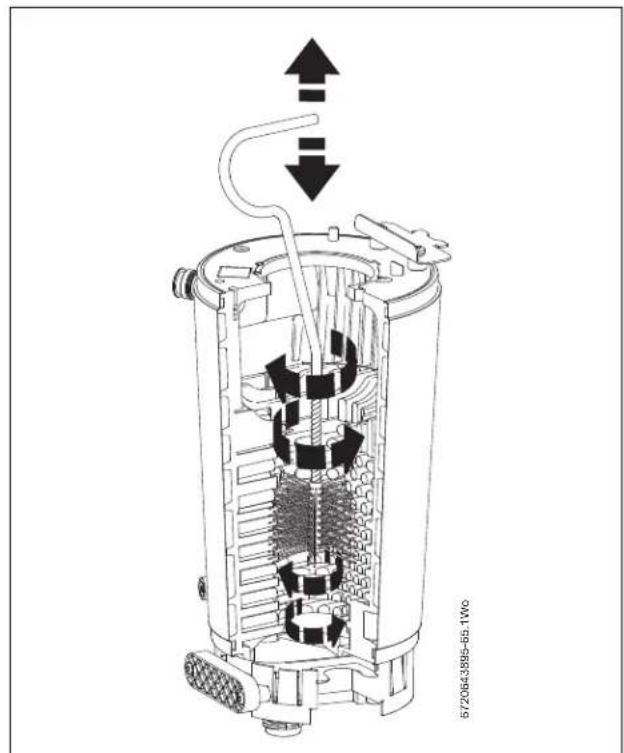
natural_image
Cross-sectional diagram of a cylindrical industrial device with internal components and directional arrows (no text or symbols)Fig. 79 Cleaning the heat exchanger

CAUTION:
Heat exchanger baffles
The baffles [1] and [2] must be refitted into the heat exchanger in the order shown in figure 77. Failure to do so may result in damage to the boiler.
NOTICE:
CO/CO _2 checks
▶ If the joint between the air/gas manifold and heat exchanger is disturbed the sealing gasket must be replaced.
▶ After completing the service of the boiler, the CO/CO2 must be checked and set to the limits shown in section Setting the air/gas ratio on page 39.
▶ When replacing the burner gasket ensure that the clamping plate is fully tightened down to the heat exchanger.
Cleaning the syphon
There is no need to remove the syphon to clean.
To drain debris from the syphon, release the clips and remove the drainage cap from the bottom of the syphon.
Catch the debris and condensate from the syphon into a suitable container.
6.8 Replacement of parts

CAUTION:
Gas and mains supplies
▶ Turn off the gas supply and isolate the mains supplies before starting any work and observe all relevant safety precautions.

CAUTION:
Replacing components
▶ After replacement of any components always check for gas tightness where relevant and carry out functional checks as described in commissioning. Damaged O-rings or gaskets must be replaced.
6.8.1 Removing the outer case
- Undo the two screws securing the top of the boiler casing.
- Undo the two screws securing the bottom of the boiler casing.
▶ Pull case forward and remove.
- To remove bottom tray, pull forward on the tag on the underside of the tray.

Fig. 80 Remove outer case
i
To gain access to the following components the outer case has to be removed:
▶ Primary sensor
▶ Overheat thermostat
▶ Flue limit thermostat
6.8.2 Primary sensor
Refer to figure 81 for removal.
- Remove electrical connection by pulling upwards. Squeeze retaining clip on plastic moulding of sensor and pull back and up until clear of pocket in heat exchanger.
- Pull forward to remove completely.
▶ Coat new sensor with heat conductive paste and replace.
6.8.3 Overheat thermostat
Refer to figure 81 for removal.
▶ Remove two electrical connectors from thermostat.
3. Slacken and remove fixing screw and thermostat [3].
▶ When replacing ensure thermostat sits correctly on surface of the casting with the left hand side of thermostat sitting up against the shoulder.
i
It is essential that the mating surface of the thermostat is coated with heat conductive paste.

Fig. 81 Primary sensor and overheat thermostat
6.8.4 Flue overheat thermostat (with grommet)
To remove and replace the thermostat either:
▶ Using a small terminal screwdriver, prise the thermostat and grommet from the plastic housing. Take care not to damage the grommet or plastic housing.
-or-
Refer to figure 82.
- Release the flue connection from the sump.
- Push the flue tube up.
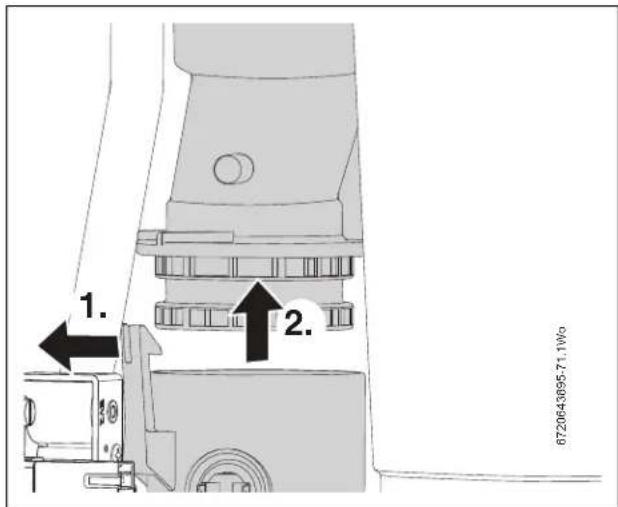
Fig. 82 Lower exhaust section
Refer to figure 83.
▶ Remove electrical connections.
▶ Push the flue limit thermostat in from the sump.
▶ Retrieve the thermostat from the sump well.

Fig. 83 Thermostat removal
▶ Replace the thermostat by:
- Pushing the thermostat and grommet gently back into the opening until contact with the locating ridge is felt.
6.8.5 Moving the control panel to the service position
i
To remove the following components require the control panel must be moved in to the service position:
Gas valve replacement
▶ Replacement of the gas valve must not be carried out if a calibrated CO/CO_2 analyser is not available.
- Remove the screw securing control panel.
- Gently pull the panel forward.

Fig. 84 Control panel to service position
6.8.6 Gas valve
Refer to figure.
▶ Isolate gas supply at boiler isolating valve.
1. Remove wire clip from the gas valve outlet.
2. Move the gas pipe free from the gas valve.
If the pipe will not come out, unscrew the nut to aid removal.

Fig. 85 Upper gas valve connection removal
Refer to figure.
- Undo bottom gas connection to gas valve.
- Undo two securing screws on the underside of casing.
▶ Disconnect electrical connections.
▶ Move valve up and forward out of boiler.
▶ Replace valve with new seals and check for gas tightness.
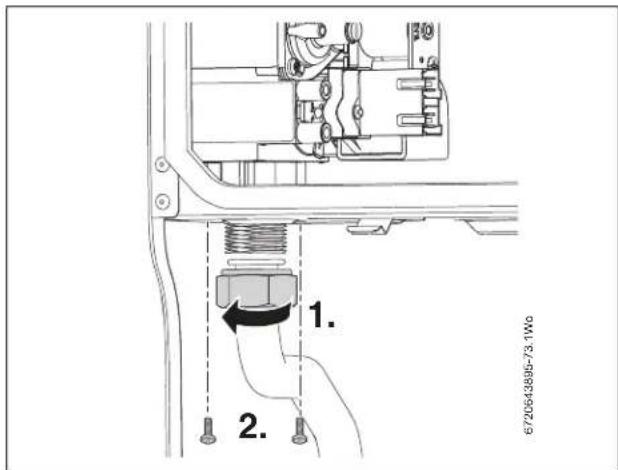
Fig. 86 Lower gas valve connection removal
NOTICE:
The gas valve will require setting:
▶ Follow procedure Setting the air/gas ratio.
6.8.7 Air/gas manifold and fan assembly
i
The following components require the air/gas manifold and fan assembly to be removed:
▶ Fan electrode assembly
▶ Burner
▶ Heat exchanger
NOTICE:
CO/CO _2 checks
▶ If the joint between the air/gas manifold and heat exchanger is disturbed the sealing gasket must be replaced. After completing the service of the boiler, the CO/CO _2 must be checked and set to the limits shown in Setting the air/gas ratio on page 39.
▶ Remove electrical connector and earth wire the from fan.
▶ Remove wire clip from gas valve outlet then move gas pipe free from the gas valve (see figure 85).
Refer to figure 87.
- Undo the securing nut at the top of the heat exchanger and remove the retaining plate assembly.

Fig. 87 Air/gas manifold retaining plate
i
Disconnect spark electrodes and flame sensor connection.
This will prevent damage to the electrodes and sensor when the air/gas manifold is rotated.
Refer to figure 88.
- Rotate fan and air/gas manifold assembly around the top of the heat exchanger until the lug on the air/ gas manifold is visible.
▶ Lift up assembly and remove from boiler.
NOTICE:
After re-assembly
▶ Check the CO/CO2 levels as described in section 6.6 "Setting the air/gas ratio".
- Remove the cover panel by removing retaining screw.
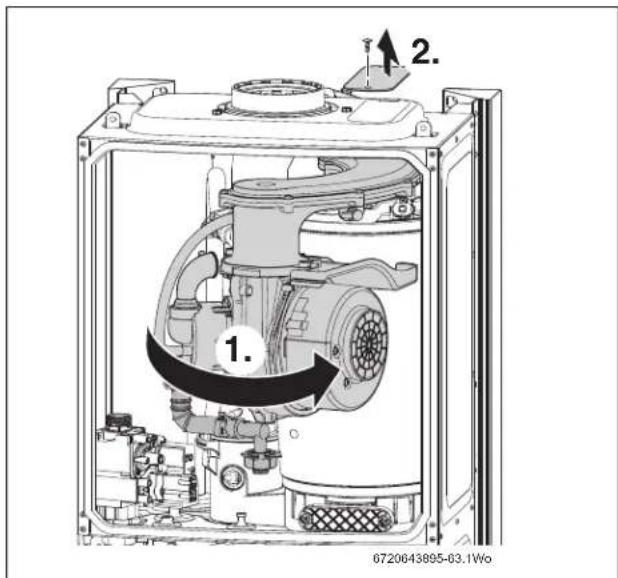
Fig. 88 Rotate the air/gas manifold assembly
6.8.8 Fan
▶ Remove the air/gas manifold from the boiler as described in the previous section.
- Remove two screws retaining the fan to the air/gas manifold.
- Remove the air/gas manifold.
- Remove the screw holding the retaining plate.
- Remove the retaining plate.
- Remove three screws and the mixing chamber.

Fig. 89 Air/gas manifold assembly dismantling
▶ Re-assemble with new fan ensuring seals are correctly fitted.
Flap valve assembly

There is no need to remove the mounting flange from the fan assembly just to gain access to the flap.
▶ Twist the mixing chamber clockwise to release from the mounting flange.
▶ Pull the mixing chamber off the mounting flange.
- Pull the rubber flap off the flap valve assembly.

Fig. 90 Flap valve assembly
▶ To replace the flap valve:
- Press the two lugs on the back of the flap into the two slots in the flap valve assembly.
▶ Push the mixing chamber back onto the mounting flange and twist anti-clockwise to secure.
6.8.9 Electrode assembly and burner
▶ Disconnect spark electrodes and flame sensor connection.
▶ Remove clamping plate.
Refer to figure 91.
- Remove spark/flame electrode assembly from heat exchanger.
- Remove the seal from the top of the heat exchanger.
- Remove the burner.

Fig. 91 Electrode assembly and burner
▶ Replace new burner in correct position.
▶ Ensure that burner tabs, as shown in figure 91, fit correctly their respective locations.
NOTICE:
CO/CO2 checks
▶ If the joint between the air/gas manifold and heat exchanger is disturbed the sealing gasket must be replaced.
After completing the service of the boiler, the CO/CO₂ must be checked and set to the limits shown in Setting the air/gas ratio on page 39.
▶ Ensure that the new seal is fitted.

CAUTION:
Clamping plate
▶ Ensure that the clamping plate is firmly tightened down on top of the heat exchanger.
▶ Replace the clamping plate.
6.8.10 Heat exchanger
▶ Isolate flow and return valves then drain the boiler.
▶ Remove syphon.
Refer to figure 92.
- Remove the clip from plastic elbow on the flow pipe.
- Move flow pipe away from heat exchanger.
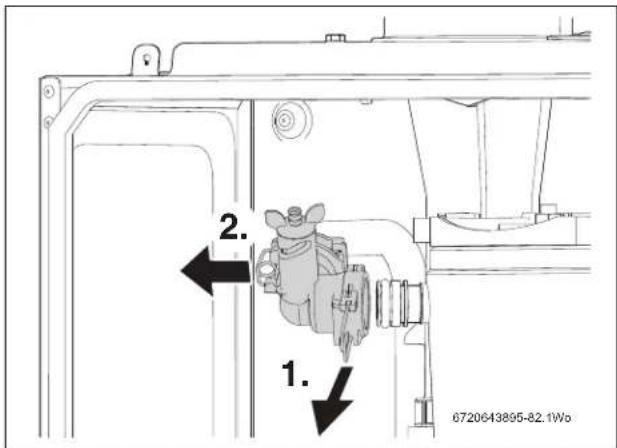
Fig. 92 Flow pipe removal
Refer to figure 93.
- Remove the three screws securing the turret to the top of the boiler.
- Turn the upper exhaust connector clockwise to release from the hook.
- Move the upper exhaust connector down.

Fig. 93 Upper exhaust assembly
Refer to figure 94.
- Release the clip.
- Move the lower exhaust connector up.
▶ Remove the complete exhaust assembly.

Fig. 94 Release lower exhaust connection
Refer to figure 95.
- Unscrew the plastic nut.
- Remove the nut from the bottom of the boiler.
- Rotate lever to release the return pipe.

Fig. 95 Release the sump
Refer to figure 96.
- Lift the heat exchanger up to clear.
- Move the heat exchanger forward from the case.
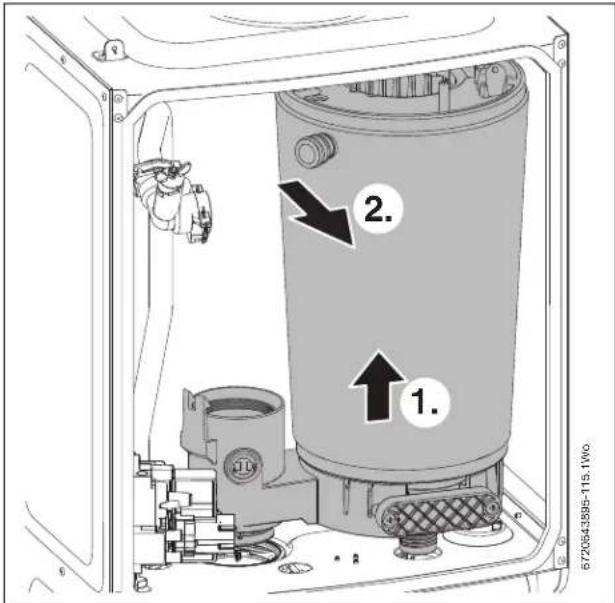
Fig. 96 Heat exchanger removal
▶ Reassemble and check combustion as stated in section Setting the air/gas ratio.
NOTICE:
CO/CO _2 checks
▶ If the joint between the air/gas manifold and heat exchanger is disturbed the sealing gasket must be replaced. After completing the service of the boiler, the CO/CO₂ must be checked and set to the limits shown in Setting the air/gas ratio on page 39.
6.8.11 Access to boiler control components
Refer to figure 97.
- Remove three screws.
- Remove cover from control.
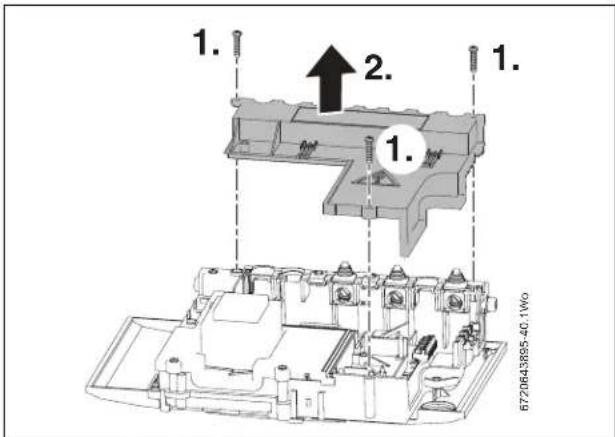
Fig. 97 Removing the connection cover
6.8.12 PCB fuse
Refer to figure 98.
Replacing the 2.5A fuse (F1)
▶ Remove the fuse carrier [1], with fuse F1 from the fuse holder on the PCB and replace a new fuse.
Replacing either the 1.5A (F2) or 0.5A fuse (F3)
▶ Remove fuse F2 [3] or F3 [2] from the fuse holder on the PCB and replace a new fuse.

Fig. 98 Fuse locations
[1] F1 2.5A-T2.5H 250V
[2] F3 0.5A - T500L 250V
[3] F2 1.5A-T1.6L 250V
Spare fuses
Spare fuses are clipped into the underside of the electrical cover, refer to figure 99.
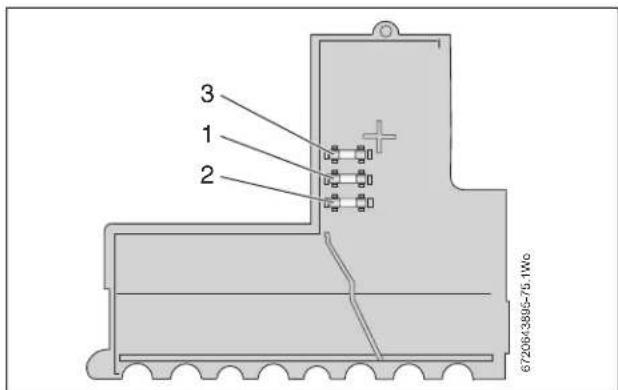
Fig. 99 Spare fuses location
[1] T1.6L 250V
[2] T2.5H 250V
[3] T500L 250V
6.8.13 Transformer/PCB
Refer to figure 100.
▶ Disconnect all electrical connections from the control.
- Remove five screws retaining the rear panel of the control.
- Remove the rear panel.
- Remove the transformer cover.

Fig. 100 Transformer/PCB access
Refitting the control board cover:
▶ Ensure that all wires are fully within the control board.
▶ Align the front right hand corner of the cover with the front right hand corner of the control board.
▶ Align the rear right hand.
▶ Holding the cover level, slide the cover onto the control board, ensuring that the incoming cables, at the top, are held clear.
6.8.14 Replacing the control panel
NOTICE:
Control panel replacement
▶ Do not replace the control unit if a calibrated CO/CO _2 analyser is NOT available.
i
The control panel is supplied within its plastic housing. The complete unit must be replaced.
Refer to figure 101.
- Remove all electrical connections from the control panel PCB including where cables run through restraints. These can be unclipped from the plastic moulding noting their position.
-
Carefully remove the system pressure gauge from the fascia by parting the plastic retaining lugs securing the gauge in place. Take care not to damage or kink the capillary tube.
-
Remove the code plug. The code plug should be left attached to the frame of the boiler by its plastic safety thread.

Fig. 101 Control panel replacement preparation
Refer to figure 102.
- Remove the three screws retaining the front fascia making sure to support the fascia when removing the last screw.
- Remove the front fascia.

Fig. 102 Fascia removal
Refer to figure 103.
- Using a suitable tool, press the button upwards.
- Slide the control support bracket to the left.

Fig. 103 Release control panel
▶ Support the control panel and unclip the support cable [1] from the boiler frame.
▶ Remove the support cable and fit to the new control.
▶ Remove appropriate cable restraints from the new control panel.

Fig. 104 Release support cable
▶ Fit control to the boiler.
▶ Re-connect support cable (1) to the boiler and all electrical connections and system to the new control.
▶ Ensure that the code plug is re-fitted to the new control. If this is not done, the boiler will indicate an error and will not function.
▶ Replace the fascia to the new control and secure the system pressure gauge back in the fascia.
NOTICE:
Control panel replaced
▶ After re-assembly, check the CO/CO _2 levels as described in section 6.6 "Setting the air/gas ratio".
6.8.15 Syphon removal
Releasing the syphon from the sump, refer to figure 105.
- Disconnect the discharge hose at the plumbing manifold.
- Using a screwdriver, disengage the retaining clip on top of the syphon.
- Pull the syphon towards you and remove the complete assembly.

Fig. 105 Syphon removal
6.8.16 Diverter valve motor (if option integral diverter valve fitted)
▶ Temporarily connect the electrical power to the boiler.
▶ Enter the service mode to ensure that the diverter valve is in the mid position (there is no need to drain the boiler).
▶ Electrically isolate the boiler.
▶ Remove diverter valve cover, if fitted.
▶ Disconnect the electrical connector from the diverter valve motor.
Refer to figure 106.
- Pull the motor assembly towards you. The assembly will slide free from the valve.
▶ Slide the body into the housing to fit the new diverter valve motor. - Ensure that "H" section of the motor actuator is fitted correctly into valve body.
- Re-connect the electrical connection. - Re-fit the protective cover (if available).

Fig. 106 Diverter valve and motor
6.8.17 Diverter valve (if option integral diverter valve fitted)
▶ Ensure the boiler has been fully drained.
▶ Disconnect the electrical connector from the diverter valve motor.
▶ Remove the diverter valve cover, if fitted.
Refer to figure 106.
- Undo the two screws holding the valve to the plastic housing.
- Withdraw the valve and clean the valve chamber if necessary.
▶ To refit, follow the above in reverse.
▶ Ensure any seals that have been disturbed are renewed.
6.8.18 Auto air vent
i
Removal of the syphon assembly will give access to the auto air vent. Refer to section 6.8.15.
▶ Ensure the boiler has been fully drained.
▶ Use a screwdriver or similar to rotate the air vent anticlockwise, as shown below.
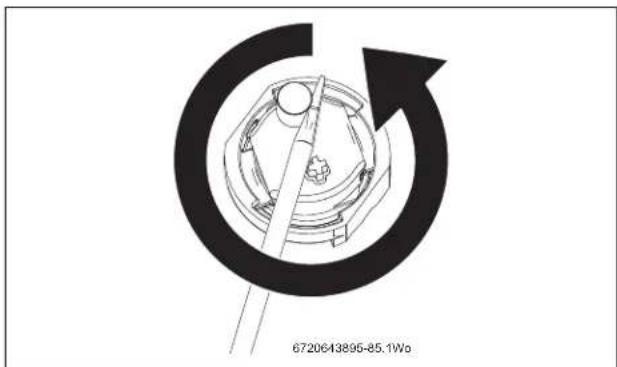
Fig. 107 Unlock auto air vent
- Lift the air vent [1] out of the housing and remove.
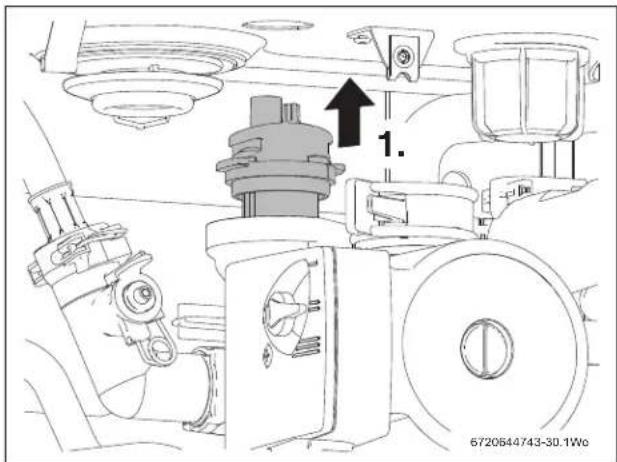
Fig. 108 Auto air vent removal
NOTICE:
Before fitting replacement auto air vent
The "O" ring must be fitted to the Auto air vent and not the hydraulic block otherwise the auto air vent will be difficult to fit.
▶ Apply silicone lubricant to the "O" ring to ease assembly.
▶ To refit, follow the above in reverse order.
6.8.19 Pump head
▶ Ensure the boiler is fully drained.
▶ Disconnect the electrical connection from the bottom of the pump.
NOTICE:
Water damage
▶ Protect the control unit from water ingress when removing the pump head.
Refer to figure 109.
- Remove the four Allen bolts securing the pump at each corner.
- Gently pull the pump towards you and remove.

Fig. 109 Pump head removal
▶ To refit, follow the above in reverse.
6.8.20 Drain tap
▶ Ensure the boiler is fully drained.
Refer to figure 110.
- Rotate the drain tap fully anticlockwise.
- Withdraw the drain tap from its housing

Fig. 110 Drain tap removal
▶ To refit, follow the above in reverse. Ensure any seals that have been disturbed are renewed.
6.8.21 Pressure gauge
▶ Ensure the boiler is fully drained.
Refer to figure 101.
- Prise the lugs apart (3) securing the pressure gauge to the fascia.
- Remove the gauge (4) taking care not to damage or kink the capillary.
- Withdraw the spring clip from the pressure sensing head housing.
- Remove the pressure sensing head and pressure gauge capillary from the housing.
NOTICE:
Risk of heat damage
▶ Route the plastic capillary tube away from the pump to ensure that the pipe is not melted against the hot pump body.
▶ To refit, follow the above in reverse. Do not forget to fit the washer from the capillary when fitting a replacement gauge.
6.8.22 Hydraulic block removal
i
Remove the syphon assembly.
▶ Refer to syphon assembly removal page 50.
▶ Ensure the boiler has been fully drained.
▶ Disconnect the electrical connections to the NTC sensor and pump.
▶ Undo the nuts securing the copper water pipes to the manifold (there is no need to remove the gas pipe).
Refer to figure 111.
- Release the spring clips securing these water pipes to the plastic housing and remove the pipes.
▶ Release the spring clip securing the expansion vessel pipe to the plastic housing and remove the pipe.
▶ Release the spring clip securing the pressure gauge sensing head to the plastic housing and remove the sensing head.
▶ Release the locking devices that secure the two copper water pipes leading to the combustion chamber by squeezing the two tabs together and rotating anticlockwise (viewed from above).
i
This is not essential but makes the removal of the block easier.
▶ Remove the rubber pipe connecting the sump and remove the syphon.
- Undo the two screws securing the hydraulic block to the chassis (located top left / top right of the housing).

Fig. 111 Hydraulic block removal part 1
Refer to figure 112.
- Lift the left hand side of the block slightly.
- Manoeuvre the block out, starting at the right hand side.
▶ Take care not to snag the harness.
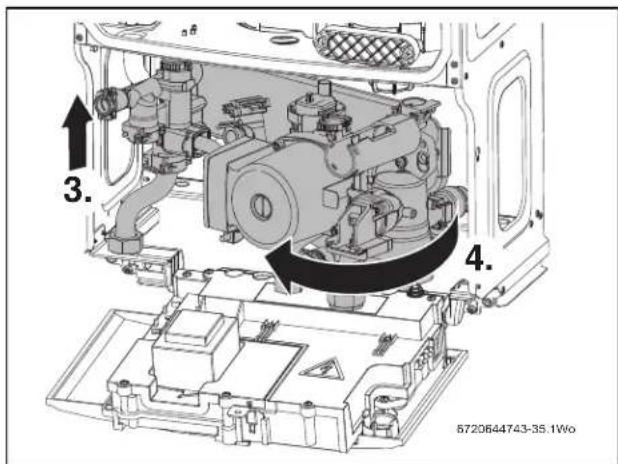
Fig. 112 Hydraulic block removal part 2
▶ To refit, follow the above in reverse. Ensure any seals that have been disturbed are renewed.
6.8.23 CH pressure relief valve
▶ Remove the hydraulic block from the boiler (see removing the hydraulic block).
1. Release the spring clip from the pressure relief valve housing.
2. Withdraw the pressure release valve from its housing.

Fig. 113 PRV removal
▶ To refit, follow the above in reverse. Ensure any seals that have been disturbed are renewed.
6.8.24 Bypass valve
- Remove the two spring clips at either end of the copper bypass pipe.
▶ Undo the screw securing the left hand plastic housing to the heat exchanger.
▶ Move the housing to the left to free up the one end of the pipe.
▶ Remove the pipe from the right hand housing to reveal the bypass valve. - Remove the two spring clips at either end of the copper bypass pipe.

Fig. 114 Removing the bypass valve
▶ To refit, follow the above in reverse. Ensure any seals renewed.
6.8.25 Expansion vessel
The expansion vessel can be replaced with the boiler in position if there is a side exit flue fitted and a minimum clearance of 340mm above the boiler casing. If a vertical flue is fitted then a similar clearance to one side of the flue is required.
If this clearance is not available, then the boiler will need to be removed from the mounting frame to gain access to the expansion vessel.
Alternatively a second vessel of at least the capacity of seven litres can be fitted to the return from the heating system as close as possible to the boiler.
Expansion vessel replacement (boiler in place)
▶ Isolate mains power from the boiler.
▶ Lower the control panel to the service position.
▶ Isolate the boiler from the heating system (and cylinder return if internal diverter valve is fitted) using service valves.
▶ Drain the boiler.
▶ At the pump manifold, release the clip and disconnect the expansion vessel hose.
Refer to figure 115.
- Remove screw [1] retaining the vessel to the top of the boiler casing.
- Move the vessel up [2] and out over the flue system or to one side if fitted with a vertical flue.

Fig. 115 Removing the expansion vessel
▶ Remove the flexible hose from the expansion vessel and fit to the replacement vessel using a new seal.
▶ Reassemble expansion vessel into wall frame and reconnect the flexible pipe to pump manifold and secure with the clip.
Expansion vessel replacement (removing the boiler)
▶ Isolate electrical supply.
▶ Isolate system and gas connections at the service valves.
▶ Drain the boiler.
▶ Disconnect electrical supply and any external controls.
▶ Disconnect flue connection from the boiler.
▶ Undo connection to boiler at the service valves.
▶ Release the clip from expansion vessel connection to the pump manifold.
▶ Carefully lift the boiler off the mounting frame.
Refer to figure 116.
- Remove the expansion vessel retaining screw.
- Lift the expansion off the cross beam.
- Move the expansion vessel towards you to remove.

Fig. 116 Removing the expansion vessel from the wall frame
▶ Replace expansion vessel in the reverse order and refit the boiler to the mounting frame.
▶ Follow the commissioning procedure in this manual.
6.9 Short parts list
 | Fan8 717 204 453 0 |  | Burner8 718 120 619 0 |  | Gas valve8 716 111 325 0 |
 | Control boardHT3 BUS enabled8 748 300 650 0 |  | Control box assembly8 717 207 937 |  | Electrodes(including gasket)8 718 107 087 0 |
 | Gasket - burner8 716 110 534 0 |  | Seal - Inner case/mantel8 716 106 635 0 |  | Pump assembly 3 speed8 716 106 355 0 |
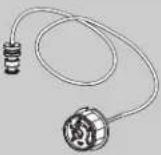 | Pressure gauge8 718 224 344 0 |  | By-pass valve8 716 106 434 0 |  | Automatic Air Vent8 716 106 445 0 |
 | Diverter valve motor8 716 106 847 0 |  | Control sensor - primary8 716 106 688 0 |  | Diverter valve assembly8 716 106 845 0 |
 | Expansion vessel8 716 119 769 | 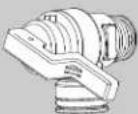 | Pressure Relief Valve8 716 106 431 0 | 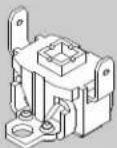 | High limit stat8 707 206 196 0 |
 | Fusing element set8 744 503 010 0Containing fuses:3.15 Amp2.5 Amp1.6 Amp0.5 Amp |  | Seals kit8 716 107 224 0 |  | Flue overheat thermostat(grommet type)8 716 206 213 0 |
Table 19 Short parts list
7 Fault finding and diagnosis
7.1 Fault finding

This fault finding information is for guidance only. Robert Bosch cannot be held responsible for costs incurred by incorrectly diagnosed faults.

This fault finding system assumes that the boiler has been operating normally until the time of failure (i.e. not a first installation error).
The electronic control system for this boiler incorporates a blue central indicator. This normally confirms the permanent mains supply but, by flashing at different rates during a fault, provides a guide to the cause as listed.
Basic checks
- Ensure that there is 230V power supply and the polarity is correct to the appliance.
- Ensure that the appliance settings and functionality is correct.
- Ensure the CH/DHW programmer/timer is functioning.
- Ensure the room thermostat is functioning.
- Ensure the cylinder thermostat (if fitted) is functioning.
- Ensure the cold water mains is turned on?
- Ensure the primary system has adequate pressure/system content for the system type.
- Ensure there is gas to the appliance?
- Are other gas appliances working, gas cooker/hob for example?
- Has the credit run out on the gas pre-payment meter?
NOTICE:
On completion of the Service/Fault-Finding task which has required the breaking and remaking of electrical connections, check:
▶ Earth continuity,
▶ Short circuit check,
▶ Polarity,
▶ Resistance to earth.
| Blue light indication | Lockout reset button | Fault Possible solution/check | |
| OFF OFF No power at control | board | ▶ Check:– Permanent mains supply to the boiler– Fuse F1 - 2.5A or Fuse F3 - 0.5A– Transformer (primary coil below 60 Ω, both secondary coil below 60 Ω.▶ Otherwise replace control board | |
| ON OFF Boiler not operating | during central heating demand | ▶ Check:– Live demand at ST10-L _R (from external controls, room thermostat/timer)– Fascia mounted (if fitted)– CH control knob is not in winter position ( ) *▶ Otherwise replace control board | |
| Boiler operating without live demand at ST10-L _R (from external controls, room thermostat/timer) | Some older thermostats (containing capacitors) may give a low voltage return at ST10-L _R when the thermostat contacts are open.▶ Check that there is no permanent live at ST10-L _R from another source.– Rectify external equipment providing voltage when there should be none during a no demand period. | ||
| Boiler not operating during hot water demand (CH ok) | ▶ Check:– Live demand at ST10-L _R (from external controls, cylinder thermostat/timer)– Fascia mounted (if fitted)– CH control knob is not in winter position ( ) *▶ Check (if “optional integral diverter valve” is fitted)– Diverter valve– Diverter valve motor▶ Otherwise replace control board | ||
| Boiler not operating during any demand. | ▶ Check fan:▶ Otherwise replace control board | ||
| Blue light indication | Lockout reset button | Fault Possible solution/check |
| Slow flash (mostly OFF, flashes ON) | Flashing (reset required) | Ignition lockout ▶ Check gas is present and at the correct pressure. ▶ Check gas valve: - Check that there is 29V d.c. to each solenoid - Check the resistance of each solenoid: Top solenoid = 380 ± 10% ( 342 - 418 ) Bottom solenoid = 190 ± 10% ( 171 - 209 ) - Gas valve adjustment. ▶ Check combustion CO _2 level. ▶ Check flue condition, ensure the flue is not blocked or restricted. ▶ Check for blocked condensate pipe or frozen condensate. ▶ Check condition and continuity of ignition electrodes/harness/connections. ▶ Otherwise replace control board |
| Slow flash (mostly ON, flashes OFF) | OFF Flue overheat | Flue temperature too high ▶ Check heat exchanger baffles are correctly fitted or removed and not refitted |
| Heat exchanger overheat ▶ Check: - Water pressure. - All air is vented. - Pump/harness/connections. - Water leaks/blockage. - Safety thermostats/low voltage wiring harness/connections. - Blocked heat exchanger. ▶ Otherwise replace control board | ||
| Fast flash OFF Volatile lockout | (sensor fan or code plug) ▶ Check: - Temperature sensors: Condition and resistance of the leads. - Fan. 230V A.C. across the live (purple) and neutral (brown) Fan lead continuity. - Code plug. Is code plug missing or not inserted properly? | |
| 2 pulses No Light Not a fault code Service mode selected to minimum. | ||
| 5 pulses No light Not a fault code Service mode selected to maximum. | ||
Table 20 Fault finding guidance
7.1.1 Circuit diagram
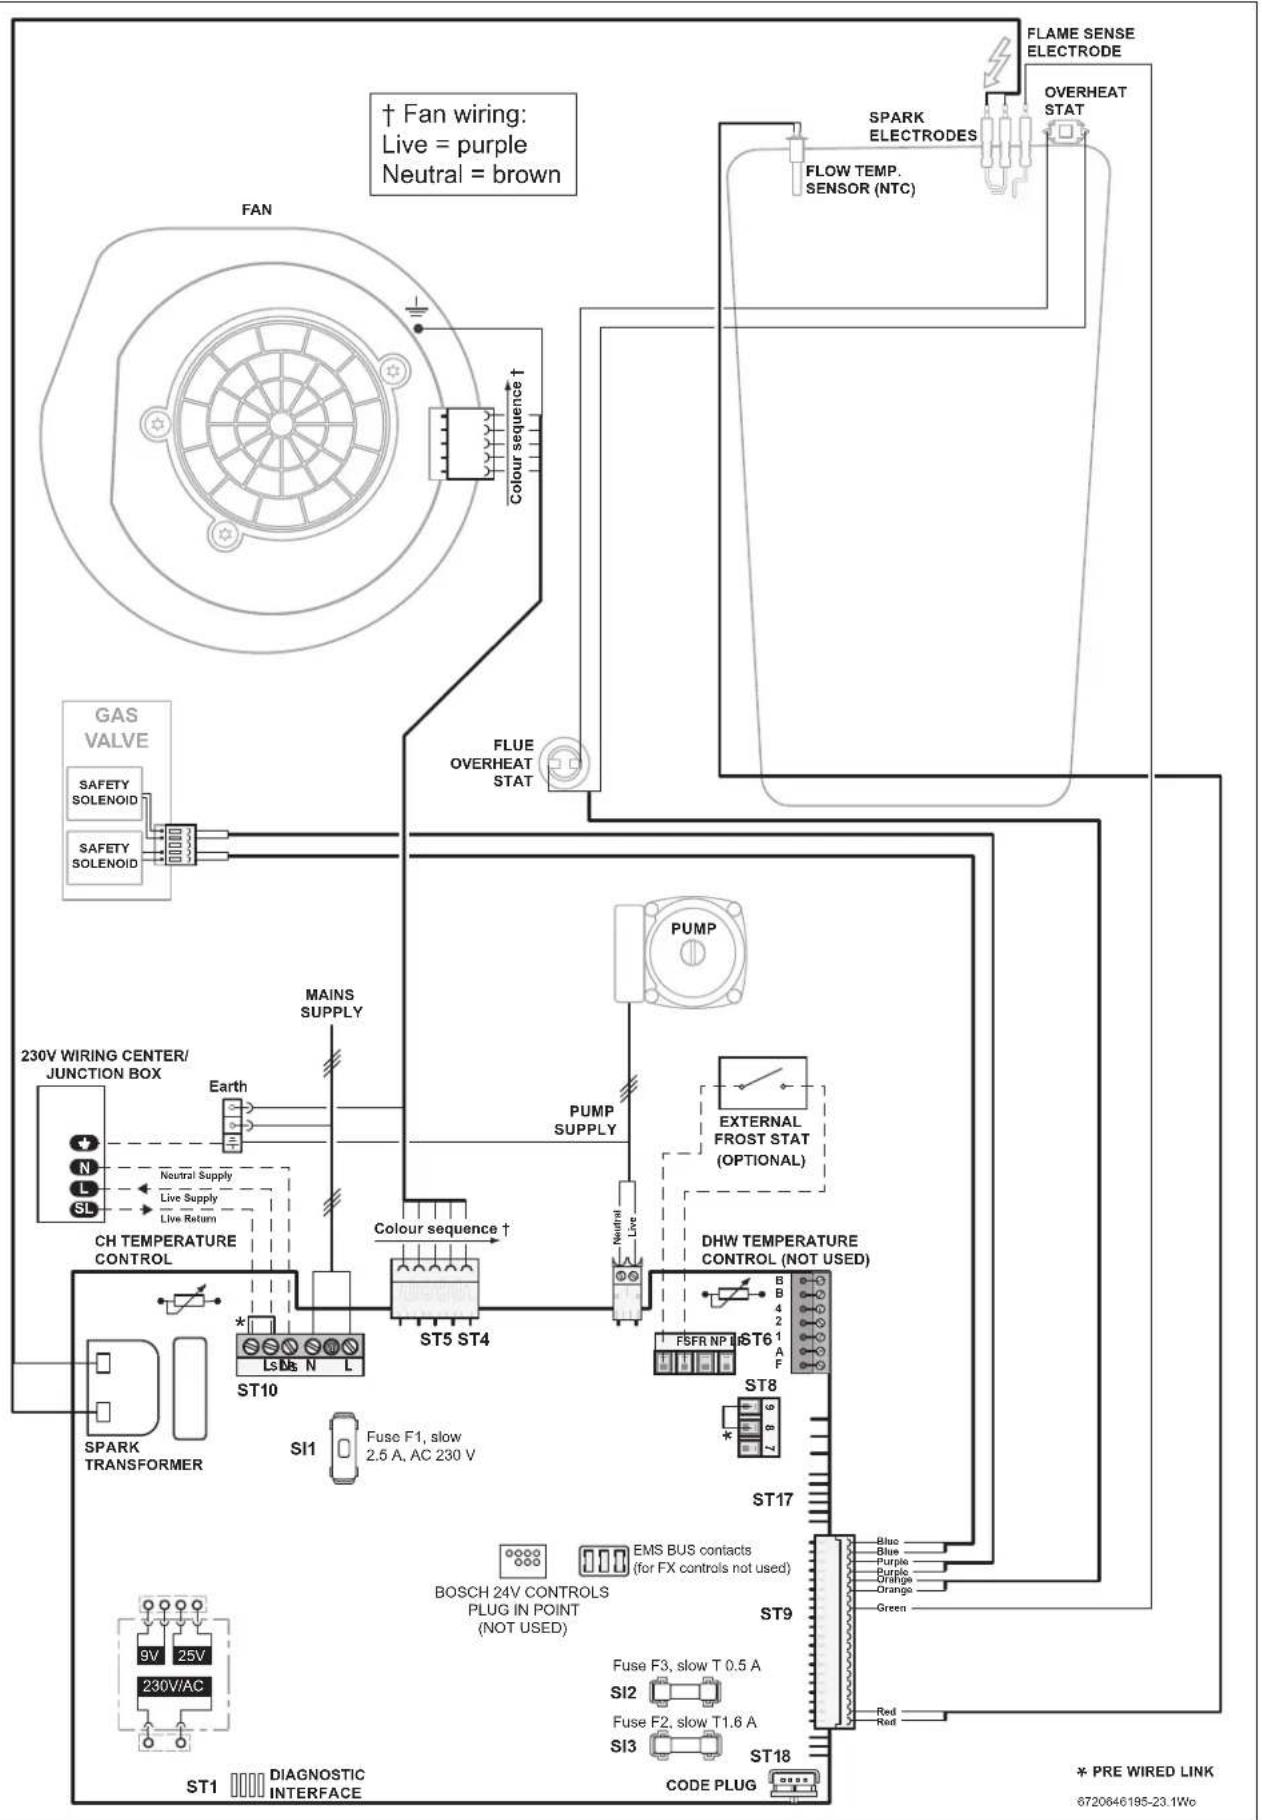
7.2 Boiler operation function
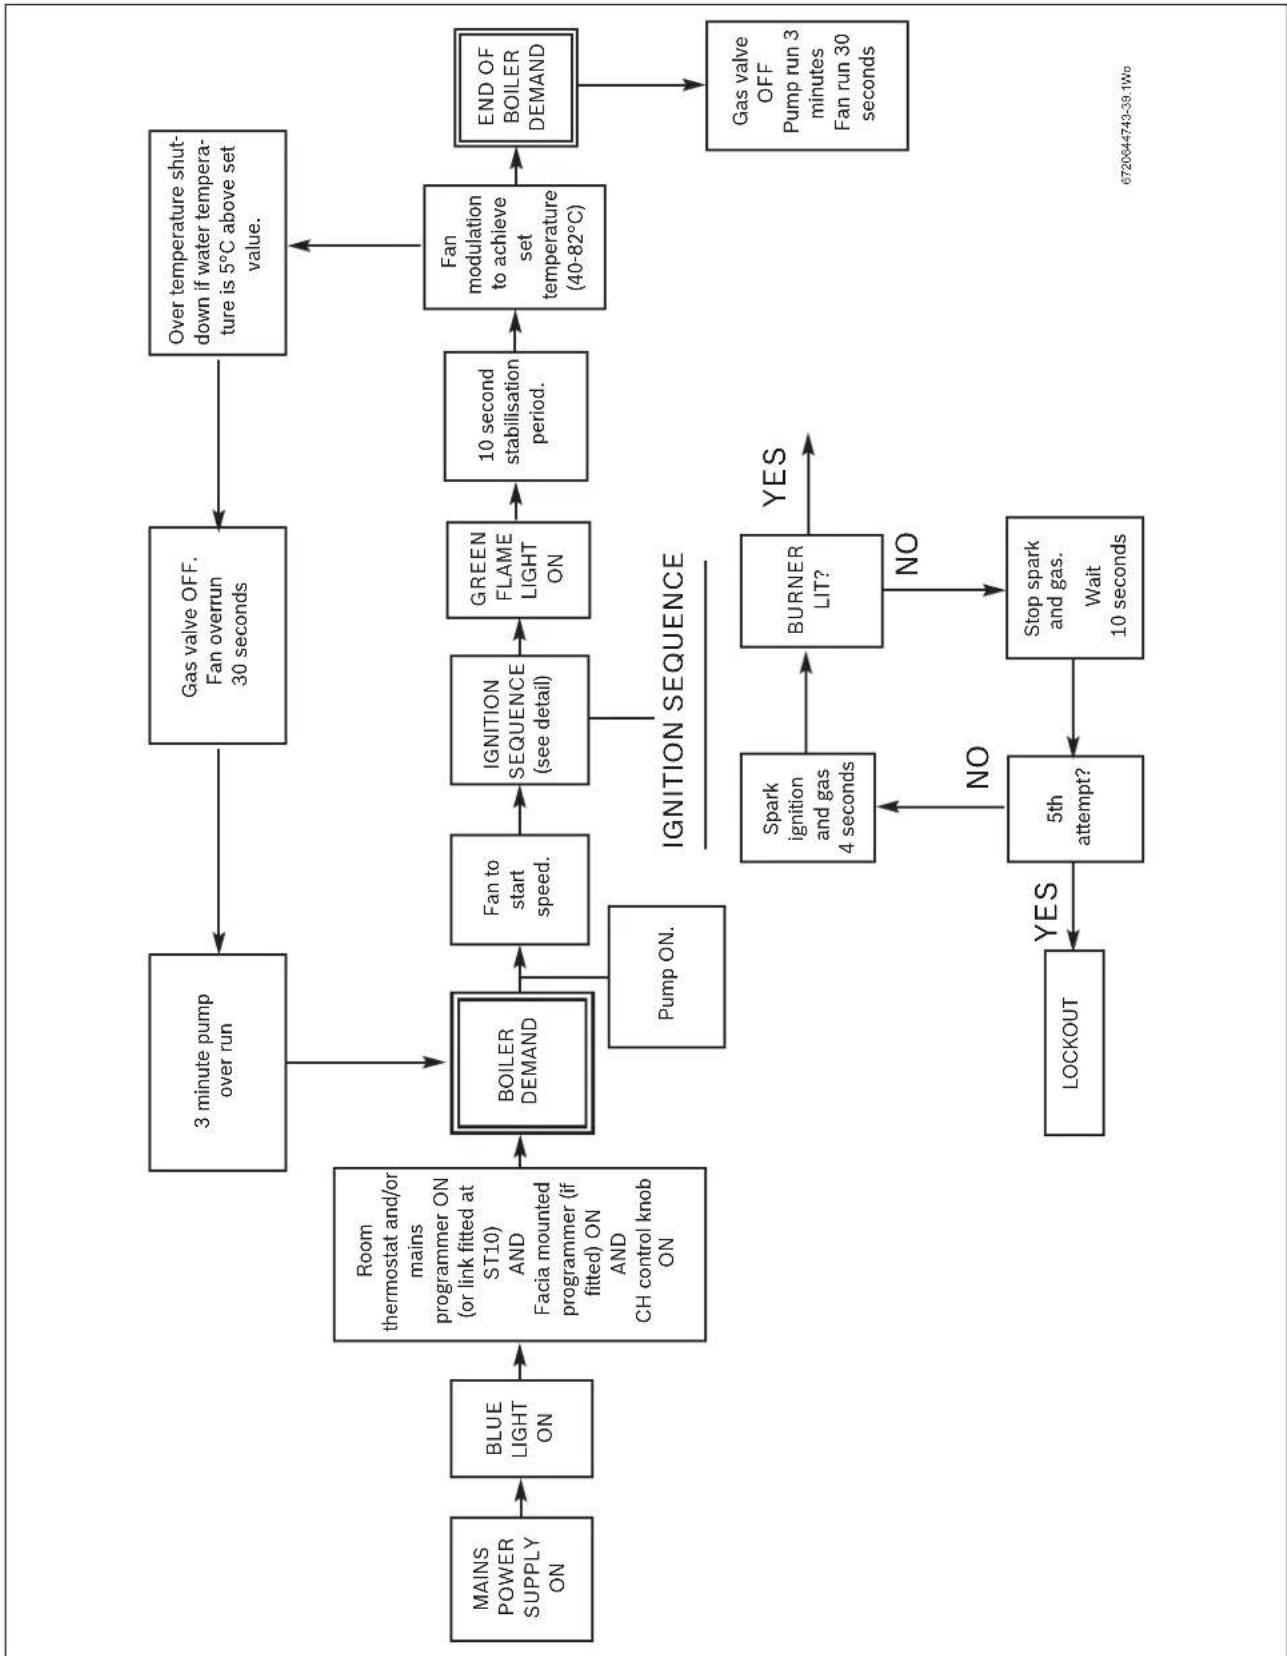
flowchart
graph TD
    A["MAINS POWER SUPPLY ON"] --> B["BLUE LIGHT ON"]
    B --> C["Room thermostat and/or mains programmer ON (or link fitted at ST10) AND Facia mounted programmer (if fitted) ON AND CH control knob ON"]
    C --> D["BOILER DEMAND"]
    D --> E["Fan to start speed."]
    E --> F["IGNITION SEQUENCE (see detail)"]
    F --> G["GREEN FLAME LIGHT ON"]
    G --> H["10 second stabilisation period."]
    H --> I["Fan modulation to achieve set temperature (40-82°C)"]
    I --> J["END OF BOILER DEMAND"]
    J --> K["Gas valve OFF Pump run 3 minutes Fan run 30 seconds"]
    K --> L["Stop spark and gas. Wait 10 seconds"]
    L --> M["5th attempt?"]
    M --> N{NO}
    N --> O["Spark ignition and gas 4 seconds"]
    O --> P["BURNER LIT?"]
    P --> Q{YES}
    Q --> R["END OF BOILER DEMAND"]
    R --> S["Gas valve OFF Pump run 3 minutes Fan run 30 seconds"]
    S --> T["Pump ON."]
    T --> D
    U["3 minute pump over run"] --> D
    V["Gas valve OFF. Fan overrun 30 seconds"] --> I
    W["Over temperature shutdown if water temperature is 5°C above set value."] --> I
    X["IGNITION SEQUENCE"] --> Y["IGNITION SEQUENCE"]
    Y --> Z["LOCKOUT"]
    Y --> AA{YES}
7.3 Boiler protection function
AUTOMATIC INTERNAL FROST FUNCTION

flowchart
graph TD
    A["Boiler automatic frost function (monitors internal boiler primary temperature)"] --> B["Internal boiler temperature between 8°C & 5°C"]
    A --> C["Internal boiler temperature below 5°C"]
    B --> D["Pump runs"]
    C --> E["Central heating demand is activated"]
    D --> F["Internal boiler temperature rises above 9°C"]
    E --> G["Internal boiler temperature rises above 12°C"]
    F --> H["Pump switches off after a 3 minute overrun period"]
    G --> I["Central heating demand switches off"]
    H --> J["Pump switches off after a 3 minute overrun period"]
    I --> J
PUMP OVERRUN FUNCTION
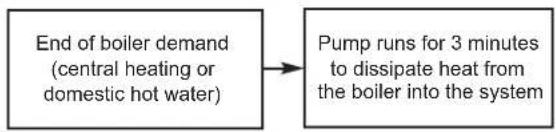
flowchart
graph LR
    A["End of boiler demand (central heating or domestic hot water)"] --> B["Pump runs for 3 minutes to dissipate heat from the boiler into the system"]
PUMP ANTISEIZE FUNCTION

flowchart
graph TD
    A["No central heating demand after a 24hr period"] --> B["Pump runs 5 seconds every 24hrs from last time pump ran"]
    B --> C["A central heating demand activated, pump runs normally"]
    C --> A
6720643895-111.1Wo
8 Technical Specifications/Logs
8.1 Commissioning report for the appliance
| Customer/system user: | ||
| Surname, first name Street, house number | ||
| Telephone/fax Postcode, town | ||
| System installer: | ||
| Order number: | ||
| Appliance type: | (Complete a separate report for every appliance!) | |
| Serial number: | ||
| Date of commissioning: | ||
| ☐ Individual appliance | ☐ Cascade, number of devices: | ||
| Installation location: | ☐ Cellar | ☐ Attic | ☐ Other: | |
| Ventilation apertures: Number: ......, Size: approx. cm 2 | ||
| Flue gas routing: | ☐ Twin pipe system | ☐ LAS | ☐ Duct | ☐ Separate pipe routing | |
| ☐ Plastic | ☐ Aluminium | ☐ Stainless steel | ||
| Total length: approx. ...... m | 90° bend: ...... pce | 15 - 45° bend: ...... pce | ||
| Leak check of the flue with a countercurrent: ☐ Yes | ☐ No | ||
| CO2 value in the combustion air at maximum rated output: % | ||
| O2 value in the combustion air at maximum rated output: % | ||
| Notes regarding underpressure or overpressure operation: | ||
| Gas setting and flue gas test: | ||
| Selected gas type: ☐ Natural Gas | ☐ Propane | ☐ Butane | ☐ U-LPG | ||
| Gas supply pressure: kPa Gas static supply pressure: kPa | ||
| Set maximum rated output: kW Set minimum rated output: | kW | |
| Gas flow rate at maximum rated output: | l/min | Gas flow rate at minimum rated output: l/min |
| Net calorific value H1β: | kWh/m3 | |
| CO2 at maximum rated output: | % | CO2 at minimum rated output: % |
| O2 at maximum rated output: | % | O2 at minimum rated output: % |
| CO at maximum rated output: | ppm | CO at minimum rated output: ppm |
| Flue gas temperature at maximum rated output: | °C | Flue gas temperature at minimum rated output: °C |
| Maximum measured flow temperature: | °C | Minimum measured flow temperature: °C |
| System Hydraulic: | ||
| ☐ Low loss header, type: | ☐ Additional expansion vesselSize/pre-charge pressure:Automatic air vent valve present? ☐ Yes | ☐ No | |
| ☐ Heating circuit pump: | ||
| ☐ DHW cylinder/type/number/heating surface output | ||
| ☐ System hydraulics checked, Notes: | ||
| Changed service functionsRead off the changed service functions and enter the values here. | ||
| ☐ Label with “settings in the service menu” filled out and affixed. | ||
| Heating controls:☐ Weather-compensated control ☐ Room temperature-dependent control☐ Remote control × ...... pce., heating circuit(s) coding:☐ Room temperature-dependent control × ...... pce., heating circuit(s) coding:☐ Module × ...... pce., heating circuit(s) coding:Miscellaneous:☐ Heating controls set, Notes:☐ Changed settings for the heating controls documented in the operating/installation instructions for the control unit | ||
| The following work has been carried out:☐ Electrical connections checked, Notes: | ||
| ☐ Condensate trap filled ☐ Carry out a combustion air/flue gas test☐ Function check carried out | ☐ Leak test carried out on the gas and water sides | |
| Commissioning includes checking the setting values, a visual leak test on the appliance and a function check of both the device and its control. The system installer conducts a test of the heating system. | ||
| The system named above has been checked to the extent described. | The documents have been handed over to the user. The user has been made aware of the safety instructions and operation of the above-mentioned wall mounted boiler, including accessories. Attention has been drawn to the requirement for regular maintenance of the above-mentioned heating system. | |
| Name of service engineer | Date, user's signature | |
| Affix the test report here. | ||
| Date, system installer's signature | ||
Table 21 Commissioning report
8.2 Inspection and maintenance checklist
The inspection and maintenance checklist also serve as a master copy.
▶ Sign and date the completed inspection work.
| Date: | ||||||||||||
| 1 | Check boiler operation (CH & DHW) and fault history. | Yes □ | Yes □ | Yes □ | Yes □ | Yes □ | Yes □ | Yes □ | Yes □ | Yes □ | Yes □ | |
| 2 Visual inspection:- | ||||||||||||
| Yes □ | Yes □ | Yes □ | Yes □ | Yes □ | Yes □ | Yes □ | Yes □ | Yes □ | Yes □ | |||
| 3 Internal visual inspection:- | ||||||||||||
| Yes □ | Yes □ | Yes □ | Yes □ | Yes □ | Yes □ | Yes □ | Yes □ | Yes □ | Yes □ | |||
| 4 | Perform a visual check of the air/flue gas routing. | Yes □ | Yes □ | Yes □ | Yes □ | Yes □ | Yes □ | Yes □ | Yes □ | Yes □ | Yes □ | |
| 5 Check gas supply pressure. mbar (kPa) | ||||||||||||
| 6 | Check Fan pressure test. | Yes □ | Yes □ | Yes □ | Yes □ | Yes □ | Yes □ | Yes □ | Yes □ | Yes □ | Yes □ | |
| Was cleaning required? No □ | No □ | No □ | No □ | No □ | No □ | No □ | No □ | No □ | No □ | |||
| Yes □ | Yes □ | Yes □ | Yes □ | Yes □ | Yes □ | Yes □ | Yes □ | Yes □ | Yes □ | |||
| 6.1 If cleaning was required check the following: | ||||||||||||
| Heat exchanger | Yes □ | Yes □ | Yes □ | Yes □ | Yes □ | Yes □ | Yes □ | Yes □ | ||||
| Burner | Yes □ | Yes □ | Yes □ | Yes □ | Yes □ | Yes □ | Yes □ | Yes □ | ||||
| Electrodes | Yes □ | Yes □ | Yes □ | Yes □ | Yes □ | Yes □ | Yes □ | Yes □ | ||||
| Diaphragm in mixer unit | Yes □ | Yes □ | Yes □ | Yes □ | Yes □ | Yes □ | Yes □ | Yes □ | ||||
| 7 | Check and clean syphon | Yes □ | Yes □ | Yes □ | Yes □ | Yes □ | Yes □ | Yes □ | Yes □ | Yes □ | Yes □ | |
| 8 Check the gas-air ratio at min./max. and adjust if necessary. | min. % max. % | |||||||||||
| 9 Check the expansion vessel pre-charge pressure matches the static head of the heating system. | bar (kPa) | |||||||||||
| 10 Check the heating system pressure. bar (kPa) | ||||||||||||
| 11 | Check electrical wiring for damage. | Yes □ | Yes □ | Yes □ | Yes □ | Yes □ | Yes □ | Yes □ | Yes □ | Yes □ | Yes □ | |
| 12 | Check the heating controller settings. | Yes □ | Yes □ | Yes □ | Yes □ | Yes □ | Yes □ | Yes □ | Yes □ | Yes □ | Yes □ | |
| 13 | Boiler left to customers settings | Yes □ | Yes □ | Yes □ | Yes □ | Yes □ | Yes □ | Yes □ | Yes □ | Yes □ | Yes □ | |
| 14 Signature | ||||||||||||
Table 22 Inspection and maintenance checklist
Robert Bosch (Australia) Pty Ltd
Thermotechnology Division
1555 Centre Road
Clayton Victoria 3168
Australia
Phone: 1300 30 70 37
Fax: 1300 30 70 38
www.bosch-climate.com.au
New Zealand
Phone: 0800 54 33 52
Fax: 0800 54 33 55
www.bosch-climate.co.nz


- Hydronic gas system boiler 18kW
- Bosch Condens 5000W
- Table of contents
- Explanation of symbols and safety instructions ..... 3
- Product Information .... 5
- Pre-Installation....11
- Installation ....20
- Commissioning....31
- Servicing and spares .... 36
- Fault finding and diagnosis....56
- Technical Specifications/Logs....61
- Explanation of symbols and safety instructions
- Explanation of symbols
- Warnings
- DANGER:
- WARNING:
- CAUTION:
- NOTICE:
- Important information
- Additional symbols
- Symbol Meaning
- General safety instructions
- PLEASE READ THESE INSTRUCTIONS CAREFULLY BEFORE STARTING INSTALLATION.
- ⚠️ If you smell gas:
- ⚠ Boiler operation
- ⚠️ Service checklist
- ⚠ Combustion and corrosive materials
- ⚠️ fittings and modifications
- ⚠ Servicing
- ⚠ Installation regulations
- Standards
- ⚠ Liquefied Petroleum Gas (LPG)
- Intended use
- ⚠ Symbols used in this manual
- Product Information
- Boiler features and checklist
- Boiler carton contents
- Pre-Installation
- Cleaning primary systems
- Before cleaning the system:
- Flushing the system:
- Inhibitor
- Sealing agents:
- Mains supply
- Electrical supply
- Equipotential (earth) bonding
- Gas supply
- Water system and pipe work
- Plastic pipe work
- Primary system connections/valves
- Sealed primary system:
- System fill
- Additional expansion vessel
- Key to figure 6:
- System layouts
- i
- Drain valve
- S Plan layout example
- Key to figure 7:
- Y Plan layout example
- Key to figure 8:
- Optional internal diverter valve (not supplied with boiler)
- Key to figure 9:
- Condensate pipe work
- Internal connections
- Soil vent stack disposal
- Key to figure 10:
- Key to figure 11:
- Internal waste pipe disposal
- Key to figure 12:
- Pressure relief drain line
- Boiler location and clearances
- Installation location
- Servicing clearances - ventilated compartment
- Compartments
- Boiler clearances - Unventilated compartments
- Installation clearances - Unventilated compartments
- Clearances
- Plumbing manifold
- Connections
- If fitting an optional integral diverter valve.
- Table 12 System connections
- Flue options
- Flue options
- NOTE:
- Installation
- Before continuing ensure:
- Unpacking the wall frame and ancillary items
- Lifting and carrying.
- Handling instructions
- Before installing the boiler!
- Wall mounting template and flue opening
- Damage to property!
- Safety!
- Fixing the wall mounting frame
- Rear flue outlet
- Side flue outlet
- Example hole size
- Flue outlet position marked and ready to drill hole
- Unpacking the boiler
- Transport protection covers
- Before hanging the boiler!
- Boiler connections
- Optional internal diverter valve
- Metric to imperial adapters
- Wall mounting frame
- Before hanging the boiler onto the wall mounting frame
- Hanging the boiler
- Check before hanging the boiler
- PRV connection
- Expansion vessel connection
- Flue installation
- Measuring the flue (standard flue)
- Reducing the telescopic flue length
- Installing the telescopic flue
- Additional notes and reminders
- Flue terminal plume re-direction
- Re-directing the flue discharge
- Outlet position
- Condensate connection
- Before fitting the syphon
- Syphon discharge hose connection
- Refer to figure 45.
- Syphon maintenance
- Electrical
- Risk of electric shock!
- Access to the electrical connections
- Damage to control unit!
- System wiring centre connection (ST10)
- Optional external frost thermostat connection (ST6)
- Commissioning
- Pre-commissioning checks
- Filling the system
- Water treatment
- Flushing (CH):
- Inhibitor (CH):
- Starting the boiler
- Running the boiler
- Switching the boiler ON/OFF:
- Commissioning
- Checking the gas inlet pressure
- Measuring the inlet pressure
- Gas pressure within the system
- Checking the gas rate
- Domestic Hot Water: Controlling the hot water temperature.
- Starting the boiler
- Replace outer casing:
- Fitting fascia flap
- Installing bottom panel
- Handover
- Servicing and spares
- Inspection and service:
- Component replacement:
- Personnel and equipment:
- Inspection
- Component access
- Check the gas inlet pressure
- Checking flue integrity
- Fan pressure test
- Setting the boiler to maximum
- Fan pressure measurement
- Flue gas analysis
- Combustion test:
- Setting the air/gas ratio
- Combustion testing
- Setting the CO/CO 2
- CO/CO2 settings for Condens 5000W
- NOTES:
- CO - less than 200 ppm (0.002 ratio) Natural Gas.
- CO - less than 250 ppm (0.0025 ratio) LPG.
- Checking the heat exchanger
- CO/CO _2 checks
- Burner removal
- Checking and cleaning the electrode assembly:
- Cleaning
- Baffle removal
- Access cover removal
- Cleaning the primary heat exchanger
- Heat exchanger baffles
- Cleaning the syphon
- Replacement of parts
- Gas and mains supplies
- Replacing components
- Removing the outer case
- Primary sensor
- Overheat thermostat
- Flue overheat thermostat (with grommet)
- -or-
- Refer to figure 83.
- Moving the control panel to the service position
- Gas valve replacement
- Gas valve
- The gas valve will require setting:
- Air/gas manifold and fan assembly
- After re-assembly
- Fan
- Flap valve assembly
- Electrode assembly and burner
- CO/CO2 checks
- Clamping plate
- Heat exchanger
- Refer to figure 96.
- Access to boiler control components
- PCB fuse
- Spare fuses
- Transformer/PCB
- Refitting the control board cover:
- Replacing the control panel
- Control panel replacement
- Refer to figure 101.
- Control panel replaced
- Syphon removal
- Diverter valve motor (if option integral diverter valve fitted)
- Diverter valve (if option integral diverter valve fitted)
- Auto air vent
- Before fitting replacement auto air vent
- Pump head
- Water damage
- Drain tap
- Pressure gauge
- Risk of heat damage
- Hydraulic block removal
- CH pressure relief valve
- Bypass valve
- Expansion vessel
- Expansion vessel replacement (boiler in place)
- Expansion vessel replacement (removing the boiler)
- Fault finding and diagnosis
- Fault finding
- Basic checks
- On completion of the Service/Fault-Finding task which has required the breaking and remaking of electrical connections, check:
- Boiler protection function
- Technical Specifications/Logs
- Commissioning report for the appliance
- Inspection and maintenance checklist
Brand : BOSCH
Model : Condens 5000W
Category : Heating