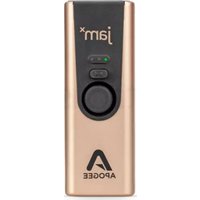
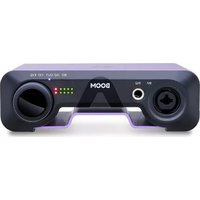
JAM X - DJ Equipment Apogee - Free user manual and instructions
Find the device manual for free JAM X Apogee in PDF.


| Product Type | DJ Controller/Mixer |
| Dimensions | 320 x 220 x 70 mm (12.6 x 8.7 x 2.8 in) |
| Weight | 2.2 kg (4.85 lbs) |
| Power Supply | USB bus powered (5V, 500 mA) |
| Main Functions | 2-channel mixer, built-in effects, 3-band EQ, crossfader |
| Inputs | 2x RCA (line), 1x Mic (1/4" TRS) |
| Outputs | 1x Master RCA, 1x Headphone (1/4" TRS) |
| Controls | Volume faders, EQ knobs, effect buttons, crossfader |
| Connectivity | USB 2.0 (Type B) for computer connection |
| Software Compatible | Serato DJ Lite, Virtual DJ |
| In the Box | JAM X controller, USB cable, user manual |
| Cleaning and Maintenance | Use a soft dry cloth. Avoid abrasive cleaners. |
| Safety Instructions | Do not expose to moisture. Keep away from heat sources. Use only supplied USB cable. |
| Spare Parts | Not available separately. Contact Apogee support for repairs. |
| Repairability | Repairs should be carried out by qualified service personnel. |
Frequently Asked Questions - JAM X Apogee
User questions about JAM X Apogee
0 question about this device. Answer the ones you know or ask your own.
Ask a new question about this device
Download the instructions for your DJ Equipment in PDF format for free! Find your manual JAM X - Apogee and take your electronic device back in hand. On this page are published all the documents necessary for the use of your device. JAM X by Apogee.
USER MANUAL JAM X Apogee
natural_image
Close-up of a beige APOGEE audio recording device with black buttons and a central knob (no visible text or symbols on body)JamXUser'sGuide
Version1.0
Contents
Contents2
IntheBox3
SystemRequirements3
RegistryyourProduct3
JamXProductTour4
ConnectingYourStudio5
Connectyourinstrument5
Connectheadphonesorspeakers5
ConnectingtoaMacorWindowscomputer6
ConnectingtoaniPadPro(USB-Cconnector)6
ConnectingtoaniOSDevice(Lightningconnector)7
JamXLightsandGettingSound8
InstallingJamXSoftware 9
Windows10Installer 9
ConfiguretheComputer'sOStouseJamXforAudiol/O 10
macOS 10
Windows11 11
AppleiOS 11
WorkingwithJamX 12
BlendMode 12
BlendOff-SoftwareMonitoring 12
MinimizeLatencywithSoftwareMonitoring 13
BlendOn-DirectMonitoring 13
ConfiguringNeuralArchetype:TimHensen-Standalone 14
ConfiguringYourDAW15
AppleLogicPro 15
AvidProTools 16
AbletonLive 17
Troubleshooting 18
WarrantyInformationandLegalNotices 19
DeclarationsofConformity 19
IntheBox
- JamX
●Micro-USBBtoUSB-Acable,1meter
●Micro-USBBtoUSB-Ccable,1meter - WarrantyBooklet
●ProductRegistrationLinkCard
SystemRequirements
•macOS10.15orgreater
●Windows10Anniversaryupdateorlater
- iOS13orgreater
●Mac&Windows:4GBminimumRAM,8GBRecommended
RegistryyourProduct
- Receivelinkstofreesoftware!
○AbletonLiveLite
○NeuralArchetype: TimHensonPluginExtendedTrial - AccessApogee'sexpertTechnicalSupportforfree
- Receiveimportantproductupdateinformationbyemail
- TaketheCustomerSatisfactionSurveyforachancetowinApogeegear!
RegisterNow:https://apogeedigital.com/my-account
JamXProductTour

ConnectingYourStudio
Awiderangeofdevices,includingdynamicmicrophones,electricinstrumentsand keyboards, speakersandheadphonesmaybeconnectedtoJamX.
Connectyourinstrument
ConnectHi-Zinstrumentssuchasguitar,bass,keyboards,andsynthesizerstotheJamXusinga1/4" instrumentcable.
- DynamicmicswithXLRplugcanbeconnectedusingaHi-ZtoLow-Ztransformerconverter.
- Condensermicrophonesrequireaseparateexternal48Vphantompowersupply.

natural_image
Illustration of a vintage camera with a blue needle inserted into the lens, next to a simple electric guitar and a piano keyboard (no text or symbols)Connectheadphonesorspeakers
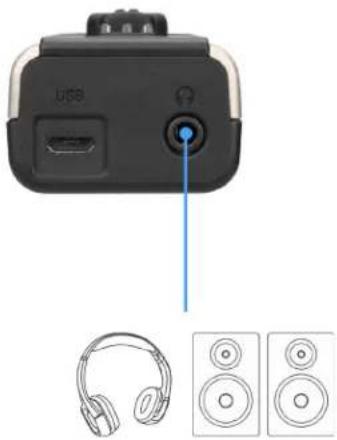
Connectheadphonestothe 1 / 8 "stereoconnector.
Poweredspeakerscanalsobeconnectedtothisjack.
- AdjusttheoutputlevelusingthevolumecontrolsonthecomputeroriOSdevice.
natural_image
Product photo of a black USB flash unit with speaker icons below (no text or symbols on main body)ConnectingtoaMacorWindowscomputer
Usingoneofthesuppliedcables,connectJamX'sMicro-USBBporttoanyUSB-AorUSB-Cporton yourMacorWindowscomputer.

ConnectingtoaniPadPro(USB-Cconnector)
Using the supplied Micro-USB to USB-Cable, connect JamX's to youriPad Pro's USB-C connector.

ConnectingtoaniOSDevice(Lightningconnector)
Using the micro-USB B to Lightning Cable (sold separately), connect to the Lighting port on your iPhoneoriPad:

ConnectingJamXtoaniPhonewithLightningconnector

ConnectingJamXtoaniPadwithLightningconnector
InstallingJamXSoftware
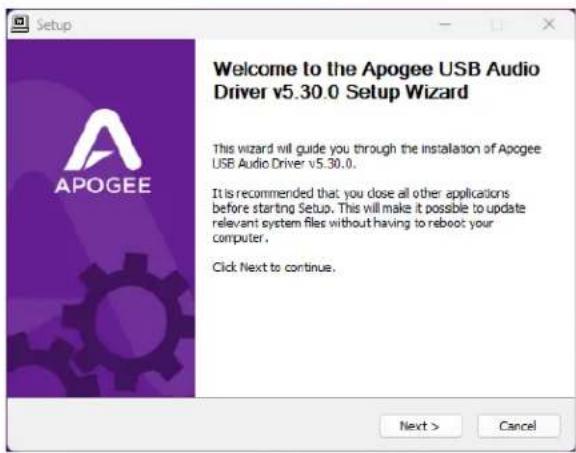
ForWindows10&11users, downloadtheApogeeASIODriverfromthelinkbelow:
https://apogeedigital.com/installer-downloads
FormacOSandiOSusers,nosoftwareisrequiredtoconnectJamtoyourMac,iPhoneoriPad.
AfterregisteringyourJamXatthelinkbelow,you'llreceivelinkstodownloadaccessorysoftware:
- AbletonLiveLite,adigitalaudioworkstation;
- NeuralArchetype: TimHenson, avirtualguitaramp/FXplugin.
https://apogeedigital.com/my-account
Windows10Installer
- In your Downloads folder, double-click the .zip file to extract it, thendouble-click the .exefiletostart the installation process.
- ClickNextthroughallsteps, thenclickFinishat thefinalstep.
- You should restart your computer immediately.
ConfiguretheComputer'sOStouseJamXforAudiol/O
macOS
TochooseJamXastheaudiointerfaceforMacapplicationsthatdon'thavespecificaudiohardware preferences,suchasSafari,Spotify,VoiceMemosandothers:
- OpenSystemSettingsbychoosingAppletmenu>System Settings.
- ClicktheSoundicontoopentheSoundSettingspanel.
- ClicktheOutputtab, thenclickJamXinthedeviceslist.
- ClicktheInputtab, thenclickJamXinthedeviceslist.


Windows11
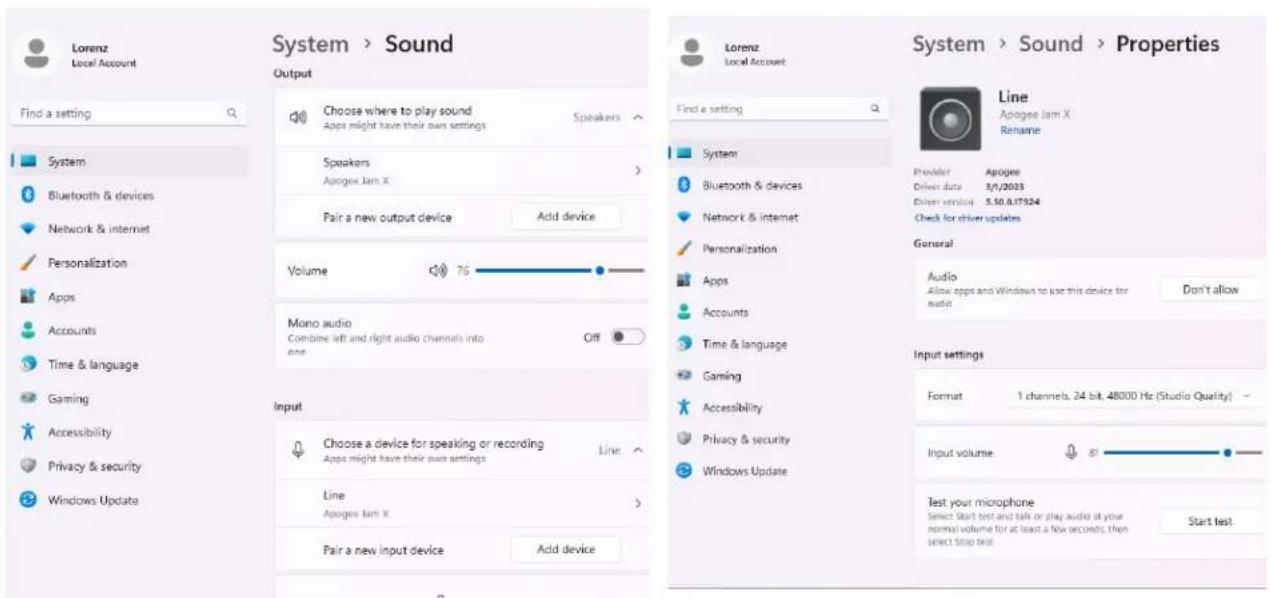
TochooseJamXastheaudiointerfaceforWindowsapplicationsthatdon'thavespecificaudiohardwarepreferences,suchasGoogleChrome,Spotify,andothers:
- TypeControlPanelintheWindowssearchbartoopentheControlPanel.Double-clicktheSound icon.
- ClicktheOutputsectionandselectSpeakers-ApogeeJamX.
3.ClickSpeakerstoshowthePropertiesofthedevice. - Ensure the Audio- "AllowappsandWindowstousethisdeviceforaudio" is Allowed. When using a DAWandappslikeSpotifysimultaneously, match the DefaultFormatsamplerate with therate of the DAWsession.
- GobacktothemainSystem>Soundwindow.
- ClicktheInputSectionandrepeatsteps2-5forInput.
AppleiOS
AppleiOS(iPhoneandiPad) automatically chooses them most recently connected audio interface as the audio/Device for all applications. Simply connect JamXtoyouriOS device's Lightningor USB-Cportas described on page 6-7.
WorkingwithJamX
JamXLEDFunctionality
UsetheJamX'smulti-colorLEDlights, buttons, and knobtoadjust your audiosignal level, monitor settings, and compressor presets.

JamXwilldisplayablueLEDwhenfirstconnectedviaUSB.
Nosoundwillpasswheninthisstandbymode.
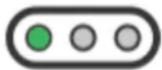
AudioinputandoutputswillactivatewhenanaudioapplicationplaysthroughtheJamX(suchasplayingAppleMusicorSpotify),orattemptstorecordfromJamX's1/4" instrumentinput(likeGaragebandorAbletonLive).

When the LED is green, it will pulse with the sign level. Use the Input Level adjustment control to change the input settings.

PushtheBlendbuttontotoggleBlend(directmonitoring)on/off. WhenBlendison,the1/4"inputsignalisblendedwith playbackfromyouraudioapp androuteddirectlytotheheadphone/speakeroutput.Usethisforalow-latencydirect signalthatdoesnotrelyonthemonitoringfunctionsofyourrecordingsoftware.See hereformoreaboutlow-latencydirectmonitoring.
PUSH

TurntheInputLeveladjustmentknobtochangetheinputrecordinglevel. Agoodruleofthumbistoadjustthisknobsothatyourstrongestplayingoccasionally triggerstherightLEDstoturnorange.
When compression is engaged, increasing the Input Level results in more compression rather than an increased input level. Use the Input Gain knob to control the amount of compression applied to the input signal.

PushthelInputLeveladjustmentknobtotogglebetweenCompressorpresets.ABlueLEDdisplaysfor1secondtoindicatethecompressorpresetselected.
PUSH
The Compressor has three reepresets: Left LED: Smooth Leveler-Gentle and smooth compression Center LED: Purple Squeeze-Medium compression Right LED: Vintage Blue Stomp-Fast and Heavy compression No LED: Compression is Off

TheOrangeLEDindicate the inputs signalising the Soft Limit analog circuit. Soft Limit engages when the input level reaches -4dBfs; this setting is fixed and permanent.
BlendMode
TheBlendmodebutton togglesJamX's signalpath between woworkflows, Software monitoring and Direct monitoring. These workflows affect how you he are your instrument while recording.
BlendOff-SoftwareMonitoring
WhenBlendisoff,youhearyourinstrumentAFTERit'sbeenroutedthroughyourAmpSimappor DAW,asshownbelow.

- Softwaremonitoringisthesimplestworkflow,wheremostsettingsaremadeinthe DAWwindow.
- If you're using an ampsimpluginorapp, you hearyourinstrument through the amp simwhilerecording.
•Cons
- Depending on your system, you may encounter latency-adelay of your Instrument's audio in your headphones.
Toconfigureyoursystemforsoftwaremonitoring:
- PresstheJamXBlendbuttontoturnBlendoff.
- ConfigureyourDAWforsoftwaremonitoring, asdescribedhere.
- SetupaDAWchannelforrecording, thenusetheDAWmixertocreatethedesiredbalance betweenthetrackbeingrecordedandtracksbeingplayedback.
MinimizeLatencywithSoftwareMonitoring
Hereareafewwaystominimizethelatencythroughyoursystem:
-
SetyourAmpsimorDAWsoftwaretoasamplerateof96kHz-thisdivideslatencyinhalf.
-
Lowerthebuffersettingonyoursoftwareaslowaspossiblewhileavoidingaudiodropoutsor glitches. If you have a powerful computer and your sessions use a moderate amount of plugin processing, you may be able to find a buffer setting that works.
-
Iflatencyisstilltoohigh, turnBlendontoengageDirectmonitoring.
BlendOn-DirectMonitoring
WhenBlendison, youhearyourinstrumentBEFOREit'sbeenroutedthroughyourAmpSimappor DAW,asshownbelow.
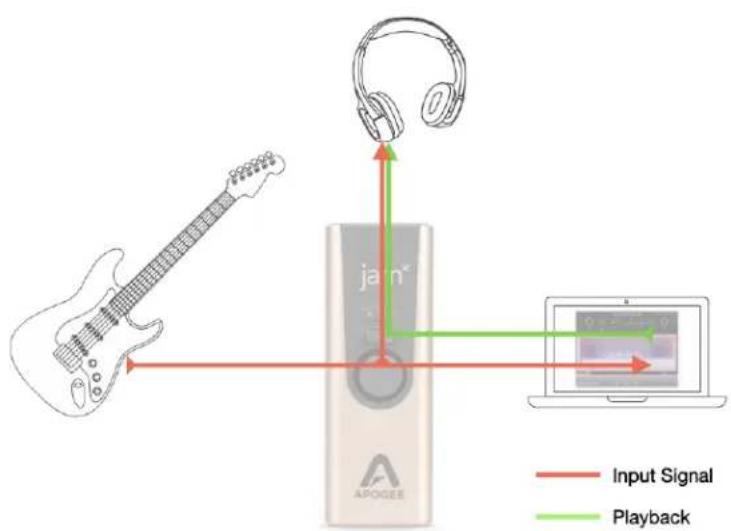
flowchart
graph TD
    A["Input Signal"] --> B["Jann"]
    C["Playback"] --> D["Jann"]
    B --> E["Headphones"]
    D --> F["Back/Left System"]
    style A fill:#f9f,stroke:#333
    style C fill:#f9f,stroke:#333
    style B fill:#ccf,stroke:#333
    style D fill:#ccf,stroke:#333
    style E fill:#dfd,stroke:#333
    style F fill:#dfd,stroke:#333
- Pros-Lowlatencyandmaximumpluginpower-theDAWIOBuffermaybesettoits maximumvalueforthegreatestnumberofnativepluginswithoutaneffectonlatency.Latency remainsvirtuallynon-existenttotheheadphone/speakeroutput.
- Cons-Ifyou'reusinganampsimapporplugin, monitoringoptionsarethefollowing: - Leavesoftwaremonitoringonintheapp, soyouheartheunprocesseddirectsignal ANDthedelayedampsimaudio. - Turnsoftwaremonitoringoffintheapp, soyouhearONLYtheunprocesseddirect signal.
Toconfigureyoursystemfordirectmonitoring:
4.PresstheBlendbuttontoturntheBlendLEDon.
-
ConfigureyourDAWfordirectmonitoringorsoftwaremonitoring, asdescribedhere,
-
SetupaDAWchannelforrecording.
ConfiguringNeuralArchetype: TimHensen-Standalone
ThebestwaytogetstartedquicklywithJamXiswiththesuppliedArchetype:TimHensenguitaramp pluginrunninginStandaloneemodeonyourMacorWindowscomputer.
- No DAW needed - After installing the Archetype: Tim Hensen plugin, goto the Applications folder (on Mac), find the Neural DSP folder, open and click on the Archetype Tim Hensen icon to launch the application in Standalone mode.
- ClickontheSettinggearinthelowerleftcorneroftheappwindow. a.SetAudioOutputDeviceandAudioInputDevicetoJamX b.SetSampleRateto96000Hz c.SetAudioBufferSizeto192samples,foralatencyof2.0ms
- StartwiththeInputandOutputknobssetto0.0.
- AdjustJam'sheadphone/speakeroutputlevelwithyourcomputeroriOSdevice'soutputlevel control.

ConfiguringYourDAW
FindbelowdetailedinformationtoconfigureJamXwithpopularDAWs:
- ConfiguretheDAWtouseJamX
- ConfiguretheDAWforDirectorSoftwaremonitoring
- AccessJamXinputs&outputsintheDAW
•AdditionalDAW-specificnotes
AppleLogicPro
ToconfigureAppleLogicProtouseJamX:
- IntheLogicPromenubar, chooseLogicPro> Preferences>Audiointhemenubar, thenclick the Devicetab.
- ChecktheCoreAudiocheckbox;setOutputDeviceand InputDevicetoJamX.
3.SetI/OBufferSize
4.ClickApply.

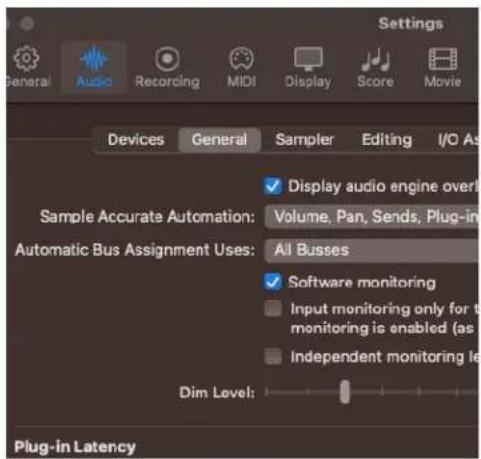
ToconfigureLogicProforDirectorSoftwareMonitoringWorkflow:
- IntheLogicPromenubar, chooseLogicPro> Preferences>Audio, thenclicktheGeneraltab.
-
ChecktheSoftwareMonitoringboxtomonitorthrough Logicwhilerecording.
-LeavetheSoftwareMonitoringboxuncheckedfor DirectmonitoringthroughtheBlendfunctionoftheJamX -
OntheJamX, presstheBlendbutton:
-
TurnBlendofforSoftwaremonitoring.
- TurnBlendonforDirectmonitoringthroughtheJam X.
AvidProTools
ToconfigureAvidProToolstouseJamX:
- OpenProTools, thenchooseSetup > Playback Engineinthemenubar.
2.SetPlaybackEnginetoJamX. - SetH/WBufferSizeto128tostart, adjust for lowerlatencyormorepluginpower.

ToconfigureProToolsforDirectorSoftwareMonitoring Workflow:
- IntheProToolsmenubar, setOptions > LowLatencyMonitoring.
- UncheckLowLatencyMonitoringforSoftwaremonitoring.
- CheckLowLatencyMonitoringforDirectmonitoring.
- OntheJamX, presstheBlendbutton:
- TurnBlendoffforSoftwaremonitoring..
- TurnBlendonforDirectmonitoringthroughtheJamX.
| Options Setup Window Avid Link | |
| Destructive Record | |
| Loop Record | L |
| ✓ QuickPunch | P |
| TrackPunch | T |
| DestructivePunch | |
| Prepare DPE Tracks | |
| Transport Online | J |
| Video Track Online | J |
| Pre/Post-Roll | K |
| ✓ Loop Playback | L |
| Dynamic Transport | P |
| Edit Window Scrolling | |
| ✓ Link Timeline and Edit Selection | |
| Link Track and Edit Selection Insertion Follows Playback | T |
| Tab to Transient Mirrored MIDI Editing | → |
| ✓ Automation Follows Edit Layered Editing | |
| ✓ Click | |
| ✓ MIDI Thru | |
| Auto-Spot Clips | P |
| ✓ Pre-Fader Metering Solo Mode | |
| Edit/Tool Mode Keyboard Lock | T |
| ✓ Delay Compensation Activate HEAT | |
| Low Latency Monitoring | |
AbletonLive
ToconfigureAbletonLive:
- IntheLivemenubar, choose Live> Preferences and click the Audiotab.
- Mac-setDriverTypetoCoreAudio; Windows-setDriverTypetoApogee ASIODriver.
- SetAudioInputDevice and Audio OutputDevice to JamX.
- SetBufferSize. Adjust for lower latency or more plugin power.

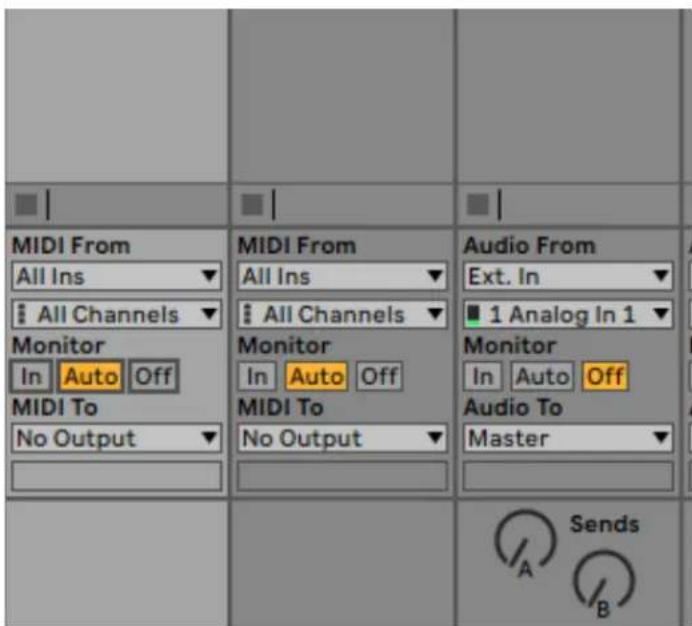
ToconfigureAbletonLiveforDirectorSoftwareMonitoringWorkflow:
- MonitorsettingsinAbletonLiveare configuredforeachchannelindividually.
- IntheAbletonmenubar, chooseView and verify that In/Out is checked.
- In each channel, set Monitor to Auto for Software monitoring or Off for Direct monitoring.
- OntheJamX, presstheBlendbutton:
- TurnBlendofforSoftware monitoring..
- TurnBlendonforDirectmonitoring throughtheJamX.
Troubleshooting
Q:TheLEDlightstaysblueandIcan'tturnitgreen
A1:CheckifJamXisrecognizedbythecomputeroriOSdevice.Ifitisn't,YourUSBcablemaybefaultyandshouldbeswappedout.
A2: The LED will not turn green until an audio application play through the JamX (such as playing Apple Music or Spotify), or attempt to record from JamX's 1/4" instrument input (like Garage and/or Ableton Live). Some apps will not do this until you actually start recordings, or you check for this.
Q: Lowsoundthroughheadphone/speakers, even though the inputs signal is speaking red.
A: The output volume may be turned down. This is a separate control from the input adjustment knob. To adjust output level, use the volume button on these side of your iPhone or iPad, or the volume control on your Mac or PC computer.
Q: The inputsignalisnoisyorhasahumorbuzz
A1: This could be abadcable. Try swapping out your instrument cable, output cable, or USB cable to see if there's improvement.
A2: Hi-Z(highimpedance) inputs our cress such a electric guitar pickups are not only noisy and susceptible topicking up interference from lights, radiotransmissions, and other electronic devices. Turn your instrument to face another direction, or movetoadifferent area away from electromagnetic source store reducethe interference being picked up.
Q: WillJamXworkwithmyAndroiddevice?
A:JamXwasdesignedtoworkwithstandarddriversthatarepartofWindowsandMacPC's,and AppleiOSdevices.YoumaytryusingJamXwithyourAndroiddevice,butwecannotguaranteethat itwillwork.
Formoreinformation
- ApogeeKnowledgeBaseandFAQs
•InformationalVideos - ApogeeProductRegistration
●HowtocontactApogeeTechnicalSupport
Pleasevisit:
www.apogeedigital.com/support
WarrantyInformationandLegalNotices
APOGEEELECTRONICSCORPORATIONwarrantsthisproducttobefreeofdefectsinmaterialand manufactureundernormaluseforaperiodof12months. Thetermofthiswarrantybeginsonthedate ofsaletothepurchaserfromanaauthorizedApogeedealer(proofofpurchaseintheformofareceipt mayberequired). UnitsreturnedforwarrantyrepairtoApogeeoranaauthorizedApogeewarranty repairfacilitywillberepairedorreplacedwithafunctionalequivalentproductthatisnewor refurbishedatthemanufacturer'soption,freeofcharge.Pleasenotethisguaranteemaybesubjectto otherconditionsasdictatedbythecustomer'slegalwarrantyrightsundertheapplicablenational legislationgoverningthesaleofconsumergoods.
Apogeereservestherighttochangeorimprovedesignatanytimewithoutpriornotification.Design changesarenotimplementedretroactively,andtheincorporationofdesignchangesintofutureunits doesnotimplytheavailabilityofanupgradetoexistingunits.ThiswarrantyisvoidifApogee determines,initssolebusinessjudgment,thedefecttobetheresultofabuse,neglect,alterationor attemptedrepairbyunauthorizedpersonnel.Thebuyeracknowledgesandagreesthatinnoevent shallthecompanybeheldliableforanyspecial,indirect,incidentalorconsequentialdamages,orfor injury,lossordamagesustainedbyanypersonorproperty,thatmayresultfromthisproductfailingto operatecorrectlyatanytime.
Warrantydetailsaresubjecttochange.Forthelatestwarrantyinformationpleasevisit www.apogeedigital.com.
DeclarationsofConformity
This device complies with Part 15 of the FCC Rules. Operation is subject to the following two conditions:
(1) This device may not cause harmful interference and (2) This device must accept any interference received, including interference that may cause undesired operation. This equipment has been tested and found to comply with the limit sofa Class B digital device, pursuant to Part 15 of the FCC Rules. CAUTION: Changes or modifications not expressly approved by Apogee Electronics Corporation compliance could void the user's authority to operate the equipment.
Rating:3.3-5V100mAUSB2.0
IndustryCanadaNotice
ThisClassBdigitalapparatusmeetsallrequirementsoftheCanadianInterference-Causing EquipmentRegulations.CetappareilnumériquedelaclasseBrespectetouteslesexigencesdu RèglementsurlematérialbrouilleurduCanada.
DeclarationofConformity–CE
ApogeeElectronicsCorporationherebydeclaresthattheproduct,JamX,towhichthisdeclarationrelates,isinmaterialconformitywiththefollowingstandardsorothernormativedocuments:
(EN50081-1/EN55022;1995)and(EN50082-1/IEC801-2,3,4;1992)
following the provisions of: (73/23/EEC-Low Voltage Directive) and (89/336/EEC-EMC Directive)
DeclarationofConformity–CE
ApogeeElectronicsCorporationherebydeclaresthattheproduct,JamX,towhichthisdeclarationrelates,isinmaterialconformitywiththefollowingstandardsorothernormativedocuments:
(EN50081-1/EN55022;1995)and(EN50082-1/IEC801-2,3,4;1992)
following the provisions of: (73/23/EEC-Low Voltage Directive) and (89/336/EEC-EMC Directive)
DeclarationofConformity-Japan
ApogeeElectronicsCorporationherebydeclaresthatJamX,towhichthisdeclarationrelates,isin materialconformitywiththeVCCIClassAstandard.
DeclarationofConformity—Australia
ApogeeElectronicsCorporationherebydeclaresthattheJamXisinmaterialconformitywithAN/NZS standardrequirements.
Useofthe "MadeforiPhone", "MadeforiPad", and "MadeforiPod" badgemeansthatanaccessory has been designed to connect specifically to the Apple product(s) identified in the badge, and has been certified by the develop portomeet Apple performance standards. Apple is not responsible for the operation of this device or its compliance with safety and regulatory standards. Please note that the use of this accessory with an Apple product may affect wireless performance.
User'sGuideVersion1.0b
- JamXUser'sGuide
- Contents
- Contents2
- JamXProductTour4
- ConnectingYourStudio5
- InstallingJamXSoftware 9
- WorkingwithJamX 12
- ConfiguringNeuralArchetype:TimHensen-Standalone 14
- ConfiguringYourDAW15
- Troubleshooting 18
- IntheBox
- SystemRequirements
- RegistryyourProduct
- JamXProductTour
- ConnectingYourStudio
- Connectyourinstrument
- Connectheadphonesorspeakers
- ConnectingtoaMacorWindowscomputer
- ConnectingtoaniPadPro(USB-Cconnector)
- ConnectingtoaniOSDevice(Lightningconnector)
- InstallingJamXSoftware
- Windows10Installer
- ConfiguretheComputer'sOStouseJamXforAudiol/O
- Windows11
- AppleiOS
- WorkingwithJamX
- JamXLEDFunctionality
- BlendMode
- BlendOff-SoftwareMonitoring
- MinimizeLatencywithSoftwareMonitoring
- BlendOn-DirectMonitoring
- ConfiguringNeuralArchetype: TimHensen-Standalone
- ConfiguringYourDAW
- AppleLogicPro
- ToconfigureAppleLogicProtouseJamX:
- ToconfigureLogicProforDirectorSoftwareMonitoringWorkflow:
- AvidProTools
- ToconfigureAvidProToolstouseJamX:
- ToconfigureProToolsforDirectorSoftwareMonitoring Workflow:
- AbletonLive
- ToconfigureAbletonLive:
- ToconfigureAbletonLiveforDirectorSoftwareMonitoringWorkflow:
- Troubleshooting
- Formoreinformation
- WarrantyInformationandLegalNotices
- DeclarationsofConformity
Brand : Apogee
Model : JAM X
Category : DJ Equipment