
Tapo TD25 - Surveillance Camera TP-LINK - Free user manual and instructions
Find the device manual for free Tapo TD25 TP-LINK in PDF.


| Product Type | Indoor/Outdoor Wi-Fi Surveillance Camera |
| Brand | TP-Link |
| Model | Tapo TD25 |
| Dimensions (H x W x D) | 85 x 85 x 118 mm (3.3 x 3.3 x 4.6 in) |
| Weight | Approx. 300 g (0.66 lb) |
| Power Supply | DC 9V, 0.6A (via included adapter) |
| Resolution | 1080p Full HD (1920 x 1080) |
| Field of View | 360° horizontal, 114° vertical (pan & tilt) |
| Night Vision | Up to 9m (30 ft) with infrared LEDs |
| Motion Detection | Yes, with customizable zones and notifications |
| Two-Way Audio | Yes, built-in microphone and speaker |
| Storage | MicroSD card up to 256 GB (not included) or cloud subscription |
| Connectivity | Wi-Fi 2.4 GHz, IEEE 802.11b/g/n |
| Security | Encrypted video with TLS/SSL; supports two-factor authentication |
| Weather Resistance | IP65 (indoor and outdoor use) |
| Compatibility | Amazon Alexa, Google Assistant |
| Cleaning & Maintenance | Wipe gently with a soft, dry cloth. Do not use corrosive or abrasive cleaners. |
| Spare Parts & Repairability | Not user-serviceable. Contact TP-Link support for issues. |
| General Information | Indoor/outdoor surveillance camera with pan/tilt, motion tracking, and alarm siren. |
Frequently Asked Questions - Tapo TD25 TP-LINK
User questions about Tapo TD25 TP-LINK
0 question about this device. Answer the ones you know or ask your own.
Ask a new question about this device
Download the instructions for your Surveillance Camera in PDF format for free! Find your manual Tapo TD25 - TP-LINK and take your electronic device back in hand. On this page are published all the documents necessary for the use of your device. Tapo TD25 by TP-LINK.
USER MANUAL Tapo TD25 TP-LINK
User Guide
Smart Video Doorbell Camera
Contents
About This Guide 1
Introduction 2
Before You Start 3
Install Jumper Wire for Your Existing Chime……4
Preparations for Installing Your Doorbell 5
Install Your Doorbell....6
Set Up Your Doorbell and Chime 10
Set Up Using Amazon Frustration-Free Setup……12
Manage Your Doorbell 16
Authentication 26
About This Guide
This guide provides a brief introduction to the Smart Video Doorbell Camera and the Tapo app, as well as regulatory information.
Please note that features available in Tapo may vary by model and software version. Tapo availability may also vary by region. All images, steps, and descriptions in this guide are only examples and may not reflect your actual Tapo Camera experience.
Conventions
In this guide, the following convention is used:
| Convention Description | |
| Blue | Key information appears in blue, including management page text such as menus, items, buttons and so on. |
| Underline | Hyperlinks are in blue and underlined. You can click to redirect to a website. |
| ■Note: Ignoring this type of note might result in a malfunction or damage to the device. | |
More Info
- Specifications can be found on the product page at https://www.tapo.com. • Our Technical Support and troubleshooting information can be found at https://www.tapo.com/support/.
Introduction
Tapo dual-power smart doorbell is flexible in placement. Replace your existing doorbell with a smarter one and answer your door from anywhere with your phone. Receive instant notifications whenever someone comes by—even before they knock. Keep an eye out for the visitors, or possible intruders with crystal clear video and audio.
- 2K 5MP Ultra-Clear Images – Always know what happens in front of your door through the Tapo app. With the spotlight and 2K 5MP resolution, check all the fine details captured even in low-light environments.
- 180° Ultra-Wide Diagonal FOV* – Featuring a 180° ultra-wide diagonal field of view and 4:3 aspect ratio, Tapo Doorbell delivers full head-to-toe visibility at your door, even when visitors are just 0.4 m away.* *The data is measured based on the doorbell's optimal installation height of 1.2 m. The actual distance will be affected by the installation height. • 10000mAh Battery Life – The built-in 10000mAh rechargeable battery leads to a long-lasting life (up to 365 days) ^ , extending your usage. ^The time of use includes recording and watching live views. Actual battery life may vary due to device settings, usage, router specifications and environmental factors.
- Color Night Vision – Reveals high-fidelity details and color at night with the spotlight.
- Dual Power Options – Enhance your viewing with pre-roll footage when the doorbell is hardwired.
- Quick Response – Respond to your deliveries without saying a word with customizable responses through the Tapo app.
- Multiple Ways to Answer – With two-way audio or a recorded quick response, communicate directly with your deliveries through the Tapo app.
- Flexible Storage Choices – Save recorded videos on the microSD card 1 (up to 512 GB) or by using Tapo Care** cloud storage services. 1 microSD card needs to be purchased separately. **Tapo Care needs to be subscribed separately.
- Two-Way Audio – Enables communication through a built-in microphone and speaker.
- IP66 Weatherproof – Offers excellent waterproof and dustproof performance for outdoor scenarios.
- Free AI Detection – Enjoy free AI detection to identify people and vehicles, and notify you as needed.
Before You Start
If you want hardwire the doorbell into your home circuit:
WARNING: Risk of Electric Shocks
- Your existing doorbell must be wired (not battery powered) and supplied by an 8-24V AC, 10VA Minimum transformer.
- Ensure that your existing doorbell works by ringing the doorbell.
- Locate your existing doorbell chime.
- Make sure the doorbell is in an area with a strong Wi-Fi signal.
- Disconnect power at the fuse or circuit breaker before installing.
- You can always find detailed wiring and installation instructions in the Tapo app.

OR
Install Jumper Wire for Your Existing Chime
Install the jumper wire to bypass the existing chime on the circuit so that the Tapo doorbell can get sufficient power to operate stably. This is only necessary when you want to hardwire the doorbell and enable Always-On Mode.

Take care to avoid electric shocks.
- Turn off the circuit breaker. Make sure the power is off by ringing your doorbell a few times.

- Remove the chime cover and take a photo of the wiring in case you want to reconnect it.

- Slightly loosen the screws for the Front and Trans of your front doorbell or the Rear and Trans of your rear doorbell, then insert the jumper wire.
Note: If your doorbell chime has different markings, refer to instructions in the Tapo app or consult a licensed electrician.


- Tighten the screws and replace the chime cover.
Preparations for Installing Your Doorbell
Before installing the new doorbell, remove your existing doorbell, and determine if you need a mounting wedge to adjust the viewing angle of the doorbell.
- Install the doorbell on a flat and clean wall.
- The doorbell should be placed 1.2 m (4 ft) above the ground.
- (Optional) Use the included mounting wedges for a more focused view from a specific side.
Without Mounting Wedge
Without Mounting Wedge
With Horizontal Mounting Wedge
With Vertical Mounting Wedge
- Avoid placing the doorbell close to a side wall in the field of view. If you must, use the mounting wedge to adjust the viewing angle to reduce reflected light from the wall for better night vision performance.
Install Your Doorbell
Follow the steps below to install your new doorbell.
Option 1. Stick to a smooth wall
Required Accessories: Mounting Bracket 3M Adhesive

Optional Horizontal Mounting wedge
Vertical Mounting wedge
Mounting Wedge Screws x4
- Attach the included adhesive to the back of the bracket or the wedge. If you use the wedge to adjust angle, first affix the bracket and the wedge with screws.
Note: The adhesive is for one-time use. Avoid re-using the adhesive to ensure its adhesion.
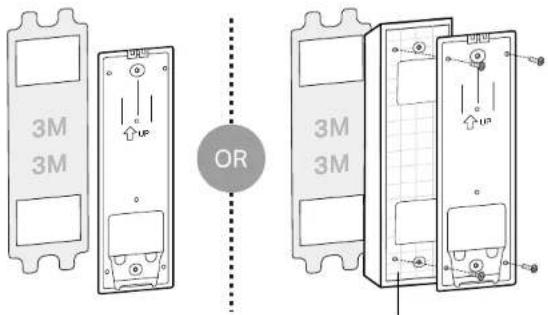

Attach the wedge's grid-side to the bracket.
- Route the wires through the bracket (if there are existing wires). Wipe off the dust from the surface using a dry cloth, stick the bracket with adhesive to the smooth wall, and press it down for 15 seconds to ensure the bracket is firmly attached. Note: This is applicable with tile, glass, marble, metal, stainless steel, and smooth wall surfaces.
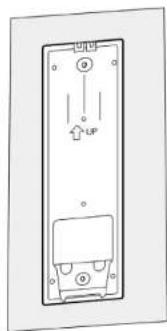
Without Wires

With Wires
- Mount the doorbell to the bracket.
Option A: Battery Powered Option B: Hardwire Powered
Starting from the bottom, attach the doorbell to the bracket.

Connect the wires to the doorbell and tighten the screws. Mount the doorbell to the bracket and turn on the circuit breaker.
Note: If the wires are too short, use the included extension wires and wire nuts to make them longer.

Install Your Doorbell
Follow the steps below to install your new doorbell.
Option 2. Mount to the wall

- Stick the mounting template to the desired place. Drill two holes according to the template.
Diameter = 6 mm (15/64 in.)

- Route the wires (if there are existing wires) through the bracket. Insert two anchors into the holes and use the screws to affix the bracket over the anchors.
Note: When mounting to uneven walls, stick the foam pad on the back of the wedge.

- Mount the doorbell to the bracket.
Note: If you have trouble attaching the doorbell to the bracket or it causes false anti-theft alarms, check if you tightened the screws too much that the bracket bent. Adjust the depth of the screw and then reinstall the doorbell.
Option A: Battery Powered Option B: Hardwire Powered
Starting from the bottom, attach the doorbell to the bracket.

Connect the wires to the doorbell and tighten the screws. Mount the doorbell to the bracket and turn on the circuit breaker.
Note: If the wires are too short, use the included extension wires and wire nuts to make them longer.

Set Up Your Doorbell and Chime
After installing the doorbell, follow the steps below to set up the doorbell, and pair with the chime.
Step 1. Download Tapo App
Get the Tapo app from the App Store or Google Play, or by scanning the QR code below.

Step 2. Log In
Open the app, and log in with your TP-Link ID. If you don't have an account, create one first.

Step 3. Add Your Camera
Tap the button in the app and search for your model. Follow the app instructions to set up your doorbell. Then plug in your chime and pair with the doorbell.
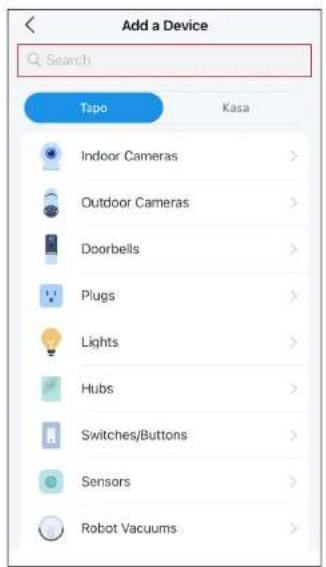

Set Up Using Amazon Frustration-Free Setup
What is Amazon Frustration-Free Setup?
Amazon Frustration-Free Setup can help connect and set up Tapo smart devices in fewer steps, without having to remember and re-enter your Wi-Fi password on each device.
To use this feature, confirm the following:
● The new Tapo device supports Amazon FFS. ● The new Tapo device is purchased from Amazon. - You have an Amazon FFS enabled Alexa device or router. - You have saved your Wi-Fi information to Amazon by using Alexa echo. - Your Tapo device and router are on the same network as your Alexa echo.
LED Indications during Amazon Frustration-Free Setup
| LED Status | |
| Blinking red and green Ready for setup | |
| Blinking amber FFS setup in progress | |
| Solid white Working properly | |
If the LED does not turn solid white after a long time, you can try to add the Tapo device manually. (Press the Reset button on your Tapo device once. Then open the Tapo app, tap the + button on the page, select your device model, and follow the app instructions.)
How to use Amazon Frustration-Free Setup with Tapo devices
- Open the Amazon Alexa app. Then tap More and select Skills & Games.
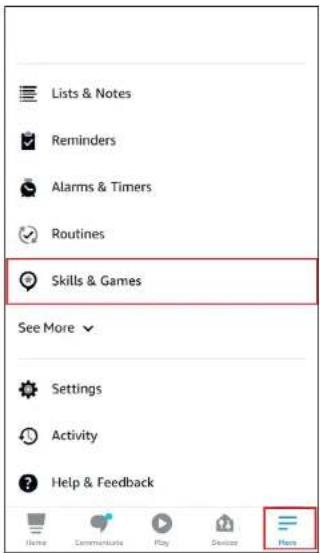
- Enter Tapo in the search bar and choose Tapo.

- Tap the ENABLE TO USE button.
- Log in with your TP-Link ID that has bound to your Tapo device, and tap Authorize. After authorized successfully, the message Tapo has been successfully linked will come up.


- Plug in your Tapo device and the setup will complete automatically in two minutes.
For setting up more Tapo devices, just plug in and enjoy!
Done!
If this device displays on the Home page in the Tapo app, it indicates this device has been successfully associated with your Amazon account and joined your Wi-Fi network automatically.
If this device does not display on the Home page in the Tapo app, try setting it up manually. (Tap the + button on the page, select your device model, and then follow the app instructions.)
Manage Your Doorbell
After setup, your device will be listed on the Home page. You can tap your device to manage it.
1. Home Page
You can check your battery, favorite/unfavorite, and remove your device on the Home page.

2. Status Page
Tap your device to enter its Status page.

3. Settings Page
Tap ☐ on the Status page to enter the Device Settings page.
3.1 Set Detection Settings
You can set when to wake up your doorbell, and the detection zones and sensitivity for each detection type.
![graph TD A["Device Settings"] --> B["Detection"] B --> C["Wake-up Settings"] C --> D["Event Detected"] D --> E["Doorbell Pressed"] E --> F["Sensitivity"] F --> G["Motion Detection"] G --> H["Increased sensitivity results in fewer missed recordings and notifications; lower sensitivity results in fewe…](/content/2026/06/1401753/images/3648a5aaaa56772ac6a0b05130f8ebdc344497ce20988c9722881d0490ae303c.jpg)
3.2 Check Power Options
You can check battery status, choose whether to show the battery status and percentage on Live View, select the power supply, set the working mode and Auto Privacy Mode, and check battery usage and wake-up times for the past 7 or 30 days.
If you want to choose the Hardwire Powered supply method, you need to hardwire your doorbell to your home circuit first.


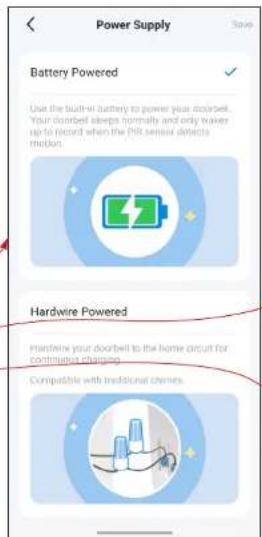


3.2 Check Power Options
If you have hardwired your doorbell to your home circuit first, you can choose whether to enable Always-On Mode, which supports 24/7 recording.

3.3 Set Doorbell settings
Doorbell Ring: Set the ringtone volume of your doorbell.
Paired Chimes: Check paired chimes/hub and add new chimes/hubs.
Doorbell Video Call: When someone presses the doorbell, you'll receive a ring call if the Tapo app is already open on your screen.
Spoken Language: Choose what language your doorbell speaks.
Anti-theft Alarm: When enabled, an alarm will be triggered once the doorbell is removed from the wall.
![graph LR A["Doorbell Ring"] --> B["Sound Settings"] B --> C["Paired Chimes"] C --> D["Doorbell Video Call"] D --> E["Add Chime/Hub"] E --> F["Doorbell Video Call"] F --> G["Anti-theft Alarm"]](/content/2026/06/1401753/images/50df8122f55f0d5d1f2c1e2967ba519eb93d1223f55c77fc7c1a6e9bbdc20f7b.jpg)
3.4 Subscribe to Tapo Care
Tapo Care is a comprehensive service with unlimited cloud storage. You can subscribe to Tapo Care to save recorded videos by your doorbell.

3.5 Storage & Recording
Check your microSD card status, enable microSD Card Recording for 24/7 recording, set recording schedule and the clips settings, and choose whether to record sound during recording.

3.6 Video & Display
Night Mode Settings: Set the recording effect at night.
Video Quality: Set the video resolution for the doorbell.
Privacy Zones: Customize zones that cannot be viewed or monitored to protect your privacy.
Frame Rate: Choose the frame rate you want. A higher frame rate will reduce the battery life.
On-screen Display Info: Custom information that overlays the doorbell's footage.
Display Tag on Screen: Display the detection tag on your screen.

3.7 Spotlight Settings
If you have turned on the spotlight on Live View, you can adjust the brightness here.
3.8 Privacy Mode
When enabled, streaming and recording feature will be temporarily unavailable.

3.9 Notifications
Choose whether to receive rich notifications (notifications with snapshots) and what type of activity notifications you want to receive.
4.0 Share Device
When enabled, streaming and recording feature will be temporarily unavailable.

Authentication
FCC compliance information statement

Product Name: Tapo Video Doorbell Camera
Model Number: Tapo D235/TD25
Responsible Party:
TP-Link USA Corporation
Address: 10 Mauchly, Irvine, CA 92618
Website: https://www.tp-link.com/us/
Tel: +1 626 333 0234
This equipment has been tested and found to comply with the limits for a Class B digital device, pursuant to part 15 of the FCC Rules. These limits are designed to provide reasonable protection against harmful interference in a residential installation. This equipment generates, uses and can radiate radio frequency energy and, if not installed and used in accordance with the instructions, may cause harmful interference to radio communications. However, there is no guarantee that interference will not occur in a particular installation. If this equipment does cause harmful interference to radio or television reception, which can be determined by turning the equipment off and on, the user is encouraged to try to correct the interference by one or more of the following measures:
- Reorient or relocate the receiving antenna.
- Increase the separation between the equipment and receiver.
- Connect the equipment into an outlet on a circuit different from that to which the receiver is connected.
- Consult the dealer or an experienced radio/TV technician for help.
This device complies with part 15 of the FCC Rules. Operation is subject to the following two conditions:
- This device may not cause harmful interference.
- This device must accept any interference received, including interference that may cause undesired operation.
Any changes or modifications not expressly approved by the party responsible for compliance could void the user's authority to operate the equipment.
Note: The manufacturer is not responsible for any radio or TV interference caused by unauthorized modifications to this equipment. Such modifications could void the user's authority to operate the equipment.
FCC RF Radiation Exposure Statement
This equipment complies with FCC RF radiation exposure limits set forth for an uncontrolled environment. This device and its antenna must not be co-located or operating in conjunction with any other antenna or transmitter.
To comply with FCC RF exposure compliance requirements, this grant is applicable to only Mobile Configurations. The antennas used for this transmitter must be installed to provide a separation distance of at least 20 cm from all persons and must not be co-located or operating in conjunction with any other antenna or transmitter.
We, TP-Link USA Corporation, have determined that the equipment shown above complies with the applicable technical standards, FCC part 15. No unauthorized change is made in the equipment and the equipment is properly maintained and operated.
Issue Date: 2024-07-07
CE Mark Warning
CE
This is a class B product. In a domestic environment, this product may cause radio interference, in which case the user may be required to take adequate measures.
OPERATING FREQUENCY (the maximum transmitted power)
2412MHz—2472MHz (20dBm)
EU Declaration of Conformity
TP-Link hereby declares that the device is in compliance with the essential requirements and other relevant provisions of directives 2014/53/EU, 2009/125/EC, 2011/65/EU and (EU)2015/863.
The original EU Declaration of Conformity may be found at https://www.tapo.com/en/support/ce/.
RF Exposure Information
This device meets the EU requirements (2014/53/EU Article 3.1a) on the limitation of exposure of the general public to electromagnetic fields by way of health protection.
The device complies with RF specifications when the device is used at 20 cm from your body.
UKCA Mark

UK Declaration of Conformity
TP-Link hereby declares that the device is in compliance with the essential requirements and other relevant provisions of the Radio Equipment Regulations 2017.
The original UK Declaration of Conformity may be found at https://www.tapo.com/support/ukca/.
Canadian Compliance Statement
This device contains licence-exempt transmitter(s)/receiver(s) that comply with Innovation, Science and Economic Development Canada's licence-exempt RSS(s). Operation is subject to the following two conditions:
- This device may not cause interference.
- This device must accept any interference, including interference that may cause undesired operation of the device.
Radiation Exposure Statement:
This equipment complies with IC radiation exposure limits set forth for an uncontrolled environment. This equipment should be installed and operated with minimum distance 20cm between the radiator & your body.
Industry Canada Statement
CAN ICES-3 (B)/NMB-3(B)


Korea Warning Statements:
| 設備名稱: Tapo Video Doorbell Camera 型號(型式): Tapo D235/TD25Equipment name Type designation (Type) | ||||||
| 單元Unit | 限用物質及其化學符號Restricted substances and its chemical symbols | |||||
| 鉛Lead(Pb) | 汞Mercury(Hg) | 鎘Cadmium(Cd) | 六價鉻Hexavalent chromium( Cr15 ) | 多溴聯苯Polybrominated biphenyls(PBB) | 多溴二苯醚Polybrominated diphenyl ethers(PBDE) | |
| PCB ○○○○○ | ||||||
| 外殼○○○○○○ | ||||||
| 電源供應板-○○○○○ | ||||||
| 其他及其配件-○○○○○ | ||||||
| 備考 1. “超出 0.1 wt %” 及 “超出 0.01 wt %” 係指限用物質之百分比含量超出百分比含量基準值Note 1: “Exceeding 0.1 wt %” and “exceeding 0.01 wt %” indicate that the percentage content of the restricted substance exceeds the reference percentage value of presence condition.備考 2. “○” 係指該項限用物質之百分比含量未超出百分比含量基準值。Note 2: “○” indicates that the percentage content of the restricted substance does not exceed the percentage of reference value of presence.備考 3. “—” 係指該項限用物質為排除項目。Note 3: The “—” indicates that the restricted substance corresponds to the exemption. | ||||||

- Never touch the product with wet hands.
- Do not disassemble, repair or modify the product.
- Do not use the device where wireless devices are not allowed.
- Do not use the product if the casing has been broken. Danger of electric shock.
- Keep the device away from fire or hot environments. DO NOT immerse in water or any other liquid.
- Do not place near automatically controlled devices such as fire alarms. Radio waves emitted from this product may cause such devices to malfunction resulting in an accident.
- Observe restrictions on using wireless products in fuel depots, chemical plants or when blasting operations are in progress.
- Do not use liquid to clean the product. Only use a dry cloth.
- Never put metal objects inside the product. If a metal object enters the product turn off the circuit breaker and contact an authorised electrician.
- This product is not intended to be used when providing medical care. Consult the manufacturer of any personal medical devices, such as pacemakers or hearing aids to determine if they are adequately shielded from external RF (radio frequency) energy.
- Do not use this product in health care facilities. Hospitals or health care facilities may be using equipment that could be sensitive to external RF energy.
- Do not use this product near water for example near a bath tub, wash bowl, kitchen sink or laundry tub, in a wet basement or near a swimming pool.
- The product should be kept free from excessive smoke, dust or high temperature and vibration. • This product should not be exposed to direct sunlight
- Do not place heavy objects on top of the product.
- This product may interfere with other electronic products such as TV, radios, personal computers, phones or other wireless devices.
- This equipment shall be installed at a height of fewer than 2 meters when sticking to a clean wall.
- Doorbell Operating Temperature: -20°C ~ 45°C (-4°F ~ 113°F)
- Chime Operating Temperature: 0°C ~ 40°C (32°F ~ 104°F) • Maximum installation height: 6ft (2m)
CAUTION!
Avoid replacement of a battery with an incorrect type that can defeat a safeguard. Avoid disposal of a battery into fire or a hot oven, or mechanically crushing or cutting of a battery, that can result in an explosion. Do not leave a battery in an extremely high temperature surrounding environment that can result in an explosion or the leakage of flammable liquid or gas. Do not leave a battery subjected to extremely low air pressure that may result in an explosion or the leakage of flammable liquid or gas.
Please read and follow the above safety information when operating the device. We cannot guarantee that no accidents or damage will occur due to improper use of the device. Please use this product with care and operate at your own risk.
Explanation of the symbols on the product label
Note: The product label is on the bottom of the product. Symbols may vary from products.
| Symbol Explanation | |
 | Class II equipment |
 | Class II equipment with functional earthing |
 | Alternating current |
 | DC voltage |
 | Polarity of output terminals |
| [case1] | Indoor use only |
| [twet] | Dangerous voltage |
| [tercal] | Caution, risk of electric shock |
| [trans1] | Energy efficiency Marking |
| [tecal] | Protective earth |
 | Earth |
 | Frame or chassis |
 | Functional earthing |
 | Caution, hot surface |
 | Caution |
 | Operator's manual |
 | Stand-by |
 | "ON"/"OFF" (push-push) |
 | Fuse |
 | Fuse is used in neutral N |
 | RECYCLINGThis product bears the selective sorting symbol for Waste electrical and electronic equipment (WEEE). This means that this product must be handled pursuant to European directive 2012/19/EU in order to be recycled or dismantled to minimize its impact on the environment.User has the choice to give his product to a competent recycling organization or to the retailer when he buys a new electrical or electronic equipment. |
 | Caution, avoid listening at high volume levels for long periods |
 | Disconnection, all power plugs |
| m Switch of mini-gap construction | |
| µ | Switch of micro-gap construction (for US version)Switch of micro-gap / micro-disconnection construction (for other versions except US) |
| Switch without contact gap (Semiconductor switching device) | |


- USER GUIDE
- SMART VIDEO DOORBELL CAMERA
- CONTENTS
- ABOUT THIS GUIDE
- CONVENTIONS
- MORE INFO
- INTRODUCTION
- BEFORE YOU START
- INSTALL JUMPER WIRE FOR YOUR EXISTING CHIME
- PREPARATIONS FOR INSTALLING YOUR DOORBELL
- INSTALL YOUR DOORBELL
- OPTION 1. STICK TO A SMOOTH WALL
- OPTION A: BATTERY POWERED OPTION B: HARDWIRE POWERED
- OPTION 2. MOUNT TO THE WALL
- SET UP YOUR DOORBELL AND CHIME
- STEP 1. DOWNLOAD TAPO APP
- STEP 2. LOG IN
- STEP 3. ADD YOUR CAMERA
- SET UP USING AMAZON FRUSTRATION-FREE SETUP
- WHAT IS AMAZON FRUSTRATION-FREE SETUP
- HOW TO USE AMAZON FRUSTRATION-FREE SETUP WITH TAPO DEVICES
- DONE
- MANAGE YOUR DOORBELL
- HOME PAGE
- STATUS PAGE
- SETTINGS PAGE
- SET DETECTION SETTINGS
- CHECK POWER OPTIONS
- SET DOORBELL SETTINGS
- SUBSCRIBE TO TAPO CARE
- STORAGE & RECORDING
- VIDEO & DISPLAY
- SPOTLIGHT SETTINGS
- PRIVACY MODE
- NOTIFICATIONS
- SHARE DEVICE
- AUTHENTICATION
- FCC RF RADIATION EXPOSURE STATEMENT
- UKCA MARK
- UK DECLARATION OF CONFORMITY
- CANADIAN COMPLIANCE STATEMENT
- RADIATION EXPOSURE STATEMENT
- INDUSTRY CANADA STATEMENT
- KOREA WARNING STATEMENTS
- CAUTION
- EXPLANATION OF THE SYMBOLS ON THE PRODUCT LABEL
Brand : TP-LINK
Model : Tapo TD25
Category : Surveillance Camera