
6000 Series XC6553 - Vacuum Cleaner PHILIPS - Free user manual and instructions
Find the device manual for free 6000 Series XC6553 PHILIPS in PDF.


| Product Type | Cordless Stick Vacuum Cleaner |
| Model | 6000 Series XC6553 |
| Brand | Philips |
| Dimensions (L x W x H) | 28 x 26 x 115 cm |
| Weight | 4.5 kg |
| Power Source | Rechargeable Li-Ion Battery |
| Battery Voltage | 25.2 V |
| Runtime (Max) | 60 minutes |
| Charging Time | 5 hours |
| Dust Capacity | 0.6 L |
| Filtration System | Washable HEPA filter |
| Suction Power | 150 Air Watts |
| Noise Level | 79 dB |
| Main Brush Type | Anti-tangle brush |
| Attachments Included | Crevice tool, mini brush, 2-in-1 combo |
| Display | LED with battery indicator |
| Maintenance | Washable dust bin and filter, replaceable battery |
| Safety Features | Overheat protection, auto shut-off |
| Repairability | Modular design with replaceable parts; spare filter, battery available |
| Warranty | 2 years |
Frequently Asked Questions - 6000 Series XC6553 PHILIPS
User questions about 6000 Series XC6553 PHILIPS
0 question about this device. Answer the ones you know or ask your own.
Ask a new question about this device
Download the instructions for your Vacuum Cleaner in PDF format for free! Find your manual 6000 Series XC6553 - PHILIPS and take your electronic device back in hand. On this page are published all the documents necessary for the use of your device. 6000 Series XC6553 by PHILIPS.
USER MANUAL 6000 Series XC6553 PHILIPS
Welcome,
Get started!
home.id/welcome
Registration and Benefits
Quick start
Digital manual
English 4 Türkçe 37
Contents
Introduction 4
General description 5
Display overview 6
Before first use 6
Installing the wall mount 6
Preparing for use 8
Using the appliance 9
Assembling the appliance 9
Vacuuming soft and hard floors 9
Vacuuming while mopping hard floors 10
Versatile usage and accessories 13
Customization and notifications on display 15
After use – Maintenance 17
Frequent maintenance after each cleaning cycle ____ 17
Periodic maintenance intermittently 21
Replacement 28
User interface signals 29
Troubleshooting 31
Dry cleaning 32
Wet cleaning 35
Introduction
Thank you for buying this product! To fully benefit from the support that we offer, register your product at www.home.id.
General description

1 Control panel 2 Handheld 3 Dust bucket 4 Battery 5 Extra filter (XC6557 only) 6 Dust bucket release button 7 Expansion screwers 8 Wallmount 9 Adapter
10 Tube 11 TriActive Smart LED Nozzle 12 Aqua tank (XC6553, XC6557 only) 13 Microfiber mopping pad 14 Pet nozzle (XC6557 only) 15 Soft brush (XC6557 only) 16 Upholstery tool (XC6557 only) 17 Crevice tool
Display overview

1 Battery level percentage 2 Maintenance reminder 3 Floor Type Recognition 4 Severe blockage warning
5 Power level indicators 6 Power increase button 7 Power decrease button 8 On/off button
Before first use
Installing the wall mount

1 Invert the wall mount and unlatch the gray lever. Insert the charging port, ensuring the metal part is visible and pointing upright on the front side of the wall mount.
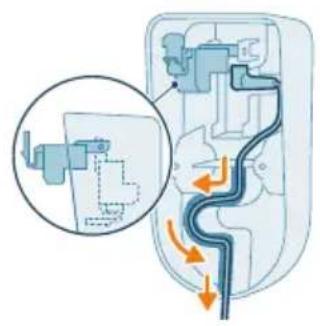
2 Neatly arrange the cable by tucking it into the designated groove.
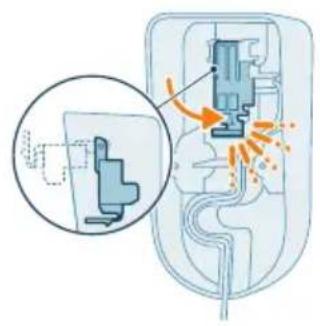
3 Close the gray lever. Make sure the gray lever is locked in place with a "CLICK" sound.

4 Securely affix the wall mount to your preferred position on the wall, ensuring that the mounting screw holes are approximately 110 cm from the floor.
Caution: Be careful when you drill holes in the wall to fasten the wall mount, to avoid the risk of electric shock.

i Note: Verify that the placement of the wall mount allows the entire appliance to hang on the wall without the nozzle coming into contact with the floor.

5 Once you have determined the optimal position and height for storing and charging your appliance, firmly tighten the screws to secure the wall mount in place.
Preparing for use

The appliance is equipped with a Li-Ion battery. Charging from empty to full takes about 5 hours.
1 Attach the battery pack to the main body of the appliance, ensuring a secure connection that's confirmed with a "CLICK" sound.

2 Charge your appliance by placing it onto the assembled wall mount.
Warning: Store and charge the appliance at a temperature above 5 °C and below 40 °C.

i Note: You can also place the handheld on a level and stable surface, and directly connect the charging cable to the appliance.
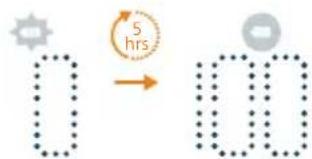
3 The appliance is designed to reach a complete charge within 5 hours. You can monitor the charging progress on the screen. When the appliance is fully charged, the value 100% lights up on the screen. After a few minutes, the display will switch off.
Using the appliance
Assembling the appliance

1 Attach the handheld to the tube. Confirm the attachment with a "CLICK" sound.

2 Attach the tube to the nozzle. Confirm the attachment with a "CLICK" sound.
Vacuuming soft and hard floors

1 Press the on/off button to switch on the appliance.
i Note: To switch off the appliance, press the on/off button again.

2 Use the + and - buttons to toggle through three different power settings.

3 You can clean on hard or soft floors with the vacuum cleaner.

With Floor Type Recognition enabled, the appliance recognizes the floor type and automatically optimizes its performance within the power settings you have selected. Read the section "Floor Type Recognition" to check how to make customizations.

Warning: Do not vacuum up water or other liquids.

Caution: Do not look directly into the illuminated LEDs or point the LEDs at someone's eyes. The LED light is very bright.
Vacuuming while mopping hard floors
Caution: Only use the aqua tank on hard floors with a water-resistant top coat (such as linoleum, enameled tiles and varnished parquet) and stone floors (such as marble). If your floor has not been treated to make it water-resistant, check with the manufacturer if you can use water to clean it. Do not use the aqua tank on hard floors of which the water-resistant top coat is damaged.
Note: Do not use the aqua tank to clean carpets.

Note: Do not move the appliance with aqua tank assembled sideways, as this leaves water traces. Only move forwards and backwards.
1 Pre-wet the microfiber mopping pad with water before use.

2 Fill the tank with water, ensuring the water temperature does not exceed 50°C.

3 (Optional) If you wish to add a liquid floor cleaner into the aqua tank, opt for a low-foaming or non-foaming variety that can be diluted. We recommend the XV1792 Philips Floor Cleaner. Add only a few drops of the liquid cleaner to the water.

4 Close the aqua tank properly.

5 Secure the microfiber mopping pad underneath the aqua tank. Align the velcro straps under the aqua tank and behind the cloth.

6 Attach the prepared aqua tank to the aqua nozzle and you're set to begin.
7 Press the on/off button to switch on the appliance. You can effectively clean hard floors with the attached aqua module on the nozzle.
Note: The aqua module is not suitable for soft floors like carpet.
Caution: The aqua module should not be used to pick up water puddles.
Tips and other important information
- It is not necessary to vacuum the floor before mopping, as the Vacuum & Mop set-up actively wet-cleans your hard floor to capture all kinds of dirt, including liquids and stains. On carpets and rugs, use the Vacuum only set-up.
- The appliance can leave a small puddle of water on the floor if you do not move the appliance while switching it off. You can reduce the size of the puddle by moving the appliance while switching it off. If needed, you can remove the last drops with a cloth.
Usage restrictions
- The Vacuum & Mop set-up is suitable for vacuuming and mopping all types of hard floors, except uncoated wooden floors.
- The Vacuum & Mop set-up is intended for regular cleaning of hard floors. Always follow the cleaning instructions for your hard floor when you use this appliance.
- If you want to add a liquid floor cleaner other than XV1792 Philips Floor Cleaner to the water in the clean aqua tank, make sure that you use a low-foaming or non-foaming liquid floor cleaner that can be diluted in water like XV1792 Philips Floor Cleaner.
- As the clean aqua tank has a capacity of 250 ml, you only have to add a few drops (max 10ml) of liquid floor cleaner to the water.
- If you use the Vacuum & Mop set-up on linoleum floors, only do so on linoleum floors that are properly affixed to prevent linoleum from being drawn into the nozzle.
- If you move/lift the appliance over a carpet or rug when it is switched off, wastewater droplets may end up on your carpet or rug.
- Do not push the appliance over the floor grilles of convector heaters. As the appliance cannot pick up water that comes out of the nozzle when you move it over the grille, water ends up at the bottom of the convector pit.
- While cleaning, do not lift the nozzle from the floor or move the nozzle sideways, and do not make strong turns, as this leaves water traces. Only move forwards and backwards.
i Note: The operating time depends on the power level used during cleaning.
Versatile usage and accessories

Warning: When using any accessory, do not vacuum up water or other liquids.
Using the handheld
You can use the handheld directly without any cleaning tool to vacuum up dust.

Using the nozzle
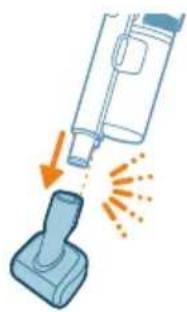
1. Attach the nozzle directly to the handheld.

2. This combination is for cleaning surfaces of varying heights, such as staircases.

Using the Pet nozzle
1. To attach the Pet nozzle, insert the tube of the handheld into the Pet nozzle.
2. You can use the Pet nozzle for standard cleaning, for instance of soft areas such as beds and couches. You can adjust the power setting to suit your cleaning needs. 3. You can use the Pet nozzle for extra thorough cleaning, for instance to vacuum up pet hair, or to clean small patches of dirt, such as spilled breadcrumbs. You can adjust the power setting to suit your cleaning needs.
Using the crevice tool
1. To attach the crevice tool, insert the tube or handheld into the crevice tool.

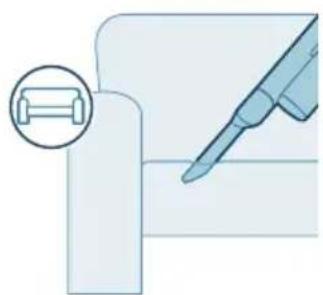
2. You can use the long crevice tool to clean narrow corners or hard-to-reach places. You can adjust the power setting to suit your cleaning needs.

Using the soft brush
1. To attach the soft brush, insert the tube or handheld into the soft brush.
2. The soft brush is designed for dedicated surfaces and comes with customizable illumination.
Using the upholstery tool
1 To attach the upholstery tool, insert the tube or handheld into the upholstery tool.
2 The upholstery tool is ideal for cleaning furniture with soft fabric, and its illumination can be adjusted according to your liking.
Customization and notifications on display
The appliance is equipped with various options to customize and monitor in the menu.

Floor Type Recognition customization
When the icon lights up, it shows that the Floor Type Recognition feature is active.
With Floor Type Recognition enabled, the appliance recognizes the floor type and automatically optimizes its performance within the power settings you have selected.
Enable or disable Floor Type Recognition
To enable or disable the feature, first turn the appliance on and then off. Immediately after turning it off, while the display is still lit, press and hold the "+" button for 4 seconds. The display will show a countdown during this period.
When the Floor Type Recognition feature is enabled, the green icon will be visible. When the feature is disabled, the green icon will disappear.
i Note: Floor Type Recognition can only be enabled or disabled when the TriActive Smart LED Nozzle is attached to the handheld. As a result, when the TriActive Smart LED Nozzle is not attached, the icon will not appear. Attach the TriActive Smart LED Nozzle to confirm on the display if the Floor Type Recognition feature is enabled or disabled.
i Note: When you first receive your appliance, Floor Type Recognition is enabled.
i Note: The Floor Type Recognition function becomes active when the nozzle identifies different cleaning surfaces while in motion.
Maintenance Reminder notifications
When the maintenance reminder icon lights up, it means that the air flow through the appliance is minimized due to pollution. It is time to clean and maintain the appliance.

Follow the steps in the 'Dust management system maintenance' section to clean the filters and empty the dust bucket.

Also, check for any foreign objects stuck in the handheld, tube, or nozzle. If you also see an i8 information code on the display there can be multiple reasons, check them in section "User interface signals".

Severe blockage notifications
When the severe blockage icon lights up, it means that there is no air flow passing through the appliance.

Check and remove any foreign objects in the nozzle, tube, or handheld. If this 'Severe Blockage' notification persists, it may also trigger the 'Maintenance Reminder icon'. Remove the object first to see if this resolves the issue.
After use – Maintenance
Frequent maintenance after each cleaning cycle
Dust management system maintenance
Empty the dust bucket after each use or when the dust is reaching the MAX level indicator.


1 Switch off the appliance.
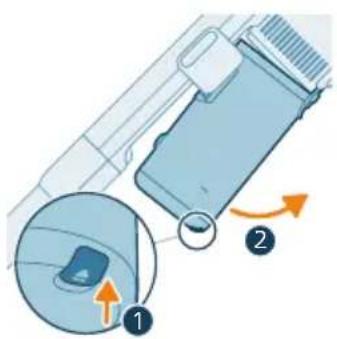
2 Hold the appliance in a 45 degree angle like shown in the illustration. Remove the dust bucket by pressing the release button. The release button is located at the bottom of the bucket.

i Note: Remove the dust bucket while keeping the appliance in an upright position.

3 Hold onto the black grip. Remove the cyclone from the dust bucket by lifting it out from the bucket

4 Empty the collected dust in the dust bucket over the trash bin.

5 Place the cyclone back in the dust bucket. Make sure the two parts are aligned.

6 Place back the assembled bucket. First align the filter side of the bucket before hinging it in place.
Aqua tank maintenance
Clean the aqua tank after each use.

1 Remove the microfiber mopping pad.
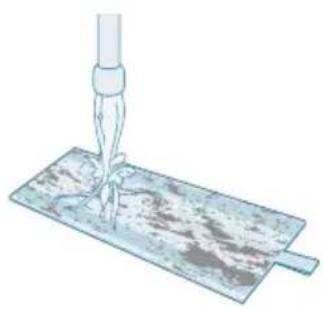
2 Rinse the mopping pad under the tap and wash it by hand or in a washing machine.

3 Pour out any remaining water in the aqua tank.

4 Fill the aqua tank with water.
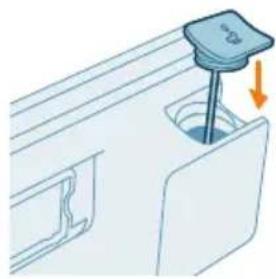
5 Close the aqua tank properly.

6 Shake the aqua tank to remove detergent residuals.

7 Empty the aqua tank and leave it open to dry.

8 Make sure to not lose the tank cap during storage. Hang the microfiber mopping pad dry.
Periodic maintenance intermittently
Dust management system maintenance
Clean the filter at least once every month or when you see the maintenance reminder icon lights up.
If you also see an i8 information code on the display, there can be multiple reasons. Check them in the section "User interface signals".


1. Rotate the filter counter-clockwise to remove it from the dust bucket.

2. Remove the washable foam filter from the plastic filter casing.

3. Tap both the filter casing and the foam filter over a trash bin.

4. Rinse the foam filter under the tap.
Note: For best cleaning results, run the water through the filter with the filter tab facing downwards, allowing deeply set dust to be washed out.

5. Squeeze the foam filter until clean water comes out.
6. Leave the washed filter to dry for 24 hours before reassembling the foam filter in the filter casing.
7. For thorough maintenance, clean the dust bucket and cyclone under a running tap or in warm soapy water.
8. Wipe the cleaned dust bucket and cyclone dry.
Caution: Make sure all parts are completely dry before you reassemble them.

Note: All parts cannot be cleaned in the dishwasher.

9. Reassemble the filter in the dust bucket. Rotate the filter clockwise to fix it in place.

10. Place back the assembled bucket. First align the filter side of the bucket before hinging it in place.
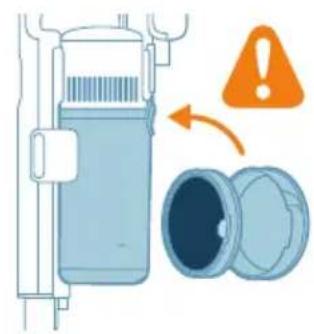
Note: After maintenance, always make sure the filter is assembled in the appliance before using it.

TriActive Smart LED Nozzle maintenance
1 Always switch off the appliance before cleaning the nozzle brush.

2 To access the brush, locate the button on the side of the nozzle. Press it and rotate to open.
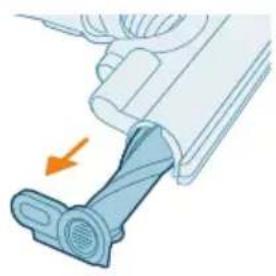
3 Gently remove the brush and the side cap of the nozzle.

4 Carefully detach any tangled hair from the brush. Support the removal of pollution with a pair of scissors.

5 When reassembling, ensure proper alignment of the brush.

6 Lock the nozzle brush by securing it until you hear a "CLICK" sound.
Pet nozzle maintenance
1 Turn the nozzle over to access the cleaning area.

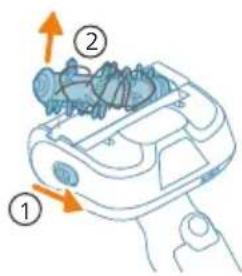


2 Slide the side button to release the brush from its position.
3 Use your hands or a pair of scissors to remove any pollution from the brush.
4 When reassembling the brush, start by placing one side in position before attaching the other side. When the brush is properly assembled, you will hear a "CLICK" sound.
Aqua tank maintenance
Descale the aqua tank once every month to avoid limescale build-up.

1 Add some descaling liquid to a measuring cup.

2 Add the correct amount of water in the measuring cup.
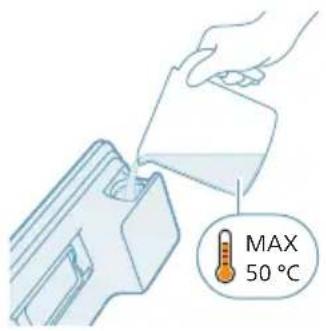
3 Add the mixed liquid in the aqua tank.

4 Close the aqua tank properly.

5 Shake the aqua tank to remove detergent residuals.

6 Leave the aqua tank (without the microfiber mopping pad) upright over 12 hours. Water is expected to slowly come out from the bottom of the aqua tank. We recommend to place the aqua tank inside the sink or over a cloth.

7 Rinse and remove any remaining liquid inside the aqua tank.

Water strip maintenance
1 Remove the water strip from the bottom of the aqua tank for a thorough cleaning.

2 Rinse the water strip under the tap.

3 Attach the water strip back to the aqua tank after cleaning.
Replacement
To buy accessories or spare parts, visit www.philips.com/parts-and-accessories or go to your Philips dealer. You can also contact the Philips Consumer Care Center in your country. Replacement parts and type numbers:
Replacement filter XV1681/01

XV1681/01
Brush CRP1020

CRP1020
Microfiber mopping pad XV1670/02

XV1670/02
Water strip CP0381/01
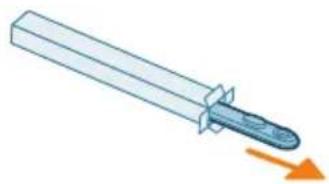
CP0381/01
Battery pack and charger XV1797

XV1797
Pet nozzle XV1684

XV1684
Note: Replace the filter and the microfiber mopping pad every 6 months to ensure maximum performance.
User interface signals
UI screen Possible cause Solution

The battery is empty. To charge the battery, connect the
appliance to the charging station or attach the handheld vacuum cleaner directly to the power plug of the adapter.

The display shows E2.
The appliance is operated below the functioning temperature.
Move the appliance to a warmer room. Do not store, charge, or use the appliance at a temperature below 5 °C or above 40 °C.
UI screen Possible cause Solution
 | The display shows E3. The appliance is operated above the functioning temperature. | Move the appliance to a cooler room. Do not store, charge or use the appliance at a temperature below 5 °C or above 40 °C. |
 | The display shows E5. The battery does not have enough power to be switched on. | Connect the appliance again to the charger. If the appliance still does not charge, take it to a Philips service center or contact the Consumer Care Center. |
 | The display shows E9. There is a problem with the nozzle. | Take it to a Philips service center or contact the Consumer Care Center. |
 | The display shows i4. The brush is stuck or objects are stuck in the air flow channel. | Make sure the appliance is switched off. Clean the nozzle according to the user manual and check the tube by removing the tube from the main appliance. Remove the object in the nozzle or tube and restart the appliance. |
 | The display shows i5. Foreign object is stuck in the airflow passage. | - Make sure the appliance is switched off. Clean the nozzle according to the user manual and check the tube by removing the tube from the main appliance. Remove the object in the nozzle, tube, or handheld and restart the appliance.- If you have checked the above and the appliance still does not charge, take it to a Philips service center or contact the Consumer Care Center. |
UI screen Possible cause Solution
 | The display shows i6 (seen from upside down with the battery icon under i6).The adapter is not removed. | Remove the adapter before operating the appliance. |
 | The display shows i7 (seen from upside down with the battery icon under i7).A wrong adapter is used. | Make sure that you use the adapter supplied. |
 | The display shows i8.Foreign object is interrupting the airflow passage. | Make sure the appliance is switched off.Clean the nozzle as instructed in the user manual.Disconnect the tube from the main appliance and check for obstructions.Remove any objects from the nozzle, tube, or handheld. Restart the appliance. |
| The display shows i8.The filter and the cyclone are dirty. | Empty the dust bucket. Clean the filter and the cyclone. Make sure the filter is washed at least once a month, when using the appliance regularly. Make sure hair and dirt stuck in the cyclone are removed. | |
| The display shows i8.The filter is old. | - You can buy new filters (XV1681/01) in the online Philips shop atwww.philips.com/supportor at your Philips dealer.- If you have checked the above and the appliance still shows the error, take it to a Philips service center or contact the Consumer Care Center. | |
| The filter is not present in the appliance. | Make sure that the filter is in the appliance and assembled correctly. |
Troubleshooting
This chapter summarizes the most common problems you could encounter with the appliance. If you are unable to solve the problem with the information
below, visit www.philips.com/support for a list of frequently asked questions or contact the Consumer Care Center in your country.
Dry cleaning
Problem Possible cause Solution
| The appliance does not respond when the on/off button is pushed. | The display shows the battery empty icon. | To charge the battery, connect the appliance to the charging station or attach the handheld vacuum cleaner directly to the power plug of the adapter. |
| The charging station is not stable on the wall. | The screws holding the charging station are loose. | Tighten the screws. |
| The screws are not the right size. | Mount the charging station with the supplied screws. | |
| The charging station is not attached to a stable wall. | Check that the wall on which the charging station will be mounted is stable. | |
| The appliance suddenly stops working. | When the appliance has an internal malfunction, the buttons will not respond and the screen will remain blank. | Connect the appliance to the charging station or attach the handheld vacuum cleaner directly to the adapter. Check the display. If an error code appears, you can find its meaning in the user manual. |
| (code: E2, E3) The appliance is not working at a suitable temperature. | Make sure the appliance is used at a temperature of 5-40 °C. | |
| (code: i4, i5) The brush is stuck or objects are stuck in the air flow channel. | Make sure the appliance is switched off. Clean the nozzle according to the user manual and check the tube by removing the tube from the main appliance. Remove the object in the nozzle or tube and restart the appliance. | |
| (code: E9) The TriActive Smart LED Nozzle is overheated. | Switch off the appliance and wait 15 minutes. Touch the upper housing of the nozzle to feel if it is still warm. If the nozzle is still warm, wait longer for the nozzle to cool down. Once the nozzle has cooled down, try switching the appliance back on. | |
| The appliance has a lower suction power than usual. | The filter and the cyclone are dirty. | Empty the dust bucket. Clean the filter and the cyclone. Make sure the filter is washed at least once a month, when using the appliance regularly. Make sure hair and dirt stuck in the cyclone are removed. |
| The dust container is not attached properly to the appliance. | Make sure the dust container is attached properly. | |
| Dust escapes from the appliance. | The filter is dirty. Clean the filter. See also the user manual. | |
Problem Possible cause Solution
| The filter is not present in the appliance. | Make sure that the filter is in the appliance and assembled correctly. | |
| Something is blocking the cyclone. | Check the cyclone for stuck objects and remove any object blocking the cyclone. Also ensure all hair and dirt stuck in the cyclone are removed. | |
| The dust container is not properly attached to the appliance. | Empty the dust container and attach the dust container correctly to the appliance. | |
| The appliance is rotated or flipped when the power is off. | Keep the appliance upright when the power is off. | |
| The appliance does not move smoothly across the floor when cleaning a carpet. | The floor type recognition function is not on. | Switch on the floor type recognition function in the digital menu. |
| The selected suction power has been too high. | Decrease the suction power. See also the user manual. | |
| The brush does not turn anymore. | The brush is clogged with hair or dirt. | Clean the brush by hand or with a pair of scissors. |
| (code i4) The brush may stop turning when it encounters too much resistance from a high-pile carpet. | Switch off the appliance and then switch it back on again. | |
| The brush has not been assembled properly into the nozzle after cleaning. | Follow the instructions in the cleaning chapter of the user manual to slide the brush into the nozzle properly. Secure the brush inside the nozzle by snapping the locking lever in place. | |
| (code: E9) The TriActive Smart LED Nozzle is overheated. | Switch off the appliance and wait 15 minutes. Touch the upper housing of the nozzle to feel if it is still warm. If the nozzle is still warm, wait longer for the nozzle to cool down. Once the nozzle has cooled down, try switching the appliance back on. | |
| The LEDs in the nozzle do not come on. | The nozzle has not been attached to the tube or appliance properly. | Attach the nozzle to the appliance or handheld properly. |
| The appliance is not charging. | The power plug is not connected properly to the appliance or the adapter is not inserted into the wall socket properly. | Make sure that the power plug is connected properly to the appliance and that the adapter is inserted into the wall socket properly. |
Problem Possible cause Solution
| The power plug is not placed properly in the charging station. | Make sure the plug is fixed properly in the charging station. Check if the plug is angled and the charging station is holding the plug in place. | |
| (code i7) An adapter other than the supplied adapter is being used. | Make sure that you use the adapter supplied. | |
| (code E5) The battery malfunctions. | The battery has failed. Replace the battery. | |
| If you have checked the above and the appliance still does not charge, take it to a Philips service center or contact the Consumer Care Center. | ||
| The appliance is charging very slow. | An external adapter or an adapter from other appliances is used. | Charge the appliance with the supplied adapter. |
| The battery is charged and attached, but the appliance cannot be switched on. | The appliance is still connected to the adapter. | Remove the appliance from the adapter before restarting it. |
| (code: E1) Something is wrong with the appliance. | Remove the battery, wait 10 seconds, and then put the battery back. If this does not work, please take the appliance to a Philips service center or contact the Consumer Care Center. | |
| The display shows the Maintenance Reminder icon (code: i8). | A foreign object is stuck in the airflow passage. | Clean and remove potential pollution inside the nozzle, tube, or handheld. |
| The filter is dirty. Clean the filter. Follow the instructions on the screen or in the users manual. | ||
| The filter is old. - You can buy new filters in the online Philips shop at www.philips.com/support or at your Philips dealer.- If you have checked the above and the appliance still shows the error, take it to a Philips service center or contact the Consumer Care Center. | ||
| The pet nozzle does not function properly. | The brush is blocked. Remove hairs from the brush with a pair of scissors. Follow the instructions in the user manual. | |
| The brush is blocked by fabric or surfaces during cleaning. | Keep the pet nozzle aligned with the surface and do not push the nozzle into soft surfaces. | |
Problem Possible cause Solution
| The brush is not properly inserted into the pet nozzle. | Make sure that brush and the pet nozzle are properly connected and that there is no gap between the parts. Follow the instructions in the manual. | |
| The suction power does not feel stable. | This could be caused by the activation of the "Floor Type Recognition" feature. Your appliance is detecting the floor type and cleaning with an optimized performance for that floor. | If you prefer to clean with a consistent power of your choice, disable this smart feature by turning the appliance on and then off. Immediately after turning it off, while the display is still lit, press and hold the "+" button for 4 seconds (see 'Floor Type Recognition customization'). |
| The Floor Type Recognition is not reacting logically. | The brush is clogged with hair or dirt. | Clean the brush with a pair of scissors or by hand. See the instructions in the user manual. |
| The appliance delivers static shocks. | The appliance builds up static electricity. The lower the air humidity, the more state electricity is build up. | Discharge the appliance by frequently holding the tube against other metal objects in the room (for example the legs of a table or chair, etc.). Or raise the air humidity level in the room. |
| The dust and dirt that is vacuumed up is static. | Empty the dust container and clean the filter according to the instructions in the user manual. |
Wet cleaning
Problem Possible cause Solution
| The water flow from the water tank is reduced. | The wetting strip is blocked by dirt. | Remove the wetting strip and clean it. Place the clean wetting strip back. |
| The microfiber mopping pad is not placed correctly and blocks the wetting strip as a result. | Make sure that you place the mopping pad correctly. Check the user manual for proper placement. | |
| The water tank is empty or nearly empty. | Refill the water tank. | |
| A microfiber mopping pad is used that is not supplied by Philips. | Only use an original Philips microfiber mopping pad. The mopping pads can be bought in the online Philips shop at www.philips.com/support or at your Philips dealer. | |
| Lime scale has build up in the wetting strip. | Buy a new wetting strip in the online Philips shop at www.philips.com/support or at your Philips dealer. | |
| Too much water flows out of the water tank at a too high speed. | The water tank cap is not attached properly. | Check the cap and make sure it is fully and properly closed. |
Problem Possible cause Solution
| The strip is not placed properly in the bottom of the water tank. | Check the strip and make sure that it is fitted properly in the bottom plate of the water tank. | |
| The floor dries with stripes. Too much liquid cleaner has been added to the water. | Use only a few drops of liquid cleaner or use a cleaner that foams less. | |
| The microfiber mopping pad is not placed correctly. | Make sure that the mopping pad is placed correctly. Check the user manual for proper placement. | |
| An incorrect mopping pad is used. | Only use Philips XV1670/02 microfiber mopping pad. The mopping pads can be bought in the online Philips shop at www.philips.com/support or at your Philips dealer. | |
Contents
Introduction 37
Using the handle
1 Turn off the device.

Water tank maintenance
Water strip maintenance
XV1681/01
Brush CRP1020

CRP1020
Microfiber mopping cloth XV1670/02
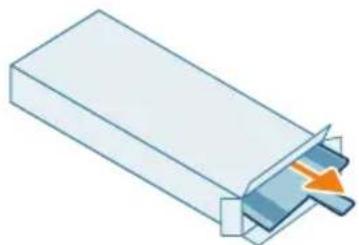
XV1670/02
Water strip CP0381/01

CP0381/01
XV1797
XV1684
PHILIPS and the Philips Shield Emblem are registered trademarks of Koninklijke Philips N.V. and are used under license.
This product has been manufactured by and is sold under the responsibility of Versuni Holding B.V., and Versuni Holding B.V. is the warrantor in relation to this product.
(02/2025)
- CONTENTS
- INTRODUCTION
- GENERAL DESCRIPTION
- DISPLAY OVERVIEW
- BEFORE FIRST USE
- INSTALLING THE WALL MOUNT
- PREPARING FOR USE
- USING THE APPLIANCE
- ASSEMBLING THE APPLIANCE
- VACUUMING SOFT AND HARD FLOORS
- VACUUMING WHILE MOPPING HARD FLOORS
- TIPS AND OTHER IMPORTANT INFORMATION
- USAGE RESTRICTIONS
- VERSATILE USAGE AND ACCESSORIES
- USING THE HANDHELD
- USING THE NOZZLE
- USING THE PET NOZZLE
- USING THE CREVICE TOOL
- USING THE SOFT BRUSH
- USING THE UPHOLSTERY TOOL
- CUSTOMIZATION AND NOTIFICATIONS ON DISPLAY
- FLOOR TYPE RECOGNITION CUSTOMIZATION
- ENABLE OR DISABLE FLOOR TYPE RECOGNITION
- MAINTENANCE REMINDER NOTIFICATIONS
- SEVERE BLOCKAGE NOTIFICATIONS
- AFTER USE – MAINTENANCE
- FREQUENT MAINTENANCE AFTER EACH CLEANING CYCLE
- DUST MANAGEMENT SYSTEM MAINTENANCE
- AQUA TANK MAINTENANCE
- PERIODIC MAINTENANCE INTERMITTENTLY
- TRIACTIVE SMART LED NOZZLE MAINTENANCE
- PET NOZZLE MAINTENANCE
- WATER STRIP MAINTENANCE
- REPLACEMENT
- USER INTERFACE SIGNALS
- UI SCREEN POSSIBLE CAUSE SOLUTION
- TROUBLESHOOTING
- DRY CLEANING
- WET CLEANING
- USING THE HANDLE
- WATER TANK MAINTENANCE
Brand : PHILIPS
Model : 6000 Series XC6553
Category : Vacuum Cleaner