
eltimo 020 Astro top3 - Switch THEBEN - Free user manual and instructions
Find the device manual for free eltimo 020 Astro top3 THEBEN in PDF.


| Product Type | Astronomic Timer Switch |
| Brand | Theben |
| Model | eltimo 020 Astro top3 |
| Category | Switch |
| Dimensions (H x W x D) | 82 x 82 x 42 mm |
| Weight | Approx. 100 g |
| Power Supply | 230 V AC, 50/60 Hz |
| Switching Capacity | 10 A (resistive load) |
| Main Functions | Astronomic timer, manual override, ON/OFF switching |
| Astronomic Feature | Automatic sunrise/sunset calculation |
| Programmable | Yes, via front buttons |
| Display | Backlit LCD |
| Degree of Protection | IP20 |
| Operating Temperature | -10°C to +50°C |
| Mounting | Flush mounting (standard 60 mm box) |
| Wiring | Single-pole, neutral required |
| Maintenance | Wipe with dry cloth; do not use solvents |
| Safety | Installation by qualified electrician only |
| Spare Parts | Not available; replace unit if faulty |
| General Information | Compliant with CE standards |
Frequently Asked Questions - eltimo 020 Astro top3 THEBEN
User questions about eltimo 020 Astro top3 THEBEN
0 question about this device. Answer the ones you know or ask your own.
Ask a new question about this device
Download the instructions for your Switch in PDF format for free! Find your manual eltimo 020 Astro top3 - THEBEN and take your electronic device back in hand. On this page are published all the documents necessary for the use of your device. eltimo 020 Astro top3 by THEBEN.
USER MANUAL eltimo 020 Astro top3 THEBEN
To rule out the risk of electrical shock or fire, protect the time switch from moisture and heat!

Prior to start-up and using the product, read and observe all the operating instructions.
Use a single mains socket (230 V\~, 50 Hz, earthed) for the power supply.
not plug time switches into each other.
- The time switches conform to EN 60669-2-1 if correctly installed and type 1 BSTU in accordance with IEC/EN 60730-2-7.
- Power reserve (6 years) is reduced when Bluetooth OBELISK top3 is connected (in battery mode).
2. Proper use
- This digital plug-in astro time switch with weekly program is suitable for indoor use (floor lamp, aquarium, Christmas lights, etc.)
- Astronomical switch function (automatic calculation of sunrise/sunset times for the whole year)
- Interface for Bluetooth OBELISK top3 (+ app)
- For earthed sockets (plug type F)
- Only use in dry, enclosed rooms
Do not use on safety devices, e.g. escape route doors, fire safety equipment, etc.
3. Installation and connection
Plug the time switch into a 230 V earthed wall socket and plug the selected device into the socket (F) on the time switch.
4. Device description
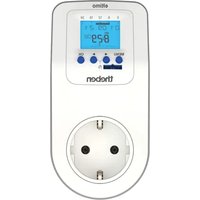
Digital plug-in time switch

① Display with date, time, week days, astro ( ) etc.
②4 buttons to operate the device
③Interface for OBELISK top3 memory card (9070130)
④Socket F (and plug on the rear)
Display and buttons


Operating instructions
- Read text line text/symbol represents query

- Make a decision

YES Confirmation
Press OK
NO Modify/ Change

Overview of menu selection
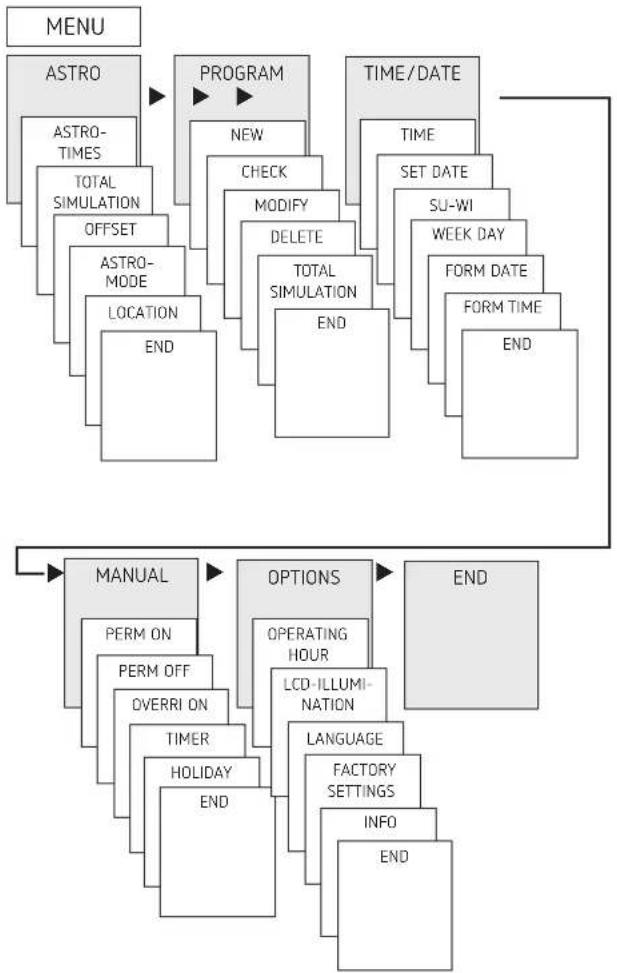
flowchart
graph TD
    A["MENU"] --> B["ASTRO"]
    B --> C["PROGRAM"]
    C --> D["TIME/DATE"]
    D --> E["TIME"]
    E --> F["SET DATE"]
    F --> G["SU-WI"]
    G --> H["WEEK DAY"]
    H --> I["FORM DATE"]
    I --> J["FORM TIME"]
    J --> K["END"]

    L["MANUAL"] --> M["OPTIONS"]
    M --> N["OPERATING HOUR"]
    N --> O["LCD-ILLUMINATION"]
    O --> P["LANGUAGE"]
    P --> Q["FACTORY SETTINGS"]
    Q --> R["INFO"]
    R --> S["END"]

    T["ASTRO-TIMES"] --> U["TOTAL SIMULATION"]
    U --> V["OFFSET"]
    V --> W["ASTRO-MODE"]
    W --> X["LOCATION"]
    X --> Y["END"]

    Z["MANUAL"] --> AA["PERM ON"]
    AA --> AB["PERM OFF"]
    AB --> AC["DVERRI ON"]
    AC --> AD["TIMER"]
    AD --> AE["HOLIDAY"]
    AE --> AF["END"]

    AG["PROGRAM"] --> AH["NEW"]
    AH --> AI["CHECK"]
    AI --> AJ["MODIFY"]
    AJ --> AK["DELETE"]
    AK --> AL["TOTAL SIMULATION"]
    AL --> AM["END"]

    AN["TIME/DATE"] --> AO["TIME"]
Initial start-up

flowchart
graph TD
    A["MENU"] --> B["GERMAN"]
    B --> C["ENGLISH"]
    B --> D["ITALIANO"]
    B --> E["NEDERLANDS"]
    C --> F["RETAIN PROGRAMS"]
    D --> F
    E --> F
    F --> G["DELETE PROGRAM"]
    G --> H["COUNTRY"]
    H --> I["COORDINATES"]
    I --> J["FORM DATE"]
    J --> K["YEAR"]
    K --> L["MONTH"]
    L --> M["DAY"]
    M --> N["FORM TIME"]
    N --> O["HOUR"]
    O --> P["MINUTE"]
    P --> Q["SUM-WI EUROPE"]
    Q --> R["9:40th"]
Set language, country, town/city, date, time as well as summer/winter time (SO-WI).
➢ Press any button and follow on-screen instructions (see figure).
5. Settings and functions
ASTRO menu
In the ASTRO menu astro times, complete simulation, offset, astromode as well as position (location) can be viewed or changed.
- Astro times
Display of the astro times (including the offsets) for the current day
• Total simulation
Display of the switching behaviour with a freely selectable Start date (the holiday program is not displayed)
- Offset
The offset (adjustment value) can be used to shift calculated astro times +/-120 min. This enables the Astro switch-on and switch-off times to be adapted to local circumstances (e.g. mountains, high buildings etc.) or to personal requirements.
- Astro mode
- Evenings on, mornings off Switches: on at sunset, switches off at sunset (Example: street lighting)
- Evenings off, mornings on Switches off: at sunset, switches on at sunrise (Example: terrarium).
- Astro inactive: The astro times are ineffective (timer function only).
- Position
- Location set by selecting a city or by coordinates (latitude/longitude, time zone). The Bluetooth OBE-LISK top3 allows up to 10 further cities (= favourites) to be entered.
Change astro time/position
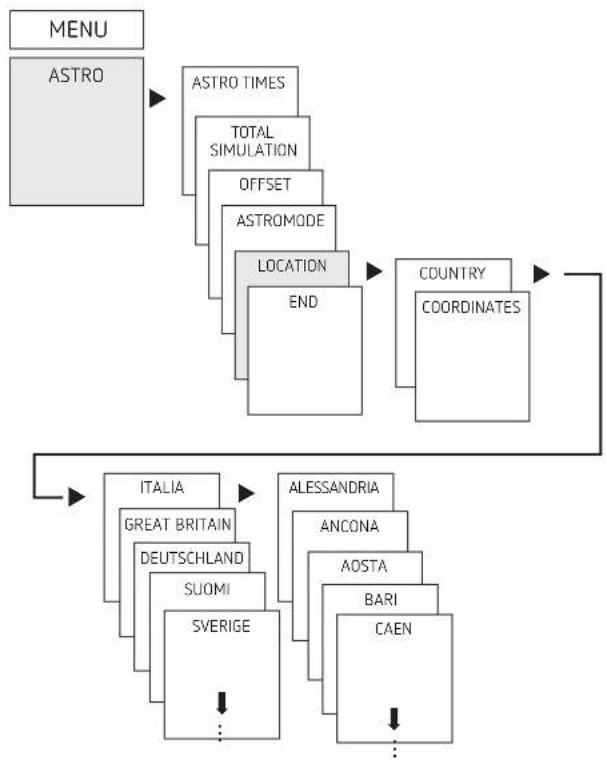
flowchart
graph TD
    A["MENU"] --> B["ASTRO"]
    B --> C["ASTRO TIMES"]
    C --> D["TOTAL SIMULATION"]
    D --> E["OFFSET"]
    E --> F["ASTROMODE"]
    F --> G["LOCATION"]
    G --> H["END"]
    H --> I["COUNTRY COORDINATES"]
    I --> J["ITALIA"]
    J --> K["GREAT BRITAIN"]
    K --> L["DEUTSCHLAND"]
    L --> M["SUOMI"]
    M --> N["SVERIGE"]
    N --> O["..."]
    I --> P["ALESSANDRIA"]
    P --> Q["ANCONA"]
    Q --> R["AOSTA"]
    R --> S["BARI"]
    S --> T["CAEN"]
E.g. enter a different country, a different town/city
▶ Press MENU (see picture).
Setting the offset function

flowchart
graph TD
    A["MENU"] --> B["ASTRO"]
    B --> C["ASTRO TIMES"]
    C --> D["TOTAL SIMULATION"]
    D --> E["OFFSET ASTROMODE"]
    E --> F["..."]
    F --> G["OFFSET MORNING 00:00"]
    G --> H["OFFSET EVENING 00:00"]
    H --> I["OFFSET EVENING 00:00"]
▶ Press MENU.
▶ Select ASTRO and press OK to confirm.
▶ Select OFFSET and press OK to confirm.
▶ Select OFFSET MORNING or OFFSET EVENING and press OK to confirm.
▶ Set the time and press OK to confirm.
Set fixed switching time

flowchart
graph TD
    A["PROGRAM"] --> B["NEW CHECK"]
    B --> C["MODIFY DELETE"]
    C --> D["TOTAL-SIMULATION END"]
    D --> E["MEM FREE 56 NIGHT BREAK or LIGHT ON"]
    E --> F["HOUR MINDUARY"]
    F --> G["MONDAY DURATION UNTIL"]
    G --> H["START"]
    H --> I["SAVE SWITCHING TIME FOR ONE DAY"]
    I --> J["COPY ADD TUESDAY SAVE"]
    J --> K["Copy switching to other days of the week. The day of the week always relates to a start time"]
① A switching time always consists of a start time and an end time (LASTS UNTIL). e.g. night switch-off on Monday 23:00 – 05:00 hrs.
① There are 56 memory cells available.
▶ Press MENU.
▶ Select PROGRAM and press OK to confirm.
▶ Select NEW and press OK to confirm.
▶ Select NIGHT SWITCH OFF or DAY SWITCH ON and press OK to confirm.
➢ Set selected switching times (hours, minutes, day) and press OK to confirm.
▶ Select COPY or SAVE.
▶ To save press ▶ and press OK to confirm.
To copy press OK.
Setting summer/winter time

flowchart
graph TD
    A["MENU"] --> B["TIME/DATE"]
    B --> C["TIME"]
    C --> D["SET DATE"]
    D --> E["SU-WI"]
    E --> F["WEEK DAY"]
    F --> G["..."]
    G --> H["SU-WI EUROPE"]
    H --> I["SU-WI GB/IRL/P"]
    I --> J["SU-WI FIN/GR/TR"]
    J --> K["..."]
▶ Press MENU.
▶ Select TIME/DAT and press OK to confirm.
▶ Select SO-WI and press OK to confirm.
▶ Select region for the SO-WI time and press OK to confirm.
Switch Permanent ON / OFF

flowchart
graph TD
    A["MENU"] --> B["MANUAL"]
    B --> C["PERM ON"]
    C --> D["PERM OFF"]
    D --> E["OVERRI ON"]
    E --> F["TIMER"]
    F --> G["HOLIDAY"]
    G --> H["END"]
▶ Press MENU.
▶ Select MANUAL and press OK to confirm.
▶ Select PERM ON or PERM OFF and press OK to confirm.
Setting holiday function

flowchart
graph TD
    A["MENU"] --> B["MANUAL"]
    B --> C["PERM ON"]
    C --> D["PERM OFF"]
    D --> E["OVERN ON"]
    E --> F["TIMER"]
    F --> G["HOLIDAY"]
    G --> H["END"]
    H --> I["ON"]
    I --> J["BEGIN HOLIDAY"]
    J --> K["..."]
    K --> L["END HOLIDAY"]
    L --> M["..."]
▶ Press MENU.
▶ Select MANUAL and press OK to confirm.
▶ Select HOLIDAY and press OK to confirm.
▶ Select ON and press OK to confirm.
▶ Select START HOLIDAY and press OK to confirm.
Enter YEAR, MONTH, DAY, HOUR and press OK to confirm.
▶ Select END HOLIDAY and press OK to confirm.
▶ Enter YEAR, MONTH, DAY, HOUR and press OK to confirm.
Setting manual or permanent switching
Manual or permanent switching can be set via the menu in MANUAL or (in the automatic screen) by button combination (see picture).
- Manual control: Reversing the channel status to the next automatic or programmed switching.
- Permanent switching: As long as a permanent switching (on or off) is activated, the programmed switching times are ineffective
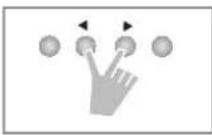
Activating manual control
▶ Briefly press both buttons simultaneously.
Activating permanent switching
▶ Press both buttons simultaneously for 2 seconds.
Cancelling manual/permanent switching
▶ Press both buttons simultaneously.
Hour counter
The operating hours of the channel (relay) are displayed and deleted in the OPTIONS menu. If the number of operating hours exceeds the value set in the Service menu, SERVICE will appear in the display.
Example: Replace a lamp after after 5,000 h.
➢ Delete operating hours or set a higher value in Service (e.g. to 10,000 h)
Using Bluetooth OBELISK top3
All functions can also be transferred to the time switch using the Bluetooth OBELISK top3 memory card (9070130).

Copying OBELISK → TIME SWITCH
This copies the switching program and optionally all time switch settings (e.g. time format etc.) from the memory card in the time switch.
Copying TIME SWITCH → OBELISK
This copies all switch programmes and settings from the time switch to the memory card.
Starting OBELISK program
Takes on the switching times that are programmed on the memory card.
As soon as the memory card is removed, the switching times of the time switch are re-activated.

flowchart
graph TD
    A["OBLISK"] --> B["BLUETOOTH"]
    B --> C["COPY OBELISK --> TSWI"]
    C --> D["COPY TSWI --> OBLISK"]
    D --> E["OVERWRITE OK"]
    E --> F["RUN OBELISK"]
    F --> G["CHECK OBELISK"]
    G --> H["END"]
    C --> I["COPY ALL DATA"]
    I --> J["COPY PROGRAM"]
    J --> K["END"]
Connecting the plug-in time switch, OBELISK top3 Bluetooth and smartphone (via app)
The devices in the top3 range can be programmed using an app (for Android, iOS) on a mobile end device. Communication takes place via Bluetooth OBELISK top3. Switch programmes are transferred and direct switch commands are sent to the device.
To use the app, you need the OBELISK top3 memory card/dongle.
Download the OBELISK top3 app from the App Store or Google Play Store


Open the app and activate using one of the 3 commands, by pressing "Download", "Manual command" or "Upload"
→ Device/device list appears on the display.


▶ Press „Connect”.
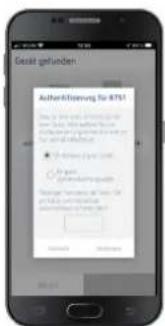
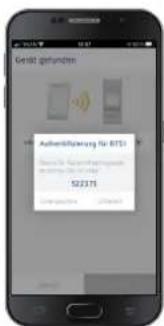
▶ Press OK on the timer.
→ The display shows BLUETOOTH ACTIVE.
▶ Press „Close“ in the app within 30 s.


Now, for example, projects can be created and uploaded.

Resetting the time switch
▶ Press the 4 buttons simultaneously.
→ You can choose between KEEP PROGRAM and DELETE PROGRAM.
6. Technical data
| Operating voltage: 230 V AC, +10 % / -15 % | |
| Frequency: | 50 Hz |
| Standby: | 0,9 W |
| Max switching capacity: | 16 A (at 250 V, cos φ = 1) |
| Switching capacity: | 10 A (at 250 V, cos φ = 0,6) |
| Min. switching capacity: | 10 mA/230 V AC |
| Shortest switching time: | 1 min |
| Switching accuracy: | accurate to the second |
| Protection rating: | IP 20 in accordance with EN 60529 |
| Protection class: | II (housing), I (plug system) in accordance with EN 60730-1 |
| Mode of operation: | type 1 BSTU |
| Operating temperature: | -10 °C ... +40 °C |
| Power reserve: | 6 years at +20 °C (without Blue-tooth OBELISK top3) |
| Time accuracy (typical): | ± 0,25 s/day (25 °C) |
| Glow lamp load: | 2600 W |
| Halogen lamp load: | 2600 W |
| Fluorescent lamp load:uncorrected, series corrected:parallel-corrected: | 2600 VA600 VA (72 μF) |
| Compact fluorescent tubes (EVG): | 1100 W |
| Resistive switching load: | 3680 W |
| LED lamps (< 2 W): | 30 W |
| LED lamps (> 2 W): | 300 W |
| Rated impulse withstand voltage: | 2,5 kV |
| Pollution degree: | 2 |
| Software class: | A |
| Bluetooth OBELISK top3: | |
| - Protection rating: | IP 40 |
| - Temperature: | -30 °C to +55 °C |
| - Range: | 15 m on open air test site |
① The time switch display is only fully functional at temperatures from +5 °C ... +40 °C.
Cleaning and service
▶ Only use a dry, soft cloth to clean the device surface.
▶ Do not use any cleaning agents or solvents.
Disposal
▶ Dispose of device in environmentally sound manner (electronic waste).
Dimensional drawings

7. Contact
Theben AG
Hohenbergstr. 32
72401 Haigerloch
GERMANY
Tel. +49 7474 692-0
Fax +49 7474 692-150
Hotline
Tel. +49 7474 692-369
hotline@theben.de
Addresses, telephone numbers etc.
www.theben.de


- Proper use
- Installation and connection
- Device description
- Digital plug-in time switch
- Display and buttons
- Operating instructions
- Settings and functions
- ASTRO menu
- Switch Permanent ON / OFF
- Setting holiday function
- Setting manual or permanent switching
- Activating manual control
- Activating permanent switching
- Cancelling manual/permanent switching
- Hour counter
- Using Bluetooth OBELISK top3
- Copying OBELISK → TIME SWITCH
- Copying TIME SWITCH → OBELISK
- Starting OBELISK program
- Connecting the plug-in time switch, OBELISK top3 Bluetooth and smartphone (via app)
- Resetting the time switch
- Technical data
- Cleaning and service
- Disposal
- Dimensional drawings
- Contact
Brand : THEBEN
Model : eltimo 020 Astro top3
Category : Switch