
Mic - Microphone DJI - Free user manual and instructions
Find the device manual for free Mic DJI in PDF.


| Product Type | Wireless Microphone System |
| Brand | DJI |
| Model | Mic |
| Category | Microphone |
| Transmitter Dimensions | 46 x 20 x 14 mm (approx.) |
| Receiver Dimensions | 46 x 20 x 14 mm (approx.) |
| Charging Case Dimensions | 110 x 60 x 45 mm (approx.) |
| Transmitter Weight | 30 g (approx.) |
| Receiver Weight | 30 g (approx.) |
| Charging Case Weight | 150 g (approx.) |
| Power Source | Built-in rechargeable battery, USB-C charging |
| Battery Life (Transmitter) | Up to 5 hours |
| Battery Life (Receiver) | Up to 5 hours |
| Charging Case Battery | Provides 2 additional charges |
| Wireless Range | Up to 250 m (line of sight) |
| Audio Transmission | 2.4 GHz digital wireless |
| Microphone Type | Built-in omnidirectional condenser |
| Frequency Response | 50 Hz - 20 kHz |
| Max SPL | 120 dB SPL |
| Main Functions | Wireless audio recording, noise cancellation, automatic pairing, recording backup |
| Care and Cleaning | Wipe with a soft, dry cloth. Do not use liquids. |
| Safety | Avoid exposure to water or extreme temperatures. Keep away from children. |
| Spare Parts & Repairability | Spare parts available through DJI official service centers. Repairs should be done by authorized personnel. |
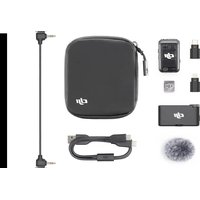
| General Information | Professional wireless microphone system for content creators. Includes transmitter, receiver, charging case, windscreens. |
Frequently Asked Questions - Mic DJI
User questions about Mic DJI
0 question about this device. Answer the ones you know or ask your own.
Ask a new question about this device
Download the instructions for your Microphone in PDF format for free! Find your manual Mic - DJI and take your electronic device back in hand. On this page are published all the documents necessary for the use of your device. Mic by DJI.
USER MANUAL Mic DJI

This document is copyrighted by DJI with all rights reserved. Unless otherwise authorized by DJI, you are not eligible to use or allow others to use the document or any part of the document by reproducing, transferring, or selling the document. Users should only refer to this document and the content thereof as instructions to operate DJI products. The document should not be used for other purposes.

Searching for Keywords
Search for keywords such as Battery or Install to find a topic. If you are using Adobe Acrobat Reader to read this document, press Ctrl+F on Windows or Command+F on Mac to begin a search.

Navigating to a Topic
View a complete list of topics in the table of contents. Click on a topic to navigate to that section.

Printing this Document
This document supports high resolution printing.
Using this Manual
Legends
⚠️ Important Hints and Tips

Read Before Use
Read the following documents before using DJI™ Mic 2.
- Safety Guidelines
- Quick Start Guide
- User Manual
It is recommended to watch all tutorial videos and read the safety guidelines before using for the first time. Make sure to review the Quick Start Guide before using for the first time and refer to this User Manual for more information.
Contents
Using this Manual 3
Legends 3
Read Before Use 3
Contents 4
Introduction 5
DJI Mic 2 Transmitter 5 Overview 5
LED Information 6
DJI Mic 2 Receiver 8
DJI Mic 2 Charging Case 9
Operation 10
Placing a Transmitter 10
Linking the Transmitter and Receiver 11
Using with a Camera 13
Using with a Mobile Device 14
Using with a Computer 15
Receiver Touchscreen Operation 16
Home Screen 16
Swipe Down-Control Menu 18
Swipe Up-Control the Transmitters 21
Connecting a Transmitter to a Bluetooth Device 22
Standalone Recording for Transmitters 23
Maintenance 24
Charging the Battery 24
Charging with the DJI Mic 2 Charging Case 24
Charging the Transmitters and Receiver 24
Storing DJI Mic 2 24
Updating Firmware 25
Accessories (Not Included) 26
DJI Lavalier Mic 26
Specifications 27
Introduction
DJI Mic 2 is a dual-channel wireless microphone system, including two transmitters and one receiver, which can record two sound sources simultaneously. Each transmitter has a built-in omnidirectional microphone, can be connected to DJI Osmo Pocket 3, mobile phones, and other devices via Bluetooth, and supports standalone recording and intelligent noise cancellation. The transmitter is equipped with a clip for portability and accommodates external microphones to meet off-camera recording needs while enhancing audio quality.
The receiver boasts an OLED touchscreen, on which users can view real-time volume levels, wireless signal strength, gain, recording modes, and more. By utilizing the expansion port, the receiver can be connected to a camera or mobile device to capture high-quality audio, or can be used as a microphone when connected to a computer. Additionally, an independent monitor port on the receiver allows for real-time audio adjustments. The charging case provided can charge the transmitters and receiver simultaneously and link them automatically.
DJI Mic 2 Transmitter
Overview

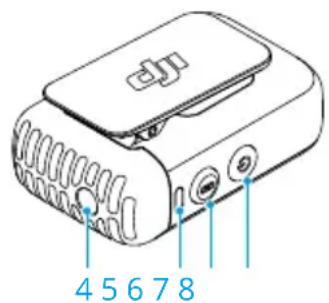

- Recording Status LED
Indicates the recording status of the transmitter.
- Data Port (USB-C)
For copying audio or updating firmware after connecting to a computer. Can also be used for charging.
- Record Button
Press once to start or stop recording in standalone recording mode.
Press and hold the button for three seconds to switch between DJI Mic 2 receiver or Bluetooth.
- 3.5 mm TRS Input
For connecting an external microphone. DO NOT connect a microphone with a power supply of 24 V or 48 V.
- System Status LED
Indicates the system status of the transmitter.
6. Linking Button
Press and hold for two seconds to start linking to the receiver or mobile device via Bluetooth. When connected to a mobile device, press once to take a photo or start or stop recording. Note that only mobile devices where the volume button can be used to take a photo or start and stop a video are supported.
7. Power Button
Press and hold for two seconds to power on or off. Press once to enable or disable noise reduction.
8. Charging Pad
Charging will begin when the charging pad of a transmitter connects to the charging pins of the DJI Mic 2 Charging Case.
LED Information

① Recording Status LED
| Blinking Pattern | Descriptions |
| Solid red | The transmitter is recording independently. |
| Pulses red The transmitter has been muted. | |
| Off The transmitter is not recording independently. | |
② System Status LED
Blinking Pattern Descriptions
Linking Status with DJI Mic 2 Receiver
| — | Solid green Linked with the receiver |
| ·Blinks green slowly Not linked with the receiver | |
| ·Blinks green quickly Linking | |
Linking Status via Bluetooth
| — | Solid blue Linked with a Bluetooth device |
| ·Blinks blue slowly No Bluetooth device linked | |
Blinks blue quickly Linking
Noise reduction
| Solid yellow Noise reduction is enabled when the transmitter is linked to the DJI Mic 2 receiver or other Bluetooth devices. |
| Blinks yellow Noise reduction is enabled when the transmitter is not linked to the DJI Mic 2 receiver or other Bluetooth devices. |
Battery Level Descriptions
| — | Solid red 0-10% |
Battery Level During Charging
| ... | Blinks green slowly 0-25% |
| ... | Blinks green twice 26-50% |
| ... | Blinks green three times 51-75% |
| ... | Blinks green four times 76-100% |
| Off | Fully charged |
Firmware Update
| Blinks red and green alternatively | Firmware updating |
DJI Mic 2 Receiver


1. Touchscreen
Displays information such as real-time volume levels, battery levels of the receiver and transmitters, charging status, wireless signal strength, gain, and recording modes. Swipe up or down on the screen to access settings. Refer to Receiver Touchscreen Operation for details.
2. Dial
When the receiver is on the home screen, press once then turn to adjust the transmitter or receiver gain. Swipe down from the top of the screen to enter the Control Menu. Select and confirm relevant settings by turning and pressing the dial.
3. Power Button
Press and hold to power on or off. Press once to lock or unlock the screen. When the receiver screen is not on the home screen, press the power button once to return to the home screen.
4. Monitor Port
Plug in 3.5 mm TRS headphones to monitor transmitter audio quality.
5. 3.5 mm TRS Output
For audio output.
6. Receiver Cold Shoe
For attaching the receiver to the cold shoe/hot shoe of a camera.
7. Data Port (USB-C)
After connecting to a computer, the data port can be used to update firmware or as a microphone for the computer when paired with the transmitter. The data port can also be used for charging.
8. Expansion Port
The receiver can be connected to a mobile device by inserting the mobile device adapter into the expansion port.
9. Charging Pad
Charging will begin when the charging pad of the receiver connects to the charging pins of the DJI Mic 2 Charging Case.
DJI Mic 2 Charging Case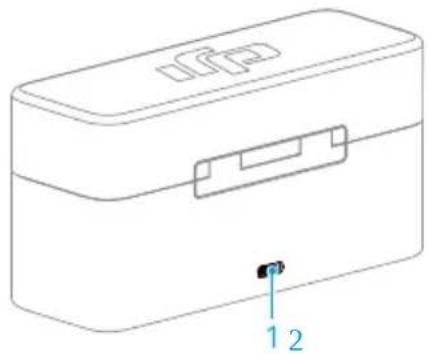

- Charging Port (USB-C)
For connecting to a USB-C charger.
- Battery Level LEDs
Indicates the battery level of the charging case. See the chart below for more details.

Indicates the battery level of the charging case.
LED is on
LED is flashing
LED is off
LED1 LED2 LED3 LED4 Battery Level During Charging (LEDs blink in sequence)


76~99%


51~75%


26~50%


≤25%


Fully charged (Power off)
LED1 LED2 LED3 LED4 Battery Level


76~100%


51~75%


26~50%


10~25%


<10%
Operation
Placing a Transmitter
A transmitter can be attached to clothing using the magnet, or set upright on a stable surface. The clip can also be used to attach a transmitter to clothes.
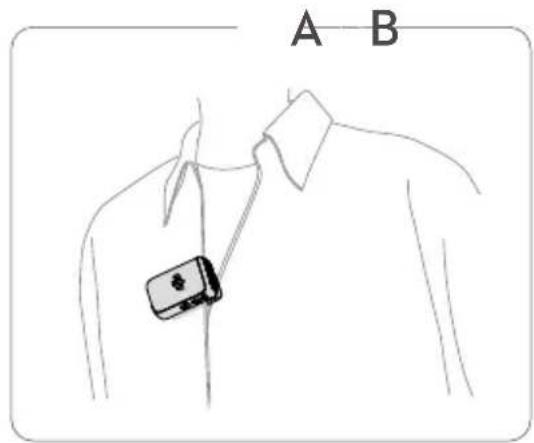
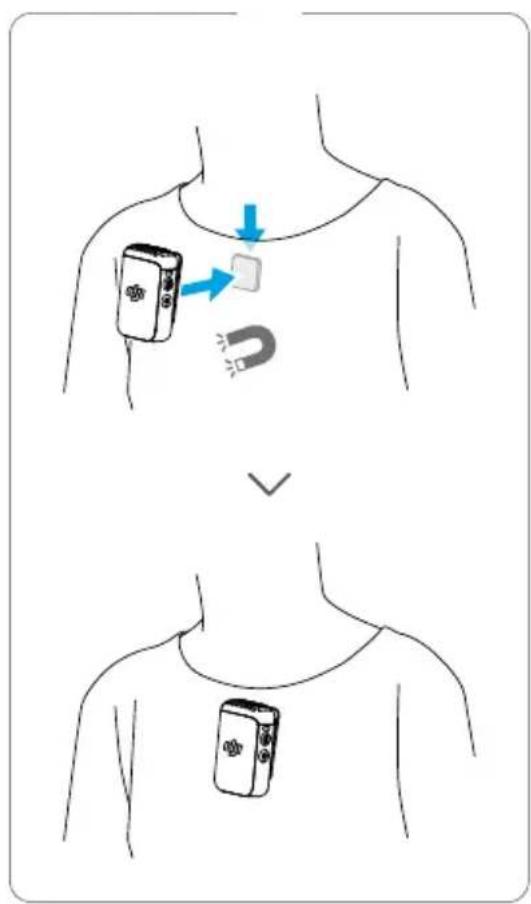

It is recommended to use the windscreen when using a transmitter outdoors or in a windy environment. Attach the windscreen to a transmitter by first aligning it with the internal microphone, then press down firmly on the windscreen to attach it.

Linking the Transmitter and Receiver
In the DJI Mic 2 (2 TX + 1 RX + Charging Case) combo and DJI Mic 2 (1 TX + 1 RX) combo, the transmitters and the receiver are linked by default. Follow the steps below to link the transmitters and receiver if they become unlinked. The transmitters and the receiver can be linked automatically by placing them in the charging case, or they can be linked manually.

- Before linking, make sure that the transmitter is in linking mode with the receiver. In this mode, the system status LED blinks green slowly. The transmitter is in Bluetooth linking mode when the system status LED of the transmitter blinks blue.
- Press and hold the record button for three seconds to switch between linking with the DJI Mic 2 receiver or Bluetooth.
![graph LR A["User Hand Click"] --> B["3s"] B --> C["Device Icon"] C --> D[">"] D --> E["TX Mode: Bluetooth ... Smartphone"] D --> F[">"] F --> G["TX Mode: RX Signal ... RX"]](/content/2026/06/1398328/images/6666f25d202f1ec343b558e1151b2ee8aeb4ac26bc520f6bab7f498f3501c83b.jpg)
Method 1: Link automatically in the charging case
Place the transmitters and the receiver in the charging case to link them automatically.

Method 2: Link manually
- When the system status LED on a transmitter blinks green slowly, press the linking button of the transmitter for two seconds, after which the transmitter will start to search for nearby receivers.
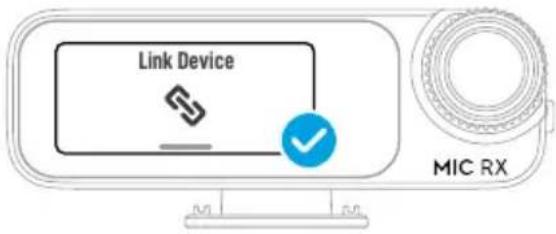
- Swipe down on the receiver screen, select Receiver Settings > Link Device, and tap Link to start linking. The transmitter is linked with the receiver when the system status LED is solid green. Users can view the status of the transmitter on the receiver interface.
Using with a Camera
To record and transmit audio to a camera, attach the receiver to a camera using the cold shoe on the receiver, then connect the receiver to the microphone port of the camera using the camera cable provided, as shown below.
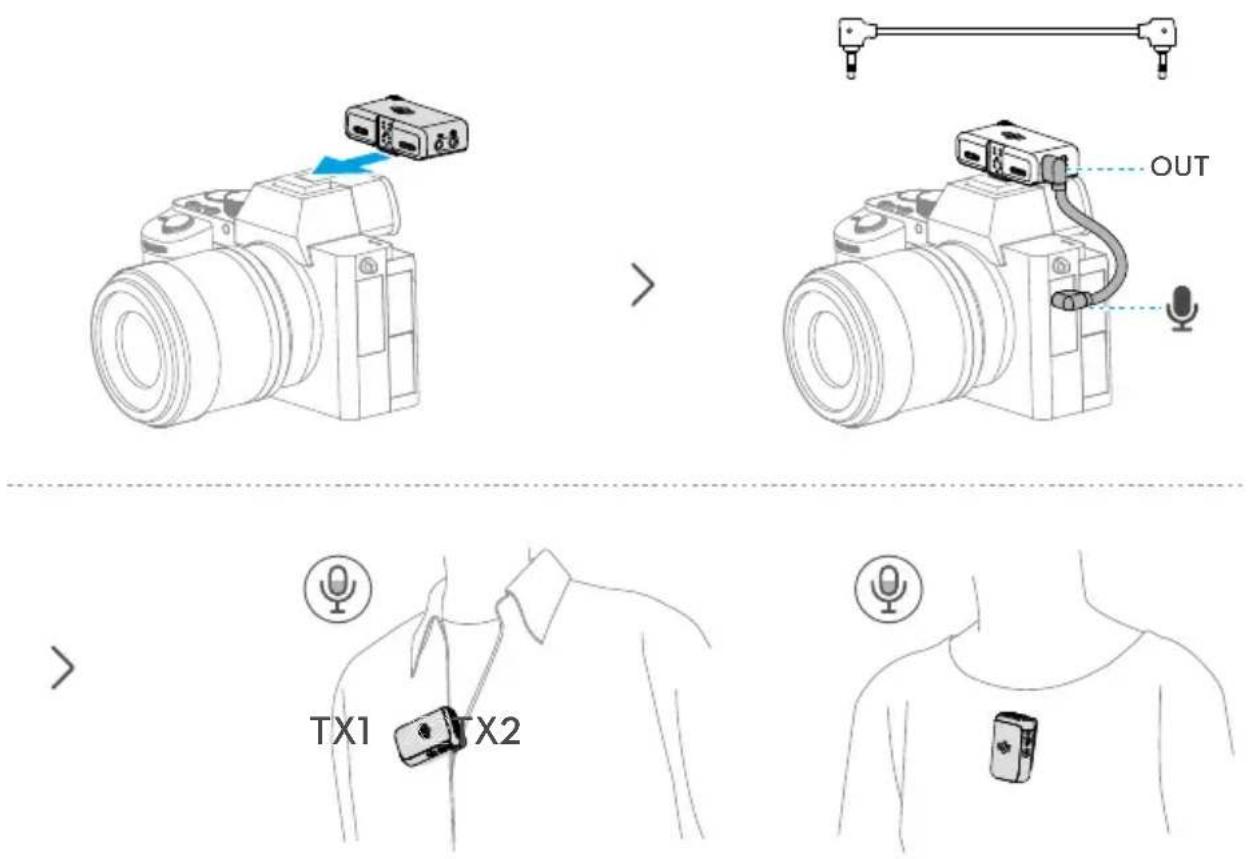

- When using the microphone with a camera, it is recommended to increase receiver gain and decrease camera gain for enhanced audio capture. Refer to the Instructions on Recommended Gain for Camera Setup for more information.
Using with a Mobile Device
Record and transmit audio to a mobile device by attaching the receiver to a mobile device using the mobile device adapter.
![graph LR A["Device with ports"] --> B["Insert port"] B --> C["OR operation"] C --> D["Package with USB port"] D --> E["Product with printer icon"]](/content/2026/06/1398328/images/014e452a72dcd3320b2f46103bebacd11d1ec2c46d5afa84bce6ec6e894ceca0.jpg)

Using with a Computer
Connect the receiver to a computer via the USB-C port in order to use the transmitter as a microphone.
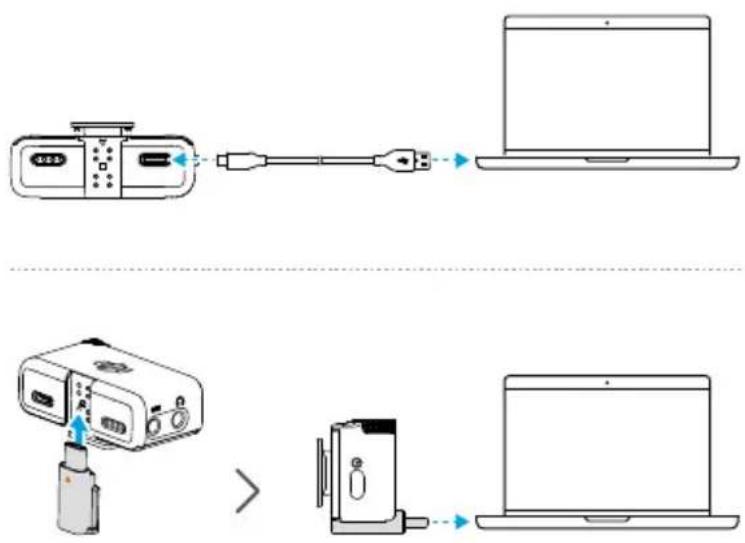
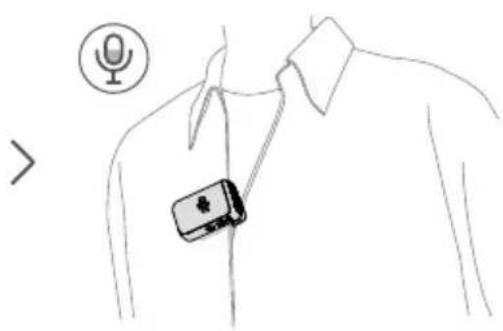

- Use a standard charging cable or the DJI Mic 2 Mobile Phone Adapter (Type-C) to connect DJI Mic 2 with a computer, and then enter the audio input settings for related settings.
- DO NOT use the receiver for data storage. Otherwise, the data may be lost.
Receiver Touchscreen Operation
The touchscreen displays information such as the real-time volume levels, battery levels of the receiver and transmitters, charging status, wireless signal strength, gain, and recording modes. The touchscreen display may vary when linked to different devices. This display is for reference only. The following is an example of the display when the receiver is linked to two transmitters at the same time.

Home Screen
The top part of the screen indicates the status of the receiver.
| S | Indicates the recording mode. Tap to select between S (Stereo), M (Mono), and Ms (Safety Track). |
| +2 | Indicates the receiver gain. |
| Indicates there are external headphones connected. | |
| Indicates that a terminal device such as a mobile device or a computer has been connected. | |
| A7S3 | Indicates the selected camera model. |
| 32BF | Indicates that the transmitter has been powered on to record audio files in 32-bit float independently. |
| 1..|| 2..|| | Indicates the wireless signal strength between Transmitter and the receiver. |
| Indicates the battery level of receiver. | |
| Indicates that the receiver screen is locked. |
The middle of the screen indicates the status of the transmitters.

Indicates the sound channel.

Indicates the transmitter gain.

Indicates that noise reduction is enabled.

Indicates that the transmitter is recording independently.

Indicates the battery level of the transmitter.
The bottom of the screen shows the real-time volume.

Audio volume from the built-in microphone on the transmitter.

The transmitter has been muted.

Audio volume from the external microphone connected to the transmitter.

The external microphone connected to the transmitter has been muted.
Swipe Down - Control Menu

Receiver Settings


Recording Mode
Mono: Indicates that the left and right channel outputs of the receiver are identical. Safety Track: Similar to Mono, but the output gain of the right channel is 6 dB less than that of the left channel to prevent overexposure.
Stereo: In Stereo mode, the audio will be separated into left and right channels.

Recommended Camera Settings
Tap to select the brand and model of the camera, and the receiver will be automatically configured to best match the receiver gain. Preset receiver gain can help with the poor sound pickup effect caused by different built-in microphone gains in different cameras.

Receiver Gain
Tap to open the Receiver Gain slider and move the slider to adjust the receiver output gain.

Volume
Tap to open the Volume slider and move the slider to adjust the monitoring volume.

Power On/Off Camera Simultaneously
When enabled, the receiver will automatically power on and off with the camera when connected to the camera via the 3.5 mm TRS cable. The receiver powers on automatically in sync with the camera. When the camera is powered off or the selected shooting mode does not record sound, then the receiver powers off automatically. This feature provides a better audio recording experience and helps save power in case the receiver was not powered off.

Receiver Auto Off
When enabled, the receiver, when not linked to a transmitter within 30 minutes, automatically shuts down after 30 minutes of no use.

Link Device
Tap to link the receiver with a transmitter. Note that previously linked devices will be forgotten after tapping Link Device.
Transmitter Settings
| Low Cut | Transmitter Gain | 32-Bit Float Recording | REC Stop Lock | Auto Record | Storage | Vibration Notification | LED Indicator |
 |  |  |  |  |  |  |  |

Low Cut
When enabled, the transmitter will automatically filter low-frequency (100 Hz and below) sounds, thus reducing low-frequency noise and making for cleaner recordings.

Transmitter Gain
Adjusts the transmitter input gain. Tap to adjust the transmitter input gain according to the real-time volume. Reduce the gain accordingly when the volume bar turns red. Note that adjusting the transmitter gain will affect the local recording volume.

32-Bit Float Recording
When enabled, the transmitter can independently record audio files in 32-bit float, which offers a wider dynamic range for audio post-editing. Note that the recording time of the transmitter will be shorter when recording audio files in 32-bit float is enabled.

REC Stop Lock
Once enabled, users cannot stop the standalone recording of the transmitter via the record button.

Auto Record
When enabled, the transmitter automatically starts recording independently as soon as it is powered on or taken out of the charging case.

Storage
Tap to view the independent recordable hours for Transmitters 1 and 2 respectively, as well as the option to format the transmitters.

Vibration Notifications
When enabled, the transmitter will generate a vibration notification when the corresponding action is triggered.
• Power on: Vibrates for a short period. • Power off: Vibrates for a longer period. - Start recording independently: Vibrates for a short period. - Stop recording independently: Vibrates twice. - Enable/disable Noise reduction: Vibrates for a short period. - Mute/unmute the transmitter: Vibrates for a short period.

LED Indicator
When enabled, the recording status LED and system status LED of the transmitter will blink normally. When disabled, both status LED lights will be turned off.
Settings
| Brightness | Language | Time/Date | Reset | Version | Certificate |
 |  |  |  |  |  |

Brightness
Tap and move the slider to adjust the brightness.

Language
Tap to set the language.

Date/Time
Set the date and time for the recording file.

Factory Reset
Tap to reset to default settings. This will delete all current settings. The receiver will be reset to the original factory settings and restart.

Version
Tap to view the SN, the receiver firmware version, and the linked transmitter firmware version.

Compliance Info
View the compliance information.
Swipe Up-Control the Transmitters
Swipe up on the home screen to view and control the recording status, mute status and enable noise canceling. Swipe up on the left side of the home screen to control Transmitter 1, and swipe up on the right side of the home screen to control Transmitter 2.
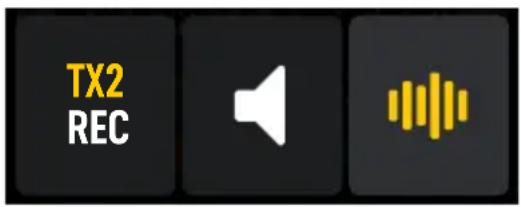
TX2 REC
Tap to start standalone recording. When TX2/REC is displayed, the transmitter is recording independently, tap again to stop recording.

Tap to mute the transmitter. When is displayed, the transmitter has been muted. Tap again to unmute the transmitter.

Tap to enable or disable noise reduction. When displayed, noise reduction has been enabled. Tap again to disable noise reduction.
Connecting a Transmitter to a Bluetooth Device
The transmitter can be connected to DJI Osmo Pocket 3, mobile phones, and other devices via Bluetooth. Taking the transmitter connecting to a mobile phone as an example, the operation steps are as follows:
- Make sure the transmitter is ready to link via Bluetooth after being powered on. The system status LED of the transmitter blinks green when it is ready to be linked with the receiver. Press and hold the record button of the transmitter for three seconds to put it in Bluetooth linking mode, and the system status LED of the transmitter will blink blue slowly.
- Press and hold the linking button of the transmitter for two seconds, the transmitter will start searching for nearby Bluetooth devices. The system status LED of the transmitter will blink blue quickly.
- Enable Bluetooth on the mobile device and select DJI-MIC2-XXXXXX among the searched Bluetooth devices for linking.
- When the transmitter is successfully linked with the mobile device via Bluetooth, the system status LED will be solid blue.
![graph LR A["3s touch"] --> B["User icon: RJI"] B --> C["User icon: 8 button with LED"] C --> D["User icon: 8 button with LED"] D --> E["User interface: DJI-MIC2-XXXXXX with 'XXXXXXX' status and '✓' button"] E --> F["User interface: DJI-MIC2-XXXXXX with 'XXXXXXX' status and '✓' button"]](/content/2026/06/1398328/images/014d86f68c04f72359d3ff0a2a190fae916fd5f0e549e673712beea3953c491f.jpg)

- For video recording via Bluetooth connection to the transmitter, third-party camera, video chat, conference, or livestreaming apps are recommended. Make sure native camera supports Bluetooth audio input.
- When connected to a smartphone via Bluetooth, the standalone recording and noise reduction functions of the transmitter are unavailable.
- The USB-C port of the transmitter allows for connection to digital signal headphones for listening to audio from a mobile phone.
Standalone Recording for Transmitters
The transmitter supports standalone recording and comes with 8GB of storage, allowing for up to 14 hours of 48 kHz 24-bit uncompressed audio.
When the transmitter is powered on, press record button to start standalone recording, and press again to stop recording.
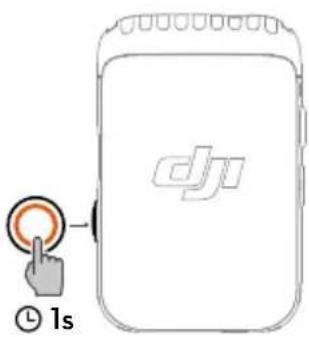
While recording 24-bit mono WAV audio, the total recording time of the transmitter is approximately 14 hours. Files automatically split every 31 minutes. Recording stops when storage is full. While recording 32-bit float audio, the total recording time of the transmitter is approximately 11 hours. Files automatically split every 23 minutes. The recorded audio can be exported or deleted after connecting to a computer. Internal storage can also be formatted via the receiver.


- The file system of the transmitter supports only FAT32 with an allocation unit size not exceeding 16 KB.
Maintenance
Charging the Battery
Charging with the DJI Mic 2 Charging Case
It is recommended to charge the charging case using a 5 V/2 A charger. The charging case has a built-in battery with a 3250 mAh capacity. Place the transmitter and receiver into the charging case to begin charging. When the charging case is open, the receiver displays the battery level of the three devices and the remaining recording time of the transmitter. The transmitter and receiver will automatically power on once removed from the charging case.
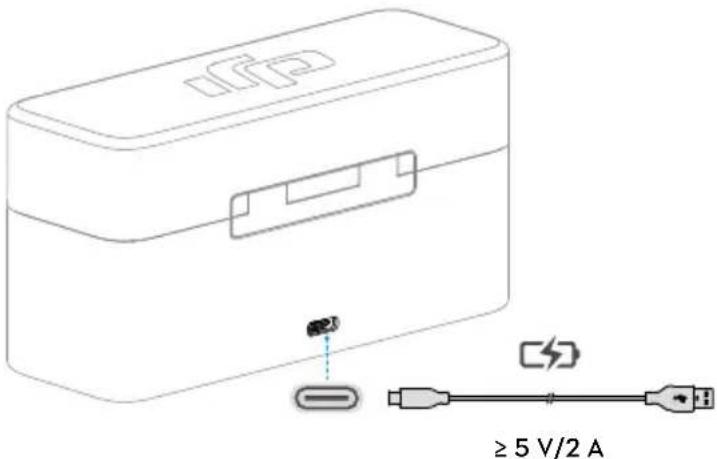
Charging the Transmitters and Receiver
It is recommended to use a charging brick with 5 V/1 A specifications to charge the transmitters and receiver via the DJI Mic USB-C Splitter Charging Cable. It takes about 70 minutes to fully charge the transmitters and receiver.

Storing DJI Mic 2
The DJI Mic 2 charging case holds two transmitters with clip magnets, two mobile device adapters, and a receiver. The mobile device adapter can also be attached on the receiver and placed together.

Updating Firmware
When there is new firmware available, update the firmware by connecting the transmitters and the receiver to the computer one at a time.
How to update firmware:
- Download the firmware on the product page at www.dji.com/mic-2/downloads.
- Connect a transmitter or the receiver to the computer using the USB-C cable provided. When connecting to a computer, the receiver needs to be in the off state, and the transmitter can be either in the on or off state.
- Place the downloaded firmware update package .bin file under the root directories of the transmitter or receiver.
- After disconnecting from the computer, the receiver will start upgrading automatically. The transmitter needs to be powered on to start upgrading automatically. The System Status LED will blink red and green alternately during the upgrading process.
- Once the upgrade is complete, the firmware version can be viewed on the receiver to confirm that it has been successfully upgraded to the latest firmware.
If the firmware update fails, download the firmware again, restart the receiver or transmitter, and repeat the steps above. After the firmware update is complete, check the firmware version on the receiver to ensure the firmware has been updated successfully.

- If the firmware of the transmitter does not automatically update after powering on, disable Auto Record on the receiver touchscreen after connecting the transmitter to the receiver.
Accessories (Not Included)
DJI Lavalier Mic
The DJI Mic 2 transmitter features a 3.5mm TRS input for use with DJI Lavalier Mics.
Insert the 3.5mm plug of the DJI Lavalier Mic into the 3.5mm input port when in use. The built-in microphone of the transmitter will be unavailable and the DJI Lavalier Mic will be used as the audio input.

When attaching the lavalier mic, clip it to the collar or the front of the shirt, and make sure that the top of the lavalier mic is 15-20 cm away from the mouth. It is recommended that the microphone cable be secured to the inside of the clothing to make sure the microphone stays in place.
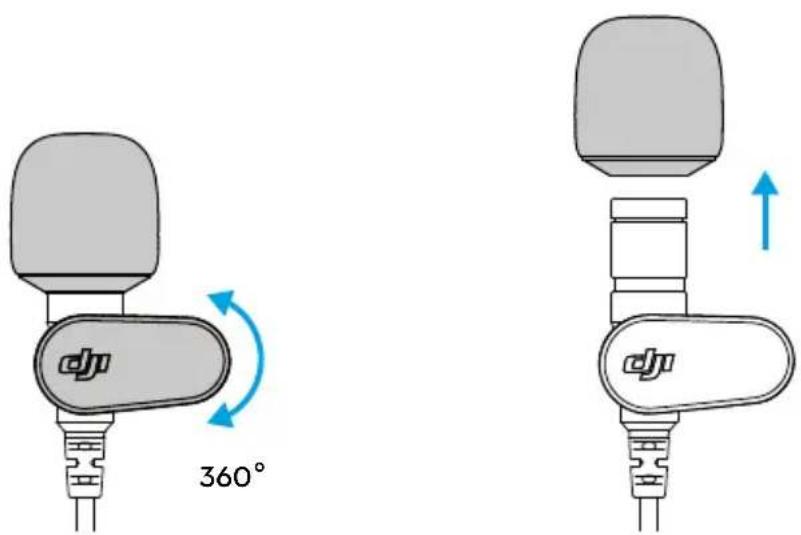

- The lavalier mic can be rotated 360°, allowing for flexible positioning of the collar clip on clothes.
- The windscreen of the lavalier mic can be removed to make the mic less visually noticeable.
Specifications
DJI MIC 2 Transmitter
Model DMT02
Dimensions 46.06×30.96×21.83 mm (L×W×H)
Weight 28 g
Wireless Mode GFSK 1 Mbps and 2 Mbps
Equivalent Isotropic Radiated Power <20 dBm (EIRP)
Wireless Mode Operating Frequency 2.4000-2.4835 GHz
Bluetooth Protocol BR/EDR
Bluetooth Operating Frequency 2.4000-2.4835 GHz
Bluetooth Transmitter Power (EIRP) <20 dBm
Battery Type Li-ion
Battery Capacity 360 mAh
Battery Energy 1.39 Wh
Battery Voltage 3.87 V
Charging Temperature 5° to 45° C (41° to 113° F)
Operating Temperature -10° to 45° C (14° to 113° F)
Charging Time 70 mins
Operating Time 6 hours [1]
DJI MIC 2 Receiver
Model DMR02
Dimensions 54.20×28.36×22.49 mm (L×W×H)
Weight 28 g
Wireless Mode GFSK 1 Mbps and 2Mbps
Equivalent Isotropic Radiated Power <20 dBm (EIRP)
Operating Frequency 2.4000-2.4835 GHz
Battery Type Li-ion
Battery Capacity 360 mAh
Battery Energy 1.39 Wh
Battery Voltage 3.87 V
Charging Temperature 5° to 45° C (41° to 113° F)
Operating Temperature -10° to 45° C (14° to 113° F)
Charging Time 70 mins
Operating Time 6 hours [1]
DJI MIC 2 Charging Case
| Model DMC02 |
| Dimensions 116×41.5×59.72 mm (L×W×H) |
| Weight 200 g |
| Battery Type 18650 Li-ion |
| Battery Capacity 3250 mAh |
| Battery Energy 11.7 Wh |
| Battery Voltage 3.6 V |
| Charging Specification 5 V, 1.5-3 A |
| Charging Temperature 5° to 40°C (41° to 104°F) |
| Operating Temperature 5° to 40°C (41° to 104°F) |
| Charging Time 2 hours and 40 mins |
| Charging Cycles for TX and RX Approx. two cycles when charging two TXs and one RX at the same time |
General
| Polar Pattern Omnidirectional | |
| Frequency Response Low Cut Off: 50 Hz - 20 kHz | |
| Low Cut On: 100 Hz - 20 kHz | |
| Max Sound Pressure Level (SPL) 120 dB SPL | |
| Max Input Level (3.5 mm) -6 dBV (THD < 0.1%) | |
| Equivalent Noise | 21 dBA |
| Monitor Interface Output Power | Max Output 12 mW@1 kHz, 32 Ω |
| Max Transmission Distance[2] | 250 m (FCC) |
| 160 m (CE) | |
[1] Tested when both TXs are connected to the RX without recording backup clips internally, and the RX is connected to a camera via Camera Audio Cable (3.5mm TRS). [2] Measured in an unobstructed outdoor environment free of interference.
WE ARE HERE FOR YOU
Contact DJI SUPPORT
This content is subject to change without prior notice.


https://www.dji.com/mic-2/downloads
If you have any questions about this document, please contact DJI by sending a message to DocSupport@dji.com.
DJI is a trademark of DJI.
Copyright © 2024 DJI All Rights Reserved.
- SEARCHING FOR KEYWORDS
- NAVIGATING TO A TOPIC
- PRINTING THIS DOCUMENT
- USING THIS MANUAL
- LEGENDS
- READ BEFORE USE
- CONTENTS
- INTRODUCTION
- OPERATION
- MAINTENANCE
- SPECIFICATIONS
- DJI MIC 2 TRANSMITTER
- OVERVIEW
- LINKING BUTTON
- POWER BUTTON
- CHARGING PAD
- LED INFORMATION
- ① RECORDING STATUS LED
- ② SYSTEM STATUS LED
- BLINKING PATTERN DESCRIPTIONS
- DJI MIC 2 RECEIVER
- TOUCHSCREEN
- DIAL
- MONITOR PORT
- MM TRS OUTPUT
- RECEIVER COLD SHOE
- DATA PORT (USB-C)
- EXPANSION PORT
- PLACING A TRANSMITTER
- LINKING THE TRANSMITTER AND RECEIVER
- METHOD 1: LINK AUTOMATICALLY IN THE CHARGING CASE
- METHOD 2: LINK MANUALLY
- USING WITH A CAMERA
- USING WITH A MOBILE DEVICE
- USING WITH A COMPUTER
- RECEIVER TOUCHSCREEN OPERATION
- HOME SCREEN
- THE MIDDLE OF THE SCREEN INDICATES THE STATUS OF THE TRANSMITTERS
- THE BOTTOM OF THE SCREEN SHOWS THE REAL-TIME VOLUME
- SWIPE DOWN - CONTROL MENU
- RECEIVER SETTINGS
- RECORDING MODE
- RECOMMENDED CAMERA SETTINGS
- RECEIVER GAIN
- VOLUME
- POWER ON/OFF CAMERA SIMULTANEOUSLY
- RECEIVER AUTO OFF
- LINK DEVICE
- TRANSMITTER SETTINGS
- LOW CUT
- TRANSMITTER GAIN
- BIT FLOAT RECORDING
- REC STOP LOCK
- AUTO RECORD
- STORAGE
- VIBRATION NOTIFICATIONS
- LED INDICATOR
- SETTINGS
- BRIGHTNESS
- LANGUAGE
- DATE/TIME
- FACTORY RESET
- VERSION
- COMPLIANCE INFO
- SWIPE UP-CONTROL THE TRANSMITTERS
- TX2 REC
- CONNECTING A TRANSMITTER TO A BLUETOOTH DEVICE
- STANDALONE RECORDING FOR TRANSMITTERS
- CHARGING THE BATTERY
- CHARGING WITH THE DJI MIC 2 CHARGING CASE
- CHARGING THE TRANSMITTERS AND RECEIVER
- STORING DJI MIC
- UPDATING FIRMWARE
- ACCESSORIES (NOT INCLUDED)
- DJI LAVALIER MIC
Brand : DJI
Model : Mic
Category : Microphone