
DYNAX 30 - Film SLR Camera KONICA MINOLTA - Free user manual and instructions
Find the device manual for free DYNAX 30 KONICA MINOLTA in PDF.

| Product type | 35mm SLR film camera |
| Brand | Konica Minolta |
| Model | Dynax 30 |
| Dimensions (W x H x D) | 135 x 92 x 66.5 mm |
| Weight (without batteries) | 335 g |
| Power supply | 2 CR2 3V lithium batteries |
| Lens mount | Minolta A bayonet mount |
| Shutter type | Vertical travel focal plane, electronically controlled |
| Shutter speeds | 30 s - 1/2000 s, Bulb |
| Flash sync | 1/90 s |
| Focusing system | TTL phase detection AF, autofocus and manual |
| AF sensitivity range | EV -1 to 18 (ISO 100) |
| Exposure modes | P, A, S, M, 5 subject programs |
| Light metering | TTL 2-segment SPC |
| Metering range | EV 4 to 20 (ISO 100, f/1.4) |
| Film sensitivity | Automatic ISO 25-3200 (DX), manual ISO 6-6400 |
| Built-in flash | Guide number 12 (ISO 100, m), coverage 28 mm |
| Flash modes | Auto, red-eye reduction, fill-in, off |
| Viewfinder | Roof pentaprism, 90% field, 0.75x magnification |
| Other features | Self-timer, bracketing, multiple exposures, IR remote (Date model), mirror lock-up |
| Maintenance | Clean with a soft dry cloth, do not use solvents |
| Safety | Do not disassemble, risk of electric shock; keep out of reach of children |
| Repairability | Contact an authorized Konica Minolta service center |
Frequently Asked Questions - DYNAX 30 KONICA MINOLTA
User questions about DYNAX 30 KONICA MINOLTA
0 question about this device. Answer the ones you know or ask your own.
Ask a new question about this device
Download the instructions for your Film SLR Camera in PDF format for free! Find your manual DYNAX 30 - KONICA MINOLTA and take your electronic device back in hand. On this page are published all the documents necessary for the use of your device. DYNAX 30 by KONICA MINOLTA.
USER MANUAL DYNAX 30 KONICA MINOLTA
natural_image
Simple black-and-white circular graphic with horizontal white lines (no text or symbols)KONICA MINOLTA
DYNAX 40 DYNAX 30 MAXXUM 50
natural_image
Technical line drawing of a DSLR camera showing front, top, and side views (no text or symbols)FOR PROPER AND SAFE USE
Read and understand all warnings and cautions before using this product.

WARNING
Using batteries improperly can cause them to leak harmful solutions, overheat, or explode which may damage property or cause personal injury. Do not ignore the following warnings:
- Only use the batteries specified in this instruction manual.
- Do not install the batteries with the polarity (+/−) reversed.
- Do not use batteries which show wear or damage.
- Do not expose batteries to fire, high temperatures, water, or moisture.
- Do not attempt to recharge, short, or disassemble batteries.
- Do not store batteries near or in metallic products.
- Do not mix batteries of different types, brands, or ages.
- Do not use leaking batteries. If fluid from the batteries enters your eye, immediately rinse the eye with plenty of fresh water and contact a doctor. If fluid from the batteries makes contact with your skin or clothing, wash the area thoroughly with water.
-
Tape over battery contacts to avoid short-circuiting during disposal; always follow local regulations for battery disposal.
-
Do not disassemble this product. Electric shock may cause injury if a high voltage circuit inside the product is touched.
- Immediately remove the batteries and discontinue use if the camera is dropped or subjected to an impact in which the interior, especially the flash unit, is exposed. The flash has a high voltage circuit which may cause an electric shock resulting in injury. The continued use of a damaged product or part may cause injuries.
- Keep batteries or small parts that could be swallowed away from infants. Contact a doctor immediately if an object is swallowed.
- Store this product out of reach of children. Be careful when around children, not to harm them with the product or parts.
- Do not fire the flash directly into the eyes. It may damage eyesight.
- Do not fire the flash at vehicle operators. It may cause a distraction or temporary blindness which may lead to an accident.
- Do not look at the sun or strong light sources directly through the viewfinder or lens. It may damage your eyesight or cause blindness.
- Do not expose this product to liquids or operate this product with wet hands. If liquid enters the product, immediately remove the batteries and discontinue use. The continued use of a product exposed to liquids may cause damage or injury through fire or electric shock.
- Do not use the product near inflammable gases or liquids such as gasoline, benzine, or paint thinner. Do not use inflammable products such as alcohol, benzine, or paint thinner to clean the product. The use of inflammable cleaners and solvents may cause an explosion or fire.
- If the product emits a strange odor, heat, or smoke, discontinue use. Immediately remove the batteries taking care not to burn yourself. The continued use of a damaged product or part may cause injuries.
- Take the product to a Konica Minolta service facility when repairs are required.

CAUTION
- Do not point the product directly at the sun. If sunlight is focused on an inflammable surface, a fire may result. Replace the lens cap when the product is not in use.
- Do not use or store the product in a hot or humid environment such as the glove compartment or trunk of a car. It may damage the product and batteries which may result in burns or injuries caused by heat, fire, explosion, or leaking battery fluid.
- If batteries are leaking, discontinue use of the product.
- Do not fire the flash while it is in contact with people or objects. The flash unit discharges a large amount of energy which may cause burns.
This device complies with Part 15 of the FCC Rules. Operation is subject to the following two conditions: (1) This device may not cause harmful interference, and (2) this device must accept any interference received, including interference that may cause undesired operation. Changes or modifications not approved by the party responsible for compliance could void the user's authority to operate the equipment. This equipment has been tested and found to comply with the limits for a Class B digital device, pursuant to Part 15 of the FCC Rules. These limits are designed to provide reasonable protection against harmful interference in a residential installation. This equipment generates, uses and can radiate radio frequency energy and, if not installed and used in accordance with the instructions, may cause harmful interference to radio communications. However, there is no guarantee that interference will not occur in a particular installation. If this equipment does cause harmful interference to radio or television reception, which can be determined by turning the equipment off and on, the user is encouraged to try to correct the interference by one or more of the following measures:
- Reorient or relocate the receiving antenna.
- Increase the separation between the equipment and the receiver.
- Connect the equipment to an outlet on a circuit different from that to which the receiver is connected.
- Consult the dealer or an experienced radio/TV technician for help.
This Class B digital apparatus complies with Canadian ICES-003.

This mark on your camera certifies that this camera meets the requirements of the EU (European Union) concerning interference causing equipment regulations. CE stands for Conformité Européenne (European Conformity).
Konica Minolta is a trademark of Konica Minolta Holdings, Inc. Dynax and Maxxum are trademarks of Konica Minolta Photo Imaging, Inc.
TABLE OF CONTENTS
Thank you for purchasing this camera. Please take time to read this manual so that you can enjoy all the features of your new camera.
Names of parts 8
Data panel 10
Viewfinder 11
Getting started 12
Attaching the strap....12
Attaching a lens....13
Removing a lens....13
Installing batteries....14
Battery condition indicator 15
Loading film 16
Diopter adjustment 17
Setting the date and time - Date model 18
Changing batteries - Date model....19
Basic operation....20
Turning on the camera 20
Handling the camera 20
Taking a picture 21
Focus signals....22
Special focusing situations 22
Focus lock 23
Flash modes....24
Flash signals....25
Flash range....25
Subject programs 26
Film rewind 28
Manual rewind 29
A short guide to photography....30
What is a stop? What is an Ev? 31
Advanced operation....32
Drive modes 32
Self-timer notes ....33
Continuous-advance notes....33
Remote control notes ....34
Attaching the eyepiece cap 35
Optional viewfinder accessories....35
Function dial 36
About full-auto program....37
Exposure warning - Program....37
Exposure modes....38
Aperture priority - A 39
Shutter priority - S 40
About shutter speeds....41
What is an f-number? 41
Exposure compensation....42
Manual exposure - M....44
Bulb exposures....45
Focus area selection 46
Focus modes....47
Exposure bracketing / Multiple exposures....48
Bracketing notes....49
Multiple exposure notes....50
Manual ISO....51
Date imprinting - Date model....52
AF illuminator....53
Shutter lock....53
Accessory notes....54
Lens notes....54
Accessory flash notes....56
Wireless Controller IR-1N....56
About flash metering....57
Troubleshooting ....58
Care and storage....60
Operating conditions....60
Storage 60
Cleaning....61
Before important events 61
Questions and service....61
Technical specifications 62
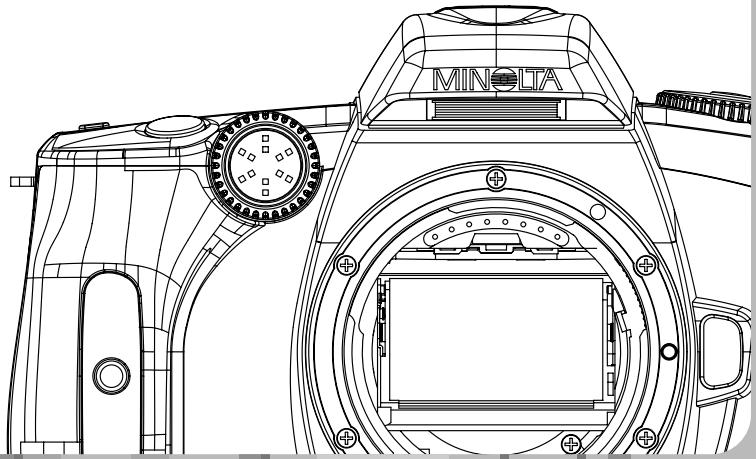
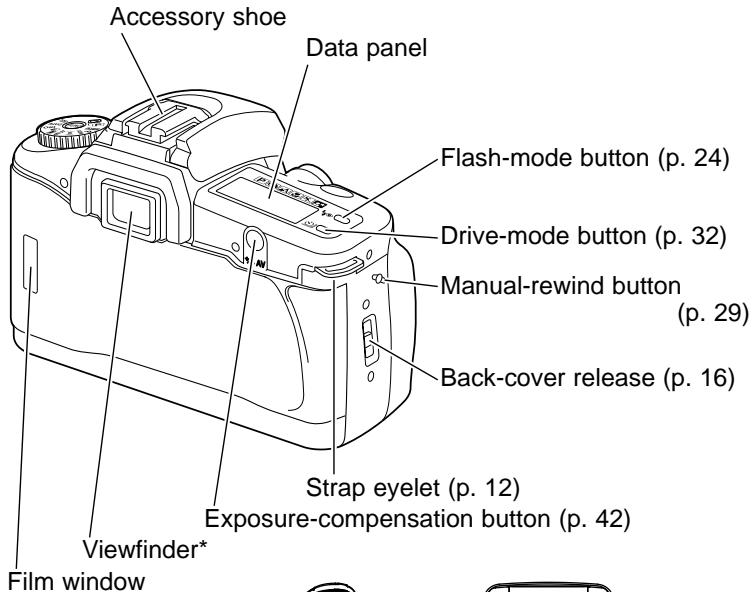
NAMES OF PARTS
*This camera is a sophisticated optical instrument. Care should be taken to keep these surfaces clean. Please read the care and storage instructions in the back of this manual (p. 60).
Remote-control receiver (p. 34, 45) (Date model)

DATA PANEL

- Full-auto program icon (p. 37)
- Subject program icons (p. 26)
- Exposure-compensation indicator (p. 42)
- Full-auto / Subject program indicator (p. 26, 37)
- Aperture display
- Battery-condition indicator (p. 15)
- Remote-control indicator (p. 32, 34, 45) (Date model)
- Frame counter
- Film-transport signals
- Cartridge mark
- Manual-focus indicator (p. 47)
- Focus area indicators (p. 46)
- Date-imprinting indicator (p. 52) (Date model)
- Flash-mode indicators (p. 24)
- Self-timer indicator (p. 32)
- Single-frame / Continuous advance indicator (p. 32)
- PASM exposure-mode indicators (p. 38)
- Multiple-exposure indicator (p. 48)
- Exposure-bracketing indicator (p. 48)
- Shutter-speed display
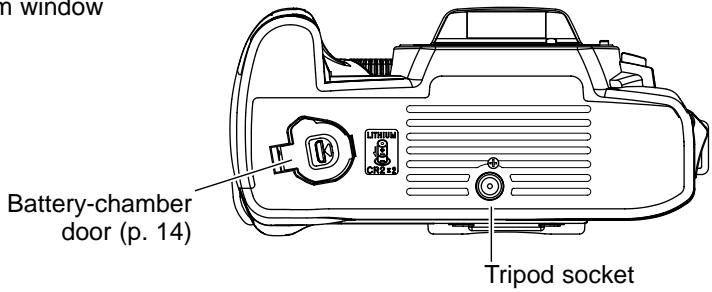
VIEWFINDER
flowchart
graph TD
    A["Square"] --> B["Circle"]
    B --> C["Bracket"]
    style A fill:#fff,stroke:#000
    style B fill:#fff,stroke:#000
    style C fill:#fff,stroke:#000
Spot focus area (p. 46)
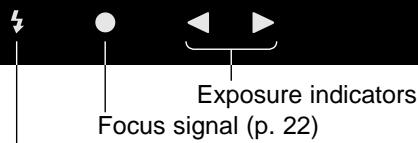
Flash indicator (p. 25)
GETTING STARTED
ATTACHING THE STRAP
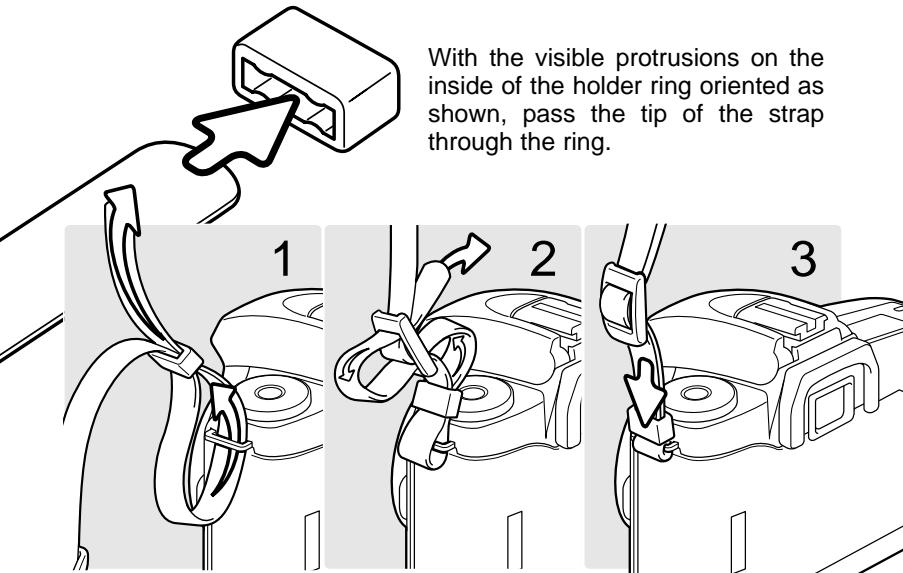
Pass the tip of the strap through the camera's strap eyelet from below and then the holder ring (1). Attach the strap so the tip comes between the strap and the camera.
Thread the tip of the strap through the inside of the buckle and pull to tighten (2). Leave some slack in the camera strap so the tip may be threaded through the buckle easily.
Push the holder ring toward the strap eyelet to secure the strap to the camera (3). Repeat with the other end of the camera strap.
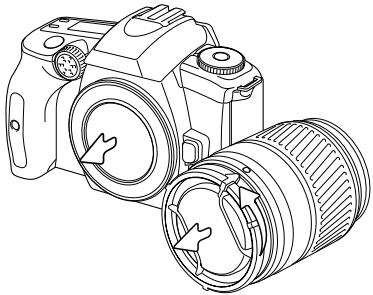
ATTACHING A LENS
natural_image
Line drawing of a DSLR camera with attached lens (no text or symbols)This camera uses interchangeable lenses. See page 54 for compatible lenses. Never touch the inside of the camera, especially the lens contacts and mirror.
Remove the body and rear lens caps. The arrow on the rear lens cap must be aligned to the lens mounting index.
Align the red mounting index on the lens and camera body (1). Carefully insert the lens into the mount, then turn it clockwise until it clicks into the locked position. Do not insert the lens at an angle. If it does not fit, check its orientation with the index marks. Never force the lens.
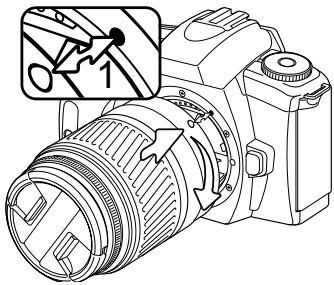
REMOVING A LENS
natural_image
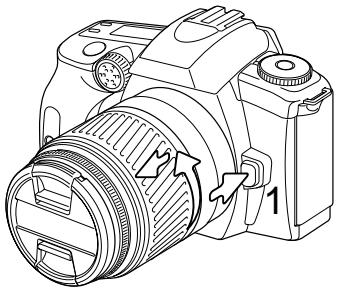
Line drawing of a DSLR camera with lens and adjustment knob (no text or symbols)Press the lens release all the way in (1) and turn the lens counterclockwise until it stops. Carefully remove the lens.
Replace the caps on the lens and attach the body cap or another lens to the camera.
INSTALLING BATTERIES
The camera requires two 3V CR2 lithium batteries to operate. Read the proper and safe use section on page 2 before using the batteries. When changing batteries, confirm the function dial is in the off position.
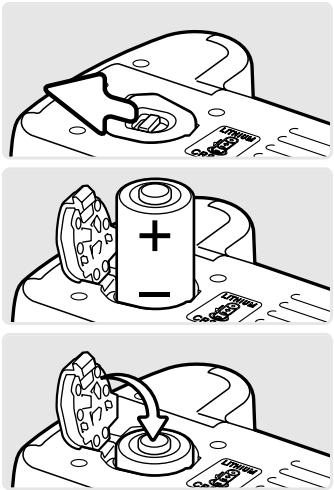
Slide the battery-chamber release in the direction shown, and open the door. Setting the camera down with the battery-chamber door open may damage the camera.
Insert the batteries as indicated on the diagram next to the battery chamber-door. Confirm the positive and negative battery terminals are oriented correctly.
Push the battery-chamber door closed until it clicks into place.
Date Model
The date display will blink when the camera is turned on until the clock and calendar are set. To set the camera's clock and calendar, see page 18.
The clock and calendar are powered by the camera batteries. If the batteries are removed, the date and time are reset, and the date-imprinting function is disabled. To save the date and time when changing batteries, see page 19.
BATTERY-CONDITION INDICATOR
![P AUTO [1 1] Q_ _ _!](/content/2025/01/139828/images/27b9bc34a2f91a21c238a16ce5a915c60a04e3d99bc51c01ff283b03266f787e.jpg)
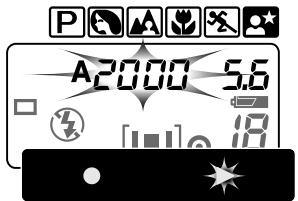
The camera has a battery-condition indicator. When the camera is on, the indicator appears on the data panel. If the data panel is blank, the batteries may be exhausted or installed incorrectly.
natural_image
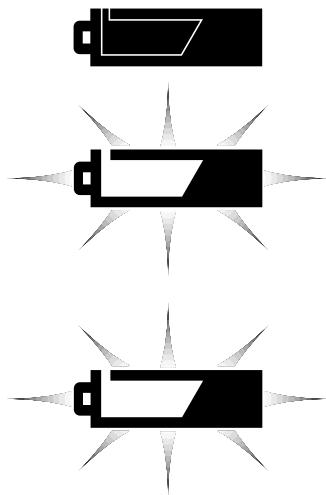
Three black battery icons with radiating starburst lines, no text or symbols presentFull-battery indicator - power is sufficient for all camera operations.
Low-battery indicator - indicator blinks. All functions are operational, but the batteries need to be replaced soon. Flash recycling time may be slow.
Low-battery warning - indicator blinks and no other indicators appear on the data panel. Power is insufficient for camera operation and the shutter will not release. Replace the batteries.
Occasionally, the battery-condition indicator can give a false low-battery warning, even though power is sufficient for operation. Turn the camera on and off a few times to reset the display.
LOADING FILM
Always load or remove the film under subdued light to reduce the chances of fogging. The camera automatically sets the correct film speed (ISO) with DX-coded film. If non-DX-coded film is used, the camera sets the film speed to ISO25. See page 51 to set the film speed manually.
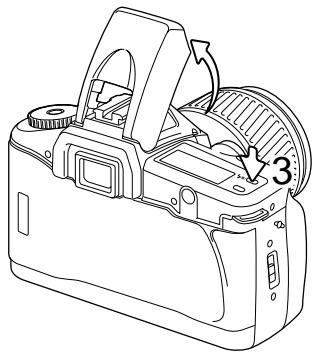
natural_image
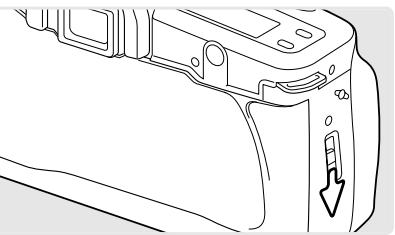
Line drawing of a camera rear panel with a downward arrow indicating a component (no text or symbols present)Slide the back-cover release down to open the camera.
Never touch the shutter curtain with your fingers or the film leader. The curtain's precision design is extremely sensitive to pressure.
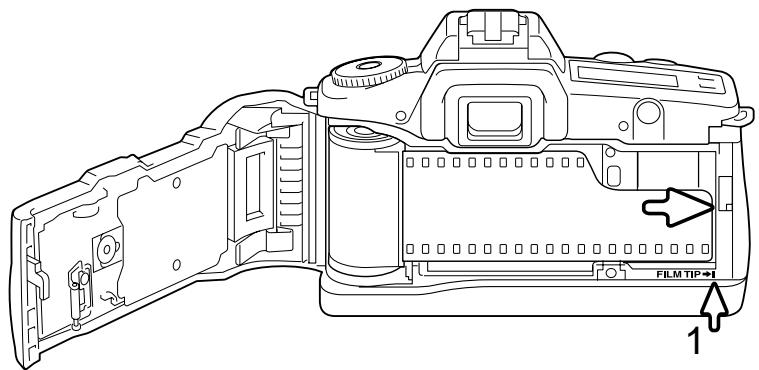
Insert the film cartridge into the film chamber. Extend the leader between the guide rails to the film-tip index mark (1). If the film tip extends beyond the index mark, take the cartridge out and rewind the excess film back into the cartridge.
natural_image
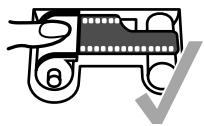
Pure mechanical diagram of a film strip with no text or symbolsHold the film cartridge down so that the film lays flat.

natural_image
Simple line drawing of a film strip with a film reel and a 'X' symbol, no text or labels present.
natural_image
Line drawing of a DSLR camera housing with mounting bracket (no text or symbols)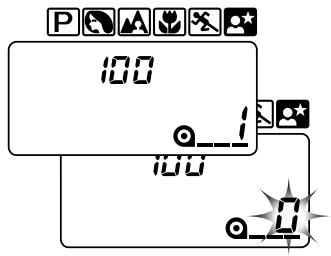
Close the back cover. The camera automatically advances the film to the first frame. Take care not to catch the strap when closing the cover.
If the film is loaded correctly, the frame counter indicates the first frame. The film speed (ISO) is displayed on the data panel for 5 seconds.
If the film is loaded incorrectly, 0 blinks in the frame counter. Reload the film.
Camera Notes
Do not use Polaroid Instant 35mm film; winding problems may occur. Infrared film cannot be used as the camera's frame counter sensor will fog the film. No more than 40 exposures can be taken on one roll. When using 72-exposure film, the camera rewinds the roll after the 40^th exposure.
When using DX-coded film, the film speed is set automatically in one Ev increments from ISO 25 to ISO 3200: 25, 50, 100, 200, 400, 800, 1600, and 3200. Film with speeds not listed are automatically set to the first value below the rated ISO. For example, ISO 125 film is set to ISO 100. Film speed can be set manually in 1/3 Ev increments with the function dial, see page 51.
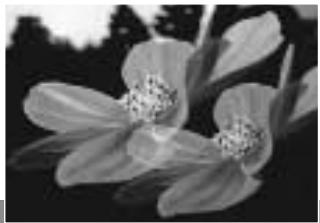
SETTING DATE AND TIME - DATE MODEL
The camera's clock and calendar need to be set for date imprinting. The date blinks on the data panel when the camera is turned on if the clock and calendar are not set or have reset because the batteries are exhausted.
![AM [■■] AEM [■■] AEM AEM AEM AEM AEM AEM AEM AEM AEM AEM AEM AEM AEM AEM AEM AEM AEM AEM AEM AEM AEM AEM AEM AEM AEM AEM AEM AEM AEM AEM AEM AEM AEM AEM D1 D2 D3 D4 D5 D6 D7 D8 D9 D10 D11 D12 D13 D14 D15 D16 D17 D18 D19 D20 D21 D22 D23 D24 D25 D26 D27 D28 D29 D30 D31 D32 D33 D34 D35 D36 D37 D38 D39 D40 D41 D42 D43 D44 D45 D46 D47 D48 D49 D50 D51 D52 D53 D54 D55 D56 D57 D58 D59 D60 D61 D62 D63 D64 D65 D66 D67 D68 D69 D70 D71 D72 D73 D74 D75 D76 D77 D78 D79 D80 D81 D82 D83 D84 D85 D86 D87 D88 D89 D90 D91 D92 D93 D94 D95 D96 D97 D98 D99 FUNC](/content/2025/01/139828/images/1d27e0e31174cc5d7ae2ee396a118ad0c793c6149f051dc8b1ef53e419ba1cab.jpg)
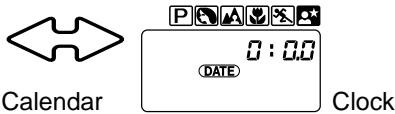
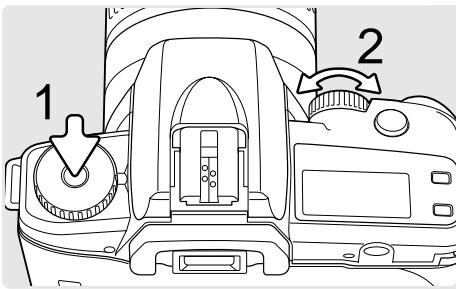
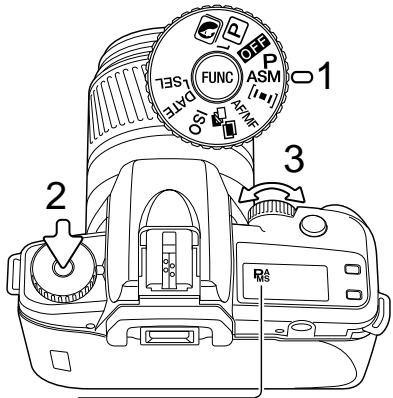
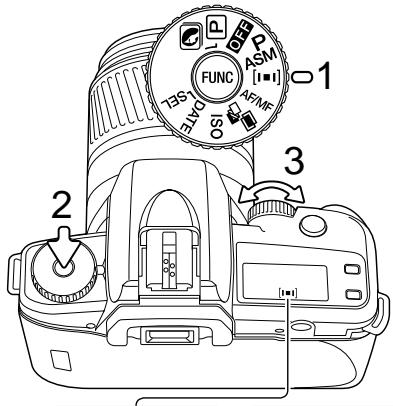
Turn the function dial to the date select position (SEL); the calendar is displayed on the data panel. The date format is year, month, day.
natural_image
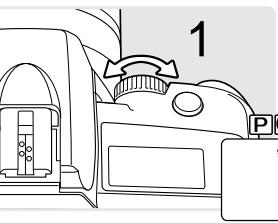
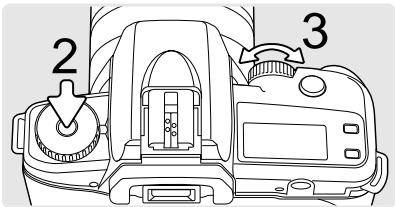
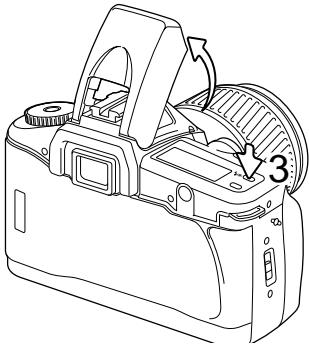
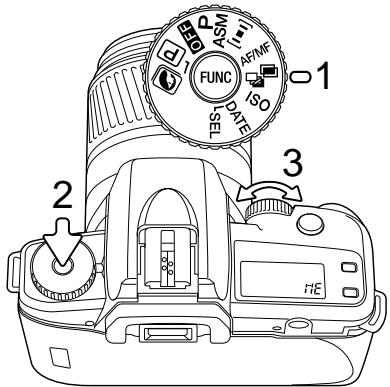
Technical line drawing of a camera with no visible text or symbolsTurn the control dial (1) to select the date and time registers; the selected register blinks.
To change the selected register, press and hold the function button (2) and turn the control dial (3). The camera uses a 24 hour clock so 14:00 is 2pm. The calendar is automatic from the year 2003 to 2039.
Continue until the calendar and clock are set. Turn the function dial to another position to view the standard data panel display. See page 52 on how to use the date imprinting function.
CHANGING BATTERIES - DATE MODEL
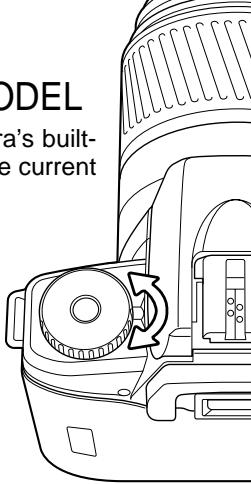
When the batteries have been removed, the camera's built-in clock will stop. The following procedure stores the current time and date when the batteries are changed.
Turn the camera on and off with the function dial. The camera stores the current date and time in a memory register each time the camera is turned off or on.
![P AUTO [1-1] 8](/content/2025/01/139828/images/afd72f0ba02987728e1334d6efac55cbd12842755c372b2713ccc61827c7dc92.jpg)
Change the batteries as described on page 14. Turn the camera on. If normal data panel display appears, the clock and calendar did not reset.
If the date blinks on the data panel when the camera is turned on, the clock and calendar reset. See the facing page on how to set the date and time.
BASIC OPERATION
This section covers the basic operation of the camera. Thoroughly familiarize yourself with the operations in this section before moving on.
TURNING THE CAMERA ON
To turn on the camera, simply turn the function dial to the appropriate mode (1). The basic operation section assumes that the full-auto program mode is selected - P enclosed in a circle. The full-auto program mode simplifies the picture taking process. For more on this and other functions, see page 36.

HANDLING THE CAMERA
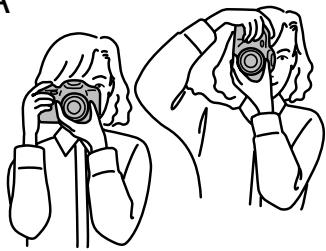
Grip the camera firmly with your right hand, while supporting the lens with your left. Keep your elbows at your side and your feet shoulder-width apart to hold the camera steady. Keep the camera strap around your neck or wrist in the event you accidentally drop the camera.
natural_image
Line drawing of two people using binoculars (no text or symbols)The use of a tripod is recommended when using the camera in low-light situations or when using telephoto lenses. If a tripod is not available, lean against a wall or rest your elbows on a solid surface to steady the camera.
TAKING A PICTURE
natural_image
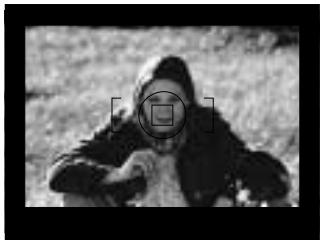
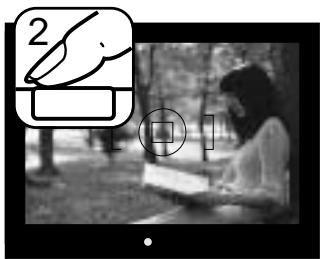
Black-and-white photo of a person aiming at a target with a targeting scope (no text or symbols visible)Place the subject in the wide focus frame. If using a zoom lens, rotate the zooming ring to frame the subject.
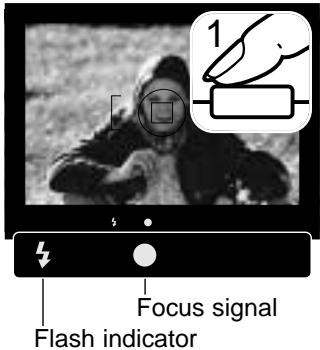
Press the shutter release button partway down to activate the autofocus and exposure systems (1). The viewfinder focus signal (p. 22) confirms focus. If the focus signal blinks, repeat the procedure.
If the flash is required for the exposure, it raises automatically and the flash indicator appears in the viewfinder (p. 25). In low-light conditions, the flash acts as an AF illuminator (p. 53).
The shutter speed and aperture used for the exposure are displayed on the data panel.
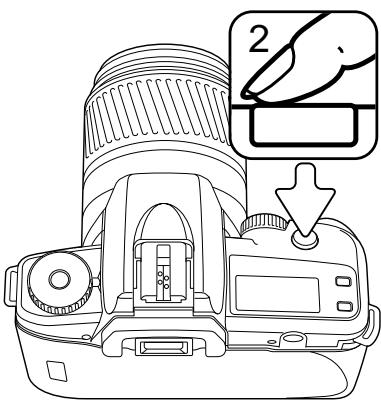
Press the shutter-release button all the way down to take the picture (2). When taking a picture, press the shutter-release button gently so not the shake the camera during the exposure.
FOCUS SIGNALS
The viewfinder focus signal indicates the status of the autofocus system. Focusing time can be longer with macro or telephoto lenses, or in low light conditions.

Focus locked.
Indicator blinks - cannot focus. The shutter is locked.
When the camera cannot focus, the subject may be too close or a special focus situations may be preventing the system from focusing. Use focus lock (p. 23) or manual focus (p. 47).
SPECIAL FOCUSING SITUATIONS
The camera may not be able to focus in the following situations. Use focus lock or manual focus (p. 47).
![1 [ ] 2 3 4](/content/2025/01/139828/images/9b0fc220643efe76915ea2fe4c45089b57532960c9533de66ce8c921af5e56ff.jpg)
- The subject within the focus frame is very bright, or low in contrast.
- Two subjects at different distances overlap in the focus frame.
- The subject is near a very bright object or area.
- The subject composed of alternating light and dark lines completely fills the focus frame.
FOCUS LOCK
Focus lock is used for off-center subjects outside the focus frame. Focus lock can also be used when a special focusing situation prevents the camera from focusing by allowing the camera to be focused on a object at the same distance as the subject.
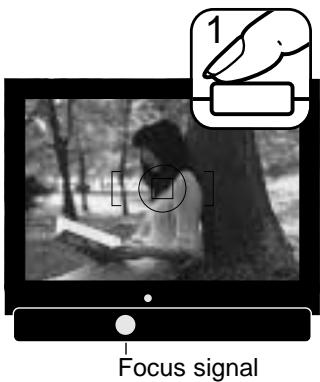
Center your subject in the wide focus frame, then press the shutter-release button partway down to lock focus (1).
The focus is locked when focus signal appears in the viewfinder. If the signal blinks, the camera was unable to focus; repeat the procedure.
The exposure is locked with focus. Releasing the shutter button cancels focus lock.
Continue to hold the shutter-release button partway down and compose the picture.
Press the shutter-release button all the way down (2) to take the picture.
FLASH MODES
The built-in flash is designed to be used with lenses with focal lengths from 28mm of longer. When using lenses shorter than 28mm, the corners of the image will not be fully illuminated. Remove the lens hood to prevent lens shadowing, see page 55. The shutter will not release while the flash is charging. Push down the built-in flash when the camera is not in use.
![1 AUTO [I I] 8](/content/2025/01/139828/images/122d1bb799381dfd9dcfedf1286950783c3bd124cd390786d03162a5812cadb9.jpg)
To change the flash mode, press the flash-mode button (1) until the appropriate mode is displayed on the data panel. The flash modes cycle in the following order:

Autoflash - the built-in-flash pops up automatically when flash illumination is required. Only available with full-auto program, program, and subject programs (p. 26).
Fill flash - the flash fires with each exposure regardless of the ambient light. Fill flash can be used to reduce harsh shadows caused by strong direct light or sunshine.
Flash cancel - the flash will not fire. Used when flash photography is prohibited, natural light is desired to illuminate the subject, or the subject is beyond the flash range.
Red-eye reduction - the camera fires several pre-flashes before the main flash burst to contract the pupils of the subject's eyes and reduce the red-eye effect.
When using aperture-priority, shutter-priority, or manual exposure mode, the flash is set to flash cancel. To use fill flash, press the flash-mode button to raise the flash. Continue to press the flash-mode button to change the mode.
FLASH SIGNALS
The viewfinder flash signal indicates the status of the flash.

Signal steady - flash charged and ready to fire.

Signal blinking - flash output was sufficient for exposure.
If the flash signal does not blink after taking the picture, the subject was not within the flash range.
FLASH RANGE
The range of the built-in flash depends on the speed of the film and the aperture used for the exposure. The flash range cannot exceed 4.0m/13.1ft. The subject must be within the flash range specified in the table below to be correctly exposed.
| Aperture | ISO 100 | ISO400 |
| f/2.8 | 1.0 ~ 4.0m / 3.3 ~ 13.1 ft. | 1.0 ~ 4.0m / 3.3 ~ 13.1 ft. |
| f/3.5 | 1.0 ~ 3.4m / 3.3 ~ 11.2 ft. | |
| f/4.0 | 1.0 ~ 3.0m / 3.3 ~ 9.8 ft. | |
| f/5.6 | 1.0 ~ 2.1m / 3.3 ~ 6.9 ft. |
Camera Notes
Do not use the built-in or accessory flash when using a filter with a filter factor greater than 0, a close-up lens, or the focus-range limiter or macro release on certain lenses. This will result in an incorrect exposure.
SUBJECT PROGRAMS
Subject programs optimize the camera system for specific conditions or subjects. Five subject programs are available.
![1 2 3 P AUTO [■] 8](/content/2025/01/139828/images/9219b9c211a3b2bfecd44484f994533fdd50cb0a1528e6832ddb4e598c84c0a6.jpg)
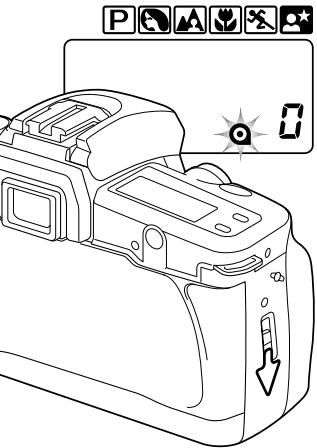
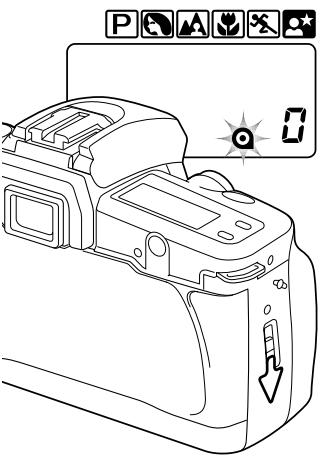
Turn the function dial (1) to the full-auto / subject program position.
Press and hold the function button (2) and turn the control dial (3) to select the appropriate program; the active program is indicated with the pointer on the data panel. The subject program is reset when the camera is turned off.

Portrait - optimized to create sharp images of the subject with a soft background. Most portraits look best at a telephoto setting; the long focal length does not exaggerate facial features and the shallow depth of field separates the subject from the background. Use fill flash (p. 24) with strong direct sunlight or backlight to reduce harsh shadows.

Landscape - optimized to create sharp landscape photographs, while maintaining a shutter speed fast enough to prevent blurring from camera shake. For best results zoom to a wide-angle setting or use a wide-angle lens. Include a foreground subject or detail to create a feeling of depth in the picture.
When taking a portrait within a landscape, use fill flash (p.24) with strong direct sunlight or backlight to reduce harsh shadows, see flash range on page 25. The flash will have no effect on the landscape. The use of a tripod is recommended.

Close-up - the camera selects the optimum aperture and shutter speed combination to photograph at short object distances. For best results use a macro lens or a macro capable zoom lens. Focusing time can be longer with macro lenses. The use of a tripod is recommended.
The built-in flash will overexpose subjects closer than 1.0m (3.3 ft.). Use flash cancel. At close distances, the lens or len hood may block the flash, creating a shadow at the bottom of the image. The use of an accessory flash is recommended.

Sports Action - the camera uses the fastest possible shutter speed to stop motion and continually adjusts focus to track the subject. The use of fast film is recommended. When the subject is not within the flash range, use flash cancel (p. 24). Mount the camera on a tripod or monopod when using telephoto lenses.

Night Portrait - for photographs of people in low-light conditions. The camera balances the ambient light exposure with the flash exposure so the background appears in the image. The use of fast film is recommended. Ask the subject not to move after the flash burst as the shutter may still be open for the background exposure. Use a tripod to reduce camera shake.
To photograph a landscape or scene at night, set the flash mode to flash cancel (p. 24). Dark night scenes may prevent the AF system from focusing, use manual focus (p. 47). Night scenes tend to photograph better at twilight rather than in the darkness of night. The faint light in the early evening sky adds detail to the shadows of the scene.
FILM REWIND
After the last frame on the roll of film has been exposed, the camera rewinds the film automatically. The frame counter counts down during rewind. Do not turn the focusing ring when the film is rewinding.
Wait until the film is completely rewound; zero (0) is displayed on the frame counter and the cartridge mark blinks on the data panel to indicate the camera can be opened to remove the film.
Slide the back-cover release down to open the camera and remove the film. Close the back cover taking care not to catch the strap. To load a new roll of film, see page 16.
Although more pictures than specified on the film package may be taken, the film processor may not print more than the number specified on the film cartridge or the last frame may be cropped.
natural_image
Line drawing of a DSLR camera with handle and control panel (no text or symbols)MANUAL REWIND
The film can be rewound manually before the roll is finished.
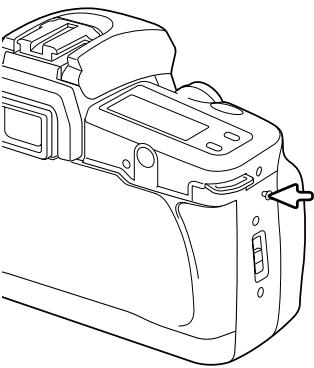
Gently press the manual-rewind button using a pen to begin rewinding the film. Only use blunt objects. Sharp objects may damage the camera.
Wait until the film is completely rewound; zero (0) is displayed on the frame counter and the cartridge mark blinks on the data panel to indicate the camera can be opened to remove the film.
Slide the back-cover release down to open the camera and remove the film. Close the back cover taking care not to catch the strap. To load a new roll of film, see page 16.
A SHORT GUIDE TO PHOTOGRAPHY
Photography can be a rewarding pursuit. It is a broad and disciplined field that can take years to master. But the pleasure in making photographs and the joy of capturing a magical moment cannot be compared. The guide is an introduction to some basic photographic principles.
The lens aperture controls not only exposure, but also depth of field; the area between the closest object in focus and the furthest object in focus. The larger the aperture value, the greater the depth of field and the longer the shutter speed needed to make the exposure. The smaller the aperture value, the shallower the depth of field and the faster the shutter speed needed to make the exposure. Usually landscape photographs use a large depth of field (large aperture value) to keep the foreground and background in focus, and portraits use a shallow depth of field (small aperture value) to separate the subject from the background.
Depth of field also changes with focal length. The shorter the focal length, the greater the depth of field; the longer the focal length, the shallower the depth of field.

natural_image
Black-and-white photo of a smiling child holding an object, outdoors under a cloudy sky (no text or symbols visible)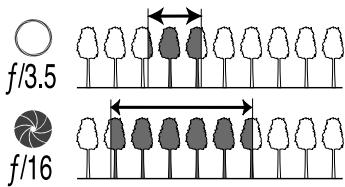
natural_image
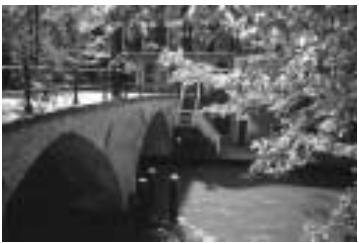
Black-and-white photo of a stone arch bridge over a river, surrounded by trees and a small building (no visible text or symbols)
natural_image
Black and white photo of a cascading waterfall surrounded by rocks (no text or symbols visible)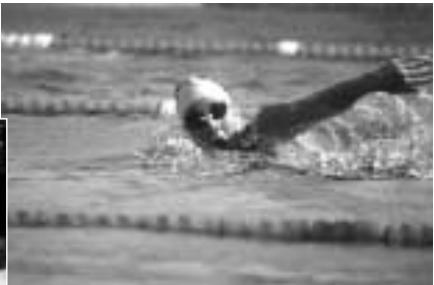
natural_image
Swimmer diving into pool with lane markings (no visible text or symbols)The shutter controls not only exposure, but also the ability to stop motion. Fast shutter speeds are used in sport photography to stop action. Slow shutter speeds can be used to show the flow of motion such as water cascading over a waterfall. The use of a tripod is recommended with slow shutter speeds.
WHAT IS A STOP? WHAT IS AN EV?
The term “stop” comes from the name of aperture plates in old lenses. Ev stands for exposure value. A change of one stop or one Ev adjusts the exposure by a factor of two.
| +3 stops | +3.0 Ev | 8X as much light |
| +2 stops | +2.0 Ev | 4X as much light |
| +1 stop | +1.0 Ev | 2X as much light |
| Calculated exposure | ||
| -1 stop | -1.0 Ev | 1/2 as much light |
| -2 stops | -2.0 Ev | 1/4 as much light |
| -3 stops | -3.0 Ev | 1/8 as much light |
ADVANCED OPERATION
This section covers the advanced features of the camera. Read the basic operation section before moving on.
DRIVE MODES
The drive modes control how pictures are captured. The remote-control drive mode is only available with the date model.
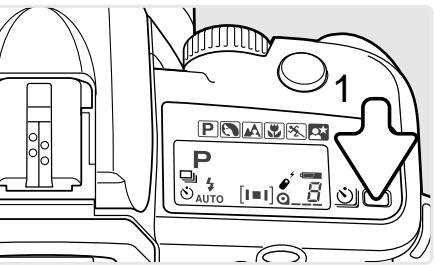
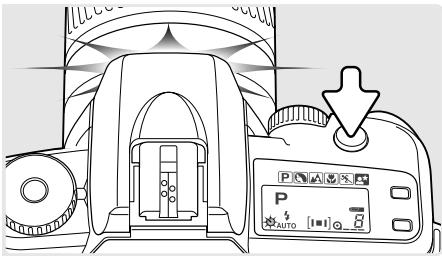
To change the drive mode, press the drive-mode button (1) until the appropriate mode is displayed on the data panel.

natural_image
Pure electrical circuit lines without any symbolsSingle-frame advance - to take a single image each time the shutter-release button is pressed (p. 21).
Self-timer - to delay the release of the shutter by approximately ten seconds. Used for self portraits (p. 33).
Continuous advance - to take a series of images when the shutter-release button is pressed and held (p. 33).
Remote control - to release the shutter from up to 5m (16.4ft.) away with the optional Remote Control RC-3 (p.34). Date model only.
SELF-TIMER NOTES
When the shutter-release button is pressed partway down, focus and exposure are locked for the picture; confirm focus lock with the viewfinder focus signal (p. 23). Do not stand directly in front of the camera when pressing the shutter-release button. To change the focus point, release the shutter button and then press it partway down again.
Press the shutter-release button all the way down to start the timer. The self-timer indicator on the data panel blinks and the flash fires four times before the shutter releases.
To cancel the self-timer countdown, change the position of the function dial. The self-timer drive mode is canceled after the picture is taken. Attach the eyepiece cap if a bright light source is behind the camera (p. 35).
CONTINUOUS-ADVANCE NOTES
The maximum frame rate with continuous advance is 1.7 frames per second with a shutter speed of 1/250 or faster, no flash, single-shot AF or manual focus, fresh batteries and no date imprinting. AF Zoom xi and Power Zoom lenses cannot be zoomed when taking pictures with continuous advance.
The frame rate is affected by the shutter speed and use of flash. The built-in flash must recharge between exposures. When using an accessory flash, the camera continues to take pictures regardless if the flash has charged.
REMOTE CONTROL NOTES
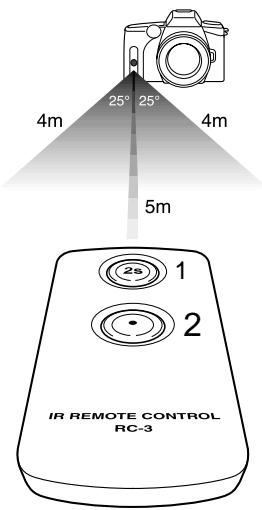
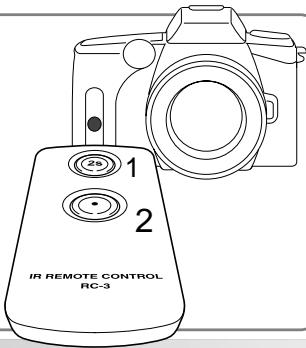
The date model can be operated up to 5m (16.4 ft.) away with the IR Remote Control RC-3 (sold separately). For detailed operation, refer to the RC-3 instruction manual. The remote-control drive mode is set with the drive-mode button (p. 32).
Point the remote control toward the camera and press the release or the delay button. If the built-in flash pops up when the release button is pressed, wait a few seconds for the flash to charge and then press the release button again.
The delay button (1) delays the release of the shutter for two seconds; the flash fires four times before the shutter releases. The release button (2) fires the shutter without a delay; the flash fires once before the shutter releases. The subject should be positioned within the focus frame; the focus and exposure are set when a remote-control button is pressed.
Focus lock can be used. To refocus the camera, press the shutter-release button partway down. Changing the position of the function dial cancels the focus and exposure lock.
The remote control can also be used with bulb exposures (p. 45), multiple exposures, and bracketing (p. 48). To save power, the drive mode is canceled if an operation is not made within five minutes. Attach the eyepiece cap if a bright light source is behind the camera (p. 35).
ATTACHING THE EYEPIECE CAP
The supplied eyepiece cap prevents light from entering through the viewfinder and affecting the exposure meter or fogging the film when using the self-timer or remote control, or during long exposures.
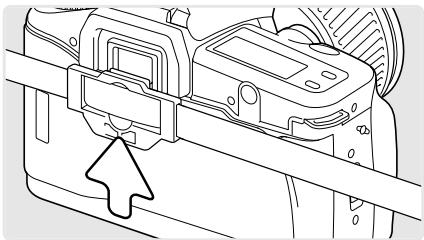
natural_image
Technical line drawing of a mechanical device with a handle and arrow indicator (no text or symbols)Slide the eyepiece cap over the viewfinder from below. The cap should be attached to the camera strap to prevent loss.
OPTIONAL VIEWFINDER ACCESSORIES
The Angle Finder V_N and Magnifier V_N can be used with this camera. The Angle Finder makes using the camera at low angles easier. The Magnifier enlarges the center of the viewfinder image for critical focusing especially for macro photography.
These accessories are mounted on the viewfinder frame as described above. For more information on these and other accessories, contact your Konica Minolta dealer.

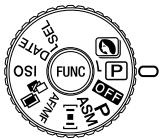
FUNCTION DIAL
The function dial controls many of the cameras creative functions and camera operations. For descriptions of the functions, refer to the appropriate sections.


AF/MF

ISO
DATE
SEL
Full-auto program (p. 37) / Subject programs (p. 26)
Power off
Exposure modes (p. 38)
Focus area selection (p. 46)
Focus modes (p. 47)
Exposure bracketing / Multiple exposure (p. 48)
Manual ISO (p. 51)
Date imprinting (p. 52) (Date model only)
Date and time setup (p. 18) (Date model only)
Many of the functions are changed with the same operation. With the function dial in the appropriate position, press and hold the function button (1) and turn the control dial (2) to change the setting. Refer to the following sections for a description on the specific operation.
Camera Notes
Except for the date imprinting function in the date model and the manual ISO settings, any changes made with the function dial are reset when using full-auto program or subject programs.
ABOUT FULL-AUTO PROGRAM
Full-auto program completely automates the picture-taking process. When the function dial is turned to or from this position, the following are reset:
| Flash mode (p. 24) | Autoflash |
| Focus area (p. 46) | Wide focus frame |
| Focus mode (p. 47) | AF |
| Drive mode (p. 32) | Single-frame advance |
| Exposure mode (p. 38) | P |
| Exposure compensation (p. 42) | 0.0 |
| Exposure bracketing (p. 48) | Off |
| Multiple exposure (p. 48) | Off |
EXPOSURE WARNING - PROGRAM
![P 2000 32 AUTO [1] [1]](/content/2025/01/139828/images/f15551165b77421e1cf180077df8c554d2013b2d09de73dc5f080a1ed8319956.jpg)
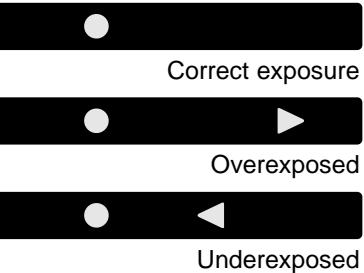
When using full-auto program, subject programs, or program exposure, if the required exposure is beyond the shutter speed and aperture range, the shutter speed and aperture displays blink on the data panel. One of the viewfinder exposure indicators blink to show if the displayed exposure will cause underexposure (<) or overexposure (>).
In bright conditions, use a neutral density filter on the lens, load a slower film, or, if using artificial lights, reduce the intensity of the illumination. In dark conditions, use the built-in flash or load a faster film.
EXPOSURE MODES
The exposure modes control how the shutter speeds and aperture are changed. Four modes are available.
Turn the function dial to the exposure-mode position (1).
While pressing the function button (2), turn the control dial (3) until the appropriate exposure mode is displayed on the data panel. Release the function button.
P
Program - controls both the shutter speed and aperture required for each exposure. The operation is the same as described in the taking-a-picture section on page 21.
A
Aperture priority - the photographer specifies the aperture, the camera sets the appropriate shutter speed for the required exposure (p. 39).
S
Shutter priority - the photographer specifies the shutter speed, the camera sets the appropriate aperture for the required exposure (p. 40).
M
Manual exposure - the photographer specifies both the shutter speed and aperture for the exposure (p. 44). Bulb exposures can be made (p. 45).
Camera Notes
If the light levels are outside the metering range of the camera, both viewfinder exposure indicators blink. In dark conditions, use the camera flash. Under bright light, use a neutral density filter to control the light level.
![APERTURE Aperture priori aperture not o area in front of 1 A 5.6 [=1] 0.2 Aperture](/content/2025/01/139828/images/9749227e8474fdc6089ba986ac98e66a52cb2fea72a1002ea47cc61bccbf8e85.jpg)
APERTURE PRIORITY - A
Aperture priority is selected with the function dial (p. 36). The aperture not only controls exposure, but also depth of field, the area in front of the camera that appears sharp, see page 30.
Turn the control dial (1) to adjust the aperture. The aperture range depends on the lens. The aperture value can be seen on the data panel.

Pressing the shutter-release button partway down (2) displays the corresponding shutter speed. Press the shutter-release button all the way down to take the picture.
natural_image
Line drawing of a digital camera with a rotary dial and adjustment knob (no text or symbols)If the required exposure is beyond the shutter speed range, the shutter-speed display blinks on the data panel. One of the viewfinder exposure indicators blink to show if the displayed exposure will cause underexposure (<) or overexposure (>). Adjust the aperture until the displays are steady.
To use fill flash, press the flash-mode (3) button to raise the flash. The shutter speed cannot exceed the flash-sync speed of 1/90 second. If the shutter-speed display blinks, adjust the aperture until the display is steady.
Flash range is dependent on the aperture, see page 25. To cancel the flash, push the flash head down.
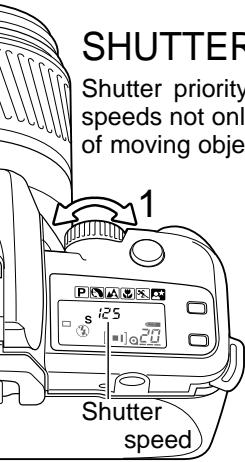
SHUTTER PRIORITY - S
Shutter priority is selected with the function dial (p. 36). Shutter speeds not only control exposure, but also the apparent sharpness of moving objects, see page 30.
Turn the control dial (1) to adjust the shutter speed between 30 and 1/2000 second. The speeds can be seen on the data panel.

Pressing the shutter-release button partway down (2) displays the corresponding aperture. Press the shutter-release button all the way down to take the picture.
![P 2000 3.5 [1-1] 18](/content/2025/01/139828/images/4343838b5bf16d10a7679067e4d8723af00d8930c781fea890433def37309e03.jpg)

natural_image
Line drawing of a DSLR camera with a rotary dial and labeled component (no text or symbols beyond the number 3)If the required exposure is beyond the aperture range, the aperture display blinks on the data panel and in the viewfinder. One of the viewfinder exposure indicators blink to show if the displayed exposure will cause underexposure (<) or overexposure (>). Adjust the shutter speed until the displays are steady.
To use fill flash, press the flash-mode (3) button to raise the flash. The shutter speed cannot exceed the flash-sync speed of 1/90 second.
Flash range is dependent on the aperture, see page 25. To cancel the flash, push the flash head down.
ABOUT SHUTTER SPEEDS
The shutter speed used for each exposure is displayed on the data panel. The following notation is used:
$$ \begin{array}{l} 1 2 5 \ 1 1 5 \ 1 5 \end{array} $$
The reciprocal is used for shutter speeds from 1/2000 second to 1/3 second. 125 is 1/125 second.
For shutter speeds of a half a second or longer, a quote mark is used to denote whole seconds. 1"5 is one and a half seconds and 15" is fifteen seconds.
WHAT IS AN f-NUMBER?
An f-number indicates the relative aperture of the lens and lets us determine how much light it lets through. But why does the number get bigger when the amount of light decreases? The answer is in the way it is written, f/4.0, f/8.0. etc. That means the focal length of the lens (f) divide by 4 or 8. So a 100mm lens at f/4 has a 25mm effective aperture (100/4) and at f/8, a 12.5mm effective aperture (100/8). The f-number indicates the size of the aperture as a fraction of the focal length of the lens.
The f-number series was carefully chosen to make controlling exposures easy. In the chart, the aperture and shutter speed combinations give the exact same exposure. Notice how the shutter speed changes to compensate for the change in aperture.
| f/2.8 | 1/2000s |
| f/4.0 | 1/1000s |
| f/5.6 | 1/500s |
| f/8.0 | 1/250s |
| f/11 | 1/125s |
| f/16 | 1/60s |
| f/22 | 1/30s |
| f/32 | 1/15s |
EXPOSURE COMPENSATION
Camera exposure can be changed by as much as ±3.0 Ev to make the final image lighter or darker. For information on Ev, see page 31. Exposure compensation can only be used with program, aperture-priority, and shutter-priority exposure modes.
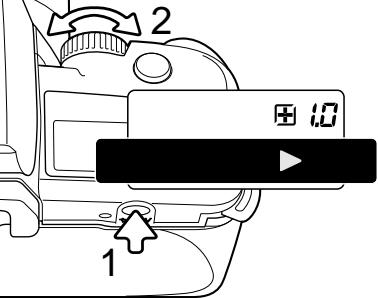
Press and hold the exposure-compensation button (1) and turn the control dial (2) to select the degree of compensation. This value is displayed on the data panel. The viewfinder exposure indicators show an increase (>) or decrease (<) in exposure compensation.
![P 6.0 +5.6 AUTO [12]](/content/2025/01/139828/images/8c021a8216b05558c27ed637c05e6fc39497af53ba519667e17332c97fe7a4e9.jpg)
Once set, the data panel exposure-compensation indicator and viewfinder exposure indicators show an increase (+ / >) or decrease (- / <) to the metered exposure.
When using exposure bracketing, the bracket is made in relation to the compensated exposure. See page 48 on how to make exposure brackets.
The viewfinder exposure indicator blinks if the exposure is outside the shutter speed or aperture control range. See the appropriate exposure mode section for more information.
Exposure compensation is not reset when the camera is turned off, but is reset if the function dial is turned to the full-auto program position.
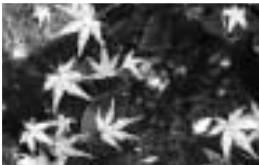
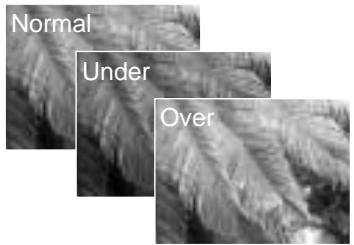
Exposure compensation is used when the camera's exposure meter is deceived by high-key or low-key subjects. For example, a very bright scene, such as a snowy landscape or a white sandy beach, can appear too dark in the final image. Before taking the picture, adjusting the exposure by +1 or +2 EV will result in an image with normal tonal values.
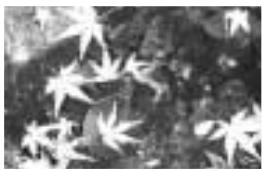
natural_image
Black-and-white close-up of white flower petals on a dark textured background (no text or symbols)Metered exposure
natural_image
Black and white close-up of maple leaves on a dark background (no text or symbols)-1.0Ev

natural_image
Black and white close-up of maple leaves on a dark background (no text or symbols)-2.0Ev
In the example above, the dark water caused the camera to overexpose the image making it bright and washed-out. By compensating the exposure, detail is brought out in the leaves, and the stones and water appear richer.
Konica Minolta History
We believe innovation and creativity is the cornerstone of our success. The Electro-zoom X was an exercise in camera design and was unveiled at Photokina in 1966.
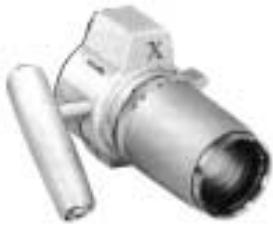
natural_image
Close-up of a metallic mechanical component with a cylindrical shaft and flange (no visible text or symbols)The Electro-zoom X is an aperture-priority SLR with a built-in 30 - 120mm f/3.5 zoom lens. It took twenty 12 X 17mm images on a roll of 16mm film. The shutter button and battery chamber are located in the grip. Only a few prototypes were built making it one of Minolta's rarest camera.
MANUAL EXPOSURE - M
Manual exposure is selected with the function dial (p. 36). For more on aperture and shutter control, see page 30. Bulb exposures can also be made, see next page.
![Aperture 125 5.6 M 2.2 [■] ⊙ 2.2 Shutter speed 2](/content/2025/01/139828/images/2872a470574c5544a220089da6f08b097c0a2c7276a31fb590cfa80ca68809f5.jpg)
Turn the control dial (1) to adjust the shutter speed between 30 and 1/2000 second.
Press and hold the exposure compensation button (2) and turn the control dial (1) to adjust the aperture. The aperture range depends on the lens. The shutter speed and aperture values are displayed on the data panel.
The viewfinder exposure indicators show if the set exposure is the same as, greater ( > ), or less ( < ) than the exposure determined by the meter. The indicators light when the difference between the set exposure and metered exposure is 0.5 Ev (1/2 stop) or greater.
natural_image
Line drawing of a digital camera with labeled parts (no text or symbols present)To use fill flash, press the flash-mode (3) button to raise the flash. The flash exposure is controlled automatically by the camera.
The shutter speed cannot exceed the flash-sync speed of 1/90 second. Flash range is dependent on the aperture, see page 25. To cancel the flash, push the flash head down.
BULB EXPOSURES
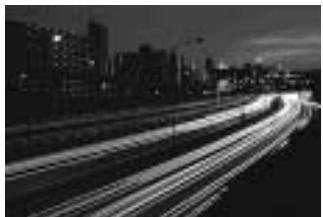
Bulb exposures can be taken in the manual-exposure mode. Bulb allows the shutter to remain open for as long as the shutter-release button is pressed. The camera's exposure meter cannot calculate bulb exposures; a separate light meter is recommended.
natural_image
Nighttime highway with light trails from multiple lanes, city skyline in background (no visible text or symbols)![Aperture M bulb 5.6 [1 2 3]](/content/2025/01/139828/images/bb7380ed9e898f3a7d77c9b89396d96580274e36ae4151f2f28a7aa9f4f0b40d.jpg)
In manual-exposure mode, use the control dial (1) to decrease the shutter speed until bulb appears in the shutter-speed display on the data panel.
Press and hold the exposure-compensation button (2) and turn the control dial to select the aperture.
Press and hold the shutter-release button for the duration of the exposure.
A tripod is recommended for bulb exposures. If the light level prevents the camera from focusing, use manual focus (p. 47).
Date Model
The optional IR Remote Control RC-3 can be used to open and close the shutter for bulb exposures in the remote-control drive mode (p. 32). The delay button (1) delays the release of the shutter for two seconds; the flash fires four times before the shutter opens. The release button (2) fires the shutter without a delay; the flash fires once before the shutter opens. Pressing the buttons a second time ends the exposure.
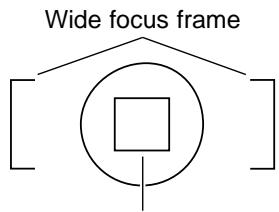
FOCUS AREA SELECTION
The AF focus area can be specified. Four options are available.
Turn the function dial to the focus area selection position (1).
While pressing the function button (2), turn the control dial (3) until the appropriate focus area is displayed on the data panel. Release the function button.
![[|□|]](/content/2025/01/139828/images/1ff598c1bd412346c9ea56075755efdad0519e356dd7357c59910aadb7f4f686.jpg)
Wide focus frame

natural_image
Grayscale image showing a blurred background with a central square and two rectangular brackets, no visible text or symbols.![[ ]](/content/2025/01/139828/images/57f6b5d1f3022d7f2f615b9f92e5e47716b29cab9dc6ac3013d1f7b1bcbdd68e.jpg)
Local focus area

natural_image
Abstract grayscale image with geometric shapes and a central circle, no visible text or symbols
natural_image
Simple geometric shape: a black square centered within a larger black square, on a light gray background (no text or symbols)Spot focus area

natural_image
Grayscale image showing a blurred background with a central square and a magnified circular region, no visible text or symbols.![[ ]](/content/2025/01/139828/images/c82befb761f99ee67766eda19cac7792324651c569ba1c067716640f94f6f7ff.jpg)
Local focus area

natural_image
Grayscale image showing a blurred background with indistinct shapes and no visible text or symbolsThe selected area remains in effect until changed with the function dial or when the position of the function dial is set to the full-auto program position. Only the wide focus frame is available with full-auto program or subject programs.
FOCUS MODES
The focus mode can be switched between autofocus and manual focus. The manual-focus indicator (MF) is displayed on the data panel when selected.
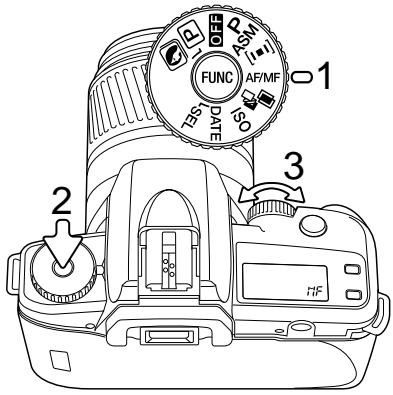
Turn the function dial to the focus -mode position (1).
While pressing the function button (2), turn the control dial (3) until AF (autofocus) or MF (manual focus) is displayed in the frame counter. Release the function button.
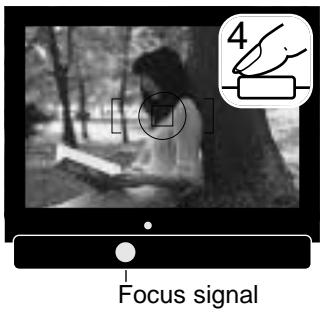
To use manual focus, turn the focusing ring on the lens until the viewfinder image is sharp.
The AF system can assist focusing. Place the subject in the focus frame. While pressing the shutter-release button partway down (4), turn the focusing ring until the focus signal appears.
The metered exposure may be different between autofocus and manual focus.
EXPOSURE BRACKETING /
MULTIPLE EXPOSURES
Turn the function dial to the exposure bracketing / multiple exposure position (1).
While pressing the function button (2), turn the control dial (3) until appropriate function is displayed on the data panel. Release the function button.

br 0.5

br 1.0
Exposure bracketing - to make a three-image bracket of a scene. Bracketing is a method of taking a series of images of a static subject in which each image has a slight variation in exposure. Bracket your exposures when shooting slides and other films with a narrow exposure latitude. The bracketing step can be specified between 0.5Ev and 1.0Ev. The larger the number, the greater the difference between exposures.

ME
Multiple exposure - to expose two or more images on the same frame.
OFF
Off - to disable the exposure bracketing and multiple exposure functions.
These functions cannot be used with full-auto program or subject programs.
Multiple exposure
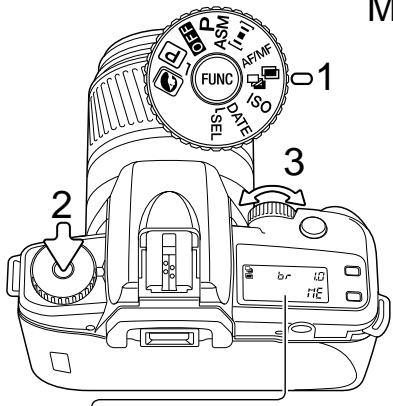
natural_image
Black and white close-up of blooming flowers with visible petals and centers (no text or symbols)BRACKETING NOTES
The order of the bracketing series is normal exposure, underexposure, and overexposure. The built-in or accessory flash cannot be used with bracketing; the flash is automatically canceled.
0.5 Ev bracket
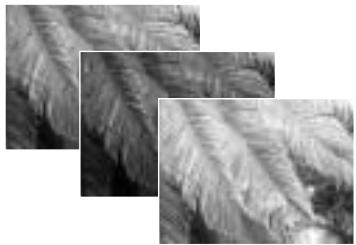
natural_image
Close-up of textured, layered plant material with no visible text or symbols1.0 Ev bracket
When the bracketing function is initially selected, the drive mode is automatically set to continuous advance. Compose the picture as described in the taking-a-picture section (p. 21). The focus and exposure are locked with the first frame.
Press and hold the shutter-release button all the way down to make the bracketing series; three consecutive frames are taken. If the shutter button is released before the last frame of the series is taken, the bracket series is reset.
![P br 1 ③ [u]er 29 P br 2 ④ [u]er 37 P br 3 ④ [u]r 31](/content/2025/01/139828/images/f1aa1e6fbdd26985cad815e5b22fefb733ffbd1eee80e097f0757fbeaf32d8fd.jpg)
Changing the drive mode (p. 32) to single-frame advance, self-timer, or remote control allows each frame to be taken one at a time; the self-timer drive mode is reset after each exposure. The data panel indicates the next bracketing frame in the series.
MULTIPLE EXPOSURE NOTES
Turn the function dial to the exposure bracketing / multiple exposure position (1).
While pressing the function button (2), turn the control dial (3) until "ME" is displayed in the frame counter. Release the function button. The first exposure can be taken.
![P AUTO [1-1] IME](/content/2025/01/139828/images/f316942b003890fb9176e5fc83a2db579c89ac3645b639bf42ae45e4c8ca1373.jpg)
ME will blink on the data panel after the initial exposure to indicate the next exposure will be the final one. Press the shutter-release button to take the second exposure and advance the film. The multiple-exposure mode is canceled after the last exposure.
To make more than two exposures, press the function button and turn the control dial counterclockwise to stop “ME” blinking after the initial exposure. An unlimited number of exposures can be made by repeating this procedure.
The camera meter indicates the required exposure for a single picture. Depending on the scene, the exposure may have to be compensated. The built-in flash can be used, but overexposure could result.
MANUAL ISO
The film speed can be set manually from ISO 6 to ISO 6400 in 1/3 Ev steps.
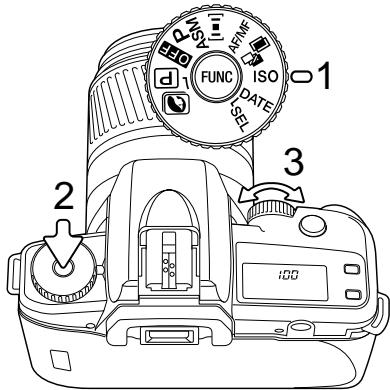
Turn the function dial to the ISO position (1).
While pressing the function button (2), turn the control dial (3) until the appropriate ISO is displayed on the data panel. Release the function button to complete the operation.
The film speed of a loaded roll of film can be confirmed through the film window in the back cover of the camera.
Camera Notes
When using DX-coded film, the film speed is set automatically in one Ev increments from ISO 25 to ISO 3200: 25, 50, 100, 200, 400, 800, 1600, and 3200. Film with speeds not listed are automatically set to the first value below the rated ISO, which will cause overexposure. For example, ISO 125 film is set to ISO 100. Film speed can be set manually in 1/3 Ev increments with the function dial.
DATE IMPRINTING - DATE MODEL
The date or the day and time a picture is taken can be imprinted in the bottom left corner of a horizontal image. See page 18 to set camera's clock and calendar.
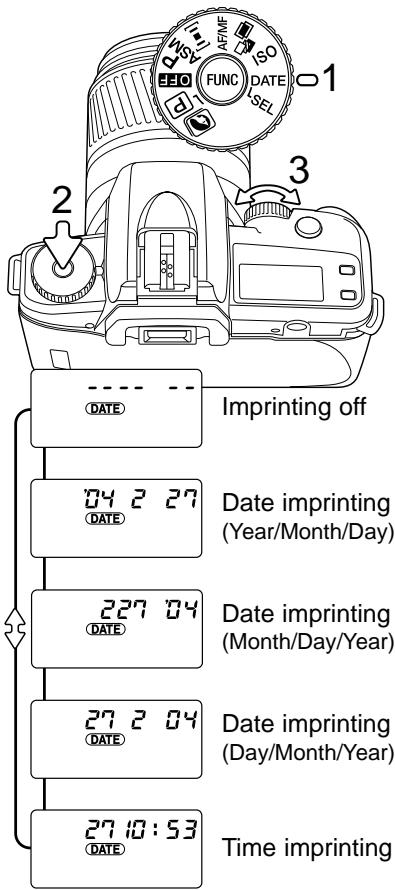
Turn the function dial (1) to the date position.
While pressing the function button (2), turn the control dial (3) to select date imprinting, time imprinting, or imprinting off. Three formats are available with date imprinting. The date indicator remains on the data panel to show imprinting is active.
Imprinted data may be difficult to read if the lower-left corner of the photograph is bright or non-uniform. Do not use the data back when temperatures are outside the range of 0^ to 50^ C ( 32^ to 122^ F). Since the date is recorded when the film is advanced to the next frame, sometimes the last frame of the roll will not have the date imprinted on it.
AF ILLUMINATOR
The built-in flash is used as an AF Illuminator. When the scene is too dark for the camera to focus, the built-in flash fires a few short bursts when the shutter-release button is pressed partway down to provide the light necessary for the camera to focus.
The range of the AF Illuminator is approximately 1 to 5 m (3.3 to 16.4 ft.). When an accessory flash is attached, the flash unit is used as the AF illuminator in place of the camera's built-in flash. The AF illuminator will not fire when flash cancel or the sports action subject program is selected. The AF illuminator may not operate with focal lengths of 300mm or longer or with the 3x-1x Macro Zoom.
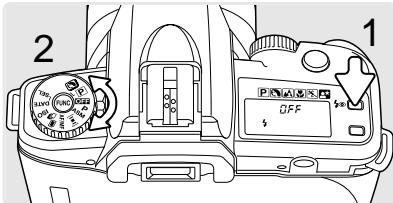
The AF Illuminator can be turned off and on. While pressing the flash mode button (1), turn the camera on with the function dial (2); the data panel displays the status of the AF Illuminator.
SHUTTER LOCK
Shutter can only be released when a lens is mounted on the camera. The shutter lock can be disabled when the camera is attached to a telescope or microscope.

While pressing the drive mode button (1), turn the camera on with the function dial (2); the data panel displays the status of the shutter lock.
ACCESSORY NOTES
This product is designed to work with accessories manufactured and distributed by Konica Minolta. Using accessories or equipment not endorsed by Konica Minolta may result in unsatisfactory performance or damage to the product and its accessories.
LENS NOTES
Only Minolta A-mount lenses can be used with this camera. For the current line of our lenses, contact your Konica Minolta dealer.
This camera is sold by itself or with the following lens:
| AF 28-100mm f/3.5-5.6 (D) | |
| Construction | 10 elements in 8 groups |
| Angle of view | 75° - 24° |
| Minimum focus distance | 0.48m / 1.6ft |
| Maximum magnification | 0.25X |
| Minimum aperture | f/22-38 |
| Filter diameter | 55mm |
| Dimensions | 66mm (dia.) X 78mm (L)2.6in. (dia.) X 3.1in. (L) |
| Weight | 240g / 8.5oz. |
Specifications are based on the latest information available at the time of printing and are subject to change without notice.
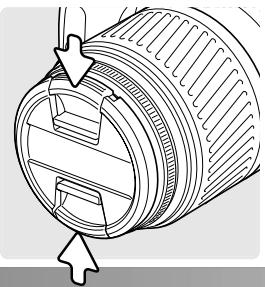
When the lens is not in use, always attach the lens cap to protect front element. Press the tabs on the lens cap to remove or attach.
natural_image
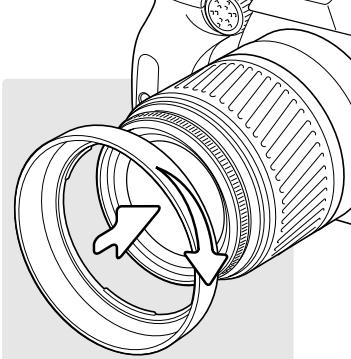
Technical line drawing of a mechanical component with no visible text or symbolsA lens hood improves image quality by reducing flare, non-image forming light.
Slide the lens hood onto the bayonet mount at the end of the lens. Turn the hood clockwise until it clicks into place.
The hood can be reverse mounted for storage. The lens cap can be attached with the hood mounted.
natural_image
Line drawing of a camera lens assembly with directional arrows indicating rotation (no text or symbols)Lens shadowing occurs when the lens or lens hood blocks part of the output from the built-in flash. Lens shadowing appears as a semi-circular shadow at the bottom (horizontal pictures) or side (vertical pictures) of the image. Remove the lens hood before using the built-in flash.
Lens shadowing may occur with the following lenses at the shorter focal lengths:
AF Zoom 28-70mm f/2.8G
AF Zoom 17-35mm f/3.5G
AF Zoom 28-135mm f/4.0-4.5
AF Zoom 28-85mm f/3.5-4.5
The built-in flash can not be used with the following lenses:
AF 300mm f/2.8 Apo G(HS)
Do not use the built-in or accessory flash when using a filter with a filter factor greater than 0, a close-up lens, or the focus-range limiter or macro release on certain lenses. This will result in an incorrect exposure.
ACCESSORY FLASH NOTES
When using an accessory flash, the viewfinder flash signals are the same for the built-in flash (p. 25). The following flash units are compatible with this camera:
Program/Maxxum Flash 5600HS (D) Program/Maxxum Flash 3600HS (D) Program/Maxxum Flash 2500 (D)
Contact your Konica Minolta dealer for information on these products.
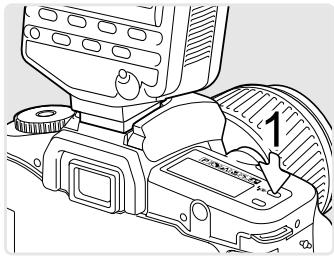
The flash mode of a mounted accessory flash can be set by pressing the flash-mode button (1) on the camera. The flash mode is displayed on the data panel.
natural_image
Diagram of a DSLR camera with a dial indicator and numbered component (no text or symbols present)Do not use the built-in or accessory flash when using a filter with a filter factor greater than 0, a close-up lens, or the focus-range limiter or macro release on certain lenses. This will result in an incorrect exposure.
WIRELESS CONTROLLER IR-1N
The camera can be permanently damaged if used with the Wireless Controller IR-1N.
ABOUT FLASH METERING
The metering mode switches automatically for both the built-in and accessory flash depending on the lens in use:
ADI Flash Metering - when using D series lenses. ADI (Advanced Distance Integration) metering uses the distance information from D series lenses in addition to Pre-flash TTL metering to control the exposure. This metering system is less influenced by background conditions or the subject's reflectance.
Pre-flash TTL Flash Metering - when using non-D series lenses. Pre-flash TTL (Through The Lens) flash metering system controls the flash during the exposure automatically.
This manual contains information on products and accessories available at the time of printing. To obtain compatibility information for products not contained in this manual, contact a Konica Minolta service facility.
TROUBLESHOOTING
Contact your nearest Konica Minolta Service Facility if the following information does not cover the problem or the condition continues.
| Problem | Cause | Solution |
| Autofocus does not work when the shutter-release button is pressed partway down. | A special focusing situation is preventing the AF system from focusing (p. 22). | Use focus lock (p. 23) or manual focus (p. 47). |
| Camera is set to manual focus. | Change the focus mode (p. 47). | |
| Subject is too close. | Check the lens' minimum focus distance. | |
| Shutter cannot be released. | Focus cannot be confirmed. | Use focus lock (p. 23) or manual focus (p. 47). |
| Camera is attached to a microscope or telescope. | Turn off shutter lock (p. 53). | |
| Flash fires when the shutter-release button is pressed partway down. | Flash was used as AF illuminator to assist the autofocus system. | To turn off the AF illuminator or set the flash mode to flash cancel. |
| Picture is blurred. | Flash did not fire in a low-light situation and the shutter speed was slow. | Use fill flash, a tripod, or faster film. |
| Flash picture is too dark. | Subject is beyond flash range. | Make sure the subject is within the flash range. |
| When using the built-in flash, the bottom of the picture is dark. | Lens hood was attached or subject distance was less than 1m (3.3ft). | Remove the lens hood. To prevent lens shadowing, the subject must be at least 1m (3.3ft.) from the camera. |
| Err appears on the data panel. | Remove the batteries. Reinsert them after turning the camera off and on. If normal camera operation does not resume or the camera malfunctions repeatedly, contact an authorized Konica Minolta service facility. | |
CAUTION: opening the back cover without rewinding the film will fog the pictures; use a film changing bag, completely dark room, or place the camera under a thick blanket.
To remove the film from the camera in case of a malfunction, use the following procedure:
- Turn the camera off.
- Open the back cover.
- Gently pull the film off the take-up spool and rewind it back into the cartridge.
Contact an authorized Konica Minolta service facility.
CARE AND STORAGE OPERATING CONDITIONS
- This camera is designed for use from -20^ to 50^ (4 to 122^ ).
- Never leave your camera where it may be subjected to extreme temperatures such as in the glove compartment of a car.
- The data panel response time will be slow at cold temperatures. The display will temporarily darken at high temperatures, but will be restored when the temperature normalizes.
- This camera is not waterproof or splashproof. When using the camera in the rain, protect the camera and lens.
- Never subject the camera to extreme humidity.
- To prevent condensation from forming, place the camera in a sealed plastic bag when bringing it from cold environment to a warm one. Allow it to come to room temperature before removing it from the bag.
- The low-battery indicator may appear even with fresh batteries depending on the storage conditions. To restore camera power, turn the camera on and off several times.
- Battery capacity decreases at colder temperatures. Keep your camera and spare batteries in a warm inside pocket when shooting in cold weather. Batteries will regain some of their capacity when warmed to normal operating temperature.
STORAGE
When storing your camera for extended periods:
• Always attach the protective caps.
- Store in a cool, dry, and well-ventilated area away from dust and chemicals such as moth balls. For long periods, place the camera in an airtight container with a silica gel drying agent.
- Periodically release the camera's shutter to keep it operating properly.
- Before using the camera after prolonged storage, check that it is operating properly.
CLEANING
- If the camera or lens barrel is dirty, wipe it gently with a soft, clean, dry cloth. If the camera or lens comes in contact with sand, gently blow away loose particles - wiping may scratch the surface.
- To clean the lens surface, first brush away any dust or sand then gently wipe the lens with a cloth or tissue designed for optics. Use lens cleaning fluid if necessary.
- Never place lens fluid directly on the lens.
- Never touch the interior of the camera, especially the shutter and mirror, doing so may impair their alignment and movement.
- Dust on the mirror will not affect the exposure but may affect the focus. Use a blower brush to remove dust from or around the mirror.
- Never use compressed air to clean the camera's interior; it may damage sensitive internal components.
- Never use organic solvents to clean the camera.
- Never touch the lens surface with your fingers.
BEFORE IMPORTANT EVENTS
- Check the camera's operation carefully, or take test photographs before an event or journey.
- Konica Minolta is not responsible for any loss that may occur due to an equipment malfunction.
QUESTIONS AND SERVICE
- If you have questions about your camera, contact your local camera dealer or write to the Konica Minolta distributor in your area.
- Before shipping your camera for repair, please contact an authorized Konica Minolta service facility for instructions.
TECHNICAL SPECIFICATIONS
| Camera type: | 35mm SLR with built-in flash and autoexposure. |
| Lens mount: | Minolta A-type bayonet mount |
| Viewfinder: | SLR roof mirror type, 90% field of view.Magnification: 0.75X |
| Shutter type: | Electronically-controlled, vertical-traverse, focal-plane type. |
| Shutter speeds: | 30 - 1/2000s, bulb |
| Flash sync. speed: | 1/90s |
| Focus system: | TTL phase-detection system using CCD line sensors. Autofocus and manual focus modes. |
| AF sensitivity range: | EV -1 to18 (ISO 100) |
| AF illuminator: | Built-in with range of 1.0 - 5.0m (3.3 - 16.4 ft.). Automatically activated in low-light and low-contrast situations. |
| AF control: | Automatic AF - automatic selection between single-shot AF and continuous AF depending on subject movement. |
| Exposure modes: | P, A, S, M, and 5 Subject Program modes (Portrait, Landscape, Close-up, Sports, Night Portrait) |
| Metering: | TTL metering, direct TTL flash metering. |
| Metering cell: | 2-segment SPC. |
| Metering range: | EV 4 - 20 (ISO 100, f/1.4 lens) |
| Film-speed setting: | Automatic: ISO 25 - 3200 (DX-coded film)Manual: ISO 6 - 6400 in 1/3 Ev increments.Flash: ISO 25 - 1000. |
Film loading: Auto load
Rewind: Auto and manual rewind.
Frame counter: Shows number of exposures taken.
Flash guide number: 12 (ISO 100 in meters)
39 (ISO 100 in feet)
Flash coverage: 28mm focal length lens.
Power source: Two CR2 lithium batteries
Battery performance:
| Condition A | Condition B | |||
| Flash use | 20°C/68°F | -10°C/14°F | 20°C/68°F | -10°C/14°F |
| 0% | 30 rolls | 24 rolls | 45 rolls | 35 rolls |
| 50% | 14 rolls | 11 rolls | 18 rolls | 14 rolls |
| 100% | 9 rolls | 7 rolls | 11 rolls | 9 rolls |
Based on 24 exposure rolls taken at a rate of two rolls per month. Battery performance varies with conditions.
Condition A: Minolta 28-100 f/3.5-5.6 lens focused from infinity to 2m (6.6 ft.) three times and the shutter-release button held partway down for ten seconds before each exposure.
Condition B: Minolta 28-100 f/3.5-5.6 lens focused from infinity to 2m (6.6 ft.) and the shutter-release button held partway down for five seconds before each exposure.
Dimensions: 135.0 (W) x 92.0 (H) x 66.5 (D) mm
5.3 (W) x 3.6 (H) x 2.6 (D) in.
Weight : 335g (11.8oz) without camera battery.
Specifications and accessories are based on the latest information available at the time of printing and are subject to change without notice.

natural_image
Simple black circular shape with horizontal white lines inside, resembling a stylized letter 'B' or symbol (no text or symbols present)KONICA MINOLTA
KONICA MINOLTA PHOTO IMAGING, INC.
© 2003 Konica Minolta Photo Imaging, Inc. under the Berne Convention and the Universal Copyright Convention.

9222-2169-11 NI-B403
Printed in China
- DYNAX 40 DYNAX 30 MAXXUM 50
- FOR PROPER AND SAFE USE
- WARNING
- CAUTION
- TABLE OF CONTENTS
- NAMES OF PARTS
- DATA PANEL
- VIEWFINDER
- GETTING STARTED
- ATTACHING THE STRAP
- ATTACHING A LENS
- REMOVING A LENS
- INSTALLING BATTERIES
- Date Model
- BATTERY-CONDITION INDICATOR
- LOADING FILM
- Camera Notes
- SETTING DATE AND TIME - DATE MODEL
- CHANGING BATTERIES - DATE MODEL
- BASIC OPERATION
- TURNING THE CAMERA ON
- HANDLING THE CAMERA
- TAKING A PICTURE
- FOCUS SIGNALS
- SPECIAL FOCUSING SITUATIONS
- FOCUS LOCK
- FLASH MODES
- FLASH SIGNALS
- FLASH RANGE
- SUBJECT PROGRAMS
- FILM REWIND
- MANUAL REWIND
- A SHORT GUIDE TO PHOTOGRAPHY
- WHAT IS A STOP? WHAT IS AN EV?
- ADVANCED OPERATION
- DRIVE MODES
- SELF-TIMER NOTES
- CONTINUOUS-ADVANCE NOTES
- REMOTE CONTROL NOTES
- ATTACHING THE EYEPIECE CAP
- OPTIONAL VIEWFINDER ACCESSORIES
- FUNCTION DIAL
- ABOUT FULL-AUTO PROGRAM
- EXPOSURE WARNING - PROGRAM
- EXPOSURE MODES
- P
- A
- S
- M
- APERTURE PRIORITY - A
- SHUTTER PRIORITY - S
- ABOUT SHUTTER SPEEDS
- WHAT IS AN f-NUMBER?
- EXPOSURE COMPENSATION
- Konica Minolta History
- MANUAL EXPOSURE - M
- BULB EXPOSURES
- FOCUS AREA SELECTION
- FOCUS MODES
- EXPOSURE BRACKETING /
- MULTIPLE EXPOSURES
- BRACKETING NOTES
- MULTIPLE EXPOSURE NOTES
- MANUAL ISO
- DATE IMPRINTING - DATE MODEL
- AF ILLUMINATOR
- SHUTTER LOCK
- ACCESSORY NOTES
- LENS NOTES
- ACCESSORY FLASH NOTES
- WIRELESS CONTROLLER IR-1N
- ABOUT FLASH METERING
- TROUBLESHOOTING
- CARE AND STORAGE OPERATING CONDITIONS
- STORAGE
- CLEANING
- BEFORE IMPORTANT EVENTS
- QUESTIONS AND SERVICE
- KONICA MINOLTA
- KONICA MINOLTA PHOTO IMAGING, INC.
Brand : KONICA MINOLTA
Model : DYNAX 30
Category : Film SLR Camera