
DIMAGE V SOFTWARE-MAC - Photography Software KONICA MINOLTA - Free user manual and instructions
Find the device manual for free DIMAGE V SOFTWARE-MAC KONICA MINOLTA in PDF.

| Product Type | Control software for digital camera |
| Brand | KONICA MINOLTA |
| Model | DIMAGE V SOFTWARE-MAC |
| System Compatibility | Macintosh 68030 25 MHz or Power Mac, System 7.5 or later |
| Required RAM | 12 MB (16 MB for Power Mac) |
| Required Hard Disk Space | 20 MB |
| Minimum Display Resolution | 640 x 480 pixels |
| QuickTime Required | Version 2.0 or later |
| Camera Connection | SC-422 serial cable (modem or printer port) |
| Supported Image Formats | PICT, JPEG, EXIF, TIFF |
| Maximum Image Resolution | 640 x 480 pixels (VGA) |
| Editing Functions | Cropping, brightness/contrast, color balance, rotation, mirror, sharpen/soften, fade |
| Advanced Functions | Remote shooting, time-lapse, QuickTime movie creation |
| Printing | ColorSync 2.0 compatible |
| Included Plug-in | QTIC Acquire for Adobe PhotoDeluxe |
| Available Languages | English, French, German, etc. (depending on CD-ROM) |
| Provided Manual | Instruction manual in PDF format (44 pages) |
Frequently Asked Questions - DIMAGE V SOFTWARE-MAC KONICA MINOLTA
User questions about DIMAGE V SOFTWARE-MAC KONICA MINOLTA
0 question about this device. Answer the ones you know or ask your own.
Ask a new question about this device
Download the instructions for your Photography Software in PDF format for free! Find your manual DIMAGE V SOFTWARE-MAC - KONICA MINOLTA and take your electronic device back in hand. On this page are published all the documents necessary for the use of your device. DIMAGE V SOFTWARE-MAC by KONICA MINOLTA.
USER MANUAL DIMAGE V SOFTWARE-MAC KONICA MINOLTA
natural_image
Monochrome illustration of a butterfly with patterned wings (no text or symbols)Minolta (UK) LTD. Photographie Division
Precedent Drive, Rooksley, Milton Keynes, MK13 8HF, England
Tel. 01 908 200 400
Fax. 01 908 208 334
Minolta (IRL) Ltd. (Photopak Sales)
241 Western Industrial Estate, Naas Road, Dublin 12, Ireland
Tel. 01 45 66 400
Fax. 01 45 00 452
Minolta Portugal Lda
© 1997 Minolta Co., Ltd.
under the Berne Convention and
Universal Copyright Convention
Edited in Germany
9222-2755-37 (P9704-A704)
Dimâge V
natural_image
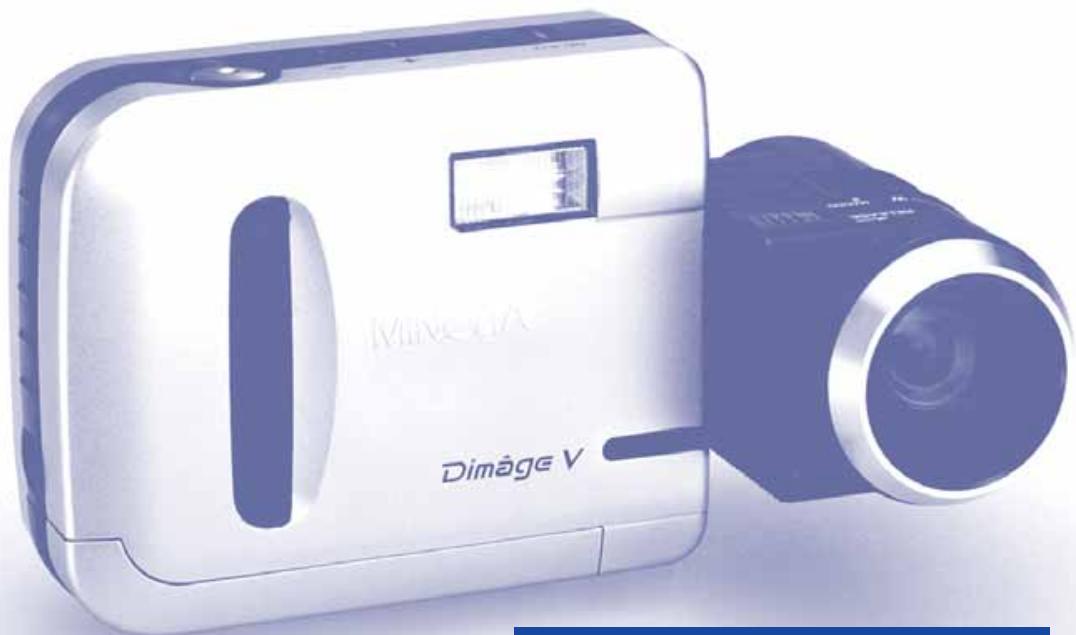
Exterior view of a white and blue D Image V digital camera with lens (no visible text or symbols beyond branding)Macintosh Version
Thank you for purchasing the Minolta Dimâge V with the Dimâge V Image Control Software. The Dimâge V control software is the driver software for exchanging data between your Macintosh and the camera. The software lets you:
- Display thumbnail previews of images on the computer monitor.
- Copy images to the camera, your hard disk, or removable media such as floppy disks.
- Delete images stored on the image memory card.
- Edit images copied to the hard drive or removable media. Try cropping, rotating adjusting brightness/contrast, or another editing function.
- Print your images.
- Save your images in a variety of convenient file formats.
- Trigger the camera's shutter remotely with the Macintosh.
- Make time lapse movies with Dimâge V images.
- This instruction manual may not be copied in part or whole without prior permission from Minolta Co., Ltd.
© 1997 Minolta Co., Ltd.
- Every necessary precaution has been taken to ensure the accuracy of this manual. Please contact us if you have any questions, find any mistakes, or notice missing information.
- Minolta is not responsible for loss, damage, or other results caused by operation.
- No part of books, magazines, music, or other productions that were released under a copyright may be used, copied, or changed without the prior permission from the author, copyright holder, or the successor to the copyright holder except for personal, home, or equivalent use.
Please take the time to read through this instruction manual so you will be able to take full advantage of the features.
This manual assumes you have a working knowledge of the Macintosh and its operating conventions. Familiarity with the mouse and standard Macintosh menus and commands is necessary before operating the Dimâge V control software.
This manual does not instruct in the:
- basic use of the Macintosh or its operating system.
- use of Adobe PhotoDeluxe™.
Please refer to the Apple Macintosh user's guide or the on-line help guide in the Adobe PhotoDeluxe™ application.
Instructions for installing Adobe PhotoDeluxe ^TM start on page 84 of this manual. Instructions for using Adobe PhotoDeluxe ^TM are built into the PhotoDeluxe ^TM software.
- Macintosh®, the Apple logo, Apple®, Power Macintosh®, QuickTime® and AppleTalk® are registered trademarks of Apple Computer, Inc.
- Adobe® and Adobe® PhotoDeluxe™ are registered trademarks of Adobe Systems Incorporated.
- SmartMedia™ is the registered trademark of Toshiba Corporation.
- Other company names and product names are the trademarks and registered trademarks of their respective companies.
TABLE OF CONTENTS
TABLE OF CONTENTS 2
BEFORE YOU BEGIN ....4
Checking the Packing List ....4
System Requirements 6
CONNECTING 8
INSTALLING THE SOFTWARE ....10
Viewing and Retouching Images .....14
Operating the Camera with the Computer .....16
LAUNCHING THE SOFTWARE ....18
VIEWER PANEL ....21
Opening the Viewer Panel ....22
Copying Selected Images 24
Copying All Images ....26
Deleting Selected Images 28
Deleting All Images ....30
Sorting Images ....32
Drag and Drop - Copying Images .....34
Drag and Drop - Deleting Images .....35
Displaying the Full Image ....36
IMAGE PANEL ....38
Opening the Image Panel .....39
Magnifying or Reducing the View .....39
Cropping Images ....40
Adjusting Brightness and Contrast .....42
Adjusting Color Balance ....43
Subtle Brightness Change ....44
Sharpening and Softening ....45
Flipping Images ....46
Rotating Images 47
Printing Images ....48
Saving Images - File Formats 49
Saving Images ....50
DIMÂGE V MAIN PANEL ....52
Opening the Dimage V Main Panel ....53
Displaying Camera Status ....54
Remote Recording 55
Exposure Compensation ....57
Self-timer ....58
Resetting the Camera Date/Time 59
Formatting Image Memory Cards ....60
Copying: From the Mac to the Camera .....62
Creating a Time Lapse Movie ....64
MOVIE PANEL 66
The Movie Window ....67
Display Options ....68
Playback Modes ....69
Drag and Drop - Creating a Time Lapse Movie .....70
Changing the Movie File Format ....73
Recompressing Movie Files ....75
TROUBLE SHOOTING ....79
System Requirements 84
Installing PhotoDeluxe ^TM .....84
Installing the QTIC Plug-in Module .....85
CHECKING THE PACKING LIST
Check the packing list before you begin. If some parts are missing, contact your camera dealer or a Minolta Service Facility listed on the front cover of this manual.
Items you will need to operate the Macintosh software:
- "Dimâge V Image Control" Windows/Macintosh CD-ROM (Software for Windows and Macintosh)
- "Dimâge V Instruction Manuals" Windows/Macintosh CD-ROM (Software Windows/Macintosh and Digital Camera Dimâge V)
- Serial Cable SC-422 for the Macintosh
• Image Memory Card RM-2S - Dimâge V Digital Camera
- 4 AA Batteries
Other items included in the package:
- Adobe® PhotoDeluxe™ CD-ROM
- Lens Extension Cable LC-V100
- Camera Case CC-V1
- Hand Strap HS-V1
- Serial Cable SC-232C for Windows
- Quick Reference Guide
- Warranty card
SYSTEM REQUIREMENTS
To use the Dimâge V Control software you need:
- An Apple Macintosh computer with a 68030 processor and a minimum clock speed of 25Mhz or an Apple Power Macintosh.
- Apple system software 7.5 or later.
- A minimum of 12MB (megabytes) available RAM (random access memory). A minimum of 16MB available RAM when using a Power Macintosh.
- A minimum of 20MB available hard disk space.
- Monitor with a display area of 640 x 480 pixels or greater.
- QuickTime, version 2.0 or higher.
- A CD-ROM drive.
Power Macs using PCI slots:
For Power Macintosh 7200/80, 7500/100, and 8500/120 please use Open Transport 1.1 (or later) or use Apple System Software 7.5.3 (or later).
Use the SC-422 serial cable, included in this package, to connect the Dimâge V to the Macintosh.
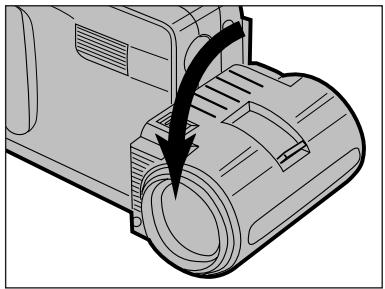
- Turn off the Dimâge V and the Macintosh.
natural_image
Diagram of a mechanical device with a black arrow indicating rotation or movement, showing internal components (no text or symbols)- Put the lens in the standard lens position (the lens is rotated forward 90° until it stops).
natural_image
Diagram of a mechanical device with a cable inserted into a component, showing a tool interacting with a circular component (no text or symbols present)-
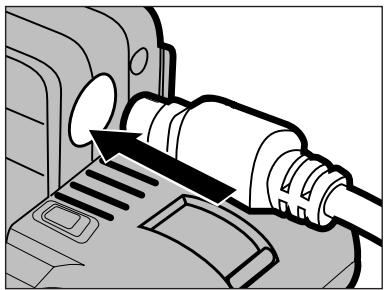
Plug one end of the serial cable into the digital in/out of the Dimâge V.
-
Both ends of the serial cable are the same.
- Note the pin configuration before plugging in the serial cable.

- Plug the other end of the serial cable into either the Macintosh's modem port or printer port.
- Make sure the cable is securely attached to the camera and the computer.
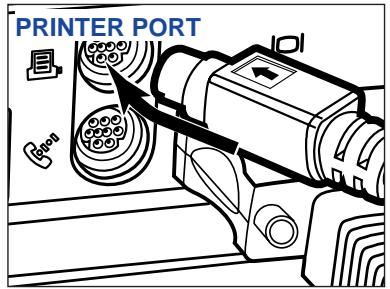
Most Macintosh desktop models are equipped with two serial ports, a modem port and a printer port. When possible, use the modem port to connect the Dimâge V.
The serial port allocated for LocalTalk (usually the printer port) may not operate normally with the Dimâge V connection. If your printer port is allocated for LocalTalk, turn AppleTalk "Off" (select Chooser in the 📄 menu) before connecting the Dimâge V via the printer port.
Some Macintosh models (PowerBook, PowerBook Duo) have only one serial port, the printer port.
With 68K series CPUs, always turn AppleTalk "Off" (select Chooser in the 📄 menu) before connecting the Dimâge V.
WARNING - BEFORE INSTALLATION
Some antivirus system extensions conflict with the operation of this installer. Please remove or disable them before launching the Minolta Dimâge Installer. Replace or re-enable them when installation is complete.
- Turn the computer on.
- Quit any applications in use.
- Insert the "Dimâge V Image Control" -CD-ROM into the CD-ROM drive.
- Double-click on the CD-ROM icon to open it.
- The contents of the CD-ROM should appear as pictured below.
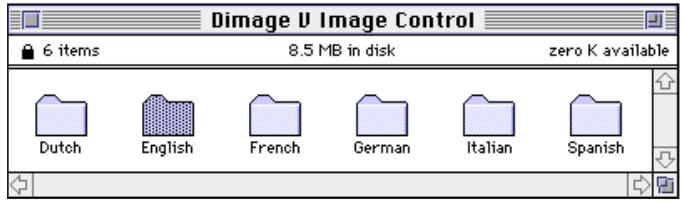
- Double-click on the Folder of the language you want to install.
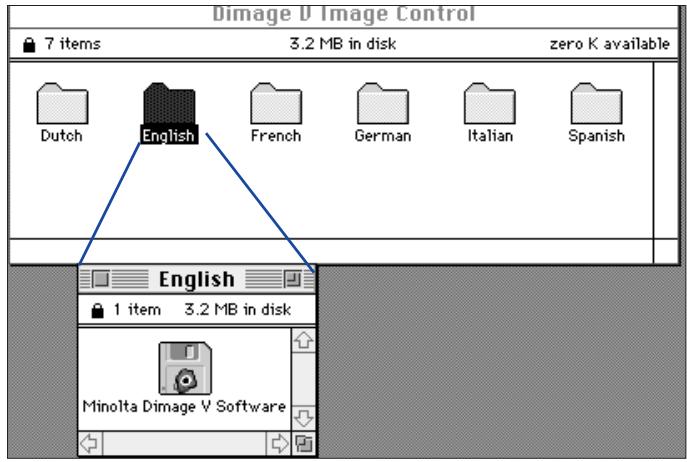
- Double-click on the “Minolta Dimâge V Software” icon.
- The contents of the “Minolta Dimâge V Software” will appear:
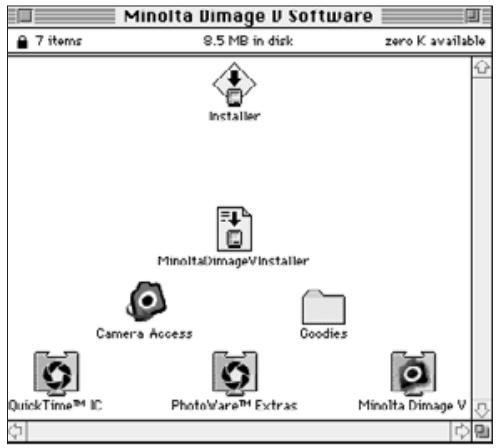
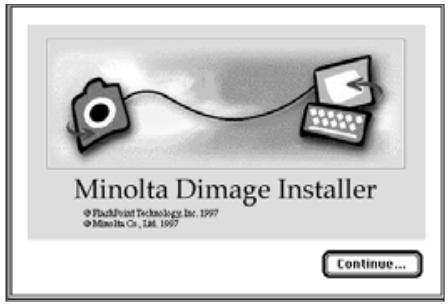
- Double-click ion the "Installer" icon.
• The following screen will appear:
-
Click on Continue....
-
The Software End-user License will appear. Read this license carefully before installing the software.
-
If you do not agree to the conditions stated in the Software End-user License Agreement, click on Disagree and the software will not be installed.
-
Click on Agree.
- The Dimâge V Installer screen will appear.
- Click on Select Folder... to change folders/drives or to create a new folder.
- Select the install type from the pop-up menu.
- The window below appears if custom install is selected.
Click on ▷ to see the files listed under a folder title.
The icon will change to ▽ when a folder is open.
-
Click on Install.
-
A bar indicating the percentage complete will appear.
- The message below appears when installation is complete.
- Click on Restart.
WHERE TO FIND THE FILES
User-selected Destination Folder
Camera Access (application software)
Goodies (folder)
Extensions Folder
QuickTime™ IC (extension)
Minolta Dimage V (extension)
PhotoWare™ Extras (extension)
- All the files listed above will be copied to the drive if Easy Install is used. If Custom Install is used, only the user-selected files will be copied onto the drive.
FOR VIEWING AND RETOUCHING IMAGES

flowchart
graph TD
    A["Launch the application software (page 18)."] --> B["The Minolta Dimâge V Main Panel will appear."]
    B --> C["Click on Viewer..."]
    C --> D["The Viewer Panel will appear."]
In the Viewer Panel:
- Miniature previews of the images, called thumbnails, will appear.
- Sort the thumbnail previews by title or date.
- Copy all or selected images stored on the image memory card to your hard drive or removable media.
- Delete all or selected images on the image memory card.
Go to page 21 for more information.
Double-click on the thumbnail to open the full-size image.
flowchart
graph TD
    A["A full-size image will be displayed in the Image panel."] --> B["In the Image Panel:"]
    B --> C["Edit images (crop, adjust brightness/contrast, adjust color balance, flip, rotate, sharpen edges, and soften edges)."]
    B --> D["Enlarge or reduce the view of images."]
    B --> E["Print images."]
    E --> F["Go to page 38 for more information."]
    B --> G["Select Save as... from the File pull-down menu."]
    G --> H["Enter the new file name.<br>Select the folder where the file is to be saved.<br>Select the file format.<br>Click on Save."]
    H --> I["The image will be saved in the selected format."]
Once the image is saved:
• View the image in the Viewer Panel as a thumbnail preview.
• Acquire the image into other application software.
- Incorporate the image into an original post card or calendar using Adobe PhotoDeluxe™, included in this package.
OPERATING THE CAMERA WITH THE COMPUTER
Launch the application software (see page 18).
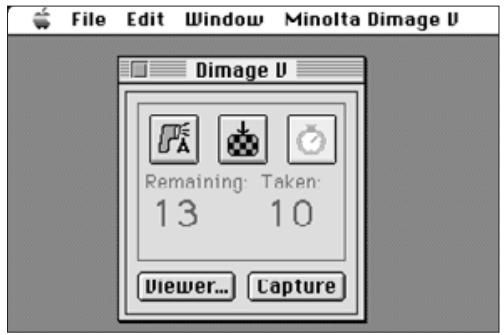
The Dimâge V Main Panel will appear.
In the Dimage V Main Panel:
- Control the Dimâge V functions (recording, flash mode, image quality mode, self-timer) with the computer.
- Format SmartMedia™.
- Display the data from the camera's information bar (frames remaining/frames taken, low battery warning).
Go to page 52 for more information.
Select Record Mode from the Minolta Dimage V menu.
Set the flash mode and select the image quality, then click on Capture.
Open the viewer panel and double-click on the thumbnail of the captured image.
The full-size image will be displayed in the image panel.
In the Image Panel:
- Edit images (crop, adjust brightness/contrast, adjust color balance, flip, rotate, sharpen edges, and soften edges).
- Enlarge or reduce the view of images.
- Print images.
Go to page 38 for more information.
Select Save as... from the File pull-down menu.
Enter the new file name. Select the folder where the file is to be saved. Select the file format. Click on Save.
The image will be saved in the selected format.
Once the image is saved:
- Display the preview of saved image in the Viewer Panel.
• Acquire the saved image into another application. - Incorporate the saved image into an original post card or calendar using Adobe PhotoDeluxe™, included in this package.
LAUNCHING THE SOFTWARE
- Connect the camera to the Macintosh (p. 8).
- Turn the camera on.
- Start-up the computer.
- Open the folder where the Camera Access application was saved.
- The application, Camera Access, will be in the folder you selected or created when installing the software (p. 12).
- Double-click on the Camera Access icon.
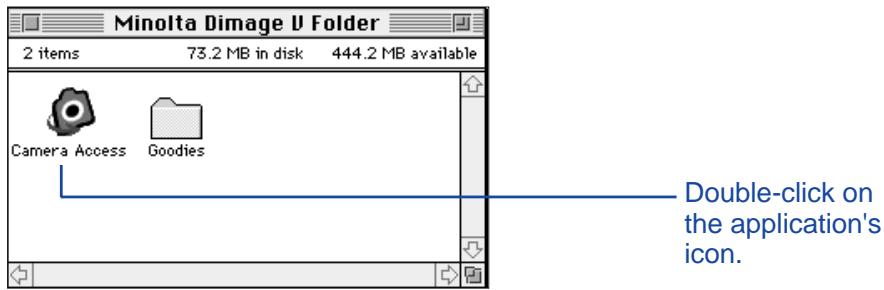
- The Dimâge V Main Panel will appear as shown below.
DIMMED OPTIONS
If the buttons, Capture, and Viewer... are dimmed (appear grey instead of black and do not function when clicked), the camera is either turned off or is not connected to the computer correctly. Check the following points when the options are dimmed, then quit and relaunch the application.
- The Dimâge V is turned on.
- The serial cable has been securely plugged into both the camera and the computer (pp. 8-9).
- An image memory card is in the camera.
- The camera has not been connected to the serial port allocated to LocalTalk (p. 9).
If the options are still dimmed after launching, reinstall the software (pp. 10-13).
VIEWER PANEL
VIEWER PANEL FUNCTIONS
The viewer panel displays miniature previews, called thumbnails, of images. The viewer panel is similar to the index display on the camera.
In the viewer panel, you can:
- Display the thumbnail previews of images on the SmartMedia™ in the camera. You can also display previews of images copied to your hard drive or removable media (p. 22).
- Display an image full-size by double-clicking on the thumbnail (p. 36).
- Sort the previews on your hard drive or removable media by title and date (p. 32).
- Copy all or selected images stored on the SmartMedia™ in the camera to your hard drive or removable media. (pp. 24-27, p. 34).
- Delete all or selected images from the SmartMedia™ in the camera (pp. 28-31). You can also delete all or selected images from a folder on your hard drive or removable media (p. 35).
OPENING THE VIEWER PANEL
There are two ways to open the viewer panel; by displaying either the images from the camera or images on your hard drive or removable media.
To Display Camera Images:
Click on Viewer....

Click on the button labeled Viewer...
To Display Floppy Disk/Hard Disk Images:
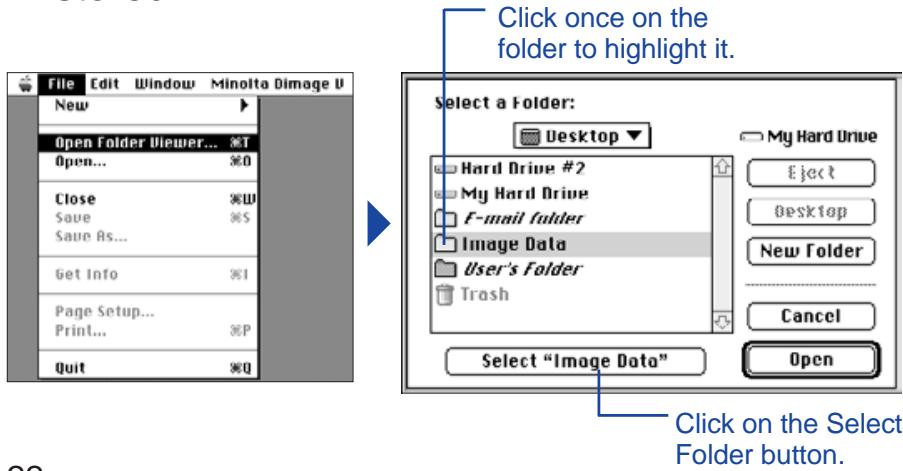
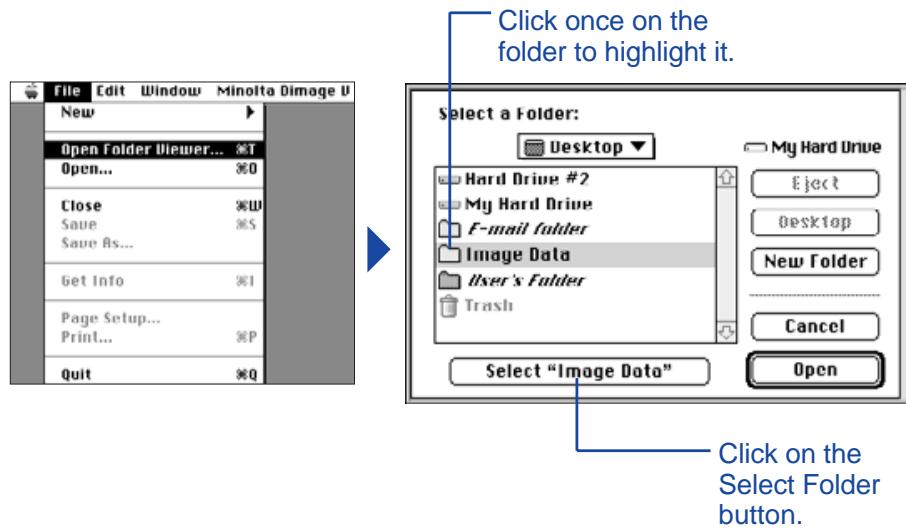
- Select Open Folder Viewer... from the File menu.
- Click once on the folder where the images are saved, then click on the Select Folder button.
- Do not open the folder where the images are stored.
The thumbnail representations of images stored on the image memory card, Macintosh hard drive, or removable media are displayed when the viewer panel is open.
If the scroll bar is grey, there are more images to display in the viewer panel.
Scroll through the images in the viewer panel by clicking on the scroll arrows at the top and bottom of the scroll bar, dragging the scroll box up or down, or clicking on the scroll bar.
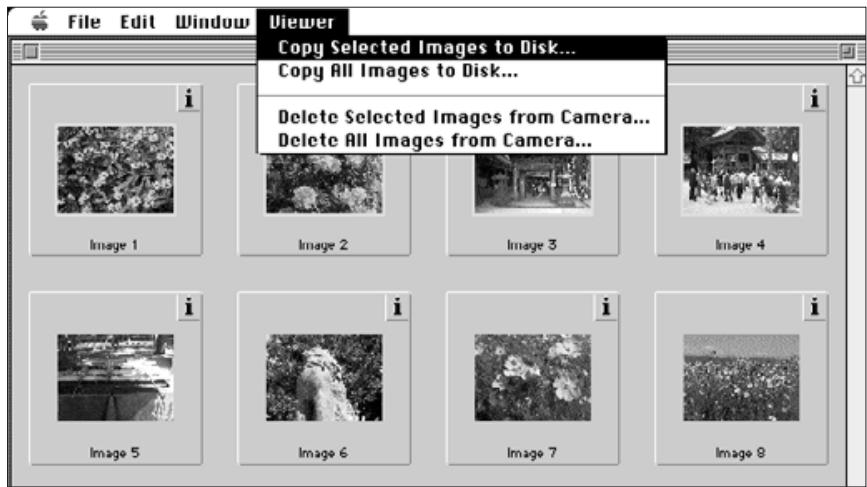
COPYING SELECTED IMAGES
Selected images on the image memory card can be copied to removable media or your computer's hard drive.
- Display the thumbnail images from the camera in the viewer panel (pp. 22).
- Click on the image to be copied. Select multiple images by holding down the shift key while clicking on images.
- A border, or cursor, will appear around the selected images.
- Deselect an image by clicking on it while holding down the shift key.
- Select Copy Selected Images to Disk... from the Viewer menu.
- The following dialog box will appear.
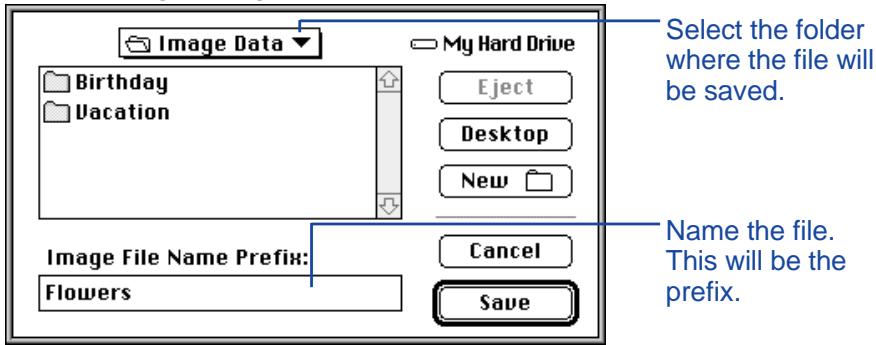
- Select the folder from the pop-up menu in the dialog box where the file will be saved.
- Enter a new file name in the box labeled Image File Name Prefix:.
- This will be the prefix of the file name. A numerical suffix will be added automatically to the file name (see EXIF at bottom of page).
- Click on Save.
- The viewer panel will return when the operation is complete.
EXIF:
Images are automatically saved in the EXIF file format. The name of an EXIF file consists of the entered file name as the prefix and a three-digit numerical suffix. The numerical suffix represents the order which a file was saved. For example: if two files are selected, the entered file name will apply to both images and their file names will have a suffix representing the sequence they were saved - Entered File Name001 and Entered File Name002.
Copied images can be displayed as thumbnails on the viewer panel. Dimâge V images can also be acquired from the camera into applications such as Adobe PhotoDeluxe™ using the QTIC plug-in (pp. 84 - 85).
COPYING ALL IMAGES
All the images on the image memory card can be copied at once to your hard drive or removable media.
- Display the thumbnail images from the camera in the viewer panel (p. 22).
- Select Copy All Images to Disk... from the Viewer menu.
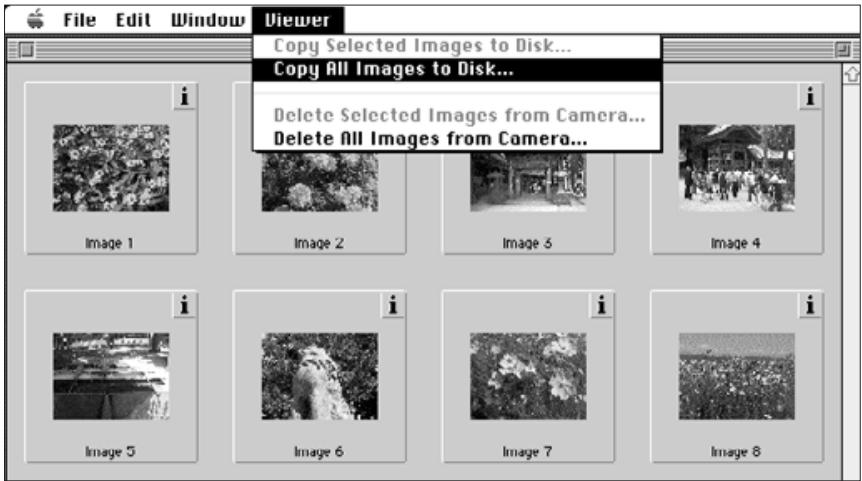
- The following dialog box will appear.
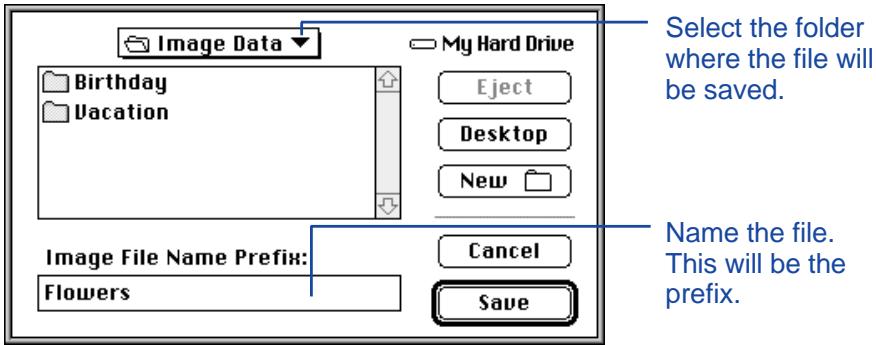
- Select the folder from the pop-up menu in the dialog box where the file will be saved.
-
Enter the desired file name in the box labeled Image File Name Prefix:.
-
This will be the prefix of the file name. A numerical suffix will be added automatically to the file name (see EXIF on page 25).
- Click on Save.
- The viewer panel will return when the operation is complete.
See page 25 for information on naming EXIF files.
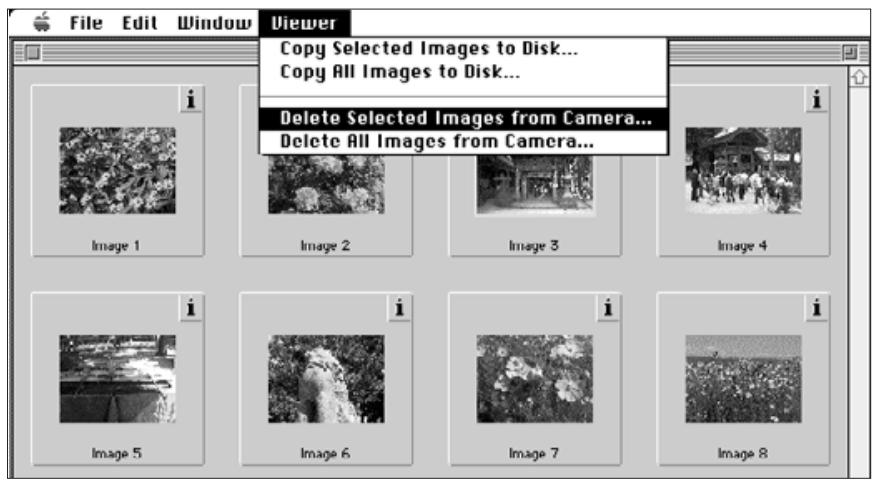
DELETING SELECTED IMAGES
You can delete a single image or multiple images from the image memory card in the camera.
- Display the thumbnail images from the camera in the viewer panel (p. 22).
-
Click on the image to be deleted. Select multiple images by holding down the shift key while clicking on images.
-
A border, or cursor, will appear around the selected images.
-
Deselect an image by clicking on it again while holding down the shift key.
-
Select Delete Selected Images from Camera... from the Viewer menu.
- The following message appears.
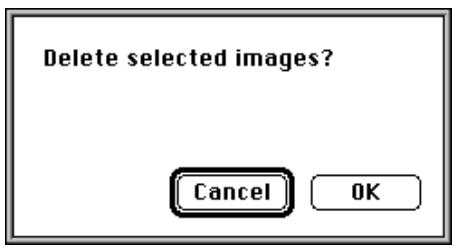
- Press OK to delete the images.
Press Cancel to escape the operation.
- The viewer panel will return when the operation is complete.
- Protected images cannot be deleted. The following message will appear if you try to delete one or more protected images.

Never remove an image memory card during the delete operation.
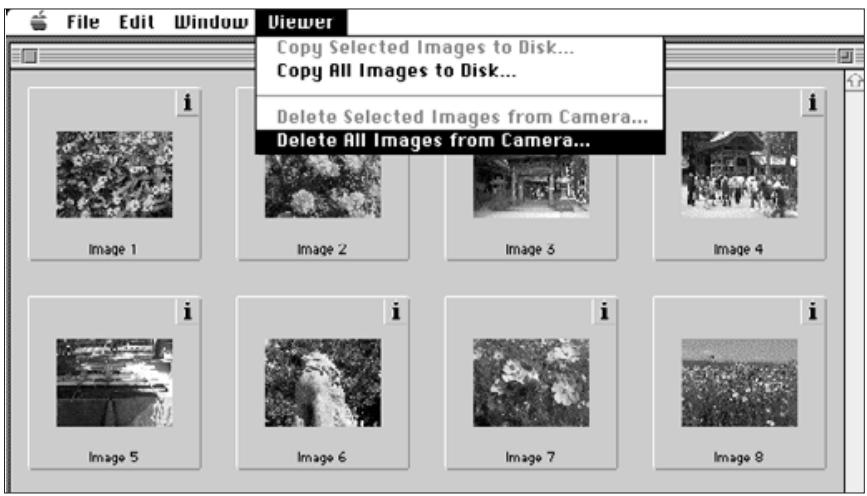
DELETING ALL IMAGES
It is possible to delete all of the unprotected images from the image memory card in the camera.
- Display the thumbnail images from the camera in the viewer panel (p. 22).
- Protected images cannot be deleted, see page 62 of the camera manual.
- Select Delete All Images from Camera... from the Viewer menu.
- The following message will appear.
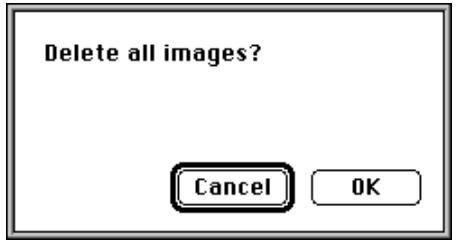
- Press OK to delete the images.
Press Cancel to escape the operation.
- The viewer panel will return when the operation is complete.
- Protected images cannot be deleted. The following message will appear if you try to delete one or more protected images.
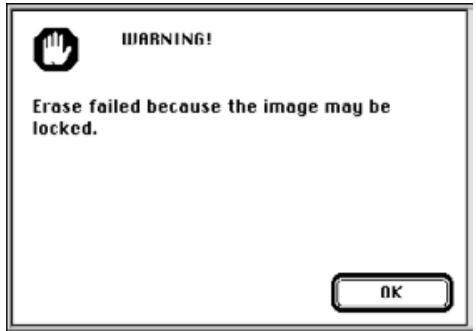
Never remove an image memory card during the delete operation.
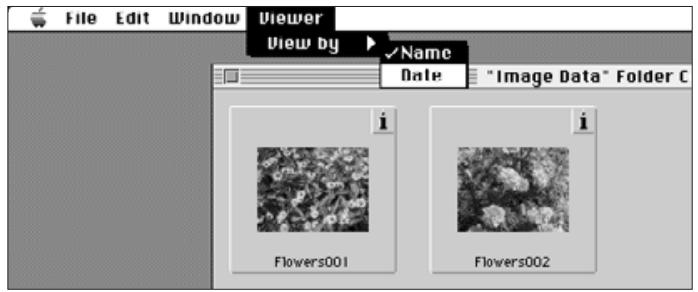
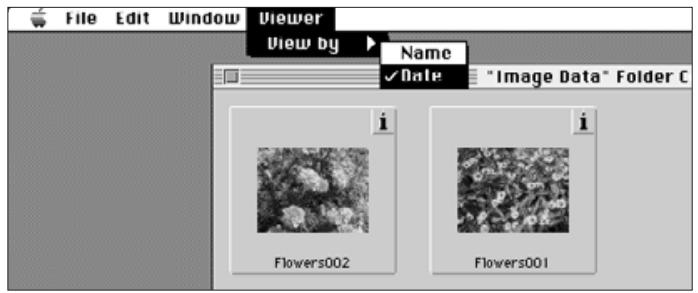
SORTING IMAGES
Images copied to your hard drive or removable media can be viewed as thumbnails and sorted alphabetically by name or chronologically by date.
Images on the image memory card cannot be sorted.
- Select Open Folder Viewer... from the File pull-down menu.
- Click once on the folder where the images are saved, then click on the Select Folder button.
- Do not open the folder.
- Go to View by under the Viewer pull-down menu and select either Name or Date from the
COPYING IMAGES - DRAG AND DROP
You can use the Macintosh's Drag and Drop function to copy images from the camera.
- Click on the image to be copied. Select multiple images by holding down the shift key.
- A border, or cursor, will appear around the selected images.
Deselect an image by clicking on it again while holding down the shift key.
- Choose Select All from the Edit menu to copy all the images on the memory card in the camera.
- Drag the selection to the desired destination.

This function cannot be used to copy images from the hard drive or removable media.
DELETING IMAGES - DRAG AND DROP
While the thumbnails are displayed, you can use the Macintosh's Drag and Drop function to delete images from the hard drive or removable media.
- Click on the image to be deleted. Select multiple images by holding down the shift key.
- A border, or cursor, will appear around the selected images.
Deselect an image by clicking on it again while holding down the shift key.
- Choose Select All from the Edit menu to delete all the images in the folder.
- Drag the selection to the trash icon.
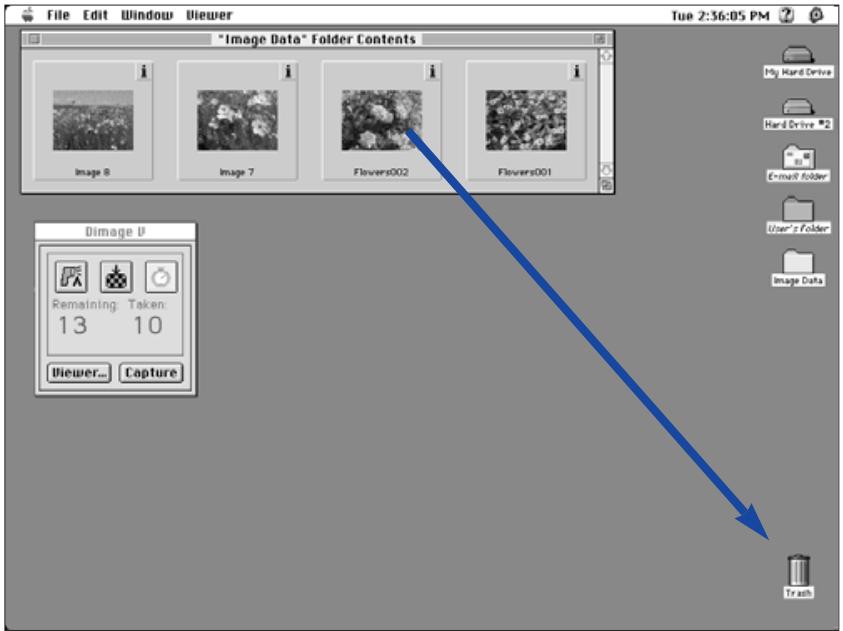
This function cannot be used to delete images from the image memory card in the camera.
DISPLAYING THE FULL IMAGE
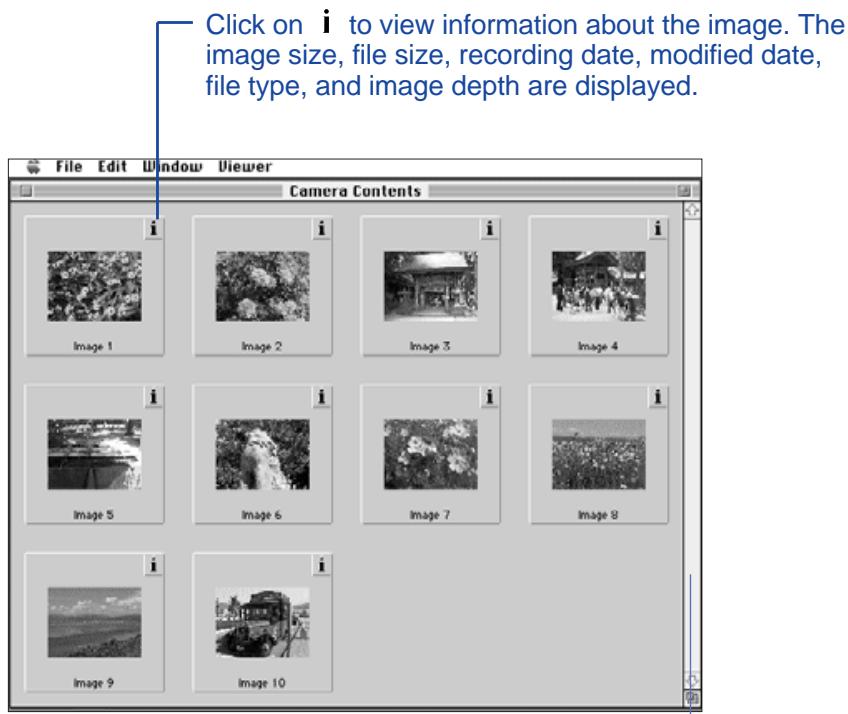
The full-size image of a thumbnail representation can be displayed on the computer monitor.
- Open the viewer panel and display the thumbnails of the desired images (pp. 22-23).
- Double-click on the thumbnail of the image to be displayed full size (640 x 480 pixels).
- When the full-size image appears, the software will switch from the viewer panel to the image panel. In the image panel, the image can be edited, printed, or saved in a different file format.
If the "Insufficient Memory" error message appears, increase the memory allocation for the Camera Access software.
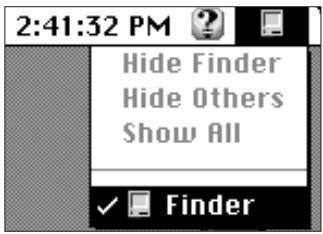
- Select Quit from the File menu.
- Select Finder from the application menu (far right on the menu bar).
- Open the folder where Camera Access is saved, then click once on the Camera Access icon. Select Get Info from the File menu.
- The following window will appear.
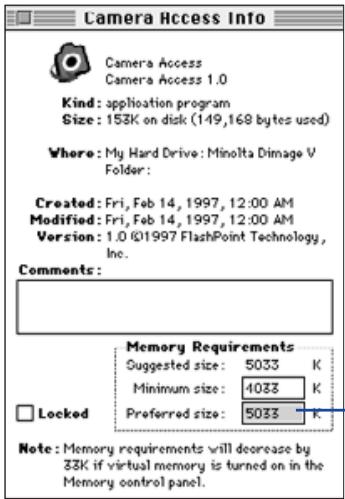
Increase the preferred memory setting.
- Double-click on the box next to Preferred Size, then enter a higher memory value.
- Close the window.
IMAGE PANEL
IMAGE PANEL FUNCTIONS
Images are displayed full size in the image panel. In the image panel, the image can be edited, printed, or saved in a different file format.
In the image panel, you can:
- Magnify or reduce the view of an image (p. 39).
-
Edit images in a variety of ways (pp. 40-47):
Crop images.
Adjust the brightness and contrast of an image.
Adjust an image's color balance.
Flip or rotate an image.
Retouch images (subtle brightness adjustment, soft focusing or image sharpening). -
Print images (p. 48).
- Save images to your hard drive or removable media in one of the following file formats (pp. 49-50):
PICT
JPEG
EXIF
TIFF
OPENING THE IMAGE PANEL
The image panel is automatically opened when an image is displayed full size. There are two ways to open the image panel:
- Double-click on a thumbnail in the viewer panel to open the image panel and display the image full size.
- While in any panel, select Open... from the File menu and choose an image from the hard drive or a floppy disk.
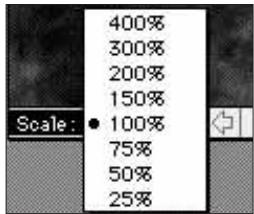
MAGNIFYING OR REDUCING THE VIEW
The image display can be magnified up to 400% or reduced to 25%. There are two ways to change the view:
- Select Zoom In from the Image menu to magnify the image. Select Zoom Out from the Image menu to reduce the image display size.
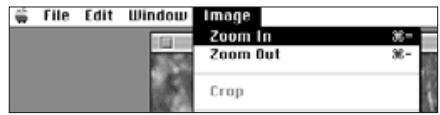
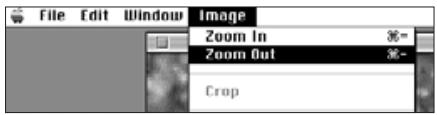
- Click on the Scale pop-up menu in the lower left corner and select the view percentage.
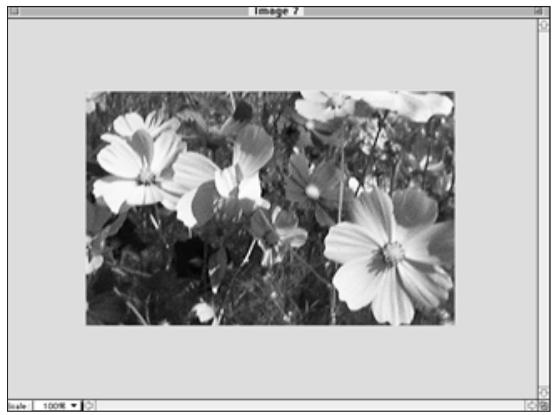
CROPPING IMAGES
Trim away unnecessary areas of the image using the crop function.
- Click and drag the cursor to select the final image area.
- The selected area will be surrounded by a marquis.
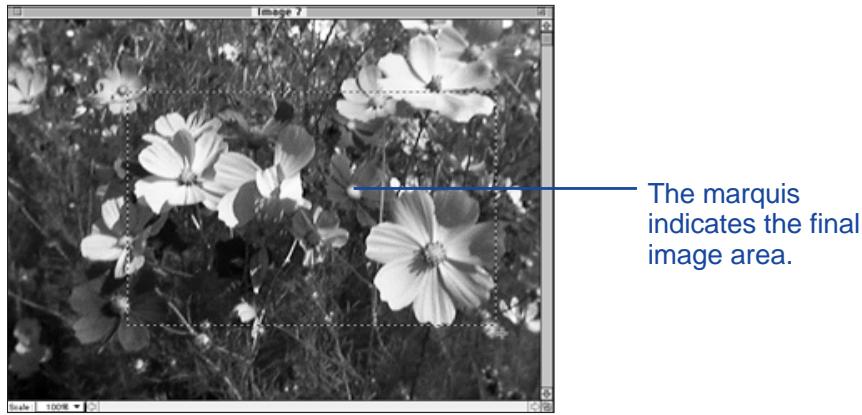
- Select Crop from the Image menu.
- The selected section remains on the screen.
natural_image
Black-and-white photo of white cosmos flowers with green foliage, no text or symbols visible- Select Save As... from the File menu. Name the file and choose a file format, then click on Save.
It is possible to copy the cropped portion of the image to the hard drive or removable media using Macintosh's Drag and Drop function. The resulting file will be a "Picture Clipping".
Choose Select All from the Edit menu. Click on the image and drag it to a folder or floppy disk.
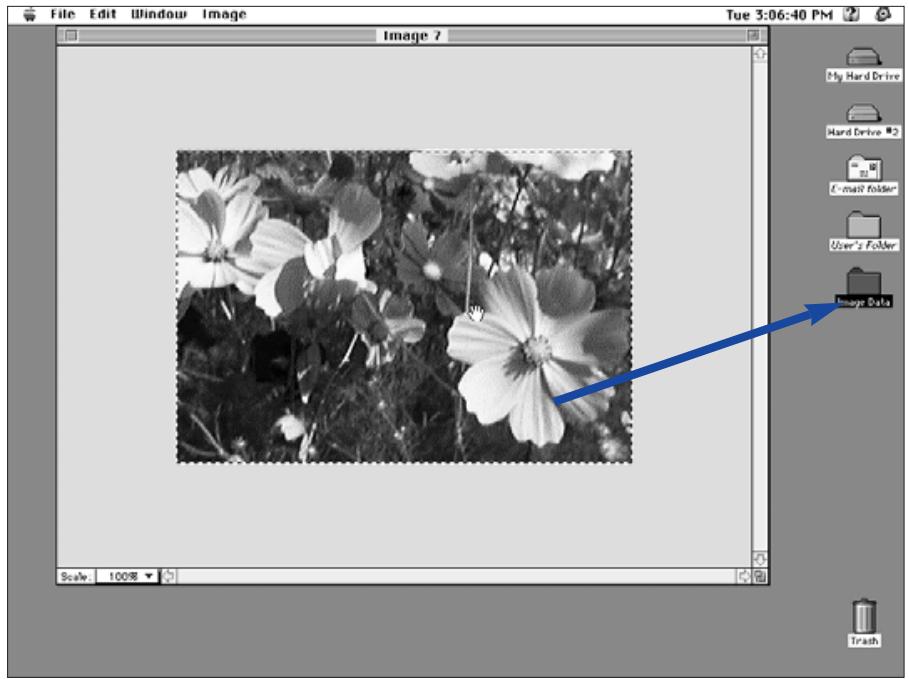
- The image is saved as a picture clipping file.
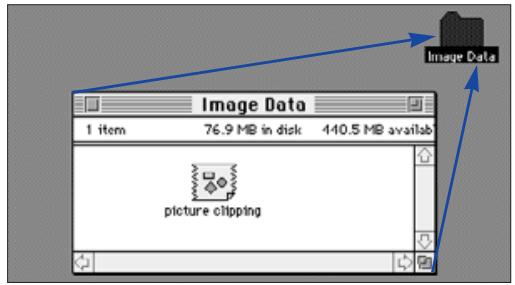
It is also possible to simply Drag and Drop the selected portion of the image after completing step 1 on page 40.
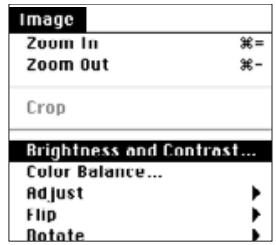
ADJUSTING BRIGHTNESS AND CONTRAST
Adjust the brightness and contrast of the actual image.
- Select Brightness and Contrast... from the Image menu.
- The Brightness/Contrast dialog box will appear.

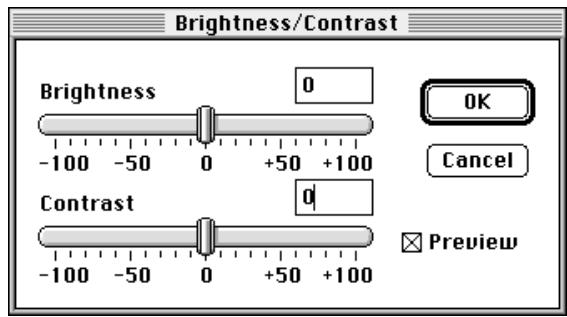
-
Click and drag the sliders to make the brightness and contrast adjustments or enter the values directly into the boxes above the bars.
-
Select the Preview check box (click on it so an X appears) to view the changes as they are made.
- Click on OK to apply the changes.
- Click on Cancel to escape the dialog box without making changes.
ADJUSTING COLOR BALANCE
- Select Color Balance... from the Image menu.
- The Color Balance dialog box will appear.


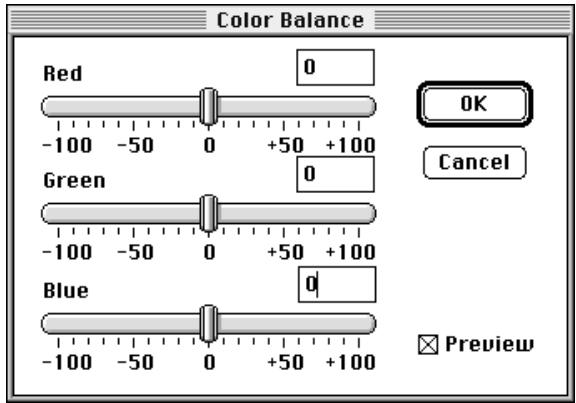
-
Click and drag the sliders to make the color corrections or enter the values directly into the boxes above the bars.
-
Select the Preview check box (click on it so an X appears) to view the changes as they are made.
- Click on OK to apply the changes.
- Click on Cancel to escape the dialog box without making changes.
SUBTLE BRIGHTNESS CHANGES
Make subtle changes in the image brightness. This function is similar to Adjusting Brightness and Contrast. However, this method allows you to fine-tune brightness changes.
Select Adjust from the Image menu and choose either Darken or Lighten from the submenu.
- The image brightness will change when the mouse is released.
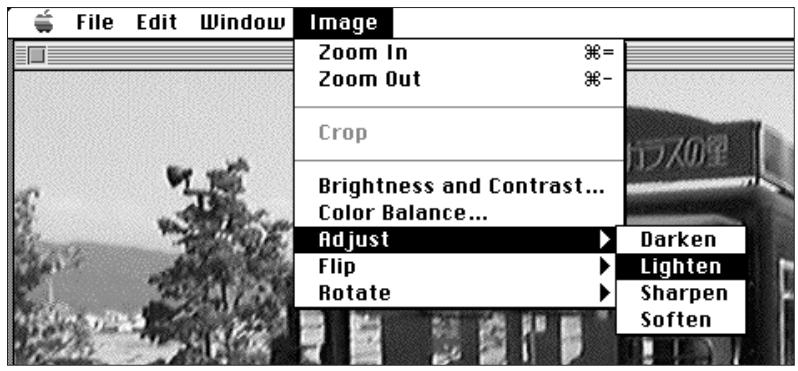
- Select Undo from the Edit menu to cancel the change. The Undo function will only cancel the last action or change made.
SHARPENING AND SOFTENING
These functions allow you to make a slightly out-of-focus image appear sharper or create a soft-focus effect on an image.
- These functions produce varying degrees of effect from image to image.
Sharpen: This function "sharpens" edges. It will give a slightly out-of-focus image a crisper appearance. The nature of this function also makes image noise more visible.
Soften: This function creates a soft-focus effect. Small details in the image are diffused, making it popular for portraits. The nature of this function makes the entire image appear unsharp.
Select Adjust from the Image menu and choose either Sharpen or Soften from the submenu.
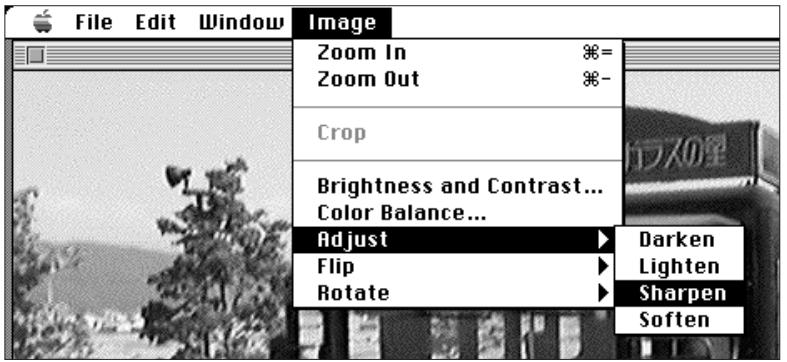
- Select Undo from the Edit menu to cancel the change. The Undo function will only cancel the last action or change made.
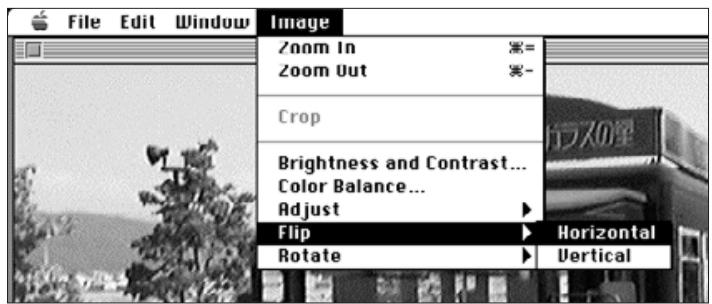
FLIPPING IMAGES
Flip the image horizontally or vertically.
Select Flip from the Image menu and choose either Horizontal or Vertical from the submenu.
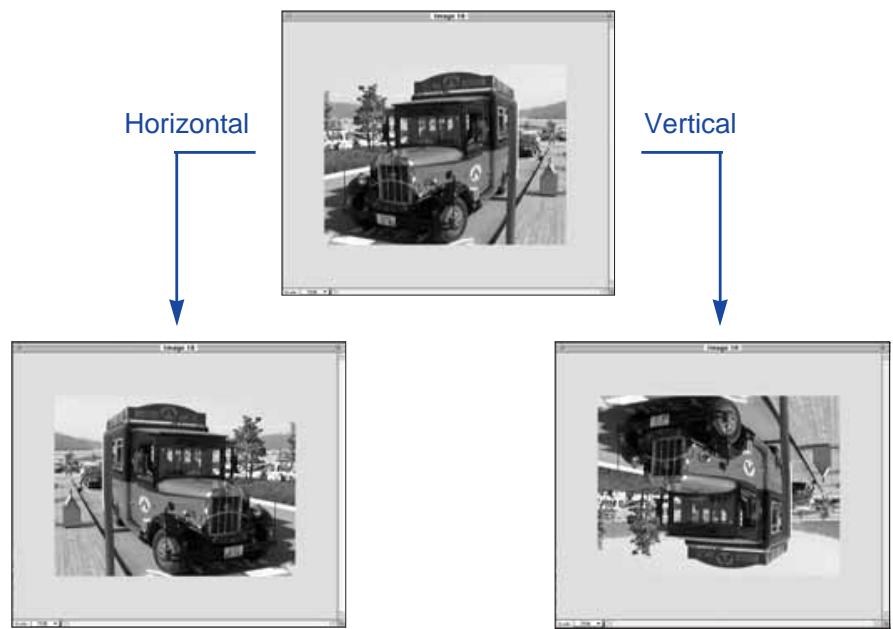
flowchart
graph TD
    A["Horizontal Image"] --> B["Vertical Image"]
    C["Bus Image"] --> D["Vertical Image"]
- Cancel the operation by either repeating it (flip it again) or selecting Undo from the Edit menu.
ROTATING IMAGES
Rotate the image clockwise or counter-clockwise in 90^ increments.
Select Rotate from the Image menu and choose either Left (counter-clockwise) or Right (clockwise) from the submenu.

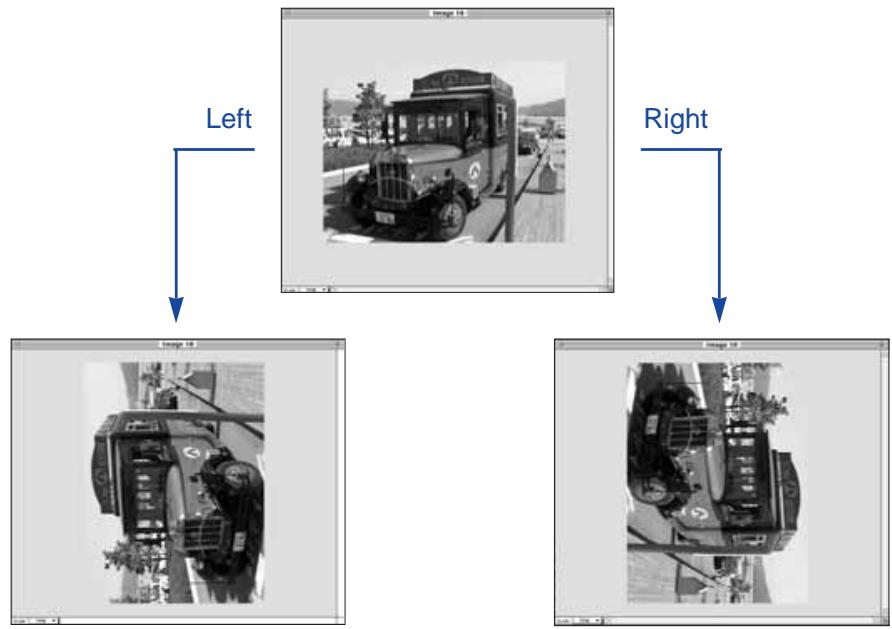
flowchart
graph TD
    A["Left Vehicle"] --> B["Right Vehicle"]
    C["Left Vehicle"] --> D["Right Vehicle"]
- Cancel the operation by selecting Undo from the Edit menu or continuing to rotate until the image appears in its original position.
PRINTING IMAGES
Make a hard copy of the image by sending it to your printer.
This software is compatible with ColorSync™ 2.0. Using
ColorSync ^™ with a compatible color printer will produce a close color match between the printed image and the image as displayed on the monitor.
1. Select Print... from the File menu.
| File | |
| New | ▶ |
| Open Folder Viewer... | ※T |
| Open... | ※O |
| Close | ※W |
| Save | ※S |
| Save As... | |
| Get Info | ※I |
| Page Setup... | |
| Print... | ※P |
| Quit | ※Q |
- The printer dialog box will appear. The dialog box display will vary according to the printer.
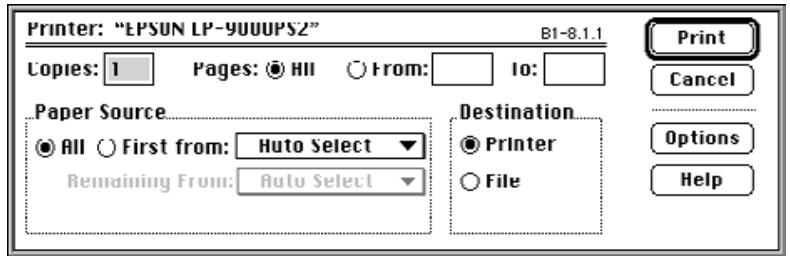
2. Enter the number of copies and select the desired printing options, then click on Print.
- For information about printing options, please refer to your printer's instruction manual.
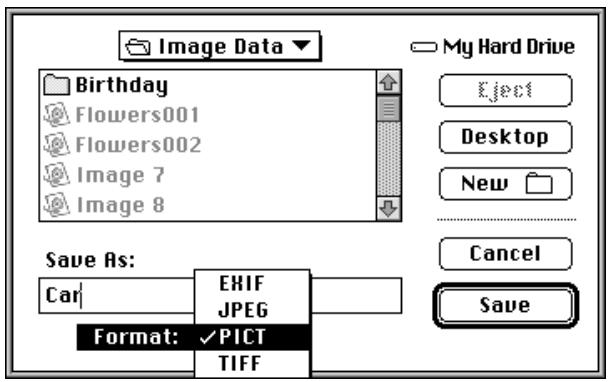
SAVING IMAGES - FILE FORMATS
From the image panel, you can save the displayed image to your hard disk or removable media in one of the following file formats.
PICT
The PICT graphic file format uses a lossless compression scheme and is compatible with many Macintosh applications.
JPEG
The JPEG (Joint Photographic Experts Group) compression standard is capable of producing a high compression ratio while maintaining image quality. JPEG is a widely supported image file format.
EXIF
The EXIF (Exchangeable Image File Format) format is commonly used with digital cameras and removable media. This is the file format the Dimâge V uses to store images.
TIFF
TIFF (Tag Image File Format) files contain bit mapped data.
Images copied from the image memory card using the viewer panel are automatically saved as EXIF files (pp. 24-27).
Adobe PhotoDeluxe™ is compatible with PICT, JPEG, TIFF, BMP, GIF, Photoshop 2.0, and Photoshop 3.0 file formats. However, the Dimâge V EXIF files can be acquired or captured directly from the camera through PhotoDeluxe™ with the use of the QTIC plug-in (p. 85).
SAVING IMAGES
- Select Save As... from the File menu.
| File | |
| New | ▶ |
| Open Folder Viewer... | ※T |
| Open... | ※O |
| Close | ※W |
| Save | ※S |
| Save As... | |
| Get Info | ※I |
| Page Setup...Print... | ※P |
| Quit | ※Q |
- The following dialog box will appear.
- Select the folder from the pop-up menu where the file will be saved.
-
Enter the desired file name in the box labeled Save As:.
-
Select the format from the format pop-up menu.
-
Click on Save.
-
The image will be saved in the selected folder and format.
- The image panel will return when the operation is complete.
DIMÂGE V MAIN PANEL
DIMÂGE V MAIN PANEL FUNCTIONS
The Dimâge V main panel allows the camera operations to be controlled through the computer.
With the Dimâge V main panel, you can:
- Display the status of the Dimâge V camera (p. 54).
- Operate the Dimâge V with the Macintosh:
Remote recording (p. 55).
Recording with exposure compensation (p. 57).
Self-timer (p. 58).
Reset the Dimâge V clock (p. 59).
Format image memory cards (p. 60). - Transfer image data to the SmartMedia™ in the camera from the hard drive or removable media (p. 62).
- Create a time-lapse movie (p. 64).
OPENING THE DIMÂGE V MAIN PANEL
There are two ways to open the Dimâge V panel:
- Launch the software (p. 18). The panel will appear as shown below.
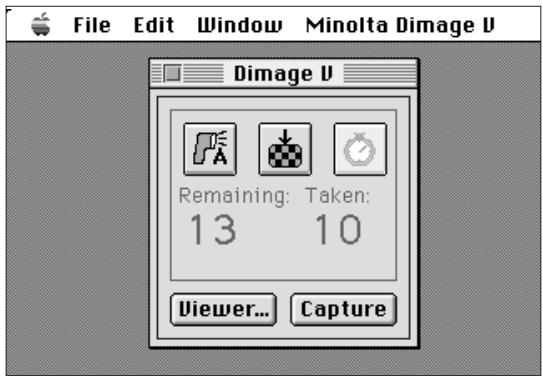
- Switch to the Dimâge V main panel from the viewer, image, or movie panel by selecting Dimage V from the Window menu.
From the picture panel:

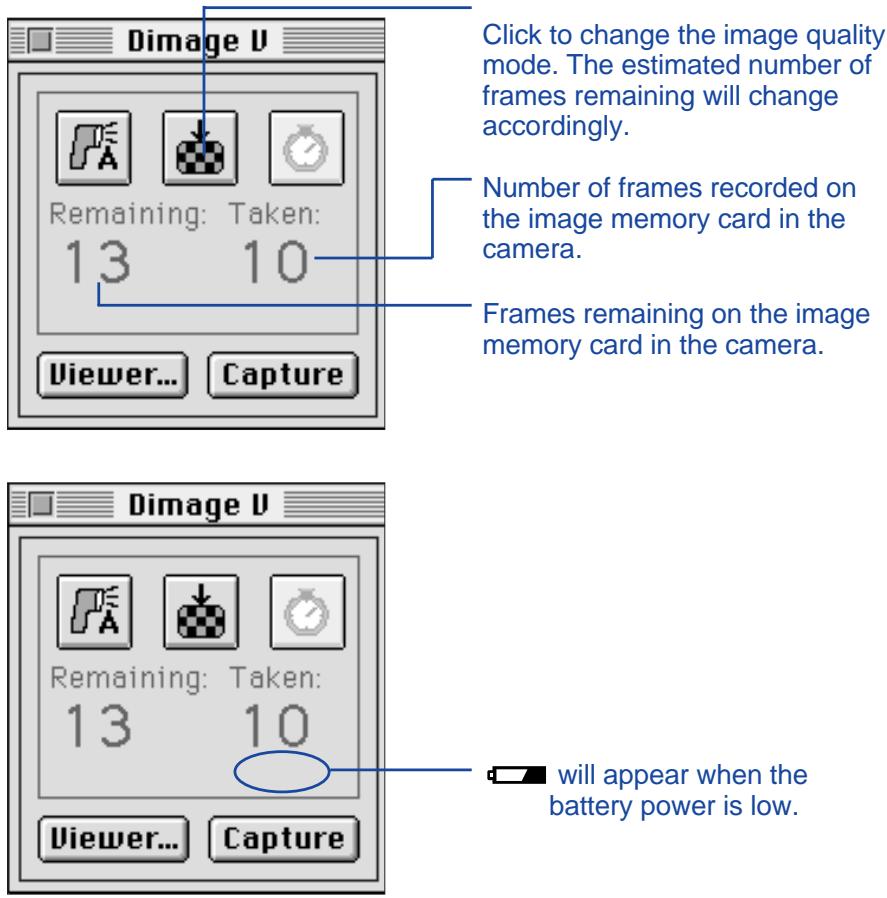
DISPLAYING CAMERA STATUS
The number of frames remaining, the number of frames taken, and the camera's low-battery warning are displayed in the Dimâge V panel.
REMOTE RECORDING
Take pictures with the camera from your computer.
- Select Record Mode from the Minolta Dimage V menu.
- Record mode will be set, regardless of the Record/Play switch setting on the camera.
-
Click on 📄 to select the flash mode.
-
The flash will not fire if the lens unit of the camera is not in the standard lens position. See the Standard Lens Position section in the Dimâge V camera manual.
- Each time is clicked, the display will change in the sequence below.

flowchart
graph LR
    A["Auto Flash"] --> B["Manual Fill flash"]
    B --> C["Flash cancel"]
-
Click on 📋 to select the image quality.
-
The estimated number of frames remaining will change accordingly.
- Each time 🔒 is clicked, the display will alternate between standard and fine mode.

- Frame your image in the camera's LCD monitor, then click on Capture.
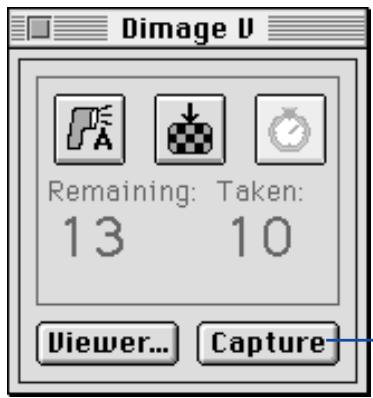
Click on Capture to record the image.
- The image is recorded to the image memory card.
- Repeat step 4 to record more images with the same settings.
To view the captured image, switch to the viewer panel. Click on Viewer... (p. 22). The thumbnail previews will be displayed. To display the full-size image (640 x 480 pixels), double-click on the thumbnail preview.
Leaving the Dimâge V in record mode will reduce the battery life. Switch the camera to play mode when not recording with the computer. Use of the AC adapter AC-V1 (sold separately) is recommended when recording remotely.
EXPOSURE COMPENSATION
Adjust the exposure before taking a picture.
- Select Record Mode from the Minolta Dimage V menu.
- Set the flash mode and image quality (p. 55).
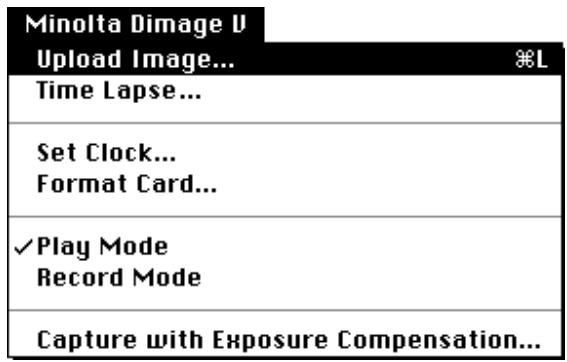
- Select Capture with Exposure Compensation... from the Minolta Dimage V menu.
| Minolta Dimage U | |
| Upload Image... Time Lapse... | ※L |
| Set Clock... Format Card... | |
| Play Mode ✓Record Mode | |
| Capture with Exposure Compensation... | |
- The following dialog box will appear.
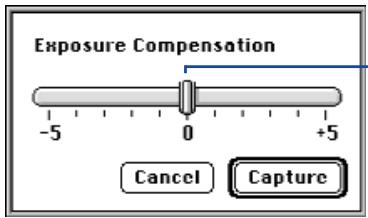
Slide the lever to the desired value. Values between the marks cannot be selected.
- Select the exposure compensation level by sliding the lever to the desired increment.
- Values between the marks cannot be selected.
- Frame your image in the camera's LCD monitor, then click on Capture.
SELF-TIMER
Use the self-timer when recording remotely.
- Click on 📋.
- The display will alternate between On and Off each time it is clicked.

Self-timer On

Self-timer Off
- Select Record Mode from the Minolta Dimage V menu.
- Set the flash mode, image quality, and exposure compensation desired (p. 55, p. 57).
-
Frame your image in the camera's LCD monitor, then click on Capture.
-
The shutter will release approximately 10 seconds after Capture is clicked.
- Self-timer is automatically canceled after the shutter is released.
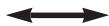
RESETTING THE CAMERA DATE/TIME
Use the computer's date/time information to reset the date and time in the camera.
Be sure the correct date and time are set on your computer before transferring the data to the camera. Use the Macintosh's Date & Time control panel to correct the information in the computer.
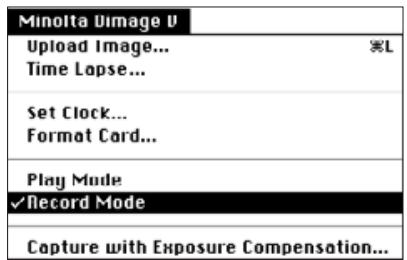
- Select Set Clock... from the Minolta Dimage V menu.
Minolta Dimage V
Upload Image...
Time Lapse...
※L
Set Clock...
Format Card...
√Play Mode
Record Mode
Capture with Exposure Compensation...
The following message will appear.
- Click on OK.
FORMATTING IMAGE MEMORY CARDS
Format the image memory card in the camera while the camera is connected to the computer.
All protected and unprotected images on the SmartMedia ^™ will be permanently removed when the format function is used. (see the Protecting Images section in the camera manual).
1. Select Format Card... from the Minolta Dimage V menu.
| Minolta Dimage U | |
| Upload Image... | ※L |
| Time Lapse... | |
| Set Clock... | |
| Format Card... | |
| ✓Play ModeRecord Mode | |
| Capture with Exposure Compensation... | |
- The following message will appear.
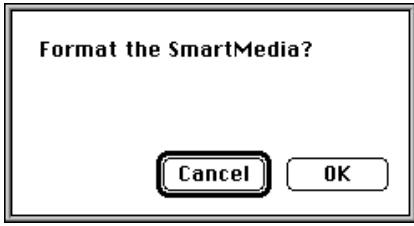
2. Click on OK.
- The bar below will appear to report progress.
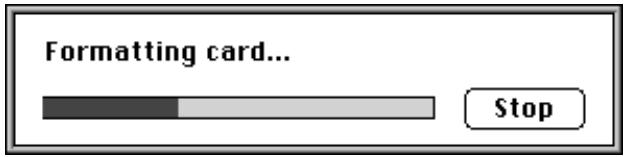
- Clicking on STOP will discontinue formatting, however some or all of the image information will have already been erased.
COPYING: FROM THE MAC TO THE CAMERA
Transfer images from your hard drive or removable media to the image memory card in the camera.
1. Select Upload Image... from the Minolta Dimage V menu.
- The following dialog box will appear.
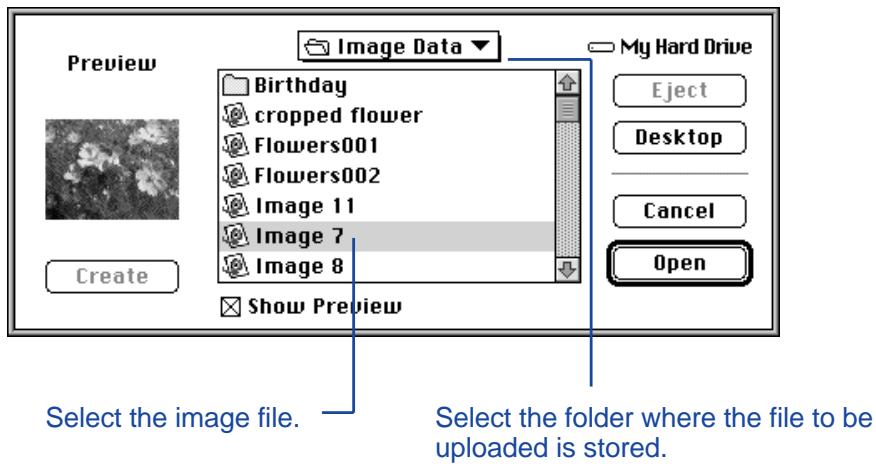
- From the pop-up menu, select the folder where the file to be uploaded is stored.
- Click on the image file to select it.
- Select the Show Preview checkbox to view a thumbnail of the image.
- Click on Open.
- While the image is being uploaded to the camera's image memory card, the bar below will indicate the progress.

Images saved in formats other than PICT, JPEG, EXIF, and TIFF cannot be written to the image memory card in the Dimâge V.
All images uploaded to the memory card in the Dimâge V camera will be saved as EXIF files.
Images that are not VGA size (640 x 480 pixels) will be automatically sized to fit the VGA standard when uploaded to the image memory card in the Dimâge V. The proportions remain unchanged so the image will not be distorted.
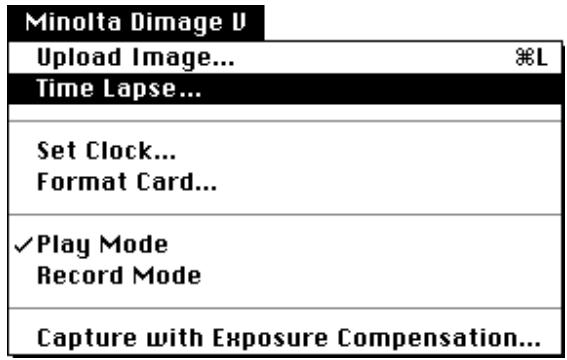
CREATING TIME LAPSE MOVIES
Record a time lapse movie while the Dimâge V is connected to the computer. View the time lapse movie in the movie panel.
- Select Time Lapse... from the Minolta Dimage V menu.
- The following dialog box will appear.
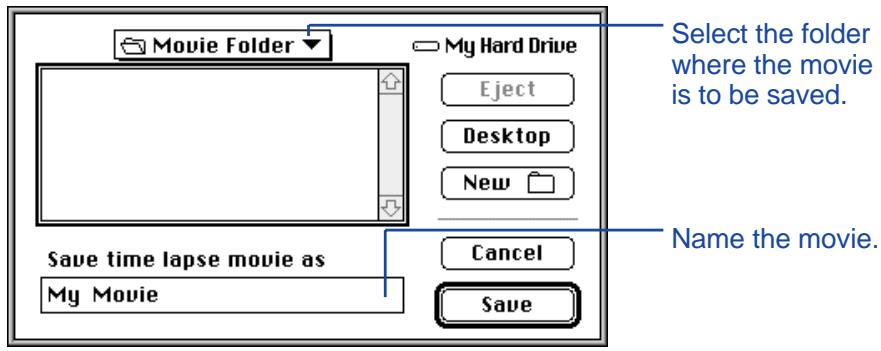
-
From the pop-up menu, select the folder where the movie is to be saved.
-
Name the movie, then click on Save.
- The following dialog box will appear.

- Enter the desired values for the number of frames and the time interval.
- The minimum recording interval is 60 seconds.
-
Click on Start.
-
The camera will begin recording using the parameters set in step 4.
-
Each image is temporarily written to the image memory card before it is uploaded to the hard drive or removable media.
-
A time lapse movie file will automatically be produced with the images when recording is complete.
-
The movie panel will open automatically and the movie will appear in a window on the computer monitor.
- You can edit your movie using the functions from the Edit menu. Display the frame to be cut, cleared, or copied and pasted, then select the function.
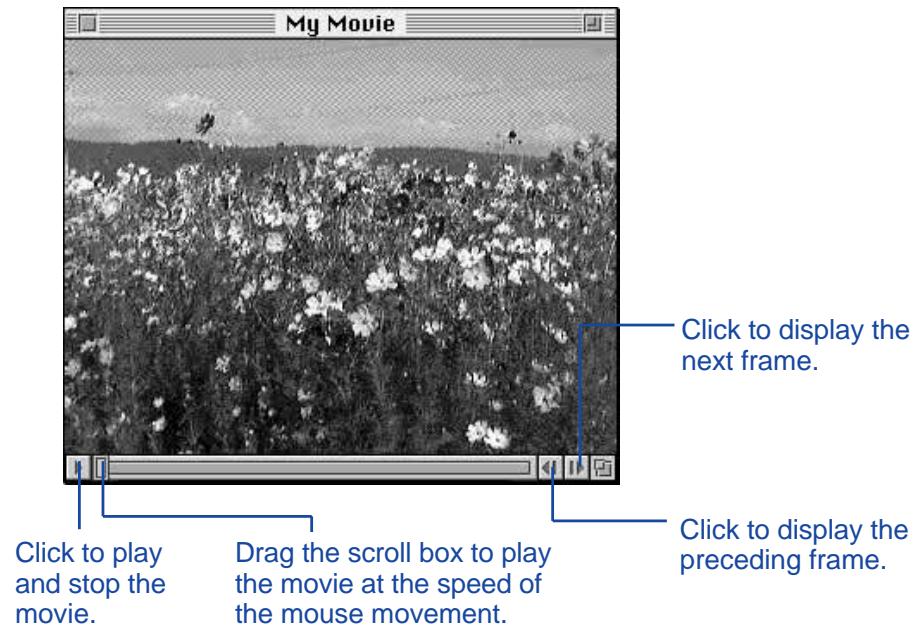
MOVIE PANEL
MOVIE PANEL FUNCTIONS
QuickTime movies can be created or played back in the movie panel.
In the movie panel, you can:
- Create a time lapse movie with images from the camera, hard drive, or removable media with the simplicity of Drag and Drop (p. 70).
- Play the movie in the movie window (p. 67).
- Change the playback mode of the movie (p. 69).
- Display the movie in a variety of sizes or view it with a black backdrop (p. 68).
- Save the movie in a different file format (p. 73).
- Recompress the movie with a QuickTime compression format (p. 75).
THE MOVIE WINDOW
The movie window appears when the movie panel is opened by creating a new movie (p. 70) or opening an existing movie (select Open... from the File menu).
DISPLAY OPTIONS
Change the display of the movie by selecting one of the options listed below from the Movie menu.

Normal Size
The display is shown full size. The size of the movie is selected in the movie panel when it is created (p 70). Time lapse movies created in the Dimâge V main panel (p 64) are 640 x 480 pixels.
Half Size
The half size display is 50% of normal size.
Double Size
Twice the size of the normal display.
Fill Screen
Almost fills the computer monitor. This option is only available when Present Movie is selected from the Movie menu.
Present Movie
The presentation movie option centers the movie in the monitor and creates a black backdrop for the movie.
- QuickTime 2.1 or higher is required for this feature.
Present Movie Format:

natural_image
Black-and-white photo of a dense field of white flowers with distant hills and sky in the background (no text or symbols visible)PLAYBACK MODES
Change the playback mode of the movie by selecting Loop or Loop Back and Forth from the Movie menu.
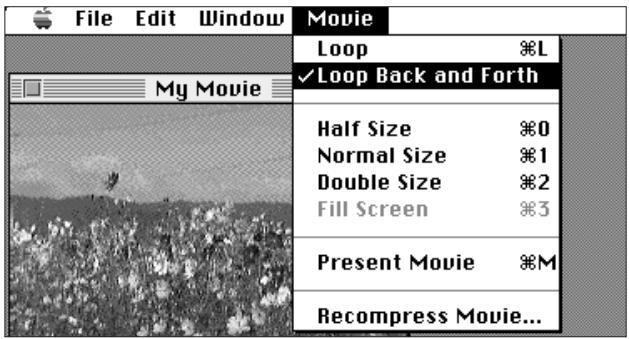
Loop
The movie will play repeatedly.
Loop Back and Forth
The movie will play repeatedly, forward and backward (from first frame to last frame, then the last frame to first frame).
DRAG AND DROP - MAKING A TIME LAPSE MOVIE
Make a time lapse movie with images already on the image memory card, hard drive, or removable media by dragging and dropping them onto the movie window.
- Select New from the File menu and choose Movie in the submenu.
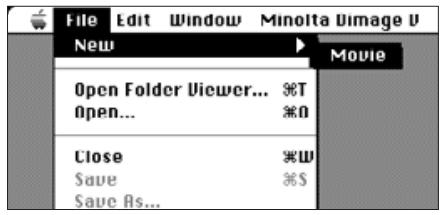
- The following dialog box will appear.
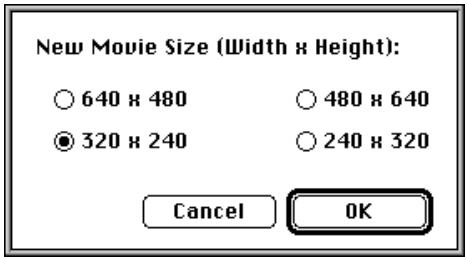
- Select the movie size by clicking on the radio button of the desired dimension, then click on OK.
- The following dialog box will appear.
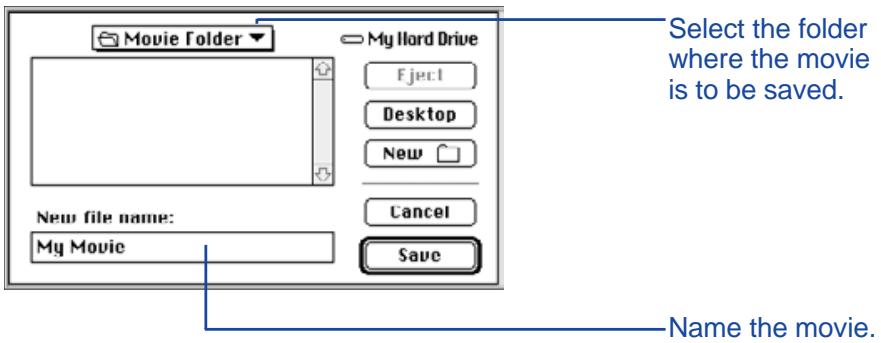
- From the pop-up menu, select the folder where the movie is to be saved.
- Name the movie, then click on Save.
- A new movie window will appear.

-
With the new movie window displayed, open the viewer panel (p. 22).
-
Click on and drag a thumbnail image from the viewer panel, then drop it onto the movie window.
- This will be the last frame in the time lapse movie. The movie will play back in the reverse order the images were dropped into the movie window.
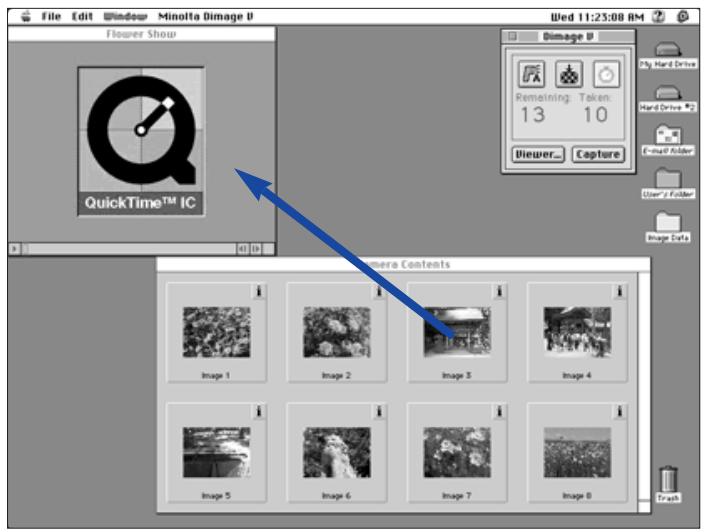
- Drag and drop the other thumbnail images onto the movie box in reverse order.
- Select Save from the File menu.
You can edit your movie using the functions from the Edit menu. Display the frame to be cut, cleared, or copied and pasted, then select the function.
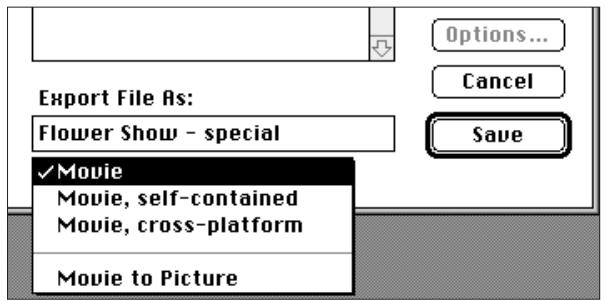
CHANGING THE MOVIE FILE FORMAT
Change the file type of your movie to one of the options below.
Movie: The default movie file format. When the movie is pasted into another file, the movie itself isn't copied to the file. Instead, a pointer is placed in the file that tells it where to find the movie.
Movie, self-contained: This means the entire movie will be copied when you paste it into another file. The file size will be larger, but the file will not need access to the drive where the original movie is stored.
Movie, cross-platform: Select this format when your movie will be played on a computer not running the Apple System Software.
Movie to Picture: Save a movie frame as a still-frame picture. Select Save As... with the movie stopped on the desired frame. The Options... button will be activated so you can choose recompression settings (p 75).
- Select Save as... from the File menu while the movie is open.
- The save dialog box will appear.
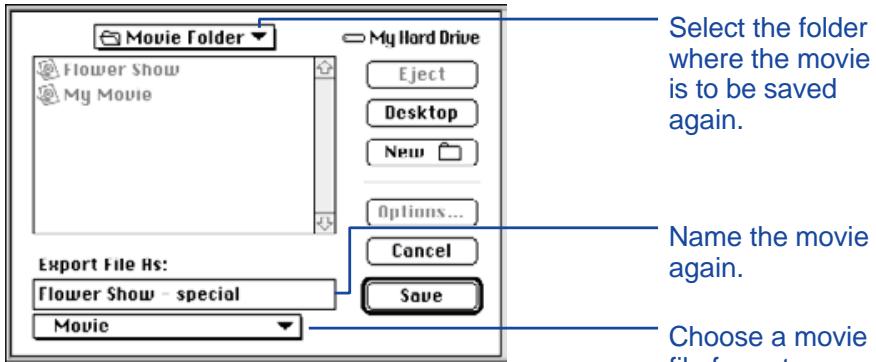
- From the pop-up menu, select the folder where the movie is to be saved, then name the movie.
- Select the format type from the format pop-up menu.
- Click on Save.
RECOMPRESSING MOVIE FILES
The purpose of recompressing a movie file is to make the format suitable for the end-use of the movie and optimize the compression scheme for the type of images used. The time lapse movie files are compressed when created, using QuickTime™ compression.
Recompressing movie files does not mean the file will be smaller than the original format.
The guide below is to help you determine what recompression type, if any, is necessary for your movie.
| Compressor Type | Compression Ratio | Image Type |
| Animation | Low | Computer-generated animation |
| Cinepak | High | Video |
| Component Video | High | Video |
| Graphics | Low | 8-bit still images |
| None | Low | Video/All image types |
| Photo-JPEG | High | Photographic images |
| Video | Low | 16-bit video |
Photo-JPEG and Video are suitable for movies recorded with the Dimâge V. Photo-JPEG is recommended for movies containing a variety of image types. Video is recommended for movies containing similar image types.
- Select Open from the File menu.
- The Open dialog box will appear.
Use the pop-up menu to find the movie to be recompressed. Click on the movie file, then click on Open.
- The selected movie will appear in the movie panel.
- Select Recompress Movie... from the Movie menu.
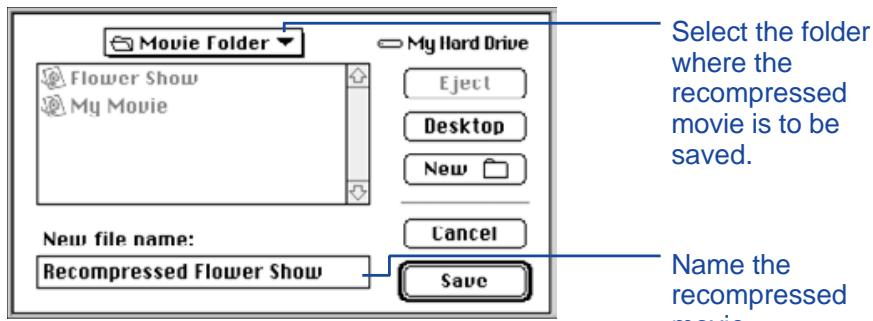
-
From the pop-up menu, select the folder where the recompressed movie is to be saved, then name the recompressed movie.
-
Click on Save.
- The Compression Settings dialog box will appear.
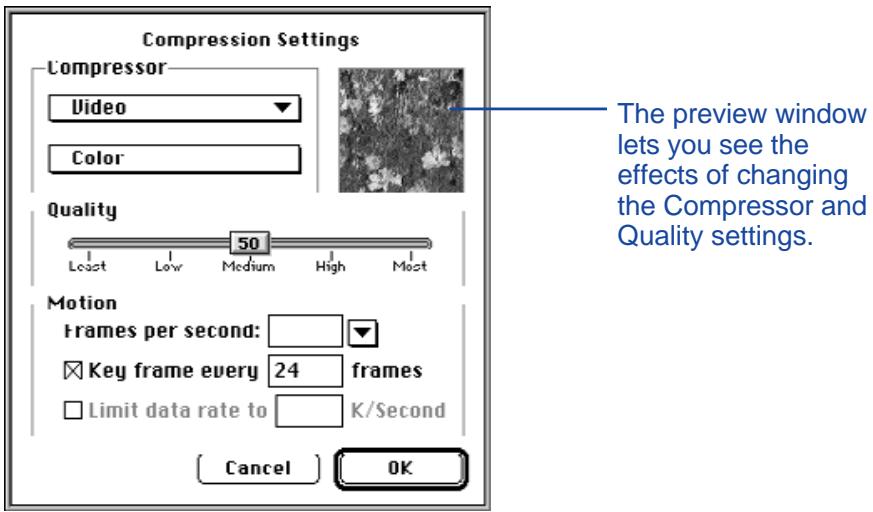
- Select the compression type from the pop-up

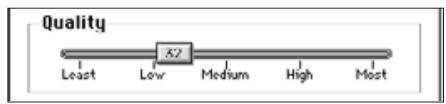
- Use the slider to select the quality of the compressed image.
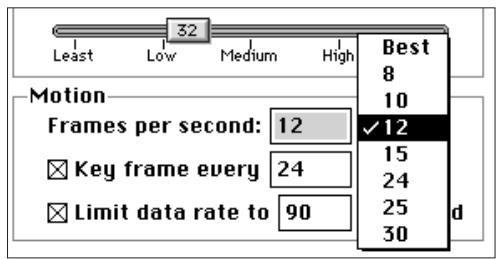
- Select the playback rate from the Frames per second: pop-up menu.
. File size will increase with higher frames per second.
- Click on OK in the dialog box.
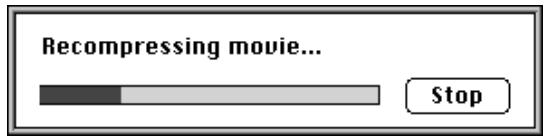
- The bar below will appear to report the progress.
The software and your Macintosh will inform you of trouble. This section lists the error messages and the appropriate action to take when the message appears.
Message: This application requires System 7.5 or greater!
Cause: Your operating system is 7.1.2 or earlier
Solution: Use system 7.5 operating system or greater.
Message: This application requires QuickTime 2.0 or greater. Please install and try again.
Cause: QuickTime 2.0 is not installed in the extensions folder.
Solution: Install the QuickTime 2.0 extension (or greater) into the extensions folder.
Message: This application needs more memory. Please increase application memory size and try again.
Cause: There is not enough memory allocated to Camera Access.
Solution: Increase the Preferred Memory Size. See page 37.
Message: Out of memory.
Message: Your system is low on memory. Please quit other open applications to free up available free memory in your system.
Message: Camera Access is out of memory. Please increase application memory size before continuing.
Message: Operation failed due to low memory. Please increase this application's memory size and/or quit other applications and try again.
Cause: The memory required to perform the operation is more than that allocated to the program.
Solution: Quit any applications other than Camera Access. Increase the Preferred Memory Size (p 37).
Message: Operation failed because disk is full.
Cause: There is not enough disk/scratch disk space for the computer to complete the operation.
Solution: Increase the free space on the hard disk by removing unnecessary files or applications.
Message: Can't open about box because filter is being used. Please close the filter and try again.
Cause: The "About this filter..." function cannot be accessed when the filter is in use.
Solution: Select "About this filter..." when the filter is not in use.
Message: Can not open about box because the panel is being used. Please close the panel and try again.
Cause: The "About this panel..." function cannot be accessed when the panel is in use.
Solution: Select "About this panel..." when the panel is not in use.
Message: An image capture device connection error occurred. Please check your connection and try again.
Message: Image capture device not connected. Please check your connection and try again.
Cause: The Dimâge V is not correctly connected to the computer.
Solution: Check the connections between the camera and the computer (pp 8-9, p 19). Then, restart the Camera Access application (p 18). If the error continues to display, contact a Minolta Service Facility listed on the back cover of this manual.
Message: This file cannot be opened by this application.
Message: This application does not support this data type.
Cause: The application does not support the data format.
Solution: To open the file with Camera Access, use another application to convert the file into a PICT, JPEG, EXIF, or TIFF file. These are the only file formats recognized by Camera Access.
Message: Could not open document due to error.
Cause An error occurred while the document was opening.
Solution: Click on OK, quit the application, then restart the Macintosh. Launch the software and try again.
Message: Unable to print document due to printer error. Please check your printer and try again.
Cause: The most likely cause is either the printer is off-line or the printer cable is not correctly connected.
Solution: Click on OK, then check the points listed above.
Message: Unknown error occurred.
Message: Unknown program error.
Cause: An unidentified error occurred.
Solution: Click on OK, quit the application, then restart the Macintosh. Launch the software and try again.
SYSTEM REQUIREMENTS
- Macintosh computer with a 68040 processor or greater, or a Power Macintosh.
• Apple System Software 7.1 or later. - Minimum12MB RAM, 16MB RAM for Power Macs.
- Minimum 45MB available hard disk space.
• Monitor capable of 256 colors. - CD-ROM drive.
- Insert the Adobe PhotoDeluxe™ CD-ROM into the CD-ROM drive, then double-click on the CD's icon.
- Double click on the flag icon for the program language, then open the Install-Disk 1 folder.
- Double-click on the Adobe PhotoDeluxe™ Install Icon, then choose your region and click on OK. After reading the End User License Agreement, click on Accept, then click on Continue.
- After reading the Read Me file, click on Continue again.
- Select the install type in the install dialog box.
- To install all the necessary files on the CD-ROM click on Easy Install.
- To install only selected items click on Custom Install.
- Select the drive where PhotoDeluxe™ will be installed from the pop-up menu. Click on Install. Follow the instructions that appear on the monitor. You will be required to enter your name and a serial number. The serial number is located on the last page of the Dimâge V camera manual.
- Restart the Macintosh.
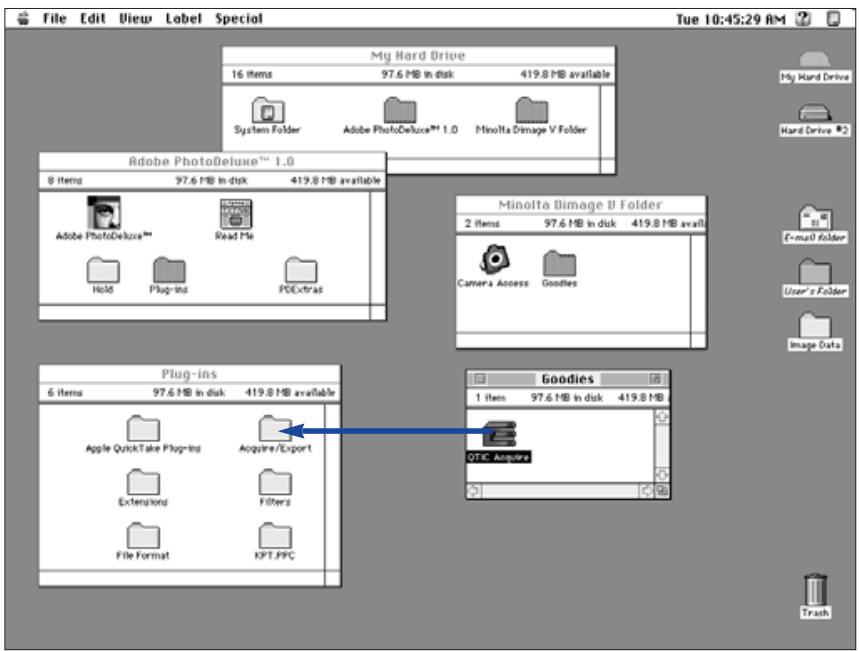
INSTALLING THE QTIC PLUG-IN MODULE
The QTIC plug-in allows you to acquire images on the Dimâge V's memory card or capture images directly with the camera through the Adobe PhotoDeluxe™ software.
- Drag the QTIC Acquire icon out of the Goodies folder that came with the Camera Access software.
- Drop the QTIC Acquire icon into the Acquire/Export folder, located in the Adobe PhotoDeluxe™ Plug-ins folder.
- Minolta (UK) LTD. Photographie Division
- Minolta (IRL) Ltd. (Photopak Sales)
- Minolta Portugal Lda
- Dimâge V
- TABLE OF CONTENTS
- TABLE OF CONTENTS 2
- BEFORE YOU BEGIN ....4
- CONNECTING 8
- INSTALLING THE SOFTWARE ....10
- LAUNCHING THE SOFTWARE ....18
- VIEWER PANEL ....21
- IMAGE PANEL ....38
- DIMÂGE V MAIN PANEL ....52
- MOVIE PANEL 66
- TROUBLE SHOOTING ....79
- CHECKING THE PACKING LIST
- Items you will need to operate the Macintosh software:
- Other items included in the package:
- SYSTEM REQUIREMENTS
- Power Macs using PCI slots:
- WARNING - BEFORE INSTALLATION
- WHERE TO FIND THE FILES
- User-selected Destination Folder
- Extensions Folder
- FOR VIEWING AND RETOUCHING IMAGES
- In the Viewer Panel:
- Once the image is saved:
- OPERATING THE CAMERA WITH THE COMPUTER
- In the Dimage V Main Panel:
- In the Image Panel:
- LAUNCHING THE SOFTWARE
- DIMMED OPTIONS
- VIEWER PANEL
- VIEWER PANEL FUNCTIONS
- OPENING THE VIEWER PANEL
- To Display Camera Images:
- COPYING SELECTED IMAGES
- EXIF:
- COPYING ALL IMAGES
- DELETING SELECTED IMAGES
- DELETING ALL IMAGES
- SORTING IMAGES
- COPYING IMAGES - DRAG AND DROP
- DELETING IMAGES - DRAG AND DROP
- DISPLAYING THE FULL IMAGE
- IMAGE PANEL
- IMAGE PANEL FUNCTIONS
- OPENING THE IMAGE PANEL
- MAGNIFYING OR REDUCING THE VIEW
- CROPPING IMAGES
- ADJUSTING BRIGHTNESS AND CONTRAST
- ADJUSTING COLOR BALANCE
- SUBTLE BRIGHTNESS CHANGES
- Select Adjust from the Image menu and choose either Darken or Lighten from the submenu.
- SHARPENING AND SOFTENING
- Select Adjust from the Image menu and choose either Sharpen or Soften from the submenu.
- FLIPPING IMAGES
- ROTATING IMAGES
- PRINTING IMAGES
- Select Print... from the File menu.
- Enter the number of copies and select the desired printing options, then click on Print.
- SAVING IMAGES - FILE FORMATS
- PICT
- JPEG
- EXIF
- TIFF
- SAVING IMAGES
- DIMÂGE V MAIN PANEL
- DIMÂGE V MAIN PANEL FUNCTIONS
- OPENING THE DIMÂGE V MAIN PANEL
- DISPLAYING CAMERA STATUS
- REMOTE RECORDING
- EXPOSURE COMPENSATION
- SELF-TIMER
- RESETTING THE CAMERA DATE/TIME
- Minolta Dimage V
- Set Clock...
- FORMATTING IMAGE MEMORY CARDS
- Select Format Card... from the Minolta Dimage V menu.
- Click on OK.
- COPYING: FROM THE MAC TO THE CAMERA
- Select Upload Image... from the Minolta Dimage V menu.
- CREATING TIME LAPSE MOVIES
- of Frames: 10
- MOVIE PANEL
- MOVIE PANEL FUNCTIONS
- THE MOVIE WINDOW
- DISPLAY OPTIONS
- Normal Size
- Half Size
- Double Size
- Fill Screen
- Present Movie
- PLAYBACK MODES
- Loop
- Loop Back and Forth
- DRAG AND DROP - MAKING A TIME LAPSE MOVIE
- CHANGING THE MOVIE FILE FORMAT
- RECOMPRESSING MOVIE FILES
- INSTALLING THE QTIC PLUG-IN MODULE
Brand : KONICA MINOLTA
Model : DIMAGE V SOFTWARE-MAC
Category : Photography Software