
DIMAGE RD3000 SOFTWARE - Image Processing Software KONICA MINOLTA - Free user manual and instructions
Find the device manual for free DIMAGE RD3000 SOFTWARE KONICA MINOLTA in PDF.

| Product type | Image processing software for Dimage RD 3000 digital camera |
| Compatible operating systems | Windows 95/98/NT 4.0; Mac OS 7.6 to 8.5.1 |
| Minimum configuration (Windows) | Intel Pentium 90 MHz processor, 32 MB RAM, 32 MB free disk space, VGA 640×480 High Color (16-bit) display, CD-ROM drive, SCSI port |
| Minimum configuration (Mac) | Power PC, 16 MB free memory, 32 MB free disk space, 13-inch 640×480 32,000-color display, CD-ROM drive, internal SCSI port |
| Main functions | Viewing, editing (crop, rotate, text, brightness/contrast/color adjustments), printing, slideshow with audio, remote and interval photography, file management |
| Supported image formats | BMP, EXIF, JPEG, PICT, TIFF, Photoshop 3.0 (PSD, Windows), FlashPix (Windows) |
| Connectivity | SCSI connection to the Dimage RD 3000 camera |
| Drivers | TWAIN driver for Windows; Adobe Photoshop plug-in |
| Installation | CD-ROM; caution: do not connect the camera before installation is complete |
| Interface languages | English; translation available upon request on notice-facile.com |
| Included documents | User manual (147 pages in PDF) downloadable free of charge |
| Software compatibility | Adobe Photoshop 3.0.5/4.0.1/5.0.1/5.0.2 (for plug-in) |
| Maintenance and cleaning | None (software); store the CD away from dust and scratches |
| Safety | Disconnect the camera before installation; do not remove the CF card during transfers |
| Spare parts and repairability | Software is not repairable; download available via notice-facile.com |
Frequently Asked Questions - DIMAGE RD3000 SOFTWARE KONICA MINOLTA
User questions about DIMAGE RD3000 SOFTWARE KONICA MINOLTA
0 question about this device. Answer the ones you know or ask your own.
Ask a new question about this device
Download the instructions for your Image Processing Software in PDF format for free! Find your manual DIMAGE RD3000 SOFTWARE - KONICA MINOLTA and take your electronic device back in hand. On this page are published all the documents necessary for the use of your device. DIMAGE RD3000 SOFTWARE by KONICA MINOLTA.
USER MANUAL DIMAGE RD3000 SOFTWARE KONICA MINOLTA
This manual does not provide instructions for the basic operation of personal computers, or the basic operation of Windows® or Mac operating systems.
Please refer to the manual that came with your computer for information on the above mentioned topics.
- This instruction manual may not be copied either in part or in its entirety without the prior permission of Minolta Co., Ltd. © 1999 Minolta Co., Ltd.
- Every precaution has been taken to ensure the accuracy of this material. Please contact Minolta if you have any questions, find any mistakes or notice missing information.
- Minolta cannot accept responsibility for any loss, damage or other problems caused by use of this software.
- With the exception of personal, home or equivalent use no part of any book, magazine, music, or other copyrighted material may be used, copied or revised without the prior permission of the author or copyright holder.
- This software has been designed to mitigate the so-called "Year 2000 Problem." For information on how Minolta has addressed the "Year 2000 Problem," please visit our Website: http://www.minoltaeurope.com
- Digita™, Digita Desktop™ and the Digita logo are licensed or registered trademarks in the United States and other countries of FlashPoint Technology, Inc.
- Microsoft® and Windows® are registered trademarks in the United States and other countries of Microsoft Corporation.
- The official name of Windows® is Microsoft® Windows® Operating System.
- I486 and Pentium® are trademarks or registered trademarks of Intel Corporation.
- Apple, the Apple logo, Macintosh, Power Macintosh, Mac OS and the Mac OS logo are registered trademarks of Apple Computer, Inc.
- Other company and product names are the trademark or registered trademark of their respective owners.
TABLE OF CONTENTS 2
BEFORE YOU BEGIN 6
User Registration 6
Terms used in this manual 7
SYSTEM REQUIREMENTS 8
For Windows 8
For Macintosh 10
INTRODUCTION
INSTALLING THE SOFTWARE 14
For Windows® 95/98/NT 14
Installing the Twain-Driver (Windows®) 17
For Macintosh 18
CONNECTING THE CAMERA TO YOUR PC 24
SCSI ID Setup 24
Terminator power supply setup 26
The SCSI connector cable 28
For PC/AT compatible computers 28
For Apple Macintosh computers 29
Connection to the computer 30
Insertion of the CF card 31
BASIC OPERATIONS 32
Basic operation (Viewer Panel, Image Panel) 32
Basic operation (Camera Panel) 34
OPENING THE SOFTWARE 36
For Windows® 95/98/NT 37
For Macintosh 38
USING THE SOFTWARE
USING THE TWAIN.DRIVER (WINDOWS)
Saving images to the hard drive 42
Deleting images from the CF-Card 43
Quitting the Twain-Driver 43
USING THE VIEWER PANEL 44
At the Viewer Panel 44
Displaying camera Images 45
Displaying Hard disk Images 48
Find 50
Copying files from the camera 52
For Windows® 95/98/NT 52
For Macintosh 53
Viewing image file properties 55
Printing albums 56
Deleting images from the CF card 57
For Windows® 95/98/NT 57
For Macintosh 58
Creating a new folder 60
For Windows® 95/98/NT 60
For Macintosh 61
Changing the Image Display 62
For Windows® 95/98/NT 62
For Macintosh 62
Sorting images in the Viewer Panel 64
For Windows® 95/98/NT 64
For Macintosh 64
Using Quick View 66
Changing file names 68
Adding audio data to an image (Macintosh only) 69
Drag and Drop operation 72
USING THE IMAGE PANEL 74
What you can do at the Image Panel 74
Displaying camera images 75
Displaying hard disk images 78
Zoom in/Zoom out 79
Resizing documents 80
Cropping the image 82
Scrolling the image 83
Adjusting Brightness and Contrast 84
Adjusting Colour Balance 85
Using the Quick Correction function 86
Lighten/Darken 86
Sharpen/Soften 87
Flipping an image (horizontally or vertically) 88
Rotating an image 90
Superimposing text 92
Resizing the image 94
Digita Desktop image filters and plug-in filters 95
Printing images 96
Saving an image 98
Image file formats 98
Saving images 100
USING THE CAMERA PANEL 102
WHAT YOU CAN DO FROM THE CAMERA PANEL 102
Camera Panel 103
To open the Camera Panel 104
When the Camera Panel does not open 105
Displaying camra images 106
Remote photography 107
CAMERA SETTINGS 110
Formatting the CF card 110
Synchronizing the internal clock with your PC clock 112
INTERVAL PHOTOGRAPHY 114
SLIDESHOWS 118
What is a slideshow? 118
To open the Slideshow window 119
Appending image files to a slideshow 120
Appending individual image files 120
Append all the image files in a folder 122
Changing the display of files in the slideshow window 124
For Windows® 95/98/NT 124
For Macintosh 124
Changing the Order of Slides 126
Updating slides (Windows® only) 126
Removing slides 127
Adding audio to a slide 128
Adding background music 130
Slideshow Preferences 132
Presenting a slideshow 134
Saving a slideshow 135
Saving the slideshow as an AVI file 136
Saving the slideshow as a QuickTime movie file. 136
VERIFYING THE DIGITA DESKTOP VERSION 140
For Windows® 95/98/NT 140
For Macintosh 143
Please register this software before you begin using it. Complete the enclosed user registration card.
Persons who register their software are recognized as official users, and receive technical support as well as software upgrade and other new product information.
- Please be aware that you will not receive any notification of registration from Minolta.
- The information contained on your user registration card is used exclusively by Minolta for customer service and product development. The information you provide will remain confidential.
TERMS USED IN THIS MANUAL
- This manual assumes that your computer's operating system (Windows® 95/98/NT or Mac OS) as well as other necessary software such as device drivers have been installed, and are operating properly.
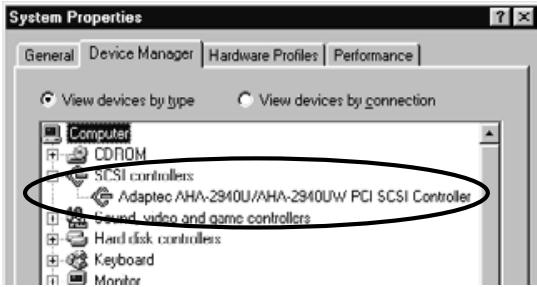
- If you are using a Windows® OS, click the Start button, point to Settings, and click Control Panel. Double-click the System icon, then click the Device Manager tab. Verify that the name of your SCSI host adapter is displayed in the tree shown under the SCSI Controller icon.
- This manual assumes the use of a two-button, right-handed mouse for Windows®. The terms 'click' and 'double-click' refer to a single or double click of the left mouse button. The term 'drag' refers to the action of holding down the left mouse button while moving the mouse.
- If you are using Macintosh OS, the term 'Command Key' refers to the key located next to the Space Bar.
- Command names shown in this manual which are common both to the Windows® and Macintosh systems do not indicate any of the shortcut keys found in Windows® command names.
Example No. 1: The File command appears as "File" on Windows® and "File" on Macintosh menus, but in this manual it is shown as merely as "File."
Example No. 2: The Save command appears as "Save" on Windows® and "Save" on Macintosh menus, but in this manual it is shown merely as "Save."
FOR WINDOWS®
The system requirements for the operation of this software are as shown below:
| IBM PC/AT COMPATIBLE COMPUTERS | |||
| CPU | Intel Pentium 90 MHz or higher1 | ||
| OS | Windows® 95 (including OSR2)/98/NT4.02 | ||
| RAM | A minimum of 32 MB of RAM | ||
| HARD DISK SPACE | 32 MB or more of free hard disk memory for use as workspace | ||
| MONITOR | VGA (640 x 480 dots) or higher/High Colour (16-bit) | ||
| CD-ROM DRIVE | Required for installation only | ||
| RECOMMENDED | Adaptec: | ||
| SCSI HOST | AVA-1505AE | AVA-2904E | AHA-2940 |
| ADAPTERS | AHA-1510B | AHA-2910B | AHA-2940U |
| AHA-1520B | AHA-2920C | AHA-2940AU | |
| AHA-1540CP | AHA-2930C | AHA-2940UW | |
| AHA-8945 | AHA-2930U | AHA-2940U2W | |
| AVA-2902E | AHA-2930U2 | ||
| APPLICATIONS | Adobe Photoshop | ||
| COMPATIBLE WITH | Ver. 3.0.5/4.0.1/5.0.1/5.0.2 | ||
| THE OPERATION OF | |||
| TWAIN DRIVERS | |||
1 Not including computers built from kits, shop-brands or other computers for which components have been selected and assembled individually.
2 Windows® NT users should manually set their virtual memory page-file size to a minimum of 100 MB. Users who run several programs concurrently could find that their computer requires more. For details on how to adjust your memory settings, please refer to your NT manual or help files.

NOTE:
The setup program for this software will install the file Winaspi.dll ver. 4.57 on your computer's system (Windows® 95 only). It is possible, however, that the installation of software for other SCSI devices automatically reinstalls an older version that is not compatible with the Dimage RD 3000 software. In the event that your Dimage RD 3000 software no longer operates properly after the installation of software for some other SCSI device, please reinstall the Dimage RD 3000 software.
Minolta does not guarantee the performance of this software when used with a SCSI host adapter not included in the list shown to the left. Minolta's guarantee is limited to the assurance that the Dimage RD 3000 will operate properly in combination with any of the SCSI host adapters included in the list shown to the left. It does not include any assurances regarding the SCSI host adapter itself nor problems caused by the SCSI host adapter. Minolta cannot guarantee nor provide customer support for the operation of the SCSI host adapter with your computer.
FOR MACINTOSH
The system requirements for the operation of this software are as shown below:
| APPLE MACINTOSH SERIES COMPUTERS | |
| CPU | Power PC (Power Macintosh or Power Macintosh G3) Excludes Mac OS compatibles. |
| OS | Mac OS 7.6 to Mac OS 8.5.1. QuickTime ver. 2.5 or later is required. QuickTime ver. 3.0 or later is required to operate the slideshow function. |
| RAM | 16 MB or more of free memory |
| HARD DISK SPACE | 32 MB or more of free hard disk memory for use as workspace |
| MONITOR | 13" (640 x 480 dots) or higher/32000 Colours |
| CD-ROM DRIVE | Required for installation only |
| RECOMMENDED SCSI HOST ADAPTERS | Standard Internal SCSI host adapter Units which have an expansion board inserted into the PCI bus or NuBus to effect a connection are not compatible. |
| APPLICATIONS COMPATIBLE WITH THE OPERATION OF THE ADOBE PHOTOSHOP PLUG IN | Adobe Photoshop Ver. 4.0.1/5.0.1/5.0.2 |

NOTE:
Minolta does not guarantee the performance of this software when used with a SCSI host adapter not included in the list shown to the left. Minolta's guarantee is limited to the assurance that the Dimage RD 3000 will operate properly in combination with any of the SCSI host adapters included in the list shown to the left. It does not include any assurances regarding the SCSI host adapter itself nor problems caused by the SCSI host adapter. Minolta cannot guarantee nor provide customer support for the operation of the SCSI host adapter with your computer.
INTRODUCTION
Use the following procedure to install Dimâge RD 3000 software on your computer.
FOR WINDOWS® 95/98/NT
The following explanation refers to the hard disk drive as drive C and the CD-ROM drive as drive D.
Be sure that the Dimage RD 3000 is not connected to your computer when you install the software.
BE SURE THAT THE DIMÂGE RD 3000 IS NOT CONNECTED TO YOUR COMPUTER WHEN YOU INSTALL THE SOFTWARE.
1 Turn the computer on to start up Windows®.
2 Insert the Dimage RD 3000 CD-ROM in your computer's disk drive.
- The Dîmâge RD 3000 setup program opens.
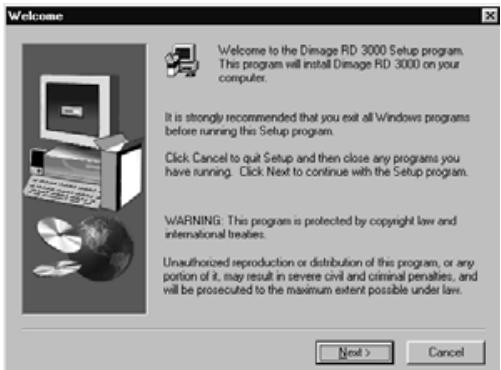
3 Click the Next button.
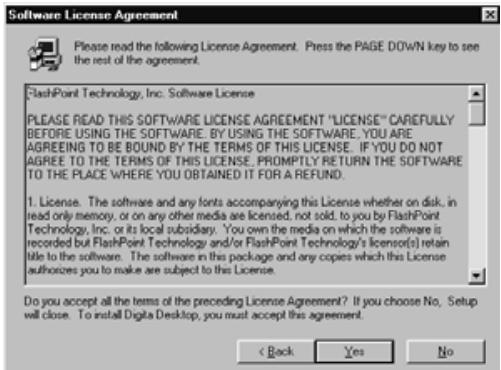
- The Product License Agreement opens. Please read the entire agreement carefully before continuing the installation.
- If you cannot agree to the terms of the Product License Agreement, click the No button to exit the Setup program.
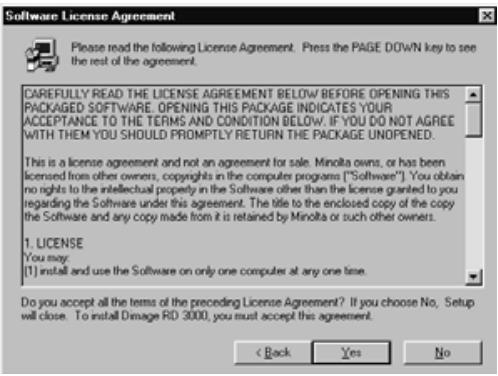
4 Click the Yes button.
- The files are copied to hard disk.
- Once the necessary files have all been copied, the DigiTa Desktop setup program closes automatically.
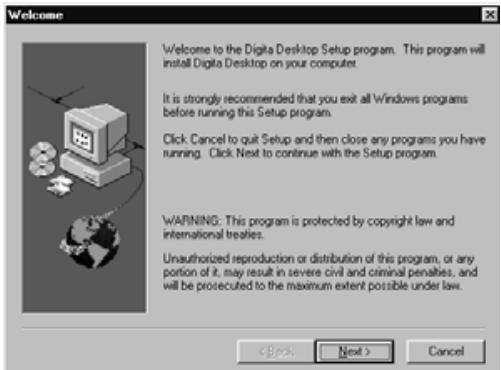
5 Click the Next button.
- The Product License Agreement opens. Please read the entire agreement carefully before continuing the installation.
- If you cannot agree to the terms of the Product License Agreement, click the No button to exit the Setup program.
6 Click the Yes button.
- The installation destination folder is displayed. If you wish to install the software in a different folder, click the Browse button.
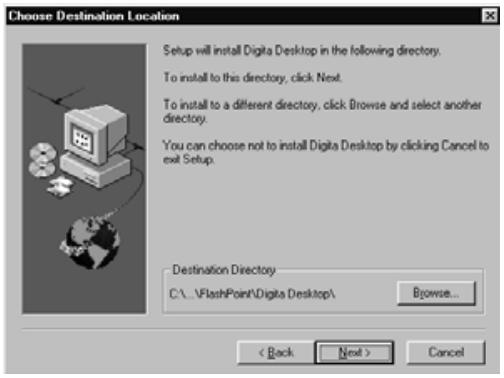
7 Click the Next button.
- The program files are copied to your computer's hard disk. Before exiting the Setup program, you will be asked if you wish to view the Readme file.
- The Readme file contains important information not found in this manual. Be sure to click the Yes button, and read the contents of this file carefully.
- After clicking the Yes button, the Readme.txt file is opened in Notepad. At the same time the Exit Program dialog box opens.
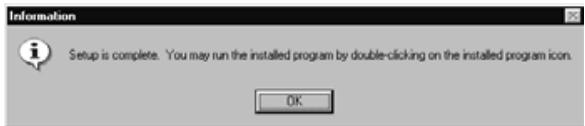
- Click the OK button in the dialog box to finish the installation process, and after viewing the Readme file, close Notepad.
INSTALLING THE TWAIN DRIVER (WINDOWS)
- It is assumed that the CD-ROM drive is drive D.
BE SURE THAT THE DIMAGE RD3000 IS NOT CONNECTED TO YOUR COMPUTER WHEN YOU INSTALL THE TWAIN DRIVER.
1 Turn the computer on to start up Windows®.
2 While pressing the Shift key, insert the Dimage RD3000 CD-ROM into the CD-ROM drive.
- This operation bypasses the auto-play function of CD-ROM.
3 Click on "Start" and click on "Run".
4 Type D:\English\Twain\Setup.exe in the Open drop-down list, then click on "OK".
- Setup program will begin.
5 Click on "Next >", then follow the directions on the screen.
FOR MACINTOSH
Before you begin
Virus protection tools and control panel documentation can be the cause of problems during installation. These programs should be removed from your system or temporarily disabled during installation.
The installation program does not operate properly on Japanese systems using Japanese-language versions of QuickTime. Either remove the Japanese-language version, and install the English-language version of QuickTime before using the installation program, or manually drag into the installation folder the files shown in the Where to Find the Files section on page 21.
Be sure that the Dimage RD 3000 is not connected to your computer when you install the software.
1 Turn on the Macintosh.
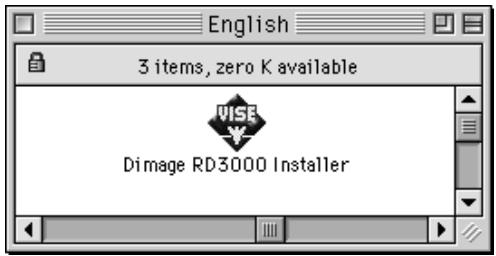
2 Once the desktop opens, insert the DimAge RD 3000 CD-ROM in your computer's disk drive.
3 Once the CD-ROM is mounted, double-click the icon.
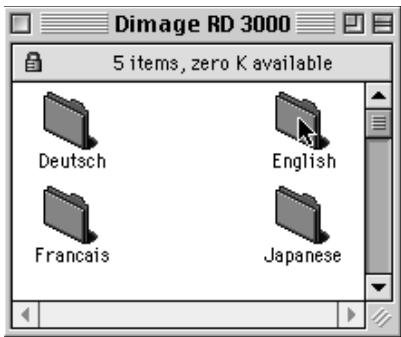
4 Double-click the ENGLISH icon.
- The Dimâge RD 3000 Installer icon is displayed.

Double-click the DimAge RD 3000 Installer icon.
- The Software License Agreement is displayed. Please read the entire agreement carefully before continuing the installation.
- Click the Save button to save the contents of the Software License Agreement as a text file. Click the Print button to print out the contents of the Software License Agreement.
- If you cannot agree to the terms of the Software License Agreement, click the Decline button to exit the installer.
6 Click the Agree button.
- The Easy Install window opens.
- If you are installing the software for the first time, leave the Easy Install settings as they are, and proceed to the next step.
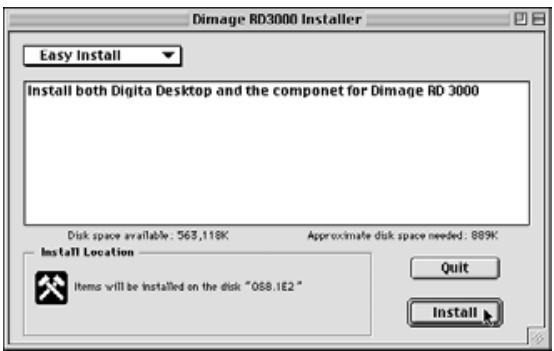
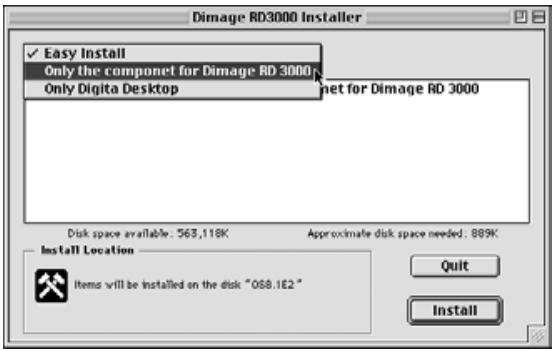
- If you wish to install only the Dimâge RD 3000 components or only the Digita Desktop components, from the pop up menu select Dimâge RD 3000 Components Only or Digita Desktop Components Only and proceed to the next step.
7 Click the Install button.
- The software installation begins. Follow the instructions that appear on the screen.
- Once the software installation is complete, the Digita Desktop installer opens automatically.
- If on the previous page, "Only the component for Dimâge RD 3000" was selected from the pop-up menu, skip steps 8 through 10 shown below and proceed directly to step 11.
8 Click the Continue button.
- The Software License Agreement is displayed. Please read the entire agreement carefully before continuing the installation.
- Click the Save button to save the contents of the Software License Agreement as a text file. Click the Print button to print out the contents of the Software License Agreement.
- If you cannot agree to the terms of the Software License Agreement, click the Disagree button to exit the installer.
9 Click the Agree button.
- The Easy Install window opens. The drive and folder in which the software is to be installed is displayed at the bottom left of the window.
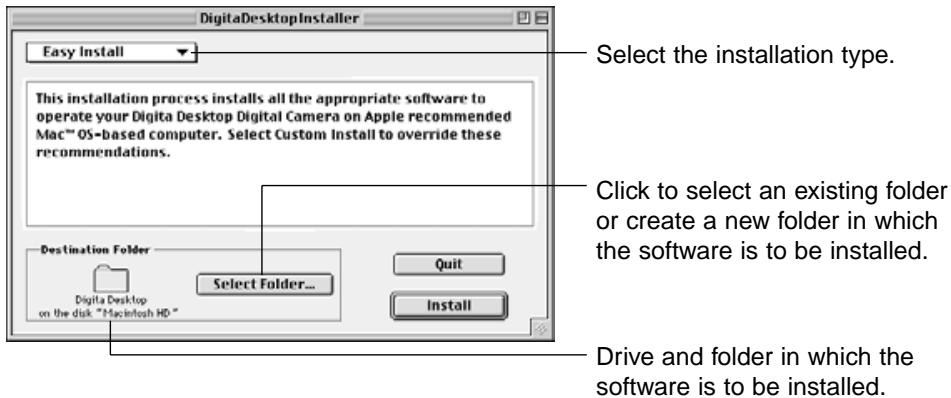
10 Confirm the current selection, select a different folder or create a new folder.
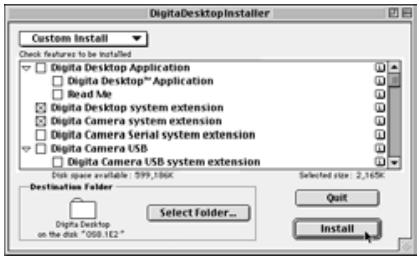
11 Select an Installation Type using the pop-up menu in the upper left of the window.
-
Selecting Custom Install opens the window shown to the left.
-
Click the Check Box to the left of the files you wish to install. An "x" will appear inside the Check Box of the files you select. Click the Left Arrow to change it to a Down Arrow, and open a list of files. Each file can be selected individually.
- Click the i to the right of a file to view file information.
12 Click the Install button.
- The installer begins. Follow the instructions that appear on the screen.
- Once the installation is complete, the Restart window opens.
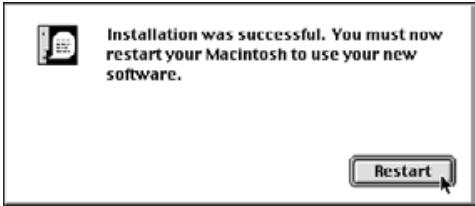
13 Click the Restart button.
Where to Find the Files
If you choose Simple Installation, all the files shown below are copied into the file folder. If you choose Custom Installation, only the files you select (by placing an "X" in the check box) are copied into the file folder.
- User-selected destination folder
- Digita Desktop (application)
- Goodies (folder)
- Extension
- Digital Desktop (extension)
- Digital Camera (extension)
- Minolta Dimâge RD 3000 (extension)
INSTALLING THE SOFTWARE
Installing the Adobe Photoshop plug-in module
The installation of this plug-in module in the specified location will enable you to open the Digma Desktop directly from Adobe Photoshop. This plug-in module is not installed automatically. To install the module, first install the Dimâge RD 3000 and Digma Desktop, then follow the instructions shown below.
Users who do not use Adobe Photoshop do not need to install this module.
1 Close Adobe Photoshop, if open.
2 Open the Adobe Photoshop folder.
3 Open the Plug-ins folder located in the Adobe Photoshop folder.
4 Open the Goodies folder located in the DigiTa Desktop folder.
5 Drag the Digits Desktop Acquire located in the Goodies folder to the Import/Export folder of the Plug-ins folder.
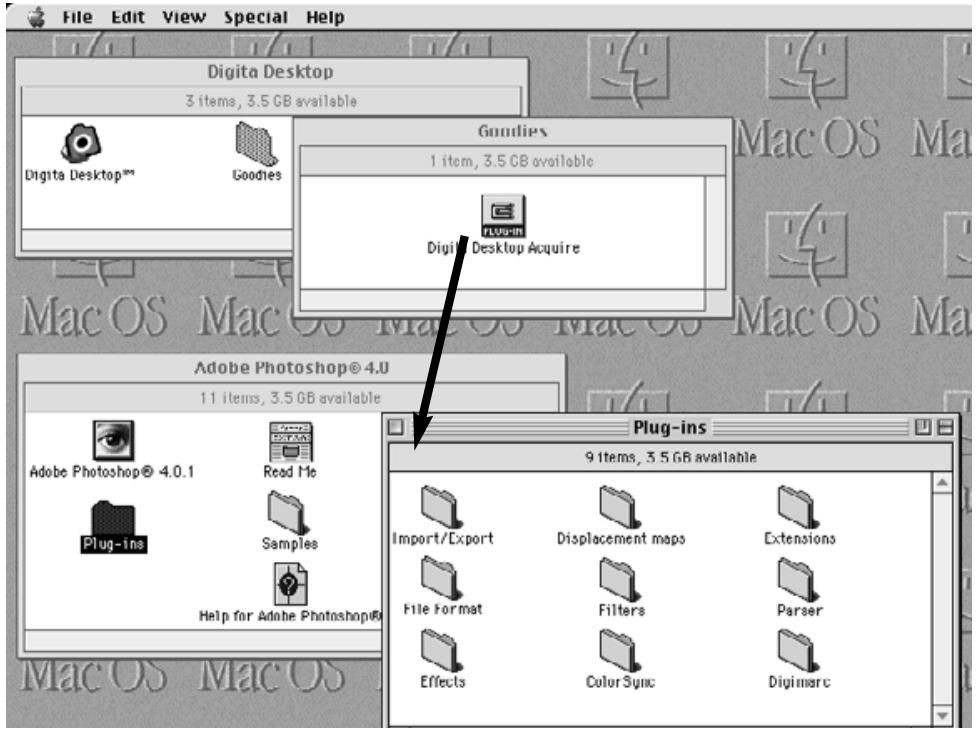
Drag the DigiTa Desktop Acquire located in the Goodies folder to the Import/Export folder of the Plug-ins folder.
SCSI ID SETUP
Each SCSI device that is connected to your computer must be assigned its own SCSI ID number from 0 to 7 so that the computer can identify it correctly.
Depending upon the computer, there are some SCSI ID Nos. which are pre-allocated, and cannot be given to any other device. Please refer to the table below.
| PRE-ALLOCATED SCSI ID NO. | |
| PC/AT COMPATIBLE | No. 7 - SCSI host adapter |
| APPLE MACINTOSH | No. 0 - Hard disk drive1 No. 3 - CD-ROM drive2 No. 7 - The Macintosh computer |
1 Some Macintosh models have IDE hard disk drives. On these models, ID No. 0 is not pre-allocated.
2 Some Macintosh models have both an internal and external SCSI bus. On these models ID No. 3 of the external SCSI bus is not pre-allocated.
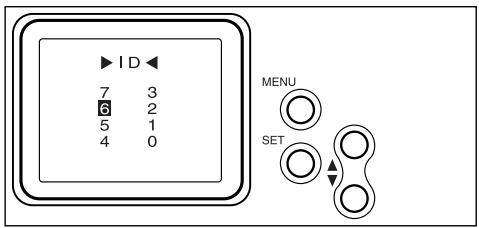
The Dimâge RD 3000 has been preset to SCSI ID No. 4 at the factory. If SCSI ID No. 4 is available for use on your computer, you need not change any settings before installing and using it.
If SCSI ID No. 4 is already in use on your computer, it will be necessary to allocate an unused ID No. to the Dimâge RD 3000.

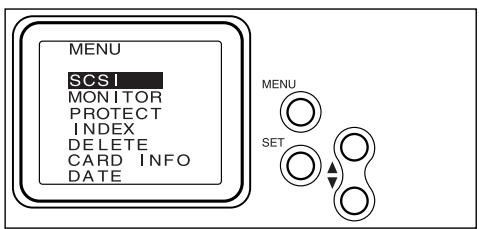
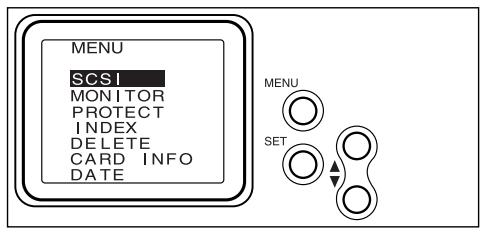
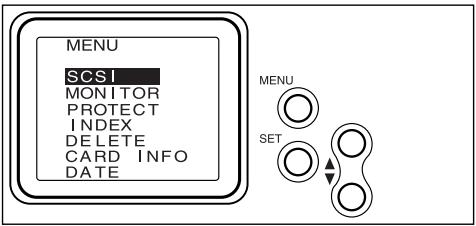
1 Turn the Dimâge RD 3000 Main Switch/Mode Selector dial to PLAY, and push the MENU button located on the back of the unit.
- The Top Menu opens on the LCD screen.
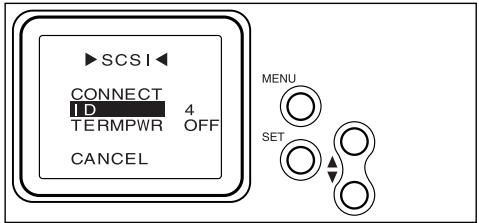
Push either the or button to move the cursor to SCSI, and push the SET button.
- The SCSI menu opens.
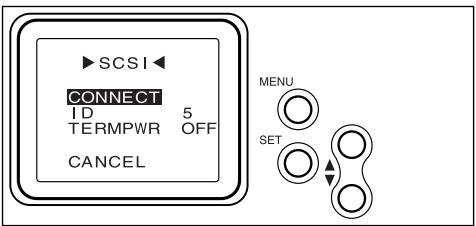
Push either the or button to move the cursor to ID, and push the SET button.
- The ID No. list opens.
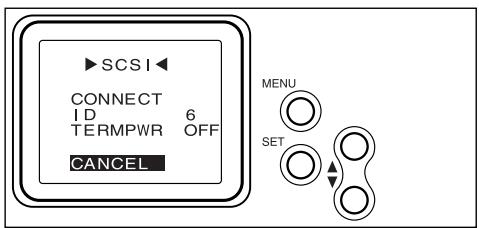
Push either the or button to move the cursor to the ID you wish to allocate, and push the SET button.
- The selected SCSI ID No. is allocated to the Dimage RD 3000, and the SCSI Menu reopens.
- This setting remains stored in the camera's memory even after the power is turned off.
Push either the or button to move the cursor to CANCEL, and push the SET button; or push the MENU button twice.
TERMINATOR POWER SUPPLY SETUP
The Dimâge RD 3000 is equipped with only one SCSI connector, which means that it can only be used as the final device on a SCSI chain. Since the final device on a SCSI chain requires a device called a terminator, the Dimâge RD 3000 comes with a built-in terminator.
The terminator requires a power source.
For PC/AT compatible computers
Check the user manual of your SCSI host adapter to determine whether or not the SCSI host adapter you are using is one that supplies power to the terminator. If it is, you do not need to perform the terminator power supply setup.
Users of SCSI host adapters that do not supply power to the terminator need to perform the terminator power supply setup in order to supply the terminator with power from the Dimâge RD 3000.
For Macintosh computers
Users of desktop and mini-tower Power Macintosh or Power Macintosh G3 model computers do not need to perform the terminator power supply setup. Users of PowerBook and PowerBook G3 computers with Power PC CPUs need to perform the terminator power supply setup in order to supply the terminator with power from the Dimâge RD 3000.
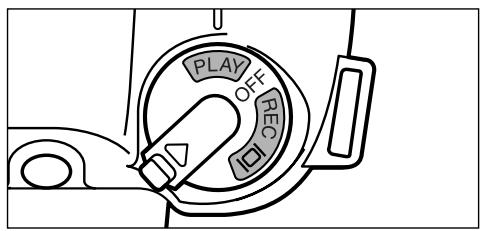
1 Turn the Dimâge RD 3000 Main Switch/Mode Selector dial to PLAY, and push the MENU button located on the back of the unit.
- The Top Menu opens on the LCD screen.
Push either the or button to move the cursor to SCSI, and push the SET button.
- The SCSI menu opens.
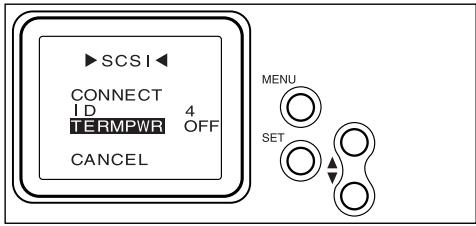
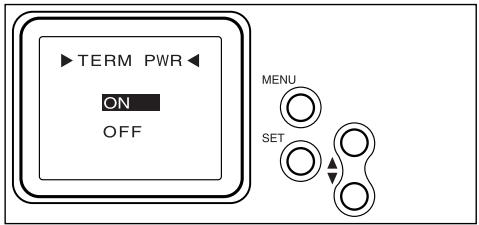
Push either the or button to move the cursor to TERMPWR, and push the SET button.
- The TERM PWR menu opens.
Push either the or button to move the cursor to ON, and push the SET button.
- The settings are revised to supply power from the Dimâge RD 3000 to the terminator, and the SCSI menu reopens.
- This setting remains stored in the camera's memory even after the power is turned off.

Push either the or button to move the cursor to CANCEL, and push the SET button; or push the MENU button twice.
THE SCSI CONNECTOR CABLE
FOR PC/ATCompatible COMPUTERS
When the Dimage RD 3000 is your only SCSI device:
For host adapters with 50-pin Wide SCSI connectors:
Use the SCSI connector cable included with your Dimage RD 3000.
For host adapters with other connector types:
Use a cable on which one end has a connector that matches your host adapter and the other end has a male 50-pin Wide SCSI connector.
When the Dimage RD 3000 is the final device on a SCSI chain:
For SCSI devices with 50-pin Wide SCSI connectors:
Use the SCSI connector cable included with your Dimage RD 3000.
For SCSI devices with other connector types:
Use a cable on which one end has a connector that matches the current terminator and the other end has a male 50-pin Wide SCSI connector.
FOR APPLE MACINTOSH COMPUTERS
When the Dimage RD 3000 is your only SCSI device:
For desktop and mini-tower Power Macintosh and Power Macintosh G3 computers:
Use the SCSI connector cable included with your Dimage RD 3000 together with a Macintosh adapter. Note that the Macintosh adapter connects to the Macintosh SCSI host adapter.
For PowerBook and PowerBook G3 computers with a PowerPC CPU:
Use a cable on which one end has a connector that matches the PowerBook SCSI host adapter (HDI-30) and the other end has a male 50-pin Wide SCSI connector.
When the Dimage RD 3000 is the final device on a SCSI chain:
For SCSI devices with 50-pin Wide SCSI connectors:
Use the SCSI connector cable included with your Dimage RD 3000.
For SCSI devices with other connector types:
Use a cable on which one end has a connector that matches the current terminator and the other end has a male 50-pin Wide SCSI connector.
CONNECTION TO THE COMPUTER
Before connecting the Dimâge RD 3000 to your computer, be sure to turn off both the computer and the Dimâge RD 3000. Connecting the Dimâge RD 3000 to the computer while the power is on could result in damage to both devices.
- To turn off the Dimage RD 3000, turn the Main Switch/Mode Selector dial to Off.
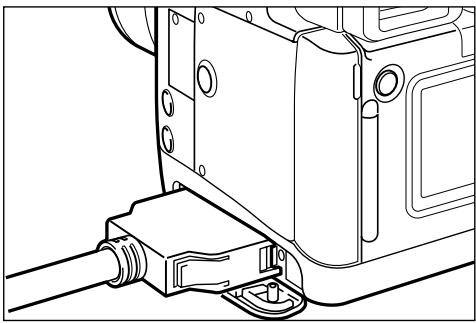
1 Open the Dimage RD 3000 connector cover.
2 Attach the 50-pin Wide SCSI cable connector to the Dimage RD 3000 SCSI connector, and press firmly until the connector clicks into place.

WHEN THE DIMÂGE RD 3000 IS YOUR ONLY SCSI DEVICE:
3 Attach the open end of the connector cable to the SCSI host adapter.
WHEN THE DIMAGE RD 3000 IS THE FINAL DEVICE ON A SCSI CHAIN:
3 Remove or render inactive the present terminator, and attach the open end of the connector cable to the SCSI connector that had been used for the terminator.
INSERTION OF THE CF CARD
Follow the instructions shown in the Dimâge RD 3000 manual to insert the compact flash card into the card slot.
BASIC OPERATION (VIEWER PANEL, IMAGE PANEL)
Used to view and modify image files saved in the camera's Compact Flash Card (CF Card).
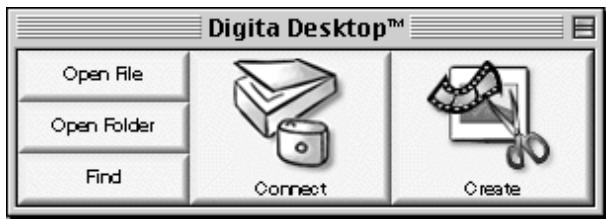
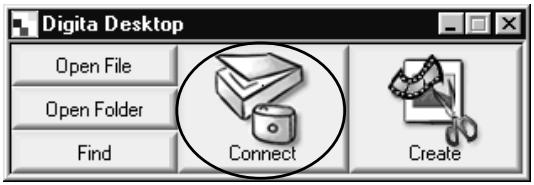
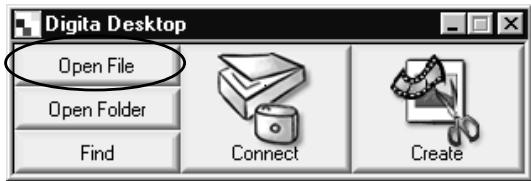
Open the Digita Desktop software (see pages 36 to 42).

Click the Connect icon on the Digita Desktop window.

The Camera Panel opens (see page 45).

Click the Viewer icon on the Camera panel.

The Viewer Panel opens, displaying thumbnail images of the files saved in the CF Card (see page 46).
At the Viewer Panel:
- Copy (download) some or all of the image files saved in the CF Card to your computer's hard disk or other memory device.
- Display or print out an album of thumbnail images of the files saved in your computer's hard disk. You can also rename the files, add audio data or view a slideshow.
- Resize or sort images, and view image properties such as size, date or image depth.
- Delete some or all of the image files displayed in the Viewer Panel.
- Drag and drop images to move or copy them to other folders.
See page 44 for details.
Double-click the thumbnail image of the file you wish to modify (see page 75).
The file is opened in an Image Panel (see page 75).
At the Image Panel:
- Modify a file by cropping, flipping, rotating, adding text, adjusting the brightness, contrast and colour balance, or resizing the image.
- Zoom in and out on the image.
- Print the image.
- Convert the image to other file formats.
See page 74 for details.
Click File menu, and then click Save As (see page 100).
Select a folder in which to save the new file, enter a filename, select a file format, and click the Save button (see page 101).
The new image file is saved (see page 101).
Image files
- Can be displayed in a Viewer Panel.
- Can be read by other applications.
- Can be included in滑片戏.
BASIC OPERATION (CAMERA PANEL)
Operate the Dimage RD 3000 camera from your computer.
Open the Digita Desktop software (see pages 36 to 42).
Click the Connect icon on the Digita Desktop window.
The Camera Panel opens (see page 104).
At the Camera Panel:
- Verify the number of images taken and number of images available.
- Control Dimage RD 3000 camera functions from the computer, including remote photography, exposure correction, flash correction, revise clock settings and initialisation of the CF Card.
- Perform interval photography.
See page 102 for details.
Adjust the exposure and flash settings as necessary.
Click the Remote Photography icon on the Camera Panel.
An Image Panel opens, in which the remote photography image is displayed (see page 108).
At the Image Panel:
- Modify a file by cropping, flipping, rotating, adding text, adjusting the brightness, contrast and colour balance, or resizing.
- Zoom in and out on the image.
- Print the image.
- Convert the image to other file formats.
See page 74 for details.
Click File menu, then click Save As (see page 100).
Select a folder in which to save the new file, enter a filename, select a file format, and click the Save button (see page 101).
The new image file is saved (see page 101).
Image files:
- Can be displayed in a Viewer Panel.
- Can be read by other applications.
- Can be included in滑片戏.
1 Following the instructions shown on pages 24 to 31, connect the Dimage RD 3000 camera to your computer.

2 Turn the Dimâge RD 3000 Main Switch/Mode Selector dial to PLAY, and push the MENU button located on the back of the unit.
- The Top Menu opens on the LCD screen.
Push either the or button to move the cursor to SCSI, and push the SET button.
- The SCSI menu opens.
Push either the or button to move the cursor to CONNECT, and push the SET button.
- The Dimâge RD 3000 camera is now set to the SCSI connection mode.
5 Turn on any other SCSI devices.
FOR WINDOWS® 95/98/NT
Launching the TWAIN-Driver
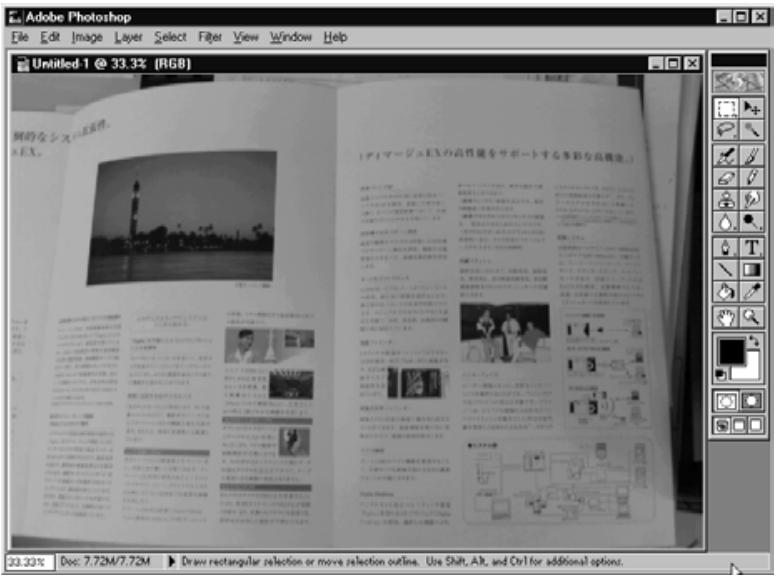
This example uses Adobe Photoshop version 4.0.1. This procedure will vary for other applications. See the operating manual for your application.
6 Turn on your PC and start Windows®.
7 Launch Adobe Photoshop.
8 Click Import on the File menu, and click on Select TWAIN_32 Source...
- The TWAIN source selection dialog box opens.
9 Select Dimage RD 3000 from the source list.
10 Click Import on the File menu, and click on TWAIN_32...
- The TWAIN driver will launch and the Minolta Dimage RD3000 index window will be displayed on the Adobe Photoshop window.
(continued from page 36)
Opening Digita Desktop as an independent application
Users who do not use TWAIN compliant applications can open the Digital Desktop as an independent application.

6 Turn on the computer.
7 Click the start button, and point to Programs. Next, point to the Digita Desktop folder, and click the Digita Desktop icon.
- The Digits Desktop control panel opens.
FOR MACINTOSH
Opening the Digita Desktop as an Adobe Photoshop plug-in
This example uses Adobe Photoshop version 4.01 which has had the Digits Desktop installed as a plug-in. See page 22 of this manual for instructions on installing the Digits Desktop plug-in module.
(continued from page 36)
6 Turn on the computer and start the Mac OS.
7 Open Adobe Photoshop.
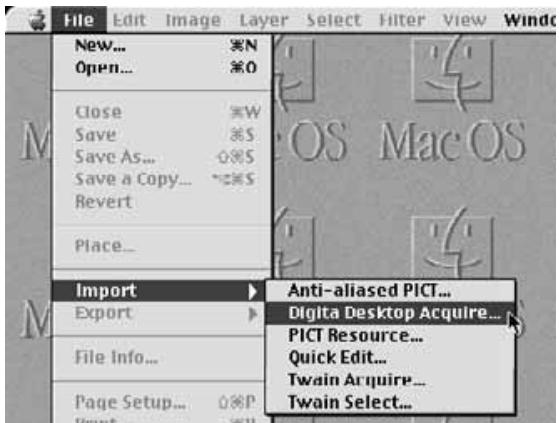
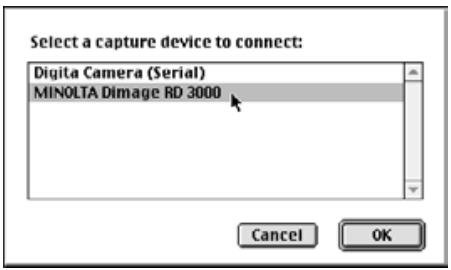
8 Click on Import on the File menu, and click DigiTa Desktop Acquire.
- The capture device selection dialog box opens.
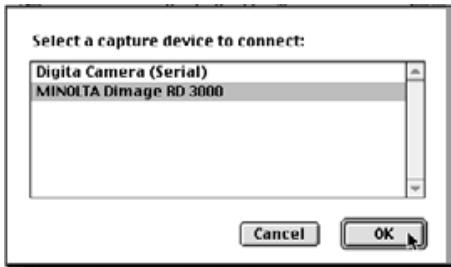
9 Click MINOLTA Dimäge RD 3000, and click the OK button.
- The Dimâge RD 3000 Camera Panel opens from within Adobe Photoshop.
- For further details on operation, see page 45 of this manual.
Opening Digita Desktop as an independent application
Users who do not use Adobe Photoshop can open the Digita Desktop as an independent application.
(continued from page 36)
6 Turn on your Macintosh computer.
7 Open the folder in which you installed Digita Desktop.
8 Double-click the application icon.
- The DigiTa Desktop control panel opens.

USING THE SOFTWARE
SAVING IMAGES TO THE HARD DRIVE
After launching the TWAIN driver, Minolta Dimage RD3000 index window will be displayed. An index of the images stored on the CompactFlash (CF) card will be displayed in the order in which they were taken.
1 Click on the images to be acquired.
- A border will surround the selected image.
- To select two or more images, press and hold the Ctrl key and click on the images to be selected.
- To select all the images, click on "Select All" in the display.
2 Click on "Acquire".
- The acquire function will start. When the image is being acquired, a counter will show the progress of completion
- When complete, images are acquired into the image processing application such as Adobe Photoshop and will be displayed on the monitor.
- Further operations on the image are passed on to the image processing application (in this case, Adobe Photoshop). Refer to the application's manual for details.

DELETING IMAGES FROM THE CF CARD
Some or all of images can be deleted from the CompactFlash (CF) card. Images can be viewed before deleting when using this TWAIN driver.
1 Click on the images to be deleted.
- A border will appear around each selected image.
- If two or more images are to be deleted, press and hold the Ctrl key and click on all of the images to be deleted.
- To delete all the images, click on "Select All" in the display.
2 Click on "Delete".
- The confirmation message will appear.
3 Click on “Yes” to delete the images. Click on “No” to cancel the operation.
- The display will return to the Minolta Dimage RD3000 index window when the delete operation is finished or canceled.
QUITTING THE TWAIN-DRIVER
1 Click on "Exit" in the Minolta Dimage RD3000 index window.
The confirmation message will appear.
2 Click on "Yes".
- The TWAIN driver will quit and the display will return to the image processing application (in this case, Adobe Photoshop).
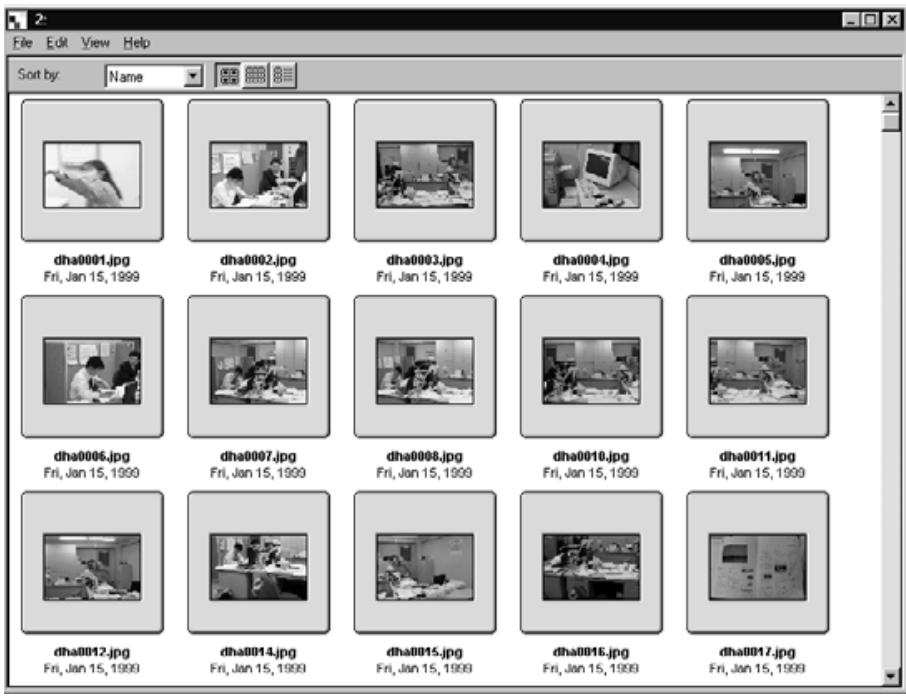
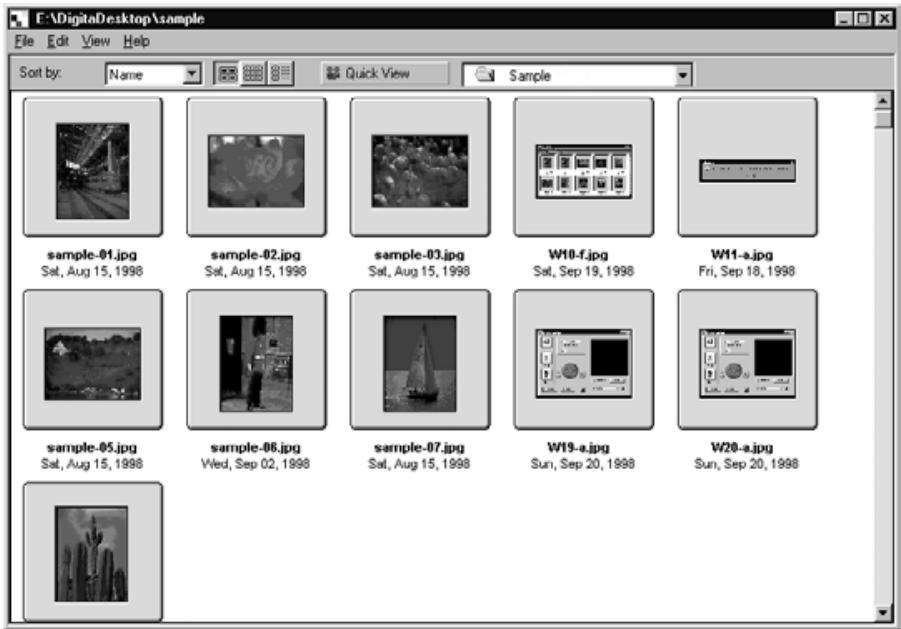
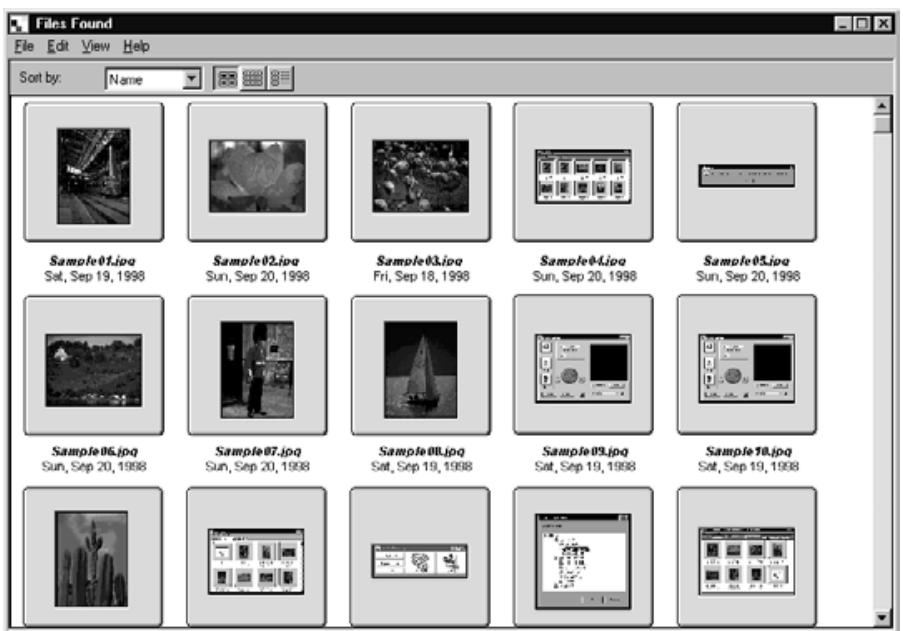
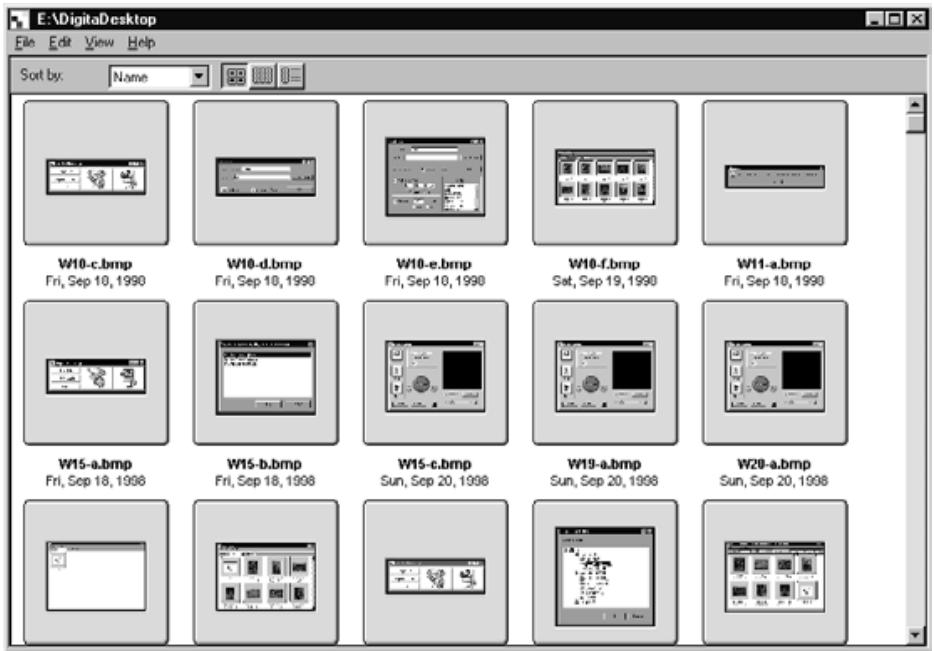
AT THE VIEWER PANEL
The Viewer Panel can be used to view thumbnail images of image files saved in either the CF Card or on the hard disk. You can also copy image files from the CF Card to your hard disk.
The following operations can be performed on images displayed In the Viewer Panel.
- Copy (download) some or all of the image files saved in the CF Card to your computer's hard disk or other memory device (see page 52).
- Display or print out an album of thumbnail images of the files saved on your computer's hard disk. Rename the files, add audio data or view a slideshow (see pages 56, 60, 69).
- Resize or sort images, and view image properties such as size, date or image depth (see pages 62, 64).
- Delete some or all of the image files (see page 57).
- Drag and drop image files to move or copy them to other folders (see page 72).
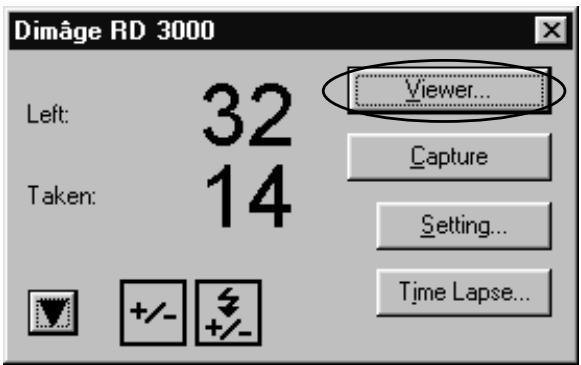
DISPLAYING CAMERA IMAGES
Display images stored on compact flash card in the camera.
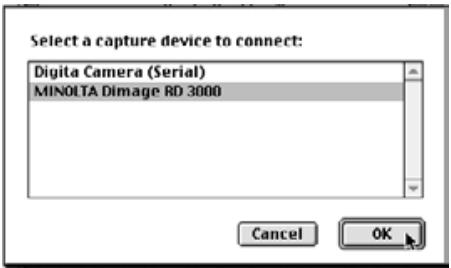
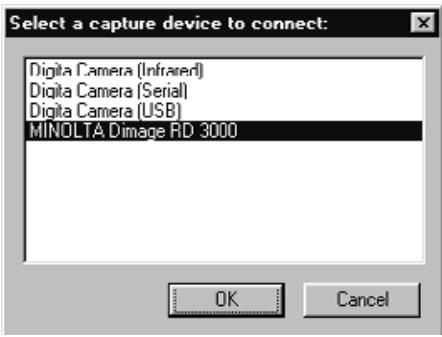
1 Open the application, and click the Connect icon on the control panel.
- A list of capture devices opens.
2 Select MINOLTA Dimäge RD 3000, and click the OK button.
- The Dimâge RD 3000 Camera Panel opens.
(For Windows®)

(For Macintosh)

3 Click the Viewer button.
- The Viewer Panel will open, displaying thumbnail images of the files saved in the CF card.
- If there are too many files to display on a single screen, a scroll bar opens. Use the mouse to click the up and down scroll arrows or drag the scroll box to view hidden thumbnail images.
If an error message opens after clicking the "OK" button in Step 2, please see page 105 of this manual.
DISPLAYING HARD DISK IMAGES
Display images saved on the hard disk.
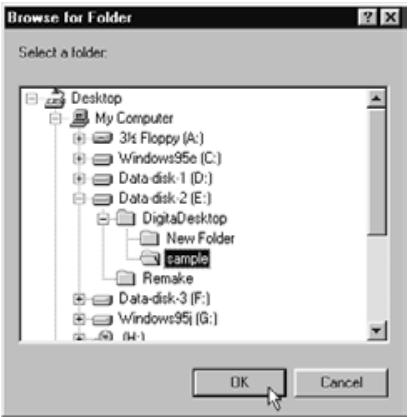
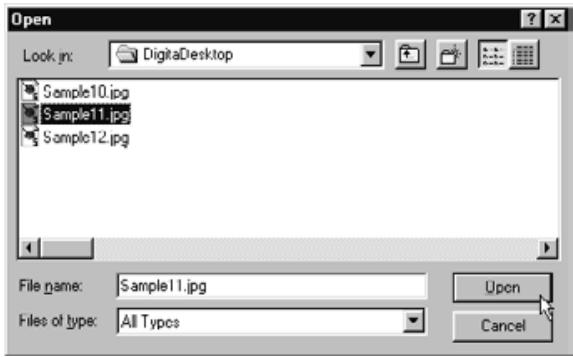
1 Open the application, and click the Open Folder icon on the control panel.
- The Select a Folder dialog box opens.
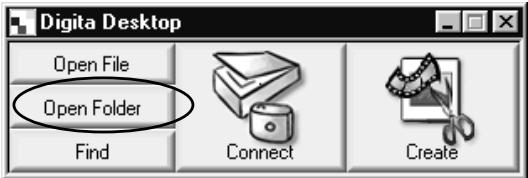
2 Select a folder in which image files have been saved, and click the OK button in Windows® or the Folder Name button in Macintosh.
- The Viewer Panel opens, displaying the image files saved in the selected folder.

- If there are too many files to display on a single screen, a scroll bar opens. Use the mouse to click the up and down scroll arrows or drag the scroll box to view hidden thumbnail images.
- Do not use Explorer or Finder to delete files that are displayed in the viewer panel. Doing so could cause the Digita Desktop application to become unstable.
FIND
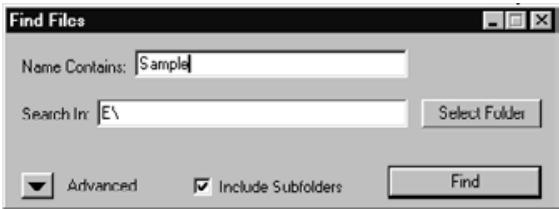
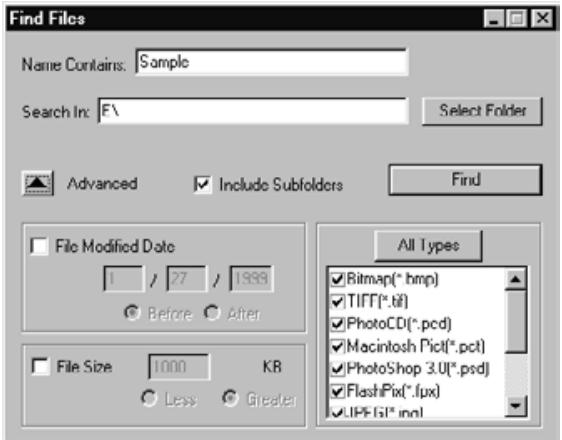
Select the desired images saved on the hard disk and display them in a list.
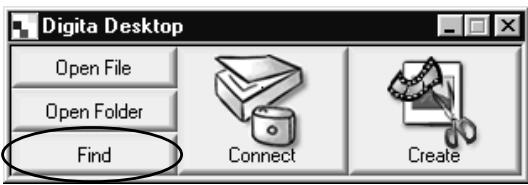
1 Open the application, and click the Find button.
- The Find Files dialog box opens.
2 Enter the name of the file you wish to find.
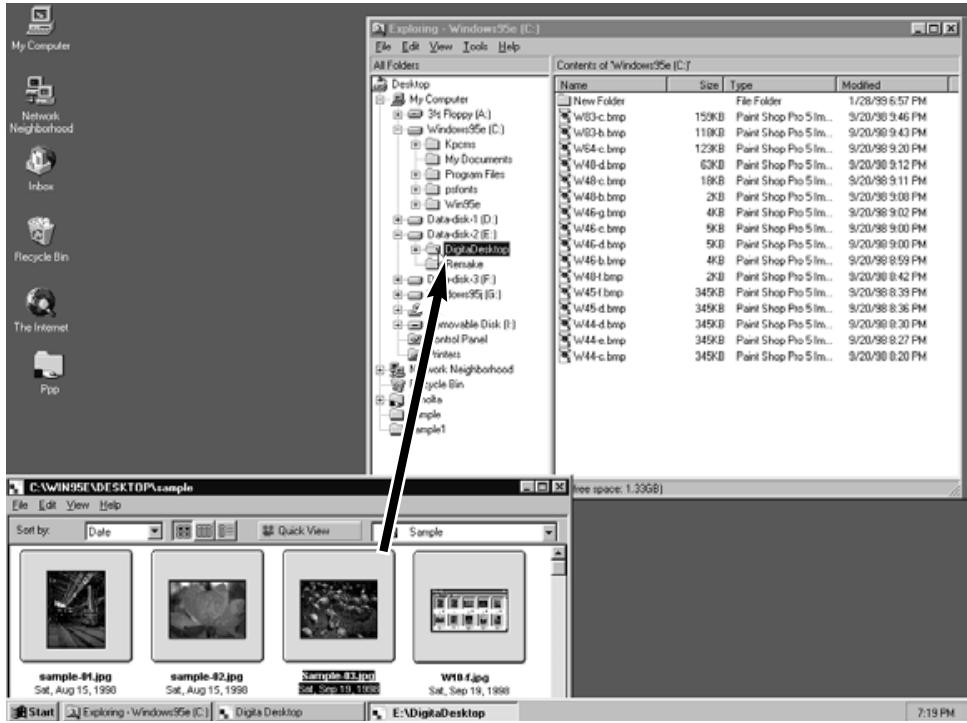
- For example, if you wish to find a file or files on the hard disk which contain the word "sample" in the filename, simply type "sample" in the Name Contains text window. Specify a drive letter in the Search In text box and click the Include Sub folders check box if you so desire.
- Click the Advanced button to display additional items. Use these items to specify additional conditions such as date, file size or file type.
3 Click the Find button.
- The Viewer Panel opens, displaying files matching the specified conditions.
All the files that match the specified conditions are show in a single window even though some files are in different folders.
- If there are too many files to display on single screen, a scroll bar opens. Use the mouse to click the up and down scroll buttons, or drag the scroll box to view hidden thumbnail images
- Do not use the Explorer or Finder to delete files that are displayed in the viewer panel. To do so could cause the Digita Desktop application to malfunction.
COPYING FILES FROM THE CAMERA
Copy some or all of the image files saved in the CF card to your hard disk or other memory devices.
FOR WINDOWS® 95/98/NT
1 Follow the instructions shown on page 45 of this manual for viewing image files saved in the CF card.
2 Point and click the image file you wish to copy. If you wish to copy more than one file at a time, hold down the Control key, and click the files you wish to copy.
- The filenames of selected files are highlighted.
- To deselect a filename, push the Control key, and click the filename once again.
- To copy all the files in the CF Card, click File menu, then and click Select All.
3 Click File menu, and then click Download.
- The Select a Folder dialog box opens.
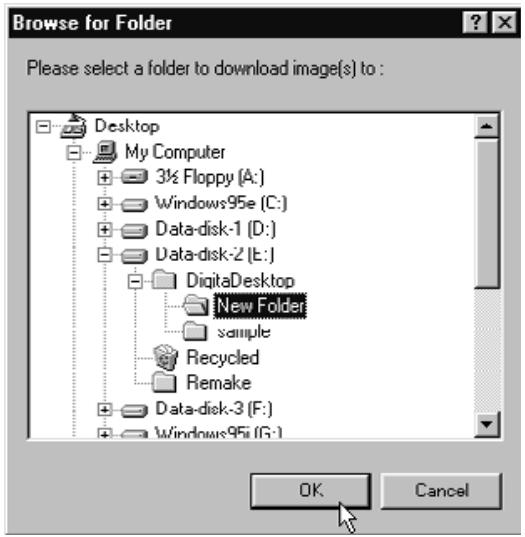
4 Select the folder to which the files are to be downloaded, and click the OK button.
- The files begin to download. When finished, the Viewer Panel opens.
- To cancel the download, click the Cancel button on the Select a Folder dialog box in step 3.

NOTE:
Downloaded image files can be viewed in the Viewer Panel (see page 48).
Double-click an image file to open it in Image Panel for modification (see page 75).
FOR MACINTOSH
1 Follow the instructions shown on page 45 of this manual for viewing image files saved in the CF card.
2 Point and click the image file you wish to copy. If you wish to copy more than one file at a time, hold down the Shift key, and click the files you wish to copy.
- The selected filenames are highlighted.
- To deselect a filename, push the Shift key, and click the filename once again.
- To copy all the files in a folder, click Viewer menu, and then click Copy All Files To Disk.
3 Click Viewer menu, and then click Copy Selected Files.
- The download folder selection screen opens.
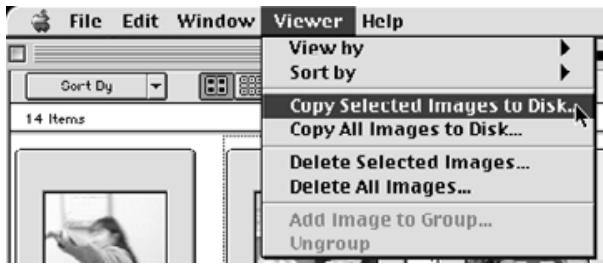
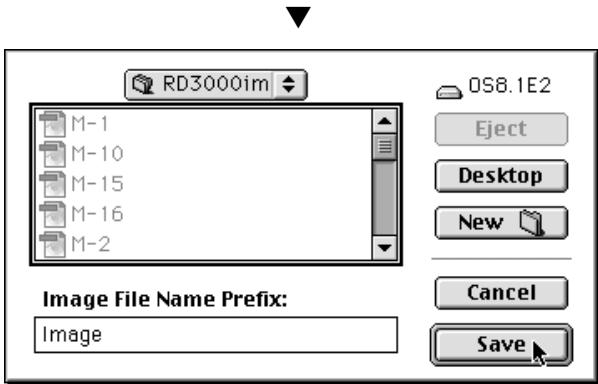
4 Select the folder to which the files will be downloaded, input the Image File Name Prefix, and then click the Save button.
- The files begin to download. When finished, the Viewer Panel reopens.
- To cancel the download, click the Cancel button on the download folder selection screen in step 3.

NOTE:
The selected images are downloaded to the specified drive and directory with names using the Image File Name Prefix and the frame number used in the camera.
For example, if "Image" is entered as the Image File Name Prefix, and five images are downloaded, they are named Image001, Image002, Image003, Image004 and Image005.
Downloaded image files can be viewed in the Viewer Panel (see page 48).
Double-click an image file to open in the Image Panel for modification (see page 75).
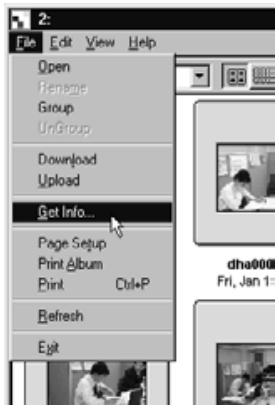
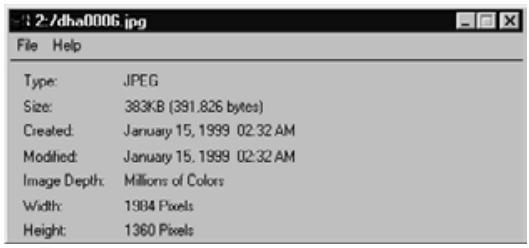
VIEWING IMAGE FILE PROPERTIES
Use the following procedure to view image file properties such as file format, size, dated, date modified, and colour depth.
1 Display the images in the Viewer Panel (see pages 45 to 51).
2 Double-click the image file you wish to view the properties.
- The selected filename is highlighted.
3 Click File menu, and then click Get Info.
- Properties for movie files or slideshow files cannot be viewed.

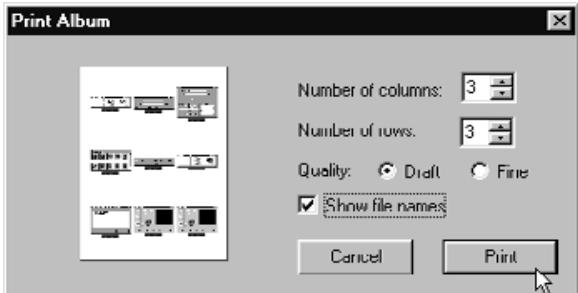
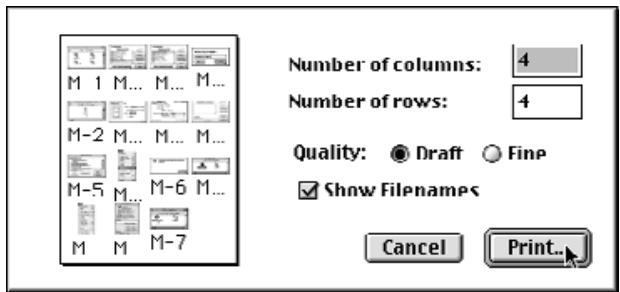
PRINTING ALBUMS
The thumbnail images shown in the Viewer Panel can be printed out as an album.
1 Display the images in the Viewer Panel (see pages 45 to 51).
- Albums can be printed from image files saved in either the CF card or the hard disk.
- You can select some or all of the thumbnail images to create an album.
2 Click File menu, and then click Print Album.
- The Print Album dialog box opens.
(For Windows®)
(For Macintosh)
3 Specify the number of columns and rows, and the desired quality.
- The size of the thumbnails images will be adjusted automatically to accommodate the specified number of columns and rows on a single sheet.
- Click the Show Filenames check box to print the filename underneath be thumbnail image.
4 Click the Print button.
- To close the dialog box without printing the album sheet, click the Cancel button.
DELETING IMAGES FROM THE CF CARD
Delete some or all of the image files saved in the CF card. Use the Viewer Panel to verify which files you wish to delete.
FOR WINDOWS® 95/98/NT
1 Follow the instructions shown on page 45 of this manual to view the image files saved in the CF card.
2 Click the image of the file you wish to delete. If you wish to delete more than one file at a time, hold down the Control key, and click the files you wish to delete.
- The selected filenames are highlighted.
- To deselect a filename, push the Control key, and click the filename once again.
- To delete all the files in a folder, click File menu, and then click Select All (Write-protected files can not be deleted. See page 59).
3 Click Edit menu, and then click Delete.
- The following dialog box opens.
4 To delete the selected files, click the Yes button. To cancel the Delete operation, click the No button.
- When the delete operation is finished, the Viewer Panel reopens.
- Do not remove the CF card from the camera while the Delete operation is in progress.
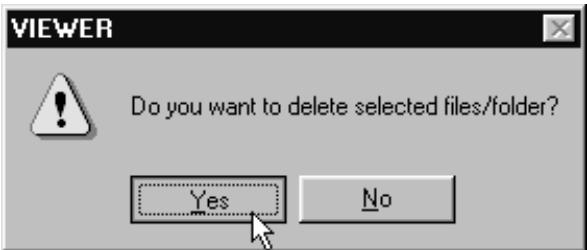
FOR MACINTOSH
1 Follow the instructions shown on page 45 of this manual to view the image files saved in the CF card.
2 Click the image of the file you wish to delete. If you wish to delete more than one file at a time, hold down the Shift key, and click the files you wish to delete.
- The selected filenames are highlighted.
- To deselect a filename, push the Shift key, and click the filename once again.
- To delete all the files in a folder, click Viewer menu, and then click Delete All Files (Write-protected files can not be deleted. See page 59).
3 Click Viewer menu, and click Delete Selected Images.
- The following dialog box opens.
4 To delete the selected files, click the OK button. To cancel the Delete operation, click the Cancel button.
- When the Delete operation is finished, the Viewer Panel reopens.
- Do not remove the CF card from the camera while the delete operation is in progress.

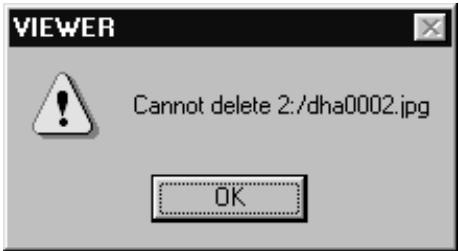
NOTE:
Write-protected files cannot be deleted (See the camera manual for details). Attempting to delete a write-protected file will result in the following dialog box opening. Click the OK button to continue to delete other files.
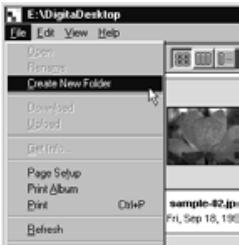
CREATING A NEW FOLDER
Create a new folder on the hard disk.
FOR WINDOWS® 95/98/NT
1 Follow the instructions shown on page 48 for viewing image files that have been copied to your hard disk.
2 Click File menu, and then click Create New Folder.
- A new folder is created inside the Viewer Panel.
- Enter the desired name of the new folder in the highlighted text box.
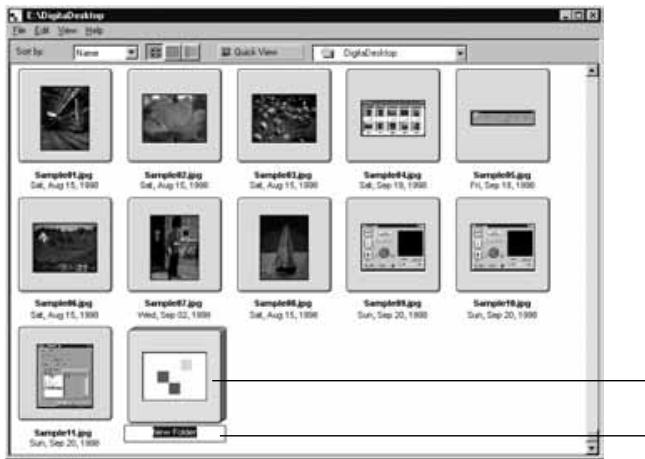
New folder
Enter the name of the new folder here
FOR MACINTOSH
1 Follow the instructions shown on page 48 for viewing image files that have been copied to your hard disk.
2 Click on File menu, and click Select a Folder.
- The Select a Folder dialog box opens.
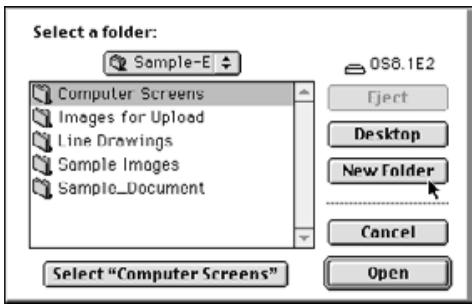
3 Click the New Folder button.
- The New Folder Name text box opens.
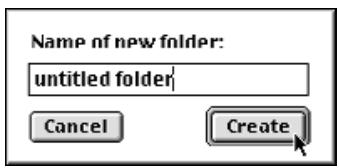
4 Enter the desired name of the new folder in the text box and click Create button.
- The Select a Folder dialog box opens.
5 Click the Cancel button.
- The Select a Folder dialog box closes, and the new folder is displayed inside the Viewer Panel.
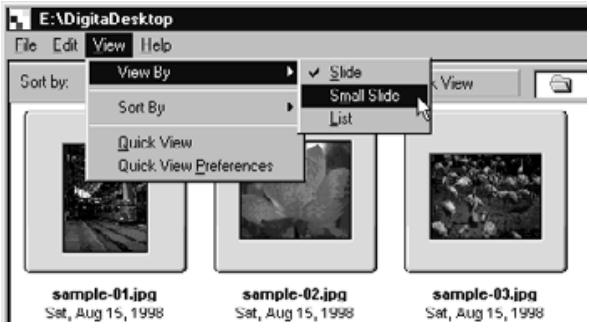
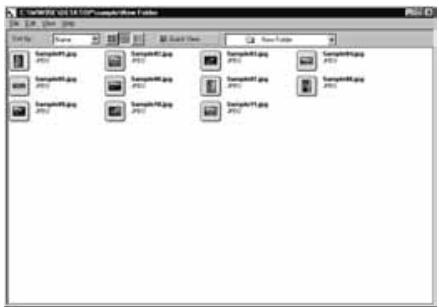
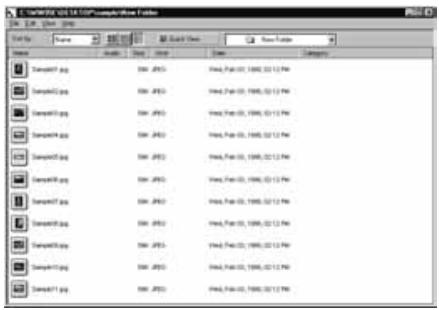
CHANGING THE IMAGE DISPLAY
The size of the thumbnail images displayed in the folder panel, can be changed to Slides, Small Slides, or List Display.
1 Display the images in the Viewer Panel (see pages 45 to 51).
- The image format can be changed regardless of whether the files are viewed from the CF Card or from your hard disk.
FOR WINDOWS® 95/98/NT
2 Click View menu, and then click Slide, Small Slide, or List.
FOR MACINTOSH
When viewing images from the CF card:
2 Click Viewer menu, point to View By, and then click Slide, Small Slide, or List on the submenu.
When viewing images from the hard disk:
2 Click View menu, point to View By, and then click Slide, Small Slide, or List on the submenu.
This same operation can be performed using the icons located on the Viewer Panel toolbar.

The thumbnail image format changes as shown below:
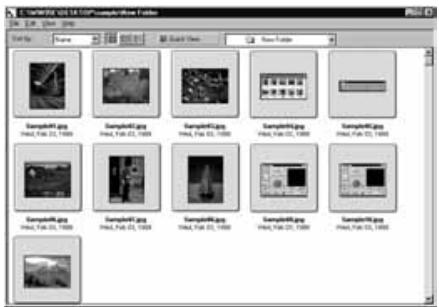
Slide
Small Slide
List
SORTING IMAGES IN THE VIEWER PANEL
Thumbnail images displayed in the Viewer Panel can be sorted by filename, date, or size.
1 Display the images in the Viewer Panel (see pages 45 to 51).
- Images can be sorted regardless of whether the files are viewed from the CF Card or from your hard disk.
FOR WINDOWS® 95/98/NT
2 Click View menu, and then click Sort By. From the submenu, click the condition you wish to use to sort the images.
FOR MACINTOSH
When viewing images from the CF card:
2 Click Viewer menu, and then click Sort By. From the submenu, click the condition you wish to use to sort the images.
When viewing images from the hard disk:
2 Click View menu, and then click Sort By. From the submenu, click the condition you wish to use to sort the images.
The same operation can be performed using the Sort By drop-down menu (Sort By pop-up menu on Macintosh) on the Viewer Panel toolbar.
Images can be sorted by filename, audio, size, kind and date.
Name: Files are sorted alphabetically by filename.
Audio: Files with audio data are sorted first.
Size: Files are sorted by size.
Kind: Files are sorted alphabetically by file format type.
Date: Files are sorted by date.
USING QUICK VIEW
Use the Quick View function to display a slideshow of the images displayed in the Viewer Panel.
1 Follow the instructions shown on page 48 for viewing file images that have been copied to your hard disk.
2 Click View menu, and then click Quick View.
- The Quick View slideshow begins in accordance with the preferences described on the following page.
Quick View button
- This same operation can be performed using the Quick View button located on the Viewer Panel toolbar.
- Push any key on the keyboard to terminate the Quick View slideshow.
QUICK VIEW PREFERENCES
1 Click View menu, and then click Quick View Preferences.
- The following Quick View Preferences dialog box opens.
After specifying your preferences, click the OK button to save the new settings and close the dialog box.
- Run a Quick View slideshow to verify that the news settings have taken effect.
CHANGING FILE NAMES
Change file names of image files displayed in the Viewer Panel from the hard disk. Use the thumbnail images to verify results of this operation.
It is not possible to change the filenames of image files in the CF Card.
1 Follow the instructions shown on page 48 for viewing image files that have been copied to your hard disk.
2 Click the image of the file you wish to change, then click once more on the highlighted filename.
- The current filename appears in a text box, where it can be edited.
- For Windows®: File extensions do not appear in the text box. Only the file name itself can be changed.
Sample-6
The filename appears in a text box, where it can be edited.
3 Enter the new filename from the keyboard.
4 After entering the new filename, click anywhere on the Viewer Panel to finalise the changes.
- The new filename will appear.
- The new filename can also be finalised by pushing the Enter key (Return key on Macintosh).
ADDING AUDIO DATA TO AN IMAGE (MACINTOSH ONLY)
Add audio data to image files displayed in the Viewer Panel from the hard disk.
This operation requires a Macintosh computer equipped with either a built-in microphone or a microphone connected to the sound input port.
Audio data cannot be added to image files displayed from the CF Card.
1 Follow the instructions shown on page 48 for viewing files that have been copied to your hard disk.
2 Click and hold on the microphone icon shown in the upper right corner of the image file to which you wish to add audio. Next, click Record on the pop up menu that opens.
- The Record dialog box opens.
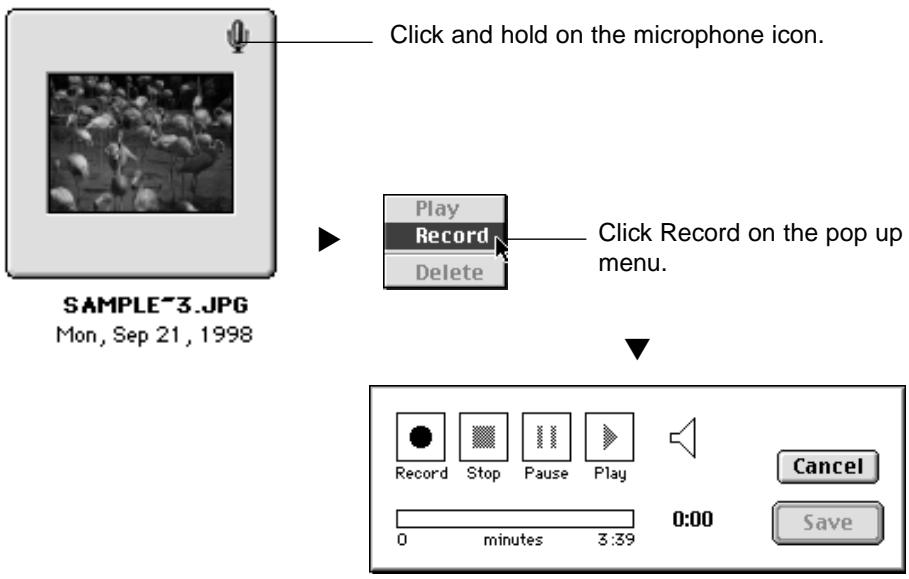
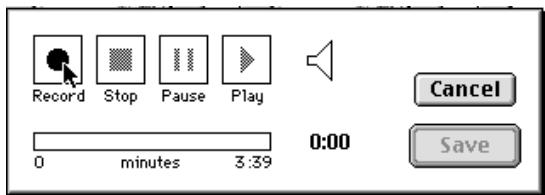
3 Click the Record button “●” to begin recording audio data. Use the microphone to record audio data.
- The maximum amount of time which can be recorded depends on how much memory your Macintosh computer has; the elapsed recording time will appear in the progress bar of the Record dialog box.
- Click the Stop button "■" to stop recording.
- Click the Play button “▶” to play back your recording.
- Re-record as many times as necessary until you are satisfied.
4 Click the Save button.
The audio data is saved.
- The microphone icon in the upper right hand corner changes to a speaker icon.
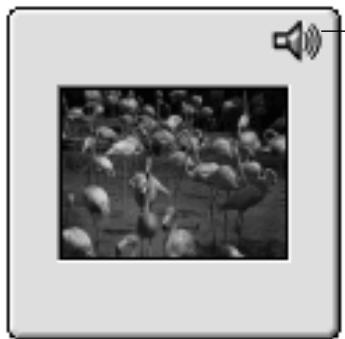
The microphone icon changes to a speaker icon.
SAMPLE*3.JPG
Mon, Sep 21, 1998
5 Click and hold on the speaker icon. Next, the pop-up menu will open.
- Click Play to replay the audio data.
- Click Delete to remove the audio data. The speaker icon will change to a microphone icon.
SAMPLE*3.JPG
Mon, Sep 21, 1998
Click and hold on the speaker icon.
Play
Record
Delete
Replay the audio data.
Delete the audio data.
DRAG AND DROP OPERATION
Files can copied or moved by dragging and dropping them from the Viewer Panel to the Windows Explorer or the Macintosh Desktop.
1 Follow the instructions shown on page 48 for viewing image files that have been copied to your hard disk.
2 Click the Start button, point to Program, and click Explorer to open the Windows Explorer, and display the target folder. For Macintosh computers, use the Finder to display the target folder.
3 At the Viewer Panel, click the image you wish to copy or move.
4 Drag and drop the image file you wish to move or copy to the target folder.
- If the target folder is located on the same hard disk partition (the same drive letter) (the same volume for Macintosh) as the source folder, then the file is moved to the target folder, and is deleted from the source folder. If the target folder is located on a different hard disk partition (a different drive letter) (a different volume for Macintosh) as the source folder, then the file is copied to the target folder, but is not deleted from the source folder.
Click on the image file you wish to move or copy, and drag it to the target folder. Release the mouse button to drop the image file in the target folder.
WHAT YOU CAN DO AT THE IMAGE PANEL
The Image Panel can be used to modify, print or save image files in a variety of formats.
The following operations can be performed in the Image Panel
-
Zoom in and out on the image (see page 79).
-
Image files can be modified as follows: (see pages 80 to 94)
Change the size of documents
Crop
Adjust brightness and contrast
Adjust colour balance
Apply Quick Correction to images (minute adjustment of brightness and enhancement of outlines)
Flip the image
Rotate the image
Superimpose text
Change the size of the image
- Image files can be printed (see page 96).
- Image files can be saved to hard disk in the following file formats (see page 98).
For Windows®:
bmp, exif, JPEG, pict, tiff, Photoshop3.0 (psd), FlashPix
For Macintosh:
bmp, exif, JPEG, pict, tiff
DISPLAYING CAMERA IMAGES
Use the Image Panel to view, modify and print image files saved in the CF Card.
1 Follow the instructions shown on page 45 of this manual for viewing image files saved in the CF Card.
2 Double-click the image you wish to view.
- The data for the selected image file is read from the CF card to the memory of the PC. Once this operation has been completed, the selected file opens in the Image Panel.
Double-click
Using the Digita Desktop Photoshop Plug-In (Mac OS only)
In cases where the Digita Desktop has been open as an Adobe Photoshop plugin, double-click on an image in the Viewer Panel to open that file as a New Image for editing in Adobe Photoshop.
At this point, editing of the file is performed from within Adobe Photoshop. For further details, see the operating manual for your software.

Double-click here.
Double-click on an image in the Viewer Panel to open that file as a New Image for editing in Adobe Photoshop.
- Starting on the following page is an explanation of how to use the Digits Desktop as an independent application.
DISPLAYING HARD DISK IMAGES
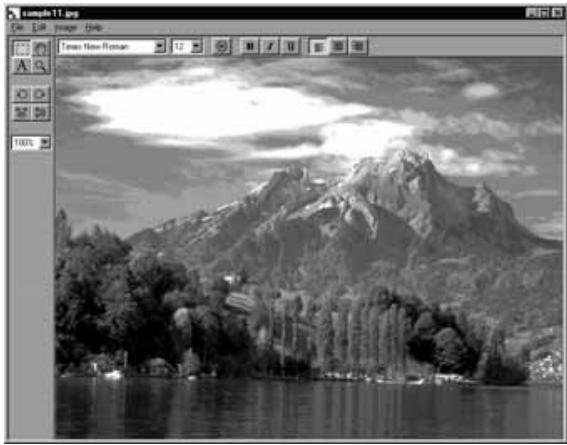
Using the Image Panel to view images saved on the hard disk.
1 Click the Open File icon on the control panel.
- The standard Open File dialog box for your operating system opens.
2 Click the image file you wish to view, and then click the Open button.
- The selected file opens in the Image Panel.


NOTE:
If you wish, you may also follow the instructions shown on page 48 for viewing image files that have been copied to your hard disk in the Viewer Panel. Double-click the image you wish to open in the Image Panel.
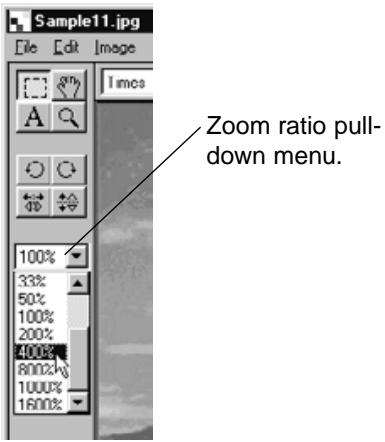
ZOOM IN/ZOOM OUT
The zoom function displays images as large as 1600% or as small as 3% of their actual size (400% to 25% for Macintosh).
1 Click the Zoom Tool button on the tool palette.
- The mouse pointer changes to the Zoom Tool pointer.
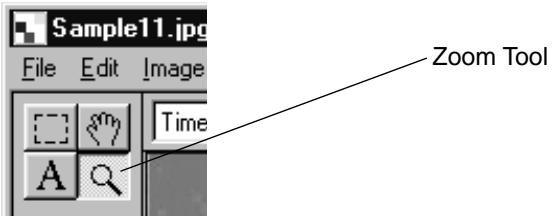
Using the Zoom Tool pointer, click the image to zoom in. Hold down the control key (option key for Macintosh) and click to zoom out.
For Windows®
- Zoom-in ratios: 100% (actual size), 200% , 400% , 800% , 1600%
- Zoom-out ratios: 100% (actual size), 50% , 25% , 12% , 6% , 3%
For Macintosh
- Zoom-in ratios: 100% (actual size), 150% , 200% , 300% , 400%
- Zoom-out ratios: 100% (actual size), 75% , 50% , 25%
This operation can also be performed as shown below:
- Use the pull down menu on the tool palette to specify a zoom ratio.
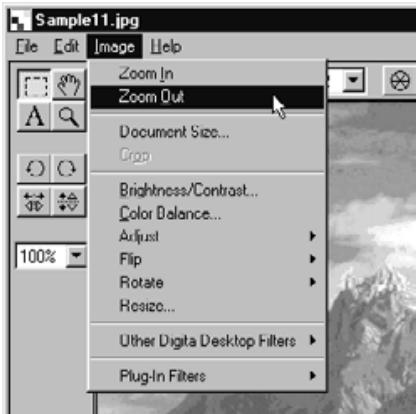
- Click either Zoom In or Zoom Out on the Image menu.
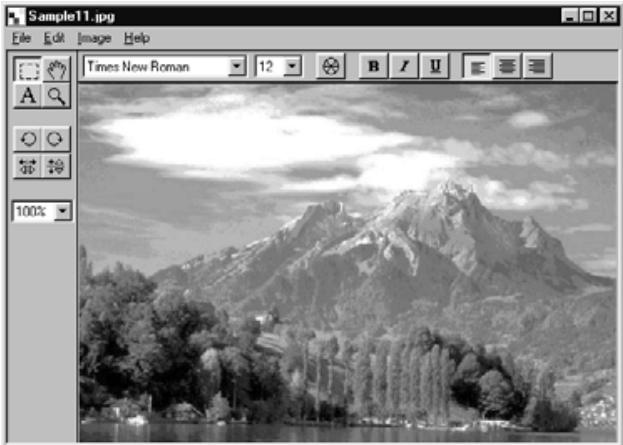
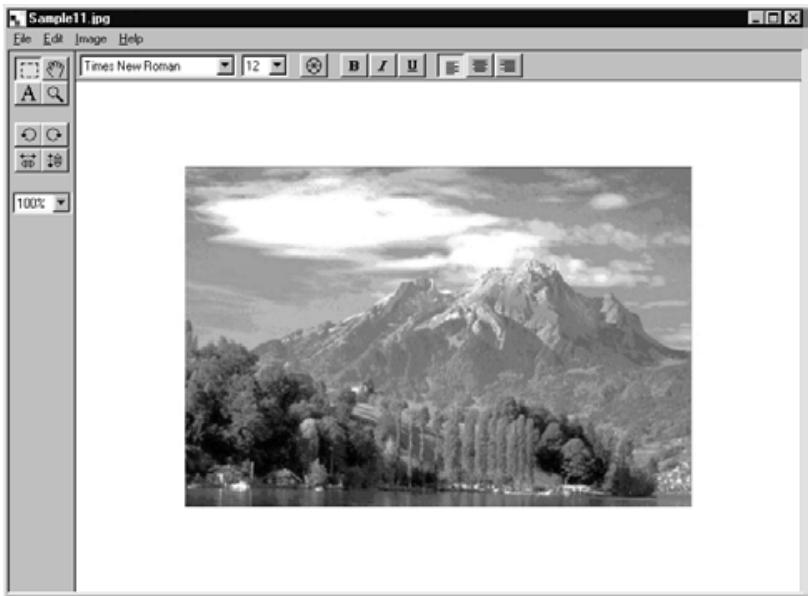
RESIZING DOCUMENTS
1 On the Image menu, click Document Size.
- The Document Size dialog box opens.
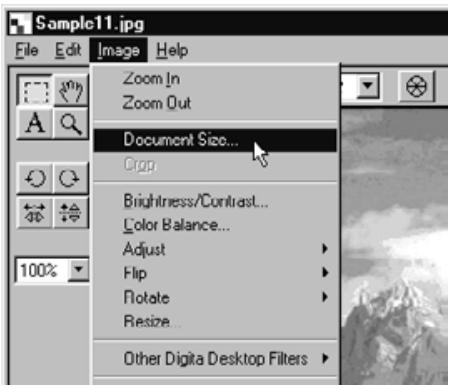
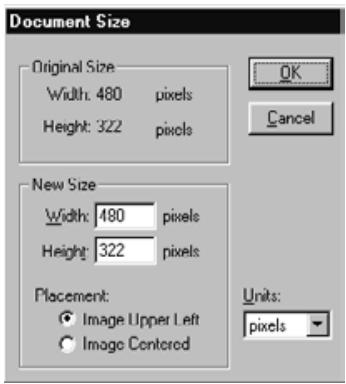
2 Specify a new width and height, and select the desired placement method. Then click the OK button.
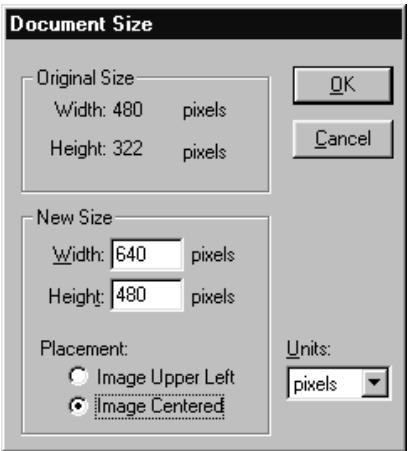
For example, make adjustments as shown on the left and click the OK button to effect changes as shown on the next page.

NOTE:
To cancel changes made in this manner, click Undo on the Edit menu. This function can be used to undo a series of operations (only the most recent operation for Macintosh). The number of operations which can be undone varies with the amount of memory on your computer.
CROPPING THE IMAGE
Trim the unwanted portions of an image.
1 Click the Selection Tool on the tool palette.
- The mouse pointer changes to a cross.
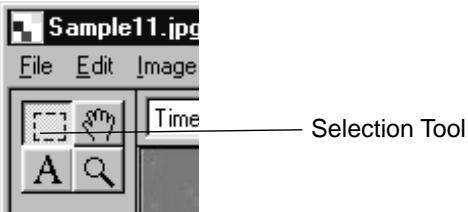
2 Select the portion of the image you wish to crop by dragging the cursor across the image.
- The selected area is bordered with a dotted line.
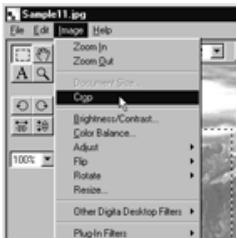
3 On the Image menu, click Cut.
- The selected portion of the image is cut.


NOTE:
To cancel changes made in this manner, click Undo on the Edit menu. This function can be used to undo a series of operations (only the most recent operation for Macintosh). The number of operations which can be undone varies with the amount of memory on your computer.

SCROLLING THE IMAGE
If the image is larger than the Image Panel window, use the Pan Tool.
1 Click the Pan Tool on the Tool Pallet.
- The mouse pointer changes to the Pan Tool icon.
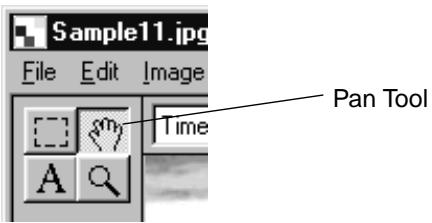
2 Drag the image to scroll.
ADJUSTING BRIGHTNESS AND CONTRAST
Adjust the brightness and contrast of the image.
1 On the Image menu, click Brightness/Contrast.
- The Brightness/Contrast dialog box opens.
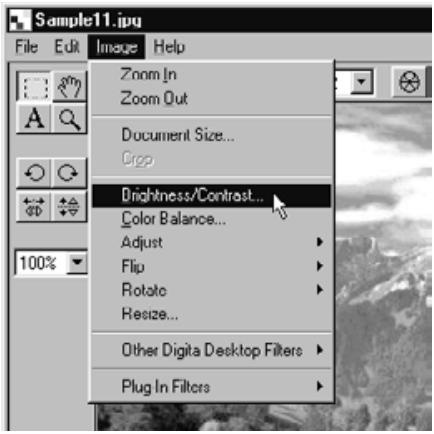

2 Click the slider and drag, or enter a numerical value directly into the text box to the right of the slider bar.
- The brightness and contrast of the image will change as the slider moves or as the values are entered.
3 When finished, click the OK button.
- Click the Cancel button to cancel the changes, and close the Brightness/Contrast dialog box.
- Click the Reset button to cancel the changes, and return the values to 0. The sliders will return to the center of the slider bar.
ADJUSTING COLOUR BALANCE
Adjusts the RGB colour balance of the image.
1 On the Image menu, click Colour Balance.
- The Colour Balance dialog box opens.
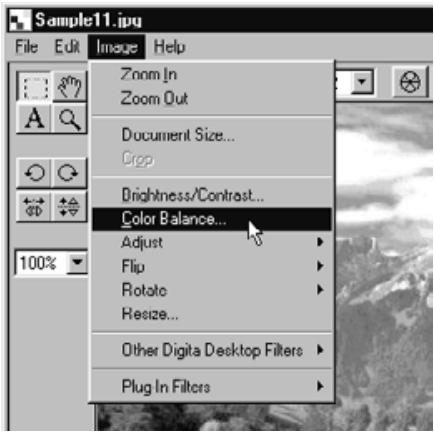
2 Click the slider and drag, or enter a numerical value directly into the text box to the right of the slider bar.
- The colour balance of the image will change as the slider moves or as the values are entered.
3 When finished, click the OK button.
- Click the Cancel button to cancel the changes, and close the Brightness/Contrast dialog box.
- Click the Reset button to cancel the changes, and return the values to 0. The sliders will return to the center of the slider bar.
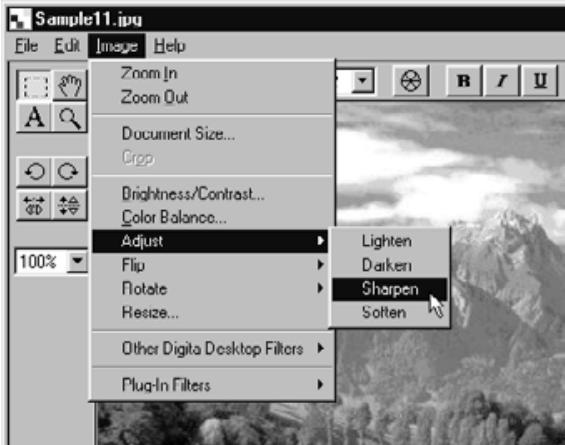
USING THE QUICK CORRECTION FUNCTION
Make minute adjustments to brightness or enhance the edges of the image using just the menu commands.
LIGHTEN/DARKEN
On the Image menu, point to Adjust, and select either Lighten or Darken from the submenu.
- The image's brightness changes accordingly.


NOTE:
To cancel changes made in this manner, click Undo on the Edit menu. This function can be used to undo a series of operations (only the most recent operation for Macintosh). The number of operations which can be undone varies with the amount of memory on your computer.
SHARPEN/SOFTEN
On the Image menu, point to Adjust, and select either Sharpen or Soften from the submenu.
- The Sharpen function enhances the outlines of the image. It will give a slightly out-of-focus image a sharper appearance. This function also increases image noise, making the image grainy.
- The Soften function degrades the outlines of the image. Minute details all are blurred, making the image fuzzy.
- Not all images are suitable for enhancement with these functions.

NOTE:
To cancel changes made in this manner, click Undo on the Edit menu. This function can be used to undo a series of operations (only the most recent operation for Macintosh). The number of operations which can be undone varies with the amount of memory on your computer.
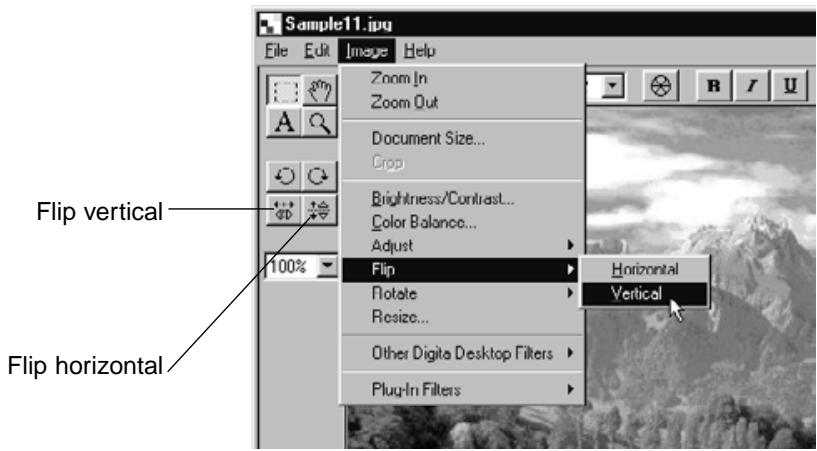
FLIPPING AN IMAGE (HORIZONTALLY OR VERTICALLY)
Flip the images along the horizontal or vertical axis.
On the Image menu, point to Flip, and select either Horizontal or Vertical.
- The image is flipped.
- This operation can also be performed using the buttons on the Tool Palette.


NOTE:
To cancel changes made in this manner, click Undo on the Edit menu. This function can be used to undo a series of operations (only the most recent operation for Macintosh). The number of operations which can be undone varies with the amount of memory on your computer.
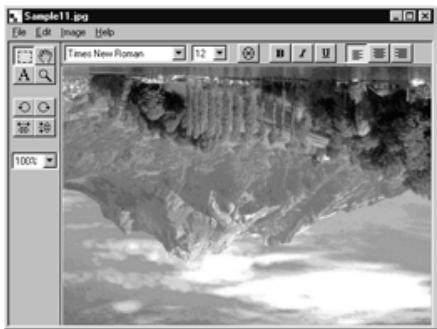
ROTATING AN IMAGE
Rotate an image 90^ left, 90^ right or 180^ .
On the Image menu, point to Rotate, and select 90^ Left, 90^ Right or 180^ .
- The image is rotated as indicated.
- This operation can also be performed using the buttons on the Tool Palette.
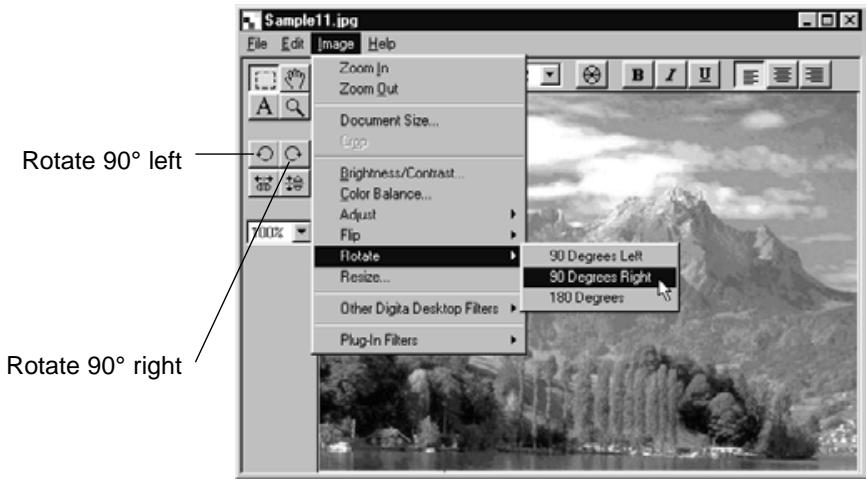
Image rotated 90° left
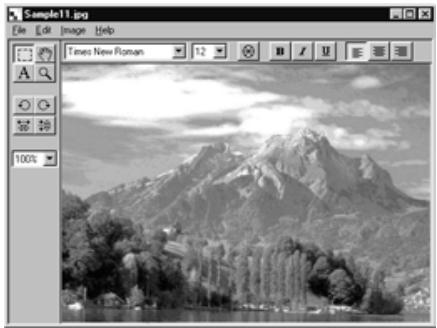
Image rotated 90^ right

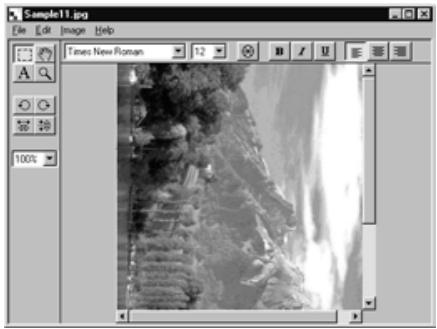
Image rotated 180^

NOTE:
To cancel changes made in this manner, click Undo on the Edit menu. This function can be used to undo a series of operations (only the most recent operation for Macintosh). The number of operations which can be undone varies with the amount of memory on your computer.
SUPERIMPOSING TEXT
Superimpose text onto an image.
1 Click the Text Tool button on the Tool Palette.
- The mouse pointer changes to the Text Tool pointer.
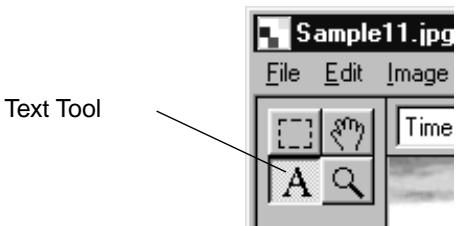
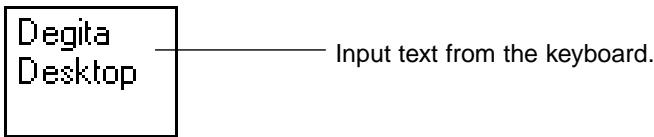
2 Move the Text Tool pointer to the desired location, and click.
- A text box opens.
3 Input text from the keyboard.
- Macintosh users can ignore step 4, then proceed directly to step 5.
4 Click anywhere outside the text box.
- The text input is finalised, and the border of the text box is highlighted in diagonal lines.
- Click inside the text box to revise the text.
- If the border of the text box disappears when the mouse is double-clicked, click Undo on the Edit menu to redisplay the text box border.

5 Point the mouse at any one of the four corners of the text box border to display the resize cursor. Drag the cursor to adjust the size of the text box.
Point the mouse at any side of the text box border to display the move cursor. Drag the cursor to change the location of the text box.
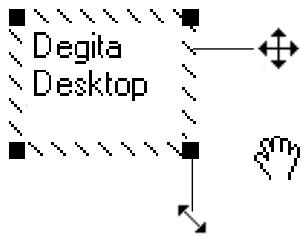
Point the mouse at any side of the text box border to display this cursor. Drag the cursor to change the location of the text box.
For Macintosh, pointing the mouse at any side of the text box border will display this cursor.
Point the mouse at any one of the four corners of the text box border to display this cursor.
Drag the cursor to adjust the size of the text box.

Adjust the size of the text box.
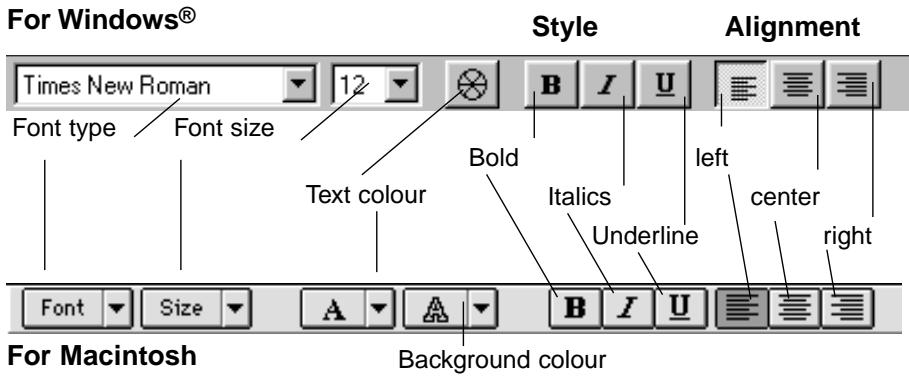
6 Use the toolbar buttons to change the font type, size or colour, as well as the text style and format (Macintosh users can also adjust the background colour).
7 Double-click outside the text box to finalise.
RESIZING THE IMAGE
Change the size of the image.
1 On the Image menu, click Resize.
- The Resize dialog box opens.
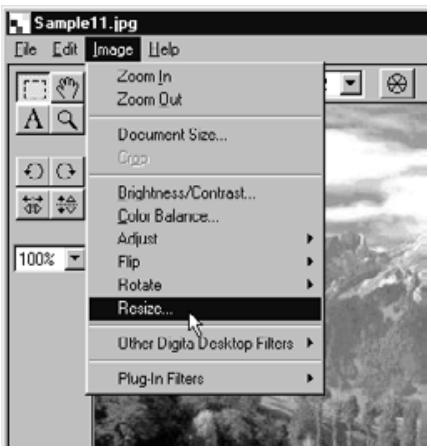
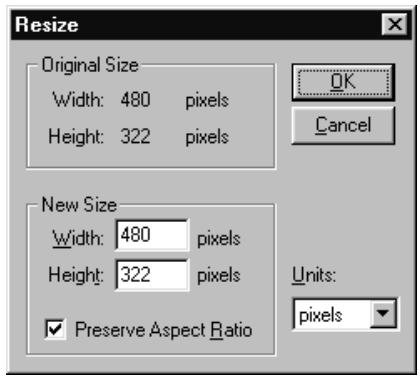
2 Use the drop-down menu to select the units you wish to use.
3 Input new values for Width and Height, and click the OK button.
- If the Preserve Aspect Ratio option (Maintain Aspect Ratio for Macintosh) is checked, inputting a new value in either the width or height text box will automatically adjust the remaining value to maintain the original ratio.
- Click the Cancel button to cancel the operation, and close the dialog box.
- Extreme resizing could result in deterioration of image quality.

NOTE:
To cancel changes made in this manner, click Undo on the Edit menu. This function can be used to undo a series of operations (only the most recent operation for Macintosh). The number of operations which can be undone varies with the amount of memory on your computer.
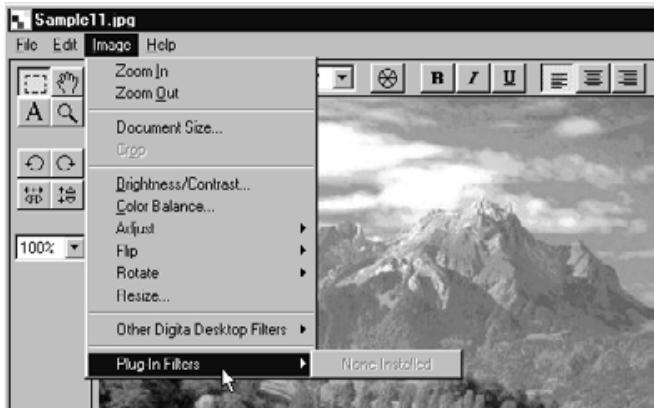
DIGITA DESKTOP IMAGE FILTERS AND PLUG-IN FILTERS
Installation of plug-in filters will expand the functionality of the Digita Desktop.

NOTE:
There are no plug-in filters included in the Digital Desktop installation.

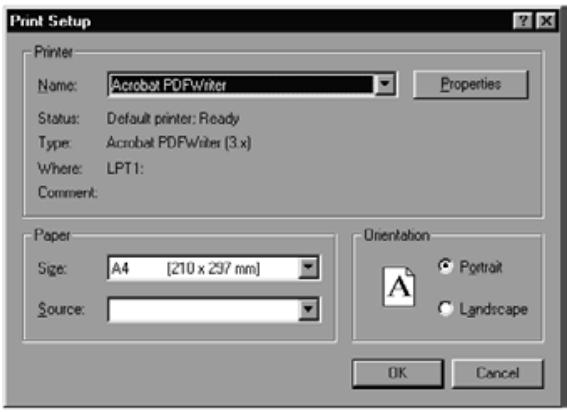
PRINTING IMAGES
Print the image.

NOTE:
The Print dialog box that opens will vary depending upon your printer. See your printer's user manual for details.
1 On the File menu, click Print Setup. Macintosh users click Paper Setup.
- The Print Setup (Paper Setup) dialog box opens.
2 Set your preferences for printer, paper and orientation, then click the OK button.
(For Windows®)
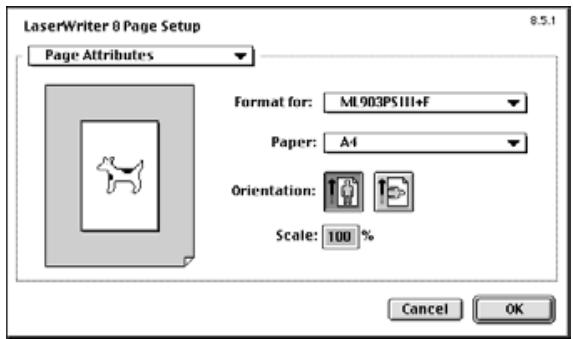
(For Macintosh)
3 On the File menu, click Print.
- The Print dialog box opens.
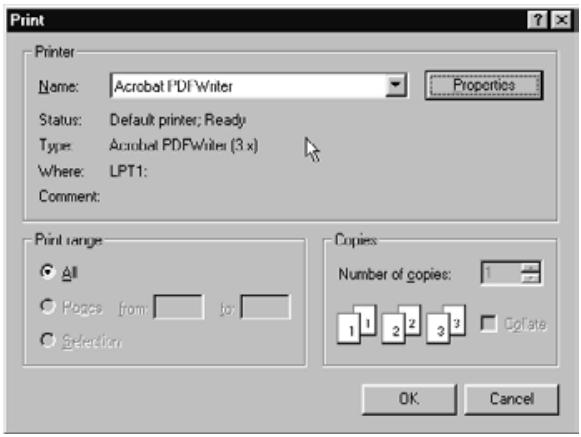
(For Windows®)
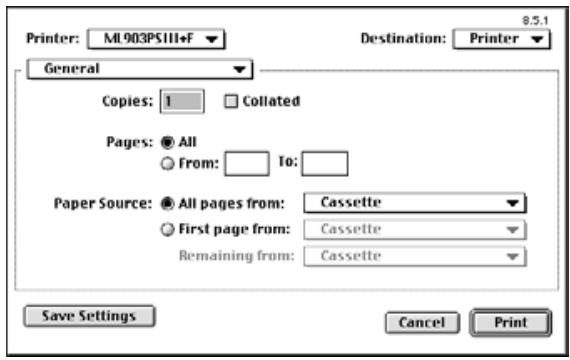
(For Macintosh)
4 Set your preferences for printer, print range and number of copies.
5 When you are ready, click the OK button (Print for Macintosh).
SAVING AN IMAGE
Images can be saved to hard disk in a variety of file formats.
IMAGE FILE FORMATS
Images displayed in the Image Panel can be saved in any of the following file formats:
BMP
BMP is the standard Windows® image file format. Files saved in this format may be viewed with Microsoft Paint or other standard software.
EXIF(EXIF2.0)
EXIF is the acronym of Exchangeable Image File Format. Images taken with the DimAge RD-3000 are stored in the compact flash card in this format. EXIF 2.0 is an enhancement of EXIF 1.0, which supports JPEG compression, simple structure, and recording of supplementary information, but which also supports new information tags such as recording of audio information during photography, and photographic settings information. It also permits simple conversion of colour information and additional information quickly, without image deterioration, and without information dropout.
PICT
PICT is the standard Macintosh image file format. Files saved in this format can be viewed with Simple Text or other standard software.
JPEG
JPEG the acronym of Joint Photographic Experts Group. JPEG has become an international standard for compression and expansion of static images. It features the ability to compress data for full colour images. Like the TIFF format, JPEG platform-independent and provides a high compression ratio with relatively little loss of image quality, making it suitable for a wide range of applications.
TIFF
TIFF is the acronym of Tag Image File Format, a format that supports high-resolution bitmap files.
Compatible with any number of platforms, it may be used with the IBM PC/AT compatible, Macintosh or other systems.
Photoshop 3.0 (PSD)
This is a proprietary file format developed for the Adobe Photoshop 3.0 image processing application by Adobe Systems Incorporated.
FlashPix
A file format developed jointly by Kodak, Microsoft, Hewlett-Packard, and Live Picture Corporation as an international standard for computer image files. It supports many features not available with other image file formats, including the following:
- All images are divided into 64 × 64 pixel files so that unnecessary data need not be processed during enlargement and movement. Each tile is compressed with the JPEG format, thus minimizing loss of image data.
- Each file comprises multiple high-resolution files allowing the image to be automatically displayed at the optimum resolution.
- Images are displayed at optimum resolution, and only the image data tiles for the visible part of the image are processed, so memory use and processing power all are minimiy
The Photoshop 3.0 (PSD) and FlashPix format are available only under Windows®
SAVING IMAGES
1 On the File menu, click Save As.
- The Save As dialog box opens.
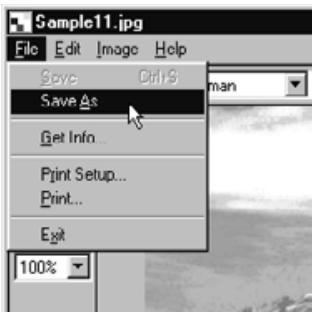

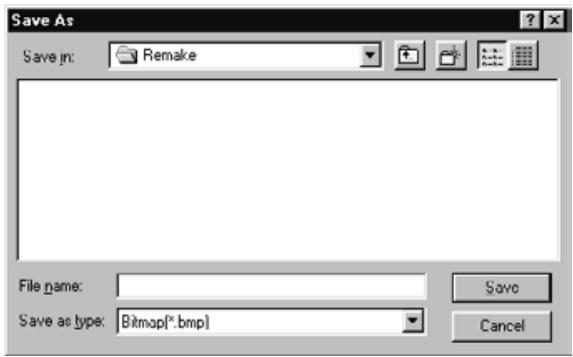
(For Windows®)
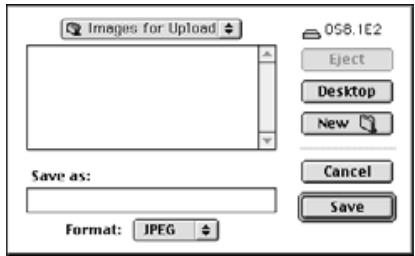
(For Macintosh)
2 Select a folder in which to save the image.
- To create a new folder, click the Create New Folder icon (New for Macintosh).
- Click the Cancel button to cancel the operation and close the dialog box.
3 Input the new filename.
4 Select the desired file format from the File Type drop-down menu (File Format pop-up menu for Macintosh).
- For Windows®, the correct file extension is automatically added to the filename.
5 Click the Save button.
- The image is saved in the specified folder and file format, and the Image Panel reopens.
WHAT YOU CAN DO FROM THE CAMERA PANEL
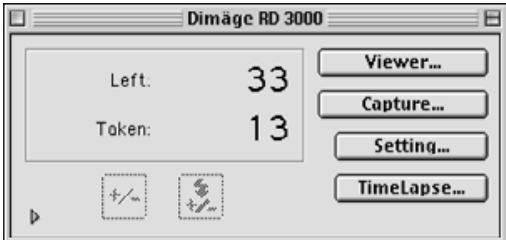
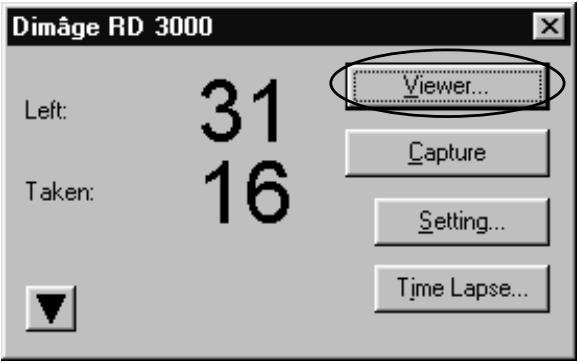
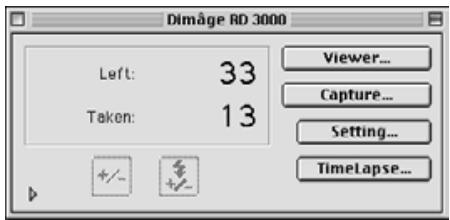
The Camera Panel is an interface which allows you to control your camera (Dîmâge RD 3000) from your PC.
The following the operations can be performed at the Camera Panel:
- Verify the number of frames used, and the number of frames remaining.
- Display image files stored in the cameras CF card using the Viewer Panel (see page 106).
- Control camera (Dimâge RD 3000) functions from the PC (see pages 107 to 113).
Remote photography
Control exposure and flash corrections during remote photography
Revise the Dimage RD 3000's internal clock
Initialise the CF card
- Interval photography (see page 114)
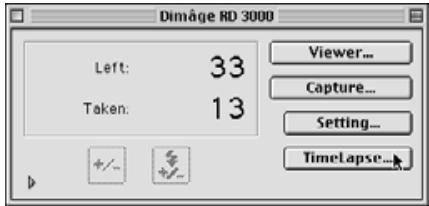
CAMERA PANEL
Display thumbnail images of the files stored in the CF card in the Viewer Panel (see page 106).
Perform remote photography (see page 107).
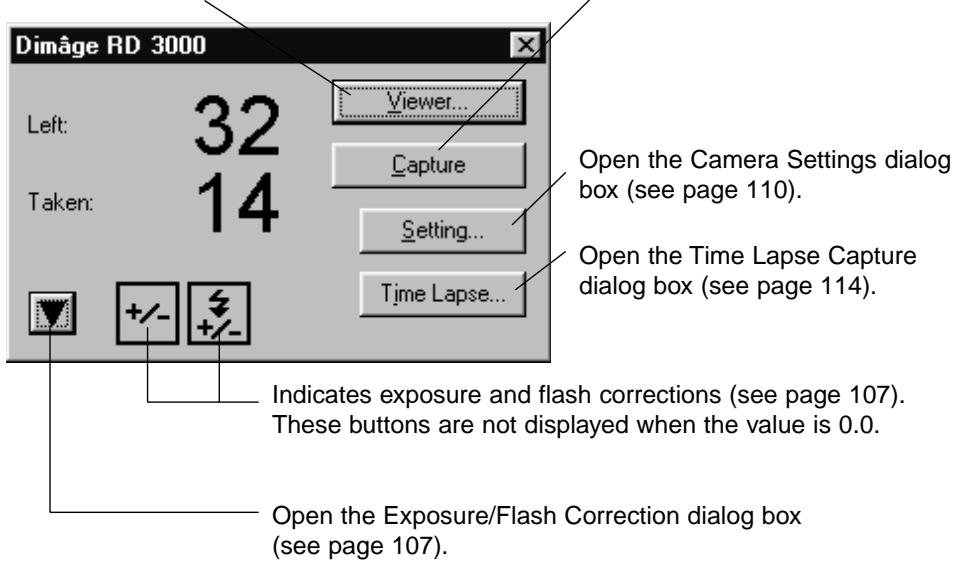
Use the mouse to drag the sliders and change the exposure/flash correction values. The correction value range is from -3.0 to +3.0 in increments of 0.5 (see page 107).
TO OPEN THE CAMERA PANEL
1 Following instructions shown on pages 36 to 42 for opening the Desktop control panel.
2 Click the Connect icon on the control panel.
- The Select Capture Device dialog box opens.
3 Select MINOLTA DimAge RD 3000, and click the OK button.
- The Dimâge RD 3000 Camera Panel opens.

(For Windows®)
(For Macintosh)

WHEN THE CAMERA PANEL DOES NOT OPEN
When the computer is unable to detect a connection to the Dimâge RD 3000, the following error message dialog box opens.

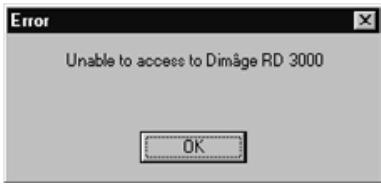
In such a case, perform the following troubleshooting operations:
1 Click the OK button to close the error message dialog box.
2 Click the Close button in the upper right corner of the Digita Desktop control panel to close the application. Mac users should click Exit on the File menu.
3 Check the following:
- Is the SCSI cable connected properly? (see page 30)
- Has the SCSI cable separated from a connector?
- Has the SCSI cable been cut or damaged?
- Is the SCSI ID number allotted to the Dimâge RD 3000 already in use by another SCSI device? (see page 24)
- Has the terminator been properly supplied with power? (see page 26)
- Did you turn on the Dimage RD 3000 before turning on your PC? (see page 36)
- Did you set the DimAge RD 3000 to PC connect mode before turning on your PC? (see page 36)
- Has a CF card been inserted into the Dimâge RD 3000? (see page 31)
4 After verifying that all of the above have been performed properly, follow the instructions on pages 36 to 42, open the Digma Desktop control panel, and once again connect to the Dimâge RD 3000.
DISPLAYING CAMRA IMAGES
1 Click the Viewer button.
- The Viewer Panel opens, displaying thumbnail images of the files stored in the CF card.

Follow the instructions shown on page 44, Using the Viewer Panel, for operations that can be performed.
REMOTE PHOTOGRAPHY
Release the Dimâge RD 3000 shutter from your PC.
Adjust the exposure and flash correction value as necessary. If such a correction is unnecessary, proceed to step No. 3.

NOTE:
Using the exposure correction and flash correction properly
The exposure correction is used to lighten or darken the overall area of the picture frame.
The flash correction controls the amount of light released by the flash unit.
For example, when photographing human subjects outdoors, using only the exposure correction will affect the entire picture, even areas unaffected by the flash such as the background. Use of the flash correction will not affect the background, but will lighten/darken the areas around the subject which can be reached by the flash.
The exposure correction and flash correction can be used simultaneously.
1 Click the button (▶ button for Macintosh) on the Camera Panel.
- The Exposure/Flash Settings dialog box opens.
2 Use the mouse to drag the sliders and change the exposure/flash correction values.
- The correction value range is from -3.0 to +3.0 in increments of 0.5.
- Click the button ( button for Macintosh) again to save the settings, and close the Exposure/Flash Settings dialog box.
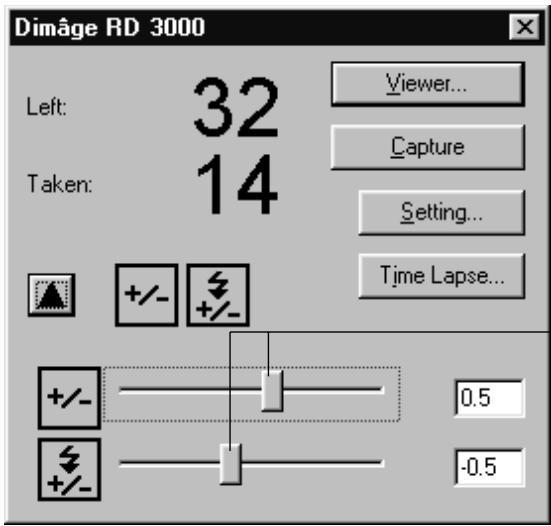
Use the mouse to drag the sliders and change the exposure/flash correction values.
3 Click the Capture button.
- The shutter releases, and the Image Panel opens to display the photograph.
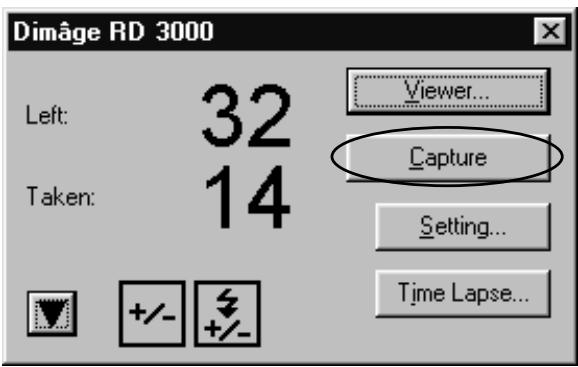


NOTE:
The Dimage RD 3000 is configured so that the shutter will not release unless the camera is in focus. When you click the Capture button, your PC will send a release signal to the Dimage RD 3000 for approximately 20 seconds. During this time, a picture will be taken when the subject comes into focus (Or, during flash photography, when the flash has recharged).
If during that 20-second interval, the camera is unable to focus or the flash does not recharge, no picture is taken. In which event, a "Shutter was not Released" error message is displayed. Click the OK button to close the error message dialog box, and return the program to stand-by status.
CAMERA SETTINGS
Use your PC to format the Dimâge RD 3000 CF card, set the Dimâge RD 3000 internal clock, or synchronise the internal clock with your PC clock.
FORMATTING THE CF CARD
All data stored in the CF card is lost during formatting. Since this data cannot be recovered, take care when performing the format operation.
1 Click the Setting button.
- The Camera Settings dialog box opens.
2 Click the Format button.
- The confirmation dialog box opens.

3 Click the Yes button.
- The CF Card is initialised, and the Camera Panel opens.
- To cancel the format operation, click the No button.
SYNCHRONISING THE INTERNAL CLOCK WITH YOUR PC CLOCK
Before performing this operation, verify that your PC clock is correct.
For Windows®: Click the Start button, point to Settings, and then click Control Panel. Click the Control Panel Time and Date icon.
For Macintosh: On the Apple Menu, select Control Panel, and click Time and Date.
1 Click the Setting button.
- The Camera Settings dialog box opens.

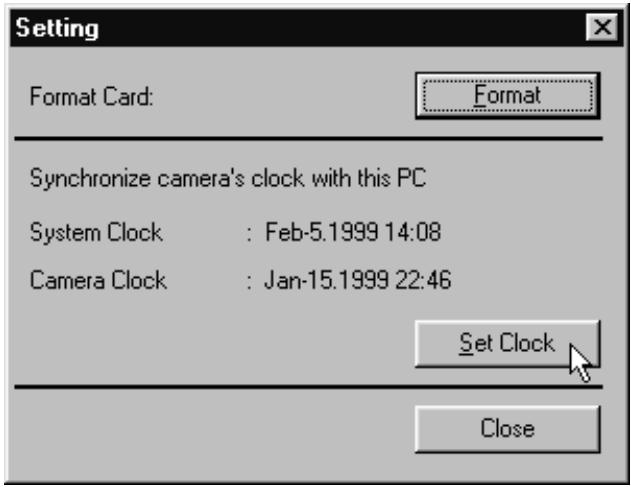
2 Click the Set Clock button.
- The time and date settings are transferred from the PC to the Dimâge RD 3000 internal clock.
- After the internal clock is synchronised, the camera panel opens.
INTERVAL PHOTOGRAPHY
Automatically record a series of photographs taken at a specified time interval.
During interval photography, each recorded frame is initially stored in the CF card, after which it is saved in the specified folder on your hard disk.
To perform interval photography you must therefore have enough space in your CF card for a minimum of one frame.
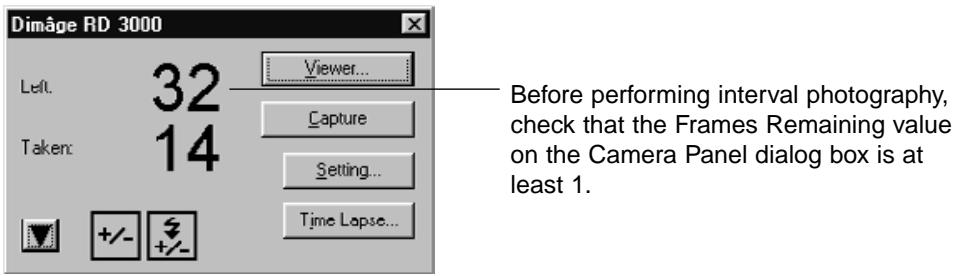
If the Frames Remaining value is 0, delete an image file or replace the current CF card with one which has a Frames Remaining value of at least 1.
1 Follow the instructions on page 107 for adjusting the exposure/flash correction value.
- If this operation is unnecessary, proceed to the next step.
2 Click the Time Lapse button.
- The Time Lapse Capture dialog box opens.
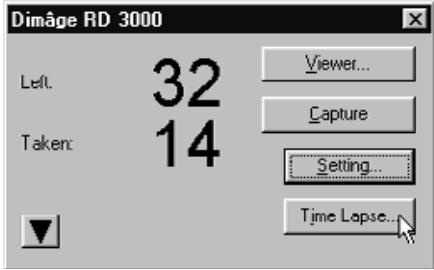
(For Windows®)
(For Macintosh)

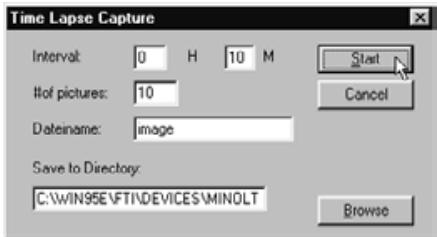

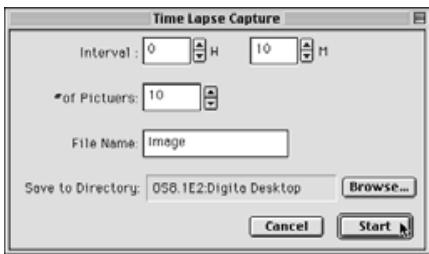
3 Set the values for time interval and number of pictures to your preferences.
- Click the arrows, or input a value directly into the text box to select your preferences for time interval and number of frames.
- The minimum time interval value is one minute; the maximum time interval value is 24 hours and 59 minutes.
- The minimum number of frames is 1; the maximum number of pictures is 999.

NOTE:
To cancel the interval photography operation, click the Cancel button.
4 Specify a filename prefix.
- Specify a filename prefix in the text box.
- Image files created by the interval photography process have filenames consisting of the specified filename combined with a four digit number.
For example, if the filename is specified as "image," and 20 frames are taken, the first file is named "image0001.jpg" and the last file is named "image0020.jpg."
5 Specify a folder in which to save the image files.
- To change the current folder, click the Browse button, and choose a new folder (Select button on Macintosh).
- Verify that the there is enough free space on the hard disk drive (volume on Macintosh) to save all of the image files you plan to record. If there is not enough free space on the hard drive, the interval photography process is terminated without warning.
6 Click the Start button.
- The following dialog box opens. Verify that the contents are correct.
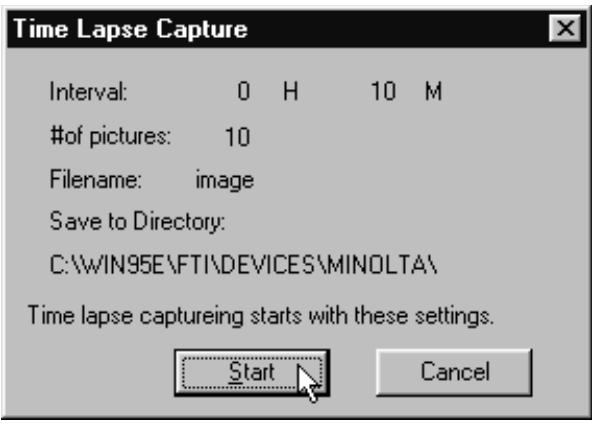
7 Click the Start button again to start the Time Lapse.
- Interval photography will begin in accordance with the preferences specified in steps 3 to 5.
- When the interval photography is completed, the Camera Panel opens.

NOTE:
The Dimage RD 3000 is configured so that the shutter will not release unless the subject is in focus. During Remote Photography, each time the specified interval passes, your PC will send a release signal to the Dimage RD 3000 for approximately 20 seconds. During this time, a picture will be taken once the camera comes into focus. (Or, once the flash has recharged during flash photography) If, during that 20-second interval, the camera remains out of focus or the flash does not recharge, no picture is taken. The camera will wait for the specified time internal to take the next picture.
WHAT IS A SLIDESHOW?
A series of image files can be displayed in succession on your computer, simulating a slideshow.
The following operations are also possible:
- Record audio data for each individual image to be replayed during the slideshow (see page 128).
- Attach background music to the slideshow (see page 130).
- Specify a time interval for each slide, or advance to the next slide with a mouse-click (see page 132).
- Save the slideshow in a file (see page 134).
- Convert the slideshow to an AVI file for Windows® or a QuickTime movie file for Macintosh (see page 136).
QuickTime 3.0 or later is required to operate a slideshow on Macintosh computers.
TO OPEN THE SLIDESHOW WINDOW
1 Follow the instructions shown on pages 36 to 42 for opening the Desktop control panel.
2 Click the Create icon on the control panel.

3 In the Select a Document to Create dialog box, select Slideshow, and click the OK button.
- The new Slideshow window opens.


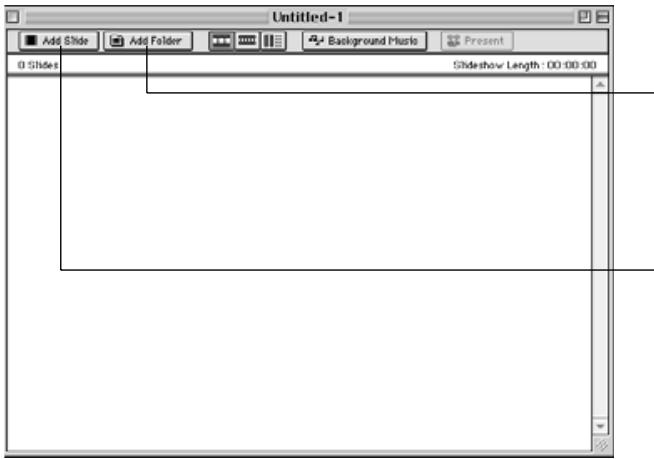
Click the Add Folder button to append all the image files in a folder to the slideshow.
Click the Add Slide button to append individual image files to the slideshow.
APPENDING IMAGE FILES TO A SLIDESHOW
Append image files to a slideshow. Image files can be appended individually, or all the image files in a folder can be appended at once.
APPENDING INDIVIDUAL IMAGE FILES
1 Follow the instructions on page 119 for opening the slideshow window.
2 On the Slideshow menu, click Add Slide.
- This operation can also be performed by clicking the Add Slide button on the toolbar.
- The standard Open a File dialog box for your operating system opens.

(For Windows®)
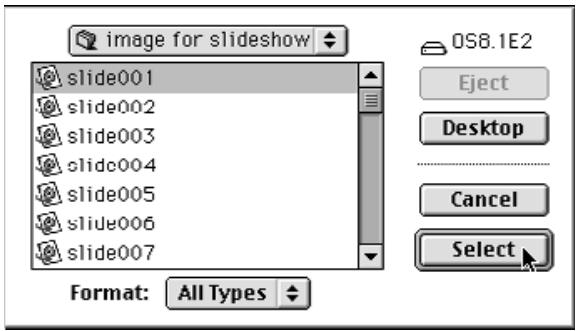
(For Macintosh)
3 Select the file you wish to append, and click the Open button (Select button on Macintosh).
- The selected file is appended to the slideshow, and appears in the slideshow window.
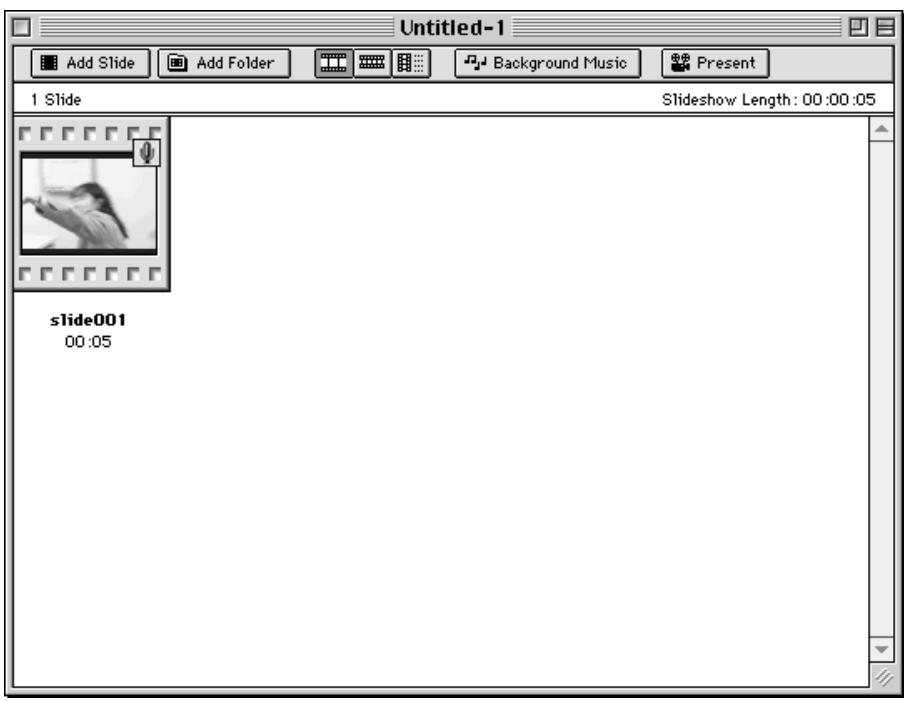
4 Repeat steps 2 and 3 as necessary.
APPEND ALL THE IMAGE FILES IN A FOLDER
1 Follow the instructions shown on page 119 for opening the slideshow window.
2 On the Slideshow menu, click Add Folder of Slides.
- This operation can also be performed by clicking the Add Folder button on the toolbar.
- The Select a Folder dialog box opens.
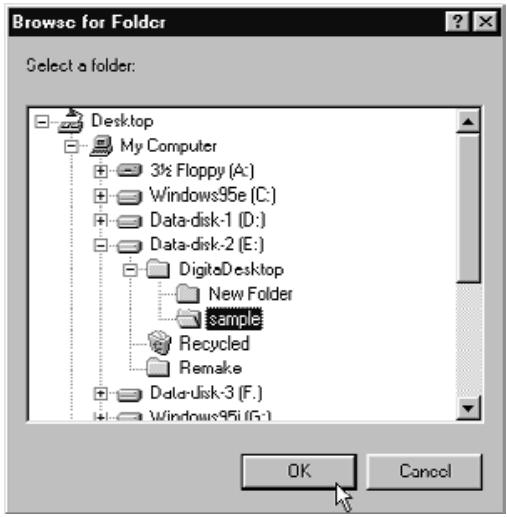
(For Windows®)
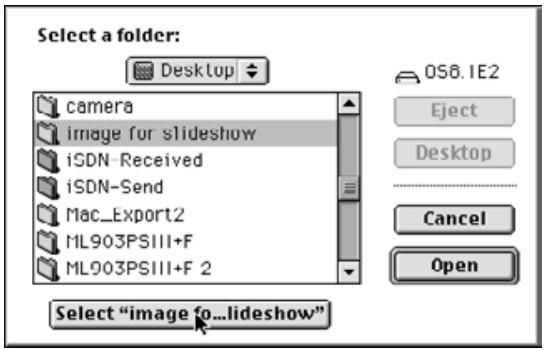
(For Macintosh)
3 Select the folder containing the image files you wish to append, and click the OK button (Select button on Macintosh).
- All the image files contained in the specified folder are appended to the slideshow, and appear in the slideshow window.
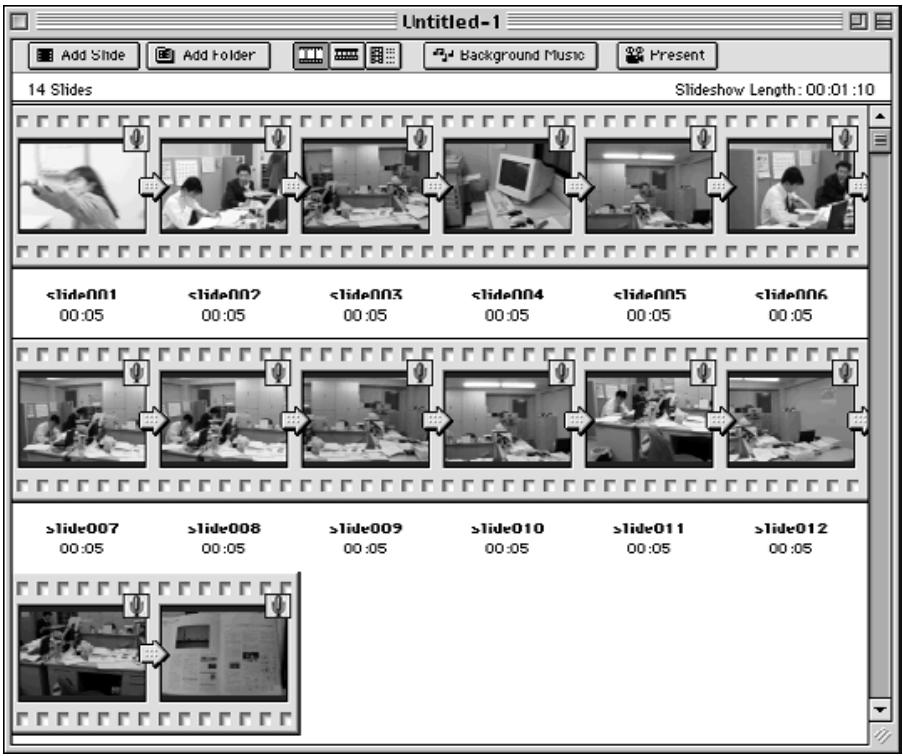
CHANGING THE DISPLAY OF FILES IN THE SLIDESHOW WINDOW
The slide image displayed in the slideshow window, can be changed to Slide, Small Slides, or List Display.
FOR WINDOWS® 95/98/NT
1 On the Slideshow menu, point at View By, and select Slide, Small Slide or List.
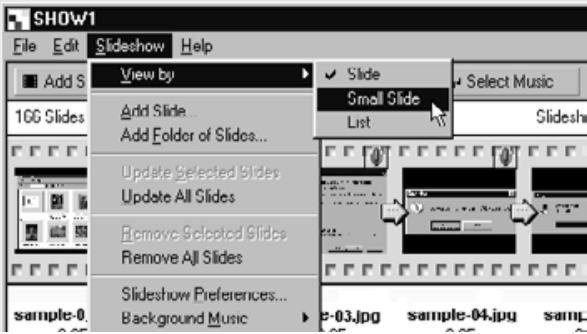
FOR MACINTOSH
1 On the Slideshow menu, point at View, and select Slide, Small Slide or List.
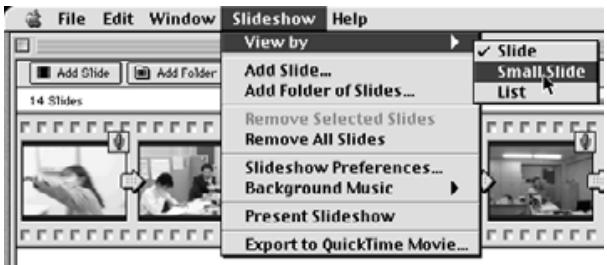
This same operation can be performed by clicking the appropriate button on the toolbar.
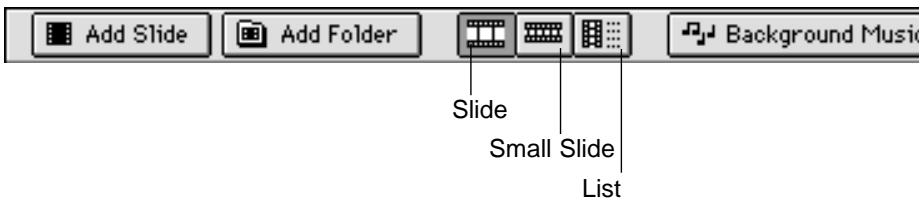
The slideshow window display changes as shown below:

Slide
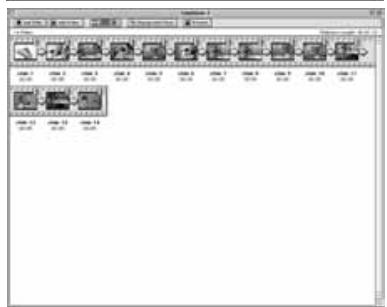
Small Slide
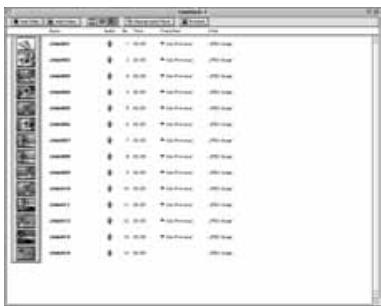
List
CHANGING THE ORDER OF SLIDES
Change the order in which the slides are viewed.
1 Drag the slide to its new location. Verify the new location with the arrow that appears in the space between the filenames, and release the mouse button to finalise.
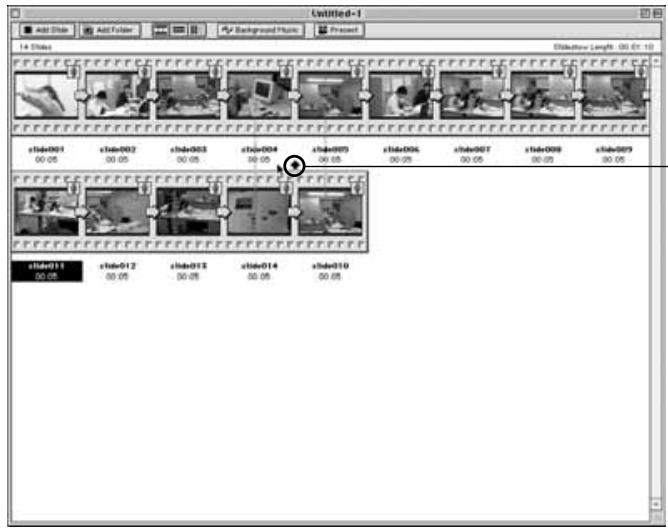
Drag the slide to its new location, verify the new location with the arrowhead, and release the mouse.
UPDATING SLIDES (WINDOWS® ONLY)
If you have used the Image Panel to modify an image file, use this command to update the thumbnail images.
1 Click the slide you wish to update.
2 On the Slideshow menu, click Update Selected Slides. Use the Update All Slides command to update the entire content all the slideshow.
REMOVING SLIDES
Remove selected slides from the slideshow. Note that although the slides are removed from the slideshow window, the image files themselves are not deleted from the hard disk.
1 Click the slide you wish to remove. If you wish to remove more than one slide at a time, hold down the control key, (shift key on Macintosh) and click each slide you wish to remove.
- The filename of the selected slides is highlighted.
- To cancel removal of a selected slide, hold down the control key, (shift key on Macintosh) and click the slide once more.
2 On the Slideshow menu, click Remove Selected Slides.
- Use the Remove All Slides command to remove the complete contents of the slideshow.
- The following dialog box opens on Windows® systems.
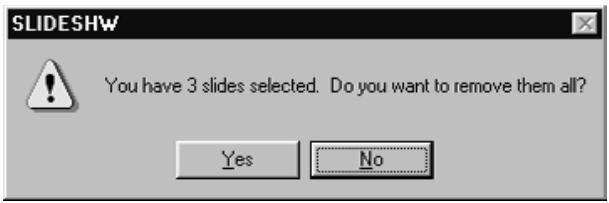
3 Click the Yes button to remove the slides. Click the No button to cancel the operation.
- Macintosh users do not see the above mentioned dialog box. Selecting either Remove Selected Slides or Remove All Slides from the Slideshow menu will immediately remove the contents of the slideshow.
ADDING AUDIO TO A SLIDE
Add audio to image files for use in Slideshow. Macintosh users can use audio added in the Viewer Panel in Slideshow.
1 Click the microphone icon shown in the upper right quarter of the image file to which you wish to add audio. Next, click Record on the pop-up menu that opens.
- The Record dialog box opens.

2 Click the Record button “●” to begin recording audio data. Use the built-in microphone, or a microphone connected to the sound board to record audio data.
- The maximum amount of time which can be recorded depends on how much memory your computer has; the elapsed recording time will appear in the progress bar of the Record dialog box.
- Click the Stop button "■" to stop recording.
- Click the Play button “▶” to play back your recording.
- Re-record as many times as necessary until you are satisfied.
3 Click the Save button.
The audio data is saved.
- The microphone icon in the upper right hand corner changes to a speaker icon.
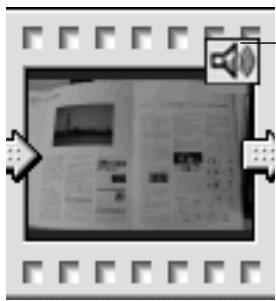
The microphone icon changes to a speaker icon.
4 Click and hold on the speaker icon. Next, the pop-up menu opens.
- Click Play to replay the audio data. Click Delete to remove the audio data. The speaker icon will change to a microphone icon.
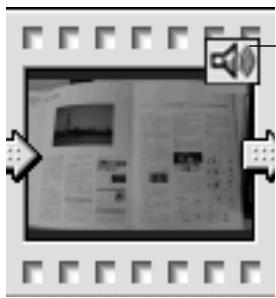
Click and hold on the speaker icon.
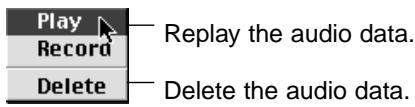
1 On the Slideshow menu, point to Background Music, and click Select on the submenu (Select AIFF on Macintosh).
- This operation can also be performed by clicking the Select Music button on the toolbar (Background Music on Macintosh).
- The standard Open File dialog box for your operating system opens.
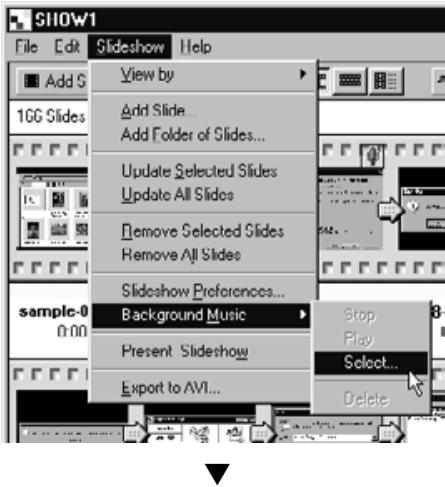
(For Windows®)
(For Macintosh)

2 Select the sound file you wish to use as background music, and click the OK button.
- The selected file is designated as background music for the slideshow.
3 On the Slideshow menu, point to Background Music, and click Play on the submenu.
- The designated sound file plays.
- Click Stop on thesubmenu to stop the playback.
- Click Delete on the submenu to remove the background music from the slideshow.

SLIDESHOW PREFERENCES
Specify your preferences for slideshow presentations.
1 On the Slideshow menu, click Slideshow Preferences.
- The Slideshow Preferences dialog box opens.
(For Windows®)
(For Macintosh)
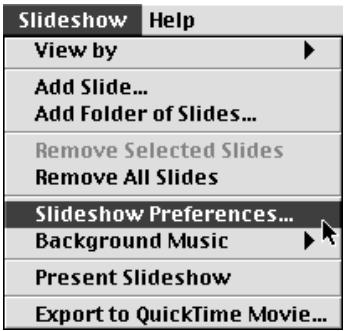
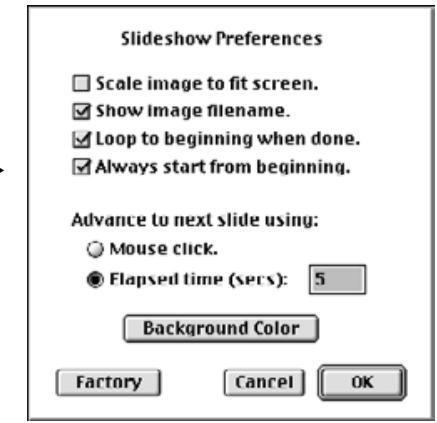
2 Specify your preferences.
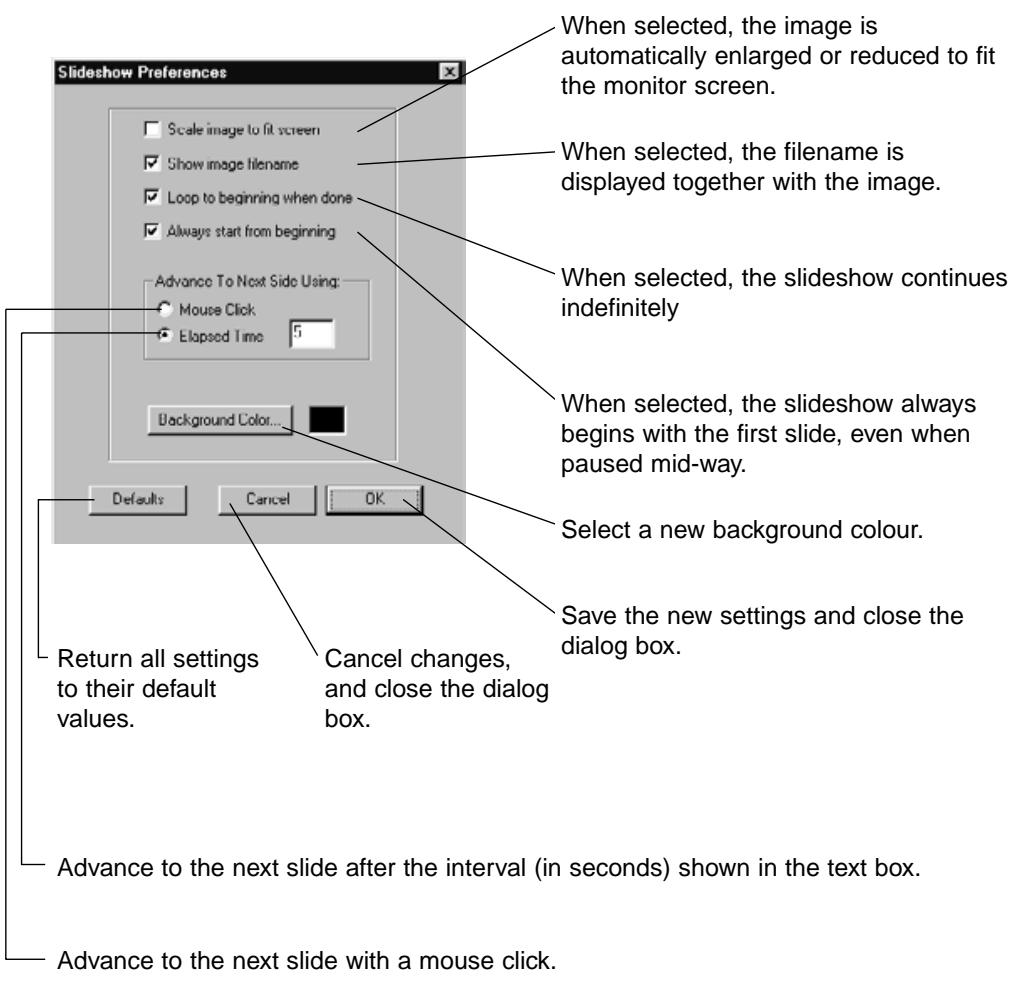
3 Click the OK button.
- The new settings are saved, and the Slideshow Preferences dialog box closes.
- Click the Default button to return all settings to their default values.
- Click the Cancel button to cancel all changes, and close the dialog box.
PRESENTING A SLIDESHOW
Present the slideshow on your computer.
1 On the Slideshow menu, click Present Slideshow.
- This same operation can be performed by clicking the Present button on the toolbar.
- The slideshow is presented in accordance with the preferences specified as shown on the previous page.
- Push any key on the keyboard to terminate the slideshow.
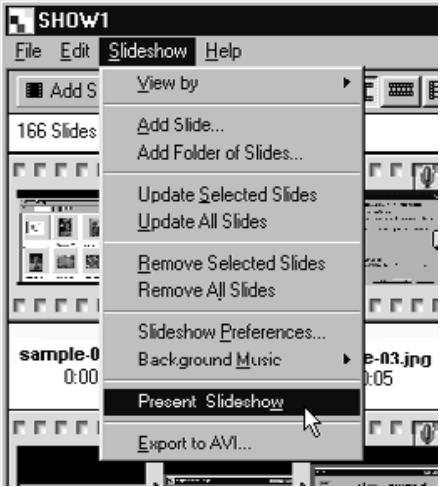
(For Windows®)
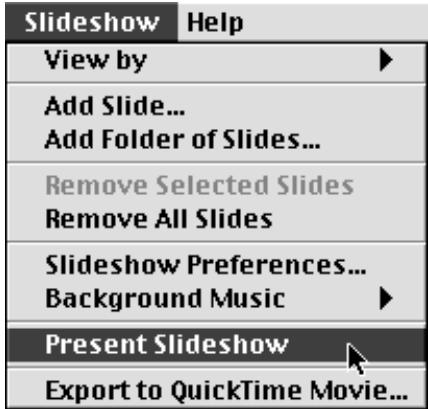
(For Macintosh)
SAVING A SLIDESHOW
Save the slideshow as a file on your hard disk.
1 With the content of the slideshow displayed in the Slideshow window, on the File menu, click Save As.
- The standard Save As dialog box for your operating system opens.

(For Windows®)
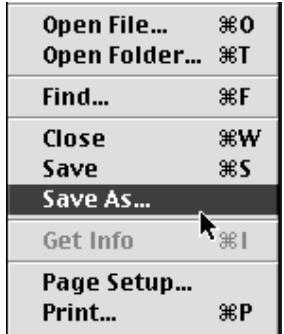
(For Macintosh)

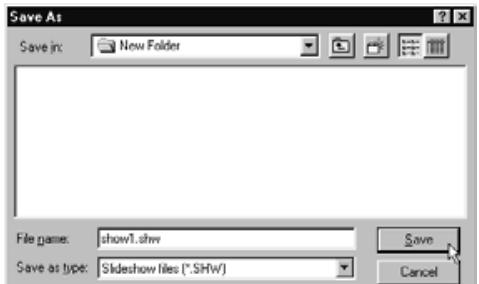


2 Select a folder in which to save the file.
- To create a new folder, click the Create New Folder icon (New for Macintosh).
- Click the Cancel button to cancel the operation and close the dialog box.
3 Input the new filename.
4 Click the Save button.
- The slideshow is saved as a file in the specified folder.
- To open slideshow files, click the Open File icon on the Digits Desktop control panel.
SAVING THE SLIDESHOW AS AN AVI FILE. SAVING THE SLIDESHOW AS A QUICKTIME MOVIE FILE.
Convert a slideshow into AVI file format (Windows®) or QuickTime movie file format (Macintosh).
AVI files and QuickTime movie files are the standard video file formats for Windows® and Macintosh respectively. Files saved in these formats can be played with standard applications supplied with the operating system such as the Windows® MediaPlayer and Macintosh MoviePlayer.
By converting a slideshow into one of these file formats, it can be viewed even on a computer which has not had the Digita Desktop installed.
1 With the content of the slideshow displayed in the Slideshow window, on the Slideshow menu, click Export to AVI (Export to QuickTime movie on Macintosh).
- The appropriate Export dialog box opens.

(For Windows®)
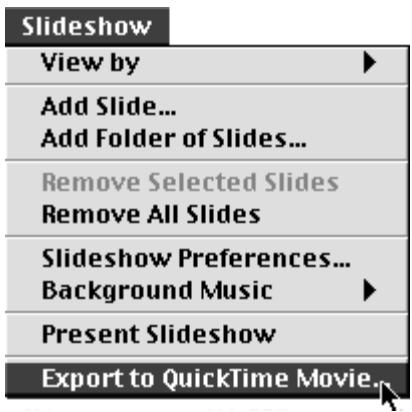
(For Macintosh)

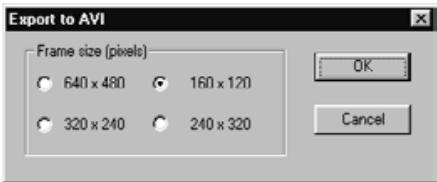
Select a movie size (width x height):
160x120
640x480
320× 240
240x320
Custom:
900 x 600

2 Select a frame size, and click the OK button (Save button on Macintosh).
- The standard Save File dialog box for your operating system opens.
- Click the Cancel button to cancel the operation and close the dialog box.
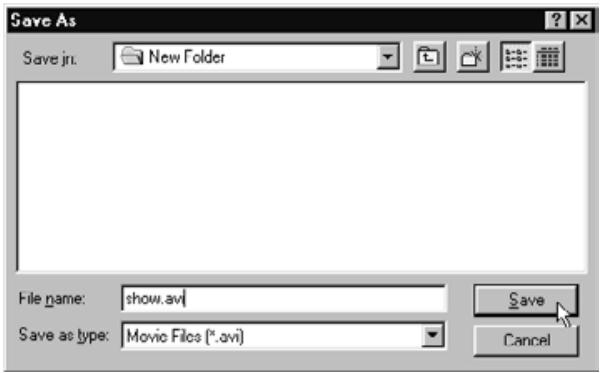
(For Windows®)
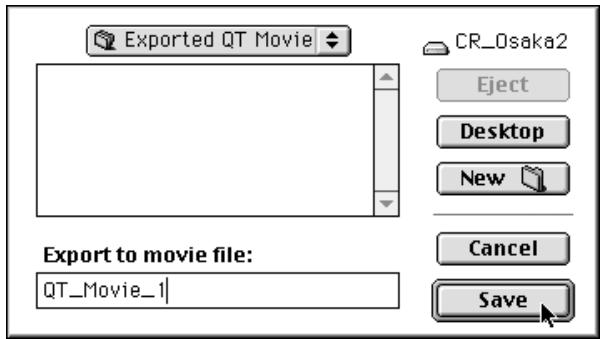
(For Macintosh)
3 Select a folder in which to save the file.
- To create a new folder, click the Create New Folder icon (New for Macintosh).
4 Enter a file name in the text box.
5 Click the Save button.
- The slideshow is saved as either an AVI file or a QuickTime movie file in the specified folder.
FOR WINDOWS® 95/98/NT
1 Turn on your computer and start Windows®.
2 Open the Digits Desktop folder, and click the Digits Desktop.exe icon.
- Unless the folder designation was changed during setup, the DigiTa Desktop.exe file is located in C:\Program Files\FlashPoint\DigiTa Desktop.
- The EXE extension may not be visible on some computers.
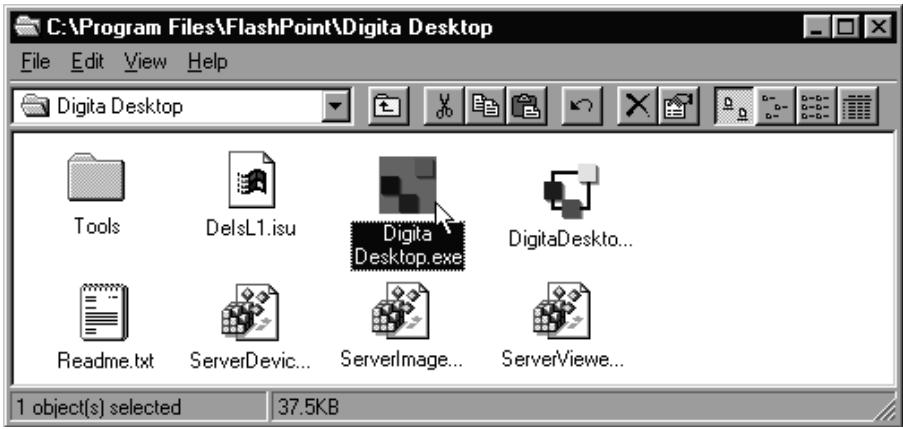
3 Right-click the highlighted Digita Desktop.exe icon.
- The file menu opens.
4 On the file menu, click Properties.
- The File Properties dialog box for Digits Desktop.exe opens.
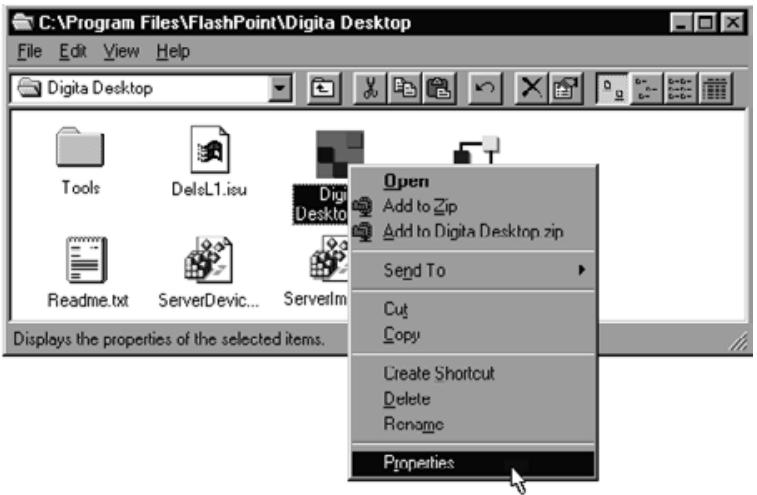
5 Click the Version tab, then click Product Version in the Item Name column.
- The version number is displayed in the Value column.

6 Click the OK button to close the dialog box.
FOR MACINTOSH
1 Turn on Macintosh and start the Mac OS.
2 Open the DigiTa Desktop folder, and click the DigiTa Desktop icon.
- Unless the folder designation was changed during setup, the Digits Desktop icon is located in the folder which was specified during installation.
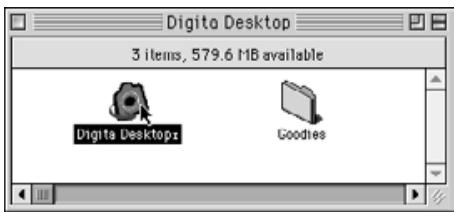
3 On the File menu, click Get Info.
- The Info window appears displaying the version number.
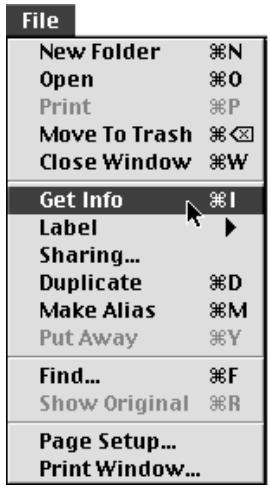
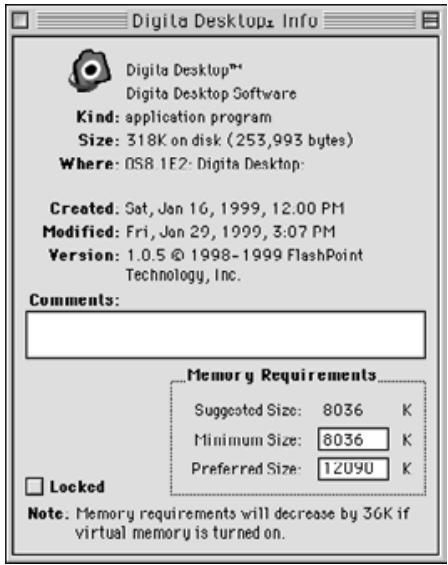
4 Click the Close button to close the window.
Please contact your dealer for additional information. If your dealer is unable to help you, contact us.
TECHNICAL SUPPORT
WWW: http://www.minolta.co.uk
Phone: 01-908-208-349
01-908-208-334
Address: Minolta (UK) LTD. Photographic Division
Precedent Drive,
Rooksley, Milton Keynes, MK13 8HF, England
Minolta Co., Ltd.
Minolta Corporation
Head Office
Los Angeles Branch
Minolta Canada Inc.
Head Office
Minolta GmbH
Minolta France S.A.
Minolta (UK) Limited
Minolta Austria Ges. m.b.H.
Minolta Camera Benelux B.V.
Belgium Branch
Minolta Hong Kong Limited
Minolta Singapore (Pte) Ltd.
3-13, 2-Chome, Azuchi-Machi, Chuo-Ku, Osaka 541-8556, Japan
101 Williams Drive, Ramsey, New Jersey 07446, U.S.A.
11150 Hope Street Cypress, CA 90630, U.S.A.
369 Britannia Road East, Mississauga, Ontario L4Z 2H5, Canada
Kurt-Fischer-Strasse 50, D-22923 Ahrensburg, Germany
365 Route de Saint-Germain, F-78420 Carrierses-Sur-Seine, France
Rooksley Park, Precedent Drive, Rooksley, Milton Keynes, MK13 8HF, England
Amalienstrasse 59-61, A-1131 Wien, Austria
Zonnebaan 39, P.O. Box 6000, NL-3600 HA Maarssen, The Netherlands
Kontichsestenweg 38, B-2630 Aartselaar, Belgium
Riedstrasse 6, CH-8953 Dietikon, Switzerland
P.O.Box 9058,Albygatan 114,S-17109 Solna,Sweden
Nittykatu 6 PL 37, SF-02201 Espoo, Finland
Room 208, 2/F, Eastern Center, 1065 King's Road, Quarry Bay, Hong Kong
10, Teban Gardens Crescent, Singapore 608923
© 1999 Minolta Co., Ltd. under the Berne
Convention and Universal Copyright Convention
Digital Camera
Dimâge RD 3000
E SOFTWARE INSTRUCTION MANUAL
Digital
- INTRODUCTION
- USING THE SOFTWARE
- USING THE TWAIN.DRIVER (WINDOWS)
- USING THE VIEWER PANEL 44
- SLIDESHOWS 118
- VERIFYING THE DIGITA DESKTOP VERSION 140
- TERMS USED IN THIS MANUAL
- FOR WINDOWS®
- NOTE:
- FOR MACINTOSH
- FOR WINDOWS® 95/98/NT
- Click the Next button.
- Click the Yes button.
- Click the Next button.
- Click the Yes button.
- Click the Next button.
- INSTALLING THE TWAIN DRIVER (WINDOWS)
- Before you begin
- Double-click the DimAge RD 3000 Installer icon.
- Click the Agree button.
- Click the Install button.
- Click the Continue button.
- Click the Agree button.
- Confirm the current selection, select a different folder or create a new folder.
- Select an Installation Type using the pop-up menu in the upper left of the window.
- Click the Install button.
- Click the Restart button.
- Where to Find the Files
- INSTALLING THE SOFTWARE
- Installing the Adobe Photoshop plug-in module
- SCSI ID SETUP
- TERMINATOR POWER SUPPLY SETUP
- For PC/AT compatible computers
- For Macintosh computers
- THE SCSI CONNECTOR CABLE
- FOR PC/ATCompatible COMPUTERS
- FOR APPLE MACINTOSH COMPUTERS
- When the Dimage RD 3000 is the final device on a SCSI chain:
- CONNECTION TO THE COMPUTER
- WHEN THE DIMÂGE RD 3000 IS YOUR ONLY SCSI DEVICE:
- INSERTION OF THE CF CARD
- BASIC OPERATION (VIEWER PANEL, IMAGE PANEL)
- At the Viewer Panel:
- At the Image Panel:
- Image files
- BASIC OPERATION (CAMERA PANEL)
- The Camera Panel opens (see page 104).
- At the Camera Panel:
- Image files:
- Launching the TWAIN-Driver
- Opening Digita Desktop as an independent application
- Opening the Digita Desktop as an Adobe Photoshop plug-in
- Click MINOLTA Dimäge RD 3000, and click the OK button.
- Turn on your Macintosh computer.
- Open the folder in which you installed Digita Desktop.
- Double-click the application icon.
- SAVING IMAGES TO THE HARD DRIVE
- Click on the images to be acquired.
- Click on "Acquire".
- DELETING IMAGES FROM THE CF CARD
- Click on the images to be deleted.
- Click on "Delete".
- Click on “Yes” to delete the images. Click on “No” to cancel the operation.
- QUITTING THE TWAIN-DRIVER
- Click on "Exit" in the Minolta Dimage RD3000 index window.
- Click on "Yes".
- AT THE VIEWER PANEL
- DISPLAYING CAMERA IMAGES
- Open the application, and click the Connect icon on the control panel.
- Select MINOLTA Dimäge RD 3000, and click the OK button.
- (For Windows®)
- (For Macintosh)
- Click the Viewer button.
- DISPLAYING HARD DISK IMAGES
- Open the application, and click the Open Folder icon on the control panel.
- Select a folder in which image files have been saved, and click the OK button in Windows® or the Folder Name button in Macintosh.
- FIND
- Open the application, and click the Find button.
- Enter the name of the file you wish to find.
- Click the Find button.
- COPYING FILES FROM THE CAMERA
- Select the folder to which the files are to be downloaded, and click the OK button.
- Click Viewer menu, and then click Copy Selected Files.
- Select the folder to which the files will be downloaded, input the Image File Name Prefix, and then click the Save button.
- VIEWING IMAGE FILE PROPERTIES
- PRINTING ALBUMS
- Display the images in the Viewer Panel (see pages 45 to 51).
- Click File menu, and then click Print Album.
- Specify the number of columns and rows, and the desired quality.
- Click the Print button.
- CREATING A NEW FOLDER
- CHANGING THE IMAGE DISPLAY
- Click View menu, and then click Slide, Small Slide, or List.
- Click Viewer menu, point to View By, and then click Slide, Small Slide, or List on the submenu.
- Click View menu, point to View By, and then click Slide, Small Slide, or List on the submenu.
- SORTING IMAGES IN THE VIEWER PANEL
- USING QUICK VIEW
- QUICK VIEW PREFERENCES
- Click View menu, and then click Quick View Preferences.
- After specifying your preferences, click the OK button to save the new settings and close the dialog box.
- CHANGING FILE NAMES
- ADDING AUDIO DATA TO AN IMAGE (MACINTOSH ONLY)
- Click the Record button “●” to begin recording audio data. Use the microphone to record audio data.
- Click the Save button.
- Click and hold on the speaker icon. Next, the pop-up menu will open.
- DRAG AND DROP OPERATION
- WHAT YOU CAN DO AT THE IMAGE PANEL
- The following operations can be performed in the Image Panel
- Using the Digita Desktop Photoshop Plug-In (Mac OS only)
- Click the Open File icon on the control panel.
- Click the image file you wish to view, and then click the Open button.
- ZOOM IN/ZOOM OUT
- Click the Zoom Tool button on the tool palette.
- Using the Zoom Tool pointer, click the image to zoom in. Hold down the control key (option key for Macintosh) and click to zoom out.
- This operation can also be performed as shown below:
- RESIZING DOCUMENTS
- On the Image menu, click Document Size.
- Specify a new width and height, and select the desired placement method. Then click the OK button.
- CROPPING THE IMAGE
- Click the Selection Tool on the tool palette.
- Select the portion of the image you wish to crop by dragging the cursor across the image.
- On the Image menu, click Cut.
- SCROLLING THE IMAGE
- Click the Pan Tool on the Tool Pallet.
- Drag the image to scroll.
- ADJUSTING BRIGHTNESS AND CONTRAST
- On the Image menu, click Brightness/Contrast.
- Click the slider and drag, or enter a numerical value directly into the text box to the right of the slider bar.
- When finished, click the OK button.
- ADJUSTING COLOUR BALANCE
- On the Image menu, click Colour Balance.
- USING THE QUICK CORRECTION FUNCTION
- LIGHTEN/DARKEN
- SHARPEN/SOFTEN
- On the Image menu, point to Adjust, and select either Sharpen or Soften from the submenu.
- FLIPPING AN IMAGE (HORIZONTALLY OR VERTICALLY)
- On the Image menu, point to Flip, and select either Horizontal or Vertical.
- ROTATING AN IMAGE
- On the Image menu, point to Rotate, and select 90° Left, 90° Right or 180° .
- SUPERIMPOSING TEXT
- Click the Text Tool button on the Tool Palette.
- Move the Text Tool pointer to the desired location, and click.
- Input text from the keyboard.
- Click anywhere outside the text box.
- RESIZING THE IMAGE
- On the Image menu, click Resize.
- Use the drop-down menu to select the units you wish to use.
- Input new values for Width and Height, and click the OK button.
- DIGITA DESKTOP IMAGE FILTERS AND PLUG-IN FILTERS
- PRINTING IMAGES
- On the File menu, click Print.
- SAVING AN IMAGE
- IMAGE FILE FORMATS
- BMP
- EXIF(EXIF2.0)
- PICT
- JPEG
- TIFF
- Photoshop 3.0 (PSD)
- FlashPix
- SAVING IMAGES
- On the File menu, click Save As.
- Select a folder in which to save the image.
- Input the new filename.
- Select the desired file format from the File Type drop-down menu (File Format pop-up menu for Macintosh).
- Click the Save button.
- WHAT YOU CAN DO FROM THE CAMERA PANEL
- CAMERA PANEL
- TO OPEN THE CAMERA PANEL
- WHEN THE CAMERA PANEL DOES NOT OPEN
- DISPLAYING CAMRA IMAGES
- Click the Viewer button.
- REMOTE PHOTOGRAPHY
- Click the button (▶ button for Macintosh) on the Camera Panel.
- Use the mouse to drag the sliders and change the exposure/flash correction values.
- Click the Capture button.
- CAMERA SETTINGS
- FORMATTING THE CF CARD
- Click the Setting button.
- Click the Format button.
- Click the Yes button.
- SYNCHRONISING THE INTERNAL CLOCK WITH YOUR PC CLOCK
- Click the Set Clock button.
- INTERVAL PHOTOGRAPHY
- Follow the instructions on page 107 for adjusting the exposure/flash correction value.
- Click the Time Lapse button.
- Set the values for time interval and number of pictures to your preferences.
- Specify a filename prefix.
- Specify a folder in which to save the image files.
- Click the Start button.
- Click the Start button again to start the Time Lapse.
- WHAT IS A SLIDESHOW?
- The following operations are also possible:
- TO OPEN THE SLIDESHOW WINDOW
- APPENDING IMAGE FILES TO A SLIDESHOW
- APPENDING INDIVIDUAL IMAGE FILES
- On the Slideshow menu, click Add Slide.
- Select the file you wish to append, and click the Open button (Select button on Macintosh).
- APPEND ALL THE IMAGE FILES IN A FOLDER
- Select the folder containing the image files you wish to append, and click the OK button (Select button on Macintosh).
- CHANGING THE DISPLAY OF FILES IN THE SLIDESHOW WINDOW
- CHANGING THE ORDER OF SLIDES
- UPDATING SLIDES (WINDOWS® ONLY)
- REMOVING SLIDES
- ADDING AUDIO TO A SLIDE
- Click the microphone icon shown in the upper right quarter of the image file to which you wish to add audio. Next, click Record on the pop-up menu that opens.
- Click the Record button “●” to begin recording audio data. Use the built-in microphone, or a microphone connected to the sound board to record audio data.
- Click the Save button.
- Click and hold on the speaker icon. Next, the pop-up menu opens.
- On the Slideshow menu, point to Background Music, and click Select on the submenu (Select AIFF on Macintosh).
- Select the sound file you wish to use as background music, and click the OK button.
- On the Slideshow menu, point to Background Music, and click Play on the submenu.
- SLIDESHOW PREFERENCES
- On the Slideshow menu, click Slideshow Preferences.
- Specify your preferences.
- Click the OK button.
- PRESENTING A SLIDESHOW
- On the Slideshow menu, click Present Slideshow.
- SAVING A SLIDESHOW
- With the content of the slideshow displayed in the Slideshow window, on the File menu, click Save As.
- Select a folder in which to save the file.
- SAVING THE SLIDESHOW AS AN AVI FILE. SAVING THE SLIDESHOW AS A QUICKTIME MOVIE FILE.
- Select a frame size, and click the OK button (Save button on Macintosh).
- Select a folder in which to save the file.
- Turn on your computer and start Windows®.
- Open the Digits Desktop folder, and click the Digits Desktop.exe icon.
- Right-click the highlighted Digita Desktop.exe icon.
- On the file menu, click Properties.
- Click the Version tab, then click Product Version in the Item Name column.
- TECHNICAL SUPPORT
- Digital Camera
- Dimâge RD 3000
Brand : KONICA MINOLTA
Model : DIMAGE RD3000 SOFTWARE
Category : Image Processing Software