
DIMAGE IMAGE VIEWER UTILITY FOR DIMAGE S304 - Image viewing software KONICA MINOLTA - Free user manual and instructions
Find the device manual for free DIMAGE IMAGE VIEWER UTILITY FOR DIMAGE S304 KONICA MINOLTA in PDF.

| Product type | Image viewing software |
| Brand | KONICA MINOLTA |
| Model | DiMAGE Image Viewer Utility for S304 |
| Compatible operating systems | Windows 95/98/Me/2000/NT 4.0, Mac OS 8.6 to 9.1 |
| Minimum processor (Windows) | Intel Pentium 133 MHz or higher |
| Minimum processor (Mac) | PowerPC 100 MHz or higher |
| Minimum RAM | 64 MB |
| Hard disk space required | 100 MB free after installation |
| Minimum screen resolution | VGA 640 x 480 pixels (recommended XGA 1024 x 768) |
| Minimum color depth | True Color (24 bits) or higher |
| Supported image formats | JPEG, TIFF, Minolta-RAW (.mrw) |
| Main functions | Thumbnail display, rotation, flipping, sorting, color correction (tone curves, histograms, brightness/contrast, hue/saturation, variation), sharpness, image saving |
| Color matching | Yes, with selection of output color space and ICC profiles |
| Required interface | USB port (to connect a compatible digital camera) |
| Camera support | DiMAGE 7, DiMAGE 5 and other USB mass storage class devices |
| Installation | CD-ROM provided, installation via InstallShield (Windows) or Installer (Mac) |
| Included software | ArcSoft PhotoImpression (photo editing) |
| License type | Proprietary, personal and domestic use |
| Instruction manual | 65 pages, available in English (translation available upon request) |
Frequently Asked Questions - DIMAGE IMAGE VIEWER UTILITY FOR DIMAGE S304 KONICA MINOLTA
User questions about DIMAGE IMAGE VIEWER UTILITY FOR DIMAGE S304 KONICA MINOLTA
0 question about this device. Answer the ones you know or ask your own.
Ask a new question about this device
Download the instructions for your Image viewing software in PDF format for free! Find your manual DIMAGE IMAGE VIEWER UTILITY FOR DIMAGE S304 - KONICA MINOLTA and take your electronic device back in hand. On this page are published all the documents necessary for the use of your device. DIMAGE IMAGE VIEWER UTILITY FOR DIMAGE S304 by KONICA MINOLTA.
USER MANUAL DIMAGE IMAGE VIEWER UTILITY FOR DIMAGE S304 KONICA MINOLTA
www.minoltaeurope.com
DiMAGE Version1.01 Image Viewer Utility
for S304
9224-2770-21 H-A107
E INSTRUCTION MANUAL
This instruction manual may not be copied either in part or in its entirety without the prior permission of Minolta Co., Ltd.
© 2001 Minolta Co., Ltd.
- Every precaution has been taken to ensure the accuracy of this material Please contact Minolta if you have any questions, find any mistakes or notice missing information.
- Minolta cannot accept responsibility for any loss, damage or other problems caused by use of this software.
- With the exception of personal, home or equivalent use No part of book, magazine, music, or other copyrighted material may be used, copied or revised without the prior permission of the author or copyright holder.
This instruction manual does not provide instructions for the basic operation of the personal computers, or the basic operation of Windows® or Mac OS operating systems.
Please refer to the manual that came with your computer for information on the above mentioned topics.
- Microsoft® and Windows® are registered trademarks in the United States and other countries of Microsoft Corporation.
- The official name of Windows® is Microsoft® Windows® Operating System.
- Pentium® is a registered trademark of Intel Corporation.
- Apple, the Apple logo, Macintosh, Power Macintosh, Mac OS and the Mac OS logo are registered trademarks of Apple Computer, Inc.
- Other company and product names are the trademarks or registered trademarks of their respective owners.
TABLE OF CONTENTS. 4
BEFORE YOU BEGIN. 6
TERMS USED IN THIS MANUAL 6
SYSTEM REQUIREMENTS (Windows) 8
SYSTEM REQUIREMENTS (Macintosh) 9
INSTALLING THE SOFTWARE (Windows®) 10
INSTALLING THE SOFTWARE (Macintosh) 13
STARTING THE SOFTWARE 16
For Windows 16
For Macintosh 17
USING THE SOFTWARE - THUMBAILS 18
To Display Thumbs nails of All Images in the Folder 19
To Display a Thumbnail of a Certain Image in the Folder 21
To Rotate, Flip and Sort Thumbsnails 24
To Change the Image Size 25
To Display the Image (Recording) Information 26
To Delete Thumbsnails 27
USING THE SOFTWARE-COLOR MATCHING 28
USING THE SOFTWARE - SAVING IMAGES 32
To Save an Image File 32
To Save Multiple Images at One Time 34
COLOR CORRECTION 36
Corrections using the tone curves 37
To Draw a Free Hand Tone Curve 38
To Correct Images Using the "Black Point" Button 39
To Correct Images Using the "White Point" Button 40
To Correct Images Using the "Gray Point" Button 41
Histogram Correction - Auto Setting 42
Histogram Correction - To Correct RGB Channels Separately 43
To Correct Brightness, Contrast and Color Balance 44
To Correct Hue, Saturation and Lightness 46
Variation Correction 48
Variation Correction - Color Balance 49
Variation Correction - Brightness & Contrast 50
Variation Correction - Saturation 51
To Undo the Correction 52
To Redo the Canceled Correction. 52
To Undo All Color Corrections 52
Snapshot 53
Color Correction Job 54
To Compare the Pre/Post Correction Images 56
To Display the Whole Post-Correction Image 57
7.58
RGB Value Display 59
SHARPNESS 60
QUITING THE SOFTWARE 62
ArcSoft PhotolmpressionTM 64
TERMS USED IN THIS MANUAL
- This manual assumes that your computer's operating system (Windows®95/98/98 Second Edition/Me/2000/NT 4.0 or Mac OS) as well as other necessary software such as device drivers have been installed, and are operating properly.
- In general, the descriptions in this manual are illustrated by the displays for the Windows® version. There are no major differences between the displays for the Windows® and Macintosh versions except for some of the button layouts and other cosmetic features.
-
This manual assumes the use of a two- button, right- handed mouse for Windows®. The terms 'click' and 'double-click' refer to a single or double click of the left mouse button. The term 'drag' refers to the action of holding down the left mouse button while moving the mouse.
-
If you are using Macintosh OS, the term 'Command Key' refers to the key located next to the Space Bar.
- Command names shown in this manual which are common both to the Windows® and Macintosh systems do not indicate any of the shortcut keys found in Windows® command names.
Example No. 1: The File command appears as "File" on Windows® and "File" on Macintosh menus, but in this manual it is shown as merely as "File."
Example No. 2: The Save command appears as "Save" on Windows® and "Save" on Macintosh menus, but in this manual it is shown merely as "Save."
The system requirements for the operation of this software are as shown below:
| IBM PC/AT and their compatible computers | |
| CPU | Intel Pentium® Processor 133MHz or higher |
| OS | Windows®2000 Professional, Windows®Me, Windows®98 / 98 Second Edition, Windows®95, Windows®NT4.0 (Service Pack 6 or later) |
| RAM | A minimum of 64MB of RAM |
| Hard Disk Space | 100MB or more of free hard disk space for use as workspace after the software installation |
| Monitor | Resolution: VGA (640 X 480 dots) or higher XGA (1024 X 768 dots) or higher is recommended Color Depth: True Color (24 bit) or higher |
| CD-ROM Drive | Required for software installation |
| Interface | USB port* that each PC maker guarantees to operate without problem |
- You need a USB port when you connect a USB mass storage class supported digital camera such as DiIMAGE 7 or DiIMAGE 5 to your PC with a USB cable and use (a CF card in) the digital camera as a removable disc with this software. If you use Windows®98/98 Second Edition, you must install the USB driver software in the attached CD-ROM to execute this operation. (See the digital camera's instruction manual for details.) If you use Windows®95/NT 4.0, you can not execute the above operation (because USB pots are not normally supported), however, you can still operate image files copied on PC hard disks since the software also runs on Windows®95/NT 4.0.
The system requirements for the operation of this software are as shown below:
| Apple Macintosh Series computers | |
| CPU | PowerPC 100MHz or higher (except a non-Macintosh Mac OS-compatible computer) |
| OS | Mac OS 8.6 / 9 / 9.0.2 / 9.0.4 / 9.1 |
| RAM | 64MB or more of free memory |
| Hard Disk Space | 100MB or more of free hard disk space for use as workspace after the software installation |
| Monitor | Resolution: 640 dots X 480 dots or higher 1024 dots X 768 dots or higher is recommended Color Depth: 24 bit Color or higher |
| CD-ROM Drive | Required for software installation |
| Interface | Standard built-in USB port* |
- You need a USB port when you connect a USB mass storage class supported digital camera such as DiIMAGE 7 or DiIMAGE 5 to your Macintosh with a USB cable and use (a CF card in) the digital camera as a removable media with this software. If you use Mac OS 8.6, you must first download the dedicated driver software from Apple Computer's Web site, and then install the downloaded software on your Macintosh to execute this operation. (See the digital camera's instruction manual for details.) If you do not download/install the dedicated driver software, you can not execute the above operation, however, you can still operate image files copied on Macintosh hard disks since the software also runs on Mac OS 8.6.
Follow the procedure below to install the software on your Windows PC.
RAM stationed programs such as anti-virus programs or installation monitoring programs may cause the installer to fail. Uninstall those programs from your system or temporarily disable them before starting the installation, and then put them back on your system after completing the installation.
For Windows®:
- In the procedure below, the hard disk drive for system startup is assumed as "drive C", and the CD-ROM drive as "drive D".
- You should install the software on the Windows®2000/NT4.0 PC with the Administrator privilege.
1. Turn on your PC to start Windows®.
2. Insert the attached "DiIMAGE Software CD-ROM" into the CD-ROM drive.

After a short time, the "DiIMAGE Installer Menu" window (figure-left) appears.
3. Click the "Starting up the DiIMAGE Image Viewer Utility installer" button.
The "InstallShield Wizard" program starts automatically, and the "Welcome" window appears. See the digital camera's instruction manual for details of the "Starting up the USB device driver installer" (this button is active if you use Windows®98/98 Second Edition) or the "Starting up the QuickTime installer" button.
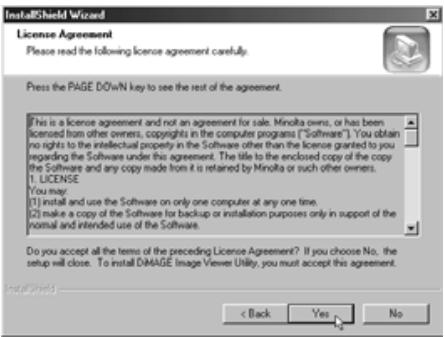
4. Click "Next >".
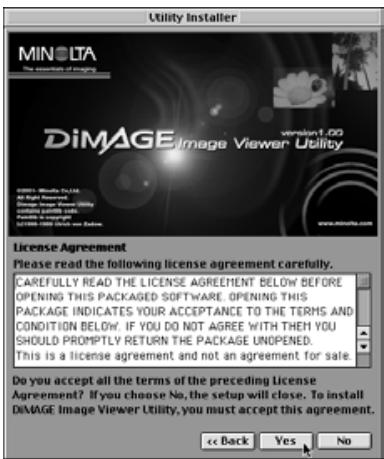
The "License Agreement" (figure-left) appears. Read the entire "License Agreement" carefully before continuing the installation
If you do not agree to the terms of the "License Agreement", click "No". The installation procedure will be terminated.
5. Click "Yes".
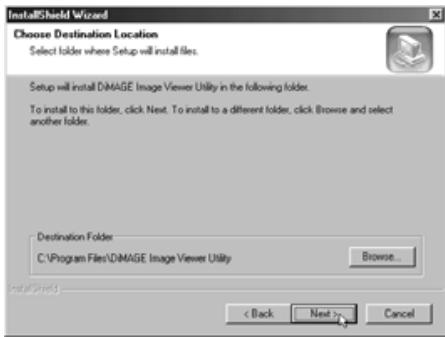
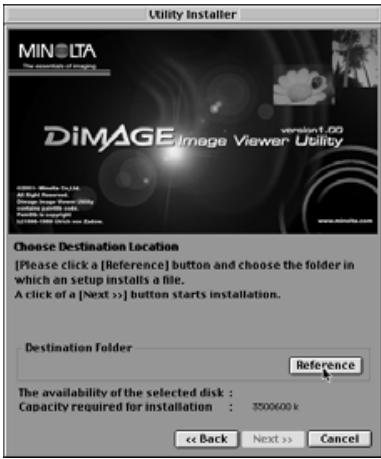
The window that lets you select a destination folder of the software (figure-left) appears.
6. To install the software in the default folder (C:\Program Files\DiIMAGE Image Viewer Utility), click "Next >".
Subsequent parts of this document assume that the software has been installed in the default folder described above.
To install the software in a different folder, click "Browse..." The "Choose Folder" window will appear. Select the folder where you wish to install the software, and then click "OK".
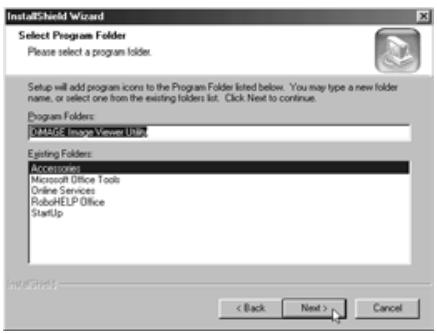
Click "Next >", and the "Select Program Folder" window (figure-left) will appear.
- The name of the program folder where you will add the program icon is shown in the window. Click "Next >" to add the icon in the default (reversed) folder.
To add the program icon in a new folder, type the folder name in the box under "Program Folders:" and then click "Next >". To add the program icon in an existing folder, select the folder from the folder list in the box under the "Existing Folders:" and click "Next >".
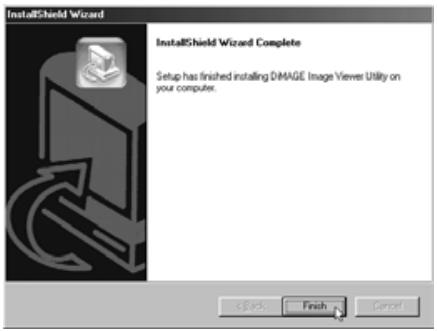
After you click "Next >", the software installation will start.
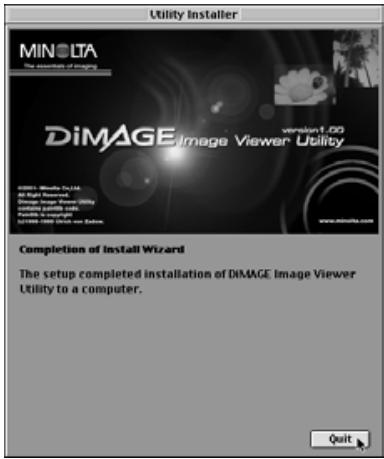
When the software installation has been completed, a completion window of "InstallShield Wizard" (figure-left) appears.
- Click "Finish", then click "Finish" in the DiIMAGE Installer Menu window.
The software installation procedure is complete.
Follow the procedure below to install the software on your Macintosh computer.
Functional expansion programs such as anti-virus programs or control panel documents may cause the installer to fail. Remove those programs/documents from your system using the utility such as the functional expansion manager or temporarily disable them before starting the installation, and then put them back on your system after completing the installation.
For Macintosh:
- Turn on your Macintosh to start Mac OS.
- When the desktop appears, insert the attached "DiIMAGE software CD-ROM" into the CD-ROM drive.
The contents of the CD-ROM appear automatically.
When the contents of the CD-ROM do not appear automatically, double-click the CD-ROM icon on the desktop (named "DiIMAGE Software") to open it.
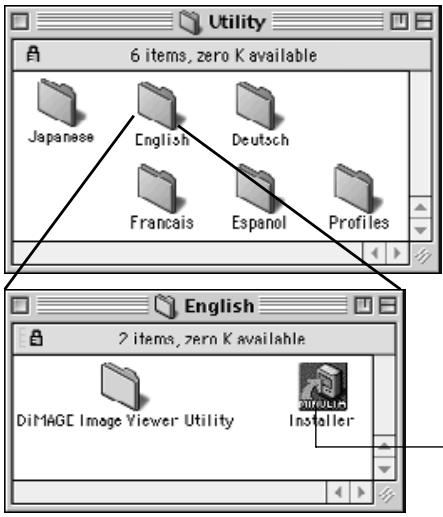
- Double-click the "Utility" folder to open it, and then double-click the "English" folder.
The "DiIMAGE Software Installer" icon appears.
- Double-click the "DiIMAGE Software Installer" icon.
The Installer program starts and the initial window appears.
"DiIMAGE Software Installer" icon
6. Click "Next >>" in the Installer's initial window.
The "License Agreement" (figure-left) appears. Read the entire "License Agreement" carefully before continuing the installation.
If you do not agree to the terms of the "License Agreement", click "No". The installation procedure will be terminated.
7. Click "Yes".
The window that lets you select a destination folder of the software (figure-left) appears.
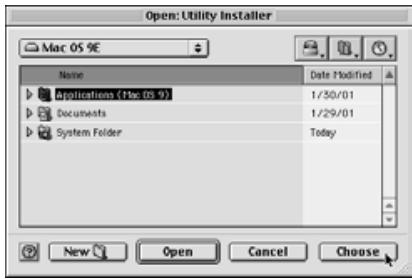
If you click "Reference", the Mac OS standard folder selection dialog box (figure-below) will appear. Select the folder where you wish to install the software, and then click "Choose" at the bottom right-hand corner of the dialog box.
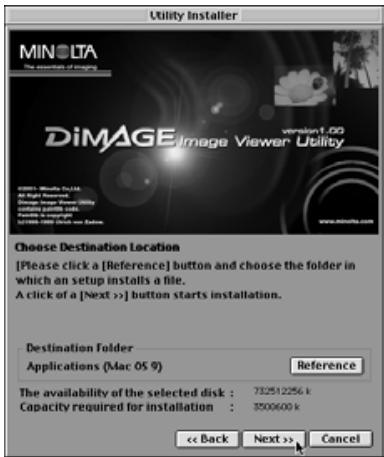
- Make sure that you have selected a proper folder for installation, and then click "Next >>".
The software installation starts. Follow the instructions shown on the screen.
When the software installation has been completed, the window shown in the lower left-hand corner (Operation 9.) appears.
- Click "Quit".
The software installation procedure is complete.
For Windows®:
- Turn on your PC to start Windows®.
- Select "Start" "Programs(P)" "DiIMAGE Image Viewer Utility" "DiIMAGE Image Viewer Utility".
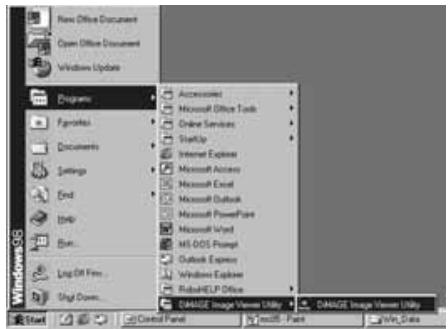

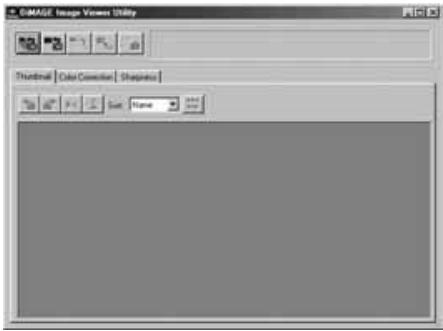
The main window of the utility (figure-left) appears.
For Macintosh:
- Turn on your Macintosh to start Mac OS.
- Open the folder where you installed the application software (the folder that you selected or created during the software installation), and open the "DiMAGE Image Viewer Utility" folder in the same way.
- Double-click the "DiIMAGE Image Viewer Utility" software application icon.
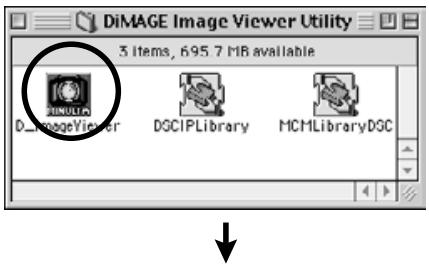
Double-click the "DiIMAGE Image Viewer Utility" software application icon (the icon circled in the left-hand figure).
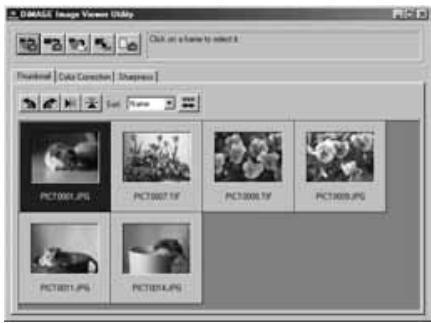
The main window of the utility appears.
This software reads all image files (or one file) in the selected folder, and displays their thumbnails (100 x 75 pixels) on the screen.
If image files are Minolta-RAW files (image files with the .mrw extension), they will be processed to the image format that can be displayed on the monitor, and their thumbnails (100 x 75 pixels) will be displayed.
Since the software also has color matching capability, you can select the output color space when image files are read so that you can control colors for the monitor or the color space that you use.
Note: Subsequent parts of this document assume the following three items:
① The computer and digital camera are connected by the USB cable.
② The computer recognizes the CF card in the digital camera as a "removable disk (or a removable media)".
③ Images in the "removable disk (or the removable media)" are (directly) handled by this software.
If you use Windows®98/98 Second Edition, you must install the driver software from the attached CD-ROM to execute the above operation. If you use Mac OS 8.6, you must first download the dedicated driver software from Apple Computer's Web site and then install it on your Macintosh. See the digital camera's instruction manual about how to install the software or download the software.
If you use Windows®95/NT4.0, you can not execute the above operation, however, the software also runs on Windows®95/NT4.0. So, you can still use this software to image files after copying those files in your selected folder from the CF card by using a CF card reader.
- Set the CF card to the digital camera according to the digital camera's instructions. Set the digital camera to the computer connection mode, and then connect it to your computer using the USB cable.
- Start the "DiIMAGE Image Viewer Utility" application software.
The main window of the utility appears.
To Display Thumbsails of All Images in the Folder:

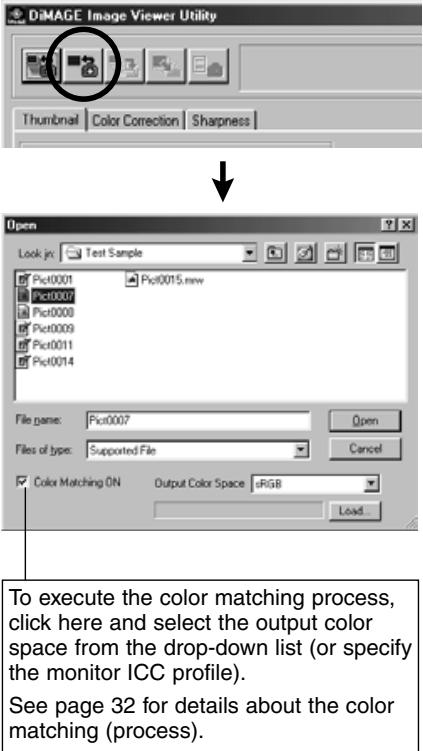
To execute the color matching process, click here and select the output color space from the drop-down list (or specify the monitor ICC profile).
See page 32 for details about the color matching (process).
3. Click the "Load All Images" button of the main window.
The OS (operating system) standard folder selection dialog box appears. (The left-hand figure is for Windows®.)
4. Select the folder where image files are stored, and then click "Select".
For Windows:
① Click the plus (+) sign located on the left of the disk icon described as Removable Disk.
② Click the plus (+) sign located on the left of the folder named Dcim.
③ Select the folder named 100mlt03 for DiIMAGE 7, 100mlt04 for DiIMAGE 5.
For Macintosh:
① Double-click the removable media icon described as Unknown.
② Double-click the folder icon named Dcim.
③ Select the folder named 100mlt03 for DiIMAGE 7, 100mlt04 for DiIMAGE 5, and then click "Choose" in the bottom of the dialog box.
5. Image files in the selected folder are read, and their thumbnails are displayed (figure-left).
-
If Minolta-RAW files (image files with the .mrw extension) exist in the selected folder, the “Open the Minolta-RAW File” window appears every time the software reads it in. Those files will be processed to the image format that can be displayed on the monitor, and their thumbnails will be displayed. See page 23 of this document for details.
-
Thumbs nails for animation files (files with the .avi extension) will not be displayed.
- See the DiIMAGE 7/DiIMAGE 5 instruction manual about "Minolta-RAW files".
If you selected a folder (folder where image files exist) on the computer hard disk rather than a folder in the CF card, only following kinds of image files can be read and displayed as thumbnails.
① Image files recorded by DiIMAGE 7/DiIMAGE 5 (excluding animations).
② Minolta-RAW files stored by this software.
③ JPEG and TIFF files stored by this software.
If JPEG or TIFF files are retouched and overwritten with image processing applications that do not support Exif files such as Adobe Photoshop, they can not be read or displayed in the DiIMAGE Image Viewer Utility (an error message "File not supported" appears).
To Display a,Thumbsail of a Certain Image in the Folder:
(continued from page 18, Operation 2)
3. Click the "Load an Image" button in the main window.
The OS (operating system) standard folder selection dialog box appears. (The left-hand figure is for Windows®.)
4. Select the image file that you wish to see, and click "Open".
In case of Windows®, follow “Removable Disk”, “Dcim folder” from the drop-down list of the “Look in:” selection box until the folder named “100mlt03” (for DiIMAGE 7) is displayed in the box (“100mlt04” for DiIMAGE 5).
In case of Macintosh, follow "untitled (removable media)", "Dcim (folder)" from the pop-up menu in the top of the dialog box until the folder named "100mlt03" (for DiIMAGE 7) is displayed in the box ("100mlt04" for DiIMAGE 5).
- If you selected a Minolta-RAW file (image file with the .mrw extension), the “Open the Minolta-RAW File” window appears when the software reads it in. The file will be processed to the image format that can be displayed on the monitor, and its thumbnail will be displayed. See page 23 of this document for details.
- Thumbs nails for animation files (files with the .avi extension) will not be displayed.
- See the DiIMAGE 7/DiIMAGE 5 instruction manual about "Minolta-RAW files".
If you selected an image file copied in a certain folder on the computer hard disk rather than a file in the CF card, only the following kinds of image files can be read and displayed as thumbnails.
① Image files recorded by DiIMAGE 7/DiIMAGE 5 (excluding animations).
② Minolta-RAW files stored by this software.
③ JPEG and TIFF files stored by this software.
If JPEG or TIFF files are retouched and overwritten with image processing applications that do not support Exif files such as Adobe Photoshop, they can not be read or displayed in the DiIMAGE Image Viewer Utility (an error message "File not supported" appears).
To Rotate, Flip and Sort Thumbs:
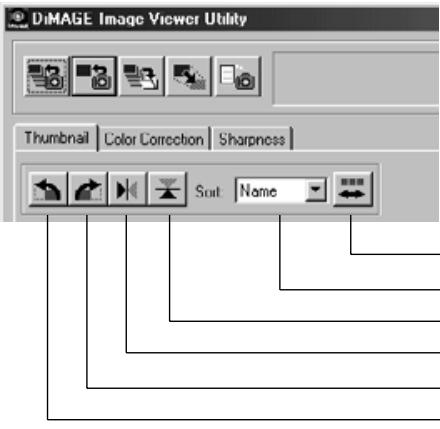
Sorting-Order Switch button
Sorting-Target Specification list box
Flip-Vertical button
Flip-Horizontal button
Rotate-Clockwise button
Rotate-Counterclockwise button
[Rotate] Select a thumbnail and click either the "Rotate-Counterclockwise" or the "Rotate-clockwise" button.
If you click the "Rotate-Counterclockwise" button once, the thumbnail will be rotated by 90 degrees counterclockwise. If you click the "Rotate-Clockwise" button once, the thumbnail will be rotated by 90 degrees clockwise.
[Flip] Select a thumbnail and click either the "Flip-Horizontal" or the "Flip-Vertical" button.
If you click the "Flip-Horizontal" button, the thumbnail will be flipped horizontally. If you click the "Flip-Vertical" button, the thumbnail will be flipped vertically.
[Sorting] Click the “Sorting-Target Specification” list box and select either “Name” or “Date”. The sorting order switches between “Ascending” and “Descending” every time you click the “Sorting-Order Switch” button.
To Change the Image Size:
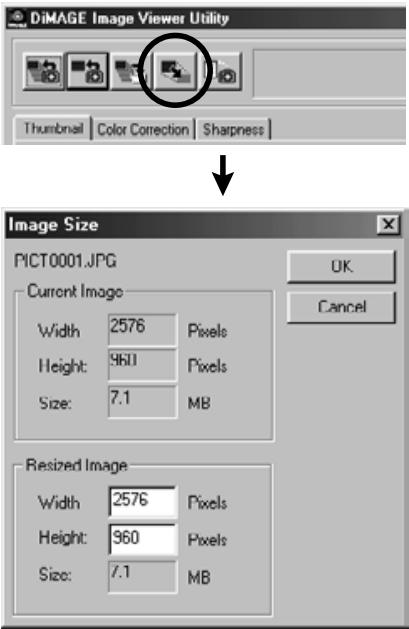
- Select the thumbnail that you wish to re-size, and then click the "Image Size" button in the main window.
The "Image Size" window appears.
- Type the width or the height value of the re-sized image in pixels.
If you change either the width or the height value, the other value will be changed automatically according to the width/height ratio of the current (before resizing) image.
When you re-size the image, you can only reduce the size. You can not enlarge the current image.
- Click "OK".
The image will be actually re-sized when you save it. (See page 36.)
To Display the Image (Recording) Information:
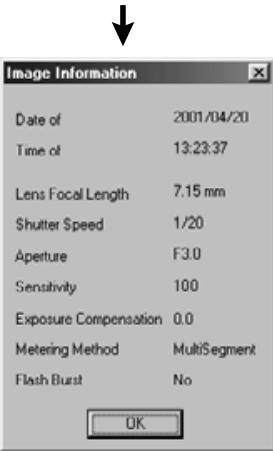
- Select the thumbnail for which you wish to see image information, and then click the "Image Information" button in the main window.
"Date of Recording", "Time of Recording" and various information during recording are displayed (figure-lower left).
Click "OK" to close the "Image Information" window.
To Delete Thumbs:
-
Select the (thumbnailed) image that you wish to delete in the thumbnail display area of the main window.
-
Press the "Delete" key on your keyboard.
The selected thumbnail will be deleted.
This only removes the selected thumbnail from the thumbnail display area of the main window, and does not have any influence on the actual image file. (The image file exists as it is.)
The color matching function of this software is to reproduce a subject's color on your monitor screen or on the specified color space.
If you wish to reproduce a subject for photography as close to original colors as possible, you should select the "Color Matching ON" option.
- If you selected the "Color Matching ON" option, the software will reproduce images as close to the subjects' original colors as possible. Images will be reproduced in different colors from those on the electronic viewfinder or on the LCD monitor during recording.
-
If you correct images using the digital camera's functions such as "Digital Effect Control" during recording, those corrections will be reflected in the images (excluding Minolta-RAW images (files)). Therefore, if you wish to capture images reproduced as close to the subjects' original colors as possible, do not use the correction function (of the digital camera) during recording.
-
Click the "Load All Images" or the "Load an Image" button, and then check the "Color Matching ON" option of the "Select Folder" window or the OS standard dialog box to open an image file.
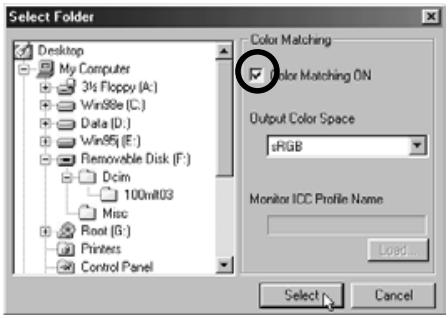

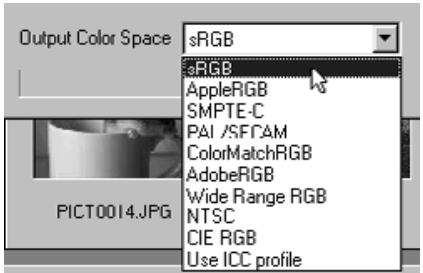
- Select the desired color space from the "Output Color Space" drop-down list.
If you wish to reproduce images on your monitor as close to the subjects' original colors as possible, select the "Use ICC profile" option from the "Output Color Space" drop-down list, and then set the ICC profile of your monitor properly.
- ICC profiles are the files that describe color monitors' color reproduction characteristics, and they are provided by the monitor manufacturers.
- See your color monitor's instruction manual about how to install the ICC profile.
- You can create color monitor ICC profiles by using one of the profile creation tools on the market. You can also create them by the OS attached "Monitor Adjustment Assistant" function for Macintosh or by "Adobe Gamma" included in Adobe PhotoShop (version 5.0 or later) for Windows®. You may be also able to download them from the Web site of the monitor manufacturers.
If you use Windows, follow the procedure below.
- Select the "Use ICC profile" option from the "Output Color Space" drop-down list.
2. Click "Load...".
The Windows standard file open dialog box appears.
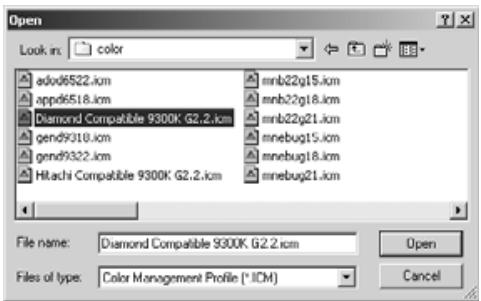
3. Select your color monitor's ICC profile, and then click "Open".
ICC profiles are normally stored in the following folders (if your system startup disk drive is C):
- Windows®95/98/98SE/Me
C:\Windows\System\Color
- Windows®NT4.0
C:\WINNT\system32\Color
- Windows®2000
C:\WINNT\system32\spool\drivers\color
If you use Macintosh, follow the procedure below.
1. Select the "Use ICC profile" option from the "Output Color Space" pop-up menu.
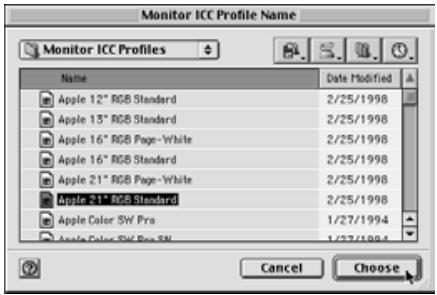
2. Click "Choose" of the folder selection dialog box or "Open" of the file selection dialog box.
The folder selection or the file selection dialog box is closed automatically, and the Mac OS standard file open dialog box (figure-left) appears.
3. Select your color monitor's ICC profile, and then click "Choose".
If you save images (photographs) displayed with the "Color Matching ON" function set to active, the ICC profile of the color space selected by the color matching function is embedded to those saved TIFF/JPEG files (as the tag information). If you open those image files by applications with color matching functions (e.g. Adobe Photoshop version 5.0 or later), embedded profile information is read and correct color information is transferred to applications. See application software manuals for details.
The following describes how to save thumbnailed images as image files in your desired location.
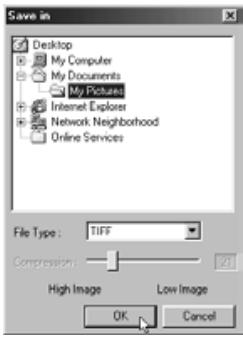
To Save an Image File:
1. Select the thumbnail that you wish to save.

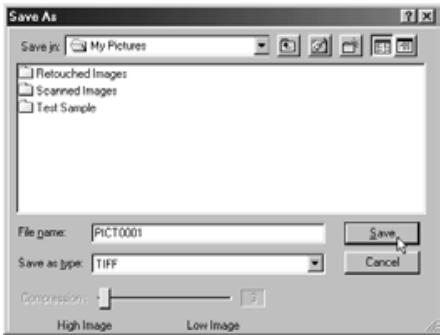
2. Click the "Save an Image" button in the main window.
The OS (operating system) standard file save dialog appears. (The figure in the lower left-hand is for Windows and that in the lower right-hand for Macintosh.)
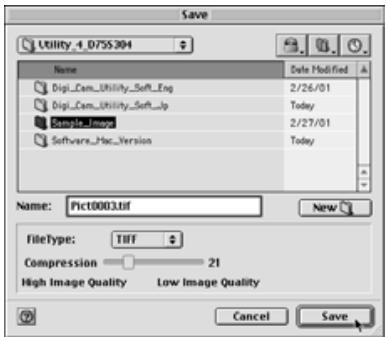
- Select the location to save the image file from the "Save in:" drop-down list (the pop-up menu on the top of the dialog for Macintosh), and then type the file name to save in the textbox next to "File name:" ("Name:" for Macintosh).
If you do not type the extension here, the corresponding extension to the type of image file that you will select in the following Operation 4. will be automatically added at the end of the filename (.tif for TIFF, or .jpg for JPEG). Therefore, in the case of Macintosh, type the filename not more than 27 characters; if you type the filename of more than 28 characters, the warning message will be displayed and you will not be able to save the image file due to the Mac OS restriction on the number of characters that you can use to a filename.
If you attach the extension not corresponding to the type of image file, the correct extension will be automatically added to it. For example, if you type "image_01.jpg" as the filename to save an image file in theTIFF format, the image file will be saved as "image_01.jpg.tif".
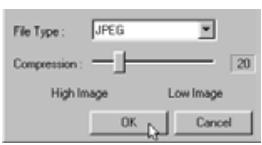
- Select the type of image file to save from the "Save as type:" drop-down list ("File Type:" pop-up menu for Macintosh).
Select either "TIFF" or "JPEG"
If you selected "JPEG", set the compression ratio within the range of 1 ("High Image") through 100 ("Low Image") by dragging the slide bar with the mouse.
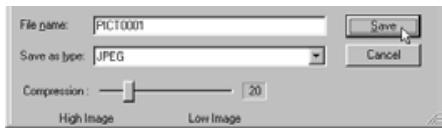
- Click "Save".
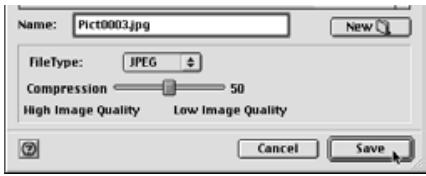
To Save Multiple Images at One Time:
1. Select the thumbnails that you wish to save.
If you wish to select more than 2 (thumbnail) images, click those (thumbnail) images while holding the "Ctrl" key ("Command" key for Macintosh).
If you wish to select more than 2 (thumbnail) images listed continuously, click the first and the last (thumbnail) images while holding the "Shift" key ("shift" key for Macintosh).
If you wish to cancel the selection, click the selected image again while holding the "Ctrl" key ("Command" key for Macintosh).
2. Click the "Save an Image" button in the main window.
The OS (operating system) standard (destination) folder selection dialog appears. (The figure in the lower left-hand is for Windows, and that in the lower right-hand for Macintosh.)
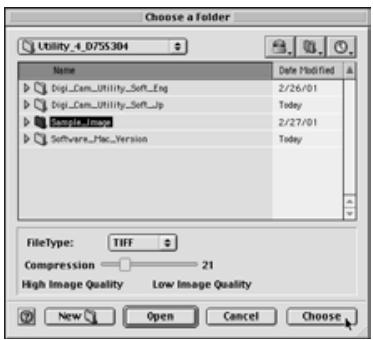
3. Select the destination folder to save images.
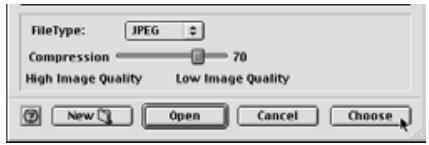
4. Select the type of image files to save from the "File Type:" drop-down list ("File Type:" pop-up menu for Macintosh).
Select either "TIFF" or "JPEG".
If you selected "JPEG", set the compression ratio within the range of 1 ("High Image") through 100 ("Low Image") by dragging the slide bar using a mouse.
All images selected at Operation 1 in the previous page will be saved as image files with the file type (and the compression ratio) specified in this window. You can not specify those to each image separately.
If you save multiple images at one time, those filenames will be original names (without original extensions) plus specified file type (.tif for "TIFF" and .jpg for "JPEG"). In the case of Macintosh files without extensions, those extensions will be added to the ends of the original names. Therefore, you can not save multiple files that have the same names excluding extensions at one time (because same filenames can not exist in one folder). The warning message "Selecting a few files with the same name" will be displayed.
5. Click "OK" (click "Choose" for Macintosh).
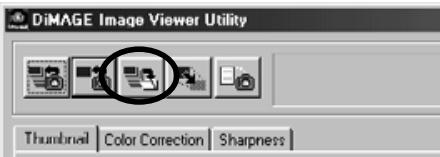
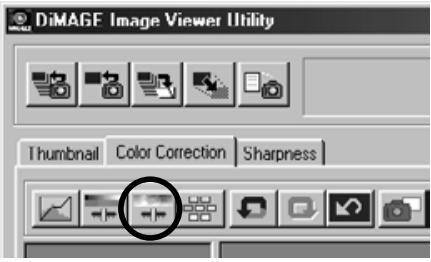
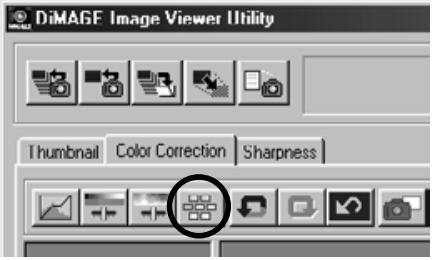
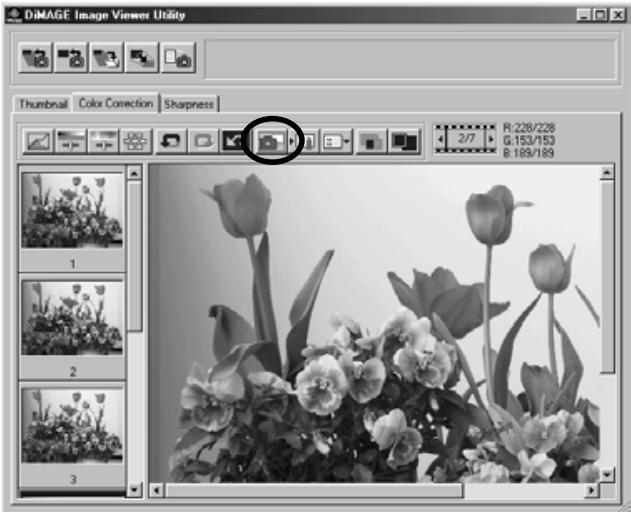
If you click the "Color Correction" tab, the following "Color Correction" window appears. You can add various corrections (retouches) using tone curves and histograms, or corrections of brightness, color balance, saturation, lightness and so on.
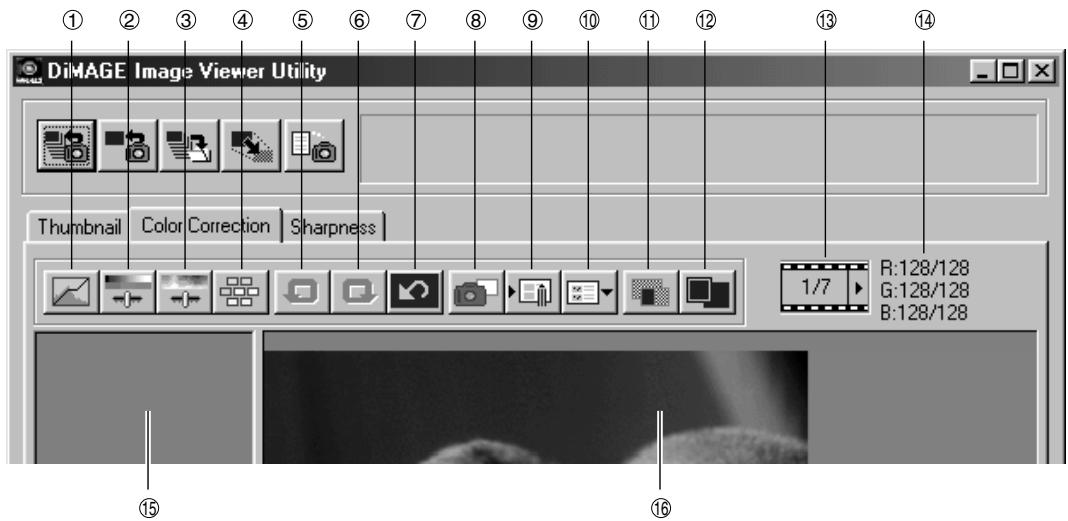
① Tone curves/histogram correction button
② Brightness, contrast and color balance correction button
③ Hue, saturation and lightness correction button
④ Variation correction button
⑤ Undo previous operation button
⑥ Redo canceled operation button
⑦ Reset all color corrections button
⑧ Snapshot button
Store a color correction job button
Select a color correction job button
Pre/post correction comparison button
Whole image button
⑬ Thumbnail number display
RGB value display
Snapshot display area
Corrected image display area
Corrections using the tone curves
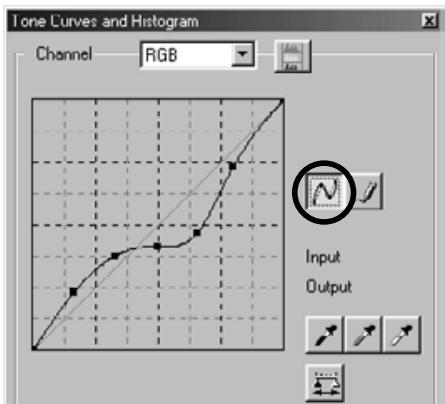
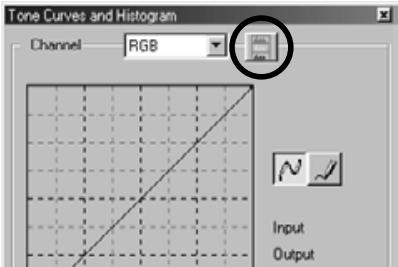
1. Click the "Tone Curves/History Correction" button.
The "Tone Curves and Histogram" window (figure-below) appears.
2. Select the desired tone curve channel to correct from the "Channel" dropdown list.
If you select the "RGB" channel, each color will be corrected based on the same ratio. If you select "R", "G" or "B", you can correct each color separately.
You can also select the channel from your keyboard (shortcut).
"Ctrl" ("Command" for Macintosh) key + 0 (zero)
→RGB
"Ctrl" ("Command" for Macintosh) key + 1 → R
"Ctrl" ("Command" for Macintosh) key + 2 → G
"Ctrl" ("Command" for Macintosh) key + 3 → B
3. Move the mouse cursor over the tone curve, and then drag it to the location where you wish to make corrections.
The tone curve correction result will be reflected in the preview image in the corrected image display area.
To Draw a Free Hand Tone Curve:
- Click the "Tone Curves/History Correction" button.
- Select the desired tone curve channel to correct from the "Channel" dropdown list.
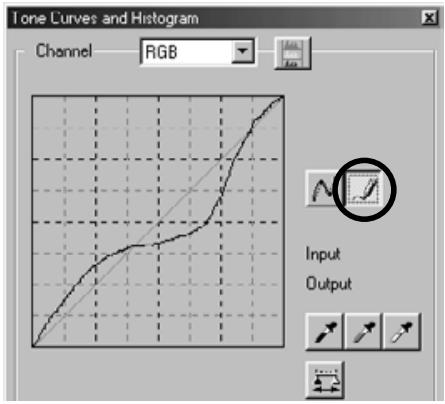
- Click the "Draw Tone Curves" button, and then move the mouse cursor over the tone curve.
The mouse cursor changes to a pen shape. - Drag the mouse to draw the tone curve.
The tone curve correction result will be reflected in the preview image in the corrected image display area.
If the drawn tone curve is discontinuous, click the "Smooth Tone Curves" button to smoothen it.
To Correct Images Using the "Black Point" Button:
You can correct images by specifying the shadow point (the point that you wish to reproduce in black) on the preview image in the corrected image display area.
- Double-click the "Black Point" button.
The "Point Value Setting" window (figure-left) appears.
Initial values of black point values are all set to zero for "R", "G" and "B" (deep-black).
-
Type values for the shadow point correction in the "Black Point Value" fields, and then click "OK".
-
Click the "Black Point" button.
The mouse cursor changes to a syringe shape.
- Click the shadow point (the point that you wish to reproduce in black) on the preview image in the corrected image display area.
The image is corrected so that the clicked point becomes a shadow point. The shadow point color will be the "Black Point Value" entered at Operation 2.
The correction result will be reflected in the preview image in the corrected image display area.
To Correct Images Using the "White Point" Button:
You can correct images by specifying the highlight point (the point that you wish to reproduce in white) on the preview image in the corrected image display area.
- Double-click the "White Point" button.
The "Point Value Setting" window (figure-left) appears.
Initial values of white point values are all set to 255 for "R", "G" and "B" (pure white).
-
Type values for the highlight point correction in "White Point Value" fields, and then click "OK".
-
Click the "White Point" button.
The mouse cursor changes to a syringe shape.
- Click the highlight point (the point that you wish to reproduce in white) on the preview image in the corrected image display area.
The image is corrected so that the clicked point becomes a highlight point. The highlight point color will be the "White Point Value" entered at Operation 2.
The correction result will be reflected in the preview image in the corrected image display area.
To Correct Images Using the "Gray Point" Button:
You can correct images by specifying the gray point (the point that you wish to reproduce in monochrome) on the preview image in the corrected image display area.

- Click the "Gray Point" button.
The mouse cursor changes to a syringe shape.
- Click the point that you wish to reproduce in monochrome (gray) on the preview image in the corrected image display area.
The image is corrected so that the clicked point keeps the brightness as it is and becomes monochrome (gray) with a well-proportioned color balance.
The correction result will be reflected in the preview image in the corrected image display area.
If you click and hold (keep pressing the mouse button) the "Apply" button, the histogram after correction performed by one of the point buttons appears.
When you release the mouse button, the histogram before the correction appears again.
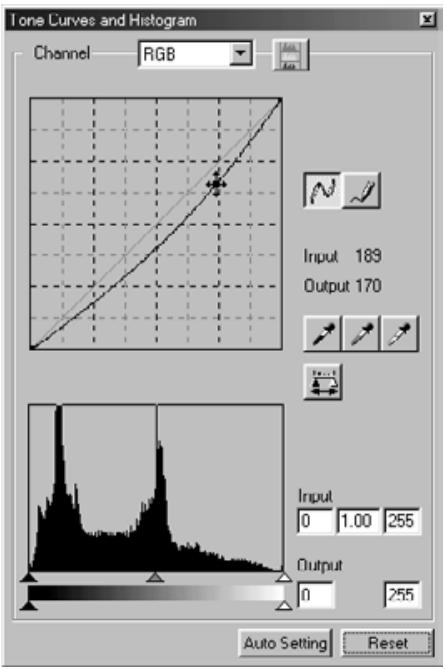
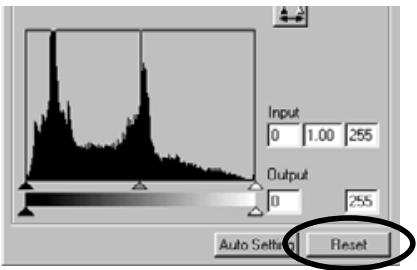
Histogram Correction - Auto Setting:
You can correct images by specifying the "Input Level" and the "Output Level" ranges in the "Histogram" palette in the corrected image display area, where the color level distribution of the preview image is displayed. The color level is divided into 256 levels from 0 through 255.
You can find the "Input Level Setting" slide bar under the "Histogram" palette, and the "Output Level Setting" slide bar under the "Input Level Setting" slide bar. The "Input Level Setting" slide bar has three kinds of controls (▲ or buttons); the "Upper Limit Setting" control (right), the "Gamma Setting" control (middle) and the "Lower Limit Setting" control (left). The "Output Level Setting" slide bar has two kinds of controls (▲ or buttons); the "Upper Limit Setting" control (right) and the "Lower Limit Setting" control (left). You can correct images by dragging each control with the mouse or typing an appropriate number in each box of the "Input" and the "Output" fields directly.
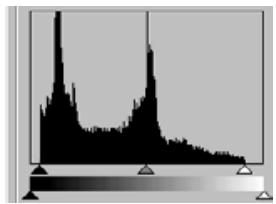
For example, if you take away the deep-black and the pure white parts where no picture elements exist by sliding the "Upper Level Setting" control a little to the left and the "Lower Level Setting" control a little to the right as the histogram figure in the left-hand shows, you will be able to create a rich-colored image making the best use of the color levels that the image primarily has.

Click "Auto Setting".
This will automatically take away the parts where no information (picture elements) exist from the histogram and correct the image to use every color level from 0 through 255.
The correction result will be reflected in the preview image in the corrected image display area.
Histogram Correction - To Correct RGB Channels Separately:
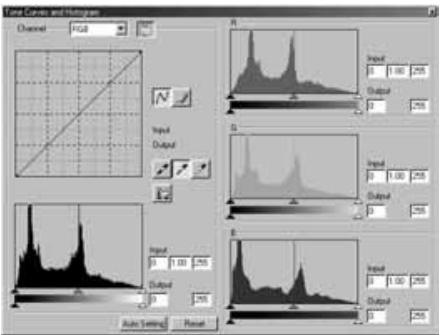
1. Click the "RGB Histograms" button.
The "Tone Curves and Histogram" window is expanded to the right and each histogram for "R", "G" and "B" (figure-lower left) appears.
You can close the histogram for each channel by click the "RGB Histograms" button again.
- Drag the "Upper Limit Setting" (△ in the right-hand) and the "Lower Limit Setting" (▲ in the left-hand) controls of the "Input Level" slide bar with the mouse for each channel, or type an appropriate number in each box of the "Input Level" and the "Output Level" fields directly.
The correction result will be reflected in the preview image in the corrected image display area.
You can cancel all kinds of correction performed in the "Tone Curves and Histogram" window by clicking "Reset". The preview image in the corrected image display area will return to the original status where no corrections are performed.
To Correct Brightness, Contrast and Color Balance:
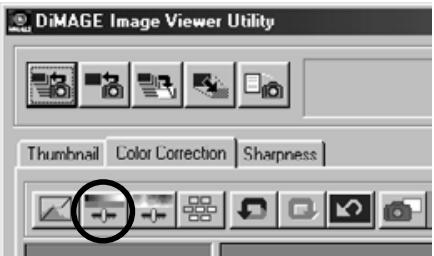
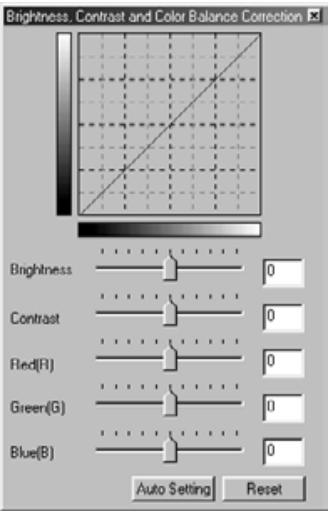
1. Click the "Brightness, Contrast and Color Balance Correction" button.
The "Brightness, Contrast and Color Balance Correction" window (figure-lower left) appears.
2. Drag the control of each slide bar with the mouse, or type an appropriate number in each box.
For each control, the farther you move the control to the right from the center (the larger a positive number you type in the box is), the larger the effect of the correction is.
On the contrary, the farther you move the control to the left from the center (the larger a negative number (absolute value) you type in the box is), the larger the effect of the opposite correction is. For example, the farther you move the control of "Brightness" to the left from the center, the darker the entire image becomes. Or the farther you move the "Green(G)" control to the left from the center, the less green element the image has, and the entire image becomes purplish.
You can enter a number from -100 through 100.
The correction result will be reflected in the preview image in the corrected image display area.
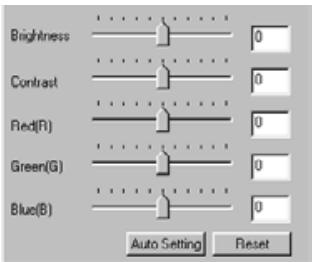
If you click "Auto Setting", "Brightness" and "Contrast" will be automatically adjusted based on the lightness information holding the RGB color balance.
You can cancel all kinds of correction performed in the "Brightness, Contrast and Color Balance Correction" window by clicking "Reset".
The preview image in the corrected image display area will return to the original status where no corrections are performed.
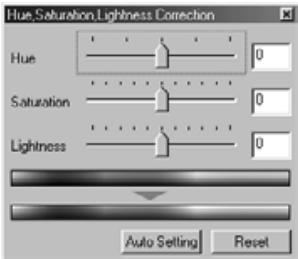
To Correct Hue, Saturation and Lightness:
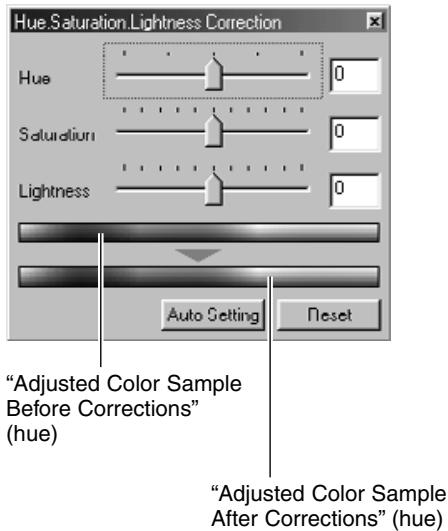
1. Click the "Hue, Saturation and Lightness Correction" button.
The "Hue, Saturation, Lightness Correction" window (figure-lower left) appears.
2. Drag the control of each slide bar with the mouse, or type an appropriate number in each box.
If you move the "Hue" control, the hue shown by the "Adjusted Color Sample Before Corrections" in red, blue and green changes to the status shown by the "Adjusted Color Sample After Corrections".
The farther you move the "Saturation" control to the right from the center (the larger a positive number you type in the box is), the more vivid the image becomes. The farther you move it to the left from the center (the larger a negative number (absolute value) you type in the box is), the less vivid the image becomes, and it raises the screen effect.
If you move the "Lightness" control, the lightness of the entire image is adjusted.
You can enter values from -180 through 180 for "Hue" and from -100 through 100 for "Saturation" and "Lightness".
The correction result will be reflected in the preview image in the corrected image display area.
If you click "Auto Setting", "Saturation" will be automatically corrected focusing on conspicuous parts of the image and holding "Hue" and "Lightness" as they are.
You can cancel all kinds of correction performed in the "Hue, Saturation, Lightness Correction" window by clicking "Reset".
The preview image in the corrected image display area will return to the original status where no corrections are performed.
Variation Correction:
You can perform corrections of "Color Balance", "Brightness & Contrast" and "Saturation" while checking the finishing (the image after corrections) on simulation images.
1. Click the "Variation Correction" button.
The "Variation" window (figure-lower left) appears.

2. Select the desired variation option from the drop-down list of the "Select Variations" combo box.
You can choose one out of three kinds; "Color Balance", "Brightness & Contrast" and "Saturation". A variety of images appear depending on the selected variation option (see page 53 through 55).
"Select Variations" combo box
Variation Correction - Color Balance:
If you selected the "Color Balance" variation option, showing the "Current" image in the center, six other simulation images are displayed for "Red (R)", "Magenta (M)", "Blue (B)", "Cyan (C)", "Green (G)" and "Yellow (Y)", where each simulation image has been corrected by one level up to the "Current" image. If you click one desired simulation image, newly simulated images are displayed by replacing the current image with the selected simulation image.
If you drag the control of the "Adjust Correction Level" slide bar with the mouse, you can change the degree of the correction by one level from the initial value (10) to another within the range of 1 through 20.
If you check the "Display Limit" checkbox, parts of simulation images that exceeded their display limits (0 or 255) will be reversed when you correct each color balance for "Red (R)", "Magenta (M)", "Blue (B)", "Cyan (C)", "Green (G)" and "Yellow (Y)".
You can cancel all kinds of correction performed in the "Color Balance" variation by clicking "Reset". The current image in the center and six simulation images will return to the status when this "Variation" window appeared for the first time.
Variation Correction - Brightness & Contrast:
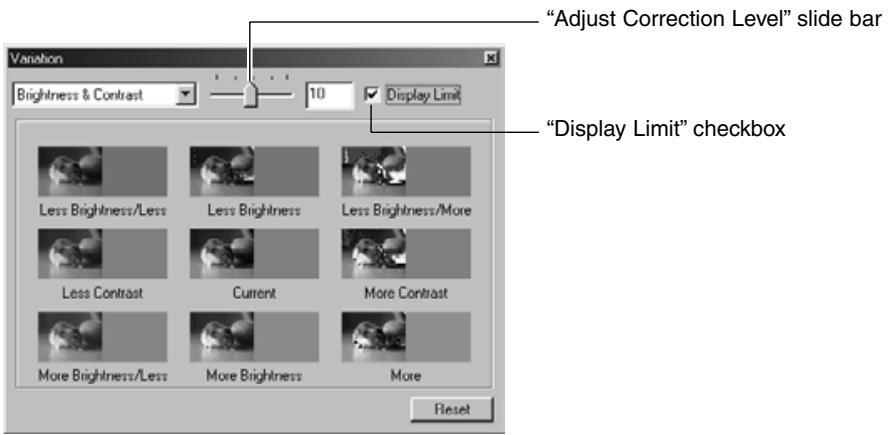
If you selected the "Brightness & Contrast" variation option, showing the "Current" image in the center, eight other simulation images are displayed, where each simulation image has been corrected by one level ("Less", "Current" and "More") for "Brightness" holding the same status in the horizontal direction and for "Contrast" in the vertical direction to the "Current" image.
If you click one desired simulation image, newly simulated images are displayed by replacing the current image with the selected simulation image.
If you drag the control of the "Adjust Correction Level" slide bar with the mouse, you can change the degree of the correction by one level from the initial value (10) to another within the range of 1 through 20.
If you check the "Display Limit" checkbox, parts of simulation images that exceeded their display limits (0 or 255) will be reversed when you correct "Brightness & Contrast".
You can cancel all kinds of correction performed in the "Brightness & Contrast" variation by clicking "Reset". The current image in the center and eight simulation images will return to the status when this "Variation" window appeared for the first time.
Variation Correction - Saturation:
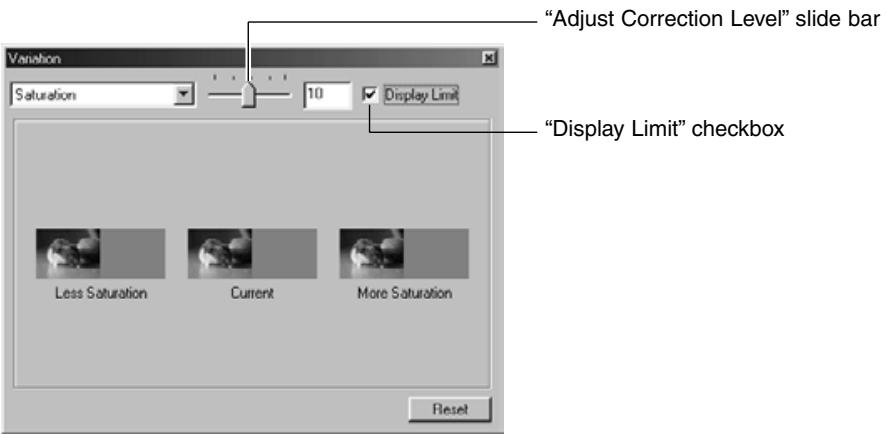
If you selected the "Saturation" variation option, showing the "Current" image in the center, two other simulation images are displayed in the horizontal direction, where each simulation image has been corrected by one level ("Less" and "More") to the "Current" image.
If you click one desired simulation image, newly simulated images are displayed by replacing the current image with the selected simulation image.
If you drag the control of the "Adjust Correction Level" slide bar with the mouse, you can change the degree of the correction by one level from the initial value (10) to another within the range of 1 through 20.
If you check the "Display Limit" checkbox, parts of simulation images that exceeded their display limits (0 or 255) will be reversed when you corrected "Saturation".
You can cancel all kinds of correction performed in the "Saturation" variation by clicking "Reset". The current image in the center and two simulation images will return to the status when this "Variation" window appeared for the first time.
To Undo the Correction:
Click the "Undo" button.
You can cancel the current image correction and return the image to the previous status. You can keep cancelling corrections you made by clicking the button repeatedly as far as your computer memory capacity allows.
To Redo the Canceled Correction:
Click the "Redo" button.
You can perform the canceled operation again.
To Undo All Color Corrections:
Click the "Reset All" button.
You can cancel all color corrections.
Snapshot:
You can save the preview image displayed in the corrected image display area temporarily in the snapshot display area. If you save the snapshot at each phase of correction, you can quickly preview the image under each correction status.
Click the "Snapshot" button.
The current preview image is temporarily saved and zoomed in the snapshot display area.
If you click one of the thumbnails in the snapshot display area, you can preview the image in the corrected image display area.
You can add images in the snapshot display area as far as your computer memory capacity allows.
If you wish to delete thumbnails in the snapshot display area, select the thumbnail to delete and then press the "Delete" key (press the "Command" and "D" keys simultaneously in the case of Macintosh).
If you quit the software, all images in the snapshot display area are deleted.
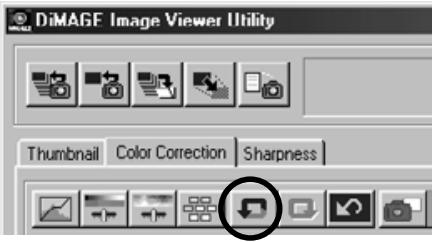
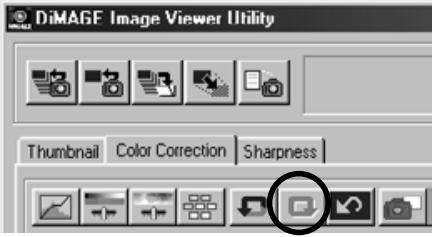
Color Correction Job:
You can register color correction contents in each correction window as the "Color Correction Job". If you have a fixed correction pattern (to some extent), you can easily perform the fixed color correction pattern by registering the series of correction contents as the color correction job and simply selecting the job.
-
Perform desired corrections to the preview image in the "Correction Image Display" area.
-
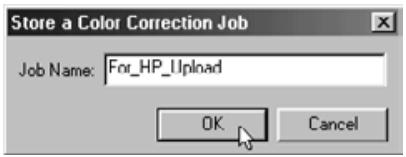
Click the "Store a Color Correction Job" button.
The "Store a Color Correction Job" window appears.
- Type the job name, and then click "OK".
The series of the correction contents performed at Operation 1 are registered as a color correction job.
To apply the registered color correction job to other images, perform the following operations:
- Display the image that you wish to apply the series of color corrections in the "Correction Image Display" area.
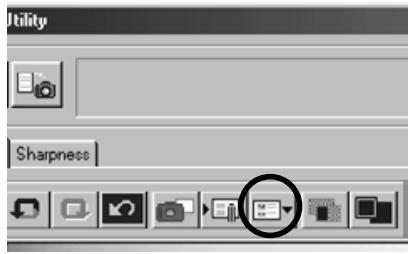
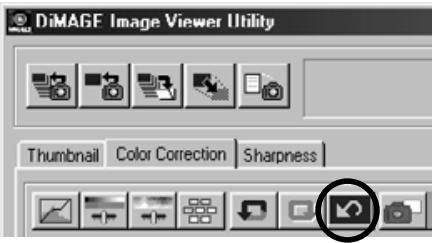
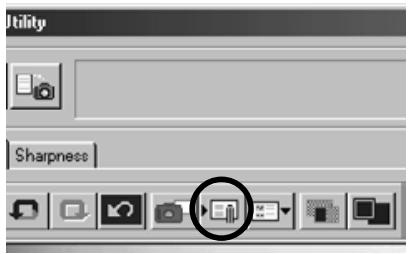
- Click the "Select a Color Correction Job" button.
The "Select a Color Correction Job" window appears.
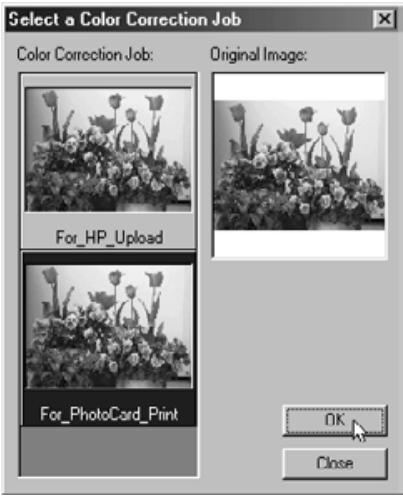
- Select the color correction job that you wish to apply, and then click "OK".
The series of registered correction contents are applied to the preview image currently displayed.
To Compare the Pre/Post Correction Images:
Click the "Pre/Post Correction Comparison" button.

You can check the correction result by comparison with the pre-correction image that appears in the left with the post-correction image in the right.
If you click the "Pre/Post Correction Comparison" button again, the pre-correction image disappears and only the post-correction image remains.
To Display the Whole Post-Correction Image:
Click the "Whole Image" button.
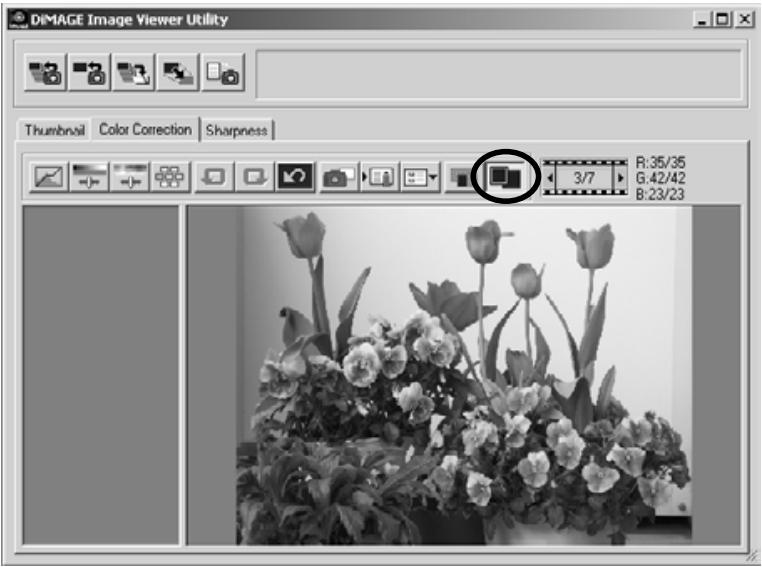
The whole post-correction image is expanded or shrunken according to the main window size, and displayed in the corrected image display area.
If you click the "Whole Image" button again, it returns to the original-sized image.
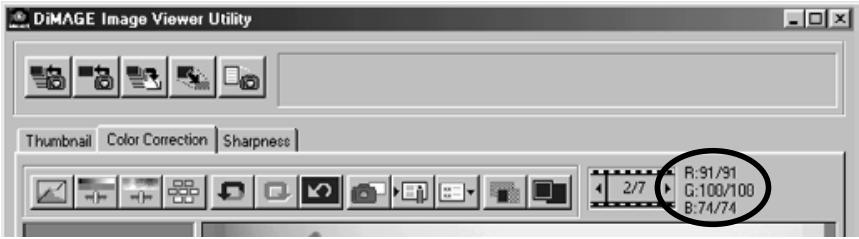
Thamburger Number Display:
If you selected the image folder (see page 19), the total number of images in the folder and the frame number of the image currently displayed.
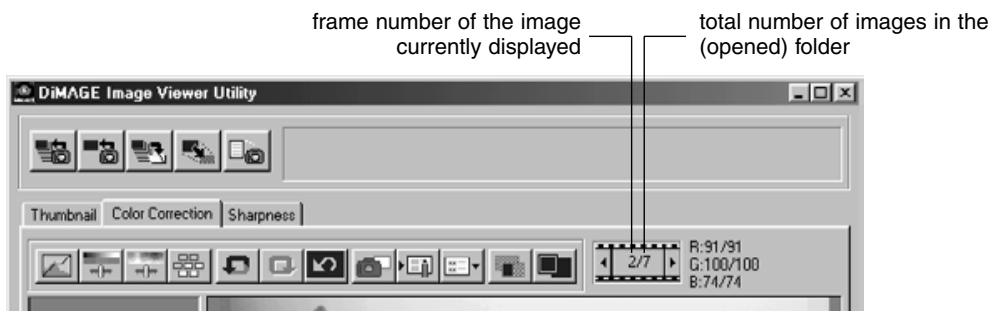
If you click “ ”, the previous frame is displayed.
If you click “▶”, the next frame is displayed.
RGB Value Display:
The RGB values are displayed for the current mouse pointer location on the preview image in the corrected image display area.
If you click the "Sharpness" tab, the following sharpness correction window appears. You can set the frequency to be emphasized or the degree to be emphasized while checking those effects on the preview image.
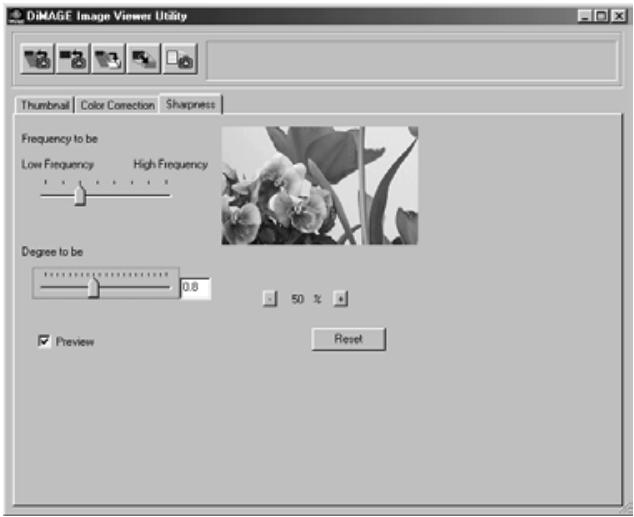
- Drag the "Frequency to be" slide bar control with the mouse to select the frequency that you wish to emphasize the sharpness.
You can not set the control between graduations.
- Drag the "Degree to be" slide bar control with the mouse to select the degree that you wish to emphasize the sharpness. Or type the value directly in the right-hand box.
You can not set the control between graduations (only in the case of Windows®).
You can set the value by "0.1" at a time within the range of 0.0 through 2.0.
The slide bar control is linked to the value in the box. If you change either one, the other value (location) is also changed correspondingly.
If you check the "Preview" checkbox, you can execute the real time reflection of the correction effect to the preview image in the sharpness correction window.
You can select display magnification out of six options; 100% , 66.7% , 50% , 33.3% , 25% and 16.7% . If you click the "+" button under the preview image, the display magnification of the preview image becomes larger. If you click the "-" button, it becomes smaller.
If you move the mouse pointer over the preview image, the mouse cursor changes to a hand shape. You can scroll the preview image to see the other part of the image by dragging it with the hand-shaped mouse cursor.
You can cancel all kinds of correction performed in the sharpness correction window by clicking "Reset". The "Degree to be" slide bar control is reset to the "0" location, and it is shown as 0 in the right-hand box.
-About Image Frequency (High-Frequency, Low-Frequency):
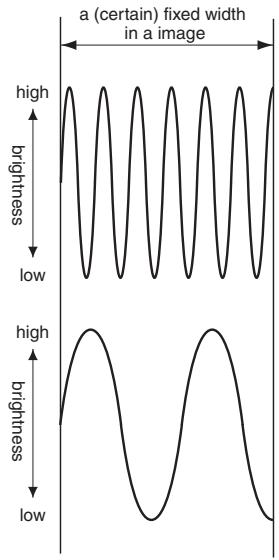
Within a (certain) fixed width in a image, when the brightness change is shown as the left-hand figure, the number of waves included within a (certain) fixed width is called "Frequency".
The part where peaks and troughs appear frequently creating fine pitches as the upper left-hand figure shows is called "High-Frequency", and, within the same width, the part where peaks and troughs appear less frequently creating coarse pitches as the lower left-hand figure shows is called "Low-Frequency".
Therefore, you can get the target effect by selecting the frequency contained the most in the part where you wish to emphasize with the "Frequency to be" slide bar control. It is recommended to work on your image while checking the preview image in the sharpness correction window because the frequency with which you can get the optimum effect depends on subjects for photography or image sizes.
QUITING THE SOFTWARE
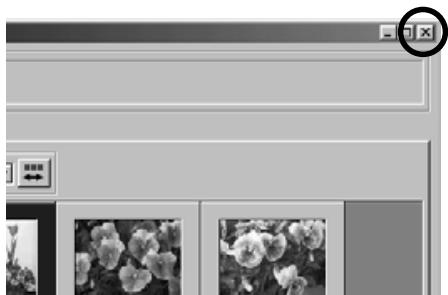
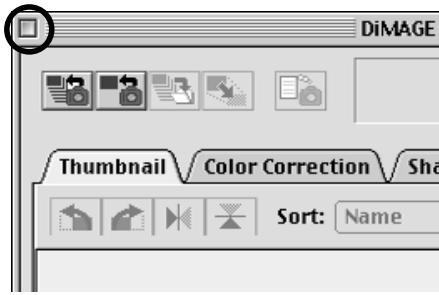
Click the "Close" box in the main window (the "X" button on the upper right-hand corner of the main window for Windows®, and the "□" button on the far left corner of the title bar for Macintosh).
The main window is closed and the software quits.
ArcSoft Photolmpression™ is an easy-to-use photo-editing program specifically designed for general consumers.
System Requirements:
For PC:
- Pentium-based PCs or equivalent
- Windows®95/98/Me/2000/NT
32MB RAM
125MB free hard disk space
16-bit (or higher) color display - CD-ROM drive
- Mouse
System Requirements:
For Macintosh:
- PowerPC
Mac OS 8.5 - 9.1
32MB RAM (64MB strongly recommended)
120MB free hard disk space
16-bit (or higher) color display - CD-ROM drive
- Mouse
Installing Photolmpression:
For PC:
- Insert the ArcSoft Photolmpression CD-ROM into your CD-ROM drive.
The software will start running automatically on your system. - Follow the instructions on the screen to complete the installation.
If the Auto-Play feature on your PC is turned off, you will have to install the software manually by taking the following steps:
- Insert the Photolmpression CD-ROM into your CD-ROM drive.
- Click Start > Run.
- In the Run dialog box, type in D:\Setup.exe (where "D" is your CD-ROM drive).
- Click OK.
- Follow the instructions on the screen to complete the installation.
Installing Photolmpression:
For Macintosh:
- Insert the ArcSoft Photolmpression CD-ROM into your CD-ROM drive. A CD-ROM icon appears on the screen.
- Double-click the CD-ROM icon to open it.
- Double-click on the folder of the language you want to install to open it.
- Double-click the "Photolmpression Installer" icon. The installation starts.
- Follow the instructions on the screen to finish the installation.
For more information about the ArcSoft Photolmpression, see the PDF manual in the MANUAL folder.
9224-2770-21 H-A107
- DiMAGE Version1.01 Image Viewer Utility
- COLOR CORRECTION 36
- SHARPNESS 60
- QUITING THE SOFTWARE 62
- ArcSoft PhotolmpressionTM 64
- TERMS USED IN THIS MANUAL
- For Windows®:
- Turn on your PC to start Windows®.
- Insert the attached "DiIMAGE Software CD-ROM" into the CD-ROM drive.
- Click the "Starting up the DiIMAGE Image Viewer Utility installer" button.
- Click "Next >".
- Click "Yes".
- To install the software in the default folder (C:\Program Files\DiIMAGE Image Viewer Utility), click "Next >".
- For Macintosh:
- Click "Next >>" in the Installer's initial window.
- Click "Yes".
- To Display Thumbsails of All Images in the Folder:
- Click the "Load All Images" button of the main window.
- Select the folder where image files are stored, and then click "Select".
- Image files in the selected folder are read, and their thumbnails are displayed (figure-left).
- To Display a,Thumbsail of a Certain Image in the Folder:
- (continued from page 18, Operation 2)
- Click the "Load an Image" button in the main window.
- Select the image file that you wish to see, and click "Open".
- To Rotate, Flip and Sort Thumbs:
- [Rotate] Select a thumbnail and click either the "Rotate-Counterclockwise" or the "Rotate-clockwise" button.
- [Flip] Select a thumbnail and click either the "Flip-Horizontal" or the "Flip-Vertical" button.
- [Sorting] Click the “Sorting-Target Specification” list box and select either “Name” or “Date”. The sorting order switches between “Ascending” and “Descending” every time you click the “Sorting-Order Switch” button.
- To Change the Image Size:
- To Display the Image (Recording) Information:
- To Delete Thumbs:
- Click "Load...".
- Select your color monitor's ICC profile, and then click "Open".
- Select the "Use ICC profile" option from the "Output Color Space" pop-up menu.
- Click "Choose" of the folder selection dialog box or "Open" of the file selection dialog box.
- Select your color monitor's ICC profile, and then click "Choose".
- To Save an Image File:
- Select the thumbnail that you wish to save.
- Click the "Save an Image" button in the main window.
- To Save Multiple Images at One Time:
- Select the thumbnails that you wish to save.
- Select the destination folder to save images.
- Select the type of image files to save from the "File Type:" drop-down list ("File Type:" pop-up menu for Macintosh).
- Click "OK" (click "Choose" for Macintosh).
- Corrections using the tone curves
- Click the "Tone Curves/History Correction" button.
- Select the desired tone curve channel to correct from the "Channel" dropdown list.
- Move the mouse cursor over the tone curve, and then drag it to the location where you wish to make corrections.
- To Draw a Free Hand Tone Curve:
- To Correct Images Using the "Black Point" Button:
- To Correct Images Using the "White Point" Button:
- To Correct Images Using the "Gray Point" Button:
- Histogram Correction - Auto Setting:
- Click "Auto Setting".
- Histogram Correction - To Correct RGB Channels Separately:
- Click the "RGB Histograms" button.
- To Correct Brightness, Contrast and Color Balance:
- Click the "Brightness, Contrast and Color Balance Correction" button.
- Drag the control of each slide bar with the mouse, or type an appropriate number in each box.
- To Correct Hue, Saturation and Lightness:
- Click the "Hue, Saturation and Lightness Correction" button.
- Variation Correction:
- Click the "Variation Correction" button.
- Select the desired variation option from the drop-down list of the "Select Variations" combo box.
- Variation Correction - Color Balance:
- Variation Correction - Brightness & Contrast:
- Variation Correction - Saturation:
- To Undo the Correction:
- Click the "Undo" button.
- To Redo the Canceled Correction:
- Click the "Redo" button.
- To Undo All Color Corrections:
- Click the "Reset All" button.
- Snapshot:
- Click the "Snapshot" button.
- Color Correction Job:
- To Compare the Pre/Post Correction Images:
- To Display the Whole Post-Correction Image:
- Thamburger Number Display:
- RGB Value Display:
- -About Image Frequency (High-Frequency, Low-Frequency):
- QUITING THE SOFTWARE
- System Requirements:
- Installing Photolmpression:
Brand : KONICA MINOLTA
Model : DIMAGE IMAGE VIEWER UTILITY FOR DIMAGE S304
Category : Image viewing software