
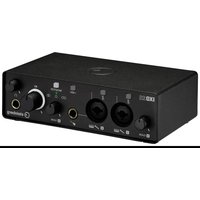
IXO12 - DJ Equipment STEINBERG - Free user manual and instructions
Find the device manual for free IXO12 STEINBERG in PDF.


| Product Type | DJ USB Audio Interface / Mixer |
| Model | IXO12 |
| Brand | Steinberg |
| Dimensions (W x D x H) | Approximately 480 x 250 x 80 mm |
| Weight | Approximately 2.5 kg |
| Power Supply | USB bus powered or optional DC 12V adapter |
| Number of Input Channels | 12 (2 mono, 5 stereo pairs) |
| Number of Output Channels | 4 (main stereo, booth, headphones) |
| Audio Resolution | 24-bit / 96 kHz |
| Connectivity | USB 2.0, RCA, 1/4" TRS, 3.5mm headphone |
| DJ Software Compatibility | Compatible with popular DJ software (Serato, Traktor, VirtualDJ) |
| Headphone Output | 1 x 3.5mm stereo jack with independent volume control |
| Phono Preamp | Built-in for turntable connection |
| MIC Input | 1 x XLR/TRS combo with gain control |
| Main Features | 12-channel mixing, EQ per channel, crossfader, effects send |
| Maintenance & Cleaning | Wipe with a soft, dry cloth. Avoid solvents. |
| Safety | Keep away from liquids and extreme temperatures. |
| Spare Parts & Repairability | Contact Steinberg support for genuine parts. Repairs by authorized service only. |
| General Information | Steinberg IXO12 is a versatile DJ interface suitable for home and club use. |
Frequently Asked Questions - IXO12 STEINBERG
User questions about IXO12 STEINBERG
0 question about this device. Answer the ones you know or ask your own.
Ask a new question about this device
Download the instructions for your DJ Equipment in PDF format for free! Find your manual IXO12 - STEINBERG and take your electronic device back in hand. On this page are published all the documents necessary for the use of your device. IXO12 by STEINBERG.
USER MANUAL IXO12 STEINBERG
Message from the Development Team......2
Before Using this Product....3
Manuals 3
Conventions in this Manual 3
Notice 3
Information....3
Panel Controls and Terminals......5
Front Panel 5
Rear Panel....7
Software....8
Yamaha Steinberg USB Driver....8
Using with a Computer....10
Connection Example 10
Computer Settings.... 11
Using a DAW to Produce Music 12
Live Streaming....14
Using with an iPhone/iPad 16
Connection Example 16
Using a DAW to Produce Music 17
Live Streaming....18
Troubleshooting....19
Block Diagrams 21
Software License and Copyrights......23
Technical Specifications ......24
General Specifications 26
Message from the Development Team
Thank you for choosing the IXO22/IXO12 (IXO series) USB Audio Interface.
Since the introduction of the MR816CSX and MR816X in 2008, the Steinberg audio interface lineup has steadily evolved through continuing software and firmware upgrades for the UR series and UR-C series. The IXO series goes beyond audio interfaces that were developed mainly for the needs of music production. These models provide strong support for music distribution as well, making them the ideal choice for your music activities online.
In terms of basic functions important for music production, the microphone preamp circuit and AD/DA conversion have been redesigned to widen the dynamic range and improve overall audio performance. To ensure an ideal recording environment, the headphone output level has been redesigned to take into account the use of a click track for synchronized performances and the monitoring environment for the live recording of a band.
Useful features for real-time streaming include a loopback function, which is necessary for streaming sound from a computer, as well as a switch to easily mute the sound from the input microphone.
The compact design will help to maintain an organized production environment. You can choose from two color variations, black and white.
These days, creators deliver their creations to the world themselves. They produce music with satisfactory sound quality and distribute it to the world. The IXO series is designed to meet your needs for a smooth and comfortable process from production to distribution.
The IXO series development team hopes to provide strong support for a lot of wonderful, unique music that will be shared with the world. We will continue to carefully nurture the IXO series so that we can support the wonderful activities of all creators.
The Steinberg Hardware Development Team
Before Using this Product
Manuals
There are two types of manuals included with the IXO22 and IXO12.
■ IXO22 IXO12 Getting Started
This manual describes precautions for safe use of the IXO22 and IXO12, and provides information on power supplies, product specifications, and product support. It is intended for use by all creators who use these products.
■ IXO22 IXO12 Operation Manual (this manual)
This manual describes the functions and how to use the IXO22 and IXO12. It is intended for use by those who have basic knowledge of music production and distribution.
Conventions in this Manual
■ Windows and Mac
If a procedure or explanation differs between Windows and Mac, or if a function is available only on one OS, the name of the OS is indicated. If no OS is indicated, the operation is the same for both operating systems. Images that are used in explanations are from the Windows version.
However, if a function is available only for the Mac version, images from the Mac version are used.
Cubase Series
In this manual, "Cubase Series" refers to all grades of Cubase (except Cubase LE). If an explanation refers to a specific grade, that grade is indicated. Images used in explanations are from the Cubase 12 series. If you are using another version of Cubase, it might differ from the images shown. Please refer to your Cubase manual for details.
Cubasis Series
Images used in explanations are from Cubasis 3. If you are using another version of Cubasis, it might differ from the images shown.
■ Procedures
"→" symbols are used in some procedures to keep explanations simple. For example, [Studio] → [Studio Setup] → [Yamaha Steinberg USB ASIO] → [Control Panel] indicates the following series of operations.
- Click the [Studio] menu.
- Select the [Studio Setup] option.
- Select [Yamaha Steinberg USB ASIO].
- Click [Control Panel].
■ Version Information
Versions are indicated as x.x.x and x.xx.
Notice
To avoid the possibility of malfunction/damage to the product, damage to data, or damage to other property, follow the notices below.
■ Handling and maintenance
- Do not expose the product to rain, use it near water or in damp or wet conditions, or place on it any containers (such as vases, bottles or glasses) containing liquids which might spill into any openings.
- Do not use the product in the vicinity of a TV, radio, or other electric products. Otherwise, the product, TV, or radio may generate noise.
- Do not expose the product to excessive dust or vibration, or extreme cold or heat, in order to prevent the possibility of panel disfiguration, unstable operation, or damage to the internal components.
- Do not install in locations where temperature changes are severe. Otherwise, condensation may form on the inside or the surface of the product, causing it to break.
- If there is reason to believe that condensation might have occurred, leave the product for several hours without turning on the power until the condensation has completely dried out, in order to prevent possible damage.
Information
■ About copyrights
- This manual is the exclusive copyrights of Yamaha Corporation.
- Copying of the software or reproduction of this manual in whole or in part by any means is expressly forbidden without the written consent of the manufacturer.
- The copyright of the “content” 1 installed in this product belongs to Steinberg Media Technologies GmbH, Yamaha Corporation, or its copyright holder. Except as permitted by copyright laws and other relevant laws, such as copying for personal use, it is prohibited to “reproduce or divert” 2 without the permission of the copyright holder. When using the content, consult with a copyright expert. If you create music or perform with the contents through the original use of the product, and then record and distribute them, the permission of Yamaha Corporation is not required regardless of whether the distribution method is paid or free of charge.
*1: The word "content" includes a computer program, audio data, Accompaniment Style data, MIDI data, waveform data, voice recording data, music score, and score data, etc.
*2: The phrase "reproduce or divert" includes taking out the content itself in this product, or recording and distributing it without changes in a similar manner.
■ Protection of copyright
- Do not use this product for any purpose that may infringe upon the rights of any third party including copyrights, as established by law in each country or region.
- Yamaha bears no responsibility for any infringement upon third party rights that may occur as a result of using this product.
About this manual
- The illustrations and screens shown in this manual are for instructional purposes only. Steinberg Media Technologies GmbH and Yamaha Corporation make no representations or warranties with regard to the use of the software and documentation and cannot be held responsible for the results of the use of this manual and the software.
- The company names and product names in this manual are the trademarks or registered trademarks of their respective companies. Steinberg and Cubase are registered trademarks of Steinberg Media Technologies GmbH. Windows is a registered trademark of Microsoft Corporation in the United States and other countries.
- Apple, Mac, iPad, iPhone, iPadOS, App Store, and Lightning are trademarks of Apple Inc. registered in the United States and other countries.
- IOS is a trademark or registered trademark of Cisco in the U.S. and other countries and is used under license.
- Software may be revised and updated without prior notice.
About disposal
This product contains recyclable components. When disposing of this product, please contact the appropriate local authorities.
Yamaha cannot be held responsible for damage caused by improper use or modifications to the product, or data that is lost or destroyed.
Panel Controls and Terminals
Front Panel


1 [INPUT 1 GAIN] knob
Adjusts the input signal level (GAIN) of the [MIC/LINE 1] connector.
2 [INPUT 1 MUTE] switch
Mutes the input signal of the [MIC/LINE 1] connector. The switch lights up when the input signal is muted.
③ [MIC/LINE 1] connector
For connection to a microphone or digital instrument. This connector can be connected to both XLR-type and phone-type (balanced/unbalanced) plugs.
NOTE
Phantom power is supplied when an XLR plug is connected to the [MIC/LINE 1] connector.
④ [INPUT 1 SIG/PEAK] indicator
Indicates the input signal level of the [MIC/LINE 1] connector.
Adjust the input signal level so that this indicator lights up green at normal volumes and flashes red briefly at the loudest input volume.
| Lamp Color Description |
| Red -3 dBFS or greater |
| Green From -20 dBFS to less than -3 dBFS |
| Off Less than -20 dBFS |
⑤ [INPUT 2 ♀(Mute)] switch
IXO22: Mutes the input signal of the [MIC/LINE 2] connector or the guitar [ ] connector.
IXO12: Mutes the input signal of the guitar [ ↗] connector.
The switch lights up when the input signal is muted.
⑥ [MIC/LINE 2] connector (IXO22 only)
For connection to a microphone or digital instrument. This connector can be connected to both XLR-type and phone-type (balanced/unbalanced) plugs.
NOTE
- Phantom power is supplied when an XLR plug is connected to the [MIC/LINE 2] connector.
- If a cable is connected to the guitar [ ] connector, the input signal to the [MIC/LINE 2] connector is canceled.
⑦ [INPUT 2 SIG/PEAK] indicator
IXO22: Indicates the input signal level of the [MIC/LINE 2] connector or the guitar [ ] connector.
IXO12: Indicates the input signal level of the guitar [√] connector.
Otherwise, this indicator operates the same as the ④ [INPUT 1 SIG/PEAK] indicator.
⑧ [+48V] switch
Turns the phantom power (+48V) on and off. When you turn this switch on, the phantom power will be supplied to the XLR plug connected to the [MIC/LINE 1, 2] connectors. Turn this switch on when using a phantom powered condenser microphone.
The switch lights up when phantom power is supplied.
NOTICE
When using phantom power, observe the following to prevent noise and possible damage to IXO22/IXO12 or connected equipment.
- Do not connect or disconnect any devices while the phantom power switch is turned to ON.
- Set the PHONES level knob and the OUTPUT level knob to the minimum before turning the phantom power switch to ON or OFF.
- When connecting devices not requiring phantom power to the [MIC/LINE 1, 2] connectors, make sure to turn the phantom power switch to OFF.
⑨ Guitar [] connector
Connect a high impedance instrument, such as an electric guitar or electric bass, to this connector. Use an unbalanced phone plug to connect an instrument to this connector.
NOTE
For IXO22, if a cable is connected to the guitar [ ] connector, the input signal to the [MIC/LINE 2] connector is canceled.
10 Loopback [Indicator
Lights up when the loopback function is on.
⑪ [MONITOR] switch
Turns the loopback and direct monitoring functions on and off. This switch lights up when direct monitoring is on. Each press of this switch toggles the loopback and direct monitoring functions between on and off.
For IXO22, it also switches between MONO/STEREO for direct monitoring. Press and hold the switch for more than 1 second to turn the loopback function on and off without changing the setting for direct monitoring.
HINT
What Is Loopback?
Loopback is a convenient function for broadcasting over the Internet. It mixes the input audio signals (such as microphone and guitar) with the audio signals playing back in the software in the computer into IXO22/IXO12, and sends them back to the computer. Refer to the block diagrams (page 21) for the specific signal path.
What Is Direct Monitoring?
This function outputs audio signals (such as microphone and guitar) to the [LINE OUT L/R] connectors or PHONES [Ω] connector without going through a computer or an app on an iOS/iPadOS device.
⑫ MONO [d], STEREO [ ] indicators (IXO22 only)
The MONO [Φindicator lights up if both INPUT 1 and 2 are output to the [LINE OUT L/R] connectors or both L and R channels of PHONES [Ω] connector.
The STEREO [∅] indicator lights up if INPUT 1 is output only to the L channel and INPUT 2 is output only to the R channel. To treat INPUT 1 and 2 as individual input channels, use the [MONITOR] switch to set them to MONO [∅]. To treat them as stereo inputs, set them to STEREO [∅].
13 [INPUT 2 GAIN] knob
IXO22: Adjusts the input signal level (GAIN) of the [MIC/LINE 2] connector or the guitar [√] connector.
IXO12: Adjusts the input signal level (GAIN) of the guitar [√] connector.
14 OUTPUT [+] level knob
Adjusts the output signal level of the [LINE OUT L/R] connectors.
For IXO12, the output signal level of the PHONES [Ω] connector is also changed at the same time.
15 Power indicator
Lights up when the power is turned on. The indicator flashes continuously if the power supply is insufficient.
16 PHONES [n] level knob (IXO22 only)
Adjusts the output signal level of the headphones.
17 PHONES [ ] connector
For connection to a set of stereo headphones.

① [LINE OUT L/R] connectors
For connection to external equipment or monitor speakers. These connectors can be connected to phone-type (balanced/unbalanced) plugs. To adjust the output signal level, use the OUTPUT [◀] level knob on the front panel.
② [USB 2.0] port
For connection to a computer or iOS/iPadOS device.
NOTICE
When connecting to a computer with a [USB 2.0] port, observe the following to prevent the computer from freezing or shutting down, as well as corruption or even loss of data.
- Before using a USB cable to connect the device to a computer, deactivate the power-saving (suspend/sleep/standby) mode of the computer.
- Before connecting/disconnecting a USB cable, quit all open software applications.
- Before connecting/disconnecting a USB cable from the [USB 2.0] port, set the speaker output knob to minimum.
- Wait at least 6 seconds between connecting/disconnecting a USB cable.
NOTE
- Apple accessories might be required when connecting IXO22/IXO12 with iOS/iPadOS devices.
- USB-C to Lightning cables that are supplied with an iPhone/iPad are not supported.
- An Apple Lightning-USB3 Camera Adapter is required to connect to an iPhone/iPad with a Lightning port.
③ [5V DC IN] port
For connecting a USB power adapter or USB mobile battery. Connect a USB Type-C plug to this port.
Use a power supply when connecting IXO22/IXO12 to a device that does not supply sufficient bus power, such as an iOS/iPadOS device. (IXO22/IXO12 does not include a USB power adapter or USB mobile battery.)
NOTICE
- Read the safety precautions for the USB power adapter or USB mobile battery that you use.
- Use a USB power adapter or USB mobile battery that accepts a USB Type-C plug and can supply power in compliance with the following standards. Output voltage: 5 V DC Output current: 500 mA or greater
Software
This section explains how to use the Yamaha Steinberg USB Driver with a computer.
Yamaha Steinberg USB Driver
Yamaha Steinberg USB Driver is a software program that allows communication between IXO22/IXO12 and a computer. In Control Panel, you can configure the basic settings for the audio driver (Windows) or confirm the audio driver information (Mac).
Windows
How to Open the Window
- From the start menu, select [Yamaha Steinberg USB Control Panel].
- From the Cubase series menu, select [Studio] → [Studio Setup] → [Yamaha Steinberg USB ASIO] → [Control Panel]
How to Select Windows
Click on the tabs at the top of the window to switch windows.
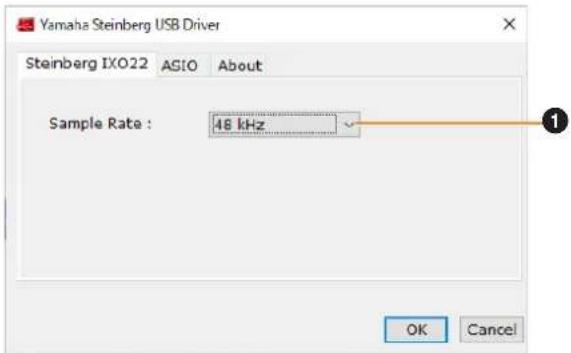
① Sample Rate
Lets you select the sample rate of the device.
Settings: 44.1 kHz, 48 kHz, 88.2 kHz, 96 kHz, 176.4 kHz, 192 kHz
ASIO Window
For selecting the ASIO driver settings.
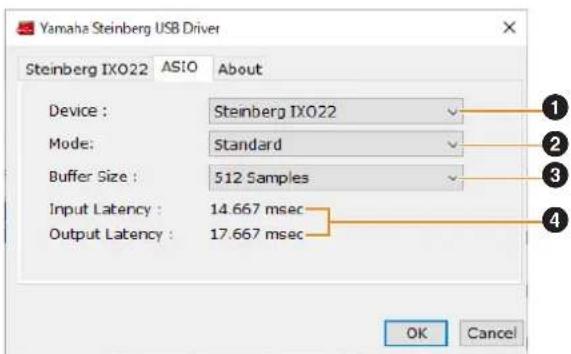
① Device
Lets you select the device for use with the ASIO driver. (This function is available when connecting two or more devices that are compatible with the Yamaha Steinberg USB Driver to the computer.)
② Mode
Lets you select the latency mode.
| Setting Description | |
| Low Latency Low latency mode. High-performance computer is required. | |
| Standard Standard latency mode. | |
| Stable High latency mode. This prioritizes stability for low-performance computer and high-load projects. | |
③ Buffer Size
Lets you select the buffer size for the ASIO driver. The range varies depending on the specified sample rate. The latency value depends on the buffer size. The lower the value of the buffer size, the lower the value of audio latency.
| Sample Rate Range | |
| 44.1 kHz/48 kHz 32 Samples-2048 Samples | |
| 88.2 kHz/96 kHz 64 Samples-4096 Samples | |
| 176.4 kHz/192 kHz | 128 Samples-8192 Samples |
④ Input Latency/Output Latency
Indicates the latency (delay time) for the audio input and output in millisecond units. The latency value depends on the buffer size. The lower the value of the buffer size, the lower the value of audio latency.
About Window
Indicates the version and copyright information of the audio driver.

Mac
How to Open the Window
- Select [Applications] → [Yamaha Steinberg USB Control Panel].
- From the Cubase series menu, select [Studio] → [Studio Setup] → [Steinberg IXO** DAW] → [Control Panel] → [Open Config App]. Either 22 or 12 is shown in place of **.
About Window
Indicates the version and copyright information of the audio driver.

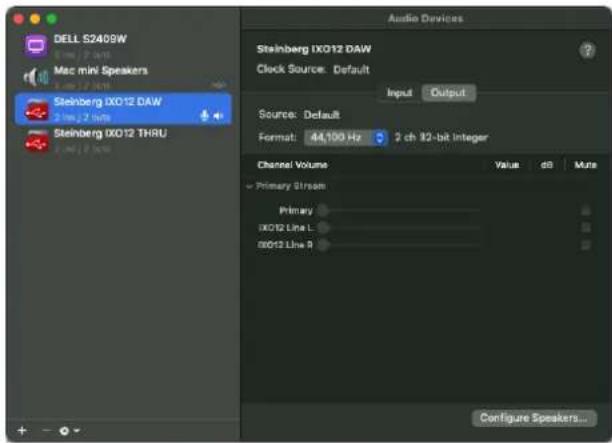
How to Select the Sample Rate
You can select the sample rate in the [Audio MIDI Setup] window. Select the sample rate from the [Applications] → [Utilities] → [Audio MIDI Setup] → [Format] menu.

How to Select the Buffer Size
You can select the buffer size in the settings window for each application (DAW software, etc.).
From the Cubase series menu, select [Studio] → [Studio Setup], then click [Control Panel] in [Steinberg IXO** DAW] in the menu on the left side of the window and select a buffer size in the "CoreAudio Device Settings" window. (Either 22 or 12 is shown in place of **.)
The method for opening the settings window is different for each application.


Using with a Computer
Connection Example
IXO22 IXO12

NOTE
- Use the supplied USB 2.0 cable (Type-C to Type-A) for connecting to a computer.
- If your computer does not have a USB A port, use a commercially available USB C to USB C cable.
- Do not use a USB hub. Make a direct connection.
- Refer to the IXO22 IXO12 Getting Started instructions for details on how to connect a commercially available USB power adapter or USB mobile battery.
NOTE
For IXO22, if a cable is connected to the guitar [ ] connector, the input signal to the [MIC/LINE 2] connector is canceled.
Computer Settings
First, download and install the "Yamaha Steinberg USB Driver" from the Steinberg website. This driver is required for your computer to recognize IXO22/IXO12.
https://o.steinberg.net/en/support/downloads/
NOTE
For the installation procedure, refer to the Installation Guide that is included in the compressed file you downloaded. The Release Notes included in the compressed file you downloaded contain information about supported operating systems.
Windows
- On the "Task Bar," open "Search."
The procedure for opening this window might vary depending on your computer configuration.
- In the "Search" window, enter "Sound Settings." When "Sound Settings" appears, select it.

The image shown above is from Windows 11.
For output, select [IXO22 (Steinberg IXO22)] or [IXO12 (Steinberg IXO12)].
For input, select [IXO22 (Steinberg IXO22)] or [IXO12 (Steinberg IXO12)].
NOTE
- Do not select [IXO22 THRU (Steinberg IXO22)] or [IXO12 THRU (Steinberg IXO12)] for the output. If you select either of these, no audio will be output from the device.
- Do not select [IXO22 THRU (Steinberg IXO22)] or [IXO12 THRU (Steinberg IXO12)] for the input. Use IXO** THRU for situations such as passing audio signals between computer applications.
Mac
- Select "Finder" → "Go" → "Applications" → "Utilities" → "Audio MIDI Setup."
- Select [Steinberg IXO22 DAW] or [Steinberg IXO12 DAW] from the list on the left side of the Audio Devices window.
If the Audio Devices window is not displayed, select "Window" → "Show Audio Devices" from the menu to display it.
- Click [v] in the lower left corner of the window and select "Use This Device For Sound Output."
- Similarly, select "Use This Device For Sound Input."
After steps 3 and 4 are completed, the microphone and speaker icons will appear in the lower right corner of [Steinberg IXO22 DAW] or [Steinberg IXO12 DAW] in the list.
NOTE
- Do not select [Steinberg IXO22 THRU] or [Steinberg IXO12 THRU] as the input or output device.
- Use IXO** THRU for situations such as passing audio signals between computer applications.
■ Configuring Audio Driver Settings on the DAW Software
Cubase Series Programs
This product includes a license for Cubase AI.
Cubase AI is DAW software for music production that allows you to record, play back, and edit audio on your computer. Refer to the following website to download and activate your license in advance.
https://www.steinberg.net/cubase/ai/
NOTE
A download access code is required to activate the license. Your code is printed on the included Steinberg License Redemption Card.
Search for the Cubase AI manual at the following URL.
https://steinberg.help/
- Make sure that all applications have been closed.
- Use the included USB cable to connect the device directly to the computer.
- Double-click the shortcut of Cubase series on the desktop to start Cubase.
- When the [Audio Driver Setup] window appears while the Cubase series program is launching, configure the setting as shown below.
Windows
Select [Yamaha Steinberg USB ASIO] and click [OK].
Mac
Select [Steinberg IXO22 DAW] or [Steinberg IXO12 DAW] and click [OK].
- When the [Steinberg Hub] window appears, select [Empty] under [More], and then click [Create].
- If the [Audio Driver Setup] window did not appear in step 4, select [Studio] → [Studio Setup] → [ASIO Driver] under [Audio System], and configure the setting as shown below.
Windows
Select [Yamaha Steinberg USB ASIO] and click [OK].
Mac
Select [Steinberg IXO22 DAW] or [Steinberg IXO12 DAW] and click [OK].
- Select [Studio] → [Audio Connections] → [Inputs], and configure Audio Devices as shown below.
Windows
Select [Yamaha Steinberg USB ASIO].
Mac
Select [Steinberg IXO22 DAW] or [Steinberg IXO12 DAW].
- Select [Studio] → [Audio Connections] → [Outputs], and configure the settings in the same way as step 7.
The audio driver settings are now complete.
For more information about the Cubase series, please read the Cubase series operation manual.
Programs Other Than Cubase Series
- Make sure that all applications have been closed.
- Use the included USB cable to connect the device directly to the computer.
- Launch the DAW software.
- Open the audio interface settings window.
- (Windows only) Select the ASIO Driver for the audio driver settings.
- Set the ASIO Driver for Windows and audio interface for Mac as shown below.
Windows
Select [Yamaha Steinberg USB ASIO] as the ASIO driver.
Mac
Select [Steinberg IXO22 DAW] or [Steinberg IXO12 DAW] as the audio interface.
The audio driver settings are now complete.
■ Recording/Playback
This section explains simple recording/playback operations for using a microphone. Connect a microphone to the [MIC/LINE 1] connector as shown in the connection example (page 10). Turn the [+48V] switch on when using a phantom powered condenser microphone.
The following explanation assumes that the device is set to the factory settings (loopback off, direct monitoring on (MONO)).
Cubase Series Programs
- Launch the Cubase series DAW and display the [Steinberg Hub] window.
- Select the template [Empty] in [More] in the [Steinberg Hub] window, then click [Create].
- In the Project window, click [Project] → [Add Track] → [Audio] to display [Add Track].
- Select [Audio Inputs], set [Configuration] to [Mono], enter a [Name], and set [Count] to [1], and then click [Add Track] to create a new audio track.

- Confirm that the [Record Enable] indicator is on and the [Monitor] indicator is off for the added audio track.

NOTE
To record while monitoring the sound through the Cubase series software without using direct monitoring on the device, turn [Monitor] on.
- While singing into the microphone, adjust the input signal level of the microphone with the [INPUT 1 GAIN] knob on the device.
- While singing into the microphone, adjust the output signal level of the headphones with the PHONES [Ω] level knob on the device (IXO22). For IXO12, adjust the output signal level with the OUTPUT [¶] level knob.
- Click [O] to start recording.

- When finished, click [☐] to stop recording.

- Turn [Monitor] off for the just recorded audio track.
- Click the ruler to move the project cursor to the desired point for starting playback.
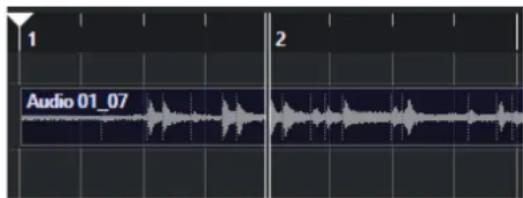
- Click [▷] to check the recorded sound. When listening to the sound over monitor speakers, adjust the output signal level by the OUTPUT [◀0] level knob on the device.

The recording and playback operations are now complete.
Programs Other Than Cubase Series
- Launch the DAW software.
- While singing into the microphone, adjust the input signal level of the microphone with the [INPUT 1 GAIN] knob on the device.
- While singing into the microphone, adjust the output signal level of the headphones with the PHONES [Ω] level knob on the device (IXO22). For IXO12, adjust the output signal level with the OUTPUT [Φ] level knob.
- Start recording on your DAW software.
- When finished, stop recording.
- Play back the newly recorded sound to check it.
For more detailed instructions on using the DAW software, refer to your particular DAW's software manual.
This section describes how to stream audio with a microphone connected to the device, such as when gaming on your computer or when chatting while playing a video/music source.
Connect a microphone to the [MIC/LINE 1] connector as shown in the connection example (page 10). Turn the [+48V] switch on when using a phantom powered condenser microphone.
- Use the [MONITOR] switch on the device to set loopback to ON and direct monitoring to ON (MONO).
HINT
Loopback is a convenient function for broadcasting over the Internet. It mixes the input audio signals (such as microphone and guitar) with the audio signals playing back in the software in the computer into IXO22/IXO12, and sends them back to the computer.
NOTE
When using the loopback function, turn off the monitoring function of the DAW software. If you use the loopback function while monitoring the input signal from the device via the DAW software, feedback will be generated. This occurs because an infinite loop of audio signals is created between the device and the DAW software.
- While singing into the microphone, adjust the input signal level of the microphone with the [INPUT 1 GAIN] knob on the device.
- While singing into the microphone, adjust the output signal level of the headphones with the PHONES [Ω] level knob on the device (IXO22). For IXO12, adjust the output signal level with the OUTPUT [Φ] level knob.
HINT
Adjust the playback level in your computer software to balance the volume with the microphone.
- Launch the streaming software.
- Open the audio interface settings window.
Windows
Select [IXO22 (Steinberg IXO22)] or [IXO12 (Steinberg IXO12)] as the audio interface.
Mac
Select [Steinberg IXO22 DAW] or [Steinberg IXO12 DAW] as the audio interface.
- Start streaming.
- If you leave your seat during a live stream, turn on the [½ (Mute)] switch to mute the microphone.
■ How to Stream Using OBS (Basic Use)
This section describes how to use streaming software, using OBS as an example. For information on how to download and install OBS, refer to the official OBS website.
Steps 1 through 3 are the same as described in the previous procedure.
- Launch OBS.
- From "File," open the "Settings" window.
- Select "Audio" in the navigation menu on the left.
- Set "Desktop Audio" under "Global Audio Devices" to "Default" or "Disabled."
- Similarly, set "Mic/Auxiliary Audio" under "Global Audio Devices" as shown below.
Windows
Select [IXO22 (Steinberg IXO22)] or [IXO12 (Steinberg IXO12)].
Mac
Select [Steinberg IXO22 DAW] or [Steinberg IXO12 DAW].
- Select "Stream" in the navigation menu on the left.
- Select a streaming service. If necessary, enter the streaming key provided by the service.
- Close the "Settings" window.
- Start streaming.
■ How to Stream Using OBS (Advanced Use)
IXO22 and IXO12 have a USB THRU function that, in combination with the Yamaha Steinberg USB Driver installed on your computer, uses the audio output signal from the computer as a separate audio input signal. This section describes how to use that function when streaming to balance the microphone volume and the audio signal from the software with the audio mixer in OBS.
- Use the [MONITOR] switch on the device to set loopback to OFF and direct monitoring to ON.
- While singing into the microphone, adjust the input signal level of the microphone with the [INPUT 1 GAIN] knob on the device.
- While singing into the microphone, adjust the output signal level of the headphones with the PHONES [Ω] level knob on the device (IXO22). For IXO12, adjust the output signal level with the OUTPUT [Φ] level knob.
- Launch OBS.
- From "File," open the "Settings" window.
- Select "Audio" in the navigation menu on the left.
- Set "Desktop Audio" under "Global Audio Devices" to "Default" or "Disabled."
- Similarly, set "Mic/Auxiliary Audio" under "Global Audio Devices" as shown below.
Windows
Select [IXO22 (Steinberg IXO22)] or [IXO12 (Steinberg IXO12)].
Mac
Select [Steinberg IXO22 DAW] or [Steinberg IXO12 DAW].
- Similarly, set "Mic/Auxiliary Audio 2" under "Global Audio Devices" as shown below.
Windows
Select [IXO22 THRU (Steinberg IXO22)] or [IXO12 THRU (Steinberg IXO12)].
Mac
Select [Steinberg IXO22 THRU] or [Steinberg IXO12 THRU].
- Select "Stream" in the navigation menu on the left.
- Select a streaming service. If necessary, enter the streaming key provided by the service.
- Close the "Settings" window.
- Click the Properties (settings) icon in the lower left corner of the Audio Mixer window to open the "Advanced Audio Properties" window.
- Select the Mono check box for the microphone. If this check box is not selected, microphone audio is broadcast only on the left channel. (Do not select the Mono check box for Mic/Aux 2.)
- Close the "Advanced Audio Properties" window.
- Use the sliders on the Audio Mixer window to adjust the volume balance.
- Start streaming.
Using with an iPhone/iPad
Connection Example
IXO22 IXO12

NOTE
- To connect to an iPhone/iPad with a Lightning port, use the supplied USB 2.0 cable (Type-C to Type-A) and an Apple Lightning-USB3 Camera Adapter. USB-C to Lightning cables that are supplied with an iPhone/iPad are not supported. When using an iPhone/iPad with a Lightning port, be sure to use a commercially available USB power adapter or USB mobile battery to supply power to the [5V DC IN] port.
- Use a commercially available USB C to USB C cable to connect directly to an iPad with a USB Type-C port. Since time is limited by the battery level of the iPad, it is recommended to use a commercially available USB power adapter or USB mobile battery to supply power to the [5V DC IN] port. Another connection option is to use the supplied USB 2.0 cable (Type-C to Type-A) and an Apple USB-C Digital AV Multiport Adapter. In that case, be sure to use a commercially available USB power adapter or USB mobile battery to supply power to the [5V DC IN] port.
- Refer to the IXO22 IXO12 Getting Started instructions for details on how to connect a commercially available USB power adapter or USB mobile battery.
NOTE
For IXO22, if a cable is connected to the guitar [ ] connector, the input signal to the [MIC/LINE 2] connector is canceled.
Once connected, the device is automatically recognized by the iPad/iPhone.
It is not necessary to configure any settings on the iPad/iPhone.
Cubasis Series Programs
Cubasis LE is bundled with this product.
You can use Cubasis LE in combination with this product to record and edit audio. Cubasis LE is a lite version of the Cubasis mobile DAW. Like Cubasis, this music production app allows you to record, play back, and edit audio from your iPad/iPhone.
Search for "Cubasis LE" in the App Store to download it. When you connect an iPad/iPhone with Cubasis LE installed to this device, the functionality restrictions will be unlocked.
For more information on Cubasis LE, please visit the Steinberg website.
https://www.steinberg.net/cubasis/le/
■ Recording/Playback
This section explains simple recording/playback operations for using a microphone. Connect a microphone to the [MIC/LINE 1] connector as shown in the connection example (page 16). Turn the [+48V] switch on when using a phantom powered condenser microphone.
The following explanation assumes that the device is set to the factory settings (loopback off, direct monitoring on (MONO)).
The procedure for using Cubasis LE 3 to record and play back audio is described below.
- Launch Cubasis LE 3.
- Tap [NEW] on the left side of the window.

- Enter a project name, and tap [CREATE].

- Tap [+ ADD] on the left side of the window, and then tap [AUDIO] to add an audio track.

One MIDI track and one audio track have already been created. You can tap [− DELETE] to delete them if necessary.
- Tap [] on the tab on the far left side of the window to display the Track inspector.
![graph TD A["Track 1"] --> B["1"] B --> C["Routing"] C --> D["Insert Effects"] style A fill:#f9f,stroke:#333 style B fill:#ccf,stroke:#333 style C fill:#cfc,stroke:#333 style D fill:#fcc,stroke:#333](/content/2026/06/1395863/images/2becdbb6f91c6912343c402ca56f8f953c069c071914db0747266bafcdeb6ce7.jpg)
- Tap [] to display the Details window, and then tap the number for the input connector to which the instrument or microphone is connected.

- Confirm that monitoring is off.

To record while monitoring the sound through Cubasis LE 3 without using direct monitoring on the device, turn monitoring on.
- While singing into the microphone, adjust the input signal level of the microphone with the [INPUT 1 GAIN] knob on the device.
- While singing into the microphone, adjust the output signal level of the headphones with the PHONES [Ω] level knob on the device (IXO22). For IXO12, adjust the output signal level with the OUTPUT [Φ] level knob.
- Tap [O] to start recording.

- When finished, tap [▷] to stop recording.

- Tap and drag the ruler to move the project cursor to the desired point for starting playback.

You can also tap [ ] to return to the position where you started recording.
- Tap [▷] to check the recorded sound.
Live Streaming
This section describes how to stream audio with a microphone connected to the device, such as when gaming on your iPhone/iPad or when chatting while playing a video/music source. Connect a microphone to the [MIC/LINE 1] connector as shown in the connection example (page 16). Turn the [+48V] switch on when using a phantom powered condenser microphone.
- Use the [MONITOR] switch on the device to set loopback to ON and direct monitoring to ON (MONO).
HINT
Loopback is a convenient function for broadcasting over the Internet. It mixes the input audio signals (such as microphone and guitar) with the audio signals playing back in the software on your iPhone/iPad into IXO22/IXO12, and sends them back to the computer.
NOTE
When using the loopback function, turn off the monitoring function of the DAW software. If you use the loopback function while monitoring the input signal from the device via the DAW software, feedback will be generated. This occurs because an infinite loop of audio signals is created between the device and the DAW software.
- While singing into the microphone, adjust the input signal level of the microphone with the [INPUT 1 GAIN] knob on the device.
- While singing into the microphone, adjust the output signal level of the headphones with the PHONES [Ω] level knob on the device (IXO22). For IXO12, adjust the output signal level with the OUTPUT [Φ] level knob.
- Launch the streaming app and start streaming.
- If you leave your seat during a live stream, turn on the [½ (Mute)] switch to mute the microphone.
Troubleshooting
| The power indicator is off The power indicator does not light when power is not supplied to the device.When operating on bus power, make sure that the computer connected to the [USB 2.0] port is turned on.When connecting an iPhone/iPad with a Lightning port or using an Apple USB-C Digital AV Multiport Adapter to connect an iPad with a USB Type-C port, be sure to supply power to the [5V DC IN] port from a commercially available USB power adapter or USB mobile battery. | |
| The power indicator flashes continuously | The indicator flashes continuously if the power supply is insufficient. If you are running the device on bus power, make sure that the computer to which it is connected is not malfunctioning. If you are supplying power to the [5V DC IN] port, use a USB power adapter or USB mobile battery that can supply power in compliance with the specifications.Output voltage: 5 V DCOutput current: 500 mA or greater |
| Indicators are dark (even when used in a dark location) | This is not a malfunction.Some computers might continue to supply power via the USB port even in shutdown/sleep mode. When connected to such a computer and operating on bus power, the indicators on the device will light up dimly if USB communication is interrupted while the computer is in shutdown/sleep mode. |
| No sound Are the microphone, digital instrument, and guitar settings configured correctly?Make sure that the equipment is not switched off and that the volume is not turned down. | |
| Unusual sound(Noise, interruption, distortion, or feedback) | Is the Yamaha Steinberg USB Driver installed?If you are using a computer, install the Yamaha Steinberg USB Driver. |
| Is the buffer size set too small?Refer to “Yamaha Steinberg USB Driver (Windows)” (page 8) or “How to Select the Buffer Size (Mac)” (page 9) to check the buffer size. | |
| Does your computer satisfy the requirements for the operating environment?Check the operating environment. For the latest information, please visit the Steinberg website.https://www.steinberg.net/ | |
| Are you playing back a lot of audio tracks in your DAW software?Depending on the performance of your computer, the sound might become choppy when playing back many audio tracks. Reduce the number of audio tracks and check the sound again. | |
| Is there a wired or wireless LAN or other network adapter operating nearby?Try turning off the network adapter. Network adapters can be a source of noise. | |
| Is the loopback configured correctly?If you are not using the loopback function, use the [MONITOR] switch on the front panel to turn it off. When the loopback function is turned on, audio track monitoring should be turned off. Otherwise, an infinite loop of audio signals will be created between the device and the DAW software. | |
| Is a microphone connected with a phone plug?Microphones should be connected with XLR plugs. Connecting a microphone with a phone plug will not provide sufficient volume. | |
| Sounds are overlapping | When direct monitoring is turned on, the direct sound and the sound output from the DAW will overlap if [Monitor] is also turned on for the audio tracks in the DAW. Be sure to turn off one of these monitoring options. |
Block Diagrams
IXO22![graph TD subgraph Inputs INPUT1["INPUT 1"] --> A1["+40V"] A1 --> B1["H1"] B1 --> C1["A1C"] C1 --> D1["SIG/PEAK M2-1-R"] D1 --> E1["MUTE"] E1 --> F1["MONITOR"] F1 --> G1["OUTPUT LEVEL"] G1 --> H1["DAC"] H1 --> I1["THA"] I1 --> J1["PHONES"] J1 --> K1["PHONES LINE"] K1 --> L1["THA"] L1 --> M1["THA"] M1…](/content/2026/06/1395863/images/0a3054c10c076bf83e718d2df6700ede9b351776302fce905cafc7360107f7d4.jpg)
IXO12![graph TD A["INPUT 1"] --> B["+48V"] B --> C["MODI 3"] C --> D["MODI 4 LDOPEACK"] D --> E["OUTPUT"] E --> F["DAC"] F --> G["PROCES LEVEL"] G --> H["HPA"] H --> I["PROCES"] J["INPUT 2"] --> K["MODI 2"] K --> L["MODI 3"] L --> M["MODI 4 LDOPEACK"] M --> N["OUTPUT"] O["USB 20"] --> P["ENCOCER"] P --> Q[…](/content/2026/06/1395863/images/ede810767e51ae50a0ecccb5c039aa1396ae6fc593c0192c236a81d744961a30.jpg)
Software License and Copyrights
The MIT License (MIT)
Permission is hereby granted, free of charge, to any person obtaining a copy of this software and associated documentation files (the "Software"), to deal in the Software without restriction, including without limitation the rights to use, copy, modify, merge, publish, distribute, sublicense, and/or sell copies of the Software, and to permit persons to whom the Software is furnished to do so, subject to the following conditions:
The above copyright notice and this permission notice shall be included in all copies or substantial portions of the Software.
THE SOFTWARE IS PROVIDED "AS IS", WITHOUT WARRANTY OF ANY KIND, EXPRESS OR IMPLIED, INCLUDING BUT NOT LIMITED TO THE WARRANTIES OF MERCHANTABILITY, FITNESS FOR A PARTICULAR PURPOSE AND NONINFRINGEMENT. IN NO EVENT SHALL THE AUTHORS OR COPYRIGHT HOLDERS BE LIABLE FOR ANY CLAIM, DAMAGES OR OTHER LIABILITY, WHETHER IN AN ACTION OF CONTRACT, TORT OR OTHERWISE, ARISING FROM, OUT OF OR IN CONNECTION WITH THE SOFTWARE OR THE USE OR OTHER DEALINGS IN THE SOFTWARE.
FreeRTOS Kernel V10.4.3
Copyright (C) 2020 Amazon.com, Inc. or its affiliates. All Rights Reserved.
https://www.FreeRTOS.org
https://github.com/FreeRTOS
Technical Specifications
0 dBu is referenced to 0.775 Vrms and 0 dBV is referenced to 1.0 Vrms.
IXO22
| MIC INPUT 1/2 (Balanced) | |
| Frequency Response +0.0/-0.3 dB, 20 Hz - 20 kHz | |
| Dynamic Range 106 dB, A-Weighted | |
| THD+N 0.004%, 1 kHz, 20 kHz LPF | |
| Maximum Input Level +6 dBu | |
| Input Impedance 3 kΩ | |
| Gain Range +6 dB - +60 dB | |
| Equivalent Input Noise -128 dBu, Rs: 150 Ω, Gain = Max., A-Weighted | |
| LINE INPUT 1/2 (Balanced) | |
| Maximum Input Level +24 dBu | |
| Input Impedance 12 kΩ | |
| Gain Range -12 dB - +42 dB | |
| HI-Z INPUT (INPUT2 Unbalanced) | |
| Maximum Input Level +9.8 dBV | |
| Input Impedance 1 MΩ | |
| Gain Range 0 dB - +54 dB | |
| LINE OUTPUT (Impedance Balanced) | |
| Frequency Response +0.0/-0.3 dB, 20 Hz - 20 kHz | |
| Dynamic Range 107 dB, A-Weighted | |
| THD+N 0.004%, 1 kHz, 20 kHz LPF | |
| Maximum Output Level +12 dBu | |
| Output Impedance 150 Ω | |
| PHONES | |
| Maximum Output Level 40 mW + 40 mW, 40 Ω | |
| USB | |
| Specification | USB 2.0, 24-bit, 44.1 kHz/48 kHz/88.2 kHz/96 kHz/176.4 kHz/192 kHz |
| XLR INPUT | |
| Polarity | 1: Ground 2: Hot (+)3: Cold (-) 2: Hot (+)3: Cold (-) |
IXO12
MIC INPUT 1 (Balanced)
Frequency Response +0.0/-0.3 dB, 20 Hz - 20 kHz
Dynamic Range 106 dB, A-Weighted
THD+N 0.004%, 1 kHz, 20 kHz LPF
Maximum Input Level +6 dBu
Input Impedance 3 kΩ
Gain Range +6 dB - +60 dB
Equivalent Input Noise -128 dBu, Rs: 150 Ω, Gain = Max., A-Weighted
LINE INPUT 1 (Balanced)
Maximum Input Level +24 dBu
Input Impedance 12 kΩ
Gain Range -12 dB - +42 dB
HI-Z INPUT (INPUT2 Unbalanced)
Maximum Input Level +9.8 dBV
Input Impedance 1 MΩ
Gain Range 0 dB - +39.5 dB
LINE OUTPUT (Impedance Balanced)
Frequency Response +0.0/-0.3 dB, 20 Hz - 20 kHz
Dynamic Range 107 dB, A-Weighted
THD+N 0.004%, 1 kHz, 20 kHz LPF
Maximum Output Level +12 dBu
Output Impedance 150 Ω
PHONES
Maximum Output Level 40 mW + 40 mW, 40 Ω
USB
Specification USB 2.0, 24-bit, 44.1 kHz/48 kHz/88.2 kHz/96 kHz/176.4 kHz/192 kHz
XLR INPUT
Polarity
1: Ground
2: Hot (+)
3: Cold (−)
General Specifications
| Power Requirements 2.5 W (5 V DC, 0.5 A) | |
| Dimensions 158 (W) × 47 (H) × 102 (D) mm | |
| Net Weight 450 g | |
| Operating Free-air Temperature Range 0 – 40°C | |
| Included Accessories • IXO22 IXO12 Getting Started (booklet)• Steinberg License Redemption Card• USB 2.0 Cable (Type-C to Type-A, 1.5 m) | |
* The contents of this manual apply to the latest specifications as of the publishing date. To obtain the latest manual, access the Steinberg website then download the manual file.
Steinberg Website https://www.steinberg.net/
© 2024 Yamaha Corporation
Published 01/2024
MW-A0
- MESSAGE FROM THE DEVELOPMENT TEAM
- BEFORE USING THIS PRODUCT
- MANUALS
- IXO22 IXO12 GETTING STARTED
- IXO22 IXO12 OPERATION MANUAL (THIS MANUAL)
- CONVENTIONS IN THIS MANUAL
- WINDOWS AND MAC
- CUBASE SERIES
- CUBASIS SERIES
- PROCEDURES
- VERSION INFORMATION
- NOTICE
- HANDLING AND MAINTENANCE
- INFORMATION
- ABOUT COPYRIGHTS
- PROTECTION OF COPYRIGHT
- ABOUT THIS MANUAL
- ABOUT DISPOSAL
- PANEL CONTROLS AND TERMINALS
- FRONT PANEL
- [INPUT 1 GAIN] KNOB
- [INPUT 1 MUTE] SWITCH
- ③ [MIC/LINE 1] CONNECTOR
- NOTE
- ④ [INPUT 1 SIG/PEAK] INDICATOR
- ⑤ [INPUT 2 ♀(MUTE)] SWITCH
- ⑥ [MIC/LINE 2] CONNECTOR (IXO22 ONLY)
- ⑦ [INPUT 2 SIG/PEAK] INDICATOR
- ⑧ [+48V] SWITCH
- ⑨ GUITAR [] CONNECTOR
- LOOPBACK [INDICATOR
- ⑪ [MONITOR] SWITCH
- HINT
- WHAT IS LOOPBACK
- WHAT IS DIRECT MONITORING
- ⑫ MONO [D], STEREO [ ] INDICATORS (IXO22 ONLY)
- [INPUT 2 GAIN] KNOB
- OUTPUT [+] LEVEL KNOB
- POWER INDICATOR
- PHONES [N] LEVEL KNOB (IXO22 ONLY)
- PHONES [ ] CONNECTOR
- ① [LINE OUT L/R] CONNECTORS
- ② [USB 2.0] PORT
- ③ [5V DC IN] PORT
- SOFTWARE
- YAMAHA STEINBERG USB DRIVER
- WINDOWS
- HOW TO OPEN THE WINDOW
- HOW TO SELECT WINDOWS
- ① SAMPLE RATE
- ASIO WINDOW
- ① DEVICE
- ② MODE
- ③ BUFFER SIZE
- ④ INPUT LATENCY/OUTPUT LATENCY
- ABOUT WINDOW
- MAC
- HOW TO SELECT THE SAMPLE RATE
- HOW TO SELECT THE BUFFER SIZE
- USING WITH A COMPUTER
- CONNECTION EXAMPLE
- COMPUTER SETTINGS
- CONFIGURING AUDIO DRIVER SETTINGS ON THE DAW SOFTWARE
- CUBASE SERIES PROGRAMS
- PROGRAMS OTHER THAN CUBASE SERIES
- RECORDING/PLAYBACK
- HOW TO STREAM USING OBS (BASIC USE)
- HOW TO STREAM USING OBS (ADVANCED USE)
- USING WITH AN IPHONE/IPAD
- CUBASIS SERIES PROGRAMS
- LIVE STREAMING
- BLOCK DIAGRAMS
- SOFTWARE LICENSE AND COPYRIGHTS
- THE MIT LICENSE (MIT)
- TECHNICAL SPECIFICATIONS
- IXO
- GENERAL SPECIFICATIONS
Brand : STEINBERG
Model : IXO12
Category : DJ Equipment