
FW-55BZ40L - Monitor SONY - Free user manual and instructions
Find the device manual for free FW-55BZ40L SONY in PDF.


 FR
FR
 AR
AR
 BG
BG
 CS
CS
 DA
DA
 DE
DE
 EL
EL
 EN
EN
 ES
ES
 ET
ET
 FI
FI
 HE
HE
 HR
HR
 HU
HU
 IT
IT
 LT
LT
 LV
LV
 NL
NL
 NO
NO
 PL
PL
 PT
PT
 RO
RO
 RU
RU
 SK
SK
 SL
SL
 SV
SV
 TH
TH
 TR
TR
 UK
UK
 VI
VI
 ZH
ZH
User questions about FW-55BZ40L SONY
0 question about this device. Answer the ones you know or ask your own.
Ask a new question about this device
Download the instructions for your Monitor in PDF format for free! Find your manual FW-55BZ40L - SONY and take your electronic device back in hand. On this page are published all the documents necessary for the use of your device. FW-55BZ40L by SONY.
USER MANUAL FW-55BZ40L SONY
Connection Diagram .....4
Using LCD Monitor as Part of
Audio System....7
Remote Control and LCD Monitor....7
Settings....9
Pro mode....9
Control functions ..... 11
RS-232C 11
IP 12
Installing the LCD Monitor to
the Wall....14
Troubleshooting....15
Specifications 15
About Manuals
This LCD Monitor comes with the following manuals. Please retain the manuals for future reference.
Setup Guide
• LCD Monitor installation and setup.

Reference Guide (this manual) / Safety Information

- Safety information, remote control, troubleshooting, wall-mount installation, specification, etc.
Help
Find more troubleshooting and other useful information directly from your LCD Monitor. Press HELP on the remote control to display a list of topics.

Setting menus are subject to change without notice.
IMPORTANT - Read the End User Software Licence Agreement before using your Sony product. Using your product indicates your acceptance of the End User Software Licence Agreement. The software licence agreement between you and Sony is available online at Sony website (https://www.sony.net/tv-software-licenses/) or on your product screen. Go to [Settings] → [System] → [About] → [Legal information] → [Notices and licences].
Note
- Before operating the LCD Monitor, please read the "Safety Information".
- Read the supplied safety documentation for additional safety information.
- Instructions about "Installing the LCD Monitor to the Wall" are included within this LCD Monitor's instruction manual.
- Images and illustrations used in the Setup Guide and this manual are for reference only and may differ from the actual product.
Location of the identification label
Labels for the LCD Monitor Model No. and Power Supply rating are located on the rear of the LCD Monitor.
Safety Information
Installation/Set-up
Install and use the LCD Monitor in accordance with the instructions below in order to avoid any risk of fire, electric shock or damage and/or injuries.
Installation
- The LCD Monitor should be installed near an easily accessible AC power outlet (mains socket).
- Place the LCD Monitor on a stable, level surface to prevent it from falling over and causing personal injury or property damage.
• Install the LCD Monitor where it cannot be pulled, pushed, or knocked over. - Install the LCD Monitor so that the LCD Monitor's Table-Top Stand does not protrude out from the LCD Monitor stand (not supplied). If the Table-Top Stand protrudes out from the LCD Monitor stand, it may cause LCD Monitor set to topple over, fall down, and cause personal injury or damage to the LCD Monitor.

Transporting
- Before transporting the LCD Monitor, disconnect all cables.
- Two or more persons (three or more persons for 214.8 cm (85 inches), four or more persons for 247.7 cm (98 inches) and above LCD Monitor) are needed to transport a large LCD Monitor.
- When transporting the LCD Monitor by hand, hold it as shown below. Do not put stress on the LCD panel and the frame around the screen.
- When lifting or moving the LCD Monitor, hold it firmly from the bottom.
FW-98BZ53L / 98BZ50L / 98BZ30L

FW-85BZ40L / 85BZ30L


FW-75BZ40L / 75BZ35L / 75BZ30L / 65BZ40L / 65BZ35L / 65BZ30L / 55BZ40L / 55BZ35L / 55BZ30L / 50BZ30L / 43BZ30L

- When transporting the LCD Monitor, do not subject it to jolts or excessive vibration.
- When transporting the LCD Monitor for repairs or when moving, pack it using the original carton and packing material.
- When handling or mounting the LCD Monitor set, do not lay down the LCD Monitor (for applicable LCD Monitor model only).
Topple prevention
(Models with supplied support belt kit)
Refer to the Setup Guide on top of the cushion.
The supplied wood screw is only for affixing to a solid object made of wood.
(Except models with supplied support belt kit)
FW-98BZ53L / 98BZ50L / 98BZ30L

FW-85BZ40L / 85BZ30L / 75BZ40L / 75BZ35L / 75BZ30L / 65BZ40L / 65BZ35L / 65BZ30L / 55BZ40L / 55BZ35L / 55BZ30L / 50BZ30L / 43BZ30L

Connection Diagram
Note
- Terminals and labels may vary depending on region/country/LCD Monitor model.
FW-98BZ53L / 98BZ50L / 98BZ30L
![graph TD A["USB storage media etc."] --> B["1"] C["Audio System with Optical Audio Input"] --> D["2"] E["Headphone"] --> F["3"] G["VCR/Video game equipment/DVD player/Camcorder"] --> H["4"] I["HDMI Device/PC"] --> J["5"] K["HDMI Device/PC"] --> L["6"] M["Audio System with eARC/ARC/HDMI Device"] -->…](/content/2026/06/1391506/images/11db2994bb9d1808c85af01b295623c14032710b58164d9a4102353516b19b35.jpg)
FW-85BZ40L / 85BZ30L / 75BZ40L / 75BZ35L / 75BZ30L / 65BZ40L / 65BZ35L / 65BZ30L / 55BZ40L / 55BZ35L / 55BZ30L / 50BZ30L / 43BZ30L
![graph TD A["USB storage media etc."] --> B["USB"] B --> C["5V 500 mA MAX"] B --> D["900 mA MAX"] E["Audio System with Optical Audio Input"] --> F["(OPTICAL)"] G["Headphone"] --> H["AV IN"] H --> I["VIDEO/AUDIO L-R"] J["VCR/Video game equipment/DVD player/Camcorder"] --> K["3"] K --> L["HDMI IN"] L -…](/content/2026/06/1391506/images/3e54225f936fa11923883ce37b1d180f395d75c0433c90682cc4de5ccd2e85fe.jpg)
1


USB
2
- Connecting a large USB device may interfere with other connected devices beside it.
2 Ⓞ (Headphone)
• Supports 3-pole stereo mini jack only.
- You cannot output sound from both the headphone and the LCD Monitor speakers at the same time.
3 - A V I N
- For a composite connection, use an Analogue Extension Cable (not supplied).

4 HDMI IN 1/2/3/4
- HDMI interface can transfer the digital video and audio on a single cable.
- If the device has a DVI jack, connect it to HDMI IN 4 through a DVI - HDMI adaptor interface (not supplied), and connect the device's audio out jack to HDMI 4 AUDIO IN.
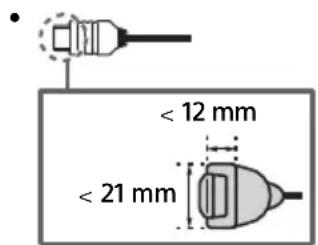
- HDMI IN 3 eARC/ARC (Enhanced Audio Return Channel/Audio Return Channel) Connect your audio system to the HDMI IN 3 to route LCD Monitor audio to your audio system. An audio system that supports HDMI eARC/ARC can send video to the LCD Monitor, and receive audio from the LCD Monitor via the same HDMI cable. If your audio system does not support HDMI eARC/ARC, an additional connection with DIGITAL AUDIO OUT (OPTICAL) is necessary.
- Use the HDMI cable with Ethernet to connect audio system with eARC.
5 REMOTE RS-232C
- Terminal for serial communication. For details, see "Control functions".

6 HDMI 4 AUDIO IN
- If the device has a DVI jack, connect it to HDMI IN 4 through a DVI - HDMI adaptor interface (not supplied), and connect the device's audio out jack to HDMI 4 AUDIO IN.
Using LCD Monitor as Part of Audio System
(FW-98BZ53L / 98BZ50L / 98BZ30L only)
Note
- Before connecting cables, disconnect the AC power cord (mains lead) of both LCD Monitor and AV receiver.
- Refer to the instruction manual of the Audio system with S-CENTER OUT terminal for detail.
![graph TD A["S-CENTER SPEAKER IN"] --> B["Centre speaker mode cable"] B --> C["S-CENTER OUT"] C --> D["HDMI (eARC/ARC) connection"]](/content/2026/06/1391506/images/d8472bb85d1fd6f461d082091115316fe05094ebe1d44787001c5e4d61e805c6.jpg)
Remote Control and LCD Monitor
The remote control shape, layout, availability and function of remote control buttons may vary depending on your region/country/LCD Monitor model/LCD Monitor settings.

1 - (Input select): Display and select the input source, etc.
SYNC MENU: Display the BRAVIA Sync Menu.
(Power)
HDMI 1/2/3/4
2 Number buttons

cc
Colour buttons


- ABOUT MANUALS
- SETUP GUIDE
- REFERENCE GUIDE (THIS MANUAL) / SAFETY INFORMATION
- HELP
- NOTE
- LOCATION OF THE IDENTIFICATION LABEL
- SAFETY INFORMATION
- INSTALLATION/SET-UP
- INSTALLATION
- TRANSPORTING
- TOPPLE PREVENTION
- (MODELS WITH SUPPLIED SUPPORT BELT KIT)
- (EXCEPT MODELS WITH SUPPLIED SUPPORT BELT KIT)
- CONNECTION DIAGRAM
- USING LCD MONITOR AS PART OF AUDIO SYSTEM
- REMOTE CONTROL AND LCD MONITOR
Brand : SONY
Model : FW-55BZ40L
Category : Monitor