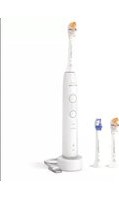
Sonicare 6100 HX7408 - Toothbrush PHILIPS - Free user manual and instructions
Find the device manual for free Sonicare 6100 HX7408 PHILIPS in PDF.

 FR
FR
 AZ
AZ
 BG
BG
 CS
CS
 DA
DA
 DE
DE
 EL
EL
 EN
EN
 ES
ES
 ET
ET
 FI
FI
 HU
HU
 HY
HY
 IT
IT
 KA
KA
 KK
KK
 KY
KY
 LT
LT
 LV
LV
 MK
MK
 NL
NL
 NO
NO
 PL
PL
 PT
PT
 RO
RO
 RU
RU
 SK
SK
 SL
SL
 SQ
SQ
 SV
SV
 TG
TG
 TK
TK
 UK
UK
 UZ
UZ
| Product type | Electric toothbrush |
| Brand | Philips |
| Model | Sonicare 6100 HX7408 |
| Dimensions (handle) | 2.5 x 1.5 x 22 cm |
| Weight (handle) | Approximately 125 g |
| Power supply | Rechargeable Li-ion battery |
| Charger type | Inductive charging base |
| Charging time | Approximately 24 hours |
| Battery life | Up to 2 weeks of use |
| Brushing modes | 3 modes: Clean, White, Gum Health |
| Timer | Smartimer (2 min) and Quadpacer (30 s per quadrant) |
| Pressure sensor | Yes, visual alert if excessive pressure |
| Charge indicator | LED indicator on the handle |
| Number of movements | Up to 31,000 strokes/min |
| Water resistance | Waterproof handle (IPX7) |
| Package contents | 1 handle, 1 charging base, 1 standard brush head |
| Care and cleaning | Rinse the head after use, clean the handle with a damp cloth |
| Spare parts | Replacement brush heads (type A3, W3, C3, G3) |
| Repairability | Repairability score 8.4/10 (according to manufacturer data) |
| Warranty | 2 years according to legal conditions |
Frequently Asked Questions - Sonicare 6100 HX7408 PHILIPS
User questions about Sonicare 6100 HX7408 PHILIPS
0 question about this device. Answer the ones you know or ask your own.
Ask a new question about this device
Download the instructions for your Toothbrush in PDF format for free! Find your manual Sonicare 6100 HX7408 - PHILIPS and take your electronic device back in hand. On this page are published all the documents necessary for the use of your device. Sonicare 6100 HX7408 by PHILIPS.
USER MANUAL Sonicare 6100 HX7408 PHILIPS
1

-1
1_
-1
1
English 5
Azərbaycanca 24
Čeština 43
Dansk 62
Deutsch 81
Eesti 102
Español 121
Français 141
Hrvatski 161
Italiano 180
Latviešu 200
Lietuviškai 219
Magyar 238
Nederlands 257
Norsk 277
O'zbek 296
Polski 315
Português 335
Română 355
Shqip 374
Slovenščina 393
Slovensky 412
Srpski 431
Suomi 450
Svenska 469
Türkmençe 488
Ελληνικά 507
Български 528
Кыргызча 549
Македонски 570
Русский 590
Точикй 611
Українська 632
Қазақша 652
Ruijtntu 672
Jusimun 665 694
715
Introduction
Welcome to the Philips Sonicare family! This toothbrush enables you to obtain superior plaque removal, whiter teeth and healthier gums. Using Sonicare's combination of gentle sonic technology and clinically developed and proven features, you can be confident that you're getting the very best clean, every time.
Further support and product registration are available to you at:
www.philips.com/support
Important safety information
Only use the product for its intended purpose. Read this information carefully before you use the product and its batteries and accessories, and save it for future reference. Misuse can lead to hazards or serious injuries.
WARNINGS
- Only use original Philips accessories or consumables. If supplied, only use the original USB cable and USB power supply unit.
- This appliance contains no user-serviceable parts. If the appliance is damaged, stop using it and contact the Consumer Care Center in your country. If the USB cable is damaged, stop using it.
- Keep the chargers away from water.
- After cleaning, make sure the chargers and travel charger cases are completely dry before you connect these.
- This appliance can be used by children and persons with reduced physical, sensory or mental capabilities or lack of experience and knowledge if they have been given supervision or instruction concerning use of the appliance in a safe way and understand the hazards involved. Cleaning and user maintenance shall not be made by children without supervision.
- Children should be supervised to ensure that they do not play with the product.
- Do not clean any part of the product in the dishwasher.
- Do not use adapters and chargers outdoors or near heated surfaces.
- This appliance has only been designed for cleaning teeth, gums and tongue.
- Stop using a brush head with crushed or bent bristles. Replace the brush head every 3 months or sooner if signs of wear appear.
- Avoid direct contact with products that contain essential oils or coconut oil. Contact may result in bristles dislodging.
- The maximum altitude of use is 4500 meters.
MEDICAL WARNINGS
- Stop using the appliance and consult your dentist/doctor if excessive bleeding occurs after use, if bleeding continues to occur after 1 week of use or if you experience discomfort or pain.
- If you have had oral or gum surgery in the previous 2 months, consult your dentist before you use this appliance.
- If you have a pacemaker or other implanted device, contact your doctor or the manufacturer of the implanted device prior to use.
- If you have medical concerns, consult your doctor before you use this appliance.
- This appliance is a personal care device and is not intended for use on multiple patients in a dental practice or institution.
BATTERY SAFETY INSTRUCTIONS
- This appliance contains batteries that are only removable by skilled persons.
- Only use the product for its intended purpose. Read this information carefully before you use the product and its batteries and accessories, and save it for future reference. Misuse can lead to hazards or serious injuries. Accessories supplied may vary for different products.
- Only use original Philips accessories and consumables.
- Keep product and batteries away from fire and do not expose them to direct sunlight or high temperatures.
- If the product becomes abnormally hot or smelly, changes color or if charging takes longer than usual, stop using and charging the product and contact Philips.
- Do not place products and their batteries in microwave ovens or on induction cookers.
- Do not open, modify, pierce, damage or dismantle the product or battery to prevent batteries from heating up or releasing toxic or hazardous substances. Do not short-circuit, overcharge or reverse charge batteries.
- This appliance contains batteries that are non-replaceable. When the battery is at end of life, the appliance shall be properly disposed of, see section on Recycling.
- Charge only with Philips HX6110 input ratings: 4.75-5.25VDC, 1.5W.
- Charge and use the product at a temperature between 0 °C and 40 °C (32°F and 104 °F).
- To avoid accidental short-circuiting of batteries after removal, do not let battery terminals come into contact with metal object (e.g. coins, hairpins, rings). Do not wrap batteries in aluminium foil. Tape battery terminals or put batteries in a plastic bag before you discard them.
- This appliance contains a Lithium-ion rechargeable cell. MUST BE RECYCLED OR DISPOSED OF PROPERLY.
Storage and transportation conditions
Temperature -20°C to +60°C (-4 °F to 140 °F).
Electromagnetic fields (EMF)
This Philips appliance complies with all applicable standards and regulations regarding exposure to electromagnetic fields.
Radio Equipment Directive
Hereby, Philips declares that electric toothbrushes with radio equipment type (Bluetooth, NFC) are in compliance with Directive 2014/53/EU.
- The Bluetooth radio frequency interface in applicable products operates at 2.4 GHz.
- The maximum output power by the Bluetooth appliance is 3 dBm.
- The NFC radio frequency interface in applicable products operates at 13.56 MHz.
- The maximum RF power transmitted by the appliance is 30.16 dBm.
The full text of the EU declaration of conformity is available at the following internet address: www.philips.com/support
Note: The Features of different models may vary. Some models may not be equipped with Bluetooth or NFC.
SAVE THESE INSTRUCTIONS
The following symbols may appear on the product:

This symbol means read the instructions for use, before using the appliance.
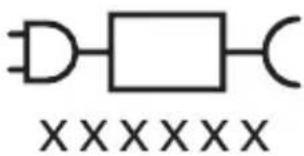
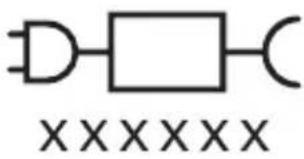
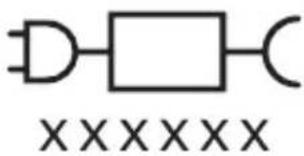
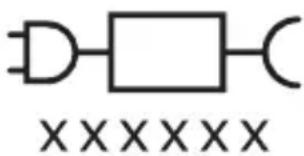
This symbol means to use the indicated power supply.
Intended use
Sonicare power toothbrushes are intended to remove adherent plaque and food debris from the teeth to reduce tooth decay and improve and maintain oral health.
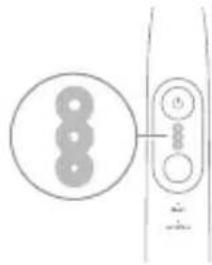
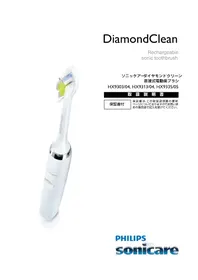
Your Philips Sonicare (Fig 1.)
1 Handle
2 Power on/off button
3 Intensity indicator
4 Mode/intensity button
5 Mode indicator
6 Brush head replacement reminder
7 Battery indicator
8 Light ring
Accessories:
9 Brush head cap
10 Smart brush head(s)
11 BrushSync symbol
12 USB charger (wall adapter not included)
13 Travel case
Note: Accessories included may vary based on the model purchased.
Getting started
Attaching the brush head
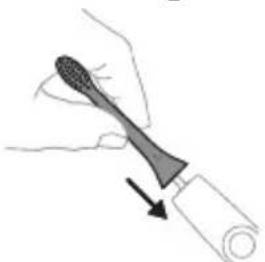
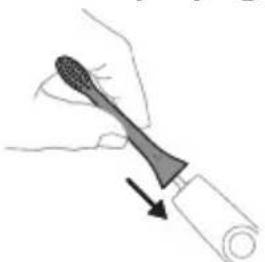
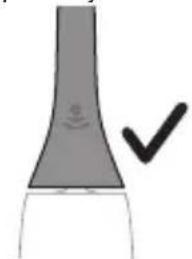
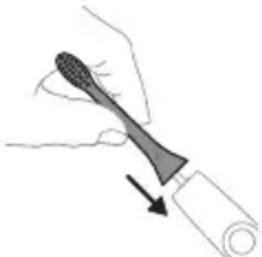
1 Align the brush head so the bristles point in the same direction as the front of the handle.
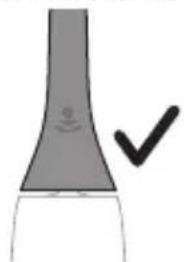
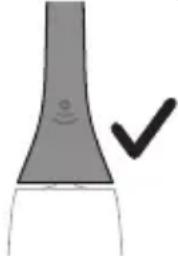
2 Firmly press the brush head down onto the metal shaft until it will not go any further.
Note: It is normal to see a slight gap between the brush head and the handle.
Using your Philips Sonicare toothbrush
If you are using your Sonicare toothbrush for the first time, it is normal to feel more vibration than when using a non-electric toothbrush. It is common for first-time users to apply too much pressure. Only apply gentle pressure and let the toothbrush do the brushing for you. Please follow the brushing instructions below for the best experience.
To help you transition to your new Sonicare power toothbrush, use a lower setting for the first 1-2 weeks, then transition to a higher setting.
Brushing instructions
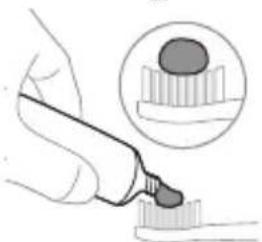
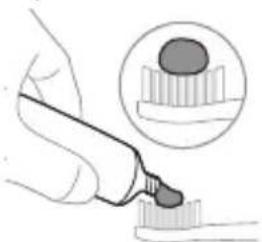
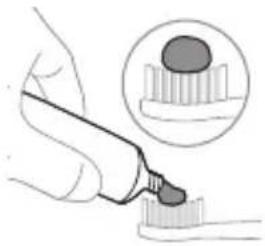
1 Wet the bristles and apply a small amount of toothpaste.
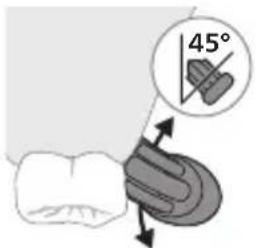
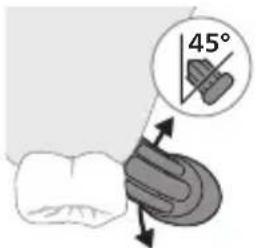
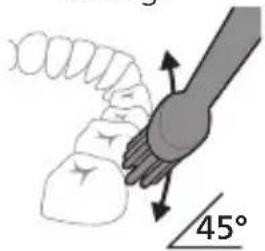
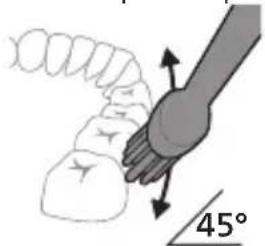
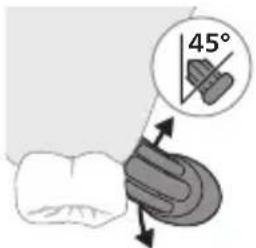
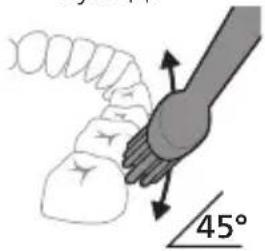
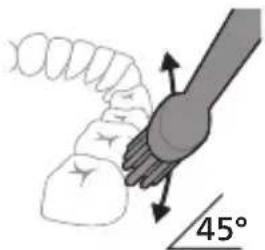
2 Place the toothbrush bristles against the teeth at a slight angle (45 degrees). Pressing firmly to make the bristles reach the gumline or slightly beneath the gumline.
Note: Keep the center of the brush in contact with the teeth at all times.
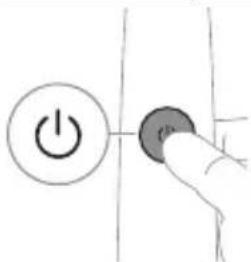
3 Press the power on/off button to switch on the Philips Sonicare.
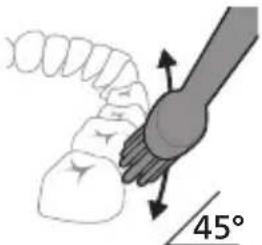
4 Gently keep the bristles placed on the teeth and in the gumline. Brush your teeth with small back and forth motion so the bristles reach between the teeth. Continue this motion throughout your brushing cycle.
Note: The bristles should slightly flare. It is not recommended to scrub as you would with a manual toothbrush.
Note: If you apply too much pressure, you will be alerted by a change in vibration of the handle and a flashing purple brushing feedback light.

5 To clean the inside surfaces of the front teeth, tilt the brush handle semi-upright and make several vertical overlapping brushing strokes on each tooth.
6 After you have completed the brushing cycle, you can spend additional time brushing the chewing surfaces of your teeth and areas where staining occurs. You can also brush your tongue, with the toothbrush switched on or off, as you prefer.
Note: Your Philips Sonicare toothbrush is safe to use on braces (brush heads wear out sooner when used on braces) and dental restorations (fillings, crowns, veneers) if they are properly adhered and not compromised.
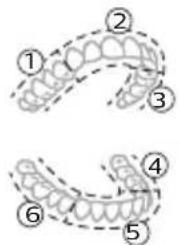
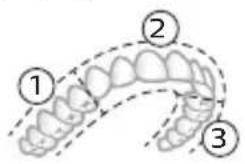
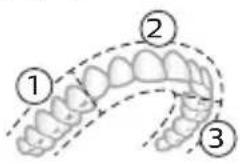
BrushPacer

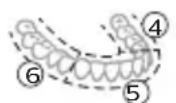
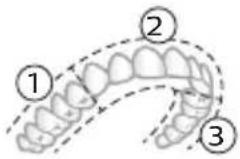
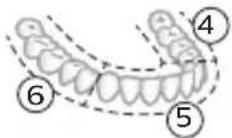
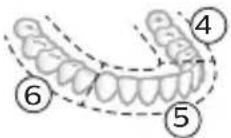
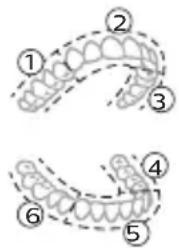
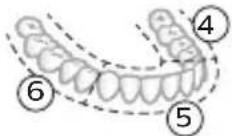
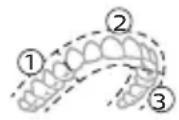
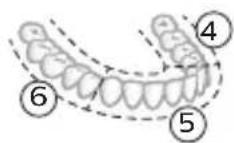
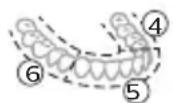
To make sure you brush evenly throughout the mouth, divide your mouth into 6 sections using the BrushPacer feature. The BrushPacer divides the brushing time into 6 equal segments and indicates when you should move to the next area. The segments are indicated with a brief pause in vibration. The toothbrush automatically stops at the end of the brushing session.
Note: Additional time may be added when you use the White or Gum Health modes.
English
Modes
Your power toothbrush is equipped with two modes: Clean and Sensitive. Based on the smart brush head you use, the optimal mode and intensity will be selected automatically by the BrushSync technology.

To manually change the mode, press the mode/intensity button when the toothbrush is off. All brush heads work with each mode.
Clean Sensitive
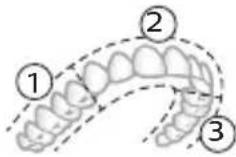
| Benefit Plaque removal Extra gentle mode for | sensitive teeth and gums | |
| Recommended intensity level | High Low* | |
| Total brushing time 2 minutes 2 minutes | ||
| How to brush Brush each segment for 20 seconds | Brush each segment for 20 seconds | |
 |  | |
 |  | |
Intensities
Intensity settings

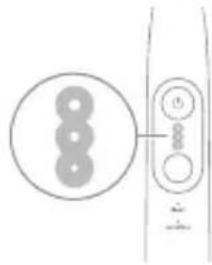
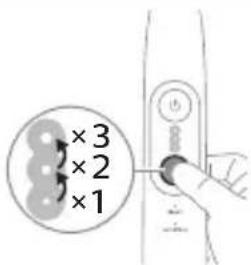
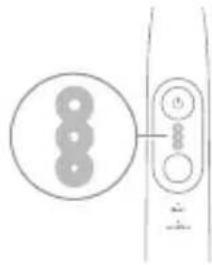
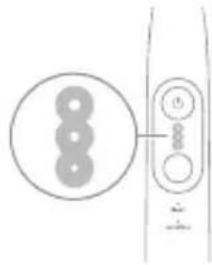
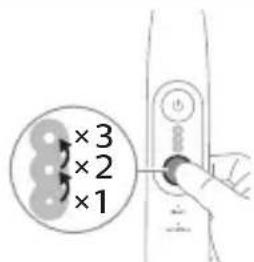
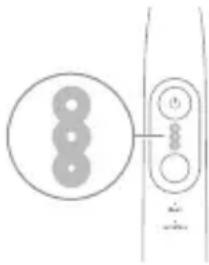
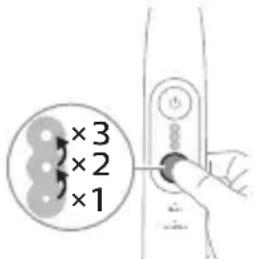
Your power toothbrush comes with 3 different intensity settings:
- High intensity (three lights)
- Medium intensity (two lights)
- Low intensity (one light)
Note: We recommend high intensity for best results.
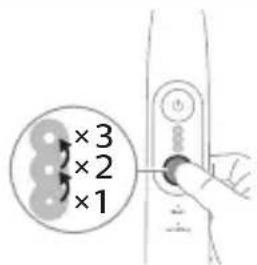
To manually select your desired intensity, press the mode/intensity button when the toothbrush is on, to cycle through the options. The intensity setting can only be changed when the toothbrush is on.
BrushSync technology
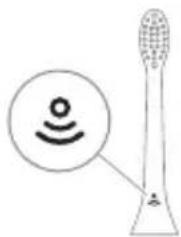
BrushSync technology enables your brush head to communicate with your handle using a microchip. The symbol at the bottom of the brush head indicates that the brush head is equipped with this technology.
BrushSync technology enables:
- Brush head replacement reminder
- BrushSync mode pairing
Philips Sonicare offers a wide range of smart brush heads, equipped with BrushSync technology. To explore our full range of toothbrush brush heads,
and find the brush head that is best for you, go to www.philips.com/toothbrush-heads for more information.
Features
- Pressure Sensor Feedback
- BrushPacer
- SmarTimer
- EasyStart
- Brush Head Replacement Reminder
- Brush Head Mode Pairing
Pressure Sensor Feedback
Your Sonicare toothbrush measures the pressure you apply while brushing, to protect your gums and teeth from damage.
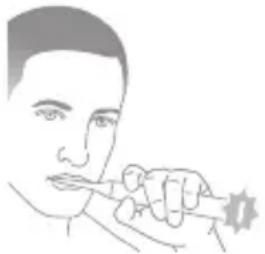
If you apply excess pressure, the handle changes its sound and vibration while the brushing feedback light flashes purple at the bottom of the handle until you reduce the pressure.
Note: Your product comes with the Pressure Sensor Feedback activated. To deactivate this feature (see 'Activating or deactivating features').
BrushPacer

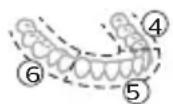
The BrushPacer is an interval timer that helps you to brush evenly through the mouth by dividing your mouth into 6 sections.
SmarTimer
The SmarTimer indicates that your brushing cycle is complete by automatically switching off the toothbrush at the end of the brushing cycle.
Dental professionals recommend brushing no less than 2 minutes twice a day.
Note: If you press the power on/off button after you started the brushing cycle, the toothbrush pauses. If you press the on/off button within 30 seconds, the timer resumes to allow you to finish your brushing cycle. After a pause of 30 seconds, the SmarTimer resets.
EasyStart
This Philips Sonicare model comes with the EasyStart feature deactivated. The EasyStart feature gently increases the power over the first 14 brushings to help you get used to brushing with the Philips Sonicare. The EasyStart feature works with all modes.
*Disclaimer
When the Philips Sonicare toothbrush is used in clinical studies, it must be used at high intensity with the handle fully charged and the EasyStart feature deactivated.
To activate EasyStart (see 'Activating or deactivating features').
Brush Head Replacement Reminder
Your Philips Sonicare is equipped with BrushSync technology that tracks the wear of your brush head.
Note: This feature only works with Philips Sonicare smart brush heads with BrushSync technology.
1 When you attach a new smart brush head for the first time, the handle recognizes that you have a Philips brush head with BrushSync technology and begins tracking brush head wear.
2 Over time, based on the pressure you apply and the total time the brush head has been used, the handle tracks brush head wear in order to determine the optimal time to replace your brush head. This feature guarantees the best cleaning and care of your teeth.
![graph TD A["Circle Node"] --> B["Vertical Line"] style A fill:#f9f,stroke:#333 style B fill:#ccf,stroke:#333](/content/2026/06/1384919/images/8afb28b4203c0192ad3c4d47d37fcaa1f963511797b4035604ac3385705dad0f.jpg)
3 When the Brush Head Replacement Reminder indicator lights up amber, you should replace your brush head.
Note: All smart brush heads come with the brush head replacement reminder feature activated. To deactivate the brush head replacement reminder see 'Activating or deactivating features'.
Brush head mode pairing
Brush heads with BrushSync technology are equipped with a microchip which communicates with the handle and automatically pairs it with the recommended mode and intensity. Most brush heads with BrushSync technology will auto pair to Clean Mode. Brush heads with specific benefits will pair with the corresponding mode (when available), e.g. S2 Sensitive: Sensitive Mode.
Note: If you choose to change mode/intensity from the recommended setting, the brush head will remember the your chosen setting for future brushing sessions.
Activating or deactivating features
You can activate or deactivate the following features of your toothbrush:
- EasyStart
- Brush Head replacement reminder
- Pressure Sensor Feedback
Note: The brush head replacement reminder is only compatible with Sonicare smart brush heads. The smart brush head must be attached to the toothbrush in order to activate or deactivate the replacement reminder.
From handle:
Step 1: Place the handle on a plugged in charger/charging travel case.

Step 2: Press and hold power on/off button for:
EasyStart Brush Head Replacement Reminder Pressure Sensor Feedback
Up to 3 seconds Up to 5 seconds Up to 7 seconds

Step 3: Let go of the power on/off button when you hear:
| 1 beep 1 beep and then2 beeps | 1 beep, 2 beeps andthen 3 beeps | |
| ↓ ↓ ↓ | ||
| Together with: | ||
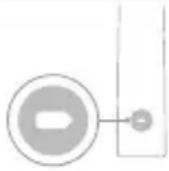 | If you see the left LED for the battery indicator flash green 2 times and hear 3 tones low to high, then the feature has been activated. | |
| OR | ||
 | If you see the left LED for the battery indicator flash amber 1 time and hear 3 tones high to low, then the feature has been deactivated. | |
Charging and battery status
This Philips Sonicare toothbrush is designed to provide on average 42 brushing sessions, each session lasting 2 minutes (21 days if used twice per day) on a fully charged battery. The battery indicator shows the battery status when you complete the 2-minute brushing session, when you pause the toothbrush, or while it is charging.
Note: It can take up to 24 hours to fully charge the battery before first use, but you can use the Philips Sonicare toothbrush before it is fully charged.
Note: Charging your Philips Sonicare toothbrush in the travel case can take up to 48 hours.
Charging
Charging on charger
1 Attach the USB charging cord to a wall adapter, plug the wall adapter into an electrical wall outlet.

2 Place the handle on the charger.
3 Connect the attached USB cable to the 5V DC input power supply unit.
- Charge only with Philips compatible chargers or safety approved adapters with input ratings: 100 - 240V\~; 50/60Hz; 3.5W and output ratings 5VDC; 2.5W.
- A UL-listed or certified 1310 Class 2 power supply (NAM only)
4 The battery indicator and light ring illuminate, the handle beeps twice, and all lights on the handle illuminate upward from the bottom of the handle.
5 The flashing light of the battery indicator shows that the toothbrush is charging.
6 When the handle is on the charger and the battery is fully charged, the LED lights of the battery indicator start flashing green. Once the battery is full, the green light remains solid for 30 seconds and then turns off.
Battery status
Battery status (handle on plugged-in charger/charging travel case)
When the handle is placed on the charger or in the charging travel case, the battery indicator shows the battery level.
Battery status
Number of flashing LEDs
LED color
| Low 1 Flashing green | |
| Partially full 2 Flashing green | |
| Full 3 Flashing green until full, | then green for 30 seconds and then switches off |
Battery status (when handle is not on plugged-in charger/charging travel case)
When the toothbrush is awake, the battery indicator at the bottom of the handle shows the battery level.
Battery status Number of LEDs LED color
Full 3 Solid green
| Partially full 2 Solid green | ||
| Medium low 1 Solid green | ||
| Low 1 with 3 beeps after brushing | Flashes amber | |
| Empty 1 with 2 beeps after brushing | Flashes amber | |
Note: To save energy, the battery indicator will switch off when not in use.
Note: When the battery is completely empty, the toothbrush switches off. Place the toothbrush on the charger to charge it.
Note: To keep the battery fully charged at all times, you may keep your toothbrush on the charger when not in use.
Cleaning
Toothbrush handle

1 Remove the brush head and rinse the metal shaft area and buttons with warm water. Make sure you remove any residual toothpaste on the handle and around the buttons at least once a week, but preferably after each use.
Caution: Do not push on the rubber seal on the metal shaft or around buttons with sharp objects, as this may cause damage.
2 Wipe the entire surface of the handle with a damp cloth.
Note: Do not tap the handle on the sink to remove excess water.
3 Dry the handle with a soft cloth or towel.
Brush head
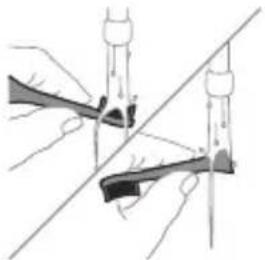
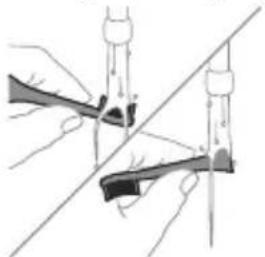
1 Rinse the brush head and bristles after each use.
2 Remove the brush head from the handle and rinse the brush head connection with warm water at least once a week. Rinse the travel cap as often as needed and air dry. Use only on a dry brush head.
Note: The brush head cap is used for shipping purposes and is not intended for continued use.
Charger
1 Unplug the charger before you clean it.
2 Wipe the surface of the charger with a damp cloth.
3 Dry the charger with a soft cloth or towel.
Travel case
Rinse with warm water and use a damp cloth to clean the travel case and allow to air dry.
Storage
If you are not going to use the product for an extended period of time, unplug it from the electrical outlet, clean it and store it in a cool and dry place away from direct sunlight.
Replacement
Replace Philips Sonicare brush heads every 3 months to achieve optimal results. Use only Philips Sonicare replacement brush heads.
Locating the model number
Look on the bottom of the Philips Sonicare toothbrush handle for the model number (e.g.HX740x).
Troubleshooting (ROW)
This chapter summarizes the most common problems you could encounter with the appliance. If you are unable to solve the problem with the
information below, visit www.philips.com/support and insert your model number for a list of frequently asked questions or contact the Consumer Care Center in your country.
Problem Possible Cause Solution
| I cannot fully attach the brush head. There is a gap between the brush head and handle. | This gap is normal and is needed for the brush head to vibrate appropriately. The brush head must be able to move to create the right amount of vibrations. | |
| My Philips Sonicare toothbrush vibration is less powerful than before. | The brush head is too close to the body of the handle. | Remove the brush head from the handle and re-set it on the metal shaft leaving a small gap.(1-2mm). |
| The toothbrush stops working. | The battery is empty. | Charge the toothbrush handle on the charger. |
| I charged my toothbrush, but it only works for a short time. | The toothbrush handle is not placed vertically on the charger, resulting in no charge. | Place the handle vertically on charger base and make sure the charger is plugged in. |
WARRANTY EXCLUSIONS
What is not covered under warranty:
- In mouth attachments including brush heads and nozzles.
- Damage caused by use of unauthorized replacement parts or unauthorized brush heads.
- Damage caused by misuse, abuse, neglect, alterations or unauthorized repair.
- Normal wear and tear, including chips, scratches, abrasions, discoloration or fading.
IMPLIED WARRANTIES
ANY IMPLIED WARRANTIES, INCLUDING IMPLIED WARRANTIES OF MERCHANTABILITY AND FITNESS FOR A PARTICULAR PURPOSE, SHALL BE LIMITED TO THE DURATION OF THE EXPRESS WARRANTIES SET FORTH ABOVE. IN SOME STATES LIMITATIONS ON DURATION OF IMPLIED WARRANTIES DO NOT APPLY.
LIMITATION OF REMEDIES
IN NO EVENT SHALL PHILIPS OR ANY OF ITS AFFILIATED OR SUBSIDIARY COMPANIES BE LIABLE FOR ANY SPECIAL, INCIDENTAL OR CONSEQUENTIAL DAMAGES BASED UPON BREACH OF WARRANTY, BREACH OF CONTRACT, NEGLIGENCE, TORT, OR ANY OTHER LEGAL THEORY. SUCH DAMAGES INCLUDE, WITHOUT LIMITATION, LOSS OF SAVINGS OR REVENUE; LOSS OF PROFIT; LOSS OF USE; THE CLAIMS OF THIRD PARTIES INCLUDING, WITHOUT LIMITATION, DENTISTS AND DENTAL HYGIENISTS; AND COST OF ANY SUBSTITUTE EQUIPMENT OR SERVICES. SOME STATES DO NOT ALLOW THE EXCLUSION OR LIMITATION OF INCIDENTAL OR CONSEQUENTIAL DAMAGES.
Warranty and support (ROW)
If you need information or support, please visit www.philips.com/support or read the international warranty leaflet.
Warranty exclusions
What is not covered under warranty:
- In mouth attachments including brush heads and nozzles.
- Damage caused by use of unauthorized replacement parts or unauthorized brush heads.
- Damage caused by misuse, abuse, neglect, alterations or unauthorized repair.
- Normal wear and tear, including chips, scratches, abrasions, discoloration or fading.
Recycling
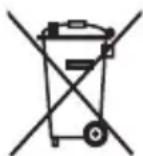
- This symbol means that electrical products and batteries shall not be disposed of with normal household waste.
- Follow your country's rules for the separate collection of electrical products and batteries.
- The built-in rechargeable battery must be removed by a qualified professional when the product is discarded. Instructions for removal of built-in rechargeable batteries can be found on www.philips.com/support. Use the Philips support home search bar to enter the toothbrush model number and find your product. The model number begins with "HX" (e.g. HX123A) and can be found on the bottom of your toothbrush. The battery removal instructions are in the Troubleshooting and Repair section of the product's support page.
- If batteries are damaged or leaking, avoid contact with the skin or eyes. If this occurs, immediately rinse well with water and seek medical care.
- When you handle batteries, make sure that your hands, the product and the batteries are dry.
Giriş
www.philips.com/support
Azərbaycanca
www.philips.com/support
www.philips.com/support
Dansk
www.philips.com/support
Tähtis ohutusteave
MEDITSIINILISED HOIATUSED
www.philips.com/support
Eesti
Clean Sensitive (suave)
GARANTÍAS IMPLÍCITAS
EXCLUSIONS DE GARANTIE
www.philips.com/support
www.philips.com/support
Napomena: značajke različitih modela mogu se razlikovati. Neki modeli možda nisu opremljeni sustavom Bluetooth ili NFC.
POHRANITE OVE UPUTE
Na proizvodu se mogu pojaviti sljedeći simboli:

Ovaj simbol znači da prije upotrebe uređaja morate pročitati upute za upotrebu.

Ovaj simbol znači da morate upotrijebiti naznačeno napajanje.
Namjena
Električne četkice za zube Sonicare namijenjene su za uklanjanje naslaga i ostataka hrane sa zuba kako bi se smanjio karijes te poboljšalo i održavalo oralno zdravlje.
Vaš Philips Sonicare (Slika 1)
1 Drška
2 gumb za uključivanje/isključivanje
3 indikator intenziteta
4 gumb za način rada / intenzitet
5 indikator načina rada
6 podsjetnik o zamjeni glave četkice
7 indikator baterije
8 svjetlosni prsten
Dodaci:
9 poklopac glave četkice
10 pametne glave četkice
11 simbol značajke BrushSync
12 USB punjač (zidni adapter nije uključen)
13 putna torbica
Napomena: priloženi dodaci mogu se razlikovati ovisno o kupljenom modelu.
Početak korištenja
Postavljanje glave četkice
2 Glavu četkice čvrsto pritisnite prema dolje na metalnu osovinu drške sve do kraja.
Napomena: Uobičajeno je vidjeti blagi razmak između glave četkice i drške.
Uporaba četkice za zube Philips Sonicare
Ako prvi put upotrebljavate četkicu za zube Sonicare, normalno je da osjećate više vibracija nego pri upotrebi četkice za zube koja nije električna. Korisnici pri prvoj upotrebi često primjenjuju preveliki pritisak. Samo blago pritisnite i četkanje prepustite četkici za zube. Za najbolje iskustvo slijedite upute za četkanje u nastavku.
Da biste se jednostavnije prebacili na svoju novu električnu četkicu za zube Sonicare, upotrebljavajte nižu postavku prvih 1 – 2 tjedna, a zatim prijeđite na višu postavku.
Upute za četkanje
1 Smočite vlakna četkice i nanesite malu količinu paste za zube.
Da biste ručno promijenili način rada, pritisnite gumb za način rada / intenzitet dok je četkica za zube isključena. Sve glave četkice rade u svakom načinu rada.
Clean Sensitive
| Prednost uklanjanje naslaga izuzetno osjetljivi način | ||
| rada za osjetljive zube i desni | ||
| Preporučena razina intenziteta | visoka niska* | |
| Ukupno vrijeme četkanja | 2 minute 2 minute | |
| Kako četkati četkajte svaki segment20 sekundi | četkajte svaki segment20 sekundi | |
 |  | |
 |  | |
Jačine
Postavke jačine
Vaša električna četkica za zube ima tri različite postavke intenziteta:
- Visok intenzitet (tri svjetla)
- Srednji intenzitet (dva svjetla)
- Nizak intenzitet (jedno svjetlo)
Napomena: za najbolje rezultate preporučujemo visok intenzitet.
Tehnologija BrushSync omogućava glavi četkice da komunicira s drškom s pomoću mikročipa. Šimbol na donjem dijelu glave četkice naznačuje da je glava četkice opremljena tom tehnologijom.
Tehnologija BrushSync omogućuje:
2 Stavite dršku na punjač.
1 Odvojite glavu četkice i isperite prostor oko metalne osovine i tipki toplom vodom. Najmanje jednom tjedno, a po mogućnosti nakon svake upotrebe, obavezno uklonite svu preostalu zubnu pastu s drške i oko tipki.
www.philips.com/support
1 Samitriniet sarus un uzklājiet mazliet zobu pastas.

Latviešu
www.philips.com/support
Svarbi saugos informacija
www.philips.com/support
Lietuviškai
www.philips.com/support
272 Nederlands
www.philips.com/support
www.philips.com/support
Xavfsizlikka oid muhim axborot
Mahsulotdan faqat to'g'ri maqsadda foydalaning. Mahsulotdan hamda uning batareyalari va aksessuarlaridan foydalanishni boshlashdan oldin ushbu axborotni diqqat bilan o'qib chiqing va keyinchalik murojaat qilish uchun uni saqlab qo'ying. Noto'g'ri foydalanish xavflarga yoki jiddiy jarohatlarga olib kelishi mumkin.
OGOHLANTIRISHLAR
- Faqat original Philips aksessuarlaridan va sarf materiallaridan foydalaning. Agar to'plamda mavjud bo'lsa, faqat original USB kabeldan va USB ta'minot blokidan foydalaning.
- Jihoz foydalanuvchi xizmat ko'rsata olmaydigan qismlarga ega. Agar jihoz shikastlangan bo'lsa, undan foydalanishni to'xtating va mamlakatingizdagi Mijozlarga xizmat ko'rsatish markaziga murojaat qiling. Agar USB kabel shikastlangan bo'lsa, undan foydalanishni to'xtating.
- Quvvatlagichlarni suvdan uzoqda tuting.
- Tozalashdan keyin quvvatlagichlar va sayohat quvvatlagich g'iloflarini tarmoqqa ulashdan avval to'liq quriganini tekshiring.
- Ushbu jihoz bolalar hamda jismoniy, hissiy yoki aqliy qobiliyatlari cheklangan yoki tajriba va bilimga ega bo'Imagan shaxslar tomonidan, agar ularga jihozdan xavfsiz foydalanish bo'yicha ko'rsatmalar berilgan bo'lsa yoki ular nazorat ostida bo'lsalar va agar ular undan kelib chiqishi mumkin bo'Igan xavfni tushunsalar, ishlatilishi mumkin. Bolalar jihozni tozalash va unga xizmat ko'rsatish ishlarini nazoratsiz amalga oshirmasliklari lozim.
- Bolalar mahsulot bilan o'ynamasliklari nazorat ostida bo'lishi lozim.
- Mahsulotning hech bir qismini idish yuvish mashinasida tozalamang.
- Adapterlar va quvvatlagichdan tashqarida yoki isitiladigan yuzalar yaqinida foydalanmang.
- Jihoz faqat tishlarni, milklarni va tilni tozalash uchun ishlab chiqilgan.
- Tuklari singan yoki bukilgan cho'tka kallagidan foydalanishni to'xtating. Cho'tka kallagini har 3 oyda yoki agar eskirganlik belgilari namoyon bo'lsa – undan ham tezroq almashtiring.
- Tarkibida efir moylari yoki kokos moyi bo'lgan mahsulotlarning bevosita teginishidan saqlaning. Teginish – cho'tkaning siljib qolishiga olib kelishi mumkin.
- Foydalanishning maksimal balandligi – 4500 metr.
TIBBIY OGOHLANTIRISHLAR
- Agar foydalanishdan keyin ortiqcha qon chiqishi kuzatilsa, qon chiqishi 1 hafta foydalangandan keyin ham davom etsa yoki noqulaylik va og'riq his qilsangiz, jihozdan foydalanishni to'xtating va stomatolog/shifokorga murojaat qiling.
- Agar oxirgi 2 oy ichida og'izda yoki milklarda jarrohlik ishlari olib borilgan bo'lsa, jihozdan foydalanishdan avval shifokor bilan maslahatlashing.
- Agar sizga kardiostimulyator yoki boshqa qurilma implantatsiya qilingan bo'lsa, foydalanishdan oldin shifokor bilan yoki implantatsiya qilingan qurilma ishlab chigaruvchisi bilan maslahatlashing.
- Agar salomatligingizda masalalar bor bo'lsa, ushbu jihozdan foydalanishdan avval shifokor bilan maslahatlashing.
- Ushbu jihoz shaxsiy parvarish qurilmasi bo'lib, stomatologik klinikada yoki muassasada bir necha bemorlar foydalanishi uchun mo'ljallanmagan.
BATAREYA XAVFSIZLIGIGA OID KO'RSATMALAR
- Bu jihozda faqat malakali shaxslar chiqara oladiğan batareyalar mavjud.
- Mahsulotdan faqat to'g'ri maqsadda foydalaning. Mahsulotdan hamda uning batareyalari va aksessuarlaridan foydalanishni boshlashdan oldin ushbu axborotni diqqat bilan o'qib chiqing va keyinchalik murojaat qilish uchun uni saqlab qo'ying. Noto'g'ri foydalanish xavflarga yoki jiddiy jarohatlarga olib kelishi mumkin. Taqdim etilayotgan aksessuarlar turli mahsulotlarda o'zaro farqlanishi mumkin.
- Fagat original Philips aksessuarlari va sarf materiallaridan foydalaning.
- Mahsulotni va batareyalarni olovdan nari tuting va quyosh yoki yuqori harorat ta'sirida goldirmang.
- Agar mahsulot noodatiy qizib ketsa yoki hid chiqarsa yoki rangini o'zgartirsa yoki odatdagidan uzoq vaqt quvvatlansa, undan foydalanishni va quvvatlashni to'xtating va Philips kompaniyasiga murojaat giling.
-
Mahsulotni va uning batareyalarini mikroto'lqinli pechga yoki induksiyali plitaga qo'ymang.
-
Batareyalar qizishi yoki zaharli va xavfli moddalar ajralishining oldini olish uchun jihozni yoki batareyani ochmang, o'zgartirmang, teshmang, shikastlamang yoki qismlarga ajratmang. Qayta quvvatlanadigan batareyalarning qisqa tutashuviga, ortiqcha quvvatlanishiga yoki teskari quvvatlanishiga yo'l qo'ymang.
- Bu jihozda almashtirib bo'Imaydigan batareyalar mavjud. Batareya xizmat muddatining oxiriga yetganida jihoz tegishli tarzda chiqindiga tashlanishi kerak, Qayta ishlash bo'limiga qarang.
- Faqat Philips HX6110 kirish nominallari bilan quvvatlang: 4,75-5,25VDC, 1,5 Vt.
- Mahsulotni 0 °C va 40 °C orasidagi haroratda quvvatlang va ishlating.
- Batareyani ajratib olgach, qisqa tutashuv sodir bo'lmasligi uchun batareya klemmalariga metall buyum (masalan, tanga, soch qadagich, uzuk) tegishining oldini oling. Batareyalarni zarqog'ozga o'ramang. Batareyani chiqindiga tashlashdan avval, uning klemmalarini skotch bilan o'rang yoki batareyani paketga soling.
- Bu jihozda litiy-ionli qayta quvvatlanadigan batareya mavjud. TEGISHLI TARTIBDA QAYTA ISHLANISHI YOKI CHIQITGA CHIQARILISHI KERAK.
Saqlash va tashish sharoitlari
Harorat -20°C to +60°C ( -4°F dan 140°F gacha) gacha.
1 Cho'tka tuklari dastaning old qismi bilan bir xil yo'nalishda bo'lishi uchun cho'tka kallagini tekislang.
2 Cho'tka kallagini u boshqa kirmagunigacha metall valga qattiq bosing.
Izoh: Cho'tka kallagi va dasta orasida kichik tirqish ko'rinishi – normal holat.
Philips Sonicare tish pastangizdan foydalanish
Agar Sonicare tish pastasidan birinchi marta foydalanayotgan bo'lsangiz, elektr bo'Imagan tish cho'tkasidan foydalanishga qaraganda ko'proq tebranish sezish normal holat. Odatda birinchi marta foydalanayotgan foydalanuvchilar ortiqcha bosim beradi. Faqat yumshoq bosib bering va tish cho'tkasi siz uchun tozalashiga imkon bering. Eng yaxshi taassurot uchun tish tozalash ko'rsatmalariga amal qiling.
Yangi Sonicare motorli tish cho'tkasiga o'tishingizga yordam berish uchun ilk 1-2 hafta pastroq sozlamada foydalaning, keyin yuqoriroq sozlamaga o'ting.
Tish tozalash ko'rsatmalari
1 Cho'tkani namlang va unga kam miqdorda tish pastasi surting.

2 Tish cho'tkasini tishlar qarshisida kichik (45 daraja) burchak ostida tuting. Cho'tkalar milk chizig'iga yoki uning tagiga yetishi uchun uni qattiq dosing. Izoh: Cho'tka markazini tishlarga doimi to'liq tekkizib turing.

3 Philips Sonicare qurilmasini yoqish uchun yoqish/o'chirish tugmasini bosing.
4 Cho'tkani tishlar va milk chizig'iga yengil tutib turing. Cho'tkalar tishlar orasiga kirishi uchun cho'tka kallagini oldinga-orqaqa kichik harakatlar bilan tishlaringizni tozalang. Bu harakatlarni tish tozalash siklingiz yakunlangunga qadar bajaring.
Og'izni bir tekisda tozalash maqsadida og'zingizni BrushPacer funksiyasi yordamida 6 qismga bo'ling. BrushPacer tish tozalash vaqtini 6 ta teng segmentga bo'ladi va keyingi hududga o'tishingiz kerak bo'Iganida bildiradi. Segmentlar tebranishdagi qisqa pauza orqali bildiriladi. Tish cho'tkasi tish tozalash seansi yakunida avtomatik ravishda to'xtaydi.
Izoh: White yoki Gum Health salomatligi rejimlaridan foydalanganingizda qo'shimcha vaqt kiritilishi mumkin.
Rejimlar
Motorli tish cho'tkangiz ikkita rejimda ishlaydi: Clean va Sensitive. Siz ishlatayotgan aqlli cho'tka kallagidan kelib chiqib, maqbul rejim va jadallik BrushSync texnologiyasi tomonidan avtomatik ravishda tanlanadi.

Bu rejimni oddiy usulda almashtirish uchun tish cho'tkasi o'chiq paytda rejim/jadallik tugmasini bosing. Barcha cho'tka kallaklari alohida rejim bilan ishlaydi.
Clean Sezuvchan
| Foydasi Qasmoqlarni ketkazish Sezuvchan tishlar va | milklar uchun juda yumshoq rejim | |
| Tavsiya etilgan jadallik darajasi | Yuqori Past* | |
| Jami tish tozalash vaqti | 2 daqiga 2 daqiga | |
| Tozalash usuli Har bir segmentni 20 soniyadan tozalang | Har bir segmentni 20 soniyadan tozalang | |
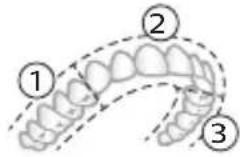 | 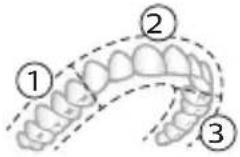 | |
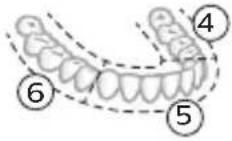 | 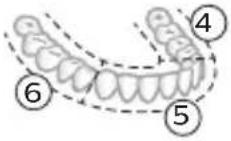 | |
Intensivlik
Jadallik sozlamalari
Motorli tish cho'tkangiz 3 turdagi jadallik sozlamalari bilan jihozlangan:
- Yuqori jadallik (uchta chiroq)
- O'rta jadallik (ikkita chiroq)
- Past jadallik (bitta chiroq)
BrushSync texnologiyasi cho'tka kallagining dasta bilan mikrochip orqali muloqot qilishiga yordam beradi. Cho'tka kallagi ostidagi Belgisi cho'tka kallagi ushbu texnologiya bilan jihozlanganini anglatadi.
BrushSync texnologiyasi quyidagilarni faollashtiradi:
- Cho'tka kallagini almashtirishni eslatish funksiyasi
- BrushSync rejimini jiftlash
Philips Sonicare BrushSync texnologiyasiga ega keng turdagi smart cho'tka kallaklarini taklif qiladi. Tish cho'tkasining cho'tka kallaklari to'liq ko'lami bilan
tanishish va sizga eng mos keladigan cho'tka kallagini topish uchun
www.philips.com/toothbrush-heads veb-saytiga kiring.
Funksiyalar
- Bosim sensori bildirgisi
- BrushPacer
- SmarTimer
- EasyStart
- Cho'tka kallagini almashtirishni eslatish funksiyasi
- Cho'tka kallagini juftlash rejimi
Ortiqcha bosim qo'llasangiz, bosimni kamaytirmaguningizgacha dasta tovushi va tebranishini o'zgartiradi va dasta quyi qismidagi cho'tkalash bildirgi chirog'i miltillaydi (binafsharang).
Izoh: Mahsulotingizda bosim sensori bildirgisi faol holatda taqdim etiladi. Bu funksiyani faolsizlantirish uchun (qarang "Funksiyalarni faollashtirish yoki faolsizlantirish").
BrushPacer
2 Dastani quvvatlash moslamasiga joylang.
3 Biriktirilgan USB kabelni quyidagi 5V kuchlanishli doim tok ta'minot blokiga ulang.
- Faqat Philips bilan muvofiq quvvatlagichlar yoki nominal kirish quvvatlari bilan xavfsizligi tasdiqlangan adapterlarida quvvatlang: 100 - 240V\~; 50/60Hz; 3,5 Vt va chiqish kuchlanishi 5VDC; 2,5 Vt.
- UL bilan qayd etilgan yoki 1310 Toifa 2 bilan sertifikatlangan quvvat ta'minoti (faqat NAM)
4 Batareya indikatori va chiroq halqasi yonadi, dasta ikki marta signal beradi va dastadagi barcha chiroqlar dastaning yuqori qismidan ostiga qarab yonadi.
5 Batareyaning miltillovchi indikatori tish cho'tkasi quvvatlanayotganini bildiradi.
6 Dasta quvvatlagichda bo'lsa va batareya to'liq quvvatlansa, batareya indikatorining LED chiroqlari yashil rangda miltillashni boshlaydi. Batareya to'liq quvvatlansa, yashil chiroq 30 soniya yonib turadi va keyin o'chadi.
Batareya holati
Batareya holati (dasta quvvatlagich/sayohat g'ilofiga ulangan)
Dasta quvvatlagichga yoki sayohat quvvatlagich g'ilofiga joylanganda batareya indikatori batareya darajasini aks ettiradi.
Batareya holati
Miltillovchi LED chiroqlar soni
LED rang
Past 1 Miltillovchi yashil
Qisman to'Igan 2 Miltillovchi yashil
To'Igan 3 To'Igunicha yashil
rangda miltillaydi, keyin 30 soniya yashil rangda yonib turadi va keyin o'chadi
Batareya holati (dasta quvvatlagich/sayohat g'ilofiga ulanmaganida)
Tish cho'tkasi faolligida dasta ostidagi batareya indikatori batareya darajasini aks ettiradi.
Batareya holati LED chiroqlar soni LED rang
| To’lgan 3 Yaxlit yashil | |
| Qisman to’lgan 2 Yaxlit yashil | |
| O’rtacha past 1 Yaxlit yashil | |
| Past Tozalashdan keyin 3 ta qisqa signal bilan 1 marta | Sariq rangda miltillaydi |
| Bo’sh Tozalashdan keyin 2 ta qisqa signal bilan 1 marta | Sariq rangda miltillaydi |
Izoh: Energiya tejash uchun batareya indikatori ishlatilmayotganida o'chadi.
1 Cho'tka kallagini chiqarib oling va metall val atrofi va tugmalarini iliq suv bilan yuving. Dasta va tugmalar atrofidagi tish pastasi qoldiqlarini haftada kamida bir marta, lekin yaxshisi har foydalanishdan keyin tozalang.
Ogohlantirish: Metall valdagi yoki tugmalar atrofidagi rezina zichlagichni o'tkir narsalar bilan bosmang, bu shikastlanishga olib kelishi mumkin.
2 Dastaning butun yuzasini nam mato bilan artib oling.
Izoh: Ortiqcha suvni yo'qotish uchun dastani rakovinaga urmang.
3 Dastani yumshoq mato yoki sochiq bilan quriting.
Cho'tka kallagi

1 Cho'tka kallagi va cho'tkani har foydalanishdan keyin yuving.
2 Cho'tka kallagini dastadan chiqarib oling va cho'tka kallagi ulanish qismini kamida haftada bir marta iliq suv bilan yuving. Sayohat qopqog'ini zarur bo'lgancha tez-tez yuving va havoda quriting. Faqat quruq cho'tka kallagida ishlating.
www.philips.com/support
GARANTIAS IMPLÍCITAS
www.philips.com/support
www.philips.com/support
Ta simbol pomeni, da morate pred uporabo aparata prebrati navodila za uporabo.
Ta simbol pomeni, da morate uporabiti navedeni napajalnik.
Predvidena uporaba
3 Zobno ščetko Philips Sonicare vklopite tako, da pritisnete gumb za vklop/izklop.
www.philips.com/support
www.philips.com/support
Tento symbol znamená, aby ste si pred použitím zariadenia prečítali návod na použitie.

4 Jemne udržujte štetiny v polohe na zuboch a d'asnách. Zuby čistite krátkymi pohybmi dopredu a dozadu tak, aby štetiny dosahovali do priestorov medzi zubami. Tento pohyb opakujte počas celého čistiaceho cyklu.
www.philips.com/support
Ovaj simbol označava da je potrebno pročitati uputstvo za upotrebu pre korišćenja uređaja.

1 Poravnajte glavu četkice tako da su vlakna okrenuta u istom smeru kao i prednja strana drške.
2 Čvrsto pritisnite glavu četkice na metalnu osovinu do kraja.
1 Pokvasite vlakna i nanesite malu količinu paste za zube.
2 Postavite vlakna četkice za zube na zube tako da budu pod blagim uglom (45 stepeni). Čvrsto pritisnite kako bi vlakna stigla do desni ili malo ispod desni.
4 Nežno držite vlakna na zubima i desnima. Perite zube blagim pokretima unapred i unazad tako da vlakna mogu da dosegnu između zuba. Nastavite sa ovakvim pokretima tokom celog ciklusa pranja zuba.
Da biste ručno promenili režim, pritisnite dugme za režim/intenzitet kad je četkica za zube isključena. Sve glave sa četkicom rade u svakom režimu.
Clean Osetljivi
| Pogodnost Uklanjanje plaka Veoma nežan režim za | osetljive zube i desni | |
| Preporučeni nivo intenziteta | Visok Nizak* | |
| Ukupno vreme pranja zuba | 2 minuta 2 minuta | |
| Kako se pere perite svaki segment 20 sekundi | perite svaki segment 20 sekundi | |
 |  | |
 |  | |
Intenziteti
Postavke intenziteta
Električna četkica za zube ima 3 različitih postavki za intenzitet:
- Veliki intenzitet (tri svetla)
- Srednji intenzitet (dva svetla)
- Mali intenzitet (jedno svetlo)
Napomena: za najbolje rezultate preporučujemo visok intenzitet.
Da biste ručno izabrali željeni intenzitet, pritisnite dugme za režim/intenzitet dok je četkica za zube uključena da biste se kretali kroz opcije. Postavka intenziteta se može prilagoditi samo kada je četkica za zube uključena.
Tehnologija BrushSync

Tehnologija BrushSync omogućava glavi četkice da komunicira sa drškom pomoću mikročipa. Simbol 🚠a dnu glave četkice pokazuje da glava četkice posjeduje ovu tehnologiju.
Tehnologija BrushSync omogućava:
Ako prekomerno pritiskate, drška menja zvuk i vibraciju, a svetlo povratnih informacija o pranju zuba treperi ljubičasto na dnu drške dok ne smanjite pritisak.
Napomena: Proizvod se isporučuje sa aktiviranim povratnim informacijama senzora pritiska. Da biste deaktivirali ovu funkciju (pogledajte 'Aktiviranje ili deaktiviranje funkcija').
BrushPacer

2 Postavite dršku na punjač.
3 Povežite priloženi USB kabl na ulazno napajanje jednosmerne struje od 5 V.
1 Skinite glavu četkice i isperite prostor oko metalne osovine i dugmadi toplom vodom. Najmanje jednom nedeljno, a po mogućnosti nakon svake upotrebe, obavezno uklonite svu preostalu zubnu pastu sa drške i oko dugmadi.
Oprez: Nemojte da gurate gumenu zaptivku na metalnoj osovini ili u području oko dugmadi oštrim predmetima pošto to može da dovede do oštećenja.
2 Čitavu površinu drške obrišite vlažnom krpom.
Napomena: Nemojte da udarate ručkom o sudoperu da biste uklonili višak vode.
1 Glavu četkice i vlakna isperite nakon svake upotrebe.
2 Bar jednom nedeljno skinite glavu četkice sa drške i toplom vodom isperite njen priključak. Putni poklopac isperite kad god je to potrebno i osušite na vazduhu. Stavljajte ga samo na suvu glavu četkice.
Napomena: Poklopac glave četkice upotrebljava se u transportu i nije namenjen za stalnu upotrebu.
Punjač
1 Isključite punjač iz električne mreže pre čišćenja.
2 Obrišite površinu punjača vlažnom krpom.
3 Osušite punjač mekom krpom ili peškirom.
Putna torbica
Putnu torbicu isperite toplom vodom i očistite vlažnom krpom i ostavite da se osuši na vazduhu.
Skladištenje
Ako proizvod nećete koristiti duže vreme, isključite ga iz zidne utičnice, očistite ga i odložite na hladno i suvo mesto, dalje od direktne sunčeve svetlosti.
Zamena
Zamenite Philips Sonicare glave četkice na svaka 3 meseca kako biste postigli optimalne rezultate. Koristite samo zamjenske glave četkice Philips Sonicare.
www.philips.com/support

Tehoasetukset
Tehoasetukset
www.philips.com/support
474 Svenska
www.philips.com/support
Möhüm howpsuzlyk maglumaty
Bu önümi diñe onuň niyetlenilýän maksady üçin ulanyň. Önümi we onuň batareýalaryny hem-de esbaplaryny ulanmazdan ozal, şu maglumatı üns bilen okaň hem-de geljekde gollanmak üçin ýygnap goýuň. Nädogry ulanmak howplara yá-da agyr şikeslere eltip bilýär.
DUYDURYSLAR
- Diñe hakyky Philips esbaplaryny y a-da sarp ediş materiallaryny ulanyň. Eger berlen bolsa, diñe original USB kabelini we USB tok üpjünçilik bloguny ulanyň.
- Bu enjamda ulanyjynyň tehniki hyzmat edip biljek şaýlary ýokdur. Eger enjama zeper ýetse, ony ulanmagy bes ediň we ýurduňyzdaky Müşderi goldawy merkezine ýüz tutuň. USB kabele zeper ýeten bolsa, ony ulanmagy bes ediň.
- Zarýadnikleri suwdan uzakda saklaň.
- Arassalanyňyzdan soň zarýad berijileri we syýahat wagtynda zarýad beriş çehollaryny birikdirmezden ozal olaryň doly gurandygyna göz yetiriň.
- Enjamy çagalar, şeyle hem enjamy howpsuz görnüşde ulanmak boyunça gözükdirijiler berlen ÿa-da howpsuz ulanmak boyunça gözegçilik astyndaky we degişli howplar özlerine mälim edilen ÿagdaÿynda fiziki, duýgurlyk ÿa-da zehin ukyplary pes ÿa-da tejribesi we bilimi bolmadyk şahslar hem ulanyp biler. Çagalar gözegçilik astynda däl wagty enjamda arassaçylyk we ulanyjy tarapyndan geçirilmäge degişli abatlayys işlerini geçirmeli däl.
- Çagalaryň önlem bilen oýnamazlygyny úpjün etmek üçin olary gözegçilikde saklamaly.
- Önümiň hiç bir bölegini gap-gaç yuwujyda arassalamaň.
- Adapterleri we zarýad berijileri açyk howada ýa-da gyzdyrylýan üstleriň ýakynynda ulanmaň.
- Bu enjam diñe dişleri, diş etini we dili arassalamak üçin dizayın edilendir.
-
Gyllary mynjiyran yá-da eplenen çotga nasadkasyny ulanmagy bes ediň. Nasadkany her 3 aydan yá-da könelme alamatlary yüze çyksa, ondan hem ir çalşyryň.
-
Düzüminde efir yaglary ya-da kokos yagy bar bolan önümler bilen gönümel galtaşdyrmaň. Galtaşma gyllaryň gopmagyna eltip biler.
- Ulanmagyň maksimum beýikligi 4500 metrdir.
LUKMANÇYLYK DUÝDURYŞLARY
- Eger ulanyşdan soň çendenaşa ganama yüze çyksa, ganama ulanyşdan 1 hepde geçensoň yüze çykmaga dowam etse ya-da bimazalyk ya-da agyry duýsaňyz, enjamy ulanmagy bes ediň we stomatolog/lukman bilen maslahatlaşyn.
- Eger öňki 2 aýda agyz yá-da diş eti operasiýasyny geçiren bolsaňyz, bu enjamy ulanmazdan öň stomatologyňyz bilen maslahatlaşyn.
- Eger size kardiostimulýator yá-da başga bir implant enjam goýlan bolsa, ulanmazdan öň lukmanyňyza yá-da implant enjamyň öndürijisine yüz tutuň.
- Eger lukmançylyk taýdan şübhelenseňiz, bu enjamy ulanmazdan öz lukmanyňyz bilen maslahatlaşyn.
- Bu önüm şahsy ideg enjamy bolup, stomatologik klinikada yá-da edarada birnäge näsagda ulaşmak üçin niyetlenilmeyär.
BATAREYİN HOWPSUZLYGY BOYUNÇA GÖZÜKDIRIJILER
Bu nysan enjamy ulanmazdan ozal ulanyş gözükdirijilerini okaň diýmegi aňladýar.
Bu nyşan görkezilen elektrik üpjünçiligini ulanmalydygyny aňladýar.
Niyetlenilýän ulanys
2 Nasadkany metal walyň üstüne ol aňryk baryp direyänçä közümli basyň.
1 Gyllary öllän we üstüne azajyk diş pastasyny çalyn.

Elektrikli diş çotgaňyz 3 dürli ýygjamlyk sazlamasy bilen gelýär:
- Yokary yygjamlyk (üç çyra)
- Orta ýygjamlyk (iki çyra)
- Pes yygjamlyk (bir çyra)
Bellik: Iň oňat netijeler üçin ýokary ýygjamlygy maslahat berýāris.

Eger artykmaç basyş etseñiz, tutawaç tä basyşy azaldyançaňyz öz sesini hem-de titremesini üýtgedýär we tutawajyň aşagyndaky çotgalama seslenme çyrasy mawy reňkde ýanyp-öçýär.
2 Tutawajy zarýadnige yerleşdiriň.
3 Dakylgy USB kabelini 5V hemişelik tok çeşmesine birikdirin,
- Diñe Philips bilen sazlaşykly yá-da giriş derejesi aşakda berlen howpsuzlygy tassyklanan adapterler bilen zarýad berin: 100 - 240V\~; 50/60Hz; 3,5W we çykyş derejeleri 5V hemişelik tok; 2,5W.
- UL talaplaryna laýyk gelýän ya-da 1310 Class 2 standardy boýunça sertifisirlenen tok çeşmesi (diñe NAM)
4 Batareyi görkeziji we çyraly halka ak reňkde ÿanýar, tutawaç iki gezek sesli duýduryş berýär we tutawaçdaky hemme çyralar tutawajyň aşagyndan ýokarlygyna ÿanýar.
1 Her ulanyşdan soň nasadkany we gyllary yuwup durlaň.
2 Azyndan hepdede bir gezek nasadkany tutawaçdan aýryp, nasadkanyň birikmesini ýyly suw bilen ýuwup durlaň. Syýahat gapagyny näçe ýygylykda zerur bolsa ýuwup durlaň we howa bilen guradyň. Diňe gury nasadkany ulanyň.
Bellik: Nasadkanyň gapagy ony daşamakda ulanylýar we hemişe ulanylmaga niyetlenilmeýär.
Zarýadnik
Kepillik we goldaw (ROW)
Maglumat yá-da goldaw gerek bolsa, www.philips.com/support salgysyna girin yá-da halkara kepillik hatyny okaň.
www.philips.com/support
www.philips.com/support
2 Кармагычты кубаттагычтын устүне коюңуз.
3 Камтылган USB кабелин 5V DC кубат булагына туташтырыңыз.
3 Барои фаьол кардани «Philips Sonicare» тугмаи фаьол/хомўшро пахш кунед.
5 Барои тоза кардани сатххои дарунии дандонхои пеш, дастаки чуткаро нимамудй хам кунед ва дар хар як дандон чанд зарбан амудии якхеларо анчом дихед.
6 Пас аз анчом додани давраи дандоншуй, шумо метавонед вақти иловагиро барои тоза кардани сатхи хояндаи дандонхо ва чойхое, ки дар он догхо пайдо мешаванд, сарф кунед. Шумо инчунин метавонед забони худро бо чёткаи дандоншуйи фаьол ё гайрифаьолшуда ба таври дилхох тоза кунед.
3 Вакте ки нишондихандаи ёдраси ивазкунии саракаи чутка бо ранги зард дурахш мезанад, шумо бояд сараки чуткаро иваз намоед.
www.philips.com/support
www.philips.com/support
Uju 'u2wùn gnìg t unwìhu, nn wùhnpudt2un t lyuŋnwl oqunwqnndúwù hnwhwùquttn` uwhupwù uwnpù oqunwqnndātn:

Uju ǔ2wùn gnìg ǐ unwìhu, nn wùhnwdtī2n ǐ oqúnwqqnnδtǐ ǔ2uìwǒ hǐtǐyùnpwúwùnwwlqwnwnniún:
Lwwinnwlywjhù oqinwqnδniú
Sonicare wunwuttnp ùwpnti ni ḥtīyúnwlywù hunqwùwlyuttn ùwhwintuqlwò tǔ ynunwylwò wunwúwuhwn n u uùnwjhù ǔuwgnnñuttn winwuttnhg hānwgutni hwiūwn, hùzì oquniú ḥ'uǐwqtgutl wunwuttnh ywnhtun l pwntiwylt l ywu wwwhwutl ptnwùh hunnzh wnnngniŋniún:
2tn Philips Sonicare-n (Uy. 1.)
1 Enuwl
2 3nuwùph úhwúguìwù/wùgùnúwù lynǎwù
3 hùntùuhùnìpàwù gnighs
4 Ναδης/ηιούμης ηρωνησίας
5 Ntduhutph gnighs
6 lunqwùwlyh qìhuh yhnhuwnhùu wù hì2tigniú
7 Uwpunlngh gnighs
8 Lniuwjhu onwly
Uputuniwnutn.
9 ἐnqu̥u̥w̥l̥h q̥l̥u̥h̥l̥h y̥w̥i̥h̥wn̥hs
10 lunqwluwlyh hutlugh qlhuhy(utn)
11 BrushSync ǔ2wǔ
12 USB lhgpwulnnh (wwunh hwnuwnwlyghzn utnwnzuwid 5)
13 Azwúhnnwnlywù wwnjwù
1 2niú 3tūn nunwúwnnyunn wputuniwnùtnŋ ywnnn tǔ unwnptnúti' qùuwó uñntiŋgh ywhuylwó:
hùzhg ulutl
Uunwqntp hunqwùwlyh qlhuhyn
1 lonquuwlyh qihuhyn hwwuwwntgntp wjuwtu, nn uwqhutnu ninnylwsh hutu unju ninnnajwup, hus pnuwlyh nhuwgh lnnun:

2 Uúnín utnútāp hunqwùwuh qíhuhyn útnplù útunwnwlywù jhutzh útɕ, u̅hùzhu wju l̅wùq wnǔh:
12 nui' funquwuhgh qihuhh u pnuwuh uhgl uhnpn wugph wnlywnjajniun unnuwl 5:
2tn Philips Sonicare wunwutph hunqwuwgh oqunwqndnniun
tpt wnwghù wùquwú tīp oqunwqnδnǚ àtn Sonicare winwúh hunqwùwǔn, wultīh 2wn jānpanng qawīn Ἇnnúwū l' hwiútuwinwǒ nǐ hītyunnwǔwù hunqwùwǔh htún: lnnúwū l, tīnp wnwghù wùquwú oqunwqnδnǚṭnŋ zwiḥhg 2wn tǔ utnúniú qnnòwnpnìu: Uhwjù yhnwnbīp ὑinnp utnúniú l jānji unltp, nnwtauqh winwúh hunqwùwǔn àtn yhnhuwntǔ úwpnh: hùnnniú tǔp htúnutī uunnnu ùtrŋyujwgulwǒ hunqwùwǔhg oqunlṭīní gnigniūṭphù 'wwluqnujù wnnjniūpūtn uunwùwlní hwiúwn: Uǔgniún àtn ὑtn ὑnp Sonicare hītyunnwǔwù winwúh hunqwùwǔhù ht₂unwgùtǐnì hwiúwn winwghù 1-2 2wpwrəluw ἠn̥paωgpnìu oqunwqnδtīp wultīh guòn ywnqwūlnniú, wjùnihtunl wǔgtp wultīh pwnàn ywnqwūlnniúwù:
Uwpnúwù hnwhuìqùtn

Ruijtntu
3 Utnútip hnuwúph úhwugúwù/wùgwnúwù lynǎwʊŋ` Philips Sonicare-n úhwugútɪni hwuśwn:

4 Unpntu wuhtp hunquuwlyh uwqtnu wunwutph ynu untwnwnluw du juntinh tanwqdnui: Uwpntp wunwutpn p#p#uwlyh htun ni wizw 2wndniwutnnu, nnwtuqh hunquuwlyh uwqhutpn hwutu winwutphu: Cwnniuwytip wju 2wndniun atn uwpnuwu ynh wupnng np#wgpnui:
L2niú hunquùwuh uwqhúutnp whtnp t úh únnp ljuwùwù: hunphnngh unnu niú wunwúutnp uwpntl wjùwtu, hùswtu nnip lúwwpnthp unlu npwlywù wunwúh hunquùwlnu:
L2niù 2wihwqwug utò àu2niú qnnδwnntjni ntāwpniú Tnip wjn úwwuhú yhuówuwp prùwlyh panpangh yhnhhnuúwù u úwùni2wlywqnjuìnú pəwnpann lniuwjhù gnighzh úhqngnu:

5 Ungluh wunwutuh utnuh uwltytnunyjutyn iwpntini hwuwipatptp hunqwuwlyh pnuwlyn yhuwninhn nhnpnyu u uh pwuh ninnwhwjwg iwpnnn 2wpndiwutn ywuunwtp jninwpwuyjnin wunwuh ynw:
6 Uwpntini hnniù wuupuntinig htinn lwwnn tpr jnwgnighs dwúwùwly hwnluywgǔti wunwùutnh dwiūn n uwlvtntuuttn uwpntiniù u wjù hwnluywòutnhù, npuntn wnugwùniú 5 pòwùnpniú: Uwpnn tpr ūwlu úwpnti ltaqiú` hunqwùwln ywwhtinú úhwgulwó lwwí wúgwùnwó, hùswtu úwhupùwnpniu tpr:
12 niú 2tn Philips Sonicare wunwúh hunquúwʊŋ wùuːnwiúq 5 wunwúutnh pntlytunutnh (hunquúwʊŋ qihʊln 2niun 5 uw2ʊniú pntlytunutnh uŋwi) u wunwúutnh ytnwʊwúqūnn hwnúwnwúputnh (ignùniúutn, 2wwyhlúutn, ytǔhnúttn) oqnwɑqnɒsuwi ñtiwpnui, tɪpə ñnwup wwnu2wá tǔ oqnwɑqnɒluniú l u ʒiù huwhuːnjuː:
BrushPacer
3wùnqutāni hwiūwn, np hwiūwwwnwzywuh tṛ p úwρnniś wúpnng pṭnwūn, ptnwūn 6 úwuh puḍwǔtp` oqunwqnδtīnu! BrushPacer qnnδwnnyjān: BrushPacer unthuīnīnqhwiù hunqwùwlyúwiù dwnúwùwlyn puḍwūniś 5 6 hwiūwwwn úwuh l u waŋwù2wūniś 5, pā tānp 5 hwnywlynn wùgutl hwnqn. hwnylwòhù: 3wunylwòutnh wqnwiù2wūniśn untnh 5 niútūniś jānjāngh ywnǎwinlu ηwnwnh úhongnu: Umwūh hunqwùwlyù wujinnúwen lytnwnu! wùgwunylniś 5 hunqwùwlytīni utuhwjh wujwnnhù:
U2niú White lyuw Gum Health nbdhúutnú oqunwqnɒtju hyunnŋ 5 wultwgʊtʃlnwgnɪghs dwuːwɪwly:
Ntchutn
Etyunnwlywù hunqwùwlyù niùh tŋlni ntdhú' Clean u Sensitive: 2tn oqunwqnndowò hutlwgh hunqwùwlyh qjhuhyh hhúwù ynw' BrushSync nthuünqhwjh úhqngnu wujnnúwun ytnwny lqnüunnultü owunhúwl ntdhún u hàuntüuhulnjajnùn:

ntdhuŋ ətɪpnu lhnhutni hwiun hunquuulq uigwunlqw dwuwuul utnútp ntdhuh/huunbuihynipajwù ynǎwln: fninn hunquuulqutnh qhuhyutnju wzhwinniu tǔ jinnpwugynin ntdhúnj:
Clean Sensitive
| Unwultinipjniù | Unwùwuhwnhhtnwniú | 2wnhwquig utnúntdhu qawjnùwnuwutph ni juntphhwúwn |
| fùntùuhlnipjwiwwngwnlhynnwunhǎwùn | Fwnàn 8wòn* | |
| funqwùwlytini nùnhwùnin dwnùwùwùn | 2 nnwú 2 nnwú | |
| fùzwytu funqwùwlyt | 3nwnpwùyjnnhwunlwwónfunqwùwlytp 20 lwwjnljwiù | 3nwnpwùyjnnhwunlwwónfunqwùwlytp 20 lwwjnljwiù |
 |  | |
 |  |
hùntùuhǔnīpājwù wùn hǎwùuán hùntùuhǔnīpājwù yúnqwǔnnuìuán
Etiqunnwlywù hunqwùwlyu niǔh hùntàuhulniājwù 3 unwnptán lqnqwwünnui.
- Fwnàn hùntùuhúlníjniù (tʌtp lnyu)
- Uhghù hùntǔuhǔnīpānǐu (tānǐnǐ lǐnju)
- 3ωδη ḥιυτιμυμημημ (υθυ μημ)
12 Niù' Lwúwqniù wnnjniùpùtnh hwiúwn hunphnnŋ bùp unwìhu pwnàn hùntiùuhynjniù:
BrushSync unthuünlnqhwiù àtn hunqwùwlyh qihuhlyhù jenijl ٤ unwihu hwnnnnwulgutj pnüwlyh htün uhlynnzhwh oqünujwúp: hunqwùwlyh qihuhlyh uunnnhù hwnluwóniú qnüylnn ١٢wùn gnjg ٤ unwihu, nn hunqwùwlyh qihuhlyu wwwwhnylquò ٤ wju unthuünlnqhwiŋnu:
BrushSync unthuunnqhwiwwwhnlnui 5.
- lunqwùwlyh qlhuhlyh yhnhuwnhùu wù hh2tigniù
- BrushSync nǎdʒuǐh qniqwùlnniú
Philips Sonicare-ù wīnwqwnlyniú ̄ BrushSync (fūnqwùwlyhUhùpnnùwgniú) unthùnīnqhwnjǔ hùlqugh fūnqwùwlyh qǐhuìyùtph lǚwù unbuwlywùh:
Unqwùwùyǔtnh qìhuìyǔtnh útān wúpnnq unjuwùwùniù dàuùnpàwùwùnì lù dǎq wútiùwhwúwwuwwunwuhuwù qìhuìyīn qúnùtǐnì lù jnugnighz untnǚlníŋajniùutnh hwuìwn wjgtīlāp www.philips.com/toothbrush-heads:
9nρδωνηγρεύτη
- ดูรุณี ดูรุณี ดูรุณี ดูรุณี
- BrushPacer
- SmarTimer
- EasyStart
- lunqwùwlyh qìhuhlyh yhnhuwnhùuòu hìh2tigniú
- lunqwùwuh qihuhuh ntāchūh qniqwulnniū
tpt wultinnq duzniu bp qnndwnnnui, wuw pnuwlyh dujun u panpengn ynhuyniu bi, huy pnuwlyh uunnphu hwunluwoniu qnuulnn inuwjhu gnighn pwnpaniu uwutni2wlywqnijuni' ushu lu ynlyh u zuuwaqigutp duzniun:
12 niú Ûwnpnú lquhuwnnnuwó ytnwnl wlnhluwgluwó t zú2úwù utüunnh wnàwqwùpn: Uju qnnòwnnijpàu wwwwwlnhluwgùtni huuíwn (Stu qlnìu «Ulnhluwgùti lyuú wwwwwlnhluwgùti qnnòwnnijpàutīnp»):
BrushPacer

BrushPacer-ŋ hùntŋuŋwɪtʃn h dwiʊwʒwɪh ʒ, nnù oqūniú ʒ àtiq hwiʊwwwnwʒwɪh u̅wpntəl pɛtnwɪŋ` pəwdwɪtʃnʊ wju 6 hwiunlʊðh:
SmarTimer
SmarTimer-n gnjg 5 unwju, nn úwpnúwú yhnú wulwnunlwið 5 úwpnúwú yhnúh útnqniú wulnnúwin ytnwnú wúgwintinú wunwúh hunquíwyn: Uunwúwwpnýd-úwuùwqtaunúttn hunphninn tiú unwju úwpnti wunwúuttn onwlywú 2 wùqwúhg nz uwwlyuu:
12 niù b à utnútp hnuwùph úhwúwù/wùgwinúwù lynǎwln úwpnúwù hnliŋ ulyutīng htunn, wunwúh hunqwúwln ywùq lwnùh: b àt 30 úwjnljwùh nùwgpniù utnútp hnuwùph úhwúwù/wùgwinúwù lynǎwln, www dwuówzwiwn yultnulyuqh` janyl unwlnú àtq wylwnntl úwpnúwù uhnliŋ: 30 úwjnljwù nwnwnhg htunn SmarTimer-n útnwlqwjlniú t:
EasyStart
Uju Philips Sonicare ünntülu wunwqwnluylniu ß EasyStart qnnðwnnynjau wwwwuynhulwgulwó uħawlynu: EasyStart qnnðwnnynjæn lyuúwg-lyuúwug wultugüniu ß hqnnnijajniüu wunwghù 14 úwpnniúutnh dwúwúwly` oqūtini àtiq unylnnti Philips Sonicare wunwuh hunquìuwlyhg oqunlątniu: EasyStart qnnðwnnynjæn qnnòniú ß pninn nzhduutynu:
*3pnwdwnwqh tnp Philips Sonicare wunwúh hunqwùwlyu oqunwqnδυlniú 5 ylhùhlywlywù htunwqnunnipajniùutpnniú, wju wtbnp 5 oqunwqnδυh pwnàn hùntüuhylnipajwù ynw` pnüwlyn wúpnηqnijawúp lhgrwulnnulwó, huy EasyStart qnnδwnnynjān` wùgwnuŋwó:
EasyStart qnnðwnnyjəu wlyunhulwɡutni hwiúwn (Stu qinju «Ulyunhulwɡutl ywu wwwwwluynhulwɡutl qnnðwnnyjəutqn»):
funqwùwuh qlhuhuh yhnhuwnhùwù hh2tgniú
2tn Philips Sonicare-tu niúh BrushSync (UwppnuwuUhuppnuwgniu) unthuunqhwuu, nnp htunwqdnui t 2tn hunqwuwlyh qlhuhyh uw2quwnpajniùn:
U2niú Uju qnnðwnnyjəu w2huwunniú ʒ úhwjù Philips Sonicare hutlugh hunqwúwlyh qihuhyutn BrushSync (hunqwúwlyhUhúpnnüwgniú) unthuüninqhwjnú:
1 bnp wnwghu wiuqwi un hutlwgh hunqwuwlyh qihuhly tpr wunwguni, pnuwln dawuwwniul 5, nn nnp niutp Philips hunqwuwly BrushSync (funqwuwlyhUhuppnnwwniul) unthuuninqhwynl u uluniul 5 htunwqdtj hunqwuwlyh qihuhlyh uww2luwdnupjnniun:
2 dwuwuwlyh npawgpnui, ywhuulwδ δtn lynuhg yhnwnzluwδ δu2niuhg u qihuhyh oqunwqnδsuwi npunhwünin dwuwuwlyhg, pnuwlyn htunwqdnui t hunqwuwlyh qihuhyh uww2lwδnupjniun` nnn2tini hwuwn δtn hunqwuwlyh qihuhyn yhnhutini hwuwn lwuwqnju dwuwuwlyn: Uju qnnδwnnyjan tnww2hwuwnnui t δtn wunwuutph lwuwqnju uwppnniui ni huuwupn:
![graph TD A["Process Node"] --> B["Terminal Node"] style A fill:#f9f,stroke:#333 style B fill:#ccf,stroke:#333](/content/2026/06/1384919/images/d49b01d2e3cec9857de8159d9c7476dca9b0ccb5384a9b5d3b1b52aec3886302.jpg)
3 tnp hunqwùwlyh qjhuhyh yhnhuwnhùwù wù hħ2tigúwù gnighzn qwnuŋniù t ntnhù qnyùnu, niptúšu w£tnp t yhnhtip hunqwùwlyh qjhuhyn:
12 niù húliwgh hunqwùwlyh pninn qihuhyùtinh ynhhuwnhùu wù hh2tgúwù qnnòwnnýrǎu wlnhluwguìwǒ t: hunqwùwuh qihuhyh ynhhuwnhùu wù hh2tgniúu wwwwwlunhluwgǔtǐnì huuwùn untóu "Ulnhluwgǔtǐ lyuú wwwwwlunhluwgǔtǐ qnnòwnnýrǎutīŋn":
unqwùwlyh qlhuhyh ntādhúh qniqwulnniú
BrushSync unthuünqhwjnu lunquuwlyh qjhuhyttnn uhlynzhu niutü, nnp hwnnnnwuglniú t pnuwynah htun u wulnnuwin ytpwnu qniqwulnniú wju wnwgwnyunn ntadhúh u huintuuhynijawu htun: BrushSync unthuünqhwjnu lunquuwlyh qjhuhytphg 2wntnu wulnnuwin ytpwnu qniqwulnniú t Clean ntadhúh htun: Nnn2wlyh wnwultinipajniùuttnu lunquuwlyh qjhuhyttnn yqniqnnnultu hwuiwwwnwuhiwu ntadhúh htun (wnlywjnipawu ntawpniu), on.' S2 Sensitive. Sensitive ntadhú:
12 nui' tpat nnn2tp ynhuti ntchup/huuntuuhunpajniun hunphnnn unnuun lwnqwulnnniuhg, hunqwuwuh qihuhyn yhh2h 2tn lynnyhg piuunnluw dwnqwulnnniun htinwqw w2huwwnw2ngwutph hwiwn:
Ulnhluwgutl ywi wwwwnlnhluwgutl qnpdwnnyrautp
2tn wunwuh hunqwuwlyh ynw 7nip lywnn tip wlnhulwgutl ywu wwwwluunhulwgutl htunljwl qnnðwnnijrautnn`
- EasyStart
- lunqwùwlyh qlhuhlyh yhnhuwnhùuìwù hh2tigniú
1 3tizwqntp hunqwùwlyh qihuhyn u lquwgtp útünwnwlywù jhutnh hwnuwrwn u lynǎwlyuttn unwp qnnu: 3wúnqutp, nn htizwqntl tpr pniwlyh ynwjh u lynǎwlyutnh 2ningn qunùlnn wunwúh úwðniyh úwugnnnúttn wnzulwqù 2wprwàn úty wùqwú, pwjg gwúlywyl f' wútu wùqwú oqnwwqnötinig htunn:
2qn12wgniu' Uh hntp ntnuhut yuhpn unin wnwnlywutpnu lntwh jhutnh utg ywu lynawylutph 2nngn, pwuh nn wju ywnnn t hwuqtguti yuuwulwoph:
2 Frùwlyh wúpnng úwyltntun úwpntp hùnùwú qnnóu wǒdpnu:
U2niU'Uh hwnylwdtp pnIuwlynyluWgwnwuhu' wyltlnnn.2ninn htnwgutjni hwiúwn:
3 Enuwyn ynwngntp ywhnly yunnnyl yww unphynl:
hunquwuh qihuh
1 3nipwpuynin oqunwqnndniuhg htunn yuwgtp hunqwüwwyh qihuhyn u uwqhylutnp:
2 3tzuwqntp hunquwuwlyh qlnihun pnwuwlyhg u wnzüuqwü 2wpwρen úty lluwgtp hunquwuwlyh qihuhyn unwp znnu: Lluwgtp áwuúhnnnwlywü lyuwhwnhsü wjúpwü hwáwhu, nnpwü wühnwdt2un 5, u jænntp, nn znnwüw: Oqnwwqnndtp úhwjü znn hunquwuwlyh qihuhyh ynuu:
12 niú 1 nquwùwúh qíhuìyì hǔwùwnhǒu oqunwqnδύniú 5 wizwpuwù ǔwwunwynú lǚ wǔhwunntuúwǒ 35 2wnniùwlywùu oqunwqnδύwù huiwùn:
Lhgpwunnhz
1 Uguwntp jhgpwulnnhyn` uwhupwù wjù uwpntān:
2 Lhgpwulnnhh uwwytntun uwpntap huniwwu qnndwlwdpnu:
3 Lhgpwulnnhsn znnwgntp chwuhny lynnnnu lywi unphsnu:
Δωύψηρηλωμώ υωμημώ
Unnntp qnl gnnu l u oqnwnqnndtp huntuw l yunn` ăwúhnnnwlywù wjuinjwùn úwpnti ni hwiśwn, l pnntpr, nn znnwùw:
الله
tāt ēp wwnnwwnunjniú tŋlywn dwnwùwly oqnwwqnδti lwwnpn, wǔgwntp wju ħlthynnwutnigúwù lwwnwlyhg, úwpntp wju l u wwhtp qnu l u snn untnniú' wnluh ninhŋ āwinwwqwjēutphg hīzni:
Φnhuwphùniú
Φnhuunhùtp Philips Sonicare hunquùwlyh qihuhyùtnù wútù 3 wúshùn útly' owunhúwìl wpnŋniùpùtn wwwwhnútlŋní hwuíwn: Oqunwqqnnòtap úhwujù Philips Sonicare-h uhnhuunhǔluŋn qihuhyùtnŋ:
phosphorus phosphate
gù lùdàmmm bùdǎsī, bùnʒnmbmm gùdmyjībòn lìbùfēngjūn dāmbùmànmànn lìgùdmyjībòsādāq.
glunodommm bndbsz, gudmnygmon dnnnnngdymn 33gdnl bysfm.
3 Philips Sonicare-nu Bubunmuzoo, qusgfngm bumoz/30dmmnznu mnmosb.
4 ghmbnngq dmsuzlgn tsgmyngon zdnngdus qss mndmnl bs88j. gunbdnbgom zdnngon dqnng bnb qss yzub dmdmsdom nlj, hmd tsgmyngon bzogdom6gb zdnngdu dmhnl. gubsgmdgm slgmn dmdmsmòs bdjbcwnl yuzmnl zgbduzmmòsdn.
∂χδησχρ: ωχθηνη Μχθεις γχρος χωνδυμπι. υχηνις χωνγηνις ωχθηνινις υχθηνινις ωχθηνινις ωχθηνινις ωχθηνινις ωχθηνινις ωχθηνινις ωχθηνινις ωχθηνινις ωχθηνινις ωχθηνινις ωχθηνινις υχθηνινις ωχθηνινις ωχθηνινις ωχθηνινις ωχθηνινις ωχθηνινις ωχθηνινις ωχθηνινις ωχθηναντρ
- INTRODUCTION
- IMPORTANT SAFETY INFORMATION
- WARNINGS
- MEDICAL WARNINGS
- BATTERY SAFETY INSTRUCTIONS
- STORAGE AND TRANSPORTATION CONDITIONS
- ELECTROMAGNETIC FIELDS (EMF)
- RADIO EQUIPMENT DIRECTIVE
- SAVE THESE INSTRUCTIONS
- INTENDED USE
- YOUR PHILIPS SONICARE (FIG 1.)
- ACCESSORIES
- GETTING STARTED
- ATTACHING THE BRUSH HEAD
- USING YOUR PHILIPS SONICARE TOOTHBRUSH
- BRUSHING INSTRUCTIONS
- BRUSHPACER
- ENGLISH
- MODES
- INTENSITIES
- INTENSITY SETTINGS
- BRUSHSYNC TECHNOLOGY
- FEATURES
- PRESSURE SENSOR FEEDBACK
- SMARTIMER
- EASYSTART
- BRUSH HEAD REPLACEMENT REMINDER
- BRUSH HEAD MODE PAIRING
- ACTIVATING OR DEACTIVATING FEATURES
- FROM HANDLE
- CHARGING AND BATTERY STATUS
- CHARGING
- CHARGING ON CHARGER
- BATTERY STATUS
- BATTERY STATUS (HANDLE ON PLUGGED-IN CHARGER/CHARGING TRAVEL CASE)
- BATTERY STATUS (WHEN HANDLE IS NOT ON PLUGGED-IN CHARGER/CHARGING TRAVEL CASE)
- BATTERY STATUS NUMBER OF LEDS LED COLOR
- CLEANING
- TOOTHBRUSH HANDLE
- BRUSH HEAD
- CHARGER
- TRAVEL CASE
- STORAGE
- REPLACEMENT
- LOCATING THE MODEL NUMBER
- TROUBLESHOOTING (ROW)
- WARRANTY EXCLUSIONS
- IMPLIED WARRANTIES
- LIMITATION OF REMEDIES
- WARRANTY AND SUPPORT (ROW)
- RECYCLING
- GIRIŞ
- AZƏRBAYCANCA
- DANSK
- TÄHTIS OHUTUSTEAVE
- MEDITSIINILISED HOIATUSED
- WWW.PHILIPS.COM/SUPPORT
- EESTI
- GARANTÍAS IMPLÍCITAS
- EXCLUSIONS DE GARANTIE
- POHRANITE OVE UPUTE
- NAMJENA
- VAŠ PHILIPS SONICARE (SLIKA 1)
- DODACI
- POČETAK KORIŠTENJA
- POSTAVLJANJE GLAVE ČETKICE
- UPORABA ČETKICE ZA ZUBE PHILIPS SONICARE
- UPUTE ZA ČETKANJE
- JAČINE
- POSTAVKE JAČINE
- LATVIEŠU
- SVARBI SAUGOS INFORMACIJA
- LIETUVIŠKAI
- 272 NEDERLANDS
- XAVFSIZLIKKA OID MUHIM AXBOROT
- OGOHLANTIRISHLAR
- TIBBIY OGOHLANTIRISHLAR
- BATAREYA XAVFSIZLIGIGA OID KO'RSATMALAR
- SAQLASH VA TASHISH SHAROITLARI
- PHILIPS SONICARE TISH PASTANGIZDAN FOYDALANISH
- TISH TOZALASH KO'RSATMALARI
- REJIMLAR
- INTENSIVLIK
- JADALLIK SOZLAMALARI
- FUNKSIYALAR
- BATAREYA HOLATI
- BATAREYA HOLATI (DASTA QUVVATLAGICH/SAYOHAT G'ILOFIGA ULANGAN)
- BATAREYA HOLATI (DASTA QUVVATLAGICH/SAYOHAT G'ILOFIGA ULANMAGANIDA)
- CHO'TKA KALLAGI
- GARANTIAS IMPLÍCITAS
- PREDVIDENA UPORABA
- INTENZITETI
- POSTAVKE INTENZITETA
- TEHNOLOGIJA BRUSHSYNC
- PUNJAČ
- PUTNA TORBICA
- SKLADIŠTENJE
- ZAMENA
- TEHOASETUKSET
- 474 SVENSKA
- MÖHÜM HOWPSUZLYK MAGLUMATY
- DUYDURYSLAR
- LUKMANÇYLYK DUÝDURYŞLARY
- BATAREYİN HOWPSUZLYGY BOYUNÇA GÖZÜKDIRIJILER
- NIYETLENILÝÄN ULANYS
- ZARÝADNIK
- KEPILLIK WE GOLDAW (ROW)
- LWWINNWLYWJHÙ OQINWQNΔNIÚ
- 2TN PHILIPS SONICARE-N (UY. 1.)
- UPUTUNIWNUTN
- HÙZHG ULUTL
- UUNWQNTP HUNQWÙWLYH QLHUHYN
- 2TN PHILIPS SONICARE WUNWUTPH HUNQWUWGH OQUNWQNDNNIUN
- UWPNÚWÙ HNWHUÌQÙTN
- RUIJTNTU
- NTCHUTN
- HÙNTÙUHǓNĪPĀJWÙ WÙN HǍWÙUÁN HÙNTÙUHǓNĪPĀJWÙ YÚNQWǓNNUÌUÁN
- 9NΡΔΩΝΗΓΡΕΎΤΗ
- FUNQWÙWUH QLHUHUH YHNHUWNHÙWÙ HH2TGNIÚ
- UNQWÙWLYH QLHUHYH NTĀDHÚH QNIQWULNNIÚ
- ULNHLUWGUTL YWI WWWWNLNHLUWGUTL QNPDWNNYRAUTP
- HUNQUWUH QIHUH
- LHGPWUNNHZ
- ΔΩΎΨΗΡΗΛΩΜΏ ΥΩΜΗΜΏ
- الله
- ΦNHUWPHÙNIÚ
- PHOSPHORUS PHOSPHATE
Brand : PHILIPS
Model : Sonicare 6100 HX7408
Category : Toothbrush